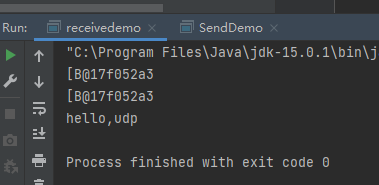
1、hello world
开发三步骤
编写程序、编译程序、运行程序
javac 编译Java文件,然后Java 运行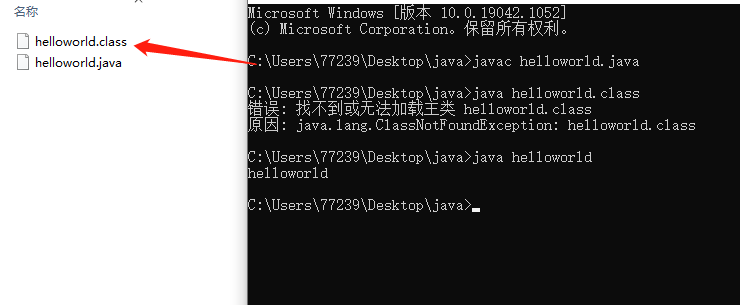
2、基础运算
3、三元运算符
a > b ? a : b ;
如果a>b ->true,则结果为a,如果a>b ->false,则结果为b
如下,输出结果为20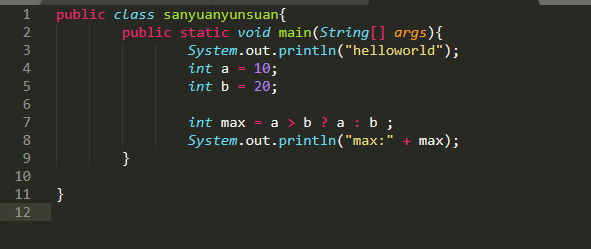
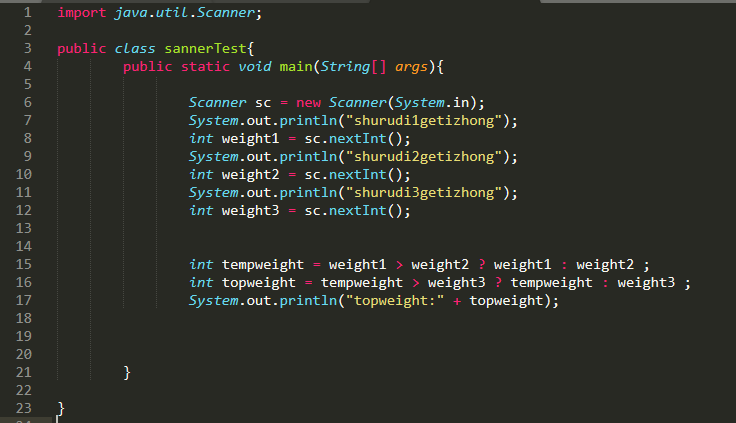
三个和尚案例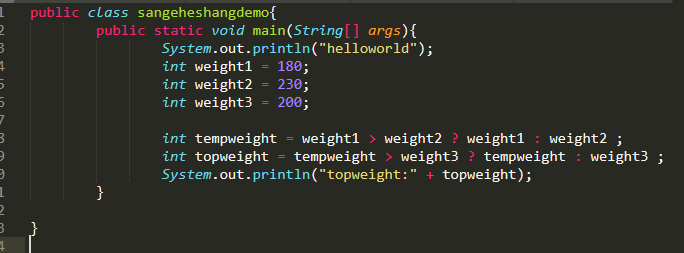
4、数据输入
import java.util.Scanner;
Scanner sc = new Scanner(System.in);
int weight1 = sc.nextInt();
import java.util.Scanner;public class sannerTest{public static void main(String[] args){Scanner sc = new Scanner(System.in);System.out.println("shurudi1getizhong");int weight1 = sc.nextInt();System.out.println("shurudi2getizhong");int weight2 = sc.nextInt();System.out.println("shurudi3getizhong");int weight3 = sc.nextInt();int tempweight = weight1 > weight2 ? weight1 : weight2 ;int topweight = tempweight > weight3 ? tempweight : weight3 ;System.out.println("topweight:" + topweight);}}
5、分支运算
1、流程控制语句分类
顺序结构-就正常从上往下
分支结构 if , switch
循环结构for ,while ,do…while
2、分支结构
1、分支结构-if
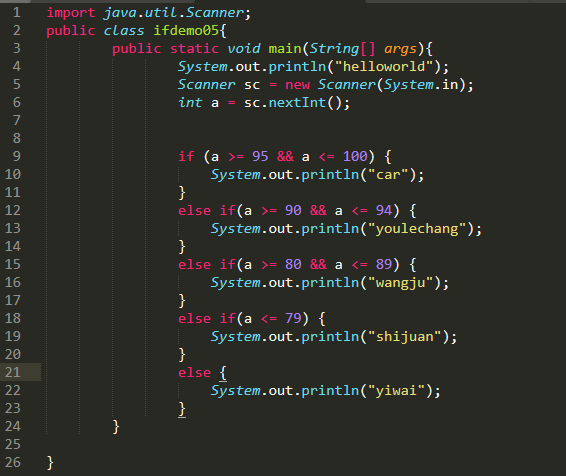
import java.util.Scanner;public class ifdemo05{public static void main(String[] args){System.out.println("helloworld");Scanner sc = new Scanner(System.in);int a = sc.nextInt();if (a >= 95 && a <= 100) {System.out.println("car");}else if(a >= 90 && a <= 94) {System.out.println("youlechang");}else if(a >= 80 && a <= 89) {System.out.println("wangju");}else if(a <= 79) {System.out.println("shijuan");}else {System.out.println("yiwai");}}}
2、分支结构switch
switch如果在命中case后,没有写break,会执行下一个case执行后break,前提是下一个case有break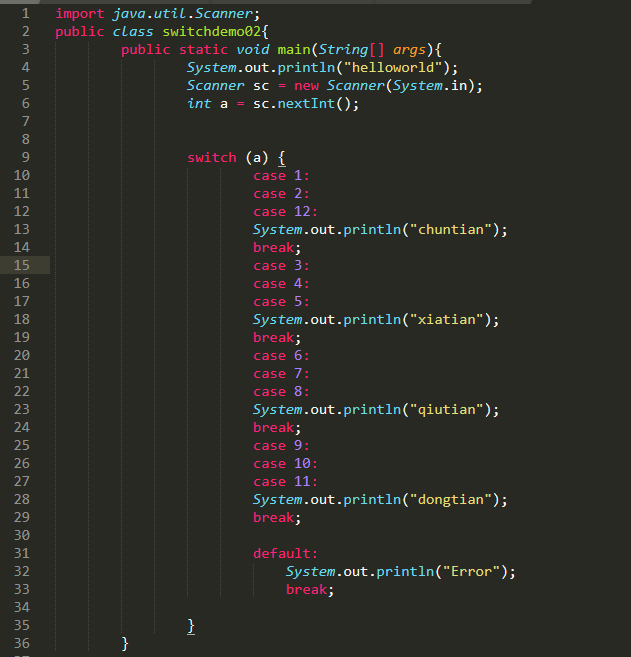
import java.util.Scanner;public class switchdemo02{public static void main(String[] args){System.out.println("helloworld");Scanner sc = new Scanner(System.in);int a = sc.nextInt();switch (a) {case 1:case 2:case 12:System.out.println("chuntian");break;case 3:case 4:case 5:System.out.println("xiatian");break;case 6:case 7:case 8:System.out.println("qiutian");break;case 9:case 10:case 11:System.out.println("dongtian");break;default:System.out.println("Error");break;}}}
3、循环结构
1、循环结构for
水仙花-三位-演示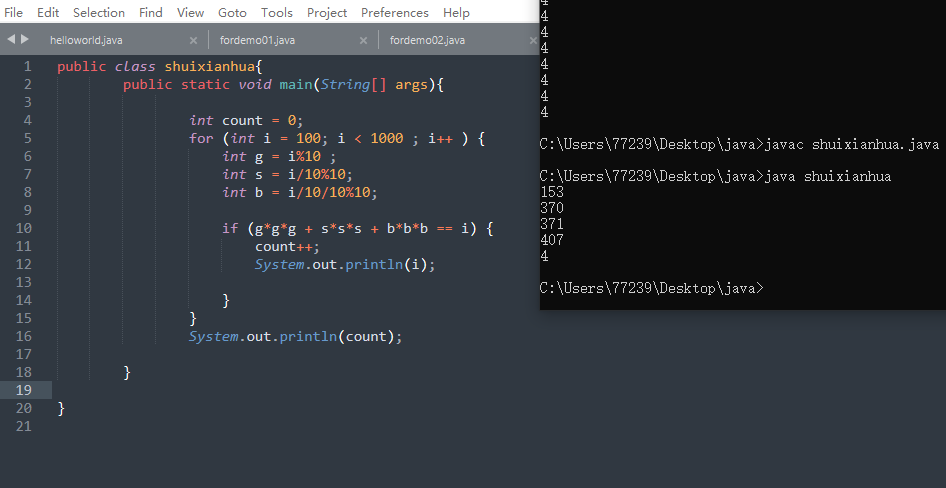
public class shuixianhua{public static void main(String[] args){int count = 0;for (int i = 100; i < 1000 ; i++ ) {int g = i%10 ;int s = i/10%10;int b = i/10/10%10;if (g*g*g + s*s*s + b*b*b == i) {count++;System.out.println(i);}}System.out.println(count);}}
2、while
在不确定上限的情况下可以使用while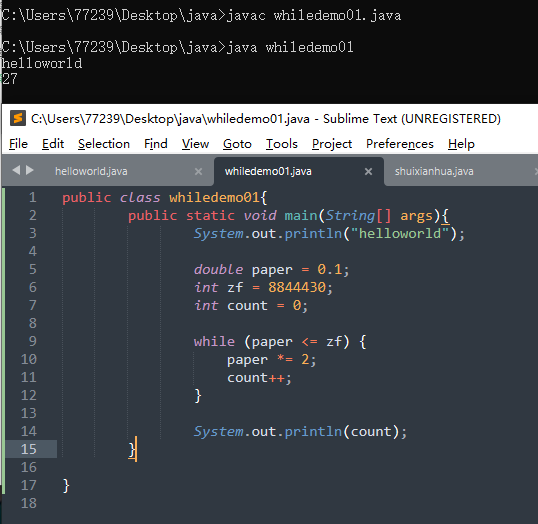
public class whiledemo01{public static void main(String[] args){System.out.println("helloworld");double paper = 0.1;int zf = 8844430;int count = 0;while (paper <= zf) {paper *= 2;count++;}System.out.println(count);}}
3、do…while
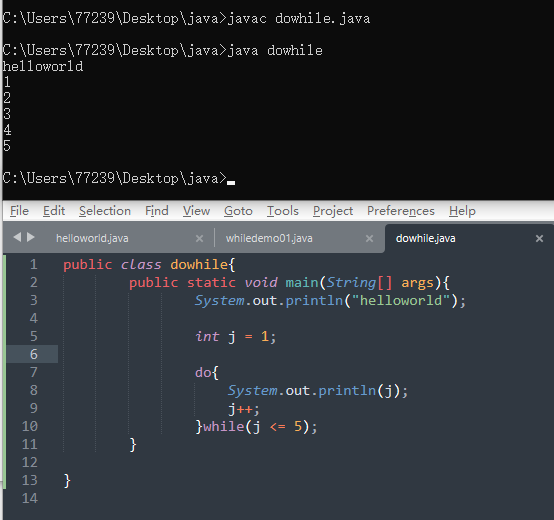
public class dowhile{public static void main(String[] args){System.out.println("helloworld");int j = 1;do{System.out.println(j);j++;}while(j <= 5);}}
4、区别
4、跳转控制语句
continue和break使用在循环体中,一个是跳转出来继续循环,一个是直接结束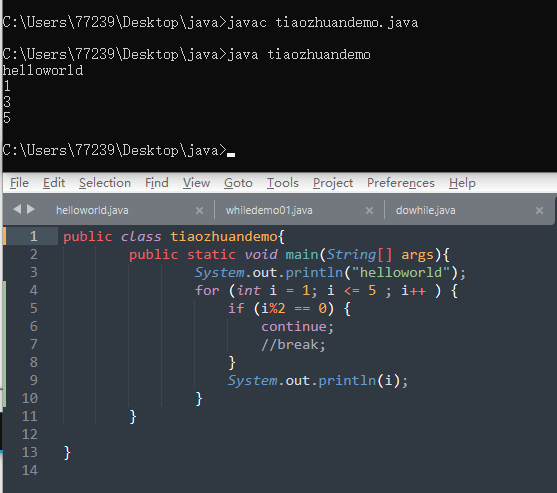
public class tiaozhuandemo{public static void main(String[] args){System.out.println("helloworld");for (int i = 1; i <= 5 ; i++ ) {if (i%2 == 0) {continue;//break;}System.out.println(i);}}}
5、循环嵌套
4、random
获取随机数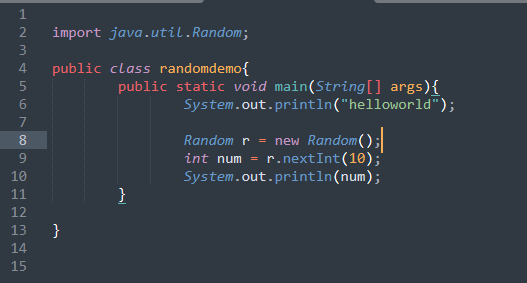
random-猜数字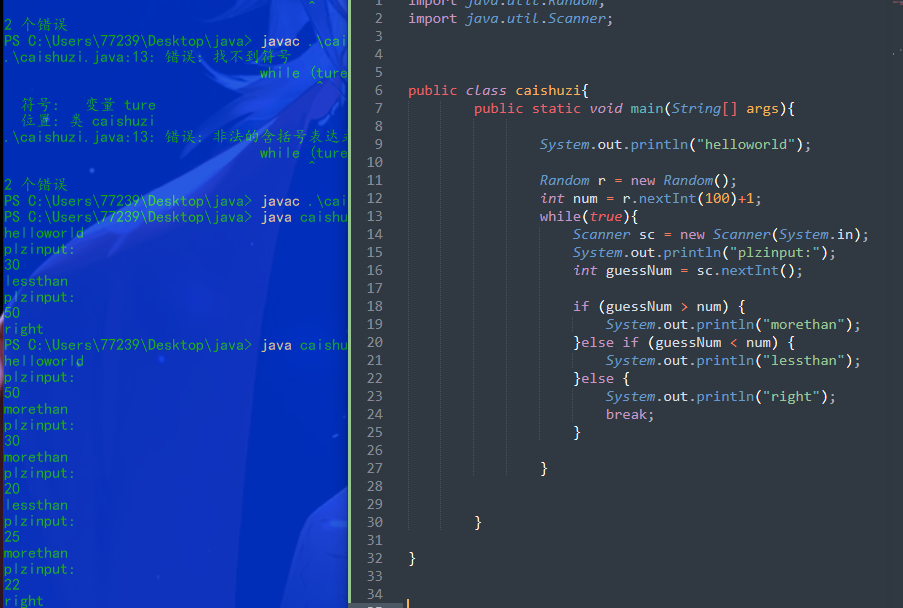
import java.util.Random;import java.util.Scanner;public class caishuzi{public static void main(String[] args){System.out.println("helloworld");Random r = new Random();int num = r.nextInt(100)+1;while(true){Scanner sc = new Scanner(System.in);System.out.println("plzinput:");int guessNum = sc.nextInt();if (guessNum > num) {System.out.println("morethan");}else if (guessNum < num) {System.out.println("lessthan");}else {System.out.println("right");break;}}}}
n、比较器 Comparator
package l;import java.util.Comparator;import java.util.TreeSet;public class chengjipaiming {public static void main(String[] args) {TreeSet<student> ts = new TreeSet<student>(new Comparator<student>() {@Overridepublic int compare(student s1, student s2) {//int num = (s2.getChinese() + s2.getMath()) - (s1.getChinese() + s1.getMath());//上面这种求和的方法有些麻烦,可以在学生类里面提供一个求和的方法//传入的两个值进行比较,如果返回的是一个正数,说明前值比后值大//compare 方法 如果大于零,则把前一个数和后一个数交换 升序//此处,首先不用在意具体传入的,根据s1.getSum()代表的是前一个数,s2.getSum()的是后一个数// 因此这是在判断升序,可以使用后一个减前一个进行查看测试是否降序int num = s1.getSum()-s2.getSum();// int num = s1.getSum()-s2.getSum();// int num = 1;return num;}});student s1 = new student("lww",18,98,88);student s2 = new student("kww",18,100,100);student s3 = new student("jww",18,66,66);ts.add(s1);ts.add(s2);ts.add(s3);for (student s : ts){System.out.println(s.getName()+" "+s.getSum());}}}

n map-HashMap
/*** 键是学生对象student,值是居住地String* 存储多个键值对对象* 遍历* 要求:保证键的唯一性:如果学生对象的成员变量值相同,就认为是同一个对象* hashmap底层是hash表,是保证键的唯一性,需要在学生类里面重写以下两个方法* hashCode()* equals()** **/package mapjihe;import java.util.HashMap;import java.util.Set;public class hashmapdemo {public static void main(String[] args) {HashMap<student,String> hm = new HashMap<student,String>();student s1 = new student("周旋久",18);System.out.println(s1);student s2 = new student("林青霞",16);student s3 = new student("刘亦菲",16);//和上面的相同,按要求要保持唯一性,在student类里面重写方法保证,下面往集合对象中添加的时候,则会覆盖,杭州覆盖上海student s4 = new student("刘亦菲",16);hm.put(s1,"北京");hm.put(s2,"天津");hm.put(s3,"上海");hm.put(s4,"杭州");//这里注意,keySet()是返回所有键的集合,我们前面设置的是student是键Set<student> ks = hm.keySet();for (student k : ks){String value = hm.get(k);//这里因为键是学生对象,所以这里会打印这个学生对象的地址System.out.println(k);System.out.println("---------------1");//输出对象集合ks里面的值System.out.println(k.getName());System.out.println(k.getAge());System.out.println("---------------2");//value是根据键找到的值,所以会打印出前面的学生的地址,即北京等System.out.println(value);System.out.println("---------------3");//完整输出System.out.println(k.getName()+","+k.getAge()+","+value);System.out.println("---------------循环一轮");}}}
n+2 ArrayList嵌套HashMap
/*** 创建一个ArrayList集合,存储三个元素,每一个元素都是HashMap,每一个HashMap的键值都是String,* 遍历集合* <p>* 思路:* 1 创建ArrayList集合* 2 创建HashMap集合,并添加键值对元素* 3 把HashMap作为元素添加到ArrayList集合* 4 遍历**/package mapjihe;import java.util.ArrayList;import java.util.HashMap;import java.util.Set;public class hashmapdemo01 {public static void main(String[] args) {ArrayList<HashMap<String, String>> arrayList = new ArrayList<HashMap<String, String>>();HashMap<String, String> hm1 = new HashMap<String, String>();hm1.put("刘亦菲", "胡歌");hm1.put("唐嫣", "霍建华");hm1.put("lyh", "lww");HashMap<String, String> hm2 = new HashMap<String, String>();hm1.put("刘亦菲1", "胡歌1");hm1.put("唐嫣1", "霍建华1");hm1.put("lyh1", "lww1");HashMap<String, String> hm3 = new HashMap<String, String>();hm1.put("刘亦菲2", "胡歌2");hm1.put("唐嫣2", "霍建华2");hm1.put("lyh2", "lww2");arrayList.add(hm1);arrayList.add(hm2);arrayList.add(hm3);//这里hm本身就是一个hashmao集合,不能直接输出hmfor (HashMap<String, String> hm : arrayList) {//先获取hashmap集合的键的集合Set<String> keyset = hm.keySet();for (String ky : keyset) {//这里需要注意,keyset中是键的集合,所以需要通过hm获取hashmap集合中的值String value = hm.get(ky);System.out.println(ky + ":" + value);}}}}
n+3 HashMap嵌套ArrayList
/*** 创建一个Hashmap集合,存储三个键值对元素,每一个元素的键是String,值是ArrayList,每一个ArrayList的元素都是String,* 遍历集合** **/package mapjihe;import java.util.ArrayList;import java.util.HashMap;import java.util.Set;public class hashmapdemo02 {public static void main(String[] args) {HashMap<String,ArrayList<String>> hm = new HashMap<String,ArrayList<String>>();ArrayList<String> array1 = new ArrayList<String>();array1.add("可口可乐");array1.add("百世可乐");ArrayList<String> array2 = new ArrayList<String>();array2.add("kfc");array2.add("麦当劳");ArrayList<String> array3 = new ArrayList<String>();array3.add("雪花");array3.add("青岛");hm.put("饮料",array1);hm.put("食品",array2);hm.put("酒",array3);Set<String> ky = hm.keySet();for (String k : ky){ArrayList<String> value = hm.get(k);System.out.println(k);for (String s : value){System.out.println("\t"+s);}System.out.print("\n");}}}
n+4 HashMap计算字符串内某一字符出现次数
/*** 统计字符串中每个字符出现的次数* 思路* 键盘录入一个字符* 创建hashmap集合 键是chaarater 值是integer* 遍历字符串,得到每一个字符* 拿到的每一个字符 作为 键 到 hashmap集合中去找对应的值,看其返回值* 如果返回值是null,说明该字符在hashmap集合中不存在,就把该字符作为键,1作为值存储* 如果返回值不是null,说明该字符在hashmap集合中存在,把该值加1,然后重新存储该字符和对应的值* 遍历hashmap集合,得到键和值,按照要求进行拼接* **/package mapjihe;import java.util.HashMap;import java.util.Scanner;import java.util.Set;import java.util.TreeMap;public class hashmapdemo02 {public static void main(String[] args) {Scanner sc = new Scanner(System.in);System.out.println("请输入一个字符串");String line = sc.nextLine();HashMap<Character,Integer> hm = new HashMap<Character,Integer>();//TreeMap和HashMap用法一样,不过它默认会自动排序结果,不是无序// TreeMap<Character,Integer> hm = new TreeMap<Character,Integer>();//遍历字符串,得到每一个字符//输入字符aacfor (int i = 0; i<line.length();i++){//a a c 会依次提取出来char key = line.charAt(i);//拿到的每一个字符作为键到hashmap集合中去找对应的值,看其返回值//这里面有一个自动装箱动作,暂时不理他,具体原理记不清了//注意这个地方,实际上是已经在查hashmap集合中是否存在这个key了//比如,第一个a 这里就是Integer value = hm.get(a),查找key a的值//很明显,之前没有存储,这里查找key a 是没有对应的值的,是null 打印查看确实是nullInteger value = hm.get(key);System.out.println(value);if (value == null){//注意,这里1就是value//因为当第一个key a查值后,就进入了if语句,key 就是 a ,这里实际是hm.put(a,1);//因此,这个1,就是value//所有else部分的value,在第二个a进入的时候,发现key a 是存在值value的,值是1,所以可以value++hm.put(key,1);}else {//如果返回值不是null,说明该字符在hashmap集合中存在,把该值加1,然后重新存储该字符和对应的值//自动拆箱value++;System.out.println("wy"+value);hm.put(key,value);System.out.println(hm.get(key));}}//遍历hashmap集合,得到键和值,按照要求进行拼接StringBuilder sb = new StringBuilder();Set<Character> keySet = hm.keySet();for (Character key : keySet){Integer value = hm.get(key);sb.append(key).append("(").append(value).append(")");}String res = sb.toString();System.out.println(res);}}
n+5 ArrayList存储学生对象,使用Collections对ArrayList进行排序
/*** 需求:ArrayList存储学生对象,使用Collections对ArrayList进行排序* 按照年龄从小到大进行排序,年龄相同时,按照姓名的首字母顺序排序** 思路:*1、定义学生类* 2、创建arraylist集合对象* 3、创建学生对象* 4、把学生添加到集合* 5、使用Collections对ArrayList集合排序* 遍历集合** **/package collectionsdemo;import java.util.ArrayList;import java.util.Collections;import java.util.Comparator;public class collectionsdemo2 {public static void main(String[] args) {ArrayList<student> arrayList = new ArrayList<student>();student s1 = new student("liuyifei",18);student s2 = new student("linqingxia",30);student s3 = new student("nazha",18);student s4 = new student("luoyihua",18);arrayList.add(s1);arrayList.add(s2);arrayList.add(s3);arrayList.add(s4);//使用collections对ArrayList集合进排序//会报错,因为这个是自然排序的,列表中的所有元素都必须实现Comparable接口。我们需要到类中重写。 不用这个方法// Collections.sort(arrayList);//public static <T> void sort(List<T> list, Comparator<? super T> c)//根据指定比较器引发的顺序对指定列表进行排序。//使用内部类的形式进行比较Collections.sort(arrayList, new Comparator<student>() {@Overridepublic int compare(student s1, student s2) {//按照年龄从小到大进行排序,年龄相同时,按照姓名的首字母顺序排序int num = s1.getAge()-s2.getAge();int num2 = (num==0)?s1.getName().compareTo(s2.getName()):num;return num2;}});//遍历集合for (student s : arrayList){System.out.println(s.getAge()+","+s.getName());}}}
n+6 斗地主简单案例发牌洗牌看牌
/*** 使用一个hashmap进行牌的存储(编号:牌值),使用一个arraylist进行牌的编号存储,使用treemap进行用户拿到的牌的有序排序* 这样对编号进行treemap排序,那么读取出来的就是按照编号顺序去hashmap里面读取* **/package doudizhu;import java.util.*;public class pokerdemo1 {public static void main(String[] args) {//创建HashMap 键是编号,值是牌HashMap<Integer,String> hm = new HashMap<Integer,String>();//创建ArrayList 存储编号ArrayList<Integer> array = new ArrayList<Integer>();//定义花色数组String[] colors = {"♦", "♣", "♥", "♠"};//定义点数数组String[] numbers = {"3", "4", "5", "6", "7", "8", "9", "10", "J", "Q", "K", "A","2"};//从0开始往HashMap里面存储编号,并存储对应的牌,同时往ArrayList里面存储编号int index =0;for (String number :numbers){for (String color:colors){hm.put(index,color+number);array.add(index);index++;}}hm.put(index,"小王");array.add(index);index++;hm.put(index,"大王");array.add(index);//洗牌,洗的是编号Collections.shuffle(array);//发牌(发的也是编号,为了保证排序,创建TreeSet集合)TreeSet<Integer> lqxSet = new TreeSet<Integer>();TreeSet<Integer> lySet = new TreeSet<Integer>();TreeSet<Integer> fqySet = new TreeSet<Integer>();TreeSet<Integer> dpSet = new TreeSet<Integer>();//注意,以下是对索引进行操作// 这里也可以直接使用i,但是会让代码可读性变低,因此多写一行x,x获取的就是array集合里面存放的索引for (int i =0;i<array.size();i++){int x = array.get(i);if (i>=array.size()-3){dpSet.add(array.get(x));}else if (i%3==0){lqxSet.add(x);}else if (i%3==1){lySet.add(x);}else if (i%3==2){fqySet.add(x);}}//看牌lookpoker("lqx",lqxSet,hm);lookpoker("ly",lySet,hm);lookpoker("fqy",fqySet,hm);lookpoker("dp",dpSet,hm);}//定义方法看牌public static void lookpoker(String name,TreeSet<Integer> ts,HashMap<Integer,String> hm){System.out.println(name + "的牌是:");for (Integer key :ts){String poker = hm.get(key);System.out.print(poker + " ");}System.out.println();}}
n+7 递归求阶乘
/*** 递归求5的阶乘* 分析:* 阶乘:5!=5*4*3*2*1* 递归出口:1!=1* 递归规则:n!=n*(n-1)! 即 5!=5*4!=5*4*3!=5*4*3*2!=5*4*3*2*1* 当1!=1的时候,会结束递归* **/package diguidemo;public class diguidemo01 {public static void main(String[] args) {int res = jc(3);System.out.println("5的阶乘是:" + res);}//定义一个方法,用于递归求阶乘,参数为一个int类型的变量/*** 分析:* 假设我们传入一个n=3* jc(3)-->3*jc(3-1)* 注意,这个时候,jc(3)这个方法是被调用中,因为返回的里面有一个调用了jc(2)* 所以,jc(3)是还在被调用中的,它需要等jc(2)计算完,返回值后,jc(3)使用了该返回值后,方法才调用完毕,从栈内存中结束* jc(2)-->2*jc(2-1)* 同理上面的* jc(1)-->n=1-->1** 返回* jc(3)等待jc(2)的结果* jc(2)等待jc(1)的结果* jc(1)返回1给jc(2)* jc(2)得到jc(1)的值,完成了jc(2)的计算,得到一个值,返回给jc(3)* jc(3)得到jc(2)返回的值,完成jc(3)的计算,得到一个值,这个值就是3的阶乘** jc(1)=1 1返回给jc(2)* jc(2)=2*jc(2-1)=2*1=2 2返回给jc(3)* jc(3)=3*jc(3-1)=3*2=6** **/public static int jc(int n){//在方法内部判断该变量的值是否是1if (n==1){//是 返回1return 1;}else {//不是 返回n*(n-1)!return n*jc(n-1);}}}
n+8 递归遍历目录
/*** 递归输出目录* D:\burp* 步骤:* 1、根据给定的路径创建一个File对象* 2、定义一个方法,用于获取给定目录下的所有内容,参数为第一步的File对象* 3、获取给的目录下面的所有文件或者目录的File数组* 4、遍历该数组,得到每一个File对象* 5、判断File对象是否是目录* 是,递归调用* 不是,获取绝对路径输出* 6、* **/package diguidemo;import java.io.File;public class diguidemo02 {public static void main(String[] args) {File srcFile = new File("D:\\burp");//调用写好的递归查询目录文件方法,该方法写了传参对象是File对象getAllFilePath(srcFile);}//定义一个方法,用于获取给定目录下的所有内容,参数为第一步的File对象public static void getAllFilePath(File srcaFile){//获取给的目录下面的所有文件或者目录的File数组File[] fileArray = srcaFile.listFiles();//遍历该数组,得到每一个File对象if (fileArray != null){for (File file : fileArray){//判断是File对象是否是目录if (file.isDirectory()){//是目录则递归调用方法getAllFilePath(file);}else {//不是目录,则获取绝对路径进行输出System.out.println(file.getAbsolutePath());}}}}}
IO流
IO-字节流readme
IO流分类:按数据流方向1、输入流:读数据2、输出流:写数据按照数据类型来分1、字节流:字节输入流,字节输出流2、字符流:字符输入流,字符输出流一般情况,我们说的IO流的分类是按照数据类型来分的如何判断什么情况使用什么流:如果使用windows自带的记事本软件打开,可以读懂,就是用字符流否则使用字节流如果不知道该使用哪种类型的流,就是用字节流一、字节流1、输入流public abstract class InputStreamextends Objectimplements Closeable此抽象类是表示输入字节流的所有类的超类。已知直接子类:AudioInputStream , ByteArrayInputStream , FileInputStream , FilterInputStream , ObjectInputStream ,PipedInputStream , SequenceInputStream , StringBufferInputStream文件输入流FileInputStream用于读取诸如图像数据的原始字节流FileInputStream(String name)通过打开与实际文件的连接来创建 FileInputStream ,该文件由文件系统中的路径名 name命名。2、输出流public abstract class OutputStreamextends Objectimplements Closeable, Flushable此抽象类是表示输出字节流的所有类的超类。 输出流接受输出字节并将它们发送到某个接收器。已知直接子类:ByteArrayOutputStream , FileOutputStream , FilterOutputStream , ObjectOutputStream , PipedOutputStream文件输出流FileOutputStream用于写入诸如图像数据的原始字节流3、字节缓冲流提高读写效率缓冲输出流Class BufferedOutputStreamjava.lang.Objectjava.io.OutputStreamjava.io.FilterOutputStreamjava.io.BufferedOutputStream实现的所有接口Closeable , Flushable , AutoCloseablepublic class BufferedOutputStreamextends FilterOutputStream该类实现缓冲输出流。 通过设置这样的输出流,应用程序可以将字节写入基础输出流,而不必为写入的每个字节调用底层系统。缓冲输入流Class BufferedInputStreamjava.lang.Objectjava.io.InputStreamjava.io.FilterInputStreamjava.io.BufferedInputStreampublic class BufferedInputStreamextends FilterInputStreamBufferedInputStream向另一个输入流添加功能 - 即缓冲输入并支持mark和reset方法的功能。创建BufferedInputStream将创建内部缓冲区阵列。 当读取或跳过来自流的字节时,内部缓冲区根据需要从包含的输入流中重新填充,一次多个字节。 mark操作会记住输入流中的一个点,并且reset操作会导致在从包含的输入流中获取新字节之前重新读取自最近的mark操作以来读取的所有字节。缓冲流的构造方法:BufferedInputStream(InputStream in)创建一个 BufferedInputStream并保存其参数,即输入流 in ,供以后使用。BufferedOutputStream(OutputStream out)创建新的缓冲输出流以将数据写入指定的基础输出流。注意:缓冲流需要的是字节流,而不是具体的文件或者路径因为字节缓冲流仅仅提高缓冲区,而真正的读写数据还得依靠基本的字节流对象进行操作
IO-字节流写数据
/*** 数据读写操作练习* FileOutputStream用于写入诸如图像数据的原始字节流* FileOutputStream(String name):创建文件输出流以写入具有指定名称的文件。**/package diguidemo;import java.io.FileNotFoundException;import java.io.FileOutputStream;//下面这个是上面FileNotFoundException的父类,所以上面的会变灰色import java.io.IOException;public class iodemo01 {public static void main(String[] args) throws IOException {//创建字节输出流对象//创建着对象,会做三个事情:// 1、调用系统功能创建文件// 2、创建了字节输出流对象// 3、让字节输出流对象指向创建好的文件FileOutputStream fos = new FileOutputStream("javaSdemo\\src\\diguidemo\\fos.txt");// write(int b)//将指定的字节写入此文件输出流。在文件中看到的是a a的字节数是97fos.write(97);//所有io相关的操作,都要释放资源fos.close();}}
IO-字节流写数据的三种方法
/**写数据的三种方式**/package iodemo;import java.io.File;import java.io.FileNotFoundException;import java.io.FileOutputStream;import java.io.IOException;import java.nio.charset.StandardCharsets;public class iodemoh01 {public static void main(String[] args) throws IOException {//第一种创建文件输出流对象的方法FileOutputStream fos = new FileOutputStream("xiayijieduan\\src\\iodemo\\fos.txt");/*** public FileOutputStream(String name) throws FileNotFoundException {* this(name != null ? new File(name) : null, false);* }* **///上面这个等于下面这个// FileOutputStream fos = new FileOutputStream(new File("xiayijieduan\src\iodemo\fos.txt"));//第二种创建文件输出流对象的方法// FileOutputStream(File file): 创建文件输出流以写入由指定的File对象表示的文件File file = new File("xiayijieduan\\src\\iodemo\\fos.txt");FileOutputStream fos2 = new FileOutputStream(file);//上面这两个加起来就是下面着// FileOutputStream fos2 = new FileOutputStream(new File("xiayijieduan\src\iodemo\fos.txt"));//观察可以发现,这个和第一个是一样的,所以直接用第一个,是最方便的//void write(int b) 方式1// fos.write(97);// fos.write(98);//void write(byte[] b) 方式2// byte[] bys = {97,98,99,100,101};// fos.write(bys);// byte[] bys = "abcdef".getBytes(StandardCharsets.UTF_8);// fos.write(bys);//void write(byte[] b,int off,int len)byte[] bys = "abcdef".getBytes(StandardCharsets.UTF_8);fos.write(bys,1,3);fos.close();}}
IO-字节流写数据:换行 追加
/*** 追加* 换行* **/package iodemo;import java.io.FileOutputStream;import java.io.IOException;import java.nio.charset.StandardCharsets;public class iodemoh02 {public static void main(String[] args) throws IOException {// FileOutputStream fos = new FileOutputStream("xiayijieduan\\src\\iodemo\\fos1.txt");//使用构造方法进行追加操作FileOutputStream fos = new FileOutputStream("xiayijieduan\\src\\iodemo\\fos1.txt",true);for (int i = 0;i<10;i++){fos.write("hello".getBytes(StandardCharsets.UTF_8));//这种方式,在idea里面看是换行了,但是在windows上面看,是没有换行的/*** 换行* window:\r\n* linux:\n* mac:\r* **/fos.write("\r\n".getBytes(StandardCharsets.UTF_8));}fos.close();}}
IO-字节流写数据-异常处理-finally
package iodemo;import java.io.FileOutputStream;import java.io.IOException;import java.nio.charset.StandardCharsets;public class iodemoh03 {public static void main(String[] args) {FileOutputStream fos = null;try {fos = new FileOutputStream("xiayijieduan\\src\\iodemo\\fos2.txt", true);fos.write("hello".getBytes(StandardCharsets.UTF_8));fos.close();}catch (IOException e){e.printStackTrace();}finally {if (fos != null){try {fos.close();}catch (IOException e){e.printStackTrace();}}}}}
IO-读数据
/**** 字节流读取数据** **/package iodemo;import java.io.FileInputStream;import java.io.FileNotFoundException;import java.io.IOException;public class iodemoh04 {public static void main(String[] args) throws IOException {//创建字节输入流对象FileInputStream fis = new FileInputStream("xiayijieduan\\src\\iodemo\\fos1.txt");//调用字节输入流对象的读数据方法//int read() : 从该输入流读取一个字节的数据,如果文件到达末尾,返回值是-1//第一次读取数据// int by = fis.read();// System.out.println(by);// System.out.println((char)by);// //第二次读取数据// by = fis.read();// System.out.println(by);// System.out.println((char)by);//循环写 方式1// int by = fis.read();// while (by != -1){//// System.out.print(by);// System.out.print((char)by);// by = fis.read();// }//循环写 方式2int by;while ((by=fis.read()) != -1){System.out.print((char) by);}//释放资源fis.close();}}
IO-简单复制
/*** 复制文件*** **/package iodemo;import java.io.FileInputStream;import java.io.FileOutputStream;import java.io.IOException;public class iodemoh05 {public static void main(String[] args) throws IOException {//根据数据源创建字节输入流对象FileInputStream fis = new FileInputStream("xiayijieduan\\src\\iodemo\\fos1.txt");//根据目的地创建字节输出流对象FileOutputStream fos = new FileOutputStream("xiayijieduan\\src\\iodemo\\fos2.txt");//读写数据int by;while ((by = fis.read()) != -1){fos.write(by);}//释放资源fos.close();fis.close();}}
IO-字节流读数据,一次读一个字节数组数据
/*** 字节流读数据,一次读一个字节数组数据** 使用字节输入流读数据的步骤* 创建字节输入流对象* 调用字节输入流对象的读数据方法* 释放资源** **/package iodemo;import java.io.FileInputStream;import java.io.IOException;public class iodemoh06 {public static void main(String[] args) throws IOException {FileInputStream fis = new FileInputStream("xiayijieduan\\src\\iodemo\\fos1.txt");/**//调用方法读数据//int read(byte[] b) 从该输入流读取最多b.length个字节的数据 到 一个字节数组。 下面的b.length就是被设定成5个字节byte[] bys = new byte[5];//第一次读取数据//这里的len是读取到的数据的字节个数,而不是上面写的字节数组的长度int len = fis.read(bys);System.out.println(len); //输出5//读取的过来的是字节数组,转换System.out.println(bys);System.out.println(new String(bys));System.out.println("------------");//第二次读取数据len = fis.read(bys);System.out.println(len);System.out.println(new String(bys));System.out.println("------------");//第三次读取数据len = fis.read(bys);System.out.println(len);System.out.println(new String(bys));// //读取从0到能读取到的字节个数,上面可以看出,因为源文件中只剩下4个字节没有被读取,所以len是4,只会读4个数据,输出的时候,没有上一个的r// 上面的都应该变成这种写法// System.out.println(new String(bys,0,len));System.out.println("------------");/*** 其实读取的内容是:* hello\r\n* world\r\n** 第一次读取:* hello* 第二次读取:* \r\nwor* 第三次读取:* ld\r\nr* 第三次的最后一个r是因为第一次读取的数据,存放了5个字节的的数据 到 字节数组bys中 -->hello* 第二次读取,也有5个字节的数据 \r\nwor 覆盖了 hello 这时bys中 -->\r\nwor* 第三次读取,源文件就只有 ld\r\n 只有4个数据,不能全部覆盖,就会留下来一个r -->ld\r\nr* 使用别的方法可以读了几个就写几个* public String(byte[] bytes,* int offset,* int length)*** **///循环改进代码byte[] bys = new byte[1024];int len;while ((len = fis.read(bys)) != -1){System.out.println(new String(bys,0,len));}//释放资源fis.close();}}
IO-复制图片
/*** 复制图片* 思路* 根据数据源创建字节输入流对象* 根据目的地创建字节输出流对象* 读写数据,复制图片,一次读取一个字节数组,一次写入一个字节数组* 释放资源* **/package iodemo;import java.io.FileInputStream;import java.io.FileOutputStream;import java.io.IOException;public class iodemoh07 {public static void main(String[] args) throws IOException {//根据数据源创建字节输入流对象FileInputStream fis = new FileInputStream("C:\\Users\\77239\\Pictures\\Saved Pictures\\11.jpg");//根据目的地创建字节输出流对象FileOutputStream fos = new FileOutputStream("xiayijieduan\\src\\iodemo\\11.jpg");//读写数据,复制图片,一次读取一个字节数组,一次写入一个字节数组byte[] bys = new byte[1024];int len;while ((len=fis.read(bys))!=-1){fos.write(bys,0,len);}//释放资源fis.close();fos.close();}}
IO-缓冲字节流.读写数据
package iodemo;import java.io.*;import java.nio.charset.StandardCharsets;public class iodemoh08 {public static void main(String[] args) throws IOException {//BufferedOutputStream(OutputStream out)//先创建一个文件输出流对象// FileOutputStream fos = new FileOutputStream("xiayijieduan\\src\\iodemo\\fos1.txt");// 再创建一个字节缓冲输出流对象// BufferedOutputStream bos = new BufferedOutputStream(fos);//上面可以写成下面这个//写数据/*BufferedOutputStream bos = new BufferedOutputStream(new FileOutputStream("xiayijieduan\\src\\iodemo\\fos3.txt"));//写数据bos.write("hello\r\n".getBytes(StandardCharsets.UTF_8));bos.write("javaworld\r\n".getBytes(StandardCharsets.UTF_8));bos.close();*///读数据,同理写数据BufferedInputStream bis = new BufferedInputStream(new FileInputStream("xiayijieduan\\src\\iodemo\\fos3.txt"));//读取方式1 一次读取一个字节数据// int by;// while ((by=bis.read())!=-1){// System.out.print((char) by);// }//读取方式2 一次读取一个字节数组数据byte[] bys = new byte[1024];int len;while ((len=bis.read(bys))!=-1){System.out.println(new String(bys,0,len));}bis.close();}}
IO-字节流复制视频
package IOdemo;import java.io.*;public class CopyAvdemo {public static void main(String[] args) throws IOException {//记录开始时间long startTime = System.currentTimeMillis();//复制视频method1();//耗时40352毫秒// method2();//耗时100毫秒// method3();//耗时232毫秒// method4();//耗时32毫秒//记录结算时间long endTime = System.currentTimeMillis();System.out.println("耗时"+(endTime-startTime)+"毫秒");}//方法4 字节缓冲流,一次读写一个字节数组public static void method4() throws IOException{BufferedInputStream bis = new BufferedInputStream(new FileInputStream("D:\\workspace\\video\\datui01.mp4"));BufferedOutputStream bos = new BufferedOutputStream(new FileOutputStream("D:\\workspace\\video1\\datui04.mp4"));byte[] bys = new byte[1024];int len;while ((len=bis.read(bys))!=-1){bos.write(bys,0,len);}bis.close();bos.close();}//方法3 字节缓冲流,一次读写一个字节public static void method3() throws IOException{BufferedInputStream bis = new BufferedInputStream(new FileInputStream("D:\\workspace\\video\\datui01.mp4"));BufferedOutputStream bos = new BufferedOutputStream(new FileOutputStream("D:\\workspace\\video1\\datui03.mp4"));int by;while ((by=bis.read())!=-1){bos.write(by);}bis.close();bos.close();}//方法2 基本字节流,一次读写一个字节数组public static void method2() throws IOException {FileInputStream fis = new FileInputStream("D:\\workspace\\video\\datui01.mp4");FileOutputStream fos = new FileOutputStream("D:\\workspace\\video1\\datui02.mp4");byte[] by = new byte[1024];int len;while ((len=fis.read(by))!=-1){fos.write(by,0,len);}fis.close();fos.close();}//方法1、基本字节流,一次读写一个字节public static void method1() throws IOException {FileInputStream fis = new FileInputStream("D:\\workspace\\video\\datui01.mp4");FileOutputStream fos = new FileOutputStream("D:\\workspace\\video1\\datui01.mp4");int by;while ((by=fis.read())!=-1){fos.write(by);}fis.close();fos.close();}}
IO-字符流readme
编码:中文GBK-2字节UTF-8-三字节使用字节流读取中文时,会由于编码问题,出现乱码,因此出现字符流字符流=字节流+编码表编码表:字符编码就是一套自然语言的字符与二进制数之间的对应规则按A编码存储的,就必须按A编码解析字符流抽象基类Reader:字符输入流的抽象类Writer:字符输出流的抽象类字符流中和编码解码相关的两个类InputStreamReader、OutputStreamWriterInputStreamReader是从字节流到字符流的桥接器:它使用指定的charset读取字节并将其解码为字符。它使用的字符集可以通过名称指定,也可以明确指定,或者可以接受平台的默认字符集。OutputStreamWriter是从字符流到字节流的桥接器:使用指定的charset将写入其中的字符编码为字节。它使用的字符集可以通过名称指定,也可以明确指定,或者可以接受平台的默认字符集。
IO-字符流编码解码
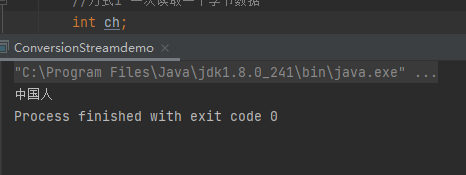
这里我想要使用GBK来看解码不成功的乱码,好像版本太高,默认不能选到GBK,导包也没成功,直接使用utf-8了
package IOdemo;import sun.nio.cs.ext.GBK;import java.io.*;import java.nio.charset.Charset;import java.nio.charset.StandardCharsets;public class ConversionStreamdemo {public static void main(String[] args) throws IOException {//public OutputStreamWriter(OutputStream out)//创建使用默认字符编码的OutputStreamWriter。//public OutputStreamWriter(OutputStream out,Charset cs)//创建使用给定charset的OutputStreamWriter。//创建字节输出流对象// FileOutputStream fos = new FileOutputStream("D:\\workspace\\txt\\123.txt");//创建字符流对象// OutputStreamWriter osw = new OutputStreamWriter(fos);// OutputStreamWriter osw = new OutputStreamWriter(new FileOutputStream("D:\\workspace\\txt\\zhongguo.txt"));// OutputStreamWriter osw = new OutputStreamWriter(new FileOutputStream("D:\\workspace\\txt\\zhongguo.txt"), StandardCharsets.UTF_8);OutputStreamWriter osw = new OutputStreamWriter(new FileOutputStream("D:\\workspace\\txt\\zhongguo.txt"),StandardCharsets.UTF_8);osw.write("中国人");osw.close();//创建字节输入流对象InputStreamReader isr = new InputStreamReader(new FileInputStream("D:\\workspace\\txt\\zhongguo.txt"),StandardCharsets.UTF_8);//字符流读取数据//方式1 一次读取一个字节数据int ch;while ((ch=isr.read())!=-1){System.out.print((char)ch);}isr.close();}}
IO-字符流写数据的5种方式
/**字符流写数据的5种方式** public void write(int c) throws IOException* 写一个字符。** public void write(char[] cbuf, int off, int len) throws IOException* 写一个字符数组或一部分。** public void write(String str, int off, int len) throws IOException* 写一个字符串或一部分。** **/package iodemo;import java.io.FileOutputStream;import java.io.IOException;import java.io.OutputStreamWriter;public class writeFive {public static void main(String[] args) throws IOException {OutputStreamWriter osw = new OutputStreamWriter(new FileOutputStream("xiayijieduan\\lll.txt"));//* public void write(int c) throws IOException// * 写一个字符。// osw.write(97);// //字符流写数据是不能够直接写进文件的,因为它最后是通过字节流写入// // 可通过刷新流或者关闭之前刷新一次写入// //刷新流// osw.flush();// osw.write(98);// * public void write(char[] cbuf, int off, int len) throws IOException// * 写一个字符数组或一部分。// char[] chs = {'a','b','c','d','e'};//// osw.write(chs);// osw.write(chs,0,3);// * public void write(String str, int off, int len) throws IOException// * 写一个字符串或一部分。// osw.write("abc");osw.write("abcde",0,3);osw.close();}}
IO-字符流读取数据的两种方式
/*** public int read() throws IOException* 读一个字符。* <p>* public int read(char[] cbuf, int offset, int length) throws IOException* 将字符读入数组的一部分。**/package iodemo;import java.io.FileInputStream;import java.io.IOException;import java.io.InputStreamReader;public class readTwo {public static void main(String[] args) throws IOException {InputStreamReader isr = new InputStreamReader(new FileInputStream("xiayijieduan\\lll.txt"));// int ch;// while ((ch=isr.read())!=-1){// System.out.print((char)ch);// }char[] chs = new char[1024];int len;while ((len = isr.read(chs)) != -1) {System.out.println(len);System.out.println(chs);//把获得的字符数组转换成为字符串System.out.println(new String(chs, 0, len));}isr.close();}}
IO-字符流复制Java文件
/**写数据的三种方式**/package iodemo;import java.io.File;import java.io.FileNotFoundException;import java.io.FileOutputStream;import java.io.IOException;import java.nio.charset.StandardCharsets;public class iodemoh01 {public static void main(String[] args) throws IOException {//第一种创建文件输出流对象的方法FileOutputStream fos = new FileOutputStream("xiayijieduan\\src\\iodemo\\fos.txt");/*** public FileOutputStream(String name) throws FileNotFoundException {* this(name != null ? new File(name) : null, false);* }* **///上面这个等于下面这个// FileOutputStream fos = new FileOutputStream(new File("xiayijieduan\src\iodemo\fos.txt"));//第二种创建文件输出流对象的方法// FileOutputStream(File file): 创建文件输出流以写入由指定的File对象表示的文件File file = new File("xiayijieduan\\src\\iodemo\\fos.txt");FileOutputStream fos2 = new FileOutputStream(file);//上面这两个加起来就是下面着// FileOutputStream fos2 = new FileOutputStream(new File("xiayijieduan\src\iodemo\fos.txt"));//观察可以发现,这个和第一个是一样的,所以直接用第一个,是最方便的//void write(int b) 方式1// fos.write(97);// fos.write(98);//void write(byte[] b) 方式2// byte[] bys = {97,98,99,100,101};// fos.write(bys);// byte[] bys = "abcdef".getBytes(StandardCharsets.UTF_8);// fos.write(bys);//void write(byte[] b,int off,int len)byte[] bys = "abcdef".getBytes(StandardCharsets.UTF_8);fos.write(bys,1,4);fos.close();}}
IO-字符流复制Java文件-进阶版
/*** 之前的方式的弊端* 转换流的名字比较长,常见的操作都是按照本地默认编码实现的,所以,为了简化书写,转换流提供了对应的子类** FileReader:用于读取字符文件的便捷类* public FileReader(String fileName) throws FileNotFoundException* 使用平台 default charset创建一个新的 FileReader ,给定要读取的文件的 名称 。** FileWriter:用于写入字符文件的便捷类* public FileWriter(String fileName) throws IOException* 构造一个 FileWriter给出文件名,使用平台的 default charset*** 思路:* 1、根据数据源创建字符输入流对象* 2、根据目的地创建字符输出流对象* 3、读写数据,复制文件* 4、释放资源* **/package iodemo;import java.io.FileReader;import java.io.FileWriter;import java.io.IOException;public class iodemo297 {public static void main(String[] args) throws IOException {FileReader fr = new FileReader("xiayijieduan\\iodemoh01.java");FileWriter fw = new FileWriter("xiayijieduan\\fwcopy.java");int ch;while ((ch= fr.read())!=-1){fw.write(ch);}fr.close();fw.close();}}
IO-字符缓冲流
/*** 字符缓冲流* public class BufferedReader* extends Reader* 从字符输入流中读取文本,缓冲字符,以便有效地读取字符,数组和行。** public class BufferedWriter* extends Writer* 将文本写入字符输出流,缓冲字符,以便有效地写入单个字符,数组和字符串。** 构造方法:*public BufferedWriter(Writer out)* 创建使用默认大小的输出缓冲区的缓冲字符输出流。* public BufferedReader(Reader in)* 创建使用默认大小的输入缓冲区的缓冲字符输入流。* **/package IOdemo;import java.io.*;public class iodemo298 {public static void main(String[] args) throws IOException {// FileWriter fw =new FileWriter("javaSdemo\\bw.txt");// BufferedWriter bw = new BufferedWriter(fw);// BufferedWriter bw = new BufferedWriter(new FileWriter("javaSdemo\\bw.txt"));// bw.write("hello\r\n");// bw.write("world");// bw.close();BufferedReader br = new BufferedReader(new FileReader("javaSdemo\\bw.txt"));// int ch;// while ((ch=br.read())!=-1){// System.out.print((char) ch);// }char[] chs = new char[1024];int len;while ((len=br.read(chs))!=-1){System.out.println(new String(chs,0,len));}}}
IO-字符缓冲流复制Java文件
/******/package IOdemo;import java.io.*;public class iodemo299 {public static void main(String[] args) throws IOException {BufferedReader br = new BufferedReader(new FileReader("javaSdemo\\Stringdemo.java"));BufferedWriter bw = new BufferedWriter(new FileWriter("javaSdemo\\copy.java"));// int ch;// while ((ch=br.read())!=-1){// bw.write(ch);// }char[] chs = new char[1024];int len;while ((len= br.read(chs))!=-1){bw.write(chs);}br.close();bw.close();}}
IO-字符流特有功能
/***newline()*readline()***/package IOdemo;import java.io.*;public class iodemo300 {public static void main(String[] args) throws IOException {// BufferedWriter bw = new BufferedWriter(new FileWriter("javaSdemo\\bw1.txt"));// for (int i=0;i<10;i++){// bw.write("hello"+i);// //使用以下这种办法,存在一个问题,它只适用于windows系统//// bw.write("\r\n");// //使用字符流特有的换行// bw.newLine();// //一般来说,每写入一个数据都进行一次刷新,保证那一个数据已经写进去// bw.flush();// }BufferedReader br = new BufferedReader(new FileReader("javaSdemo\\bw1.txt"));//bw中两行// String line = br.readLine();// System.out.println(line);//// line= br.readLine();// System.out.println(line);//// //第三次读取返回null// line = br.readLine();// System.out.println(line);//readline不会自动换行String line;while ((line= br.readLine())!=null){System.out.print(line);}br.close();}}
IO-字符流特有功能复制文件
package IOdemo;import java.io.*;public class iodemo301 {public static void main(String[] args) throws IOException {BufferedReader br = new BufferedReader(new FileReader("javaSdemo\\Stringdemo.java"));BufferedWriter bw = new BufferedWriter(new FileWriter("javaSdemo\\Copy.java"));//readline读数据不换行,所以写数据的时候,使用newline换行String line;while ((line= br.readLine())!=null){bw.write(line);bw.newLine();bw.flush();}br.close();bw.close();}}
集合到文件
集合到文件
/**** 集合到文件* 创建ArrayList集合* 往集合中存储字符串元素* 创建字符缓冲输出流对象* 遍历集合,得到每一个字符串数据* 调用字符缓冲输出流对象的方法写数据* 释放资源*** **/package iodemo;import java.io.BufferedWriter;import java.io.FileWriter;import java.io.IOException;import java.util.ArrayList;public class iodemo303 {public static void main(String[] args) throws IOException {ArrayList<String> arrray = new ArrayList<String>();arrray.add("hello");arrray.add("world");arrray.add("java");BufferedWriter bw = new BufferedWriter(new FileWriter("xiayijieduan\\array.txt"));for (String s:arrray){bw.write(s);bw.newLine();bw.flush();}bw.close();}}
文件到集合
/**** 把文本文件中的数据读取到集合中,并遍历集合,文件中的每一行数据是一个集合元素** 创建字符缓冲输入流对象* 创建ArrayList对象* 调用字符缓冲输入流对象的方法读数据* 把读取到的字符串数据存储到集合中* 释放资源* 遍历集合*** **/package iodemo;import java.io.BufferedReader;import java.io.FileReader;import java.io.IOException;import java.util.ArrayList;public class iodemo304 {public static void main(String[] args) throws IOException {BufferedReader br = new BufferedReader(new FileReader("xiayijieduan\\array.txt"));ArrayList<String> array = new ArrayList<String>();String line;while ((line=br.readLine())!=null){array.add(line);}for (String s:array){System.out.println(s);}}}
说明
上面的两种情况,体现读写会有很多中情况,文件到文件,集合到文件,文件到集合等
案例中的文件及路径按照自己的进行
案例 点名器
/**** 有一个文件里面存储了班级同学的姓名,每个姓名战一行* 要求通过程序实现随机点名器**创建字符缓冲输入流对象*创建ArrayList集合对象*调用字符缓冲输入流对象的方法读取数据* 把读取到的字符串数据存储到集合中* 释放资源* 使用Random产生一个随机数* 使用随机数作为索引用于集合中获取值* 输出** **/package iodemo;import java.io.BufferedReader;import java.io.FileReader;import java.io.IOException;import java.util.ArrayList;import java.util.Random;public class iodemo305 {public static void main(String[] args) throws IOException {BufferedReader br = new BufferedReader(new FileReader("xiayijieduan\\lll.txt"));ArrayList<String> array = new ArrayList<String>();String line;while ((line=br.readLine())!=null){array.add(line);}br.close();Random r = new Random();int index = r.nextInt(array.size());String name = array.get(index);System.out.println(name);}}
文件到集合改进版
/**** 把集合中的数据写入到文本文件* 要求,每一个学生对象的数据作为文件中一行数据,如:* 格式:学号,姓名,年龄,居住的** 思路* 定义学生类* 创建Arraylist集合* 把学生对象添加到集合中* 创建字符缓冲输出流对象* 遍历集合,得到每一个学生对象* 把学生对象的数据拼接成指定格式的字符串* 调用字符缓冲输出流对象的方法写数据* 释放资源*** **/package iodemo;import java.io.BufferedWriter;import java.io.FileWriter;import java.io.IOException;import java.util.ArrayList;public class iodemo306 {public static void main(String[] args) throws IOException {ArrayList<student> array = new ArrayList<student>();student s1 = new student("001","lww01","address01",18);student s2 = new student("002","lww02","address02",17);student s3 = new student("003","lww03","address03",16);student s4 = new student("004","lww04","address04",15);array.add(s1);array.add(s2);array.add(s3);array.add(s4);BufferedWriter bw =new BufferedWriter(new FileWriter("xiayijieduan\\student.txt"));for (student s : array){StringBuilder sb = new StringBuilder();sb.append(s.getSid()).append(",").append(s.getName()).append(",").append(s.getAge()).append(",").append(s.getAddress());bw.write(sb.toString());bw.newLine();bw.flush();}bw.close();}}
package iodemo;public class student {private String sid;private String name;private String address;private int age;public student() {}public student(String sid, String name, String address, int age) {this.sid = sid;this.name = name;this.address = address;this.age = age;}public String getSid() {return sid;}public void setSid(String sid) {this.sid = sid;}public String getName() {return name;}public void setName(String name) {this.name = name;}public String getAddress() {return address;}public void setAddress(String address) {this.address = address;}public int getAge() {return age;}public void setAge(int age) {this.age = age;}}
文件到集合改进版
/**** 把文本文件中的数据读取到集合中,并遍历集合* 文件中每一行数据是一个学生对象的成员变量值* 如:* 学号,姓名,年龄,地址** 定义学生类* 创建字符缓冲输入流对象* 创建ArrayList集合对象* 调用字符缓冲输入流对象的方法读数据* 把读取到的字符串数据用split()进行分割,得到一个字符串数组* 创建学生对象* 把字符串数组中的每一个元素取出来对应的赋值给学生对象的成员变量值* 把学生对象添加到集合* 释放资源*遍历集合** **/package iodemo;import java.io.BufferedReader;import java.io.FileReader;import java.io.IOException;import java.util.ArrayList;public class iodemo307 {public static void main(String[] args) throws IOException {BufferedReader br = new BufferedReader(new FileReader("xiayijieduan\\student.txt"));ArrayList<student> array = new ArrayList<student>();String line;while ((line= br.readLine())!=null){//把读取到的字符串数据用split()进行分割,得到一个字符串数组String[] strArray = line.split(",");student s = new student();//把字符串数组中的每一个元素取出来对应的赋值给学生对象的成员变量值// 文件中的格式如下//001,lww01,18,address01// 所以被存储到数组strArray中的第一个就是001,索引是0s.setSid(strArray[0]);s.setName(strArray[1]);//因为这里学生对象的成员变量值是int类型,而数组strArray是String类型,因此需要强转s.setAge(Integer.parseInt(strArray[2]));s.setAddress(strArray[3]);array.add(s);}br.close();for (student s :array){System.out.println(s.getSid()+","+s.getName()+","+s.getAge()+","+s.getAddress());}}}
package iodemo;public class student {private String sid;private String name;private String address;private int age;public student() {}public student(String sid, String name, String address, int age) {this.sid = sid;this.name = name;this.address = address;this.age = age;}public String getSid() {return sid;}public void setSid(String sid) {this.sid = sid;}public String getName() {return name;}public void setName(String name) {this.name = name;}public String getAddress() {return address;}public void setAddress(String address) {this.address = address;}public int getAge() {return age;}public void setAge(int age) {this.age = age;}}
集合到文件数据排序版
/*** 键盘录入5个学生信息 要求按照总分从高到低写入文本文件* <p>* <p>* 定义学术类* 创建TreeSet集合 通过比较器排序* 录入学生数据* 创建学生对象,录入数据赋值对应成员变量* 把学生对象添加到集合* 创建字符缓冲输出流对象* 遍历集合,得到每一个学生对象* 把学生对象的数据拼接成指定格式的字符串* 调用字符缓冲输出流对象的方法写数据* 释放资源**/package IOdemo;import java.io.BufferedWriter;import java.io.FileWriter;import java.io.IOException;import java.util.Comparator;import java.util.Scanner;import java.util.TreeSet;public class iodemo308 {public static void main(String[] args) throws IOException {// 创建TreeSet集合 通过比较器排序TreeSet<studentchengji> ts = new TreeSet<studentchengji>(new Comparator<studentchengji>() {@Overridepublic int compare(studentchengji s1, studentchengji s2) {//比较总分int num = s2.getSum() - s1.getSum();//比较其它课程分int num2 = num == 0 ? s1.getChinese() - s2.getChinese() : num;int num3 = num2 == 0 ? s1.getMath() - s2.getMath() : num2;int num4 = num3 == 0 ? s1.getEnglish() - s2.getEnglish() : num3;int num5 = num4 == 0 ? s1.getName().compareTo(s2.getName()) : num4;return num5;}});//录入学生数据for (int i = 0; i < 5; i++) {Scanner sc = new Scanner(System.in);System.out.println("请录入第" + (i + 1) + "个学生信息:");System.out.println("姓名:");String name = sc.nextLine();System.out.println("语文成绩:");int chinese = sc.nextInt();System.out.println("数学成绩:");int math = sc.nextInt();System.out.println("英语成绩:");int english = sc.nextInt();//创建学生对象studentchengji s = new studentchengji();s.setName(name);s.setChinese(chinese);s.setEnglish(english);s.setMath(math);//把学生对象添加到集合ts.add(s);}BufferedWriter bw = new BufferedWriter(new FileWriter("javaSdemo\\ts.txt"));for (studentchengji s :ts){//拼接成指定格式的字符串StringBuilder sb = new StringBuilder();sb.append(s.getName()).append(",").append(s.getChinese()).append(",").append(s.getMath()).append(",").append(s.getEnglish()).append(",").append(s.getSum());//写入数据,作为一个字符串写入bw.write(sb.toString());bw.newLine();bw.flush();}bw.close();}}
package IOdemo;public class studentchengji {private String name;private int chinese;private int math;private int english;public studentchengji() {}public studentchengji(String name, int chinese, int math, int english) {this.name = name;this.chinese = chinese;this.math = math;this.english = english;}public String getName() {return name;}public void setName(String name) {this.name = name;}public int getChinese() {return chinese;}public void setChinese(int chinese) {this.chinese = chinese;}public int getMath() {return math;}public void setMath(int math) {this.math = math;}public int getEnglish() {return english;}public void setEnglish(int english) {this.english = english;}public int getSum() {return this.chinese + this.math + this.english;}}
复制单级文件夹
package IOdemo;import java.io.*;import static com.sun.deploy.cache.Cache.copyFile;/***把D:\workspace\video文件夹复制到模块目录下** 创建数据源目录File对象 路径是D:\workspace\video* 获取数据源目录File对象的名称* 创建目的地目录File对象,路径名是模块名加video组成* 判断目的地目录对应的File是否存在,如果不存在,就创建* 获取数据源目录下所有文件的File数组* 遍历File数组,得到每一个File对象,该File对象,其实就是数据源文件* 获取数据源文件File对象的名称* 创建目的地文件File对象,路径名是目的地目录+文件名称组成* 复制文件* 由于文件不仅仅是文本文件,还有图片,视频等,所以采用字节流复制文件***/public class iodemo309 {public static void main(String[] args) throws IOException{File srcF = new File("D:\\workspace\\video");//获取数据源目录File对象的名称String srcFName = srcF.getName();//创建目的地目录File对象,路径名是模块名加video组成File desF = new File("javaSdemo",srcFName);if (!desF.exists()){desF.mkdir();}//获取数据源目录下所有文件的File数组File[] listFiles = srcF.listFiles();for (File srcFile : listFiles){//获取数据源文件File对象的名称String srcFileName = srcFile.getName();//创建目的地文件File对象,路径名是目的地目录+文件名称组成File desFile=new File(desF,srcFileName);copyFile(srcFile,desFile);}}private static void copyFile(File srcFile,File desFile) throws IOException{BufferedInputStream bis =new BufferedInputStream(new FileInputStream(srcFile));BufferedOutputStream bos = new BufferedOutputStream(new FileOutputStream(desFile));byte[] bys = new byte[1024];int len;while ((len=bis.read(bys))!=-1){bos.write(bys,0,len);}bis.close();bos.close();}}
递归复制多级文件
/*** 复制多级文件夹*** **/package IOdemo;import java.io.*;public class iodemo310 {public static void main(String[] args) throws IOException{File srcFile = new File("D:\\workspace\\video");File destFile = new File("D:\\workspace\\D");//写方法实现文件夹的复制,参数为数据源和目的地的File对象CopyFolder(srcFile,destFile);}private static void CopyFolder(File srcFile, File destFile) throws IOException{//判断数据源File是否是目录if(srcFile.isDirectory()){//在目的地创建与数据源File名称一样的目录String srcFileName = srcFile.getName();File newFolder = new File(destFile,srcFileName);if (!newFolder.exists()){newFolder.mkdir();}//获取数据源File下所有的文件或者目录的File数组File[] fileArray = srcFile.listFiles();//遍历该File数组,得到每一个File对象for (File files : fileArray){//把该files作为数据源File对象,递归调用复制文件夹的方法CopyFolder(files,newFolder);}}else {//不是目录,说明就是文件,用字节流File newFile = new File(destFile,srcFile.getName());copyFile(srcFile,newFile);}}private static void copyFile(File srcFile, File desFile) throws IOException {BufferedInputStream bis =new BufferedInputStream(new FileInputStream(srcFile));BufferedOutputStream bos = new BufferedOutputStream(new FileOutputStream(desFile));byte[] bys = new byte[1024];int len;while ((len=bis.read(bys))!=-1){bos.write(bys,0,len);}bis.close();bos.close();}}
特殊操作流-readme
特殊操作流1、标准输入输出流public final class Systemextends ObjectSystem类包含几个有用的类字段和方法。 它无法实例化。 System类提供的设施包括标准输入,标准输出和错误输出流;访问外部定义的属性和环境变量; 加载文件和库的方法; 以及用于快速复制阵列的一部分的实用方法。public static final InputStream in“标准”输入流。 此流已打开并准备好提供输入数据。 通常,该流对应于键盘输入或由主机环境或用户指定的另一输入源。public static final PrintStream out“标准”输出流。 此流已打开并准备接受输出数据。 通常,该流对应于主机环境或用户指定的显示输出或另一输出目的地。
标准输入输出流-Scanner-转换
package IOdemo;import java.io.*;import java.util.Scanner;/**标准输入输出流** public static final InputStream in* “标准”输入流。 此流已打开并准备好提供输入数据。 通常,该流对应于键盘输入或由主机环境或用户指定的另一输入源。** public static final PrintStream out* “标准”输出流。 此流已打开并准备接受输出数据。 通常,该流对应于主机环境或用户指定的显示输出或另一输出目的地。** **/public class iodemo312 {public static void main(String[] args) throws IOException {// InputStream is = System.in;// int by;// while ((by=is.read())!=-1){// System.out.print((char) by);// }//上面这个写法,输入什么就会输出什么,但是,不能读取中文,所以要包装成字符流//字节流// InputStream is = System.in;// //使用转换流,将字节流转换成为字符流// InputStreamReader isr = new InputStreamReader(is);// //字符流包装为字符缓冲流// BufferedReader br = new BufferedReader(isr);//上面这个合并为:BufferedReader br = new BufferedReader(new InputStreamReader(System.in));System.out.println("请输入一个字符串:");String line = br.readLine();System.out.println("你输入的字符串是:"+line);System.out.println("请输入一个整数:");int i = Integer.parseInt(br.readLine());System.out.println("你输入的整数:"+i);//上面自己实现键盘录入太过于麻烦,所以Java就提供了一个类Scanner sc = new Scanner(System.in);}}
字节打印流
package IOdemo;import java.io.IOException;import java.io.PrintStream;/*** 字节打印流* Class PrintStream* java.lang.Object* java.io.OutputStream* java.io.FilterOutputStream* java.io.PrintStream* 继承自字节输出流** 打印流的特点:* 只负责输出数据,不负责读取数据* 有自己的特有方法*** **/public class iodemo314 {public static void main(String[] args) throws IOException {PrintStream ps = new PrintStream("javaSdemo\\ps.txt");//使用字节输出流的方法写数据ps.write(97);//使用特有方法写数据,直接写入97,而不是aps.print(97);ps.close();}}
字符打印流
package IOdemo;import java.io.FileWriter;import java.io.IOException;import java.io.PrintWriter;public class iodemo315 {public static void main(String[] args) throws IOException {// PrintWriter pw = new PrintWriter("javaSdemo\\pw.txt");// //使用继承的父类的方法写数据// pw.write("hello");// pw.write("\r\n");// pw.flush();// pw.write("java");// pw.write("\r\n");// pw.flush();//// //使用自带的方法进行写数据,自带换行// pw.println("hello");// pw.flush();//以上还是需要手动进行flushPrintWriter pw1 = new PrintWriter(new FileWriter("javaSdemo\\pw.txt"),true);pw1.println("lww");}}
字符打印流复制文件
package iodemo;import java.io.*;public class iodemo316 {public static void main(String[] args) throws IOException {BufferedReader br = new BufferedReader(new FileReader("xiayijieduan\\iodemoh01.java"));PrintWriter pw = new PrintWriter(new FileWriter("xiayijieduan\\copydemo.java",true));String line;while ((line = br.readLine())!=null){pw.println(line);}br.close();pw.close();}}
序列化
序列化:public class ObjectOutputStreamextends OutputStreamimplements ObjectOutput, ObjectStreamConstantsObjectOutputStream将Java对象的原始数据类型和图形写入OutputStream。可以使用ObjectInputStream读取(重构)对象。 可以通过使用流的文件来完成对象的持久存储。如果流是网络套接字流,则可以在另一个主机或另一个进程中重新构建对象。public ObjectOutputStream(OutputStream out) throws IOException创建一个写入指定OutputStream的ObjectOutputStream。此构造函数将序列化流标头写入基础流; 调用者可能希望立即刷新流以确保接收ObjectInputStreams的构造函数在读取头时不会阻塞。public final void writeObject(Object obj) throws IOException将指定的对象写入ObjectOutputStream。写入对象的类,类的签名,以及类的非瞬态和非静态字段及其所有超类型的值。可以使用writeObject和readObject方法覆盖类的默认序列化。 该对象引用的对象是可传递的,因此可以通过ObjectInputStream重建完整的对象等效图。注意:一个对象要想被序列化,该对象所属的类必须实现Serializable接口Serializable只是一个标记接口,实现该接口,不需要重写任何方法反序列化:public class ObjectInputStreamextends InputStreamimplements ObjectInput, ObjectStreamConstantsObjectInputStream对先前使用ObjectOutputStream编写的原始数据和对象进行反序列化。public ObjectInputStream(InputStream in) throws IOException创建一个从指定的InputStream读取的ObjectInputStream。从流中读取序列化流头并进行验证。 此构造函数将阻塞,直到相应的ObjectOutputStream已写入并刷新标头。public final Object readObject() throws IOException, ClassNotFoundException从ObjectInputStream中读取一个对象。 读取对象的类,类的签名,以及类的非瞬态和非静态字段及其所有超类型的值。可以使用writeObject和readObject方法覆盖类的默认反序列化。 这个对象引用的对象是可传递的,因此readObject可以重建完整的等效对象图。
对象序列化流
package iodemo;import java.io.FileOutputStream;import java.io.IOException;import java.io.ObjectOutputStream;import java.io.OutputStreamWriter;public class iodemo317 {public static void main(String[] args) throws IOException {ObjectOutputStream oos = new ObjectOutputStream(new FileOutputStream("xiayijieduan\\oos.txt"));student s = new student("12","lww","sz",18);oos.writeObject(s);oos.close();}}
package iodemo;import java.io.Serializable;public class student implements Serializable {private String sid;private String name;private String address;private int age;public student() {}public student(String sid, String name, String address, int age) {this.sid = sid;this.name = name;this.address = address;this.age = age;}public String getSid() {return sid;}public void setSid(String sid) {this.sid = sid;}public String getName() {return name;}public void setName(String name) {this.name = name;}public String getAddress() {return address;}public void setAddress(String address) {this.address = address;}public int getAge() {return age;}public void setAge(int age) {this.age = age;}}

对象反序列化流
package iodemo;import java.io.FileInputStream;import java.io.IOException;import java.io.ObjectInputStream;public class iodemo318 {public static void main(String[] args) throws IOException, ClassNotFoundException {ObjectInputStream ois = new ObjectInputStream(new FileInputStream("xiayijieduan\\oos.txt"));Object obj = ois.readObject();//向下转移student s = (student) obj;System.out.println(s.getSid()+","+s.getAddress()+","+s.getName()+","+s.getAge());ois.close();}}
序列化id
//保持类改变不会导致读取发生错误//private static final long serialVersionUID = 1234;//private transient int age; 定义某个成员变量不想被序列化,对象被反序列化的时候,该对象还是有这个参数的,反序列化读取该参数为0package iodemo;import java.io.Serializable;public class student implements Serializable {private static final long serialVersionUID = 1234;private String sid;private String name;private String address;private transient int age;public student() {}public student(String sid, String name, String address, int age) {this.sid = sid;this.name = name;this.address = address;this.age = age;}public String getSid() {return sid;}public void setSid(String sid) {this.sid = sid;}public String getName() {return name;}public void setName(String name) {this.name = name;}public String getAddress() {return address;}public void setAddress(String address) {this.address = address;}public int getAge() {return age;}public void setAge(int age) {this.age = age;}@Overridepublic String toString() {return "student{" +"sid='" + sid + '\'' +", name='" + name + '\'' +", address='" + address + '\'' +", age=" + age +'}';}}
package iodemo;import java.io.*;public class iodemo319 {public static void main(String[] args) throws IOException, ClassNotFoundException {write();read();}public static void write() throws IOException {ObjectOutputStream oos = new ObjectOutputStream(new FileOutputStream("xiayijieduan\\oos1.txt"));student s = new student("12","lww","sz",18);oos.writeObject(s);oos.close();}public static void read() throws IOException, ClassNotFoundException {ObjectInputStream ois = new ObjectInputStream(new FileInputStream("xiayijieduan\\oos1.txt"));Object obj = ois.readObject();student s = (student) obj;System.out.println(s.getSid()+","+s.getAddress()+","+s.getName()+","+s.getAge());ois.close();}}
Properties
package IOdemo;/*** Properties类表示一组持久的属性。 Properties可以保存到流中或从流中加载。 属性列表中的每个键及其对应的值都是一个字符串。* Properties作为map集合使用** **/import java.util.Properties;import java.util.Set;public class iodemo320 {public static void main(String[] args) {Properties pops = new Properties();pops.put("nvsec01","yongge");pops.put("nvsec02","D");pops.put("nvsec03","XING");//获取键集合Set<Object> ks = pops.keySet();for (Object key : ks){Object value = pops.get(key);System.out.println(key+","+value);}}}
Properties 特有方法
package IOdemo;/**** Properties特有方法,与上面进行对比** **/import java.util.Properties;import java.util.Set;public class iodemo320 {public static void main(String[] args) {Properties pops = new Properties();System.out.println(pops);System.out.println("-----------");//public Object setProperty (String key, String value)//调用Hashtable方法put 。 提供与getProperty方法的并行性。 强制使用字符串作为属性键和值。 返回的值是Hashtable调用put的结果。pops.setProperty("ny001","lww");pops.setProperty("ny002","lww1");pops.setProperty("ny003","lww2");/*** public synchronized Object setProperty(String key, String value) {* return put(key, value);* }* **/// pops.put("nvsec01","yongge");// pops.put("nvsec02","D");// pops.put("nvsec03","XING");System.out.println(pops);System.out.println("-----------");//// System.out.println(pops.getProperty("ny003"));// System.out.println("-----------");//获取键集合// Set<Object> ks = pops.keySet();// for (Object key : ks){// Object value = pops.get(key);// System.out.println(key+","+value);// }Set<String> names = pops.stringPropertyNames();for (String key:names){// System.out.println(key);String value = pops.getProperty(key);System.out.println(key+","+value);}}}
Properties 结合 io
package IOdemo;import java.io.FileReader;import java.io.FileWriter;import java.io.IOException;import java.util.Properties;public class iodemo322 {public static void main(String[] args) throws IOException{// mystore();myload();}public static void mystore() throws IOException {Properties pops =new Properties();pops.setProperty("001","lww");pops.setProperty("002","lwe");pops.setProperty("003","lwr");FileWriter fw = new FileWriter("javaSdemo\\pops.txt");//把集合中的数据存储到pops.txt中,第二个参数是描述,填写null即可pops.store(fw,null);fw.close();}public static void myload() throws IOException{Properties pops =new Properties();FileReader fr = new FileReader("javaSdemo\\pops.txt");//读取pops.txt中的数据到集合中pops.load(fr);fr.close();//看一下是否写入成功System.out.println(pops);}}
Properties案例
package iodemo;/***猜数字游戏**/import java.io.FileReader;import java.io.FileWriter;import java.io.IOException;import java.util.Properties;public class iodemo323 {public static void main(String[] args) throws IOException {Properties pops = new Properties();FileReader fr = new FileReader("xiayijieduan\\array.txt");pops.load(fr);fr.close();String count = pops.getProperty("count");int i = Integer.parseInt(count);if (i>=3){System.out.println("游戏次数耗尽,请充钱");}else {guestNum.start();i++;pops.setProperty("count",String.valueOf(i));FileWriter fw = new FileWriter("xiayijieduan\\array.txt");pops.store(fw,null);fw.close();}}}
package iodemo;import java.util.Random;import java.util.Scanner;public class guestNum {private guestNum(){}public static void start(){Random r = new Random();int number = r.nextInt(100)+1;while (true){Scanner sc =new Scanner(System.in);System.out.println("请输入你要猜的数字:");int gNum = sc.nextInt();if (gNum>number){System.out.println("大了");}else if (gNum<number){System.out.println("小了");}else {System.out.println("对了");break;}}}}

多线程
readme
进程-->正在运行的程序是系统进行资源分配和调用的独立单位每一个进程都有它自己的内存空间和系统资源线程-->是进程中的单个顺序控制流,是一条执行路径一个进程中只有一条执行路径,则是单线程程序一个进程中只有多条执行路径,则是多线程程序简述:记事本,在输入文字的时候,打开记事本的属性就不能继续输入文字,必须先关闭记事本,这就是单线程扫雷,在扫雷的时候,扫雷的计时器也在运行,停止扫雷的时候,计时器也在运行,这就是多线程
多线程demo
package threadsdemo;/***可以同时开启两个for循环输出**/public class mythreaddemo {public static void main(String[] args) {mythread my1 = new mythread();mythread my2 = new mythread();// my1.run();// my2.run();//上面不能进入多线程,需要使用start方法my1.start();my2.start();}}
package threadsdemo;/***需要继承Thread类,并且重写run方法**/public class mythread extends Thread{@Overridepublic void run() {for (int i=0;i<100;i++){System.out.println(i);}}}
设置及获取线程名称
package threademo;public class threademo {public static void main(String[] args) {// mythread my1 = new mythread();// mythread my2 = new mythread();// my1.setName("高铁");// my2.setName("飞机");//上面两种方式进行线程名的设置,通过构造线程类里面的构造方法,可以在实例化对象的时候,进行线程名的设置mythread my1 = new mythread("高铁");mythread my2 = new mythread("飞机");// my1.start();// my2.start();//对当前正在运行main方法,如果想知道他的线程名System.out.println(Thread.currentThread().getName());}}
package threademo;public class mythread extends Thread {public mythread(){}public mythread(String name){//Thread内存在成员变量name和构造方法,这里使用super,将nema传过去,进行线程名的设置super(name);}@Overridepublic void run() {for (int i =0 ;i<100;i++){System.out.println(getName()+","+i);}}}
线程优先级设置
package threademo;public class threademo327 {public static void main(String[] args) {mythread my1 = new mythread("高铁");mythread my2 = new mythread("飞机");mythread my3 = new mythread("火箭");//范围1-10,10获取资源的几率高一些my1.setPriority(10);System.out.println(my1.getPriority());System.out.println(my2.getPriority());System.out.println(my3.getPriority());my1.start();my2.start();my3.start();}}
线程控制
/****sleep 将当前正在执行的线程停留(暂停执行)指定的毫秒数*join 等待这个线程死亡*setDaemon 守护线程,将此线程标记为守护线程,当运行的线程都是守护线程时,Java虚拟机将退出***/package threademo;public class threademo327 {public static void main(String[] args) {mythread my1 = new mythread("高铁");mythread my2 = new mythread("飞机");mytheard01 my3 = new mytheard01("火箭");//范围1-10,10获取资源的几率高一些my3.setPriority(10);System.out.println(my1.getPriority());System.out.println(my2.getPriority());System.out.println(my3.getPriority());//my1 my2是守护线程,当其它线程都跑完了,只剩下这两个,就会直接结束,Java虚拟机退出my1.setDaemon(true);my2.setDaemon(true);//my1.start();//当my1的线程结束以后,才能跑其它线程try {my1.join();} catch (InterruptedException e) {e.printStackTrace();}my2.start();my3.start();}}
多线程实现方式
两种:1、继承Thread类(上面多线程demo实现)2、实现Rundemo接口(下面案例)
package threadsdemo;public class myrundemotest {public static void main(String[] args) {myRundemo my = new myRundemo();//创建Thread类的对象,把mythreaddemo的对象作为构造方法的参数Thread t1 = new Thread(my);Thread t2 = new Thread(my,"有名字的");t1.start();t2.start();}}
package threadsdemo;public class myRundemo implements Runnable{@Overridepublic void run() {for (int i=0;i<100;i++){System.out.println(Thread.currentThread().getName()+":"+i);}}}
卖票
运行起来会发现有异常结果,多个线程在争cpu的时候出现了问题,因为多个线程都在执行一个共同资源的代码块
package threadsdemo;public class selltiketdemo {public static void main(String[] args) {sellTicket st = new sellTicket();Thread t1 = new Thread(st,"窗口1");Thread t2 = new Thread(st,"窗口2");Thread t3 = new Thread(st,"窗口3");t1.start();t2.start();t3.start();}}
package threadsdemo;public class sellTicket implements Runnable{private int tickets = 100;@Overridepublic void run() {while (true) {if (tickets > 0) {try {Thread.sleep(100);}catch (InterruptedException e){e.printStackTrace();}System.out.println(Thread.currentThread().getName() + "正在出售第" + tickets + "张票");tickets--;}}}}
这里是因为,t1在执行tickets—的时候,t2也执行了输出,而tickets—还没执行完,所以还是100,t3同理,然后三个执行完,票就是97了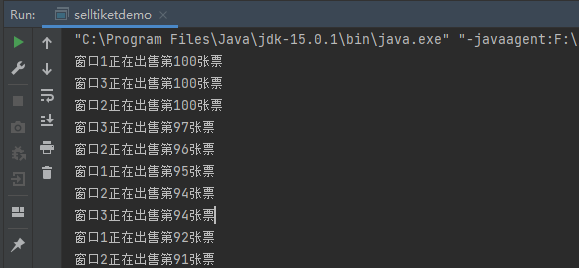
卖票问题解决-锁
package threadsdemo;public class selltiketdemo {public static void main(String[] args) {sellTicket st = new sellTicket();Thread t1 = new Thread(st,"窗口1");Thread t2 = new Thread(st,"窗口2");Thread t3 = new Thread(st,"窗口3");t1.start();t2.start();t3.start();}}
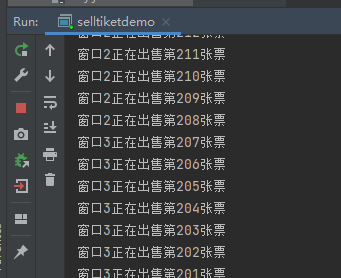
package threadsdemo;public class sellTicket implements Runnable{private int tickets = 1000;private Object obj = new Object();@Overridepublic void run() {while (true) {//假设t1抢到了cpu的执行权//t2在t1休眠的时候抢到了cpu的执行权,但是发现这段代码锁住了,就只能等//t1出来后,三个对象又重新抢cpu的执行权,抢到的进去执行synchronized (obj) {//t1进来后,就会把这段代码锁起来if (tickets > 0) {try {//t1休眠10毫秒,然后t2这个时候抢到了cpu的执行权Thread.sleep(10);} catch (InterruptedException e) {e.printStackTrace();}System.out.println(Thread.currentThread().getName() + "正在出售第" + tickets + "张票");tickets--;}//t1出来后,这段代码就解锁了}}}}
卖票问题解决-锁2-代码优化
同步方法:就是把synchronized关键字加到方法上格式:修饰符 synchronized 返回值类型 方法名(方法参数){}同步方法的锁对象是什么呢?this同步静态方法:就是把synchronized关键字加到静态方法上格式:修饰符 static synchronized 返回值类型 方法名(方法参数){}同步静态方法的锁对象是什么呢?类名.class
package threadsdemo;public class selltiketdemo {public static void main(String[] args) {sellTicket st = new sellTicket();Thread t1 = new Thread(st,"窗口1");Thread t2 = new Thread(st,"窗口2");Thread t3 = new Thread(st,"窗口3");t1.start();t2.start();t3.start();}}
package threadsdemo;public class sellTicket implements Runnable {private static int tickets = 1000;private Object obj = new Object();private int x = 0;@Overridepublic void run() {while (true) {if (x % 2 == 0) {// //假设t1抢到了cpu的执行权// //t2在t1休眠的时候抢到了cpu的执行权,但是发现这段代码锁住了,就只能等// //t1出来后,三个对象又重新抢cpu的执行权,抢到的进去执行//// synchronized (this) { //因为下面使用了静态方法,所以不能使用this//// 使用这个类的字节码// synchronized (sellTicket.class) {//// //t1进来后,就会把这段代码锁起来// if (tickets > 0) {// try {// //t1休眠10毫秒,然后t2这个时候抢到了cpu的执行权// Thread.sleep(5);// } catch (InterruptedException e) {// e.printStackTrace();// }// System.out.println(Thread.currentThread().getName() + "正在出售第" + tickets + "张票");// tickets--;// }// //t1出来后,这段代码就解锁了// }selltickets();} else {// synchronized (obj) {// //t1进来后,就会把这段代码锁起来// if (tickets > 0) {// try {// //t1休眠10毫秒,然后t2这个时候抢到了cpu的执行权// Thread.sleep(10);// } catch (InterruptedException e) {// e.printStackTrace();// }// System.out.println(Thread.currentThread().getName() + "正在出售第" + tickets + "张票");// tickets--;// }// //t1出来后,这段代码就解锁了selltickets();}}}private static synchronized void selltickets() {//t1进来后,就会把这段代码锁起来if (tickets > 0) {try {//t1休眠10毫秒,然后t2这个时候抢到了cpu的执行权Thread.sleep(5);} catch (InterruptedException e) {e.printStackTrace();}System.out.println(Thread.currentThread().getName() + "正在出售第" + tickets + "张票");tickets--;//t1出来后,这段代码就解锁了}}}
卖票问题解决-锁2-Lock
使用Lock锁,更加直观方便
package threadsdemo;public class selltiketdemo {public static void main(String[] args) {sellTickets2 st = new sellTickets2();Thread t1 = new Thread(st,"窗口1");Thread t2 = new Thread(st,"窗口2");Thread t3 = new Thread(st,"窗口3");t1.start();t2.start();t3.start();}}
package threadsdemo;import java.util.concurrent.locks.Lock;import java.util.concurrent.locks.ReentrantLock;public class sellTickets2 implements Runnable{private int tickets = 1000;private Lock lock =new ReentrantLock();@Overridepublic void run() {while (true){try {lock.lock();if (tickets>0){try {Thread.sleep(1);}catch (InterruptedException e){e.printStackTrace();}System.out.println(Thread.currentThread().getName() + "正在出售第" + tickets + "张票");tickets--;}}finally {lock.unlock();}}}}
生产者消费者案例
package threadsdemo;/*** 生产者消费者案例思路:* 1、奶箱类Box,定义一个成员变量,表示第x瓶奶,提供存储牛奶和获取牛奶的操作* 2、生产者类producer,实现Runable接口,重写run方法,调用存储牛奶的操作* 3、消费者类customer,实现Runable接口,重写run方法,调用获取牛奶的操作* 4、测试类Boxdemo,main方法:* 创建奶箱对象,这里共享数据区域* 创建生产者对象,把奶箱对象作为构造方法参数转递,这样就可以在这个类中调用存储牛奶的操作* 创建消费者对象,把奶箱对象作为构造方法参数转递,这样就可以在这个类中调用获取牛奶的操作* 创建2个线程对象,分别把生产者对象和消费者对象作为构造方法参数传递* 启动线程** **/public class Boxdemo {public static void main(String[] args) {Box b = new Box();producer p = new producer(b);customer c = new customer(b);Thread t1 = new Thread(p);Thread t2 = new Thread(c);t1.start();t2.start();}}
package threadsdemo;public class Box {private int milk;//定义一个奶箱的状态,true才可以进行获取方法,不然就会进行wait,进入等待private boolean status = false;public synchronized void put(int milk){if (status){try {wait();} catch (InterruptedException e) {e.printStackTrace();}}this.milk = milk;System.out.println("送奶工将第"+this.milk+"瓶奶放入奶箱");status = true;//唤醒正在等待的线程notifyAll();}public synchronized void get(){if (!status){try {wait();} catch (InterruptedException e) {e.printStackTrace();}}System.out.println("用户拿到第"+this.milk+"瓶奶");status=false;notifyAll();}}
package threadsdemo;public class producer implements Runnable{private Box b;public producer(Box b) {this.b=b;}@Overridepublic void run() {for (int i =1;i<=5;i++){b.put(i);}}}
package threadsdemo;public class customer implements Runnable{private Box b;public customer(Box b) {this.b=b;}@Overridepublic void run() {while (true){b.get();}}}
网络编程
udp
udp发送数据的步骤1、创建发送端的Socket对象(DatagramSocket)2、创建数据,并把数据打包3、调用Socket对象的方法发送数据4、关闭发送端udp接收数据的步骤1、创建接收端的Socket对象(DatagramSocket)2、创建一个数据包,用于接收数据3、调用Socket对象的方法接收数据4、解析数据包,并把数据在控制台显示5、关闭接收端
package wlbc01;import java.io.IOException;import java.net.DatagramPacket;import java.net.DatagramSocket;import java.net.InetAddress;import java.net.SocketException;import java.nio.charset.StandardCharsets;public class SendDemo {public static void main(String[] args) throws IOException {//创建发送端的Socket对象(DatagramSocket)DatagramSocket ds = new DatagramSocket();//创建数据,并把数据打包byte[] bys = "hello,udp".getBytes();// int length = bys.length;// InetAddress address = InetAddress.getByName("192.168.93.1");// int port = 10086;// DatagramPacket dp = new DatagramPacket(bys,length,address,port);//打包数据DatagramPacket dp = new DatagramPacket(bys, bys.length,InetAddress.getByName("192.168.93.1"),10086);//发送数据ds.send(dp);ds.close();}}
package wlbc01;import java.io.IOException;import java.net.DatagramPacket;import java.net.DatagramSocket;import java.net.SocketException;public class receivedemo {public static void main(String[] args) throws IOException {//创建接收端的Socket对象(DatagramSocket)DatagramSocket ds = new DatagramSocket(10086);//创建一个数据包,用于接收数据byte[] bys = new byte[1024];DatagramPacket dp = new DatagramPacket(bys, bys.length);ds.receive(dp);System.out.println(dp.getData());int len = dp.getLength();byte[] data = dp.getData();System.out.println(data);//字节数组转字符串String dataString = new String(data,0,len);System.out.println(dataString);ds.close();}}
udp案例通讯
package udpdemo;import java.io.BufferedReader;import java.io.IOException;import java.io.InputStreamReader;import java.net.*;import java.nio.charset.StandardCharsets;/*** 发送数据,当发送数据为886的时候,结束* **/public class senddemo {public static void main(String[] args) throws IOException {DatagramSocket ds = new DatagramSocket();//自己封装键盘录入,不适用ScannerBufferedReader br = new BufferedReader(new InputStreamReader(System.in));String line;while ((line=br.readLine())!=null){if ("886".equals(line)){break;}//创建数据,并打包数据byte[] bys = line.getBytes(StandardCharsets.UTF_8);DatagramPacket dp = new DatagramPacket(bys,bys.length, InetAddress.getByName("192.168.93.1"),12345);ds.send(dp);}}}
package udpdemo;import java.io.IOException;import java.net.DatagramPacket;import java.net.DatagramSocket;import java.net.SocketException;public class receive {public static void main(String[] args) throws IOException {DatagramSocket ds = new DatagramSocket(12345);while (true) {byte[] bys = new byte[1024];DatagramPacket dp = new DatagramPacket(bys, bys.length);ds.receive(dp);System.out.println(new String(dp.getData(), 0, dp.getLength()));// ds.close();}}}
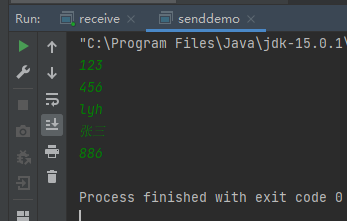
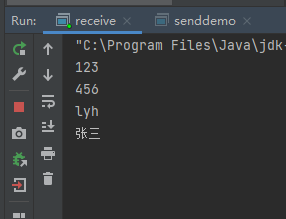
tcp
TCP发送数据创建客户端的Socket对象获取输出流,写数据释放资源TCP接收数据创建服务端的Socket对象获取输入流,读取数据,并把数据显示在控制台释放资源
tcp通讯案例
package TCP;import java.io.IOException;import java.io.OutputStream;import java.net.InetAddress;import java.net.Socket;import java.nio.charset.StandardCharsets;public class Clientdemo {public static void main(String[] args) throws IOException {// Socket s = new Socket(InetAddress.getByName("192.168.0.107"),10000);Socket s = new Socket("192.168.0.107",888);//获取输出流,写数据 在Socket中找方法// getOutputStream() 返回此套接字的输出流OutputStream os = s.getOutputStream();os.write("hellotcp".getBytes(StandardCharsets.UTF_8));// os.close();s.close();}}
package TCP;import java.io.IOException;import java.io.InputStream;import java.net.ServerSocket;import java.net.Socket;public class serverdemo {public static void main(String[] args) throws IOException {//创建服务器端的Socket对象ServerSocket s = new ServerSocket(888);//监听客户端链接,返回一个Socket对象Socket socket = s.accept();//获取输入流,读数据InputStream is = socket.getInputStream();//打印数据byte[] bys = new byte[1024];int len = is.read(bys);String data = new String(bys,0,len);System.out.println(data);// socket.close();//socket是使用s实例化出来的,关闭最前面那个就好s.close();}}
tcp通讯案例-服务器有反馈
package TCP01;import java.io.IOException;import java.io.InputStream;import java.io.OutputStream;import java.net.ServerSocket;import java.net.Socket;import java.nio.charset.StandardCharsets;public class serverdemo {public static void main(String[] args) throws IOException {ServerSocket s = new ServerSocket(1080);Socket socket = s.accept();InputStream is = socket.getInputStream();byte[] bys = new byte[1024];int len = is.read(bys);String data = new String(bys,0,len);System.out.println("服务器:"+data);//给出反馈,服务端写出数据OutputStream os = socket.getOutputStream();os.write("收到".getBytes(StandardCharsets.UTF_8));s.close();}}
package TCP01;import java.io.IOException;import java.io.InputStream;import java.io.OutputStream;import java.net.Socket;import java.nio.charset.StandardCharsets;public class clientdemo {public static void main(String[] args) throws IOException {Socket s = new Socket("192.168.0.107",1080);OutputStream os = s.getOutputStream();os.write("hello tcp".getBytes(StandardCharsets.UTF_8));//客户端收数据InputStream is = s.getInputStream();byte[] bys = new byte[1024];int len = is.read(bys);String data = new String(bys,0,len);System.out.println("客户端:"+data);s.close();}}
tcp通讯案例-手动输入写入文本
package TCP02;import java.io.*;import java.net.ServerSocket;import java.net.Socket;public class serverdemo {public static void main(String[] args) throws IOException {ServerSocket s = new ServerSocket(1079);Socket socket = s.accept();//接收数据BufferedReader br = new BufferedReader(new InputStreamReader(socket.getInputStream()));//把数据写入文本文件BufferedWriter bw = new BufferedWriter(new FileWriter("F:\\idea\\ideaprojects\\pachong\\src\\main\\java\\TCP02\\tcp02.txt"));String line;while ((line= br.readLine())!=null){bw.write(line);bw.newLine();bw.flush();}s.close();}}
package TCP02;import java.io.*;import java.net.Socket;public class clientdemo {public static void main(String[] args) throws IOException {Socket s = new Socket("192.168.0.107",1079);//数据来自于键盘录入BufferedReader br = new BufferedReader(new InputStreamReader(System.in));//封装输出流对象BufferedWriter bw = new BufferedWriter(new OutputStreamWriter(s.getOutputStream()));String line;while ((line=br.readLine())!=null){if ("886".equals(line)){break;}bw.write(line);bw.newLine();bw.flush();}s.close();}}
tcp通讯案例-文本到文本
package TCP03;import java.io.*;import java.net.ServerSocket;import java.net.Socket;public class serverdemo {public static void main(String[] args) throws IOException {ServerSocket s = new ServerSocket(1078);Socket socket = s.accept();//接收数据BufferedReader br = new BufferedReader(new InputStreamReader(socket.getInputStream()));//把数据写入文本文件BufferedWriter bw = new BufferedWriter(new FileWriter("F:\\idea\\ideaprojects\\pachong\\src\\main\\java\\TCP03\\tcp3.txt"));String line;while ((line= br.readLine())!=null){bw.write(line);bw.newLine();bw.flush();}s.close();}}
package TCP03;import java.io.*;import java.net.Socket;public class clientdemo {public static void main(String[] args) throws IOException {Socket s = new Socket("192.168.0.107",1078);//封装文本文件的数据BufferedReader br = new BufferedReader(new FileReader("F:\\idea\\ideaprojects\\pachong\\src\\main\\java\\TCP02\\tcp02.txt"));//封装输出流写写数据BufferedWriter bw = new BufferedWriter(new OutputStreamWriter(s.getOutputStream()));String line;while ((line= br.readLine())!=null){bw.write(line);bw.newLine();bw.flush();}br.close();s.close();}}
tcp通讯案例-阻塞问题及多线程
package TCP04;import java.io.IOException;import java.net.ServerSocket;import java.net.Socket;public class serverdemo {public static void main(String[] args) throws IOException {ServerSocket s = new ServerSocket(1086);while (true){Socket socket = s.accept();//为每一个客户端开启一个线程new Thread(new ServerThread(socket)).start();}}}
package TCP04;import java.io.*;import java.net.Socket;public class ServerThread implements Runnable {private Socket socket;public ServerThread(Socket socket) {this.socket=socket;}@Overridepublic void run() {//接收数据写到文本文件try {BufferedReader br = new BufferedReader(new InputStreamReader(socket.getInputStream()));// BufferedWriter bw = new BufferedWriter(new FileWriter("F:\\idea\\ideaprojects\\pachong\\src\\main\\java\\TCP04\\tcp04.txt"));int count = 0;File file = new File("F:\\idea\\ideaprojects\\pachong\\src\\main\\java\\TCP04\\tcp["+count+"].txt");while (file.exists()){count++;file = new File("F:\\idea\\ideaprojects\\pachong\\src\\main\\java\\TCP04\\tcp["+count+"].txt");}BufferedWriter bw = new BufferedWriter(new FileWriter(file));String line;while ((line= br.readLine())!=null){bw.write(line);bw.newLine();bw.flush();}//给出反馈BufferedWriter bwserver = new BufferedWriter(new OutputStreamWriter(socket.getOutputStream()));bwserver.write("文件上传成功");bwserver.newLine();bwserver.flush();socket.close();} catch (IOException e) {e.printStackTrace();}}}
package TCP04;import java.io.*;import java.net.Socket;public class clientdemo {public static void main(String[] args) throws IOException {Socket s = new Socket("192.168.0.107",1086);//封装文本文件的数据BufferedReader br = new BufferedReader(new FileReader("F:\\idea\\ideaprojects\\pachong\\src\\main\\java\\TCP02\\tcp02.txt"));//封装输出流写写数据BufferedWriter bw = new BufferedWriter(new OutputStreamWriter(s.getOutputStream()));String line;while ((line= br.readLine())!=null){bw.write(line);bw.newLine();bw.flush();}//自定义结束标记,当服务端接收到就会关闭接收,不然服务端就会继续保持接收状态,而客户端已经在等待反馈了,就会卡死// bw.write("886");// bw.newLine();// bw.flush();//停止上面的套接字,官方解决阻塞方法s.shutdownOutput();BufferedReader brclient = new BufferedReader(new InputStreamReader(s.getInputStream()));String data = brclient.readLine();System.out.println("服务器反馈:"+data);br.close();s.close();}}
lambda
标准格式
格式:(形式参数)->{代码块}形式参数:如果有多个参数,参数之间用逗号隔开,没有参数,留空即可->:固定写法,代表指定动作代码块:具体要做的事情,也就是以前写的方法体内容使用前提:有一个接口接口中有且仅有一个抽象方法Lambda和匿名内部类,都代表一个接口的匿名实现----某网友lambda表达式和匿名内部类的区别:所需类型不同:匿名内部类:可以是接口、抽象类、具体类lambda表达式:只能是接口使用限制不同:如果接口中有且仅有一个抽象方法,两者都可以使用如果接口中有于一个抽象方法,不能使用lambda表达式实现原理不同:匿名内部类:编译后,产生一个单独的.class字节码文件lambda表达式:编译后,没有一个单独的.class字节码文件,对应的字节码会在运行的时候动态生成
lambdademo01
package myLambda;/*** 启动一个多线程,使用多种方式,看其中的差别和代码量**/public class lambdademo01 {public static void main(String[] args) {//正常启动一个多线程: 创建一个线程类,启动多线程// myThread mt = new myThread();// Thread thread= new Thread(mt);// thread.start();//匿名内部类的方式实现// new Thread(new Runnable() {// @Override// public void run() {// System.out.println("起飞,多线程启动了!");// }// }).start();//Lambda实现new Thread(()->{System.out.println("起飞,多线程开始启动了!");}).start();}}
lambdademo02
package myLambda01;public class eatabledemo {public static void main(String[] args) {//接口的实现类实例化一个对象,然后再传该对象给调用方法,从而成功调用eatableImpl e =new eatableImpl();useeatable(e);//使用匿名内部类实现上面的功能useeatable(new eatable() {@Overridepublic void eat() {System.out.println("继续干饭!");}});//这里在括号后面加一个.,可以变成lambda,但是和下面的有差异//使用lambda实现上面的功能useeatable(() -> {System.out.println("快速干饭!");});}//写了一个方法调用eat方法,但是不能之间调用,需要eatable接口的实现类对象才可以private static void useeatable(eatable e){e.eat();}}
package myLambda01;public interface eatable {//抽象方法,需要该接口的实现类才可以调用void eat();}
package myLambda01;public class eatableImpl implements eatable{@Overridepublic void eat() {System.out.println("干饭干饭!");}}
lambdademo03 带参无返回值
package myLambda;import java.nio.charset.StandardCharsets;public class flyabledemo {public static void main(String[] args) {useflyable(new flyable() {@Overridepublic void fly(String s) {System.out.println(s);System.out.println("好好吃饭");}});System.out.println("--------------");//lambdauseflyable((String s) -> {System.out.println(s);System.out.println("好好睡觉");});}private static void useflyable(flyable f){f.fly("好好生活");}}
package myLambda;public interface flyable {void fly(String s);}
lambdademo04 带参有返回值
package myLambda;/** lambda带参有返回值:(形式参数) -> {代码块}* 参数在()里面写,返回值在代码块里面写,写返回什么就是什么,因为在接口的抽象方法里面并没有写返回值* */public class addabledemo {public static void main(String[] args) {useaddable((int x,int y) ->{// return x+y; //30return x-y; //20});}private static void useaddable(addable a){int sum = a.add(10,20);System.out.println(sum);}}
package myLambda;public interface addable {int add(int x,int y);}
接口
接口组成
接口的组成常量public static final抽象方法public abstract默认方法Java8静态方法Java8私有方法Java9当需要增加接口中的方法的时候,如果增加抽象方法,那么就需要在实现类里面重写该方法 实现类过多时,就工作量大或者新写一个接口,然后需要该接口的实现类多实现一个接口,但是就会出现一中情况:实现类实现了很多接口静态方法,只有接口才可以调用,不能通过对象和类调用 因为当实现类实现多个接口的时候,如果不同接口中有同名静态方法,解释器就不知道是哪个的静态方法
接口静态方法
package jiekou01;public class myIFdemo {public static void main(String[] args) {myInterFace my = new myIFimp();my.show();my.method();// my.test();// myIFimp.test();// 上面都不能调用静态方法,只有接口才可以 因为当实现类实现多个接口的时候,如果不同接口中有同名静态方法,解释器就不知道是哪个的静态方法myInterFace.test();testface.test();}}
package jiekou01;public class myIFdemo {public static void main(String[] args) {myInterFace my = new myIFimp();my.show();my.method();// my.test();// myIFimp.test();// 上面都不能调用静态方法,只有接口才可以 因为当实现类实现多个接口的时候,如果不同接口中有同名静态方法,解释器就不知道是哪个的静态方法myInterFace.test();testface.test();}}
package jiekou01;public interface testface {static void test(){System.out.println("testface 中的静态方法执行了");}}
package jiekou01;public class myIFimp implements myInterFace,testface{@Overridepublic void show() {System.out.println("重写shwo方法");}}
接口默认方法
package jiekou;public class myIFdemo {public static void main(String[] args) {myInterface my = new myIFimp();my.show1();my.show2();my.show3();}}
package jiekou;public interface myInterface {void show1();void show2();//当需要增加接口中的方法的时候,如果增加抽象方法,那么就需要在实现类里面重写该方法 实现类过多时,就工作量大// 或者新写一个接口,然后需要该接口的实现类多实现一个接口,但是就会出现一中情况:实现类实现了很多接口// 这个地方是灰色的,说明可以去掉这个pubulicpublic default void show3(){System.out.println("show3");}}
package jiekou;public class myIFimp implements myInterface{@Overridepublic void show1() {System.out.println("one show1");}@Overridepublic void show2() {System.out.println("one show2");}@Overridepublic void show3() {System.out.println("one show3");}}
package jiekou;public class myIFimptwo implements myInterface{@Overridepublic void show1() {System.out.println("two show1");}@Overridepublic void show2() {System.out.println("two show2");}}
函数式接口
示例1
package hanshushijiekou;//Runnable是一个函数式接口public class runnabledemo {public static void main(String[] args) {//启动一个线程,首先需要实例化一个Thread类的对象,这个在下面的startThread方法中就完成了// 所以这里使用这个方法,里面使用匿名内部类的方式的时候,就相当于已经创建好Thread的对象,并且在重写run后startstartThread(new Runnable() {@Overridepublic void run() {System.out.println(Thread.currentThread().getName()+"线程启动");}});startThread(() -> System.out.println(Thread.currentThread().getName()+"线程启动"));}private static void startThread(Runnable runnable){// Thread r = new Thread(runnable);// r.start();new Thread(runnable).start();}}
示例2
package hanshushijiekou;import java.util.ArrayList;import java.util.Collection;import java.util.Collections;import java.util.Comparator;public class comparatordemo {public static void main(String[] args) {ArrayList<String> array = new ArrayList<String>();array.add("ccccc");array.add("aa");array.add("b");array.add("dddd");System.out.println("排序前"+array);Collections.sort(array,getComparator());System.out.println("排序后"+array);}//写一个方法,返回值类型是Comparator<String>// Comparator<String>是一个函数式接口// 如果一个方法的返回值是一个函数式接口,可以是使用lambda表达式作为结果返回private static Comparator<String> getComparator(){//匿名内部类方式实现// Comparator<String> comp = new Comparator<String>() {// @Override// public int compare(String s1, String s2) {// return s1.length()-s2.length();// }// };// return comp;// return new Comparator<String>() {// @Override// public int compare(String s1, String s2) {// return s1.length()-s2.length();// }// };// return (String s1,String s2) -> {// return s1.length()-s2.length();// };//return (s1,s2) -> s1.length() - s2.length();}}
函数式接口-Predicate、Function
package hanshishijiekou;/** Predicate<T> 常用四个方法* boolean test() 对给定的参数进行判断(判断逻辑由lambda表达式实现),返回一个布尔值* default Predicate<T> negate() 返回一个逻辑的否定,对应逻辑非* default Predicate<T> and(Predicate other) 返回一个组合判断,对应短路与* default Predicate<T> or(Predicate other) 返回一个组合判断,对应短路或** 案例条件:* 字符串数组中有多条信息,按要求拼装出来到集合ArrayList中* 满足:姓名长度大于2,年龄大于30** */import java.util.ArrayList;import java.util.function.Function;import java.util.function.Predicate;public class PredicateTest {public static void main(String[] args) {String[] strArr = {"林青霞,30", "柳岩,34", "张曼玉,35", "貂蝉,31", "王祖贤,33"};ArrayList<String> array = myFilter(strArr, s -> s.split(",")[0].length() > 2,s -> Integer.parseInt(s.split(",")[1]) > 30);System.out.println("符合条件的有:");for (String str : array) {System.out.println(str);}//其它筛选-FunctionSystem.out.println("*************");convert("100",s -> Integer.parseInt(s),a ->String.valueOf(a+566) );System.out.println("*************");String s ="林青霞,30";//三个函数似乎并不是用函数名去传递,比如这个位置会报错// convert1(s,s1 -> s1.split(",")[1],s2 -> Integer.parseInt(s1),i -> i + 70);convert1(s,s1 -> s1.split(",")[1],s2 -> Integer.parseInt(s2),i -> i + 70);//中间这里可以改成方法引用的方式convert1(s,s1 -> s1.split(",")[1],Integer::parseInt,i -> i + 70);//甚至于可以写成各种样子convert1(s,ss -> ss.split(",")[1],ss -> Integer.parseInt(ss),i -> i + 70);convert1(s,ss -> ss.split(",")[1],ss -> Integer.parseInt(ss),ss -> ss + 70);}private static ArrayList<String> myFilter(String[] strArray, Predicate<String> pre1, Predicate<String> pre2) {//创建一个数组ArrayList<String> array = new ArrayList<String>();//遍历外部传入的数组strArray里面的数据,符合条件的就添加到数组array里面for (String str : strArray) {if (pre1.and(pre2).test(str)) {array.add(str);System.out.println("录入:");System.out.println(str);System.out.println("---------");}}return array;}private static void convert(String s , Function<String,Integer> fun1,Function<Integer,String> fun2){String ss = fun1.andThen(fun2).apply(s);System.out.println(ss);}private static void convert1(String s, Function<String, String> fun1,Function<String, Integer> fun2,Function<Integer, Integer> fun3){int i = fun1.andThen(fun2).andThen(fun3).apply(s);System.out.println(i);}}
Stream流
反射
demo1
package fanshe;public class student {private String name;private int age;public String address;public student() {}private student(String name) {this.name = name;}public student(String name, int age, String address) {this.name = name;this.age = age;this.address = address;}public String getName() {return name;}public void setName(String name) {this.name = name;}public int getAge() {return age;}public void setAge(int age) {this.age = age;}public String getAddress() {return address;}public void setAddress(String address) {this.address = address;}private void function(){System.out.println("function");}public void method(){System.out.println("method");}public void method1(String s){System.out.println("method"+s);}@Overridepublic String toString() {return "student{" +"name='" + name + '\'' +", age=" + age +", address='" + address + '\'' +'}';}}
package fanshe;//反射获取构造方法并使用import java.lang.reflect.Constructor;import java.lang.reflect.InvocationTargetException;public class refl {public static void main(String[] args) throws ClassNotFoundException, NoSuchMethodException, InvocationTargetException, InstantiationException, IllegalAccessException {Class<?> c = Class.forName("fanshe.student");//getDeclaredConstructor获取私有的构造方法Constructor<?> con = c.getDeclaredConstructor(String.class);//私有的构造方法不能用于实例化对象,会进行访问检查// Object obj = con.newInstance("lww");// System.out.println(obj);//暴力反射实例化对象,取消访问检查con.setAccessible(true);Object obj = con.newInstance("lww");System.out.println(obj);}}
package fanshe;//反射获取变量并使用import java.io.File;import java.lang.reflect.Constructor;import java.lang.reflect.Field;import java.lang.reflect.InvocationTargetException;public class refl01 {public static void main(String[] args) throws ClassNotFoundException, NoSuchFieldException, NoSuchMethodException, InvocationTargetException, InstantiationException, IllegalAccessException {Class<?> c = Class.forName("fanshe.student");// Field[] filds = c.getFields(); //这个是获取公有变量的,所以没有数据Field[] filds = c.getDeclaredFields(); //获取所有变量的for(Field field:filds){System.out.println(field);}//获取单个的Field fild01 = c.getField("address");// Field fild02 = c.getDeclaredField("address");//获取无参构造方法创建对象Constructor<?> con = c.getConstructor();Object obj = con.newInstance();//Field类中有一个set方法 给obj对象的成员变量address赋值为szfild01.set(obj,"sz");System.out.println(obj);}}
demo2
package fanshe;public class stu {private String name;int age;public String address;public stu() {}private stu(String name) {this.name = name;}stu(String name, int age) {this.name = name;this.age = age;}public stu(String name, int age, String address) {this.name = name;this.age = age;this.address = address;}public String getName() {return name;}public void setName(String name) {this.name = name;}public int getAge() {return age;}public void setAge(int age) {this.age = age;}public String getAddress() {return address;}public void setAddress(String address) {this.address = address;}@Overridepublic String toString() {return "stu{" +"name='" + name + '\'' +", age=" + age +", address='" + address + '\'' +'}';}}
package fanshe;import java.lang.reflect.Constructor;import java.lang.reflect.Field;import java.lang.reflect.InvocationTargetException;public class refl02 {public static void main(String[] args) throws ClassNotFoundException, NoSuchMethodException, InvocationTargetException, InstantiationException, IllegalAccessException, NoSuchFieldException {Class<?> c = Class.forName("fanshe.stu");Constructor<?> con = c.getConstructor();Object obj = con.newInstance();Field nameF = c.getDeclaredField("name");nameF.setAccessible(true);//私有变量访问受限,有访问检查,暴力访问nameF.set(obj,"lww");System.out.println(obj);Field ageF = c.getDeclaredField("age");// ageF.setAccessible(true);ageF.set(obj,20);System.out.println(obj);Field addressF = c.getDeclaredField("address");addressF.set(obj,"sz");System.out.println(obj);}}
demo3
package fanshe;//获取方法并使用import java.lang.reflect.Constructor;import java.lang.reflect.InvocationTargetException;import java.lang.reflect.Method;public class refl03 {public static void main(String[] args) throws ClassNotFoundException, NoSuchMethodException, InvocationTargetException, InstantiationException, IllegalAccessException {Class<?> c = Class.forName("fanshe.stu");// Method[] methods = c.getMethods();Method[] methods = c.getDeclaredMethods();for (Method method:methods){System.out.println(method);}System.out.println("------");//获取单个方法Method method1 = c.getMethod("method1");Constructor<?> con = c.getConstructor();Object obj = con.newInstance();method1.invoke(obj);}}
demo4
package fanshe;//反射获取成员方法并使用练习import java.lang.reflect.Constructor;import java.lang.reflect.InvocationTargetException;import java.lang.reflect.Method;public class refl01 {public static void main(String[] args) throws ClassNotFoundException, NoSuchMethodException, InvocationTargetException, InstantiationException, IllegalAccessException {Class<?> c = Class.forName("fanshe.stu");Constructor<?> con = c.getConstructor();Object obj = con.newInstance();Method m1 = c.getMethod("method1");m1.setAccessible(true);m1.invoke(obj);Method m2 = c.getMethod("method2", String.class);m2.invoke(obj,"lww");Method m3 = c.getMethod("method3", String.class, int.class);Object o = m3.invoke(obj, " lww", 30);System.out.println(o);Method f = c.getDeclaredMethod("function");f.setAccessible(true);f.invoke(obj);}}
demo5
package fanshe1;import java.io.FileNotFoundException;import java.io.FileReader;import java.io.IOException;import java.lang.reflect.Constructor;import java.lang.reflect.InvocationTargetException;import java.lang.reflect.Method;import java.util.Properties;public class fefl02 {public static void main(String[] args) throws IOException, ClassNotFoundException, NoSuchMethodException, InvocationTargetException, InstantiationException, IllegalAccessException {/** class.txt* className=fanshe1.stu* methodName=study* */Properties prop = new Properties();//加载使用的类FileReader fr = new FileReader("F:\\idea\\ideaprojects\\helloworld\\wangluobiancheng\\src\\fanshe1\\class.txt");// FileReader fr = new FileReader("wangluobiaocheng\\fanshe1\\class.txt");prop.load(fr);fr.close();String className = prop.getProperty("className");String methodName = prop.getProperty("methodName");Class<?> c = Class.forName(className);//fanshe1.stuConstructor<?> con = c.getConstructor();Object obj = con.newInstance();Method m = c.getMethod(methodName);//studym.invoke(obj);}}
className=fanshe1.stumethodName=study
package fanshe1;public class stu {public void study(){System.out.println("hhxx,ttxs");}}
注解
demo
package zhujie;import java.lang.annotation.ElementType;import java.lang.annotation.Retention;import java.lang.annotation.RetentionPolicy;import java.lang.annotation.Target;@Retention(RetentionPolicy.RUNTIME)@Target(ElementType.METHOD)public @interface Check {}
package zhujie;public class calc {@Checkpublic void add(){System.out.println("1+0="+(1+0));}@Checkpublic void div(){System.out.println("1/0="+(1/0));//这个位置有一个除0异常,分母不能为0}}
package zhujie;import java.io.BufferedWriter;import java.io.FileWriter;import java.io.IOException;import java.lang.reflect.InvocationTargetException;import java.lang.reflect.Method;public class testCheck {public static void main(String[] args) throws IOException {calc c = new calc();Class<? extends calc> cls = c.getClass();Method[] methods = cls.getMethods();int num = 0;BufferedWriter bw = new BufferedWriter(new FileWriter("BUG.txt"));for (Method method : methods) {if (method.isAnnotationPresent(Check.class)){try {method.invoke(c);} catch (Exception e) {num ++;bw.write(method.getName()+"方法出异常");bw.newLine();bw.write("异常名称:"+e.getCause().getClass().getSimpleName());bw.newLine();bw.write("异常原因:"+e.getCause().getMessage());bw.newLine();bw.write("----------------");bw.newLine();}}}bw.write("一共"+num+"次异常");bw.flush();bw.close();}}
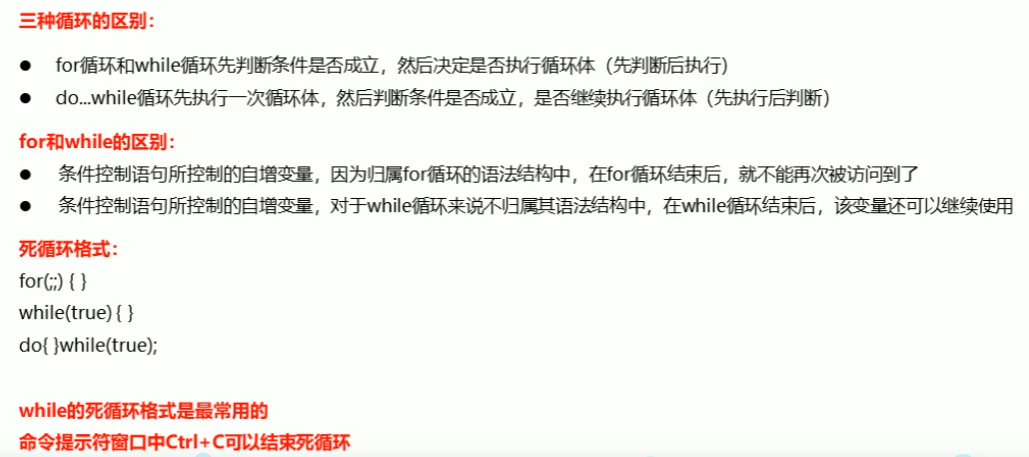
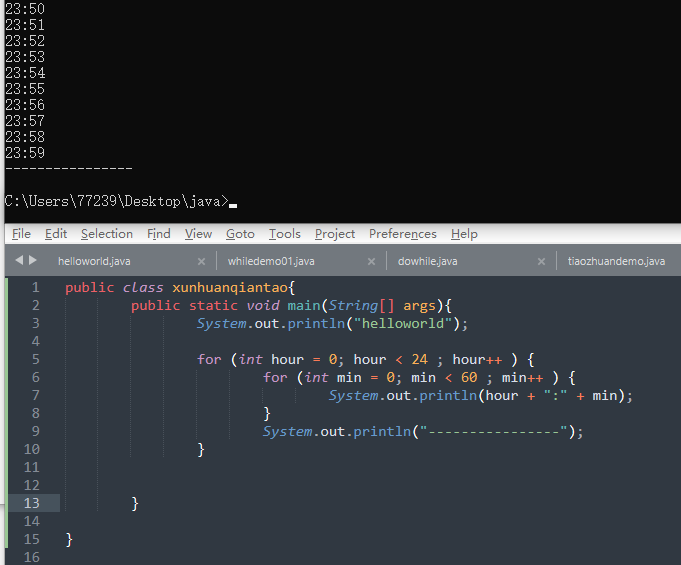
 、
、
