SpringSecurity
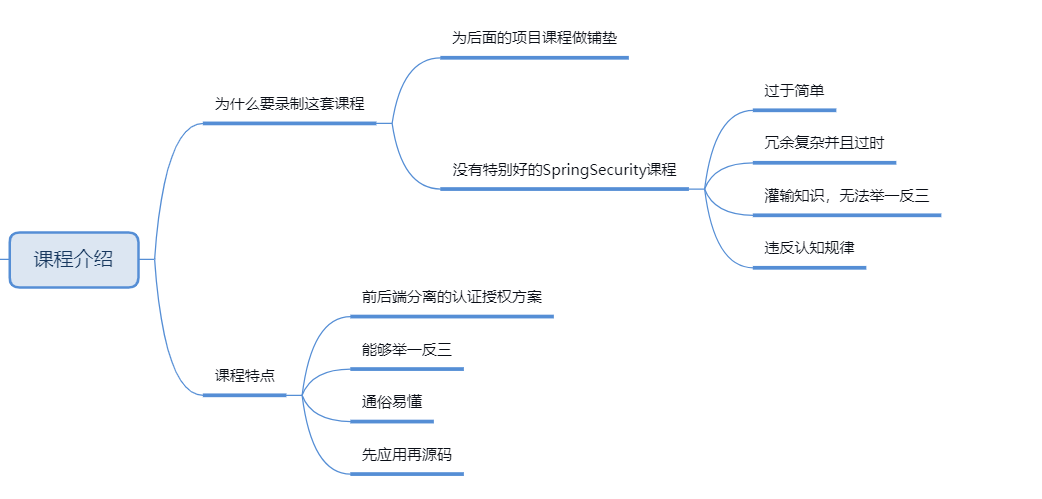
课程介绍
0. 简介
**Spring Security** 是 Spring 家族中的一个安全管理框架。相比与另外一个安全框架**Shiro**,它提供了更丰富的功能,社区资源也比Shiro丰富。一般来说中大型的项目都是使用**SpringSecurity** 来做安全框架。小项目有Shiro的比较多,因为相比与SpringSecurity,Shiro的上手更加的简单。一般Web应用的需要进行**认证**和**授权**。**认证:验证当前访问系统的是不是本系统的用户,并且要确认具体是哪个用户****授权:经过认证后判断当前用户是否有权限进行某个操作**而认证和授权也是SpringSecurity作为安全框架的核心功能。
1. 快速入门
1.1 准备工作
我们先要搭建一个简单的SpringBoot工程
① 设置父工程 添加依赖
<parent><groupId>org.springframework.boot</groupId><artifactId>spring-boot-starter-parent</artifactId><version>2.5.0</version></parent><dependencies><dependency><groupId>org.springframework.boot</groupId><artifactId>spring-boot-starter-web</artifactId></dependency><dependency><groupId>org.projectlombok</groupId><artifactId>lombok</artifactId><optional>true</optional></dependency></dependencies>
② 创建启动类
@SpringBootApplicationpublic class SecurityApplication {public static void main(String[] args) {SpringApplication.run(SecurityApplication.class,args);}}
③ 创建Controller
import org.springframework.web.bind.annotation.RequestMapping;import org.springframework.web.bind.annotation.RestController;@RestControllerpublic class HelloController {@RequestMapping("/hello")public String hello(){return "hello";}}
1.2 引入SpringSecurity
在SpringBoot项目中使用SpringSecurity我们只需要引入依赖即可实现入门案例。
<dependency><groupId>org.springframework.boot</groupId><artifactId>spring-boot-starter-security</artifactId></dependency>
引入依赖后我们在尝试去访问之前的接口就会自动跳转到一个SpringSecurity的默认登陆页面,默认用户名是user,密码会输出在控制台。必须登陆之后才能对接口进行访问。
2. 认证
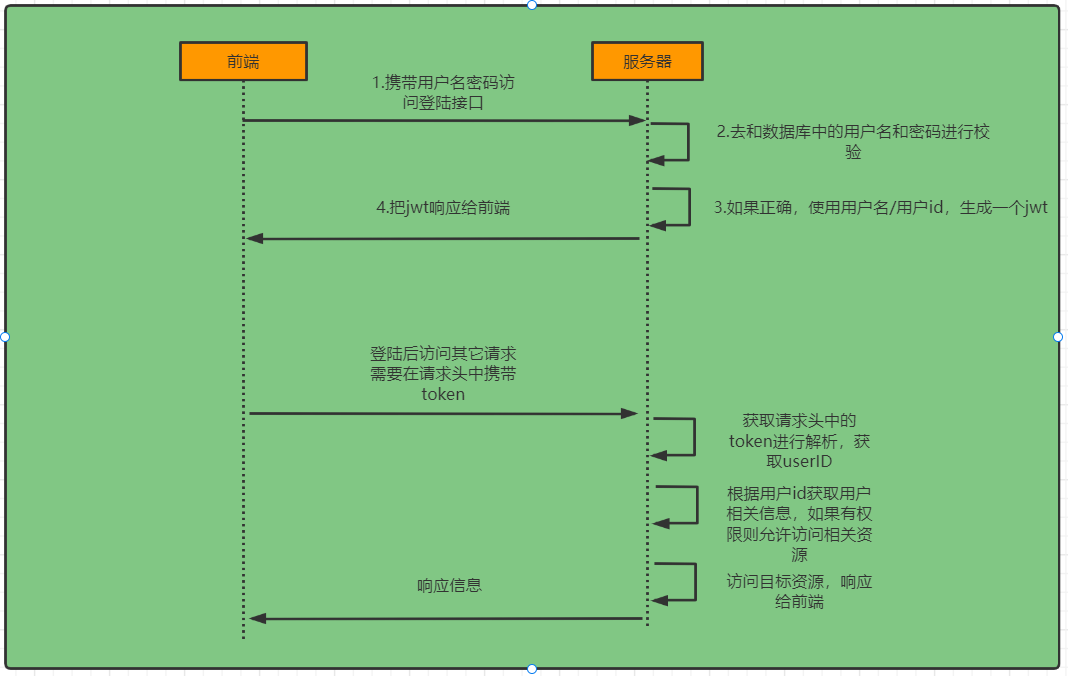
2.1 登陆校验流程
2.2 原理初探
想要知道如何实现自己的登陆流程就必须要先知道入门案例中SpringSecurity的流程。
2.2.1 SpringSecurity完整流程
SpringSecurity的原理其实就是一个过滤器链,内部包含了提供各种功能的过滤器。这里我们可以看看入门案例中的过滤器。
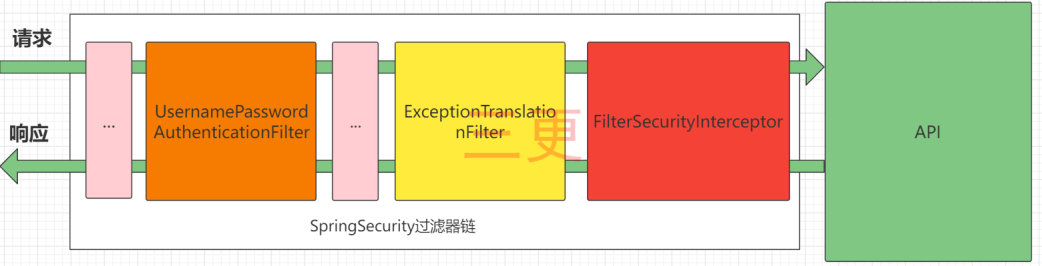
图中只展示了核心过滤器,其它的非核心过滤器并没有在图中展示。
UsernamePasswordAuthenticationFilter:负责处理我们在登陆页面填写了用户名密码后的登陆请求。入门案例的认证工作主要有它负责。
ExceptionTranslationFilter:处理过滤器链中抛出的任何AccessDeniedException和AuthenticationException 。
FilterSecurityInterceptor:负责权限校验的过滤器。
我们可以通过Debug查看当前系统中SpringSecurity过滤器链中有哪些过滤器及它们的顺序。<br />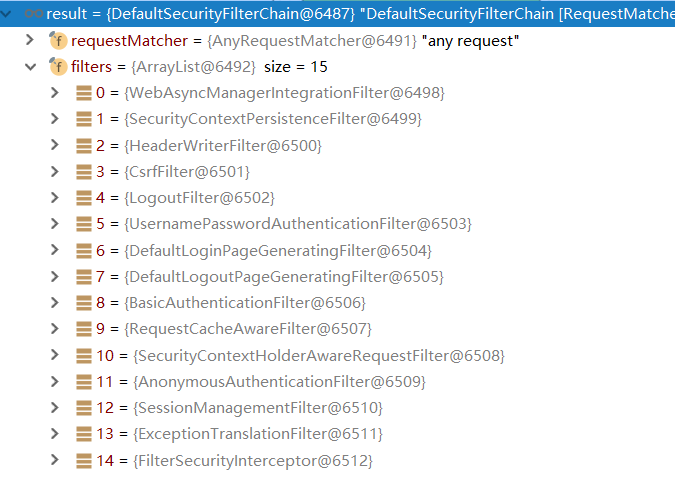
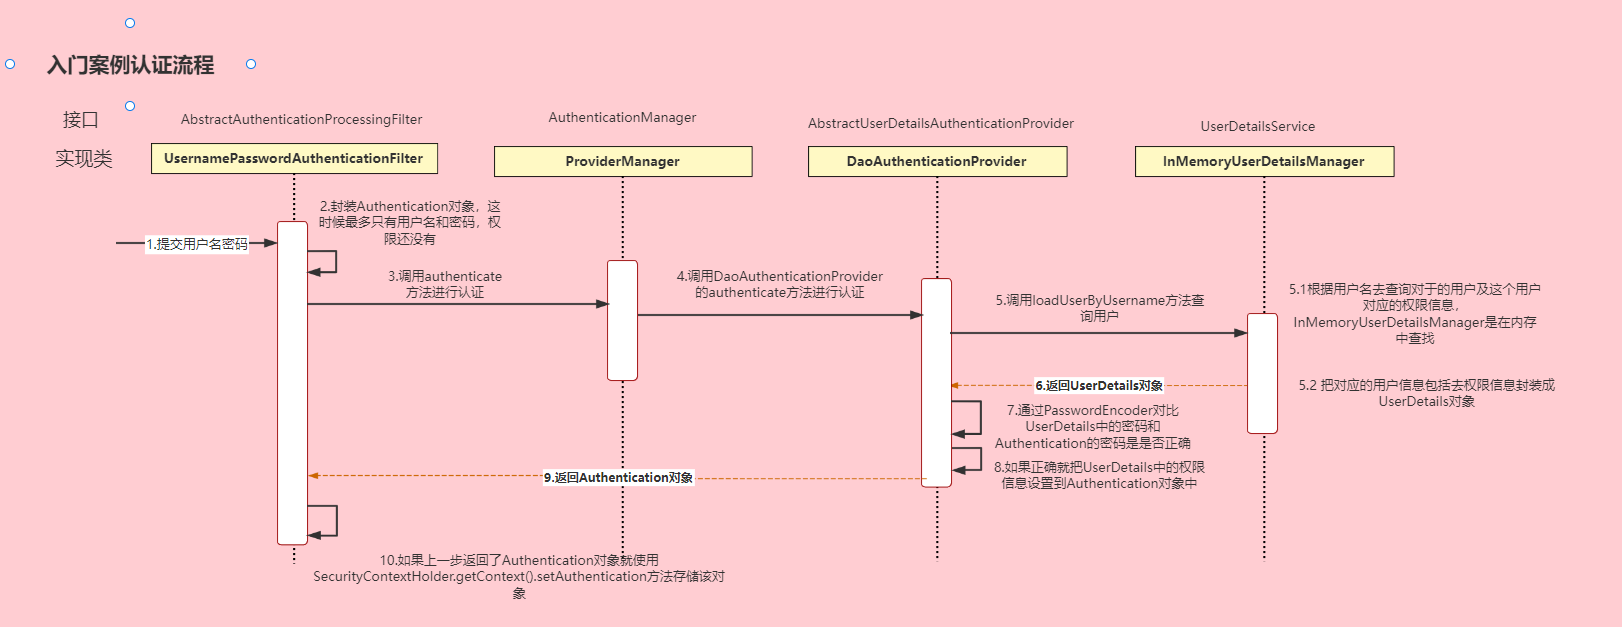
2.2.2 认证流程详解
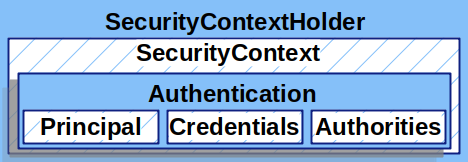
 概念速查:
概念速查:
Authentication接口: 它的实现类,表示当前访问系统的用户,封装了用户相关信息。
AuthenticationManager接口:定义了认证Authentication的方法
UserDetailsService接口:加载用户特定数据的核心接口。里面定义了一个根据用户名查询用户信息的方法。
UserDetails接口:提供核心用户信息。通过UserDetailsService根据用户名获取处理的用户信息要封装成UserDetails对象返回。然后将这些信息封装到Authentication对象中。
2.3 解决问题
2.3.1 思路分析
登录
①自定义登录接口调用ProviderManager的方法进行认证 如果认证通过生成jwt把用户信息存入redis中②自定义UserDetailsService在这个实现类中去查询数据库
校验:
①定义Jwt认证过滤器获取token解析token获取其中的userid从redis中获取用户信息存入SecurityContextHolder
2.3.2 准备工作
①添加依赖
<!--redis依赖--><dependency><groupId>org.springframework.boot</groupId><artifactId>spring-boot-starter-data-redis</artifactId></dependency><!--fastjson依赖--><dependency><groupId>com.alibaba</groupId><artifactId>fastjson</artifactId><version>1.2.33</version></dependency><!--jwt依赖--><dependency><groupId>io.jsonwebtoken</groupId><artifactId>jjwt</artifactId><version>0.9.0</version></dependency>
② 添加Redis相关配置
import com.alibaba.fastjson.JSON;import com.alibaba.fastjson.serializer.SerializerFeature;import com.fasterxml.jackson.databind.JavaType;import com.fasterxml.jackson.databind.ObjectMapper;import com.fasterxml.jackson.databind.type.TypeFactory;import org.springframework.data.redis.serializer.RedisSerializer;import org.springframework.data.redis.serializer.SerializationException;import com.alibaba.fastjson.parser.ParserConfig;import org.springframework.util.Assert;import java.nio.charset.Charset;/*** Redis使用FastJson序列化** @author sg*/public class FastJsonRedisSerializer<T> implements RedisSerializer<T>{public static final Charset DEFAULT_CHARSET = Charset.forName("UTF-8");private Class<T> clazz;static{ParserConfig.getGlobalInstance().setAutoTypeSupport(true);}public FastJsonRedisSerializer(Class<T> clazz){super();this.clazz = clazz;}@Overridepublic byte[] serialize(T t) throws SerializationException{if (t == null){return new byte[0];}return JSON.toJSONString(t, SerializerFeature.WriteClassName).getBytes(DEFAULT_CHARSET);}@Overridepublic T deserialize(byte[] bytes) throws SerializationException{if (bytes == null || bytes.length <= 0){return null;}String str = new String(bytes, DEFAULT_CHARSET);return JSON.parseObject(str, clazz);}protected JavaType getJavaType(Class<?> clazz){return TypeFactory.defaultInstance().constructType(clazz);}}
import org.springframework.context.annotation.Bean;import org.springframework.context.annotation.Configuration;import org.springframework.data.redis.connection.RedisConnectionFactory;import org.springframework.data.redis.core.RedisTemplate;import org.springframework.data.redis.serializer.StringRedisSerializer;@Configurationpublic class RedisConfig {@Bean@SuppressWarnings(value = { "unchecked", "rawtypes" })public RedisTemplate<Object, Object> redisTemplate(RedisConnectionFactory connectionFactory){RedisTemplate<Object, Object> template = new RedisTemplate<>();template.setConnectionFactory(connectionFactory);FastJsonRedisSerializer serializer = new FastJsonRedisSerializer(Object.class);// 使用StringRedisSerializer来序列化和反序列化redis的key值template.setKeySerializer(new StringRedisSerializer());template.setValueSerializer(serializer);// Hash的key也采用StringRedisSerializer的序列化方式template.setHashKeySerializer(new StringRedisSerializer());template.setHashValueSerializer(serializer);template.afterPropertiesSet();return template;}}
③ 响应类
import com.fasterxml.jackson.annotation.JsonInclude;/*** @Author 三更 B站: https://space.bilibili.com/663528522*/@JsonInclude(JsonInclude.Include.NON_NULL)public class ResponseResult<T> {/*** 状态码*/private Integer code;/*** 提示信息,如果有错误时,前端可以获取该字段进行提示*/private String msg;/*** 查询到的结果数据,*/private T data;public ResponseResult(Integer code, String msg) {this.code = code;this.msg = msg;}public ResponseResult(Integer code, T data) {this.code = code;this.data = data;}public Integer getCode() {return code;}public void setCode(Integer code) {this.code = code;}public String getMsg() {return msg;}public void setMsg(String msg) {this.msg = msg;}public T getData() {return data;}public void setData(T data) {this.data = data;}public ResponseResult(Integer code, String msg, T data) {this.code = code;this.msg = msg;this.data = data;}}
④工具类
import io.jsonwebtoken.Claims;import io.jsonwebtoken.JwtBuilder;import io.jsonwebtoken.Jwts;import io.jsonwebtoken.SignatureAlgorithm;import javax.crypto.SecretKey;import javax.crypto.spec.SecretKeySpec;import java.util.Base64;import java.util.Date;import java.util.UUID;/*** JWT工具类*/public class JwtUtil {//有效期为public static final Long JWT_TTL = 60 * 60 *1000L;// 60 * 60 *1000 一个小时//设置秘钥明文public static final String JWT_KEY = "sangeng";public static String getUUID(){String token = UUID.randomUUID().toString().replaceAll("-", "");return token;}/*** 生成jtw* @param subject token中要存放的数据(json格式)* @return*/public static String createJWT(String subject) {JwtBuilder builder = getJwtBuilder(subject, null, getUUID());// 设置过期时间return builder.compact();}/*** 生成jtw* @param subject token中要存放的数据(json格式)* @param ttlMillis token超时时间* @return*/public static String createJWT(String subject, Long ttlMillis) {JwtBuilder builder = getJwtBuilder(subject, ttlMillis, getUUID());// 设置过期时间return builder.compact();}private static JwtBuilder getJwtBuilder(String subject, Long ttlMillis, String uuid) {SignatureAlgorithm signatureAlgorithm = SignatureAlgorithm.HS256;SecretKey secretKey = generalKey();long nowMillis = System.currentTimeMillis();Date now = new Date(nowMillis);if(ttlMillis==null){ttlMillis=JwtUtil.JWT_TTL;}long expMillis = nowMillis + ttlMillis;Date expDate = new Date(expMillis);return Jwts.builder().setId(uuid) //唯一的ID.setSubject(subject) // 主题 可以是JSON数据.setIssuer("sg") // 签发者.setIssuedAt(now) // 签发时间.signWith(signatureAlgorithm, secretKey) //使用HS256对称加密算法签名, 第二个参数为秘钥.setExpiration(expDate);}/*** 创建token* @param id* @param subject* @param ttlMillis* @return*/public static String createJWT(String id, String subject, Long ttlMillis) {JwtBuilder builder = getJwtBuilder(subject, ttlMillis, id);// 设置过期时间return builder.compact();}public static void main(String[] args) throws Exception {String token = "eyJhbGciOiJIUzI1NiJ9.eyJqdGkiOiJjYWM2ZDVhZi1mNjVlLTQ0MDAtYjcxMi0zYWEwOGIyOTIwYjQiLCJzdWIiOiJzZyIsImlzcyI6InNnIiwiaWF0IjoxNjM4MTA2NzEyLCJleHAiOjE2MzgxMTAzMTJ9.JVsSbkP94wuczb4QryQbAke3ysBDIL5ou8fWsbt_ebg";Claims claims = parseJWT(token);System.out.println(claims);}/*** 生成加密后的秘钥 secretKey* @return*/public static SecretKey generalKey() {byte[] encodedKey = Base64.getDecoder().decode(JwtUtil.JWT_KEY);SecretKey key = new SecretKeySpec(encodedKey, 0, encodedKey.length, "AES");return key;}/*** 解析** @param jwt* @return* @throws Exception*/public static Claims parseJWT(String jwt) throws Exception {SecretKey secretKey = generalKey();return Jwts.parser().setSigningKey(secretKey).parseClaimsJws(jwt).getBody();}}
import java.util.*;import java.util.concurrent.TimeUnit;@SuppressWarnings(value = { "unchecked", "rawtypes" })@Componentpublic class RedisCache{@Autowiredpublic RedisTemplate redisTemplate;/*** 缓存基本的对象,Integer、String、实体类等** @param key 缓存的键值* @param value 缓存的值*/public <T> void setCacheObject(final String key, final T value){redisTemplate.opsForValue().set(key, value);}/*** 缓存基本的对象,Integer、String、实体类等** @param key 缓存的键值* @param value 缓存的值* @param timeout 时间* @param timeUnit 时间颗粒度*/public <T> void setCacheObject(final String key, final T value, final Integer timeout, final TimeUnit timeUnit){redisTemplate.opsForValue().set(key, value, timeout, timeUnit);}/*** 设置有效时间** @param key Redis键* @param timeout 超时时间* @return true=设置成功;false=设置失败*/public boolean expire(final String key, final long timeout){return expire(key, timeout, TimeUnit.SECONDS);}/*** 设置有效时间** @param key Redis键* @param timeout 超时时间* @param unit 时间单位* @return true=设置成功;false=设置失败*/public boolean expire(final String key, final long timeout, final TimeUnit unit){return redisTemplate.expire(key, timeout, unit);}/*** 获得缓存的基本对象。** @param key 缓存键值* @return 缓存键值对应的数据*/public <T> T getCacheObject(final String key){ValueOperations<String, T> operation = redisTemplate.opsForValue();return operation.get(key);}/*** 删除单个对象** @param key*/public boolean deleteObject(final String key){return redisTemplate.delete(key);}/*** 删除集合对象** @param collection 多个对象* @return*/public long deleteObject(final Collection collection){return redisTemplate.delete(collection);}/*** 缓存List数据** @param key 缓存的键值* @param dataList 待缓存的List数据* @return 缓存的对象*/public <T> long setCacheList(final String key, final List<T> dataList){Long count = redisTemplate.opsForList().rightPushAll(key, dataList);return count == null ? 0 : count;}/*** 获得缓存的list对象** @param key 缓存的键值* @return 缓存键值对应的数据*/public <T> List<T> getCacheList(final String key){return redisTemplate.opsForList().range(key, 0, -1);}/*** 缓存Set** @param key 缓存键值* @param dataSet 缓存的数据* @return 缓存数据的对象*/public <T> BoundSetOperations<String, T> setCacheSet(final String key, final Set<T> dataSet){BoundSetOperations<String, T> setOperation = redisTemplate.boundSetOps(key);Iterator<T> it = dataSet.iterator();while (it.hasNext()){setOperation.add(it.next());}return setOperation;}/*** 获得缓存的set** @param key* @return*/public <T> Set<T> getCacheSet(final String key){return redisTemplate.opsForSet().members(key);}/*** 缓存Map** @param key* @param dataMap*/public <T> void setCacheMap(final String key, final Map<String, T> dataMap){if (dataMap != null) {redisTemplate.opsForHash().putAll(key, dataMap);}}/*** 获得缓存的Map** @param key* @return*/public <T> Map<String, T> getCacheMap(final String key){return redisTemplate.opsForHash().entries(key);}/*** 往Hash中存入数据** @param key Redis键* @param hKey Hash键* @param value 值*/public <T> void setCacheMapValue(final String key, final String hKey, final T value){redisTemplate.opsForHash().put(key, hKey, value);}/*** 获取Hash中的数据** @param key Redis键* @param hKey Hash键* @return Hash中的对象*/public <T> T getCacheMapValue(final String key, final String hKey){HashOperations<String, String, T> opsForHash = redisTemplate.opsForHash();return opsForHash.get(key, hKey);}/*** 删除Hash中的数据** @param key* @param hkey*/public void delCacheMapValue(final String key, final String hkey){HashOperations hashOperations = redisTemplate.opsForHash();hashOperations.delete(key, hkey);}/*** 获取多个Hash中的数据** @param key Redis键* @param hKeys Hash键集合* @return Hash对象集合*/public <T> List<T> getMultiCacheMapValue(final String key, final Collection<Object> hKeys){return redisTemplate.opsForHash().multiGet(key, hKeys);}/*** 获得缓存的基本对象列表** @param pattern 字符串前缀* @return 对象列表*/public Collection<String> keys(final String pattern){return redisTemplate.keys(pattern);}}
import javax.servlet.http.HttpServletResponse;import java.io.IOException;public class WebUtils{/*** 将字符串渲染到客户端** @param response 渲染对象* @param string 待渲染的字符串* @return null*/public static String renderString(HttpServletResponse response, String string) {try{response.setStatus(200);response.setContentType("application/json");response.setCharacterEncoding("utf-8");response.getWriter().print(string);}catch (IOException e){e.printStackTrace();}return null;}}
⑤实体类
import java.io.Serializable;import java.util.Date;/*** 用户表(User)实体类** @author 三更*/@Data@AllArgsConstructor@NoArgsConstructorpublic class User implements Serializable {private static final long serialVersionUID = -40356785423868312L;/*** 主键*/private Long id;/*** 用户名*/private String userName;/*** 昵称*/private String nickName;/*** 密码*/private String password;/*** 账号状态(0正常 1停用)*/private String status;/*** 邮箱*/private String email;/*** 手机号*/private String phonenumber;/*** 用户性别(0男,1女,2未知)*/private String sex;/*** 头像*/private String avatar;/*** 用户类型(0管理员,1普通用户)*/private String userType;/*** 创建人的用户id*/private Long createBy;/*** 创建时间*/private Date createTime;/*** 更新人*/private Long updateBy;/*** 更新时间*/private Date updateTime;/*** 删除标志(0代表未删除,1代表已删除)*/private Integer delFlag;}
2.3.3 实现
2.3.3.1 数据库校验用户
从之前的分析我们可以知道,我们可以自定义一个UserDetailsService,让SpringSecurity使用我们的UserDetailsService。我们自己的UserDetailsService可以从数据库中查询用户名和密码。
准备工作
我们先创建一个用户表, 建表语句如下:
CREATE TABLE `sys_user` (`id` BIGINT(20) NOT NULL AUTO_INCREMENT COMMENT '主键',`user_name` VARCHAR(64) NOT NULL DEFAULT 'NULL' COMMENT '用户名',`nick_name` VARCHAR(64) NOT NULL DEFAULT 'NULL' COMMENT '昵称',`password` VARCHAR(64) NOT NULL DEFAULT 'NULL' COMMENT '密码',`status` CHAR(1) DEFAULT '0' COMMENT '账号状态(0正常 1停用)',`email` VARCHAR(64) DEFAULT NULL COMMENT '邮箱',`phonenumber` VARCHAR(32) DEFAULT NULL COMMENT '手机号',`sex` CHAR(1) DEFAULT NULL COMMENT '用户性别(0男,1女,2未知)',`avatar` VARCHAR(128) DEFAULT NULL COMMENT '头像',`user_type` CHAR(1) NOT NULL DEFAULT '1' COMMENT '用户类型(0管理员,1普通用户)',`create_by` BIGINT(20) DEFAULT NULL COMMENT '创建人的用户id',`create_time` DATETIME DEFAULT NULL COMMENT '创建时间',`update_by` BIGINT(20) DEFAULT NULL COMMENT '更新人',`update_time` DATETIME DEFAULT NULL COMMENT '更新时间',`del_flag` INT(11) DEFAULT '0' COMMENT '删除标志(0代表未删除,1代表已删除)',PRIMARY KEY (`id`)) ENGINE=INNODB AUTO_INCREMENT=2 DEFAULT CHARSET=utf8mb4 COMMENT='用户表'
引入MybatisPuls和mysql驱动的依赖
<dependency><groupId>com.baomidou</groupId><artifactId>mybatis-plus-boot-starter</artifactId><version>3.4.3</version></dependency><dependency><groupId>mysql</groupId><artifactId>mysql-connector-java</artifactId></dependency>
配置数据库信息
spring:datasource:url: jdbc:mysql://localhost:3306/sg_security?characterEncoding=utf-8&serverTimezone=UTCusername: rootpassword: rootdriver-class-name: com.mysql.cj.jdbc.Driver
定义Mapper接口
public interface UserMapper extends BaseMapper<User> {}
修改User实体类
类名上加@TableName(value = "sys_user") ,id字段上加 @TableId
配置Mapper扫描
@SpringBootApplication@MapperScan("com.sangeng.mapper")public class SimpleSecurityApplication {public static void main(String[] args) {ConfigurableApplicationContext run = SpringApplication.run(SimpleSecurityApplication.class);System.out.println(run);}}
添加junit依赖
<dependency><groupId>org.springframework.boot</groupId><artifactId>spring-boot-starter-test</artifactId></dependency>
测试MP是否能正常使用
/*** @Author 三更 B站: https://space.bilibili.com/663528522*/@SpringBootTestpublic class MapperTest {@Autowiredprivate UserMapper userMapper;@Testpublic void testUserMapper(){List<User> users = userMapper.selectList(null);System.out.println(users);}}
核心代码实现
创建一个类实现UserDetailsService接口,重写其中的方法。更加用户名从数据库中查询用户信息
/*** @Author 三更 B站: https://space.bilibili.com/663528522*/@Servicepublic class UserDetailsServiceImpl implements UserDetailsService {@Autowiredprivate UserMapper userMapper;@Overridepublic UserDetails loadUserByUsername(String username) throws UsernameNotFoundException {//根据用户名查询用户信息LambdaQueryWrapper<User> wrapper = new LambdaQueryWrapper<>();wrapper.eq(User::getUserName,username);User user = userMapper.selectOne(wrapper);//如果查询不到数据就通过抛出异常来给出提示if(Objects.isNull(user)){throw new RuntimeException("用户名或密码错误");}//TODO 根据用户查询权限信息 添加到LoginUser中//封装成UserDetails对象返回return new LoginUser(user);}}
因为UserDetailsService方法的返回值是UserDetails类型,所以需要定义一个类,实现该接口,把用户信息封装在其中。
/*** @Author 三更 B站: https://space.bilibili.com/663528522*/@Data@NoArgsConstructor@AllArgsConstructorpublic class LoginUser implements UserDetails {private User user;@Overridepublic Collection<? extends GrantedAuthority> getAuthorities() {return null;}@Overridepublic String getPassword() {return user.getPassword();}@Overridepublic String getUsername() {return user.getUserName();}@Overridepublic boolean isAccountNonExpired() {return true;}@Overridepublic boolean isAccountNonLocked() {return true;}@Overridepublic boolean isCredentialsNonExpired() {return true;}@Overridepublic boolean isEnabled() {return true;}}
注意:如果要测试,需要往用户表中写入用户数据,并且如果你想让用户的密码是明文存储,需要在密码前加{noop}。例如
这样登陆的时候就可以用sg作为用户名,1234作为密码来登陆了。
2.3.3.2 密码加密存储
实际项目中我们不会把密码明文存储在数据库中。默认使用的PasswordEncoder要求数据库中的密码格式为:{id}password 。它会根据id去判断密码的加密方式。但是我们一般不会采用这种方式。所以就需要替换PasswordEncoder。我们一般使用SpringSecurity为我们提供的BCryptPasswordEncoder。我们只需要使用把BCryptPasswordEncoder对象注入Spring容器中,SpringSecurity就会使用该PasswordEncoder来进行密码校验。我们可以定义一个SpringSecurity的配置类,SpringSecurity要求这个配置类要继承WebSecurityConfigurerAdapter。
/*** @Author 三更 B站: https://space.bilibili.com/663528522*/@Configurationpublic class SecurityConfig extends WebSecurityConfigurerAdapter {@Beanpublic PasswordEncoder passwordEncoder(){return new BCryptPasswordEncoder();}}
2.3.3.3 登陆接口
接下我们需要自定义登陆接口,然后让SpringSecurity对这个接口放行,让用户访问这个接口的时候不用登录也能访问。在接口中我们通过AuthenticationManager的authenticate方法来进行用户认证,所以需要在SecurityConfig中配置把AuthenticationManager注入容器。认证成功的话要生成一个jwt,放入响应中返回。并且为了让用户下回请求时能通过jwt识别出具体的是哪个用户,我们需要把用户信息存入redis,可以把用户id作为key。
@RestControllerpublic class LoginController {@Autowiredprivate LoginServcie loginServcie;@PostMapping("/user/login")public ResponseResult login(@RequestBody User user){return loginServcie.login(user);}}
/*** @Author 三更 B站: https://space.bilibili.com/663528522*/@Configurationpublic class SecurityConfig extends WebSecurityConfigurerAdapter {@Beanpublic PasswordEncoder passwordEncoder(){return new BCryptPasswordEncoder();}@Overrideprotected void configure(HttpSecurity http) throws Exception {http//关闭csrf.csrf().disable()//不通过Session获取SecurityContext.sessionManagement().sessionCreationPolicy(SessionCreationPolicy.STATELESS).and().authorizeRequests()// 对于登录接口 允许匿名访问.antMatchers("/user/login").anonymous()// 除上面外的所有请求全部需要鉴权认证.anyRequest().authenticated();}@Bean@Overridepublic AuthenticationManager authenticationManagerBean() throws Exception {return super.authenticationManagerBean();}}
@Servicepublic class LoginServiceImpl implements LoginServcie {@Autowiredprivate AuthenticationManager authenticationManager;@Autowiredprivate RedisCache redisCache;@Overridepublic ResponseResult login(User user) {UsernamePasswordAuthenticationToken authenticationToken = new UsernamePasswordAuthenticationToken(user.getUserName(),user.getPassword());Authentication authenticate = authenticationManager.authenticate(authenticationToken);if(Objects.isNull(authenticate)){throw new RuntimeException("用户名或密码错误");}//使用userid生成tokenLoginUser loginUser = (LoginUser) authenticate.getPrincipal();String userId = loginUser.getUser().getId().toString();String jwt = JwtUtil.createJWT(userId);//authenticate存入redisredisCache.setCacheObject("login:"+userId,loginUser);//把token响应给前端HashMap<String,String> map = new HashMap<>();map.put("token",jwt);return new ResponseResult(200,"登陆成功",map);}}
2.3.3.4 认证过滤器
我们需要自定义一个过滤器,这个过滤器会去获取请求头中的token,对token进行解析取出其中的userid。使用userid去redis中获取对应的LoginUser对象。然后封装Authentication对象存入SecurityContextHolder
@Componentpublic class JwtAuthenticationTokenFilter extends OncePerRequestFilter {@Autowiredprivate RedisCache redisCache;@Overrideprotected void doFilterInternal(HttpServletRequest request, HttpServletResponse response, FilterChain filterChain) throws ServletException, IOException {//获取tokenString token = request.getHeader("token");if (!StringUtils.hasText(token)) {//放行filterChain.doFilter(request, response);return;}//解析tokenString userid;try {Claims claims = JwtUtil.parseJWT(token);userid = claims.getSubject();} catch (Exception e) {e.printStackTrace();throw new RuntimeException("token非法");}//从redis中获取用户信息String redisKey = "login:" + userid;LoginUser loginUser = redisCache.getCacheObject(redisKey);if(Objects.isNull(loginUser)){throw new RuntimeException("用户未登录");}//存入SecurityContextHolder//TODO 获取权限信息封装到Authentication中UsernamePasswordAuthenticationToken authenticationToken =new UsernamePasswordAuthenticationToken(loginUser,null,null);SecurityContextHolder.getContext().setAuthentication(authenticationToken);//放行filterChain.doFilter(request, response);}}
/*** @Author 三更 B站: https://space.bilibili.com/663528522*/@Configurationpublic class SecurityConfig extends WebSecurityConfigurerAdapter {@Beanpublic PasswordEncoder passwordEncoder(){return new BCryptPasswordEncoder();}@AutowiredJwtAuthenticationTokenFilter jwtAuthenticationTokenFilter;@Overrideprotected void configure(HttpSecurity http) throws Exception {http//关闭csrf.csrf().disable()//不通过Session获取SecurityContext.sessionManagement().sessionCreationPolicy(SessionCreationPolicy.STATELESS).and().authorizeRequests()// 对于登录接口 允许匿名访问.antMatchers("/user/login").anonymous()// 除上面外的所有请求全部需要鉴权认证.anyRequest().authenticated();//把token校验过滤器添加到过滤器链中http.addFilterBefore(jwtAuthenticationTokenFilter, UsernamePasswordAuthenticationFilter.class);}@Bean@Overridepublic AuthenticationManager authenticationManagerBean() throws Exception {return super.authenticationManagerBean();}}
2.3.3.5 退出登陆
我们只需要定义一个登陆接口,然后获取SecurityContextHolder中的认证信息,删除redis中对应的数据即可。
/*** @Author 三更 B站: https://space.bilibili.com/663528522*/@Servicepublic class LoginServiceImpl implements LoginServcie {@Autowiredprivate AuthenticationManager authenticationManager;@Autowiredprivate RedisCache redisCache;@Overridepublic ResponseResult login(User user) {UsernamePasswordAuthenticationToken authenticationToken = new UsernamePasswordAuthenticationToken(user.getUserName(),user.getPassword());Authentication authenticate = authenticationManager.authenticate(authenticationToken);if(Objects.isNull(authenticate)){throw new RuntimeException("用户名或密码错误");}//使用userid生成tokenLoginUser loginUser = (LoginUser) authenticate.getPrincipal();String userId = loginUser.getUser().getId().toString();String jwt = JwtUtil.createJWT(userId);//authenticate存入redisredisCache.setCacheObject("login:"+userId,loginUser);//把token响应给前端HashMap<String,String> map = new HashMap<>();map.put("token",jwt);return new ResponseResult(200,"登陆成功",map);}@Overridepublic ResponseResult logout() {Authentication authentication = SecurityContextHolder.getContext().getAuthentication();LoginUser loginUser = (LoginUser) authentication.getPrincipal();Long userid = loginUser.getUser().getId();redisCache.deleteObject("login:"+userid);return new ResponseResult(200,"退出成功");}}
3. 授权
3.0 权限系统的作用
例如一个学校图书馆的管理系统,如果是普通学生登录就能看到借书还书相关的功能,不可能让他看到并且去使用添加书籍信息,删除书籍信息等功能。但是如果是一个图书馆管理员的账号登录了,应该就能看到并使用添加书籍信息,删除书籍信息等功能。总结起来就是**不同的用户可以使用不同的功能**。这就是权限系统要去实现的效果。我们不能只依赖前端去判断用户的权限来选择显示哪些菜单哪些按钮。因为如果只是这样,如果有人知道了对应功能的接口地址就可以不通过前端,直接去发送请求来实现相关功能操作。所以我们还需要在后台进行用户权限的判断,判断当前用户是否有相应的权限,必须具有所需权限才能进行相应的操作。
3.1 授权基本流程
在SpringSecurity中,会使用默认的FilterSecurityInterceptor来进行权限校验。在FilterSecurityInterceptor中会从SecurityContextHolder获取其中的Authentication,然后获取其中的权限信息。当前用户是否拥有访问当前资源所需的权限。所以我们在项目中只需要把当前登录用户的权限信息也存入Authentication。然后设置我们的资源所需要的权限即可。
3.2 授权实现
3.2.1 限制访问资源所需权限
SpringSecurity为我们提供了基于注解的权限控制方案,这也是我们项目中主要采用的方式。我们可以使用注解去指定访问对应的资源所需的权限。但是要使用它我们需要先开启相关配置。
@EnableGlobalMethodSecurity(prePostEnabled = true)
然后就可以使用对应的注解。[@PreAuthorize ](/PreAuthorize )
@RestControllerpublic class HelloController {@RequestMapping("/hello")@PreAuthorize("hasAuthority('test')")public String hello(){return "hello";}}
3.2.2 封装权限信息
我们前面在写UserDetailsServiceImpl的时候说过,在查询出用户后还要获取对应的权限信息,封装到UserDetails中返回。我们先直接把权限信息写死封装到UserDetails中进行测试。我们之前定义了UserDetails的实现类LoginUser,想要让其能封装权限信息就要对其进行修改。
package com.sangeng.domain;import com.alibaba.fastjson.annotation.JSONField;import lombok.AllArgsConstructor;import lombok.Data;import lombok.NoArgsConstructor;import org.springframework.security.core.GrantedAuthority;import org.springframework.security.core.authority.SimpleGrantedAuthority;import org.springframework.security.core.userdetails.UserDetails;import java.util.Collection;import java.util.List;import java.util.stream.Collectors;/*** @Author 三更 B站: https://space.bilibili.com/663528522*/@Data@NoArgsConstructorpublic class LoginUser implements UserDetails {private User user;//存储权限信息private List<String> permissions;public LoginUser(User user,List<String> permissions) {this.user = user;this.permissions = permissions;}//存储SpringSecurity所需要的权限信息的集合@JSONField(serialize = false)private List<GrantedAuthority> authorities;@Overridepublic Collection<? extends GrantedAuthority> getAuthorities() {if(authorities!=null){return authorities;}//把permissions中字符串类型的权限信息转换成GrantedAuthority对象存入authorities中authorities = permissions.stream().map(SimpleGrantedAuthority::new).collect(Collectors.toList());return authorities;}@Overridepublic String getPassword() {return user.getPassword();}@Overridepublic String getUsername() {return user.getUserName();}@Overridepublic boolean isAccountNonExpired() {return true;}@Overridepublic boolean isAccountNonLocked() {return true;}@Overridepublic boolean isCredentialsNonExpired() {return true;}@Overridepublic boolean isEnabled() {return true;}}
LoginUser修改完后我们就可以在UserDetailsServiceImpl中去把权限信息封装到LoginUser中了。我们写死权限进行测试,后面我们再从数据库中查询权限信息。
package com.sangeng.service.impl;import com.baomidou.mybatisplus.core.conditions.query.LambdaQueryWrapper;import com.baomidou.mybatisplus.core.conditions.query.QueryWrapper;import com.baomidou.mybatisplus.extension.conditions.query.LambdaQueryChainWrapper;import com.sangeng.domain.LoginUser;import com.sangeng.domain.User;import com.sangeng.mapper.UserMapper;import org.springframework.beans.factory.annotation.Autowired;import org.springframework.security.core.userdetails.UserDetails;import org.springframework.security.core.userdetails.UserDetailsService;import org.springframework.security.core.userdetails.UsernameNotFoundException;import org.springframework.stereotype.Service;import java.util.ArrayList;import java.util.Arrays;import java.util.List;import java.util.Objects;/*** @Author 三更 B站: https://space.bilibili.com/663528522*/@Servicepublic class UserDetailsServiceImpl implements UserDetailsService {@Autowiredprivate UserMapper userMapper;@Overridepublic UserDetails loadUserByUsername(String username) throws UsernameNotFoundException {LambdaQueryWrapper<User> wrapper = new LambdaQueryWrapper<>();wrapper.eq(User::getUserName,username);User user = userMapper.selectOne(wrapper);if(Objects.isNull(user)){throw new RuntimeException("用户名或密码错误");}//TODO 根据用户查询权限信息 添加到LoginUser中List<String> list = new ArrayList<>(Arrays.asList("test"));return new LoginUser(user,list);}}
3.2.3 从数据库查询权限信息
3.2.3.1 RBAC权限模型
RBAC权限模型(Role-Based Access Control)即:基于角色的权限控制。这是目前最常被开发者使用也是相对易用、通用权限模型。<br />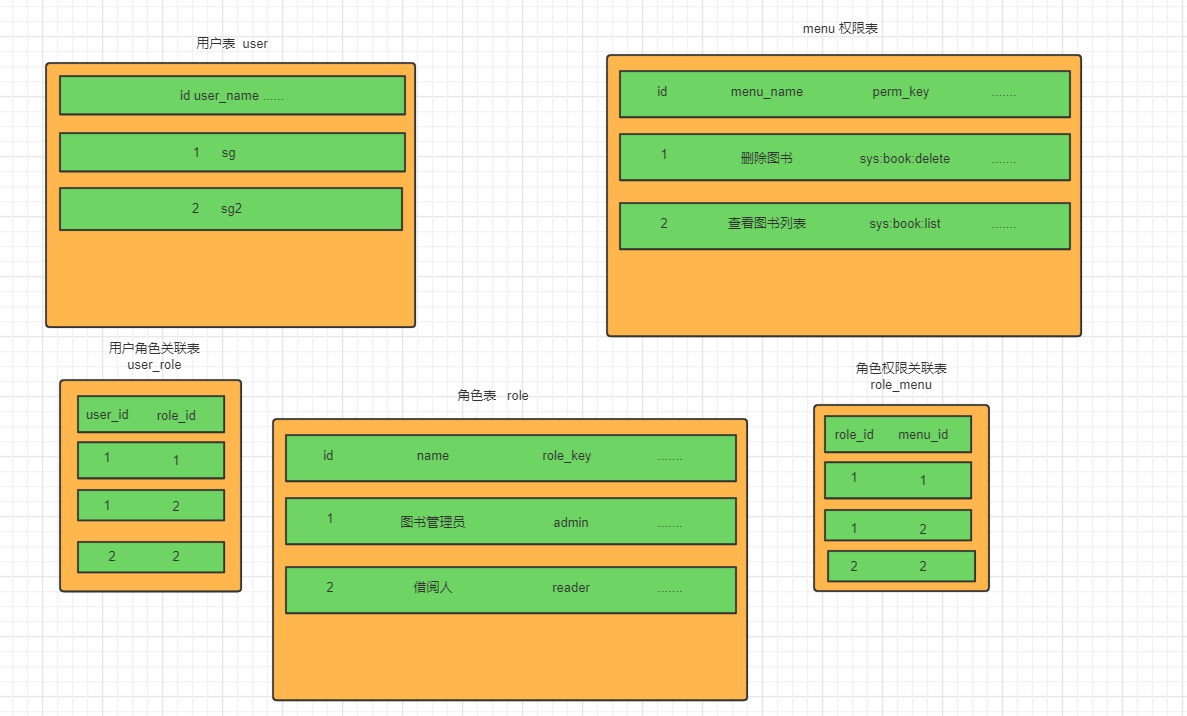
3.2.3.2 准备工作
CREATE DATABASE /*!32312 IF NOT EXISTS*/`sg_security` /*!40100 DEFAULT CHARACTER SET utf8mb4 */;USE `sg_security`;/*Table structure for table `sys_menu` */DROP TABLE IF EXISTS `sys_menu`;CREATE TABLE `sys_menu` (`id` bigint(20) NOT NULL AUTO_INCREMENT,`menu_name` varchar(64) NOT NULL DEFAULT 'NULL' COMMENT '菜单名',`path` varchar(200) DEFAULT NULL COMMENT '路由地址',`component` varchar(255) DEFAULT NULL COMMENT '组件路径',`visible` char(1) DEFAULT '0' COMMENT '菜单状态(0显示 1隐藏)',`status` char(1) DEFAULT '0' COMMENT '菜单状态(0正常 1停用)',`perms` varchar(100) DEFAULT NULL COMMENT '权限标识',`icon` varchar(100) DEFAULT '#' COMMENT '菜单图标',`create_by` bigint(20) DEFAULT NULL,`create_time` datetime DEFAULT NULL,`update_by` bigint(20) DEFAULT NULL,`update_time` datetime DEFAULT NULL,`del_flag` int(11) DEFAULT '0' COMMENT '是否删除(0未删除 1已删除)',`remark` varchar(500) DEFAULT NULL COMMENT '备注',PRIMARY KEY (`id`)) ENGINE=InnoDB AUTO_INCREMENT=2 DEFAULT CHARSET=utf8mb4 COMMENT='菜单表';/*Table structure for table `sys_role` */DROP TABLE IF EXISTS `sys_role`;CREATE TABLE `sys_role` (`id` bigint(20) NOT NULL AUTO_INCREMENT,`name` varchar(128) DEFAULT NULL,`role_key` varchar(100) DEFAULT NULL COMMENT '角色权限字符串',`status` char(1) DEFAULT '0' COMMENT '角色状态(0正常 1停用)',`del_flag` int(1) DEFAULT '0' COMMENT 'del_flag',`create_by` bigint(200) DEFAULT NULL,`create_time` datetime DEFAULT NULL,`update_by` bigint(200) DEFAULT NULL,`update_time` datetime DEFAULT NULL,`remark` varchar(500) DEFAULT NULL COMMENT '备注',PRIMARY KEY (`id`)) ENGINE=InnoDB AUTO_INCREMENT=3 DEFAULT CHARSET=utf8mb4 COMMENT='角色表';/*Table structure for table `sys_role_menu` */DROP TABLE IF EXISTS `sys_role_menu`;CREATE TABLE `sys_role_menu` (`role_id` bigint(200) NOT NULL AUTO_INCREMENT COMMENT '角色ID',`menu_id` bigint(200) NOT NULL DEFAULT '0' COMMENT '菜单id',PRIMARY KEY (`role_id`,`menu_id`)) ENGINE=InnoDB AUTO_INCREMENT=2 DEFAULT CHARSET=utf8mb4;/*Table structure for table `sys_user` */DROP TABLE IF EXISTS `sys_user`;CREATE TABLE `sys_user` (`id` bigint(20) NOT NULL AUTO_INCREMENT COMMENT '主键',`user_name` varchar(64) NOT NULL DEFAULT 'NULL' COMMENT '用户名',`nick_name` varchar(64) NOT NULL DEFAULT 'NULL' COMMENT '昵称',`password` varchar(64) NOT NULL DEFAULT 'NULL' COMMENT '密码',`status` char(1) DEFAULT '0' COMMENT '账号状态(0正常 1停用)',`email` varchar(64) DEFAULT NULL COMMENT '邮箱',`phonenumber` varchar(32) DEFAULT NULL COMMENT '手机号',`sex` char(1) DEFAULT NULL COMMENT '用户性别(0男,1女,2未知)',`avatar` varchar(128) DEFAULT NULL COMMENT '头像',`user_type` char(1) NOT NULL DEFAULT '1' COMMENT '用户类型(0管理员,1普通用户)',`create_by` bigint(20) DEFAULT NULL COMMENT '创建人的用户id',`create_time` datetime DEFAULT NULL COMMENT '创建时间',`update_by` bigint(20) DEFAULT NULL COMMENT '更新人',`update_time` datetime DEFAULT NULL COMMENT '更新时间',`del_flag` int(11) DEFAULT '0' COMMENT '删除标志(0代表未删除,1代表已删除)',PRIMARY KEY (`id`)) ENGINE=InnoDB AUTO_INCREMENT=3 DEFAULT CHARSET=utf8mb4 COMMENT='用户表';/*Table structure for table `sys_user_role` */DROP TABLE IF EXISTS `sys_user_role`;CREATE TABLE `sys_user_role` (`user_id` bigint(200) NOT NULL AUTO_INCREMENT COMMENT '用户id',`role_id` bigint(200) NOT NULL DEFAULT '0' COMMENT '角色id',PRIMARY KEY (`user_id`,`role_id`)) ENGINE=InnoDB DEFAULT CHARSET=utf8mb4;
SELECTDISTINCT m.`perms`FROMsys_user_role urLEFT JOIN `sys_role` r ON ur.`role_id` = r.`id`LEFT JOIN `sys_role_menu` rm ON ur.`role_id` = rm.`role_id`LEFT JOIN `sys_menu` m ON m.`id` = rm.`menu_id`WHEREuser_id = 2AND r.`status` = 0AND m.`status` = 0
package com.sangeng.domain;import com.baomidou.mybatisplus.annotation.TableId;import com.baomidou.mybatisplus.annotation.TableName;import com.fasterxml.jackson.annotation.JsonInclude;import lombok.AllArgsConstructor;import lombok.Data;import lombok.NoArgsConstructor;import java.io.Serializable;import java.util.Date;/*** 菜单表(Menu)实体类** @author makejava* @since 2021-11-24 15:30:08*/@TableName(value="sys_menu")@Data@AllArgsConstructor@NoArgsConstructor@JsonInclude(JsonInclude.Include.NON_NULL)public class Menu implements Serializable {private static final long serialVersionUID = -54979041104113736L;@TableIdprivate Long id;/*** 菜单名*/private String menuName;/*** 路由地址*/private String path;/*** 组件路径*/private String component;/*** 菜单状态(0显示 1隐藏)*/private String visible;/*** 菜单状态(0正常 1停用)*/private String status;/*** 权限标识*/private String perms;/*** 菜单图标*/private String icon;private Long createBy;private Date createTime;private Long updateBy;private Date updateTime;/*** 是否删除(0未删除 1已删除)*/private Integer delFlag;/*** 备注*/private String remark;}
3.2.3.3 代码实现
我们只需要根据用户id去查询到其所对应的权限信息即可。所以我们可以先定义个mapper,其中提供一个方法可以根据userid查询权限信息。
import com.baomidou.mybatisplus.core.mapper.BaseMapper;import com.sangeng.domain.Menu;import java.util.List;/*** @Author 三更 B站: https://space.bilibili.com/663528522*/public interface MenuMapper extends BaseMapper<Menu> {List<String> selectPermsByUserId(Long id);}
尤其是自定义方法,所以需要创建对应的mapper文件,定义对应的sql语句
<?xml version="1.0" encoding="UTF-8" ?><!DOCTYPE mapper PUBLIC "-//mybatis.org//DTD Mapper 3.0//EN" "http://mybatis.org/dtd/mybatis-3-mapper.dtd" ><mapper namespace="com.sangeng.mapper.MenuMapper"><select id="selectPermsByUserId" resultType="java.lang.String">SELECTDISTINCT m.`perms`FROMsys_user_role urLEFT JOIN `sys_role` r ON ur.`role_id` = r.`id`LEFT JOIN `sys_role_menu` rm ON ur.`role_id` = rm.`role_id`LEFT JOIN `sys_menu` m ON m.`id` = rm.`menu_id`WHEREuser_id = #{userid}AND r.`status` = 0AND m.`status` = 0</select></mapper>
在application.yml中配置mapperXML文件的位置
spring:datasource:url: jdbc:mysql://localhost:3306/sg_security?characterEncoding=utf-8&serverTimezone=UTCusername: rootpassword: rootdriver-class-name: com.mysql.cj.jdbc.Driverredis:host: localhostport: 6379mybatis-plus:mapper-locations: classpath*:/mapper/**/*.xml
然后我们可以在UserDetailsServiceImpl中去调用该mapper的方法查询权限信息封装到LoginUser对象中即可。
/*** @Author 三更 B站: https://space.bilibili.com/663528522*/@Servicepublic class UserDetailsServiceImpl implements UserDetailsService {@Autowiredprivate UserMapper userMapper;@Autowiredprivate MenuMapper menuMapper;@Overridepublic UserDetails loadUserByUsername(String username) throws UsernameNotFoundException {LambdaQueryWrapper<User> wrapper = new LambdaQueryWrapper<>();wrapper.eq(User::getUserName,username);User user = userMapper.selectOne(wrapper);if(Objects.isNull(user)){throw new RuntimeException("用户名或密码错误");}List<String> permissionKeyList = menuMapper.selectPermsByUserId(user.getId());// //测试写法// List<String> list = new ArrayList<>(Arrays.asList("test"));return new LoginUser(user,permissionKeyList);}}
4. 自定义失败处理
我们还希望在认证失败或者是授权失败的情况下也能和我们的接口一样返回相同结构的json,这样可以让前端能对响应进行统一的处理。要实现这个功能我们需要知道SpringSecurity的异常处理机制。在SpringSecurity中,如果我们在认证或者授权的过程中出现了异常会被ExceptionTranslationFilter捕获到。在ExceptionTranslationFilter中会去判断是认证失败还是授权失败出现的异常。如果是认证过程中出现的异常会被封装成AuthenticationException然后调用**AuthenticationEntryPoint**对象的方法去进行异常处理。如果是授权过程中出现的异常会被封装成AccessDeniedException然后调用**AccessDeniedHandler**对象的方法去进行异常处理。所以如果我们需要自定义异常处理,我们只需要自定义AuthenticationEntryPoint和AccessDeniedHandler然后配置给SpringSecurity即可。
①自定义实现类
@Componentpublic class AccessDeniedHandlerImpl implements AccessDeniedHandler {@Overridepublic void handle(HttpServletRequest request, HttpServletResponse response, AccessDeniedException accessDeniedException) throws IOException, ServletException {ResponseResult result = new ResponseResult(HttpStatus.FORBIDDEN.value(), "权限不足");String json = JSON.toJSONString(result);WebUtils.renderString(response,json);}}
/*** @Author 三更 B站: https://space.bilibili.com/663528522*/@Componentpublic class AuthenticationEntryPointImpl implements AuthenticationEntryPoint {@Overridepublic void commence(HttpServletRequest request, HttpServletResponse response, AuthenticationException authException) throws IOException, ServletException {ResponseResult result = new ResponseResult(HttpStatus.UNAUTHORIZED.value(), "认证失败请重新登录");String json = JSON.toJSONString(result);WebUtils.renderString(response,json);}}
②配置给SpringSecurity
先注入对应的处理器
@Autowiredprivate AuthenticationEntryPoint authenticationEntryPoint;@Autowiredprivate AccessDeniedHandler accessDeniedHandler;
然后我们可以使用HttpSecurity对象的方法去配置。
http.exceptionHandling().authenticationEntryPoint(authenticationEntryPoint).accessDeniedHandler(accessDeniedHandler);
5. 跨域
浏览器出于安全的考虑,使用 XMLHttpRequest对象发起 HTTP请求时必须遵守同源策略,否则就是跨域的HTTP请求,默认情况下是被禁止的。 同源策略要求源相同才能正常进行通信,即协议、域名、端口号都完全一致。前后端分离项目,前端项目和后端项目一般都不是同源的,所以肯定会存在跨域请求的问题。所以我们就要处理一下,让前端能进行跨域请求。
①先对SpringBoot配置,运行跨域请求
@Configurationpublic class CorsConfig implements WebMvcConfigurer {@Overridepublic void addCorsMappings(CorsRegistry registry) {// 设置允许跨域的路径registry.addMapping("/**")// 设置允许跨域请求的域名.allowedOriginPatterns("*")// 是否允许cookie.allowCredentials(true)// 设置允许的请求方式.allowedMethods("GET", "POST", "DELETE", "PUT")// 设置允许的header属性.allowedHeaders("*")// 跨域允许时间.maxAge(3600);}}
②开启SpringSecurity的跨域访问
由于我们的资源都会收到SpringSecurity的保护,所以想要跨域访问还要让SpringSecurity运行跨域访问。
@Overrideprotected void configure(HttpSecurity http) throws Exception {http//关闭csrf.csrf().disable()//不通过Session获取SecurityContext.sessionManagement().sessionCreationPolicy(SessionCreationPolicy.STATELESS).and().authorizeRequests()// 对于登录接口 允许匿名访问.antMatchers("/user/login").anonymous()// 除上面外的所有请求全部需要鉴权认证.anyRequest().authenticated();//添加过滤器http.addFilterBefore(jwtAuthenticationTokenFilter, UsernamePasswordAuthenticationFilter.class);//配置异常处理器http.exceptionHandling()//配置认证失败处理器.authenticationEntryPoint(authenticationEntryPoint).accessDeniedHandler(accessDeniedHandler);//允许跨域http.cors();}
6. 遗留小问题
其它权限校验方法
我们前面都是使用@PreAuthorize注解,然后在在其中使用的是hasAuthority方法进行校验。SpringSecurity还为我们提供了其它方法例如:hasAnyAuthority,hasRole,hasAnyRole等。这里我们先不急着去介绍这些方法,我们先去理解hasAuthority的原理,然后再去学习其他方法你就更容易理解,而不是死记硬背区别。并且我们也可以选择定义校验方法,实现我们自己的校验逻辑。hasAuthority方法实际是执行到了SecurityExpressionRoot的hasAuthority,大家只要断点调试既可知道它内部的校验原理。它内部其实是调用authentication的getAuthorities方法获取用户的权限列表。然后判断我们存入的方法参数数据在权限列表中。hasAnyAuthority方法可以传入多个权限,只有用户有其中任意一个权限都可以访问对应资源。
@PreAuthorize("hasAnyAuthority('admin','test','system:dept:list')")public String hello(){return "hello";}
hasRole要求有对应的角色才可以访问,但是它内部会把我们传入的参数拼接上 **ROLE_** 后再去比较。所以这种情况下要用用户对应的权限也要有 **ROLE_** 这个前缀才可以。
@PreAuthorize("hasRole('system:dept:list')")public String hello(){return "hello";}
hasAnyRole 有任意的角色就可以访问。它内部也会把我们传入的参数拼接上 **ROLE_** 后再去比较。所以这种情况下要用用户对应的权限也要有 **ROLE_** 这个前缀才可以。
@PreAuthorize("hasAnyRole('admin','system:dept:list')")public String hello(){return "hello";}
自定义权限校验方法
我们也可以定义自己的权限校验方法,在@PreAuthorize注解中使用我们的方法。
@Component("ex")public class SGExpressionRoot {public boolean hasAuthority(String authority){//获取当前用户的权限Authentication authentication = SecurityContextHolder.getContext().getAuthentication();LoginUser loginUser = (LoginUser) authentication.getPrincipal();List<String> permissions = loginUser.getPermissions();//判断用户权限集合中是否存在authorityreturn permissions.contains(authority);}}
在SPEL表达式中使用 @ex相当于获取容器中bean的名字未ex的对象。然后再调用这个对象的hasAuthority方法
@RequestMapping("/hello")@PreAuthorize("@ex.hasAuthority('system:dept:list')")public String hello(){return "hello";}
基于配置的权限控制
我们也可以在配置类中使用使用配置的方式对资源进行权限控制。
@Overrideprotected void configure(HttpSecurity http) throws Exception {http//关闭csrf.csrf().disable()//不通过Session获取SecurityContext.sessionManagement().sessionCreationPolicy(SessionCreationPolicy.STATELESS).and().authorizeRequests()// 对于登录接口 允许匿名访问.antMatchers("/user/login").anonymous().antMatchers("/testCors").hasAuthority("system:dept:list222")// 除上面外的所有请求全部需要鉴权认证.anyRequest().authenticated();//添加过滤器http.addFilterBefore(jwtAuthenticationTokenFilter, UsernamePasswordAuthenticationFilter.class);//配置异常处理器http.exceptionHandling()//配置认证失败处理器.authenticationEntryPoint(authenticationEntryPoint).accessDeniedHandler(accessDeniedHandler);//允许跨域http.cors();}
CSRF
CSRF是指跨站请求伪造(Cross-site request forgery),是web常见的攻击之一。[https://blog.csdn.net/freeking101/article/details/86537087](https://blog.csdn.net/freeking101/article/details/86537087)SpringSecurity去防止CSRF攻击的方式就是通过csrf_token。后端会生成一个csrf_token,前端发起请求的时候需要携带这个csrf_token,后端会有过滤器进行校验,如果没有携带或者是伪造的就不允许访问。我们可以发现CSRF攻击依靠的是cookie中所携带的认证信息。但是在前后端分离的项目中我们的认证信息其实是token,而token并不是存储中cookie中,并且需要前端代码去把token设置到请求头中才可以,所以CSRF攻击也就不用担心了。
认证成功处理器
实际上在UsernamePasswordAuthenticationFilter进行登录认证的时候,如果登录成功了是会调用AuthenticationSuccessHandler的方法进行认证成功后的处理的。AuthenticationSuccessHandler就是登录成功处理器。我们也可以自己去自定义成功处理器进行成功后的相应处理。
@Componentpublic class SGSuccessHandler implements AuthenticationSuccessHandler {@Overridepublic void onAuthenticationSuccess(HttpServletRequest request, HttpServletResponse response, Authentication authentication) throws IOException, ServletException {System.out.println("认证成功了");}}
@Configurationpublic class SecurityConfig extends WebSecurityConfigurerAdapter {@Autowiredprivate AuthenticationSuccessHandler successHandler;@Overrideprotected void configure(HttpSecurity http) throws Exception {http.formLogin().successHandler(successHandler);http.authorizeRequests().anyRequest().authenticated();}}
认证失败处理器
实际上在UsernamePasswordAuthenticationFilter进行登录认证的时候,如果认证失败了是会调用AuthenticationFailureHandler的方法进行认证失败后的处理的。AuthenticationFailureHandler就是登录失败处理器。我们也可以自己去自定义失败处理器进行失败后的相应处理。
@Componentpublic class SGFailureHandler implements AuthenticationFailureHandler {@Overridepublic void onAuthenticationFailure(HttpServletRequest request, HttpServletResponse response, AuthenticationException exception) throws IOException, ServletException {System.out.println("认证失败了");}}
@Configurationpublic class SecurityConfig extends WebSecurityConfigurerAdapter {@Autowiredprivate AuthenticationSuccessHandler successHandler;@Autowiredprivate AuthenticationFailureHandler failureHandler;@Overrideprotected void configure(HttpSecurity http) throws Exception {http.formLogin()// 配置认证成功处理器.successHandler(successHandler)// 配置认证失败处理器.failureHandler(failureHandler);http.authorizeRequests().anyRequest().authenticated();}}
登出成功处理器
@Componentpublic class SGLogoutSuccessHandler implements LogoutSuccessHandler {@Overridepublic void onLogoutSuccess(HttpServletRequest request, HttpServletResponse response, Authentication authentication) throws IOException, ServletException {System.out.println("注销成功");}}
@Configurationpublic class SecurityConfig extends WebSecurityConfigurerAdapter {@Autowiredprivate AuthenticationSuccessHandler successHandler;@Autowiredprivate AuthenticationFailureHandler failureHandler;@Autowiredprivate LogoutSuccessHandler logoutSuccessHandler;@Overrideprotected void configure(HttpSecurity http) throws Exception {http.formLogin()// 配置认证成功处理器.successHandler(successHandler)// 配置认证失败处理器.failureHandler(failureHandler);http.logout()//配置注销成功处理器.logoutSuccessHandler(logoutSuccessHandler);http.authorizeRequests().anyRequest().authenticated();}}
其他认证方案畅想
7. 源码讲解
投票过50更新源码讲解

若有收获,就点个赞吧
0 人点赞
