4.6 gRPC 和 Protobuf 扩展
目前开源社区已经围绕 Protobuf 和 gRPC 开发出众多扩展,形成了庞大的生态。本节我们将简单介绍验证器和 REST 接口扩展。
4.6.1 验证器
到目前为止,我们接触的全部是第三版的 Protobuf 语法。第二版的 Protobuf 有个默认值特性,可以为字符串或数值类型的成员定义默认值。
我们采用第二版的 Protobuf 语法创建文件:
syntax = "proto2";package main;message Message {optional string name = 1 [default = "gopher"];optional int32 age = 2 [default = 10];}
内置的默认值语法其实是通过 Protobuf 的扩展选项特性实现。在第三版的 Protobuf 中不再支持默认值特性,但是我们可以通过扩展选项自己模拟默认值特性。
下面是用 proto3 语法的扩展特性重新改写上述的 proto 文件:
syntax = "proto3";package main;import "google/protobuf/descriptor.proto";extend google.protobuf.FieldOptions {string default_string = 50000;int32 default_int = 50001;}message Message {string name = 1 [(default_string) = "gopher"];int32 age = 2[(default_int) = 10];}
其中成员后面的方括号内部的就是扩展语法。重新生成 Go 语言代码,里面会包含扩展选项相关的元信息:
var E_DefaultString = &proto.ExtensionDesc{ExtendedType: (*descriptor.FieldOptions)(nil),ExtensionType: (*string)(nil),Field: 50000,Name: "main.default_string",Tag: "bytes,50000,opt,name=default_string,json=defaultString",Filename: "helloworld.proto",}var E_DefaultInt = &proto.ExtensionDesc{ExtendedType: (*descriptor.FieldOptions)(nil),ExtensionType: (*int32)(nil),Field: 50001,Name: "main.default_int",Tag: "varint,50001,opt,name=default_int,json=defaultInt",Filename: "helloworld.proto",}
我们可以在运行时通过类似反射的技术解析出 Message 每个成员定义的扩展选项,然后从每个扩展的相关联的信息中解析出我们定义的默认值。
在开源社区中,github.com/mwitkow/go-proto-validators 已经基于 Protobuf 的扩展特性实现了功能较为强大的验证器功能。要使用该验证器首先需要下载其提供的代码生成插件:
$ go get github.com/mwitkow/go-proto-validators/protoc-gen-govalidators
然后基于 go-proto-validators 验证器的规则为 Message 成员增加验证规则:
syntax = "proto3";package main;import "github.com/mwitkow/go-proto-validators/validator.proto";message Message {string important_string = 1 [(validator.field) = {regex: "^[a-z]{2,5}$"}];int32 age = 2 [(validator.field) = {int_gt: 0, int_lt: 100}];}
在方括弧表示的成员扩展中,validator.field 表示扩展是 validator 包中定义的名为 field 扩展选项。validator.field 的类型是 FieldValidator 结构体,在导入的 validator.proto 文件中定义。
所有的验证规则都由 validator.proto 文件中的 FieldValidator 定义:
syntax = "proto2";package validator;import "google/protobuf/descriptor.proto";extend google.protobuf.FieldOptions {optional FieldValidator field = 65020;}message FieldValidator {// Uses a Golang RE2-syntax regex to match the field contents.optional string regex = 1;// Field value of integer strictly greater than this value.optional int64 int_gt = 2;// Field value of integer strictly smaller than this value.optional int64 int_lt = 3;// ... more ...}
从 FieldValidator 定义的注释中我们可以看到验证器扩展的一些语法:其中 regex 表示用于字符串验证的正则表达式,int_gt 和 int_lt 表示数值的范围。
然后采用以下的命令生成验证函数代码:
protoc \--proto_path=${GOPATH}/src \--proto_path=${GOPATH}/src/github.com/google/protobuf/src \--proto_path=. \--govalidators_out=. --go_out=plugins=grpc:.\hello.proto
windows: 替换
${GOPATH}为%GOPATH%即可.
以上的命令会调用 protoc-gen-govalidators 程序,生成一个独立的名为 hello.validator.pb.go 的文件:
var _regex_Message_ImportantString = regexp.MustCompile("^[a-z]{2,5}$")func (this *Message) Validate() error {if !_regex_Message_ImportantString.MatchString(this.ImportantString) {return go_proto_validators.FieldError("ImportantString", fmt.Errorf(`value '%v' must be a string conforming to regex "^[a-z]{2,5}$"`,this.ImportantString,))}if !(this.Age> 0) {return go_proto_validators.FieldError("Age", fmt.Errorf(`value '%v' must be greater than '0'`, this.Age,))}if !(this.Age < 100) {return go_proto_validators.FieldError("Age", fmt.Errorf(`value '%v' must be less than '100'`, this.Age,))}return nil}
生成的代码为 Message 结构体增加了一个 Validate 方法,用于验证该成员是否满足 Protobuf 中定义的条件约束。无论采用何种类型,所有的 Validate 方法都用相同的签名,因此可以满足相同的验证接口。
通过生成的验证函数,并结合 gRPC 的截取器,我们可以很容易为每个方法的输入参数和返回值进行验证。
4.6.2 REST 接口
gRPC 服务一般用于集群内部通信,如果需要对外暴露服务一般会提供等价的 REST 接口。通过 REST 接口比较方便前端 JavaScript 和后端交互。开源社区中的 grpc-gateway 项目就实现了将 gRPC 服务转为 REST 服务的能力。
grpc-gateway 的工作原理如下图:
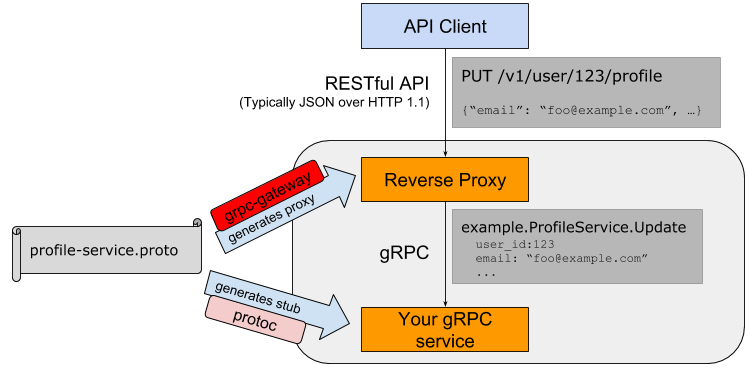
图 4-2 gRPC-Gateway 工作流程
通过在 Protobuf 文件中添加路由相关的元信息,通过自定义的代码插件生成路由相关的处理代码,最终将 REST 请求转给更后端的 gRPC 服务处理。
路由扩展元信息也是通过 Protobuf 的元数据扩展用法提供:
syntax = "proto3";package main;import "google/api/annotations.proto";message StringMessage {string value = 1;}service RestService {rpc Get(StringMessage) returns (StringMessage) {option (google.api.http) = {get: "/get/{value}"};}rpc Post(StringMessage) returns (StringMessage) {option (google.api.http) = {post: "/post"body: "*"};}}
我们首先为 gRPC 定义了 Get 和 Post 方法,然后通过元扩展语法在对应的方法后添加路由信息。其中 “/get/{value}” 路径对应的是 Get 方法,{value} 部分对应参数中的 value 成员,结果通过 json 格式返回。Post 方法对应 “/post” 路径,body 中包含 json 格式的请求信息。
然后通过以下命令安装 protoc-gen-grpc-gateway 插件:
go get -u github.com/grpc-ecosystem/grpc-gateway/protoc-gen-grpc-gateway
再通过插件生成 grpc-gateway 必须的路由处理代码:
$ protoc -I/usr/local/include -I. \-I$GOPATH/src \-I$GOPATH/src/github.com/grpc-ecosystem/grpc-gateway/third_party/googleapis \--grpc-gateway_out=. --go_out=plugins=grpc:.\hello.proto
windows: 替换
${GOPATH}为%GOPATH%即可.
插件会为 RestService 服务生成对应的 RegisterRestServiceHandlerFromEndpoint 函数:
func RegisterRestServiceHandlerFromEndpoint(ctx context.Context, mux *runtime.ServeMux, endpoint string,opts []grpc.DialOption,) (err error) {...}
RegisterRestServiceHandlerFromEndpoint 函数用于将定义了 Rest 接口的请求转发到真正的 gRPC 服务。注册路由处理函数之后就可以启动 Web 服务了:
func main() {ctx := context.Background()ctx, cancel := context.WithCancel(ctx)defer cancel()mux := runtime.NewServeMux()err := RegisterRestServiceHandlerFromEndpoint(ctx, mux, "localhost:5000",[]grpc.DialOption{grpc.WithInsecure()},)if err != nil {log.Fatal(err)}http.ListenAndServe(":8080", mux)}
启动 grpc 服务 , 端口 5000
type RestServiceImpl struct{}func (r *RestServiceImpl) Get(ctx context.Context, message *StringMessage) (*StringMessage, error) {return &StringMessage{Value: "Get hi:" + message.Value + "#"}, nil}func (r *RestServiceImpl) Post(ctx context.Context, message *StringMessage) (*StringMessage, error) {return &StringMessage{Value: "Post hi:" + message.Value + "@"}, nil}func main() {grpcServer := grpc.NewServer()RegisterRestServiceServer(grpcServer, new(RestServiceImpl))lis, _ := net.Listen("tcp", ":5000")grpcServer.Serve(lis)}
首先通过 runtime.NewServeMux() 函数创建路由处理器,然后通过 RegisterRestServiceHandlerFromEndpoint 函数将 RestService 服务相关的 REST 接口中转到后面的 gRPC 服务。grpc-gateway 提供的 runtime.ServeMux 类也实现了 http.Handler 接口,因此可以和标准库中的相关函数配合使用。
当 gRPC 和 REST 服务全部启动之后,就可以用 curl 请求 REST 服务了:
$ curl localhost:8080/get/gopher{"value":"Get: gopher"}$ curl localhost:8080/post -X POST --data '{"value":"grpc"}'{"value":"Post: grpc"}
在对外公布 REST 接口时,我们一般还会提供一个 Swagger 格式的文件用于描述这个接口规范。
$ go get -u github.com/grpc-ecosystem/grpc-gateway/protoc-gen-swagger$ protoc -I. \-I$GOPATH/src/github.com/grpc-ecosystem/grpc-gateway/third_party/googleapis \--swagger_out=. \hello.proto
然后会生成一个 hello.swagger.json 文件。这样的话就可以通过 swagger-ui 这个项目,在网页中提供 REST 接口的文档和测试等功能。
4.6.3 Nginx
最新的 Nginx 对 gRPC 提供了深度支持。可以通过 Nginx 将后端多个 gRPC 服务聚合到一个 Nginx 服务。同时 Nginx 也提供了为同一种 gRPC 服务注册多个后端的功能,这样可以轻松实现 gRPC 负载均衡的支持。Nginx 的 gRPC 扩展是一个较大的主题,感兴趣的读者可以自行参考相关文档。

若有收获,就点个赞吧
0 人点赞
