我们把app的流从Storyboard中重构代码到单独的协调类中。这样就避免了View Controller紧耦与他们的上下文。
今天我们来谈谈故事版和如何改进故事版的使用。我们有一个app来显示Table View.如果你点击table里面的一项,会进入详情页。也有一个profile按钮,用来弹出一个模态navigation Controller包裹的另一个view Controller。如果你点击了完成,模态navigation Controller会消失。
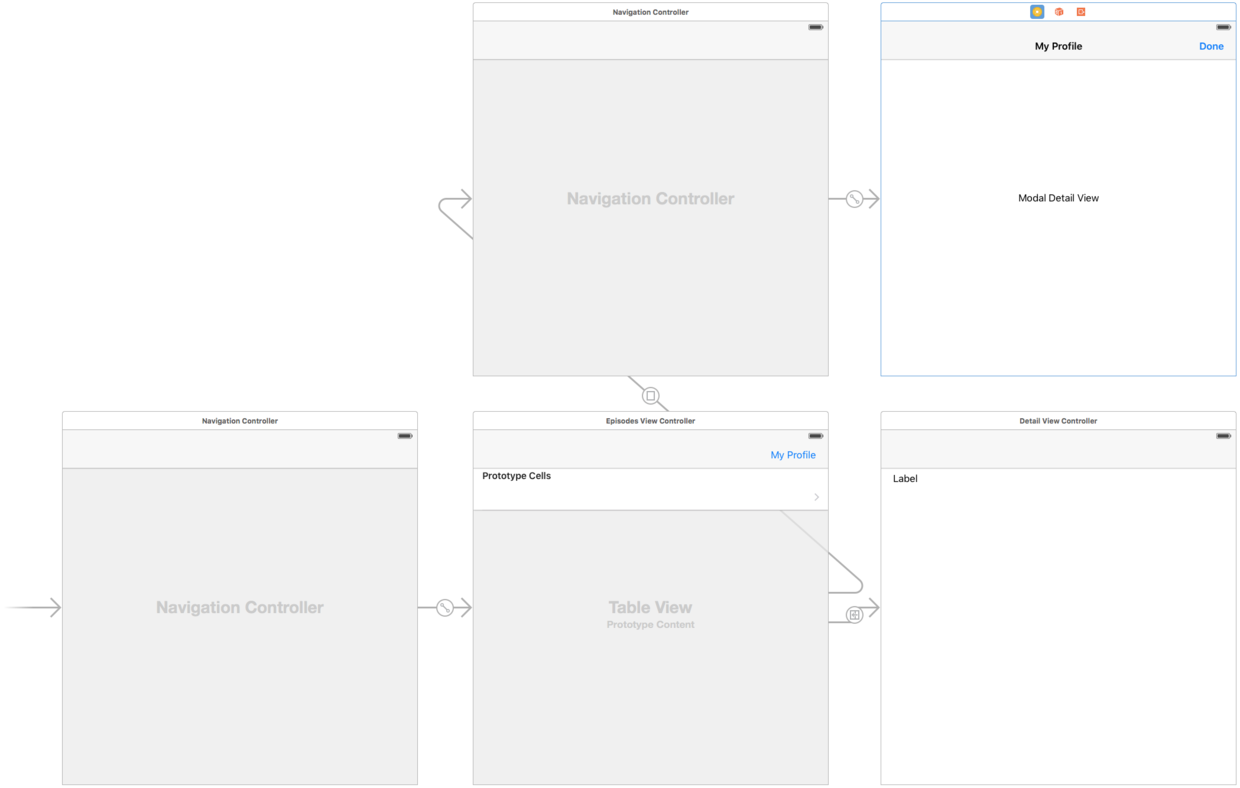
在故事版中,我们有一些View Controller: navigation Controller; 视频集的列表;详情View Controller,最终navigation Controller包括了模态个人中心视图。在代码里,我们有3个类:ProfileViewController和DetailViewController.EpisodesViewController有一点复杂。是一个简单的table View Controller,但是又有我们想重构的prepareForSegue方法。prepareForSegue方法区分两个不同的segue和配置各自的view Controller。最终未解开的IBAction拥有segue无论何时模态View Controller消失。
故事版给我们可视化的展示了view Controllers是如何链接的。然而想要改变view Controller的链接就不灵活,应为并不是所有的东西都在故事版中配置,比如segues在故事版中,而prepareForSegue方法又是在View Controller中。我们需要当心代码和故事版的配合。比起把view Controller的链接放在两者都有,我们当然是只放在一个地方会好些。
重构故事版
首先,我们把故事版里面的segues删掉。为了布局这些视图,我们先保留故事版。我们删掉push segue,模态展示segue,并解开IBAction。现在我们的故事版仅仅被用来定义view Controllers。
在我们的代码中,我们先删除prepareForSegue和解开IBAction。现在我们必须找个不同的方式来链接我们的view Controllers。首先我们重写tableView:didSelectRowAtIndexPath这个方法。在这个方法中,我们不想push到下一个View Controller,因为这样就把两个view Controller缠住了。相反我们想从外面控制流。这样的话view Controllers是独立的,而且并不知道他们的被使用的上下文。为了实现这个,当一个row被选中的时候,我们就调用一个方法didSelect传入被选中的episode。
override func tableView(tableView: UITableView, didSelectRowAtIndexPath indexPath: NSIndexPath) {let episode = episodes[indexPath.row]didSelect(episode)}
didSelect的属性很简单,是一个方法类型Episode -> (),并且我们提供一个空的默认实现。
var didSelect: (Episode) -> () = { _ in }
现在我们在AppDelegate中配置这个属性。首先,我们通过window对象获得navigation Controller的引用。其次我们再navigation controller栈中的第一个view Controller获取EpisodesViewController的引用。
let nc = window?.rootViewController as! UINavigationControllerlet episodesVC = nc.viewControllers[0] as! EpisodesViewController
强制转换并不好,但是我们坚持用故事版就没办法。我可以可以去除强制转换如果我们用纯代码的方式来构建,但是我们使用故事版就必须使用强制转换。然而我们可以创建一个中心地来做这个,举个栗子,在UIStoryboard的扩展中。
Connecting Two View Controllers
既然我们引用了EpisodesViewController,我们能设置didSet属性。匿名方法中传入episode并且在navigation Controller中调用pushViewController。因我们想在故事版中实例化我们的详情View Controller,我们先创建故事版的引用。我们然后可以通过调用instantiateViewControllerWithIdentifier来得到详情View Controller.
let storyboard = UIStoryboard(name: "Main", bundle: nil)episodesVC.didSelect = { episode inlet detailVC = storyboard.instantiateViewControllerWithIdentifier("Detail") as! DetailViewControllernc.pushViewController(detailVC, animated: true)}
我们已经连接了这两个view Controllers, 并且我们的episodes View Controller并不知道详情View Controller,因为流仅仅在didSelect的回调用被控制了。最终我们需要配置详情View Controller,所以我们传入我们在didSelect回调中的到的episode。
episodesVC.didSelect = { episode inlet detailVC = storyboard.instantiateViewControllerWithIdentifier("Detail") as! DetailViewControllerdetailVC.episode = episodenc.pushViewController(detailVC, animated: true)}
在我们的app中,我们可以选择cell并且详情View Controller被正确的配置。然而,个人中心页面还没有弄好。在我们的故事板中,我们需要连接个人中心按钮和episodes view controller中的一个action。
class EpisodesViewController: UITableViewController {// ...@IBAction func showProfile(sender: AnyObject) {// TODO}}
我们也需要稍后释放个人中心页面,所以我们也需要为它创建一个action。
class ProfileViewController: UIViewController {// ...@IBAction func close(sender: AnyObject) {// TODO}}
在showProfile action中,我们不想写死ProfileViewController的展示。就像刚刚一样,我们在EpisodesViewController中创建一个方法属性的didTapProfile。
class EpisodesViewController: UITableViewController {// ...var didTapProfile: () -> () = {}@IBAction func showProfile(sender: AnyObject) {didTapProfile()}}
我们给ProfileViewController中的关闭action做同样的事。
class ProfileViewController: UIViewController {// ...var didTapClose: () -> () = {}@IBAction func close(sender: AnyObject) {didTapClose()}}
在AppDelegate中,我们用闭包来配置didTapProfile属性,闭包中我们实例化ProfileViewController并且显示。
episodesVC.didTapProfile = {let profileVC = storyboard.instantiateViewControllerWithIdentifier("Profile") as! UINavigationControllernc.presentViewController(profileVC, animated: true, completion: nil)}
为了让消失一样起作用,我们也这样配置didTapClose属性。在这个闭包中我们需要在navigation Controller中弹出ProfileViewController。
episodesVC.didTapProfile = {let profileNC = storyboard.instantiateViewControllerWithIdentifier("Profile") as! UINavigationControllerlet profileVC = profileNC.viewControllers[0] as! ProfileViewControllerprofileVC.didTapClose = {nc.dismissViewControllerAnimated(true, completion: nil)}nc.presentViewController(profileNC, animated: true, completion: nil)}
这个模式解耦了我们的view Controllers,他们相互不知道,也不相互显示。他们在外面的一个集中的地方被连接起来,因此这些View Controllers并不知道他们被包含在一个navigation Controller中。然而把所有的这些代码放到AppDelegate中也不好。我们需要继续重构。
创建一个App类
最简单的改进现状的方式就是把所有的代码放到我们自己的App类里面。
class App {init(window: UIWindow) {let nc = window.rootViewController as! UINavigationControllerlet episodesVC = nc.viewControllers[0] as! EpisodesViewControllerlet storyboard = UIStoryboard(name: "Main", bundle: nil)episodesVC.didSelect = { episode inlet detailVC = storyboard.instantiateViewControllerWithIdentifier("Detail") as! DetailViewControllerdetailVC.episode = episodenc.pushViewController(detailVC, animated: true)}episodesVC.didTapProfile = {let profileNC = storyboard.instantiateViewControllerWithIdentifier("Profile") as! UINavigationControllerlet profileVC = profileNC.viewControllers[0] as! ProfileViewControllerprofileVC.didTapClose = {nc.dismissViewControllerAnimated(true, completion: nil)}nc.presentViewController(profileNC, animated: true, completion: nil)}}}
在AppDelegate中,我们给App创建一个属性,并实例化这个属性。
class AppDelegate: UIResponder, UIApplicationDelegate {var window: UIWindow?var app: App?func application(application: UIApplication, didFinishLaunchingWithOptions launchOptions: [NSObject: AnyObject]?) -> Bool {if let window = window {app = App(window: window)}return true}}
我们的问题在于我们的App.init是一堆代码。里面有很多回调,包括了回调中的回调。我们应该通过把这些回调拿出来来改进我们的代码,因为回调的情况只会把这些变得复杂:navigation栈中的每一层会引起另一个嵌套的回调。
删除嵌套回调
放弃用闭包配置回调,我们可以把代码放到didSelectEpisode方法中。
func didSelectEpisode(episode: Episode) {let detailVC = storyboard.instantiateViewControllerWithIdentifier("Detail") as! DetailViewControllerdetailVC.episode = episodenavigationController.pushViewController(detailVC, animated: true)}
在我们的闭包中,我们可以调用didSelectEpisode方法。
episodesVC.didSelect = { episode inself.didSelectEpisode(episode)}
didSelectEpisode听起来像是一个回调方法。改进这个命名,用其他的比如showEpisode可能会更好。
func showEpisode(episode: Episode) {let detailVC = storyboard.instantiateViewControllerWithIdentifier("Detail") as! DetailViewControllerdetailVC.episode = episodenavigationController.pushViewController(detailVC, animated: true)}
为了编译这些,我们把故事版和navigation Controller拉出来放到App类中。
final class App {let storyboard = UIStoryboard(name: "Main", bundle: nil)let navigationController: UINavigationControllerinit(window: UIWindow) {navigationController = window.rootViewController as! UINavigationController// ...}// ...}
为了不写闭包和调用这个方法,我们可以配置didSelect方法,这样写清爽多了。
episodesVC.didSelect = showEpisode
我们可以给个人中心的选择做同样的事情。我们创建showProfile方法并从闭包中拉出来。
init(window: UIWindow) {navigationController = window.rootViewController as! UINavigationControllerlet episodesVC = navigationController.viewControllers[0] as! EpisodesViewControllerepisodesVC.didSelect = showEpisodeepisodesVC.didTapProfile = showProfile}func showProfile() {let profileNC = self.storyboard.instantiateViewControllerWithIdentifier("Profile") as! UINavigationControllerlet profileVC = profileNC.viewControllers[0] as! ProfileViewControllerprofileVC.didTapClose = {self.navigationController.dismissViewControllerAnimated(true, completion: nil)}navigationController.presentViewController(profileNC, animated: true, completion: nil)}
有了这些方法命名确实增加了可读性,因为这些命名方法比所有这些嵌套的回调都容易理解。
我们成功的让view Controllers简单。仅仅app类知道他们是怎么连接的。为了展示这个改变有多简单,我们可以在一个视频集被点击的时候,展示个人中心view controller。我们只需要在一个地方改变,就能让我们的app不同。
episodesVC.didSelect = { _ in self.showProfile() }
App这个类代码密度比较大,但是其他的代码都很简单而且解耦。还有个问题,当你看到一个持有self引用的闭包的时候,你需要知道是否形成了循环引用。在我们的实例中,没有。举个栗子,只有navigation Controller引用了profile View Controller。一旦你点击了返回,引用页释放了。不过所有代码这些闭包可能会引起你的思考,是不是需要使用weak?当重构的时候,还是容易一不小心就造成循环引用了。
我们的方法可以方便的创建更多可服用的view Controller.举个栗子,我们可以使用一些泛型View Controller在不同的地方复用。让我们期待后面的几个视频集吧。

若有收获,就点个赞吧
0 人点赞
