一、概述
1.1 web开发的介绍
- web开发是完成,程序员将代码项目开发好了之后,将项目部署在服务站点上,其他用户可以通过访问该服务站点,进行项目的执行。
- 前端开发
HTML、DIV+CSS、JavaScript
- 后端开发
1.2 手写一个服务站点
import java.net.*;import java.io.*;//编写一个tcp的服务端public class Server{public static void main(String[] args)throws Exception{//创建tcp服务端套接字对象ServerSocket ss = new ServerSocket(10001);//获取socket套接字对象Socket socket = ss.accept();//获取输出流对象OutputStream out = socket.getOutputStream();//将硬盘中的文件读入内存BufferedReader br = new BufferedReader(new FileReader("d:\\test\\index.html"));//复制String line = null;while((line = br.readLine()) != null){out.write(line.getBytes());}//关闭流br.close();out.close();socket.close();ss.close();}}
1.3 常用的服务器
1、下载tomcat服务器,下载路径:http://tomcat.apache.org/
2、启动服务器
- tomcat目录结构
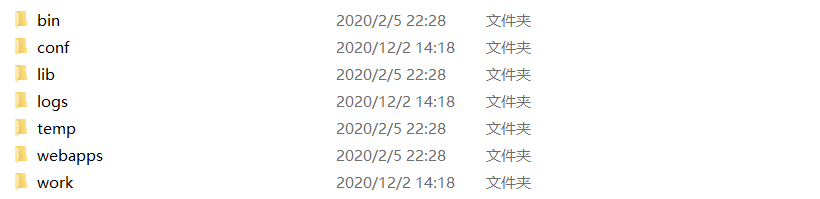
- 解释tomcat服务器的目录
1、bin目录:存放的是开启和关闭等可执行的文件
2、conf目录:放置配置文件的,里面的server.xml配置文件为全局的配置文件
3、lib目录:存放tomcat服务器的依赖jar包,其中包括了Servlet.jar包
4、logs目录:存放tomcat运行和报错的日志文件
5、temp目录:在tomcat服务器运行期间,用来存储临时文件的。
6、webapps目录:用来存放程序员开发的应用程序,通过访问服务器,实际上就是访问服务器下的webapps目录里面的资源。
7、work目录:主要用来存放tomcat运行期间的一些目录,缓存目录
1.5 web应用程序结构(开发程序结构)
1、web容器(webapps目录):主要用于存放应用程序的目录
2、webContent目录:主要用来存放静态资源等,页面资源、图片资源、js资源和css资源
3、classes目录:java可执行文件的存放目录
4、lib目录:和上面的tomcat中lib目录不一样,要完成该web程序开发所需要的依赖jar包
5、web.xml配置文件:用来配置该应用程序的全局配置文件,会被注解所替代。
二、网络协议
2.1 模型概念
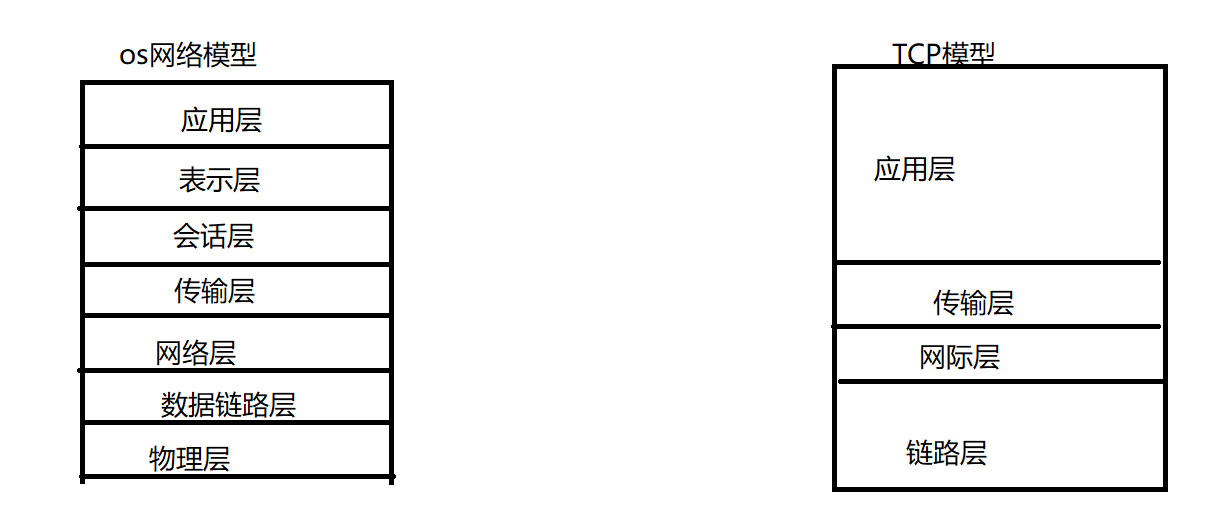
1、物理层:传输的网线,一般分为电缆或者光纤,数据称为比特数据
2、数据链路层:识别mac地址,找到主机,硬件:交换机
3、网络层:主要用于接受数据链路层的数据,完成硬件:路由器
4、传输层:用户数据传输,通过一些指定的协议进行传输数据,比如:HTTP和HTTPS协议。
5、会话层:通过ip等数据,确定数据的主机
6、表示层:对接受到的数据进行解析,其中包括解码、解密加密、压缩和解压缩等操作。
7、应用层:浏览器或者应用程序等,可以供用户使用的。
2.2 HTTP协议
- HTTP协议,全称:Hypertext transfer protocol,超文本传输协议
- 完成B/S系统的协议,称为浏览器和服务器系统。
- HTTP版本:1.0和1.1
1、HTTP/1.0版本
2、HTTP/1.1版本
两个版本的区别:
1.0版本:链接之后,当数据传输完毕会断开连接
1.1版本:链接之后,数据传输完毕不会断开连接,主动关闭连接。
2.3 HTTP协议的请求数据(重点Request)
http协议包括:客户端请求服务器和服务器响应客户端,请求:客户端向服务器发起了请求传输了数据以及请求头信息;响应:服务器通过请求成功之后,给客户端发起响应数据和响应头信息。
- 查看请求数据,需要浏览器端进行抓包,抓取数据包,通过数据包对该次请求进行分析。
请求头字段和数据(重点):客户端可以通过请求头字段及数据告诉服务器一些标准
请求头如图: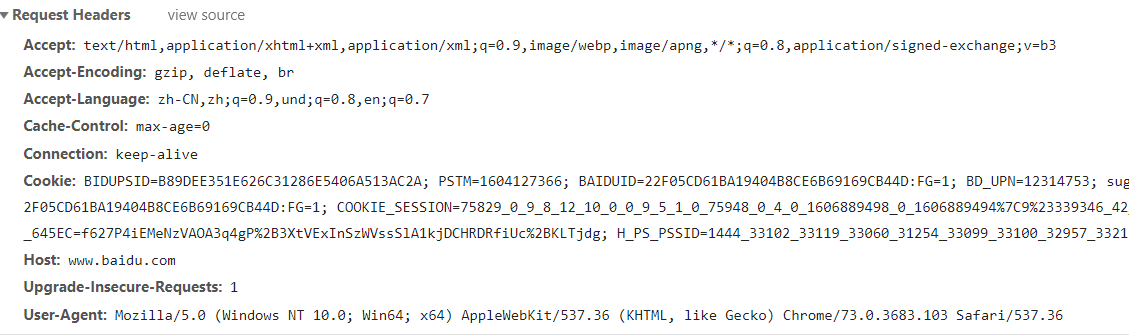
对请求头字段及数据进行解析:
- Accept:浏览器告诉服务器,当前浏览器能够接受的数据类型
- Accept-Encoding:浏览器告诉服务器,能接受压缩格式
- Accept-Language:浏览器告诉服务器,语言格式
- Cache-Control:浏览器告诉服务器,缓存的时间长度。
- Connection:浏览器告诉服务器,请求成功之后,是否保持连接
- Cookie(重点,客户端层面的会话技术):后面会专门学习到的会话技术
- Host:浏览器告诉服务器,请求的主机名+端口
User-Agent:浏览器高度服务器,当前请求的浏览器版本。
2.4 服务器响应浏览器的请求(Response)
响应头字段及数据:由服务器告诉浏览器一些规则及数据,要求浏览器按照响应头中的规则进行解析数据
图片: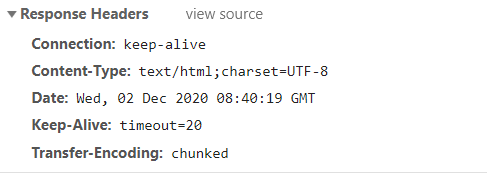
响应字段及数据1、Connection:服务器告诉浏览器是否保持连接
- 2、Content-type:服务器告诉浏览器,本次响应的数据格式及编码集,很重要,后续会通过该响应头规定浏览器以指定编码集打开数据,解决乱码问题。
- 3、Date:服务器告诉浏览器响应的时间点。
- 4、Keep-Alive:服务器告诉浏览器是否保持链接
- 5、Content-Length:服务器告诉浏览器,本次响应的数据长度
响应的状态码:request status
100-199:服务器成功接收到了该次请求,需要用户进一步操作,才能进行正常的请求响应,不常见
200-299:服务器收到该次请求,并且成功的做了响应,一般为200
300-399:服务器收到该次请求,但是需要用户继续页面跳转才能正常的进行访问,304,307
400-499:请求到了服务器,但是,服务器找不到你想要的资源,一般是404
500-599:服务器接收到了请求,但是服务器端代码错误,代码异常,代码error
三、Servlet入门
3.1 在eclipse工具上部署tomcat
3.2 Servlet接口
- 通过查看API,Servlet是一个接口,里面提供了公共的方法,其中包含声明周期的方法,比如:
1、init()方法,用于Servlet的初始化
2、service()方法,用于接受并响应处理请求
3、destroy()方法,用于销毁一个Servlet
- 提供了其他的方法,比如:
1、getServletConfig()方法:获取关于生命周期的一些参数信息
2、getServletInfo()方法:获取启动服务器和关闭服务器等参数信息。(基本不用)
- 要编写一个自己的Servlet,不需要直接实现Serlvet接口,只需要继承Servlet的实现类即可,比如:
1、GenericServelt类
2、HttpServlet类
3.3 继承GenericServlet类
java代码 ```java public class ServletDemo1 extends GenericServlet{ /*
Title: service
Description: 重写Service方法
- @param request 获取请求的对象,目前的作用,获取前端传递过来的参数,没有参数可以不用
- @param response 发出响应的对象,由服务器将数据传递给浏览器
- @throws ServletException
- @throws IOException
@see javax.servlet.GenericServlet#service(javax.servlet.ServletRequest, javax.servlet.ServletResponse) */ @Override public void service(ServletRequest request, ServletResponse response) throws ServletException, IOException { System.out.println(“接受到了请求,并执行service方法”); //根据response对象获取 OutputStream out = response.getOutputStream();
//输出数据 out.write(“hello heiheihei”.getBytes());
}
}
- web.xml配置信息```xml<?xml version="1.0" encoding="UTF-8"?><web-app version="3.1" xmlns="http://xmlns.jcp.org/xml/ns/javaee" xmlns:xsi="http://www.w3.org/2001/XMLSchema-instance" xsi:schemaLocation="http://xmlns.jcp.org/xml/ns/javaee http://xmlns.jcp.org/xml/ns/javaee/web-app_3_1.xsd"><!-- 配置Servlet的映射关系 --><servlet><!-- 给servlet取一个名字,建议和类名一致 --><servlet-name>ServletDemo1</servlet-name><!-- 对应类的全路径 --><servlet-class>com.woniuxy.servlet.ServletDemo1</servlet-class></servlet><!-- 前端的路径请求配置 --><servlet-mapping><!-- 给该映射取一个名字,要求:必须和对应的servlet中servlet-name的值一致 --><servlet-name>ServletDemo1</servlet-name><!-- 配置前端输入的映射名称 --><url-pattern>/demo1</url-pattern></servlet-mapping></web-app>
3.4 继承HttpServlet类开发
public class ServletDemo2 extends HttpServlet{@Overrideprotected void doGet(HttpServletRequest req, HttpServletResponse resp) throws ServletException, IOException {System.out.println("执行了get请求");doPost(req,resp);}@Overrideprotected void doPost(HttpServletRequest request, HttpServletResponse response) throws ServletException, IOException {//获取响应的输出流OutputStream out = response.getOutputStream();out.write("hello 123123".getBytes());}}
web.xml配置信息
<!-- 配置ServletDemo2映射 --><servlet><servlet-name>ServletDemo2</servlet-name><servlet-class>com.woniuxy.servlet.ServletDemo2</servlet-class></servlet><servlet-mapping><servlet-name>ServletDemo2</servlet-name><url-pattern>/demo2</url-pattern></servlet-mapping>
总结:完成一个简单的web项目开发的步骤
1、创建一个类,并继承GenericServlet或者HttpServlet(推荐方式),并且重写service或者重写doGet()和doPost()方法。
2、配置web.xml映射文件(后续用注解),配置中需要servlet和servlet-mapping,servlet里面配置名字和类的全路径,目的是找到执行的类文件;servlet-mapping里面配置的是名称和请求的路径,路径是前端请求的路径。
3、浏览器发起请求,在地址栏直接输出请求地址:localhost:8080/工程名/url地址,url地址为url-pattern标签中的名称一致。
在两个类中,GenericServlet类是HttpServlet的父类,建议使用HttpServlet类进行实现web程序的开发。
3.5 请求步骤和Servlet生命周期
3.5.1 请求步骤
主要是为了说明从浏览器发起请求到服务器整个过程中的解析步骤,需要从地址栏开始。比如:localhost:8080/工程名/请求映射
1、从请求地址中,解析出主机名。
2、请求地址中解析出端口,tomcat默认端口号为8080。
3、服务器找出服务器中的资源名称,资源名称一般和工程名相同。
4、找到web.xml对应的映射名称,从而找到实际运行的java类代码。
5、主动执行service,或者doPost或者doGet方法。
6、服务器执行完方法之后,进行响应
3.5.2 Servlet生命周期
初始化的方法init:只有对该Servlet第一次发送请求的时候执行,后续的请求将不再初始化
@Overridepublic void init() throws ServletException {System.out.println("demo3初始化");}
销毁的方法destroy:只有发生了请求的Servlet类在关闭服务器的时候,才会执行销毁方法。
@Overridepublic void destroy() {System.out.println("demo3销毁");}
1、服务器在启动的时候,会创建一个Servlet对象。
2、在创建了Servlet对象之后,会在对服务器发起第一次请求,会调用对应的Servlet类里面的init方法进行初始化。
3、在发起请求之后,Servlet对象会给doGet或者doPost方法分别创建HttpServletRequest对象和HttpServletResponse对象。
4、执行doPost或者doGet方法中的代码,处理请求(request)和产生响应(response)
5、服务器在关闭的时候,会销毁Servlet对象。3.6 Servlet中其他对象
3.6.1 ServletConfig对象
概念:获取和Servlet生命周期相关的参数数据,该对象和初始化Servlet方法有关系,获取ServletConfig对象。
获取ServletConfig对象的方法1:通过初始化方法init直接获取,在init方法里面有参数ServletConfig config参数,在服务器启动的时候,第一次发送请求之后,会将对应的参数及参数值封装到一个ServletConfig对象中
public class ServletDemo4 extends HttpServlet{//声明全局的ServletConfig对象ServletConfig config = null;@Overrideprotected void doGet(HttpServletRequest req, HttpServletResponse resp) throws ServletException, IOException {doPost(req, resp);}@Overrideprotected void doPost(HttpServletRequest req, HttpServletResponse resp) throws ServletException, IOException {System.out.println("请求到了");//获取所有的参数名称Enumeration<String> e = config.getInitParameterNames();while(e.hasMoreElements()) {String name = e.nextElement();String value = config.getInitParameter(name);System.out.println(value);}}@Overridepublic void init(ServletConfig config) throws ServletException {this.config = config;}}
获取ServletConfig对象的方式2:直接通过Servlet对象获取ServletConfig对象
@Overrideprotected void doPost(HttpServletRequest req, HttpServletResponse resp) throws ServletException, IOException {//获取ServletConfig对象ServletConfig config = this.getServletConfig();String value = config.getInitParameter("username");System.out.println(value);}
3.6.2 Request对象(重点)
request对象主要用于获取请求及请求中的参数,
- 请求路径:
1、直接请求Servlet,路径:localhost:8080/工程名/url-pattern
2、在浏览器请求前端页面,路径:localhost:8080/工程名/webContent下面的文件夹/文件名.后缀
3、在前端的form表单中的action=”/工程名/url-pattern映射”
- 跳转路径:
1、请求转发,如果资源再WebContent中,路径:/文件夹名/页面.html
2、请求转发,如果资源再WEB-INF下,路径:/WEB-INF/文件夹/页面.html
3、请求换发,如果是请求转发到其他的servlet,路径:/url路径, 和注解里面的值一致
4、重定向,只能实现页面跳转,WEB-INF下面的文件无法访问,路径:文件夹/页面.html
- get请求和post请求的区别
1、对于数据安全来说,get请求会将参数值放在URL上,而POST存在请求体中
2、对于数据的长度来说,get请求参数基本要求1k,而post理论上没有限制
3、对于缓存,get请求浏览器会自动缓存,而post需要手动设置才会缓存
4、对于数据历史记录,get请求会将参数及参数值存在历史记录,而post不会将参数值存入历史记录
5、对于请求次数,get只向服务器请求一次,成功则返回100;而post请求,会发送两次请求,第一次连接服务器,成功返回100,再次发送数据包给服务器,返回200
request对象中的方法介绍1、getCookies();通过请求获取由浏览器带过来的cookie对象,获取数组2、getHeader(String name);根据请求头字段名获取对应的参数值3、getMethod();获取该次请求方式(get和post)4、getRequestURL();获取该次请求的请求路径,其中包括了主机名和端口等。5、getRequestURI();获取该次请求的资源路径,6、getSession();获取session对象7、getAttribute(String name);根据名称获取元素值8、setAttribute(String name,Object obj);设置元素的值到requestremoveAttribute(String name);根据名称将执行元素从request域中移除9、getInputStream();获取输入流对象10、getLocalAddr();获取服务器的主机ip(了解)11、getParameter();获取前端传递过来的参数值12、getParameterNames();获取前端所有的标签名称,可以再根据名称获取value值13、getRequestDispatcher(String path);请求转发14、setCharacterEncoding(String character) ;设置编码集
3.6.3 Response对象(重点)
主要服务器端的响应
response对象的方法*1、addCookie(Cookie cookie);服务器向浏览器添加一个cookie对象2、addHeader(String name,String value);服务器向浏览器发送一个指定头字段及值**3、setHeader(String value);服务器向浏览器设置一个头字段的值。进行设置编码response.setHeader("Content-Type","text/html;charset=utf-8");4、setStatus(int sc);修改服务器向浏览器发送的状态码,成功默认发送200*5、getOutputStream();获取字节输出流6、getWriter();获取字符输出流*7、setCharacterEncoding();设置在响应期间的编码集8、setContentType();设置编码的方法*9、sendRedirect(String local);实现重定向,一般用于页面跳转
一次请求,设置编码集,避免编码问题
1、request.setCharacterEncoding("UTF-8");2、response.setHeader("Content-type","text/html;charset=utf-8");---->response.setContentType("UTF-8")3、response.setCharacterEncoding("UTF-8");
3.6.4 ServletContext对象
ServletContext对象在容器中是全局的对象,整个服务器共享一个ServletContext对象
- 获得ServletContext对象的方式
1、通过ServletConfig对象中getServletContext()方法获取ServletContext对象。
ServletConfig config = this.getServletConfig();ServletContext context = config.getServletContext();
2、通过Servlet对象获取ServletContext对象,推荐方式。
ServletContext context = this.getServletContext();
SerlvetContext对象方法列表
1、getAttribute(String name);向ServletContext域中获取一个数据2、setAttribute(String name,Object obj);向ServletContext域中存入一个数据3、getInitParameter(String name);获取全局的配置参数4、getInitParameterNames();获取全局配置参数中的所有名称5、getResourceAsStream(String path),根据路径,获取输入流6、getRealPath();根据相对路径,找到带有盘符的绝对路径
ServletContext对象的作用:
作用1:获取全局的配置参数
<!-- 配置全局的参数,所有的Servlet类中都能获取该配置参数的值 --><context-param><param-name>charset</param-name><param-value>utf-8</param-value></context-param>
使用ServletContext对象获取全局的配置参数值
ServletContext context = this.getServletContext();String charset = context.getInitParameter("charset");System.out.println("charset = "+charset);
作用2:实现多个Servlet之间的数据共享 ```java @WebServlet(“/demo1”) public class ServletDemo1 extends HttpServlet {
protected void doGet(HttpServletRequest request, HttpServletResponse response) throws ServletException, IOException {
doPost(request, response);
}
protected void doPost(HttpServletRequest request, HttpServletResponse response) throws ServletException, IOException {//获取ServletContext对象ServletContext context = this.getServletContext();//向ServletContext对象中存入参数值context.setAttribute("name", "张三");//向前端发送数,表示该次请求已经响应成功PrintWriter pw = response.getWriter();pw.write("demo1success");}
}
@WebServlet(“/demo2”) public class ServletDemo2 extends HttpServlet { protected void doGet(HttpServletRequest request, HttpServletResponse response) throws ServletException, IOException { doPost(request, response); }
protected void doPost(HttpServletRequest request, HttpServletResponse response) throws ServletException, IOException {//获取ServletContext对象ServletContext context = this.getServletContext();//获取SerlvetContext对象中的值String name = (String)context.getAttribute("name");System.out.println("name = "+name);//向前端发送数,表示该次请求已经响应成功PrintWriter pw = response.getWriter();pw.write("demo2success");}
}
- 作用3:读取配置文件(比较重要),根据路径直接获取流,getResourceAsStream使用该方法根据路径获取输入流的时候,因为执行代码的是服务器,路径只识别服务器路径,在web项目里面,src目录下的文件,到了服务器中,路径将修改为:/WEB-INF/classes/```java@WebServlet("/read1")public class ReadFile1 extends HttpServlet {protected void doGet(HttpServletRequest request, HttpServletResponse response) throws ServletException, IOException {doPost(request, response);}protected void doPost(HttpServletRequest request, HttpServletResponse response) throws ServletException, IOException {System.out.println("成功请求");//获取ServletContext对象ServletContext context = this.getServletContext();//根据路径获取输入流InputStream in = context.getResourceAsStream("/WEB-INF/classes/db.properties");//创建Properties对象Properties prop = new Properties();prop.load(in);//解析数据String driver = prop.getProperty("driver");System.out.println("driver = "+driver);}}
使用ServletContext对象读取文件,根据getRealPath()方法,该方法是通过相对路径,读取到服务器中的绝对路径 ```java @WebServlet(“/read2”) public class ReadFile2 extends HttpServlet { protected void doGet(HttpServletRequest request, HttpServletResponse response) throws ServletException, IOException {
doPost(request, response);
}
protected void doPost(HttpServletRequest request, HttpServletResponse response) throws ServletException, IOException {
//获取ServletContext对象ServletContext context = this.getServletContext();//根据相对路径获取绝对路径String path = context.getRealPath("/WEB-INF/classes/db.properties");//根据路径获取输入流InputStream in = new FileInputStream(path);Properties prop = new Properties();prop.load(in);//解析数据String driver = prop.getProperty("driver");System.out.println("driver = "+driver);
} }
- 读取配置文件,把文件存放在webContent目录下```java@WebServlet("/read3")public class ReadFile3 extends HttpServlet {protected void doGet(HttpServletRequest request, HttpServletResponse response) throws ServletException, IOException {doPost(request, response);}protected void doPost(HttpServletRequest request, HttpServletResponse response) throws ServletException, IOException {//获取ServletContext对象ServletContext context = this.getServletContext();//根据路径获取流InputStream in = context.getResourceAsStream("/db.properties");Properties prop = new Properties();prop.load(in);//解析数据String driver = prop.getProperty("driver");System.out.println("driver = "+driver);}}
四、JSP基础应用
- jsp看上去是前端代码,本身实际上是java代码,jsp的底层为Servlet
在jsp页面使用el表达式完成后端服务器响应数据,前端获取数据 ```html //页面的内容,需要创建jsp文件,并在上面引入jstl的表达式库 <%@ taglib uri=”http://java.sun.com/jsp/jstl/core“ prefix=”c”%> <%@ page language=”java” contentType=”text/html; charset=UTF-8” pageEncoding=”UTF-8”%> <%@ taglib uri=”http://java.sun.com/jsp/jstl/core“ prefix=”c”%> <!DOCTYPE html>
接受服务器端的代码
获取字符串数据:${status }
获取整形数据:${age }
获取对象中的数据: ${user.address }
${user.gender }
${user.tel }
${user.height }
${user.weight }
获取集合中的数据:
商品名称 库存量 单价 ${prod.name } ${prod.number } ${prod.price }
- 后端代码```java@WebServlet("/index")public class IndexServlet extends HttpServlet {protected void doGet(HttpServletRequest request, HttpServletResponse response) throws ServletException, IOException {doPost(request, response);}protected void doPost(HttpServletRequest request, HttpServletResponse response) throws ServletException, IOException {String status = "success";int age = 19;//创建User对象User user = new User();user.setAddress("重庆");user.setGender("男");user.setTel("8080");user.setHeight(180);user.setWeight(80);List<String> str = new ArrayList<String>();str.add("男装");str.add("女装");str.add("鞋子");//创建对象,并将对象存入集合Product p1 = new Product("旺仔",1000,5.5);Product p2 = new Product("旺仔",1000,6.5);Product p3 = new Product("旺仔",1000,7.5);Product p4 = new Product("旺仔",1000,8.5);Product p5 = new Product("旺仔",1000,9.5);Product p6 = new Product("旺仔",1000,10.5);Product p7 = new Product("旺仔",1000,11.5);Product p8 = new Product("旺仔",1000,12.5);List<Product> listProd = new ArrayList<>();listProd.add(p1);listProd.add(p2);listProd.add(p3);listProd.add(p4);listProd.add(p5);listProd.add(p6);listProd.add(p7);listProd.add(p8);//将该参数存入到request域中request.setAttribute("status", status);request.setAttribute("age", age);request.setAttribute("user", user);request.setAttribute("str", str);request.setAttribute("list", listProd);//实现请求转发request.getRequestDispatcher("/message.jsp").forward(request, response);}}

若有收获,就点个赞吧
0 人点赞
