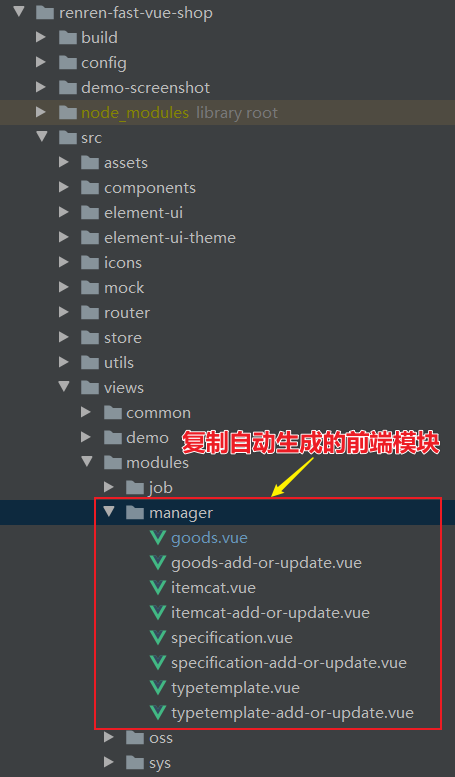
一、创建前端项目renren-fast-vue-shop
1.1 项目结构如下:
1.2 修改static/config/index.js文件
;(function () {
  window.SITE_CONFIG = {};

  // api接口请求地址
  //window.SITE_CONFIG['baseUrl'] = 'http://localhost:8080/renren-fast';
  window.SITE_CONFIG['baseUrl'] = 'http://zeyigou.com/s';

  // cdn地址 = 域名 + 版本号
  window.SITE_CONFIG['domain']  = './'; // 域名
  window.SITE_CONFIG['version'] = '';   // 版本号(年月日时分)
  window.SITE_CONFIG['cdnUrl']  = window.SITE_CONFIG.domain + window.SITE_CONFIG.version;
})();
1.3 修改config/index.js文件
'use strict'
// Template version: 1.2.5
// see http://vuejs-templates.github.io/webpack for documentation.

const path = require('path')
const devEnv = require('./dev.env')

module.exports = {
  dev: {
    // Paths
    assetsSubDirectory: 'static',
    assetsPublicPath: '/',
    // 代理列表, 是否开启代理通过[./dev.env.js]配置
    proxyTable: devEnv.OPEN_PROXY === false ? {} : {
      '/proxyApi': {
        target: 'http://zeyigou.com/s',
        changeOrigin: true,
        pathRewrite: {
          '^/proxyApi': '/'
        }
      }
    },
    hot:true,   //加上这句才会进行热启动
    // Various Dev Server settings
    host: 'localhost', // can be overwritten by process.env.HOST
    port: 8002, // can be overwritten by process.env.PORT, if port is in use, a free one will be determined
    autoOpenBrowser: true,
    errorOverlay: true,
    notifyOnErrors: true,
    poll: false, // https://webpack.js.org/configuration/dev-server/#devserver-watchoptions-

    // Use Eslint Loader?
    // If true, your code will be linted during bundling and
    // linting errors and warnings will be shown in the console.
    useEslint: false,   //这里关闭eslint
    // If true, eslint errors and warnings will also be shown in the error overlay
    // in the browser.
    showEslintErrorsInOverlay: false,

    /**
     * Source Maps
     */

    // https://webpack.js.org/configuration/devtool/#development
    devtool: 'eval-source-map',

    // If you have problems debugging vue-files in devtools,
    // set this to false - it *may* help
    // https://vue-loader.vuejs.org/en/options.html#cachebusting
    cacheBusting: true,

    // CSS Sourcemaps off by default because relative paths are "buggy"
    // with this option, according to the CSS-Loader README
    // (https://github.com/webpack/css-loader#sourcemaps)
    // In our experience, they generally work as expected,
    // just be aware of this issue when enabling this option.
    cssSourceMap: false,
  },

  build: {
    // Template for index.html
    index: path.resolve(__dirname, '../dist/index.html'),

    // Paths
    assetsRoot: path.resolve(__dirname, '../dist'),
    assetsSubDirectory: 'static',
    assetsPublicPath: './',

    /**
     * Source Maps
     */

    productionSourceMap: false,
    // https://webpack.js.org/configuration/devtool/#production
    devtool: '#source-map',

    // Gzip off by default as many popular static hosts such as
    // Surge or Netlify already gzip all static assets for you.
    // Before setting to `true`, make sure to:
    // npm install --save-dev compression-webpack-plugin
    productionGzip: false,
    productionGzipExtensions: ['js', 'css'],

    // Run the build command with an extra argument to
    // View the bundle analyzer report after build finishes:
    // `npm run build --report`
    // Set to `true` or `false` to always turn it on or off
    bundleAnalyzerReport: process.env.npm_config_report
  }
}
1.4 修改config/dev.env.js
'use strict'
const merge = require('webpack-merge')
const prodEnv = require('./prod.env')

module.exports = merge(prodEnv, {
  NODE_ENV: '"development"',
  OPEN_PROXY: true // 是否开启代理, 重置后需重启vue-cli
})
二、创建后端项目renren-fast-shop
修改application-dev.yml文件:
spring:
  datasource:
      type: com.alibaba.druid.pool.DruidDataSource
      druid:
          driver-class-name: com.mysql.cj.jdbc.Driver
          url: jdbc:mysql://192.168.56.10:3306/renren_fast_shop?useUnicode=true&characterEncoding=UTF-8&serverTimezone=Asia/Shanghai
          username: root
          password: 123
三、修改前端views/shop/goods.vue文件
```vue
商品基本信息 {{dataForm}} 上传图片 {{ scope.row.color }} 删除 {{ scope.row.text }} 规格 保存 返回列表 {{imageEntity}} 点击上传 只能上传jpg/png文件,且不超过500kb
<a name="bbWUO"></a>
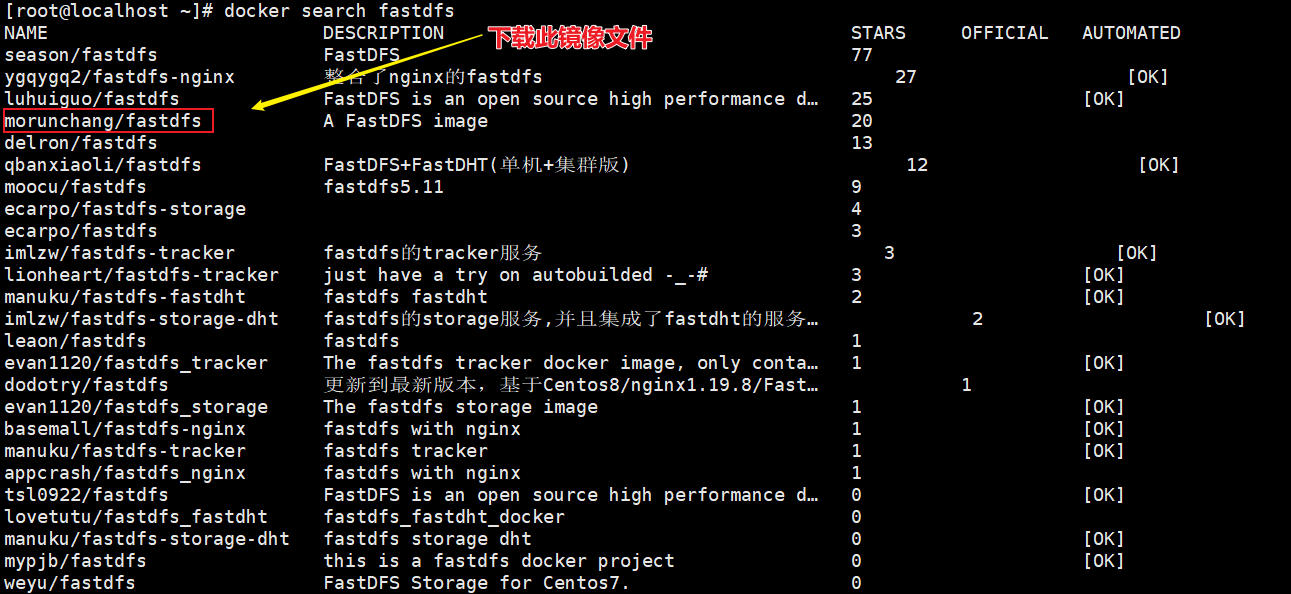
## 四、fastDFS服务器安装与配置
<a name="q84Jb"></a>
### 4.1 从docker中下载fastdfs镜像
```shell
docker search fastdfs
4.2 安装tracker与storage服务器
4.2.1 创建Tracker:
docker run -d --name tracker --net=host morunchang/fastdfs sh tracker.sh
4.2.2 创建Storage:
docker run -d --name storage --net=host -e TRACKER_IP=192.168.56.10:22122 -e GROUP_NAME=group1 morunchang/fastdfs sh storage.sh
4.2.3 配置fastdfs自带的服务器:
第一步:进入storage内部:
docker exec -it storage /bin/bash
第二步:编辑nginx服务器:
Vi /etc/nginx/conf/nginx.conf

4.3 在zyg-common工程中引入依赖:
        <dependency>
            <groupId>org.csource.fastdfs</groupId>
            <artifactId>fastdfs</artifactId>
            <version>1.2</version>
        </dependency>
4.4 在zyg-common工程中添加工具包访问fastdfs:
/**
 * 功能: 操作fastdfs的工具类
 * 参数:
 * 返回值:
 * 时间: 2021/7/28 14:49
 */
public class FastDFSClient {
    private TrackerClient trackerClient = null;
    private TrackerServer trackerServer = null;
    private StorageServer storageServer = null;
    private StorageClient1 storageClient = null;

    public FastDFSClient(String conf) throws Exception {
        if (conf.contains("classpath:")) {
            conf = conf.replace("classpath:", this.getClass().getResource("/").getPath());
        }
        ClientGlobal.init(conf);
        trackerClient = new TrackerClient();
        trackerServer = trackerClient.getConnection();
        storageServer = null;
        storageClient = new StorageClient1(trackerServer, storageServer);
    }
    /**
     * 上传文件方法
     * <p>Title: uploadFile</p>
     * <p>Description: </p>
     * @param fileName 文件全路径
     * @param extName 文件扩展名,不包含(.)
     * @param metas 文件扩展信息
     * @return
     * @throws Exception
     */
    public String uploadFile(String fileName, String extName, NameValuePair[] metas) throws Exception {
        String result = storageClient.upload_file1(fileName, extName, metas);
        return result;
    }
    public String uploadFile(String fileName) throws Exception {
        return uploadFile(fileName, null, null);
    }
    public String uploadFile(String fileName, String extName) throws Exception {
        return uploadFile(fileName, extName, null);
    }
    /**
     * 上传文件方法
     * <p>Title: uploadFile</p>
     * <p>Description: </p>
     * @param fileContent 文件的内容,字节数组
     * @param extName 文件扩展名
     * @param metas 文件扩展信息
     * @return
     * @throws Exception
     */
    public String uploadFile(byte[] fileContent, String extName, NameValuePair[] metas) throws Exception {
        String result = storageClient.upload_file1(fileContent, extName, metas);
        return result;
    }
    public String uploadFile(byte[] fileContent) throws Exception {
        return uploadFile(fileContent, null, null);
    }
    public String uploadFile(byte[] fileContent, String extName) throws Exception {
        return uploadFile(fileContent, extName, null);
    }
}
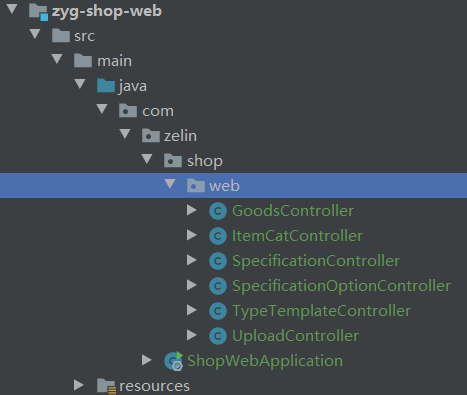
4.5 新建后端项目zyg-shop-web:
4.5.1 pom.xml文件如下:
 <dependencies>
        <dependency>
            <groupId>org.springframework.boot</groupId>
            <artifactId>spring-boot-starter-web</artifactId>
        </dependency>
        <dependency>
            <groupId>com.zelin</groupId>
            <artifactId>zyg-sellergoods-service</artifactId>
            <version>2.0</version>
        </dependency>
    </dependencies>
4.5.2 复制zyg-manager-web工程下的相关controller如下图:
4.5.3 application.yml文件如下:
server:
  port: 9002

spring:
  dubbo:
    registry:
      address: zookeeper://192.168.56.10:2181
    base-package: com.zelin.shop.web.controller
    application:
      name: zyg-shop-web

logging:
  level:
    com.zelin: debug
4.6 在zyg-shop-web工程resources/fastdfs.conf配置文件
tracker_server=192.168.56.10:22122
4.7 在zyg-manager-web工程定义文件上传控制器
@RestController
public class UploadController {
    /**
     * 功能: 测试原生的文件上传
     * 参数:
     * 返回值: void
     * 时间: 2021/7/28 15:06
     */
    @RequestMapping("uploadxxx")
    public void uploadxxx() throws Exception {
        // //1.对当前fsastdsf的环境进行初始化处理
        ClientGlobal.init("E:\\idea-projects\\java0426\\zyg-parent\\zyg-manager-web\\src\\main\\resources\\fastdfs.conf");
        //2.定义一个TrackerCleint对象
        TrackerClient trackerClient = new TrackerClient();
        //3.根据trackerClient得到trackerServer对象
        TrackerServer trackerServer = trackerClient.getConnection();
        //4.定义一个StorageServer
        StorageServer storageServer = null;
        //5.构造一个StorageClient对象
        StorageClient storageClient = new StorageClient(trackerServer,storageServer);
        //6.进行文件上传
        String[] strings = storageClient.upload_file("d:/abc.jpg", "jpg", null);
        //7.打印得到上传文件每一部分的值
        for (String string : strings) {
            System.out.println(string);
        }
    }
    @RequestMapping("/upload")
    public R upload(MultipartFile file) throws Exception {
        //1.得到fastDFSClient对象
        FastDFSClient fastDFSClient = new FastDFSClient("classpath:fastdfs.conf");
        //2. 获取文件名
        String filename = file.getOriginalFilename();
        //3. 得到文件后缀名
        String suffixName = filename.substring(filename.lastIndexOf(".") + 1);
        System.out.println("filename = " + filename);
        //4. 上传文件
        String s = fastDFSClient.uploadFile(file.getBytes(), suffixName);
        //5. 最后的地址
        String url = "http://192.168.56.10:8080/" + s;

        return R.ok().put("url",url);
    }
}
4.8 前端goods.vue文件中关于文件上传
<!--上传图片对话框-->
    <el-dialog
      title="上传商品图片"
      :close-on-click-modal="false"
      :visible.sync="dialogVisible">
      <el-form :model="imageEntity"  label-width="100px">
        {{imageEntity}}
        <el-form-item label="颜色" prop="name">
          <el-input v-model="imageEntity.color" placeholder="颜色"></el-input>
        </el-form-item>
        <el-form-item label="上传图片" prop="firstChar">
          <!--文件上传组件-->
          <!--:http-request="uploadFile" 此代码代表自定义文件上传-->
          <el-upload
            action=""
            class="upload-demo"
            :file-list="fileList"
            :on-preview="handlePreview"
            :on-remove="handleRemove"
            :http-request="uploadFile"
            list-type="picture">
            <el-button size="small" type="primary">点击上传</el-button>
            <div slot="tip" class="el-upload__tip">只能上传jpg/png文件,且不超过500kb</div>
          </el-upload>
        </el-form-item>
      </el-form>
      <span slot="footer" class="dialog-footer">
      <el-button @click="dialogVisible = false">取消</el-button>
      <el-button type="primary" @click="addPic">确定</el-button>
    </span>
    </el-dialog>
//以下是文件上传js代码:
//0. 上传文件
      uploadFile(val){
        console.log("uploadFile.....")
        //1. 定义Formdata对象
        let form = new FormData();
        console.log("val:",val)
        form.append("file",val.file);
        //2. 清空上传列表(只能一次上传一个图片)
        this.fileList = [];
        //3. 开始文件上传
        this.$http({
          url:this.$http.adornUrl('/manager/upload'),
          method:'post',
          data:form,
          headers:{'Content-Type': 'multipart/form-data' },
        }).then((data)=>{
          console.log("data:",data)
          if(data && data.data.code === 0 ){
            console.log("url--->",data.data.url);
            //得到上传的图片路径
            //this.imageUrl = data.data.url;
            //将图片路径放到文件列表中,注意,文件格式为:{name:xxx,url:xxx}
            this.fileList.push({name:val.raw,url:data.data.url});
            //将图片地址设置给imageEntity
            this.imageEntity.url = data.data.url;
          }
        })
五、在goods.vue文件添加自定义扩展属性
5.1 初始化数组属性:
dataForm:{goods:{typeTemplateId:''},goodsDesc:{customAttributeItems:[],itemImages:[]},items:[]},
5.2 goods.vue页面添加扩展属性
<el-tab-pane label="扩展属性">
        <el-table
          :data="dataForm.goodsDesc.customAttributeItems"
          style="width: 100%;">
          <el-table-column
            header-align="center"
            align="center"
            width="300px"
            label="属性名">
            <template slot-scope="scope">
              <span style="margin-left: 10px">{{ scope.row.text }}</span>
            </template>
          </el-table-column>
          <el-table-column
            header-align="center"
            align="center"
            label="属性值">
            <template slot-scope="scope">
              <el-input v-model="scope.row.value"/>
            </template>
          </el-table-column>
        </el-table>
   </el-tab-pane>
六、在goods.vue文件添加规格及sku商品列表
6.1 规格的显示
6.1.1 后端SpecificationOptionController层
   /**
     * 功能: 根据前台传入的模板表中的specIds对象查询规格及规格选项列表
     * 参数:
     * 返回值: com.zelin.utils.R
     * 时间: 2021/7/29 8:16
     */
    @RequestMapping("/findSpecList")
    public R findSpecList(@RequestBody List<SpecificationVoEntity> specs){
        List<SpecificationVoEntity> specList = specificationOptionService.findSpecList(specs);
        System.out.println("specList = " + specList);
        return R.ok().put("specList",specList);
    }
6.1.2 后端specificationOptionService服务层
/**
     * 功能: 根据规格找到规格及其规格选项列表
     * 参数:
     * 返回值: java.util.List<SpecificationVoEntity>
     * 时间: 2021/7/28 15:42
     */
    @Override
    public List<SpecificationVoEntity> findSpecList(List<SpecificationVoEntity> specs) {
        for (SpecificationVoEntity spec : specs) {
            Long id = spec.getId();
            List<SpecificationOptionEntity> options = this.list(new QueryWrapper<SpecificationOptionEntity>().eq("spec_id", id));
            spec.setOptions(options);
        }
        return specs;
    }
6.1.3 前端goods.vue
页面部分:
  <!--1. 显示规格-->
        <el-table
          :data="specList"
          style="width: 100%;">
          <el-table-column
            header-align="center"
            align="center"
            width="200px">
            <template slot-scope="scope">
              <span style="margin-left: 2px;">{{ scope.row.text }}</span>
            </template>
          </el-table-column>
          <el-table-column
            header-align="center"
            prop="options"
            align="left">
            <template slot-scope="scope">
              <el-checkbox-group  size="mini" v-model="optionList[scope.$index]"
                                  @change="getSpecItems">
                <el-checkbox border v-for="option in scope.row.options" :label="option.optionName" :key="option.id" />
              </el-checkbox-group>
            </template>
          </el-table-column>
        </el-table>

        <!--2. 动态显示sku商品列表-->
        <el-table :data="dataForm.items">
          <!--2.1 处理规格及规格选项-->
          <el-table-column :key="key" :label="item['attributeName']" v-for="(item,key) in dataForm.goodsDesc.specificationItems" align="center" >
            <template slot-scope="scope">
              <span >
               {{scope.row.spec[item['attributeName']]}}
              </span>
            </template>
          </el-table-column>
          <!--2.2 处理价格-->
          <el-table-column  label="价格"  align="center" >
            <template slot-scope="scope">
              <el-input v-model="scope.row.price"/>
            </template>
          </el-table-column>
          <!--2.3 处理数量-->
          <el-table-column  label="数量"  align="center" >
            <template slot-scope="scope">
              <el-input v-model="scope.row.num"/>
            </template>
          </el-table-column>
        </el-table>
JS部分:
   //2. 点击规格改变时触发
    getSpecItems(){
        console.log("optionList---->",this.optionList);
        //2.1 根据optionList的值拼装数据
        let specList = [];
        for(let i = 0;i < this.optionList.length;i++){
          specList.push({"attributeName":this.sName[i],"attributeValue":this.optionList[i]});
        }

        //2.2 将组装发好的数据放赋值给this.dataForm.goodsDesc.specificationItems对象
        this.dataForm.goodsDesc.specificationItems = specList;

        //2.3 处理特殊情况:
        //① 如果this.dataForm.goodsDesc.specificationItems中的某一项的attributeValue的长度为0,就过滤掉
        this.dataForm.goodsDesc.specificationItems=
        this.dataForm.goodsDesc.specificationItems.filter(spec=>{
          return spec.attributeValue.length > 0;
        })
        //② 如果this.dataForm.goodsDesc.specificationItems中没有数据了,就从 this.dataForm.goodsDesc删除它
        if(this.dataForm.goodsDesc.specificationItems.length == 0){
          delete this.dataForm.goodsDesc.specificationItems;
        }
        //2.4 生成items这些sku商品列表
        this.createItemList();
      },

        //3. 当模板id发生变化时,通过规格找到规格选项并返回新的集合
      findSpecList(data){
        this.$http({
          url: this.$http.adornUrl(`/manager/specificationoption/findSpecList`),
          method: 'post',
          data:data
        }).then(({data}) => {
          if (data && data.code === 0) {
             this.specList = data.specList;
             let length = this.specList.length;
             this.header = [];
             for (let i = 0;i < length;i++){
               let specName = this.specList[i].text;
               this.sName[i] = specName;
                this.optionList.push([]);
             }
          }
        })
      },
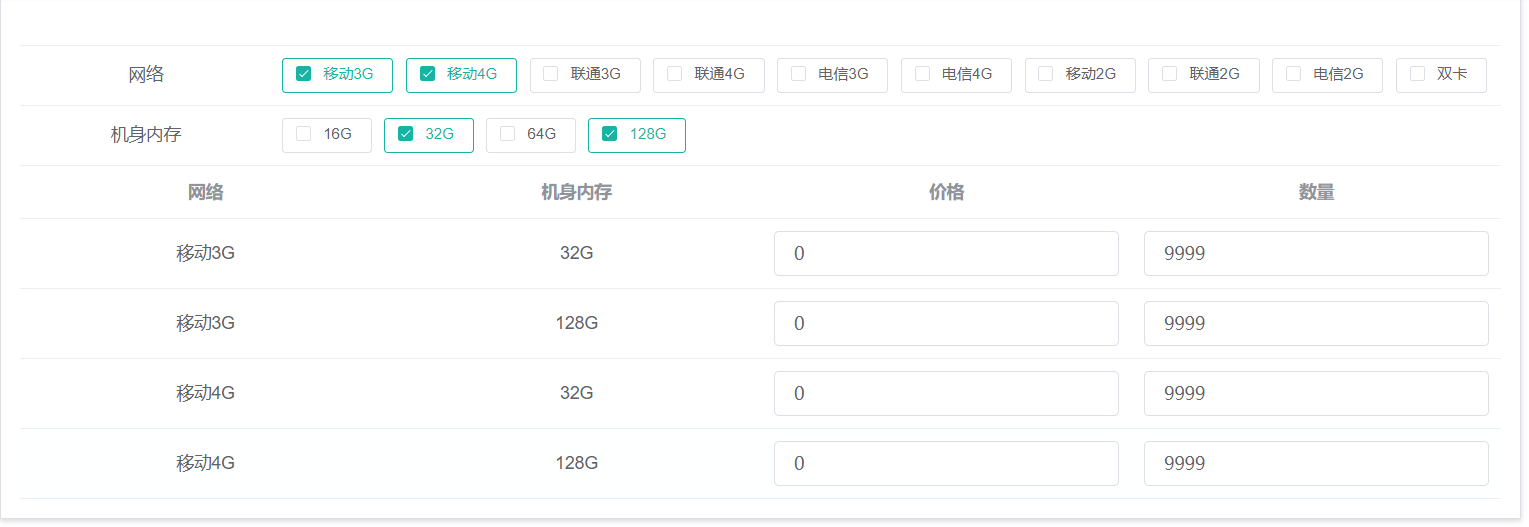
6.2 显示出的规格效果如下:
七、添加商品相关内容:
7.1 处理提交的前台数据为字符串(因后台是字符串接受的)
//1.保存商品
      save(){
        //1.1 深克隆this.dataForm对象,不然,就会触发触件绑定问题。
        let data = JSON.parse(JSON.stringify(this.dataForm));
        //1.2 将传入到后端的goodsDesc中的内部数组都转为字符串
        data.goodsDesc.specificationItems=JSON.stringify( data.goodsDesc.specificationItems);
        data.goodsDesc.customAttributeItems=JSON.stringify(data.goodsDesc.customAttributeItems)
        data.goodsDesc.itemImages=JSON.stringify(data.goodsDesc.itemImages);
        //1.3 将data.items(sku商品列表)中的spec字段(json对象)
        let items = data.items;
        data.items = items.map(item=>{
          item.spec = JSON.stringify(item.spec);
          return item;
        })
        console.log("dataForm----->",data);
        //1.4 向后端发出保存请求
        this.$http({
          url: this.$http.adornUrl(`/manager/goods/save`),
          method: 'post',
          data
        }).then(({data}) => {
          if (data && data.code === 0) {
            //保存成功后,就恢复默认值
            this.dataForm.goods = {};
            this.dataForm.goodsDesc = {customAttributeItems: [],specificationItems: [],itemImages: []};
            this.dataForm.items = [];
            this.optionList=[];   //选择的规格选项列表
          }
        })
      },
7.2 处理watch方法的分类id的是否存在的兼容性:
watch:{
       //1、 当一级分类发生变化时,自动查询出二级分类
        category1Idnew(newV,oldV) {   //newV:代表我们点击的一级分类的id值
          if(newV){
            this.$http({
              url: this.$http.adornUrl(`/manager/itemcat/findByParentId/${newV}`),
              method: 'get',
            }).then(({data}) => {
              if (data && data.code === 0) {
                delete this.dataForm.goods.category2Id ;  //删除此变量就不会自动显示了
                this.categorys2 = data.list;
              }
            })
          }

        },
      //2、 当二级分类发生变化时,自动查询出三级分类
      category2Idnew(newV,oldV) {
        if(newV){
          this.$http({
            url: this.$http.adornUrl(`/manager/itemcat/findByParentId/${newV}`),
            method: 'get',
          }).then(({data}) => {
            if (data && data.code === 0) {
              delete this.dataForm.goods.category3Id ;  //删除此变量就不会自动显示了
              this.categorys3 = data.list;
            }
          })
        }

      },
      //3、 当三级分类发生变化时,自动查询模板id
      category3Idnew(newV,oldV) {
        if(newV){
          this.$http({
            url: this.$http.adornUrl(`/manager/itemcat/info/${newV}`),
            method: 'get',
          }).then(({data}) => {
            if (data && data.code === 0) {
              //delete this.dataForm.goods.category3Id ;  //删除此变量就不会自动显示了
              console.log("data......",data);
              //得到模板id
              this.dataForm.goods.typeTemplateId = data.itemCat.typeId;
            }
          })
        }

      },
      //4. 当模板id发生变化时,自动模板中的品牌列表
      typeTemplateIdnew(templateId,oldV){
        if(templateId){
          //4.1 查询出此模板下的所有品牌列表
          this.$http({
            url: this.$http.adornUrl(`/manager/typetemplate/info/${templateId}`),
            method: 'get',
          }).then(({data}) => {
            if (data && data.code === 0) {
              // 删除品牌,如果不删除就会出现模板id发生变化时,品牌下拉框中的文本框中还会出现原来的品牌
              delete this.dataForm.goods.brandId;
              //① 得到品牌列表
              this.brands = JSON.parse(data.typeTemplate.brandIds);
              //② 得到自定义扩展属性
              this.dataForm.goodsDesc.customAttributeItems = JSON.parse(data.typeTemplate.customAttributeItems);
              //③ 得到规格及规格选项列表
              this.findSpecList( JSON.parse(data.typeTemplate.specIds));
            }
          })
        }

      },
        deep:true
    }
7.3 后端sellergoods-service添加商品:
/**
     * 功能: 保存商品(组合对象)
     * 参数:
     * 返回值: void
     * 时间: 2021/7/29 14:54
     */
    @Override
    @Transactional
    public void saveGoods(Goods goods) {
        //1. 添加tb_goods表的数据
        goods.getGoods().setAuditStatus("0");       //代表未审核
        goods.getGoods().setSellerId("zelin");      //代表商家id
        this.save(goods.getGoods());

        //2. 添加tb_goodsDesc表的数据
        //2.1 设置tb_goodsDesc的主键
        goods.getGoodsDesc().setGoodsId(goods.getGoods().getId());
        //2.2 添加商品描述信息
        goodsDescService.save(goods.getGoodsDesc());
          //2.3 添加sku商品列表
        insertItem(goods);

    }
    /**
     * 功能: 添加sku商品
     * 参数:
     * 返回值: void
     * 时间: 2021/7/29 15:20
     */
    private void insertItem(Goods goods) {
        //3. 添加sku商品列表
        //3.1 得到sku商品列表
        List<ItemEntity> items = goods.getItems();
        //3.2 遍历sku商品列表添加信息
        for (ItemEntity item : items) {
            item.setGoodsId(goods.getGoods().getId());
            item.setCreateTime(new Date());
            item.setUpdateTime(new Date());
            //得到三级分类
            Long category3Id = goods.getGoods().getCategory3Id();
            //得到分类的名称
            String categoryName = itemCatService.getById(category3Id).getName();
            item.setCategoryid(category3Id);
            item.setCategory(categoryName);
            //得到商家id
            String sellerId = goods.getGoods().getSellerId();
            //得到商家名称
            String name = sellerService.getById(sellerId).getName();
            item.setSellerId(sellerId);
            item.setSeller(name);
            //设置标题
            item.setTitle(goods.getGoods().getGoodsName());
            //设置图像
            //得到上传的图像json串
            String itemImages = goods.getGoodsDesc().getItemImages();
            //转换为java的集合
            List<Map> maps = JSON.parseArray(itemImages, Map.class);
            //遍历此集合
             String url = (String) maps.get(0).get("url");
             //将url地址设置给sku对象
             item.setImage(url);

            //最后,保存sku商品
            itemService.save(item);
        }
    }
7.4 在mybatis-plus配置文件上添加事务注解:
@Configuration
@MapperScan("com.zelin.dao")
@EnableTransactionManagement
public class MybatisPlusConfig {
  ...
}
7.5 如7.3所示,在需要添加事务的方法前添加注解:
    @Override
    @Transactional
    public void saveGoods(Goods goods) {
      ...
    }
八、nginx服务器配置
8.1 修改nginx配置文件/mydata/nginx/conf/nginx.conf:
http {
    include       /etc/nginx/mime.types;
    default_type  application/octet-stream;

    log_format  main  '$remote_addr - $remote_user [$time_local] "$request" '
                      '$status $body_bytes_sent "$http_referer" '
                      '"$http_user_agent" "$http_x_forwarded_for"';

   upstream manager{
    server 192.168.56.1:9001;
   }
    upstream shop{
    server 192.168.56.1:9002;
   }
    access_log  /var/log/nginx/access.log  main;

    sendfile        on;
    #tcp_nopush     on;

    keepalive_timeout  65;

    #gzip  on;

    include /etc/nginx/conf.d/*.conf;
}
说明:添加了shop上游服务器配置。
8.2 修改nginx配置文件/mydata/nginx/conf/conf.d/zeyigou.conf:
server {
    listen       80;
    server_name  zeyigou.com;

    location /m/manager {
            proxy_pass http://manager/;
            proxy_set_header Host $host;
    }
     location  /s/manager {
            proxy_pass http://manager/;
            proxy_set_header Host $host;
    }
    location  /s/shop {
            proxy_pass http://shop/;
            proxy_set_header Host $host;
    }

    #运营商管理后台
    location /m {
            proxy_pass http://192.168.56.1:8080/renren-fast/;
            proxy_set_header Host $host;
    }

    #商家管理后台
    location /s {
            proxy_pass http://192.168.56.1:8081/renren-fast/;
            proxy_set_header Host $host;
    }

}
说明:添加了/s/shop代表后台的zyg-shop-web模块
附1:FastDFS说明:【面试重点】
FastDFS 是用 c 语言编写的一款开源的分布式文件系统。FastDFS 为互联网量身定制,充分考虑了冗余备份、负载均衡、线性扩容等机制,并注重高可用、高性能等指标,使用 FastDFS很容易搭建一套高性能的文件服务器集群提供文件上传、下载等服务。FastDFS 架构包括 Tracker server 和 Storage server。客户端请求 Tracker server 进行文件上传、下载,通过 Tracker server 调度最终由 Storage server 完成文件上传和下载。
Tracker server 作用是负载均衡和调度,通过 Tracker server 在文件上传时可以根据一些策略找到 Storage server 提供文件上传服务。可以将 tracker 称为追踪服务器或调度服务器。
Storage server 作用是文件存储,客户端上传的文件最终存储在 Storage 服务器上,Storageserver 没有实现自己的文件系统而是利用操作系统 的文件系统来管理文件。可以将storage称为存储服务器。
服务端两个角色:
Tracker:管理集群,tracker 也可以实现集群。每个 tracker 节点地位平等。收集 Storage 集群的状态。
Storage:实际保存文件 Storage 分为多个组,每个组之间保存的文件是不同的。每个组内部可以有多个成员,组成员内部保存的内容是一样的,组成员的地位是一致的,没有主从的概念。
文件上传及下载的流程:
- 上传流程:
客户端上传文件后存储服务器将文件 ID 返回给客户端,此文件 ID 用于以后访问该文件的索引信息。文件索引信息包括:组名,虚拟磁盘路径,数据两级目录,文件名。
组名:文件上传后所在的 storage 组名称,在文件上传成功后有 storage 服务器返回,需要客户端自行保存。
虚拟磁盘路径:storage 配置的虚拟路径,与磁盘选项 store_path对应。如果配置了store_path0 则是 M00,如果配置了 store_path1 则是 M01,以此类推。
数据两级目录:storage 服务器在每个虚拟磁盘路径下创建的两级目录,用于存储数据文件。
* 文件名:与文件上传时不同。是由存储服务器根据特定信息生成,文件名包含:源存储服务器 IP 地址、文件创建时间戳、文件大小、随机数和文件拓展名等信息。
- 下载流程:

若有收获,就点个赞吧
0 人点赞
