- 一 介绍
- 二 插入数据INSERT
- 三 更新数据UPDATE
- 四 删除数据DELETE
- 五 查询数据SELECT
- 创建表
- 查看表结构
- 插入记录
- 三个部门:教学,销售,运营
- ps:如果在windows系统中,插入中文字符,select的结果为空白,可以将所有字符编码统一设置成gbk
- 1:单条件查询
- 2:多条件查询
- 3:关键字BETWEEN AND
- 4:关键字IS NULL(判断某个字段是否为NULL不能用等号,需要用IS)
- 5:关键字IN集合查询
- 6:关键字LIKE模糊查询
- 1、首先明确一点:分组发生在where之后,即分组是基于where之后得到的记录而进行的
- 2、分组指的是:将所有记录按照某个相同字段进行归类,比如针对员工信息表的职位分组,或者按照性别进行分组等
- 3、为何要分组呢?
- 4、大前提:
- 强调:聚合函数聚合的是组的内容,若是没有分组,则默认一组
- 题1:
- 题目2:
- 题目3:
- 题目1
- 题目2
- 题目3
- 建表
- 插入数据
- 查看表结构和数据
- 找两张表共有的部分,相当于利用条件从笛卡尔积结果中筛选出了正确的结果
- department没有204这个部门,因而employee表中关于204这条员工信息没有匹配出来
- 上述sql等同于
- 注意:mysql不支持全外连接 full JOIN
- 强调:mysql可以使用此种方式间接实现全外连接
- 查看结果
- 注意 union与union all的区别:union会去掉相同的纪录
- 查询平均年龄在25岁以上的部门名
- 查看技术部员工姓名
- 查看不足1人的部门名(子查询得到的是有人的部门id)
- 在 SQL 中 ANY 和 SOME 是同义词,SOME 的用法和功能和 ANY 一模一样。
- ANY 和 IN 运算符不同之处1
- ANY和 IN 运算符不同之处2
- 比较运算符:=、!=、>、>=、<、<=、<>
- 查询大于所有人平均年龄的员工名与年龄
- 查询大于部门内平均年龄的员工名、年龄

一 介绍
MySQL数据操作: DML
========================================================
在MySQL管理软件中,可以通过SQL语句中的DML语言来实现数据的操作,包括
- 使用INSERT实现数据的插入
- UPDATE实现数据的更新
- 使用DELETE实现数据的删除
- 使用SELECT查询数据以及。
========================================================
本节内容包括:
插入数据
更新数据
删除数据
查询数据
二 插入数据INSERT
1. 插入完整数据(顺序插入)语法一:INSERT INTO 表名(字段1,字段2,字段3…字段n) VALUES(值1,值2,值3…值n);语法二:INSERT INTO 表名 VALUES (值1,值2,值3…值n);2. 指定字段插入数据语法:INSERT INTO 表名(字段1,字段2,字段3…) VALUES (值1,值2,值3…);3. 插入多条记录语法:INSERT INTO 表名 VALUES(值1,值2,值3…值n),(值1,值2,值3…值n),(值1,值2,值3…值n);4. 插入查询结果语法:INSERT INTO 表名(字段1,字段2,字段3…字段n)SELECT (字段1,字段2,字段3…字段n) FROM 表2WHERE …;
三 更新数据UPDATE
语法:UPDATE 表名 SET字段1=值1,字段2=值2,WHERE CONDITION;示例:UPDATE mysql.user SET password=password(‘123’)where user=’root’ and host=’localhost’;
四 删除数据DELETE
语法:DELETE FROM 表名WHERE CONITION;示例:DELETE FROM mysql.userWHERE password=’’;练习:更新MySQL root用户密码为mysql123删除除从本地登录的root用户以外的所有用户
五 查询数据SELECT
1. 单表查询
1.1 单表查询的语法
SELECT 字段1,字段2... FROM 表名WHERE 条件GROUP BY fieldHAVING 筛选ORDER BY fieldLIMIT 限制条数
1.2 关键字的执行优先级(重点)
重点中的重点:关键字的执行优先级fromwheregroup byhavingselectdistinctorder bylimit
1.找到表:from2.拿着where指定的约束条件,去文件/表中取出一条条记录3.将取出的一条条记录进行分组group by,如果没有group by,则整体作为一组4.将分组的结果进行having过滤5.执行select6.去重7.将结果按条件排序:order by8.限制结果的显示条数
SQL逻辑查询语句执行顺序
1.3.1 SELECT语句关键字的定义顺序
SELECT DISTINCT <select_list>FROM <left_table><join_type> JOIN <right_table>ON <join_condition>WHERE <where_condition>GROUP BY <group_by_list>HAVING <having_condition>ORDER BY <order_by_condition>LIMIT <limit_number>
1.3.2 SELECT语句关键字的执行顺序
(7) SELECT(8) DISTINCT <select_list>(1) FROM <left_table>(3) <join_type> JOIN <right_table>(2) ON <join_condition>(4) WHERE <where_condition>(5) GROUP BY <group_by_list>(6) HAVING <having_condition>(9) ORDER BY <order_by_condition>(10) LIMIT <limit_number>
1.3.3 准备表和数据
新建一个测试数据库TestDB;
create database TestDB;
创建测试表table1和table2;
CREATE TABLE table1(customer_id VARCHAR(10) NOT NULL,city VARCHAR(10) NOT NULL,PRIMARY KEY(customer_id))ENGINE=INNODB DEFAULT CHARSET=UTF8;CREATE TABLE table2(order_id INT NOT NULL auto_increment,customer_id VARCHAR(10),PRIMARY KEY(order_id))ENGINE=INNODB DEFAULT CHARSET=UTF8;
插入测试数据;
INSERT INTO table1(customer_id,city) VALUES('163','hangzhou');INSERT INTO table1(customer_id,city) VALUES('9you','shanghai');INSERT INTO table1(customer_id,city) VALUES('tx','hangzhou');INSERT INTO table1(customer_id,city) VALUES('baidu','hangzhou');INSERT INTO table2(customer_id) VALUES('163');INSERT INTO table2(customer_id) VALUES('163');INSERT INTO table2(customer_id) VALUES('9you');INSERT INTO table2(customer_id) VALUES('9you');INSERT INTO table2(customer_id) VALUES('9you');INSERT INTO table2(customer_id) VALUES('tx');INSERT INTO table2(customer_id) VALUES(NULL);
准备工作做完以后,table1和table2看起来应该像下面这样:
mysql> select * from table1;+-------------+----------+| customer_id | city |+-------------+----------+| 163 | hangzhou || 9you | shanghai || baidu | hangzhou || tx | hangzhou |+-------------+----------+4 rows in set (0.00 sec)mysql> select * from table2;+----------+-------------+| order_id | customer_id |+----------+-------------+| 1 | 163 || 2 | 163 || 3 | 9you || 4 | 9you || 5 | 9you || 6 | tx || 7 | NULL |+----------+-------------+7 rows in set (0.00 sec)
1.3.4 准备SQL逻辑查询测试语句
#查询来自杭州,并且订单数少于2的客户。SELECT a.customer_id, COUNT(b.order_id) as total_ordersFROM table1 AS aLEFT JOIN table2 AS bON a.customer_id = b.customer_idWHERE a.city = 'hangzhou'GROUP BY a.customer_idHAVING count(b.order_id) < 2ORDER BY total_orders DESC;
1.3.5 执行顺序分析
在这些SQL语句的执行过程中,都会产生一个虚拟表,用来保存SQL语句的执行结果(这是重点),我现在就来跟踪这个虚拟表的变化,得到最终的查询结果的过程,来分析整个SQL逻辑查询的执行顺序和过程。
执行FROM语句
第一步,执行FROM语句。我们首先需要知道最开始从哪个表开始的,这就是FROM告诉我们的。现在有了
关于什么是笛卡尔积,请自行Google补脑。经过FROM语句对两个表执行笛卡尔积,会得到一个虚拟表,暂且叫VT1(vitual table 1),内容如下:
+-------------+----------+----------+-------------+| customer_id | city | order_id | customer_id |+-------------+----------+----------+-------------+| 163 | hangzhou | 1 | 163 || 9you | shanghai | 1 | 163 || baidu | hangzhou | 1 | 163 || tx | hangzhou | 1 | 163 || 163 | hangzhou | 2 | 163 || 9you | shanghai | 2 | 163 || baidu | hangzhou | 2 | 163 || tx | hangzhou | 2 | 163 || 163 | hangzhou | 3 | 9you || 9you | shanghai | 3 | 9you || baidu | hangzhou | 3 | 9you || tx | hangzhou | 3 | 9you || 163 | hangzhou | 4 | 9you || 9you | shanghai | 4 | 9you || baidu | hangzhou | 4 | 9you || tx | hangzhou | 4 | 9you || 163 | hangzhou | 5 | 9you || 9you | shanghai | 5 | 9you || baidu | hangzhou | 5 | 9you || tx | hangzhou | 5 | 9you || 163 | hangzhou | 6 | tx || 9you | shanghai | 6 | tx || baidu | hangzhou | 6 | tx || tx | hangzhou | 6 | tx || 163 | hangzhou | 7 | NULL || 9you | shanghai | 7 | NULL || baidu | hangzhou | 7 | NULL || tx | hangzhou | 7 | NULL |+-------------+----------+----------+-------------+
总共有28(table1的记录条数 * table2的记录条数)条记录。这就是VT1的结果,接下来的操作就在VT1的基础上进行。
执行ON过滤
执行完笛卡尔积以后,接着就进行ON a.customer_id = b.customer_id条件过滤,根据ON中指定的条件,去掉那些不符合条件的数据,得到VT2表,内容如下:
+-------------+----------+----------+-------------+| customer_id | city | order_id | customer_id |+-------------+----------+----------+-------------+| 163 | hangzhou | 1 | 163 || 163 | hangzhou | 2 | 163 || 9you | shanghai | 3 | 9you || 9you | shanghai | 4 | 9you || 9you | shanghai | 5 | 9you || tx | hangzhou | 6 | tx |+-------------+----------+----------+-------------+
VT2就是经过ON条件筛选以后得到的有用数据,而接下来的操作将在VT2的基础上继续进行。
添加外部行
这一步只有在连接类型为OUTER JOIN时才发生,如LEFT OUTER JOIN、RIGHT OUTER JOIN和FULL OUTER JOIN。在大多数的时候,我们都是会省略掉OUTER关键字的,但OUTER表示的就是外部行的概念。LEFT OUTER JOIN把左表记为保留表,得到的结果为:
+-------------+----------+----------+-------------+| customer_id | city | order_id | customer_id |+-------------+----------+----------+-------------+| 163 | hangzhou | 1 | 163 || 163 | hangzhou | 2 | 163 || 9you | shanghai | 3 | 9you || 9you | shanghai | 4 | 9you || 9you | shanghai | 5 | 9you || tx | hangzhou | 6 | tx || baidu | hangzhou | NULL | NULL |+-------------+----------+----------+-------------+
RIGHT OUTER JOIN把右表记为保留表,得到的结果为:
+-------------+----------+----------+-------------+| customer_id | city | order_id | customer_id |+-------------+----------+----------+-------------+| 163 | hangzhou | 1 | 163 || 163 | hangzhou | 2 | 163 || 9you | shanghai | 3 | 9you || 9you | shanghai | 4 | 9you || 9you | shanghai | 5 | 9you || tx | hangzhou | 6 | tx || NULL | NULL | 7 | NULL |+-------------+----------+----------+-------------+
FULL OUTER JOIN把左右表都作为保留表,得到的结果为:
+-------------+----------+----------+-------------+| customer_id | city | order_id | customer_id |+-------------+----------+----------+-------------+| 163 | hangzhou | 1 | 163 || 163 | hangzhou | 2 | 163 || 9you | shanghai | 3 | 9you || 9you | shanghai | 4 | 9you || 9you | shanghai | 5 | 9you || tx | hangzhou | 6 | tx || baidu | hangzhou | NULL | NULL || NULL | NULL | 7 | NULL |+-------------+----------+----------+-------------+
添加外部行的工作就是在VT2表的基础上添加保留表中被过滤条件过滤掉的数据,非保留表中的数据被赋予NULL值,最后生成虚拟表VT3。
由于我在准备的测试SQL查询逻辑语句中使用的是LEFT JOIN,过滤掉了以下这条数据:
| baidu | hangzhou | NULL | NULL |
现在就把这条数据添加到VT2表中,得到的VT3表如下:
+-------------+----------+----------+-------------+| customer_id | city | order_id | customer_id |+-------------+----------+----------+-------------+| 163 | hangzhou | 1 | 163 || 163 | hangzhou | 2 | 163 || 9you | shanghai | 3 | 9you || 9you | shanghai | 4 | 9you || 9you | shanghai | 5 | 9you || tx | hangzhou | 6 | tx || baidu | hangzhou | NULL | NULL |+-------------+----------+----------+-------------+
接下来的操作都会在该VT3表上进行。
执行WHERE过滤
对添加外部行得到的VT3进行WHERE过滤,只有符合WHERE a.city = 'hangzhou'的时候,就会得到以下内容,并存在虚拟表VT4中:
+-------------+----------+----------+-------------+| customer_id | city | order_id | customer_id |+-------------+----------+----------+-------------+| 163 | hangzhou | 1 | 163 || 163 | hangzhou | 2 | 163 || tx | hangzhou | 6 | tx || baidu | hangzhou | NULL | NULL |+-------------+----------+----------+-------------+
但是在使用WHERE子句时,需要注意以下两点:
- 由于数据还没有分组,因此现在还不能在WHERE过滤器中使用
where_condition=MIN(col)这类对分组统计的过滤; - 由于还没有进行列的选取操作,因此在SELECT中使用列的别名也是不被允许的,如:
SELECT city as c FROM t WHERE c='shanghai';是不允许出现的。
执行GROUP BY分组GROU BY子句主要是对使用WHERE子句得到的虚拟表进行分组操作。我们执行测试语句中的GROUP BY a.customer_id,就会得到以下内容(默认只显示组内第一条):
+-------------+----------+----------+-------------+| customer_id | city | order_id | customer_id |+-------------+----------+----------+-------------+| 163 | hangzhou | 1 | 163 || baidu | hangzhou | NULL | NULL || tx | hangzhou | 6 | tx |+-------------+----------+----------+-------------+
得到的内容会存入虚拟表VT5中,此时,我们就得到了一个VT5虚拟表,接下来的操作都会在该表上完成。
执行HAVING过滤HAVING子句主要和GROUP BY子句配合使用,对分组得到的VT5虚拟表进行条件过滤。当我执行测试语句中的HAVING count(b.order_id) < 2时,将得到以下内容:
+-------------+----------+----------+-------------+| customer_id | city | order_id | customer_id |+-------------+----------+----------+-------------+| baidu | hangzhou | NULL | NULL || tx | hangzhou | 6 | tx |+-------------+----------+----------+-------------+
这就是虚拟表VT6。
SELECT列表
现在才会执行到SELECT子句,不要以为SELECT子句被写在第一行,就是第一个被执行的。
我们执行测试语句中的SELECT a.customer_id, COUNT(b.order_id) as total_orders,从虚拟表VT6中选择出我们需要的内容。我们将得到以下内容:
+-------------+--------------+| customer_id | total_orders |+-------------+--------------+| baidu | 0 || tx | 1 |+-------------+--------------+
还没有完,这只是虚拟表VT7。
执行DISTINCT子句
如果在查询中指定了DISTINCT子句,则会创建一张内存临时表(如果内存放不下,就需要存放在硬盘了)。这张临时表的表结构和上一步产生的虚拟表VT7是一样的,不同的是对进行DISTINCT操作的列增加了一个唯一索引,以此来除重复数据。
由于我的测试SQL语句中并没有使用DISTINCT,所以,在该查询中,这一步不会生成一个虚拟表。
执行ORDER BY子句
对虚拟表中的内容按照指定的列进行排序,然后返回一个新的虚拟表,我们执行测试SQL语句中的ORDER BY total_orders DESC,就会得到以下内容:
+-------------+--------------+| customer_id | total_orders |+-------------+--------------+| tx | 1 || baidu | 0 |+-------------+--------------+
可以看到这是对total_orders列进行降序排列的。上述结果会存储在VT8中。
执行LIMIT子句LIMIT子句从上一步得到的VT8虚拟表中选出从指定位置开始的指定行数据。对于没有应用ORDER BY的LIMIT子句,得到的结果同样是无序的,所以,很多时候,我们都会看到LIMIT子句会和ORDER BY子句一起使用。
MySQL数据库的LIMIT支持如下形式的选择:
LIMIT n, m
表示从第n条记录开始选择m条记录。而很多开发人员喜欢使用该语句来解决分页问题。对于小数据,使用LIMIT子句没有任何问题,当数据量非常大的时候,使用LIMIT n, m是非常低效的。因为LIMIT的机制是每次都是从头开始扫描,如果需要从第60万行开始,读取3条数据,就需要先扫描定位到60万行,然后再进行读取,而扫描的过程是一个非常低效的过程。所以,对于大数据处理时,是非常有必要在应用层建立一定的缓存机制(现在的大数据处理,大都使用缓存)
1.3 简单查询
- 准备表和记录
```python
company.employee
员工id id int
姓名 emp_name varchar 性别 sex enum 年龄 age int 入职日期 hire_date date 岗位 post varchar 职位描述 post_comment varchar 薪水 salary double 办公室 office int 部门编号 depart_id int
创建表
create table employee( id int not null unique auto_increment, name varchar(20) not null, sex enum(‘male’,’female’) not null default ‘male’, #大部分是男的 age int(3) unsigned not null default 28, hire_date date not null, post varchar(50), post_comment varchar(100), salary double(15,2), office int, #一个部门一个屋子 depart_id int );
查看表结构
mysql> desc employee; +———————+———————————-+———+——-+————-+————————+ | Field | Type | Null | Key | Default | Extra | +———————+———————————-+———+——-+————-+————————+ | id | int(11) | NO | PRI | NULL | auto_increment | | name | varchar(20) | NO | | NULL | | | sex | enum(‘male’,’female’) | NO | | male | | | age | int(3) unsigned | NO | | 28 | | | hire_date | date | NO | | NULL | | | post | varchar(50) | YES | | NULL | | | post_comment | varchar(100) | YES | | NULL | | | salary | double(15,2) | YES | | NULL | | | office | int(11) | YES | | NULL | | | depart_id | int(11) | YES | | NULL | | +———————+———————————-+———+——-+————-+————————+
插入记录
三个部门:教学,销售,运营
insert into employee(name,sex,age,hire_date,post,salary,office,depart_id) values (‘xio’,’male’,18,’20170301’,’teacher’,7300.33,401,1), #以下是教学部 (‘jion’,’male’,78,’20150302’,’teacher’,1000000.31,401,1), (‘wupeiqi’,’male’,81,’20130305’,’teacher’,8300,401,1), (‘yuanhao’,’male’,73,’20140701’,’teacher’,3500,401,1), (‘liwenzhou’,’male’,28,’20121101’,’teacher’,2100,401,1), (‘jingliyang’,’female’,18,’20110211’,’teacher’,9000,401,1), (‘jinxin’,’male’,18,’19000301’,’teacher’,30000,401,1), (‘成龙’,’male’,48,’20101111’,’teacher’,10000,401,1),
(‘歪歪’,’female’,48,’20150311’,’sale’,3000.13,402,2),#以下是销售部门 (‘丫丫’,’female’,38,’20101101’,’sale’,2000.35,402,2), (‘丁丁’,’female’,18,’20110312’,’sale’,1000.37,402,2), (‘星星’,’female’,18,’20160513’,’sale’,3000.29,402,2), (‘格格’,’female’,28,’20170127’,’sale’,4000.33,402,2),
(‘张野’,’male’,28,’20160311’,’operation’,10000.13,403,3), #以下是运营部门 (‘程咬金’,’male’,18,’19970312’,’operation’,20000,403,3), (‘程咬银’,’female’,18,’20130311’,’operation’,19000,403,3), (‘程咬铜’,’male’,18,’20150411’,’operation’,18000,403,3), (‘程咬铁’,’female’,18,’20140512’,’operation’,17000,403,3) ;
ps:如果在windows系统中,插入中文字符,select的结果为空白,可以将所有字符编码统一设置成gbk
```python#简单查询SELECT id,name,sex,age,hire_date,post,post_comment,salary,office,depart_idFROM employee;SELECT * FROM employee;SELECT name,salary FROM employee;#避免重复DISTINCTSELECT DISTINCT post FROM employee;#通过四则运算查询SELECT name, salary*12 FROM employee;SELECT name, salary*12 AS Annual_salary FROM employee;SELECT name, salary*12 Annual_salary FROM employee;#定义显示格式CONCAT() 函数用于连接字符串SELECT CONCAT('姓名: ',name,' 年薪: ', salary*12) AS Annual_salaryFROM employee;CONCAT_WS() 第一个参数为分隔符SELECT CONCAT_WS(':',name,salary*12) AS Annual_salaryFROM employee;结合CASE语句:SELECT(CASEWHEN NAME = 'xio' THENNAMEWHEN NAME = 'jion' THENCONCAT(name,'_BIGSB')ELSEconcat(NAME, 'SB')END) as new_nameFROMemp;
例:
1 查出所有员工的名字,薪资,格式为
<名字:xio> <薪资:3000>
2 查出所有的岗位(去掉重复)
- 3 查出所有员工名字,以及他们的年薪,年薪的字段名为annual_year
select concat('<名字:',name,'> ','<薪资:',salary,'>') from employee;select distinct depart_id from employee;select name,salary*12 annual_salary from employee;
1.4 WHERE约束
where字句中可以使用:
1. 比较运算符:> < >= <= <> !=
2. between 80 and 100 值在10到20之间
3. in(80,90,100) 值是10或20或30
4. like ‘egon%’
pattern可以是%或,
%表示任意多字符
表示一个字符
5. 逻辑运算符:在多个条件直接可以使用逻辑运算符 and or not ```python1:单条件查询
SELECT name FROM employeeWHERE post='sale';
2:多条件查询
SELECT name,salary FROM employeeWHERE post='teacher' AND salary>10000;
3:关键字BETWEEN AND
SELECT name,salary FROM employeeWHERE salary BETWEEN 10000 AND 20000;SELECT name,salary FROM employeeWHERE salary NOT BETWEEN 10000 AND 20000;
4:关键字IS NULL(判断某个字段是否为NULL不能用等号,需要用IS)
SELECT name,post_comment FROM employeeWHERE post_comment IS NULL;SELECT name,post_comment FROM employeeWHERE post_comment IS NOT NULL;SELECT name,post_comment FROM employeeWHERE post_comment=''; 注意''是空字符串,不是nullps:执行update employee set post_comment='' where id=2;再用上条查看,就会有结果了
5:关键字IN集合查询
SELECT name,salary FROM employeeWHERE salary=3000 OR salary=3500 OR salary=4000 OR salary=9000 ;SELECT name,salary FROM employeeWHERE salary IN (3000,3500,4000,9000) ;SELECT name,salary FROM employeeWHERE salary NOT IN (3000,3500,4000,9000) ;
6:关键字LIKE模糊查询
通配符’%’SELECT * FROM employeeWHERE name LIKE 'xi%';通配符’_’SELECT * FROM employeeWHERE name LIKE 'ji__';
例:- 1. 查看岗位是teacher的员工姓名、年龄- 2. 查看岗位是teacher且年龄大于30岁的员工姓名、年龄- 3. 查看岗位是teacher且薪资在9000-1000范围内的员工姓名、年龄、薪资- 4. 查看岗位描述不为NULL的员工信息- 5. 查看岗位是teacher且薪资是10000或9000或30000的员工姓名、年龄、薪资- 6. 查看岗位是teacher且薪资不是10000或9000或30000的员工姓名、年龄、薪资- 7. 查看岗位是teacher且名字是jin开头的员工姓名、年薪```pythonselect name,age from employee where post = 'teacher';select name,age from employee where post='teacher' and age > 30;select name,age,salary from employee where post='teacher' and salary between 9000 and 10000;select * from employee where post_comment is not null;select name,age,salary from employee where post='teacher' and salary in (10000,9000,30000);select name,age,salary from employee where post='teacher' and salary not in (10000,9000,30000);select name,salary*12 from employee where post='teacher' and name like 'jin%';
1.5 分组查询:GROUP BY
2、分组指的是:将所有记录按照某个相同字段进行归类,比如针对员工信息表的职位分组,或者按照性别进行分组等
3、为何要分组呢?
取每个部门的最高工资取每个部门的员工数取男人数和女人数
小窍门:‘每’这个字后面的字段,就是我们分组的依据
4、大前提:
可以按照任意字段分组,但是分组完毕后,比如group by post,只能查看post字段,如果想查看组内信息,需要借助于聚合函数
- **ONLY_FULL_GROUP_BY**```python# !!!SQL_MODE设置!!!#查看MySQL 5.7默认的sql_mode如下:mysql> select @@global.sql_mode;ONLY_FULL_GROUP_BY,STRICT_TRANS_TABLES,NO_ZERO_IN_DATE,NO_ZERO_DATE,ERROR_FOR_DIVISION_BY_ZERO,NO_AUTO_CREATE_USER,NO_ENGINE_SUBSTITUTION#!!!注意ONLY_FULL_GROUP_BY的语义就是确定select target list中的所有列的值都是明确语义,简单的说来,在ONLY_FULL_GROUP_BY模式下,target list中的值要么是来自于聚集函数的结果,要么是来自于group by list中的表达式的值。#设置sql_mole如下操作(我们可以去掉ONLY_FULL_GROUP_BY模式):mysql> set global sql_mode='STRICT_TRANS_TABLES,NO_ZERO_IN_DATE,NO_ZERO_DATE,ERROR_FOR_DIVISION_BY_ZERO,NO_AUTO_CREATE_USER,NO_ENGINE_SUBSTITUTION';
mysql> select @@global.sql_mode;+-------------------+| @@global.sql_mode |+-------------------+| |+-------------------+1 row in set (0.00 sec)mysql> select * from emp group by post;+----+------+--------+-----+------------+--------------+--------------+------------+--------+-----------+| id | name | sex | age | hire_date | post | post_comment | salary | office | depart_id |+----+------+--------+-----+------------+--------------+--------------+------------+--------+-----------+| 14 | 张野 | male | 28 | 2016-03-11 | operation | NULL | 10000.13 | 403 | 3 || 9 | 歪歪 | female | 48 | 2015-03-11 | sale | NULL | 3000.13 | 402 | 2 || 2 | jion | male | 78 | 2015-03-02 | teacher | NULL | 1000000.31 | 401 | 1 || 1 | xio | male | 18 | 2017-03-01 | teacher | NULL | 7300.33 | 401 | 1 |+----+------+--------+-----+------------+-------------+--------------+------------+--------+-----------+4 rows in set (0.00 sec)#由于没有设置ONLY_FULL_GROUP_BY,于是也可以有结果,默认都是组内的第一条记录,但其实这是没有意义的mysql> set global sql_mode='ONLY_FULL_GROUP_BY';Query OK, 0 rows affected (0.00 sec)mysql> quit #设置成功后,一定要退出,然后重新登录方可生效Byemysql> use db1;Database changedmysql> select * from emp group by post; #报错ERROR 1055 (42000): 'db1.emp.id' isn't in GROUP BYmysql> select post,count(id) from emp group by post; #只能查看分组依据和使用聚合函数+----------------------------+-----------+| post | count(id) |+----------------------------+-----------+| operation | 5 || sale | 5 || teacher | 8 |+----------------------------+-----------+4 rows in set (0.00 sec)
- GROUP BY ```python 单独使用GROUP BY关键字分组 SELECT post FROM employee GROUP BY post; 注意:我们按照post字段分组,那么select查询的字段只能是post,想要获取组内的其他相关信息,需要借助函数
GROUP BY关键字和GROUP_CONCAT()函数一起使用 SELECT post,GROUP_CONCAT(name) FROM employee GROUP BY post;#按照岗位分组,并查看组内成员名 SELECT post,GROUP_CONCAT(name) as emp_members FROM employee GROUP BY post;
GROUP BY与聚合函数一起使用 select post,count(id) as count from employee group by post;#按照岗位分组,并查看每个组有多少人
**强调:**```python如果我们用unique的字段作为分组的依据,则每一条记录自成一组,这种分组没有意义多条记录之间的某个字段值相同,该字段通常用来作为分组的依据
示例: SELECT COUNT() FROM employee; SELECT COUNT() FROM employee WHERE depart_id=1; SELECT MAX(salary) FROM employee; SELECT MIN(salary) FROM employee; SELECT AVG(salary) FROM employee; SELECT SUM(salary) FROM employee; SELECT SUM(salary) FROM employee WHERE depart_id=3;
例:<br />. 查询岗位名以及岗位包含的所有员工名字<br />. 查询岗位名以及各岗位内包含的员工个数<br />. 查询公司内男员工和女员工的个数<br />. 查询岗位名以及各岗位的平均薪资<br />. 查询岗位名以及各岗位的最高薪资<br />. 查询岗位名以及各岗位的最低薪资<br />. 查询男员工与男员工的平均薪资,女员工与女员工的平均薪资```python#题1:分组mysql> select post,group_concat(name) from employee group by post;#题目2:mysql> select post,count(id) from employee group by post;#题目3:mysql> select sex,count(id) from employee group by sex;#题目4:mysql> select post,avg(salary) from employee group by post;#题目5mysql> select post,max(salary) from employee group by post;#题目6mysql> select post,min(salary) from employee group by post;#题目七mysql> select sex,avg(salary) from employee group by sex;
1.6 HAVING过滤
HAVING与WHERE不一样的地方在于!!!!!!
#!!!执行优先级从高到低:where > group by > having#1. Where 发生在分组group by之前,因而Where中可以有任意字段,但是绝对不能使用聚合函数。#2. Having发生在分组group by之后,因而Having中可以使用分组的字段,无法直接取到其他字段,可以使用聚合函数
验证:
mysql> select @@sql_mode;+--------------------+| @@sql_mode |+--------------------+| ONLY_FULL_GROUP_BY |+--------------------+1 row in set (0.00 sec)mysql> select * from emp where salary > 100000;+----+------+------+-----+------------+---------+--------------+------------+--------+-----------+| id | name | sex | age | hire_date | post | post_comment | salary | office | depart_id |+----+------+------+-----+------------+---------+--------------+------------+--------+-----------+| 2 | jion | male | 78 | 2015-03-02 | teacher | NULL | 1000000.31 | 401 | 1 |+----+------+------+-----+------------+---------+--------------+------------+--------+-----------+1 row in set (0.00 sec)mysql> select * from emp having salary > 100000;ERROR 1463 (42000): Non-grouping field 'salary' is used in HAVING clausemysql> select post,group_concat(name) from emp group by post having salary > 10000;#错误,分组后无法直接取到salary字段ERROR 1054 (42S22): Unknown column 'salary' in 'having clause'mysql> select post,group_concat(name) from emp group by post having avg(salary) > 10000;+-----------+-------------------------------------------------------+| post | group_concat(name) |+-----------+-------------------------------------------------------+| operation | 程咬铁,程咬铜,程咬银,程咬金,张野 || teacher | 成龙,jinxin,jingliyang,liwenzhou,yuanhao,wupeiqi,jion,xio |+-----------+-------------------------------------------------------+2 rows in set (0.00 sec)
例:
- 查询各岗位内包含的员工个数小于2的岗位名、岗位内包含员工名字、个数
- 查询各岗位平均薪资大于10000的岗位名、平均工资
题目2:
mysql> select post,avg(salary) from employee group by post having avg(salary) > 10000;
题目3:
mysql> select post,avg(salary) from employee group by post having avg(salary) > 10000 and avg(salary) <20000;
<a name="s0rmK"></a>### 1.7 查询排序:ORDER BY```python按单列排序SELECT * FROM employee ORDER BY salary;SELECT * FROM employee ORDER BY salary ASC;SELECT * FROM employee ORDER BY salary DESC;按多列排序:先按照age排序,如果年纪相同,则按照薪资排序SELECT * from employeeORDER BY age,salary DESC;
例:
- 查询所有员工信息,先按照age升序排序,如果age相同则按照hire_date降序排序
- 查询各岗位平均薪资大于10000的岗位名、平均工资,结果按平均薪资升序排列
题目2
mysql> select post,avg(salary) from employee group by post having avg(salary) > 10000 order by avg(salary) asc;
题目3
mysql> select post,avg(salary) from employee group by post having avg(salary) > 10000 order by avg(salary) desc;
<a name="R5XNS"></a>### 1.8 限制查询的记录数:LIMIT```python示例:SELECT * FROM employee ORDER BY salary DESCLIMIT 3; #默认初始位置为0SELECT * FROM employee ORDER BY salary DESCLIMIT 0,5; #从第0开始,即先查询出第一条,然后包含这一条在内往后查5条SELECT * FROM employee ORDER BY salary DESCLIMIT 5,5; #从第5开始,即先查询出第6条,然后包含这一条在内往后查5条
例:
- 分页显示,每页5条 ```python mysql> select * from employee limit 0,5;
mysql> select * from employee limit 5,5;
mysql> select * from employee limit 10,5;
<a name="1KARu"></a>### 1.9 使用正则表达式查询```pythonSELECT * FROM employee WHERE name REGEXP '^on';SELECT * FROM employee WHERE name REGEXP 'on$';SELECT * FROM employee WHERE name REGEXP 'm{2}';小结:对字符串匹配的方式WHERE name = 'xio';WHERE name LIKE 'yua%';WHERE name REGEXP 'on$';
例:
查看所有员工中名字是jin开头,x或者y结果的员工信息
select * from employee where name regexp '^jin.*[xy]$';
2. 多表查询
准备表 ```python
建表
create table department( id int, name varchar(20) );
create table employee( id int primary key auto_increment, name varchar(20), sex enum(‘male’,’female’) not null default ‘male’, age int, dep_id int );
插入数据
insert into department values (200,’技术’), (201,’人力资源’), (202,’销售’), (203,’运营’);
insert into employee(name,sex,age,dep_id) values (‘xio’,’male’,18,200), (‘jion’,’female’,48,201), (‘wupeiqi’,’male’,38,201), (‘yuanhao’,’female’,28,202), (‘liwenzhou’,’male’,18,200), (‘jingliyang’,’female’,18,204) ;
查看表结构和数据
mysql> desc department; +———-+——————-+———+——-+————-+———-+ | Field | Type | Null | Key | Default | Extra | +———-+——————-+———+——-+————-+———-+ | id | int(11) | YES | | NULL | | | name | varchar(20) | YES | | NULL | | +———-+——————-+———+——-+————-+———-+
mysql> desc employee; +————+———————————-+———+——-+————-+————————+ | Field | Type | Null | Key | Default | Extra | +————+———————————-+———+——-+————-+————————+ | id | int(11) | NO | PRI | NULL | auto_increment | | name | varchar(20) | YES | | NULL | | | sex | enum(‘male’,’female’) | NO | | male | | | age | int(11) | YES | | NULL | | | dep_id | int(11) | YES | | NULL | | +————+———————————-+———+——-+————-+————————+
mysql> select * from department; +———+———————+ | id | name | +———+———————+ | 200 | 技术 | | 201 | 人力资源 | | 202 | 销售 | | 203 | 运营 | +———+———————+
mysql> select * from employee; +——+——————+————+———+————+ | id | name | sex | age | dep_id | +——+——————+————+———+————+ | 1 | xio | male | 18 | 200 | | 2 | jion | female | 48 | 201 | | 3 | wupeiqi | male | 38 | 201 | | 4 | yuanhao | female | 28 | 202 | | 5 | liwenzhou | male | 18 | 200 | | 6 | jingliyang | female | 18 | 204 | +——+——————+————+———+————+
<a name="GOhFQ"></a>### 2.1 多表连接查询```python#重点:外链接语法SELECT 字段列表FROM 表1 INNER|LEFT|RIGHT JOIN 表2ON 表1.字段 = 表2.字段;
交叉连接:不适用任何匹配条件。生成笛卡尔积
mysql> select * from dep,emp;+------+--------------+----+--------+--------+------+--------+| id | name | id | name | sex | age | dep_id |+------+--------------+----+--------+--------+------+--------+| 200 | 技术 | 1 | xio | male | 18 | 200 || 201 | 人力资源 | 1 | xio | male | 18 | 200 || 202 | 销售 | 1 | xio | male | 18 | 200 || 203 | 运营 | 1 | xio | male | 18 | 200 || 200 | 技术 | 2 | jiaxin | female | 48 | 201 || 201 | 人力资源 | 2 | jiaxin | female | 48 | 201 || 202 | 销售 | 2 | jiaxin | female | 48 | 201 || 203 | 运营 | 2 | jiaxin | female | 48 | 201 || 200 | 技术 | 3 | haojie | male | 18 | 201 || 201 | 人力资源 | 3 | haojie | male | 18 | 201 || 202 | 销售 | 3 | haojie | male | 18 | 201 || 203 | 运营 | 3 | haojie | male | 18 | 201 || 200 | 技术 | 4 | nick | male | 28 | 202 || 201 | 人力资源 | 4 | nick | male | 28 | 202 || 202 | 销售 | 4 | nick | male | 28 | 202 || 203 | 运营 | 4 | nick | male | 28 | 202 || 200 | 技术 | 5 | owen | male | 18 | 203 || 201 | 人力资源 | 5 | owen | male | 18 | 203 || 202 | 销售 | 5 | owen | male | 18 | 203 || 203 | 运营 | 5 | owen | male | 18 | 203 || 200 | 技术 | 6 | jerry | female | 18 | 204 || 201 | 人力资源 | 6 | jerry | female | 18 | 204 || 202 | 销售 | 6 | jerry | female | 18 | 204 || 203 | 运营 | 6 | jerry | female | 18 | 204 |+------+--------------+----+--------+--------+------+--------+24 rows in set (0.00 sec)
内连接:只连接匹配的行 ```python
找两张表共有的部分,相当于利用条件从笛卡尔积结果中筛选出了正确的结果
department没有204这个部门,因而employee表中关于204这条员工信息没有匹配出来
mysql> select employee.id,employee.name,employee.age,employee.sex,department.name from employee inner join department on employee.dep_id=department.id; +——+—————-+———+————+———————+ | id | name | age | sex | name | +——+—————-+———+————+———————+ | 1 | xio | 18 | male | 技术 | | 2 | jion | 48 | female | 人力资源 | | 3 | wupeiqi | 38 | male | 人力资源 | | 4 | yuanhao | 28 | female | 销售 | | 5 | liwenzhou | 18 | male | 技术 | +——+—————-+———+————+———————+
上述sql等同于
mysql> select employee.id,employee.name,employee.age,employee.sex,department.name from employee,department where employee.dep_id=department.id;
- **外链接之左连接:优先显示左表全部记录**```python#以左表为准,即找出所有员工信息,当然包括没有部门的员工#本质就是:在内连接的基础上增加左边有右边没有的结果mysql> select employee.id,employee.name,department.name as depart_name from employee left join department on employee.dep_id=department.id;+----+------------+--------------+| id | name | depart_name |+----+------------+--------------+| 1 | xio | 技术 || 5 | liwenzhou | 技术 || 2 | jion | 人力资源 || 3 | wupeiqi | 人力资源 || 4 | yuanhao | 销售 || 6 | jingliyang | NULL |+----+------------+--------------+
外链接之右连接:优先显示右表全部记录
#以右表为准,即找出所有部门信息,包括没有员工的部门#本质就是:在内连接的基础上增加右边有左边没有的结果mysql> select employee.id,employee.name,department.name as depart_name from employee right join department on employee.dep_id=department.id;+------+-----------+--------------+| id | name | depart_name |+------+-----------+--------------+| 1 | xio | 技术 || 2 | jion | 人力资源 || 3 | wupeiqi | 人力资源 || 4 | yuanhao | 销售 || 5 | liwenzhou | 技术 || NULL | NULL | 运营 |+------+-----------+--------------+
全外连接:显示左右两个表全部记录 ```python 全外连接:在内连接的基础上增加左边有右边没有的和右边有左边没有的结果
注意:mysql不支持全外连接 full JOIN
强调:mysql可以使用此种方式间接实现全外连接
select from employee left join department on employee.dep_id = department.id union select from employee right join department on employee.dep_id = department.id ;
查看结果
+———+——————+————+———+————+———+———————+ | id | name | sex | age | dep_id | id | name | +———+——————+————+———+————+———+———————+ | 1 | xio | male | 18 | 200 | 200 | 技术 | | 5 | liwenzhou | male | 18 | 200 | 200 | 技术 | | 2 | jion | female | 48 | 201 | 201 | 人力资源 | | 3 | wupeiqi | male | 38 | 201 | 201 | 人力资源 | | 4 | yuanhao | female | 28 | 202 | 202 | 销售 | | 6 | jingliyang | female | 18 | 204 | NULL | NULL | | NULL | NULL | NULL | NULL | NULL | 203 | 运营 | +———+——————+————+———+————+———+———————+
注意 union与union all的区别:union会去掉相同的纪录
**<a name="mUJMX"></a>### 2.2 符合条件连接查询```python#示例1:以内连接的方式查询employee和department表,并且employee表中的age字段值必须大于25,即找出年龄大于25岁的员工以及员工所在的部门select employee.name,department.name from employee inner join departmenton employee.dep_id = department.idwhere age > 25;#示例2:以内连接的方式查询employee和department表,并且以age字段的升序方式显示select employee.id,employee.name,employee.age,department.name from employee,departmentwhere employee.dep_id = department.idand age > 25order by age asc;
2.3 子查询
#1:子查询是将一个查询语句嵌套在另一个查询语句中。#2:内层查询语句的查询结果,可以为外层查询语句提供查询条件。#3:子查询中可以包含:IN、NOT IN、ANY、ALL、EXISTS 和 NOT EXISTS等关键字#4:还可以包含比较运算符:= 、 !=、> 、<等
- 带IN关键字的子查询
```python
查询平均年龄在25岁以上的部门名
select id,name from department where id in(select dep_id from employee group by dep_id having avg(age) > 25);
查看技术部员工姓名
select name from employee where dep_id in (select id from department where name=’技术’);
查看不足1人的部门名(子查询得到的是有人的部门id)
select name from department where id not in (select distinct dep_id from employee);
```python# !!!注意not innot in 无法处理null的值,即子查询中如果存在null的值,not in将无法处理,如下mysql> select * from emp;+----+------------+--------+------+--------+| id | name | sex | age | dep_id |+----+------------+--------+------+--------+| 1 | egon | male | 18 | 200 || 2 | alex | female | 48 | 201 || 3 | wupeiqi | male | 38 | 201 || 4 | yuanhao | female | 28 | 202 || 5 | liwenzhou | male | 18 | 200 || 6 | jingliyang | female | 18 | 204 || 7 | xxx | male | 19 | NULL |+----+------------+--------+------+--------+7 rows in set (0.00 sec)mysql> select * from dep;+------+--------------+| id | name |+------+--------------+| 200 | 技术 || 201 | 人力资源 || 202 | 销售 || 203 | 运营 |+------+--------------+4 rows in set (0.00 sec)# 子查询中存在nullmysql> select * from dep where id not in (select distinct dep_id from emp);Empty set (0.00 sec)# 解决方案如下mysql> select * from dep where id not in (select distinct dep_id from emp where dep_id is not null);+------+--------+| id | name |+------+--------+| 203 | 运营 |+------+--------+1 row in set (0.00 sec)mysql>
ANY 和 IN 运算符不同之处1
ANY 必须和其他的比较运算符共同使用,而且ANY必须将比较运算符放在 ANY 关键字之前,所比较的值需要匹配子查询中的任意一个值,这也就是 ANY 在英文中所表示的意义
例如:使用 IN 和使用 ANY运算符得到的结果是一致的 select * from employee where salary = any ( select max(salary) from employee group by depart_id);
select * from employee where salary in ( select max(salary) from employee group by depart_id);
结论:也就是说“=ANY”等价于 IN 运算符,而“<>ANY”则等价于 NOT IN 运算符
ANY和 IN 运算符不同之处2
ANY 运算符不能与固定的集合相匹配,比如下面的 SQL 语句是错误的
SELECT * FROM T_Book WHERE FYearPublished < ANY (2001, 2003, 2005)
- **带ALL关键字的子查询**```python# all同any类似,只不过all表示的是所有,any表示任一查询出那些薪资比所有部门的平均薪资都高的员工=》薪资在所有部门平均线以上的狗币资本家select * from employee where salary > all (select avg(salary) from employee group by depart_id);查询出那些薪资比所有部门的平均薪资都低的员工=》薪资在所有部门平均线以下的无产阶级劳苦大众select * from employee where salary < all (select avg(salary) from employee group by depart_id);查询出那些薪资比任意一个部门的平均薪资低的员工=》薪资在任一部门平均线以下的员工select * from employee where salary < any ( select avg(salary) from employee group by depart_id);查询出那些薪资比任意一个部门的平均薪资高的员工=》薪资在任一部门平均线以上的员工select * from employee where salary > any (select avg(salary) from employee group by depart_id);
- 带比较运算符的子查询
```python
比较运算符:=、!=、>、>=、<、<=、<>
查询大于所有人平均年龄的员工名与年龄
mysql> select name,age from emp where age > (select avg(age) from emp); +————-+———+ | name | age | +————-+———+ | xio | 48 | | wupeiqi | 38 | +————-+———+ 2 rows in set (0.00 sec)
查询大于部门内平均年龄的员工名、年龄
select t1.name,t1.age from emp t1 inner join (select dep_id,avg(age) avg_age from emp group by dep_id) t2 on t1.dep_id = t2.dep_id where t1.age > t2.avg_age;
- **带EXISTS关键字的子查询**EXISTS关字键字表示存在。在使用EXISTS关键字时,内层查询语句不返回查询的记录。<br />而是返回一个真假值。True或False<br />当返回True时,外层查询语句将进行查询;当返回值为False时,外层查询语句不进行查询```python#department表中存在dept_id=203,Turemysql> select * from employee-> where exists-> (select id from department where id=200);+----+------------+--------+------+--------+| id | name | sex | age | dep_id |+----+------------+--------+------+--------+| 1 | xio | male | 18 | 200 || 2 | jion | female | 48 | 201 || 3 | wupeiqi | male | 38 | 201 || 4 | yuanhao | female | 28 | 202 || 5 | liwenzhou | male | 18 | 200 || 6 | jingliyang | female | 18 | 204 |+----+------------+--------+------+--------+#department表中存在dept_id=205,Falsemysql> select * from employee-> where exists-> (select id from department where id=204);Empty set (0.00 sec)
in与exists
!!!!!!当in和exists在查询效率上比较时,in查询的效率快于exists的查询效率!!!!!!==============================exists==============================# existsexists后面一般都是子查询,后面的子查询被称做相关子查询(即与主语句相关),当子查询返回行数时,exists条件返回true,否则返回false,exists是不返回列表的值的,exists只在乎括号里的数据能不能查找出来,是否存在这样的记录。# 例查询出那些班级里有学生的班级select * from class where exists (select * from stu where stu.cid=class.id)# exists的执行原理为:1、依次执行外部查询:即select * from class2、然后为外部查询返回的每一行分别执行一次子查询:即(select * from stu where stu.cid=class.cid)3、子查询如果返回行,则exists条件成立,条件成立则输出外部查询取出的那条记录==============================in==============================# inin后跟的都是子查询,in()后面的子查询 是返回结果集的# 例查询和所有女生年龄相同的男生select * from stu where sex='男' and age in(select age from stu where sex='女')# in的执行原理为:in()的执行次序和exists()不一样,in()的子查询会先产生结果集,然后主查询再去结果集里去找符合要求的字段列表去.符合要求的输出,反之则不输出.
- not in与 not exists ```python !!!!!!not exists查询的效率远远高与not in查询的效率。!!!!!!
==============================not in============================== not in()子查询的执行顺序是: 为了证明not in成立,即找不到,需要一条一条地查询表,符合要求才返回子查询的结果集,不符合的就继续查询下一条记录,直到把表中的记录查询完,只能查询全部记录才能证明,并没有用到索引。
==============================not exists============================== not exists: 如果主查询表中记录少,子查询表中记录多,并有索引。 例如:查询那些班级中没有学生的班级 select * from class
where not exists
(select * from student where student.cid = class.cid)
not exists的执行顺序是: 在表中查询,是根据索引查询的,如果存在就返回true,如果不存在就返回false,不会每条记录都去查询。
---<a name="nNNhy"></a># 六 权限管理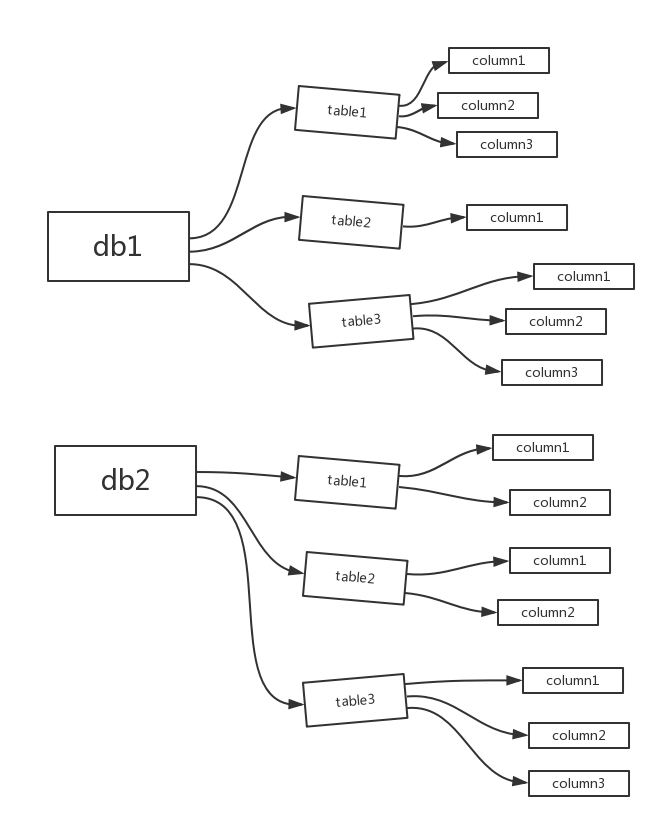```python#授权表user #该表放行的权限,针对:所有数据,所有库下所有表,以及表下的所有字段db #该表放行的权限,针对:某一数据库,该数据库下的所有表,以及表下的所有字段tables_priv #该表放行的权限。针对:某一张表,以及该表下的所有字段columns_priv #该表放行的权限,针对:某一个字段#按图解释:user:放行db1,db2及其包含的所有db:放行db1,及其db1包含的所有tables_priv:放行db1.table1,及其该表包含的所有columns_prive:放行db1.table1.column1,只放行该字段
权限相关操作
#创建用户create user 'aaaa'@'1.1.1.1' identified by '123';create user 'aaaa'@'192.168.1.%' identified by '123';create user 'aaaa'@'%' identified by '123';#授权:对文件夹,对文件,对文件某一字段的权限查看帮助:help grant常用权限有:select,update,alter,deleteall可以代表除了grant之外的所有权限#针对所有库的授权:*.*grant select on *.* to 'aaaa'@'localhost' identified by '123'; #只在user表中可以查到aaaa1用户的select权限被设置为Y#针对某一数据库:db1.*grant select on db1.* to 'aaaa2'@'%' identified by '123'; #只在db表中可以查到aaaa2用户的select权限被设置为Y#针对某一个表:db1.t1grant select on db1.t1 to 'aaaa3'@'%' identified by '123'; #只在tables_priv表中可以查到aaaa3用户的select权限#针对某一个字段:mysql> select * from t3;+------+-------+------+| id | name | age |+------+-------+------+| 1 | aaaa1 | 18 || 2 | aaaa2 | 19 || 3 | aaaa3 | 29 |+------+-------+------+grant select (id,name),update (age) on db1.t3 to 'aaaa4'@'localhost' identified by '123';#可以在tables_priv和columns_priv中看到相应的权限mysql> select * from tables_priv where user='aaaa4'\G*************************** 1. row ***************************Host: localhostDb: db1User: aaaa4Table_name: t3Grantor: root@localhostTimestamp: 0000-00-00 00:00:00Table_priv:Column_priv: Select,Updaterow in set (0.00 sec)mysql> select * from columns_priv where user='egon4'\G*************************** 1. row ***************************Host: localhostDb: db1User: aaaa4Table_name: t3Column_name: idTimestamp: 0000-00-00 00:00:00Column_priv: Select*************************** 2. row ***************************Host: localhostDb: db1User: aaaa4Table_name: t3Column_name: nameTimestamp: 0000-00-00 00:00:00Column_priv: Select*************************** 3. row ***************************Host: localhostDb: db1User: aaaa4Table_name: t3Column_name: ageTimestamp: 0000-00-00 00:00:00Column_priv: Updaterows in set (0.00 sec)#删除权限revoke select on db1.* from 'aaaa'@'%';

若有收获,就点个赞吧
0 人点赞
