why we need ‘单向数据流’?
弊端
React 可以简单粗暴的理解为 View 视图层的解决方案。如果你的应用足够简单,简单到,你可以直接在把少量的数据维护到 view 层本地。
但是当业务逻辑丰富起来之后,单纯 view 层维护数据会有很多问题:比如,不同页面或组件间共享数据的问题,共享数据一致性的问题。
当然上述问题并不是引不引入所谓单向数据流思想的问题,而是是否将数据从视图层中解耦的问题。
对于这个问题,最经典的解决方案就是:数据模型和视图分离,他们之间的关系用控制器来维护。控制器是视图与数据之间的桥梁。
这就是所谓 MVC。
这种思想非常好,理想情况的 MVC 应该是:当视图中需要改变数据,先通过请求 Controller,由 Controller 驱动数据模型层更新。但实际应用中,往往会有很多情况 View 层直接更新了 Modal 层的数据,绕过了 Controller。这样就会越来越混乱,维护的成本就会变得很高。
单向数据流思想
上文中提到 :MVC 在现实实践中可能并没有严格的按照理想情况来运转,核心的原因是 View 层可能直接接触了 Modal 层。
那么解决这个问题的思路就很清晰:加一条限制,让所有需要更新 Modal 层的请求都经由“Controller”层,这就解决了 modal 层数据更新的问题。
但当 modal 层中数据变化之后如何反馈到 view 层中呢?再加一条限制,就是 modal 层中的数据变更了之后,不经过 controller 而直接反馈到 view 层。
这样数据流就变成了这样:
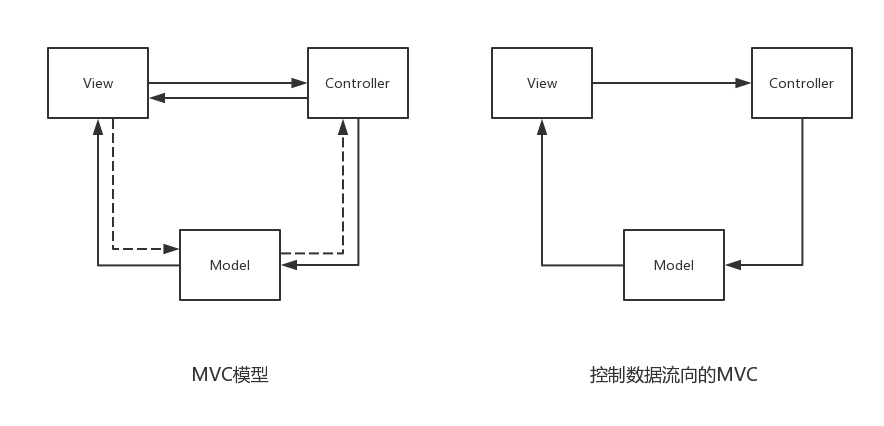
这就是单向数据流的思想。可以粗暴的理解为,严格限制数据流向版本的 MVC。
Flux
Flux 框架是 Facebook 实现单向数据流思想的一种框架。在 Flux 框架中涉及:
- Store:数据模型层 Model,负责存储维护数据
- Dispatcher:按类型分发处理数据的请求的控制器。
- Action:处理数据类型的对象。
- View:视图,在 React 项目中为组件。
单向数据流关系表现如下:

结合 Demo:Flux 单向数据流怎么做
- 一个 Counter 计数器的例子:页面上有两个计数器,分别都有按钮”+”or”-“,点击之后对应的数字会增加或者减小(单位 1)
在线代码编辑:Flux 的计数器Demo
Modal 层
model,体现在 Flux 中就是 Store,新建一个 CounterStore.js,在该文件中:
- 两个计数器的初始数据
const counterValues = {c1: 10,c2: 20,};
下来我们要明晰要用 Store 来做什么:首先,顾名思义,Store 是存储数据的地方,而且存储的不只有初始数据,而是当前的最新数据; 其次, Store 需要提供一种能力来对外输出最新的值,以及对外暴露更改自己所存储的值得方法;最后,当自己内部的值更新后,需要让外界了解(通知外部对象)。
为了实现这样的功能,借助了 EventEmitter 对象,让 Store 扩展 EventEmmiter:
const CHANGE_EVENT = "changed";// CounterStore现在就要注册时间相应事件等功能const CounterStore = Object.assign({}, EventEmitter.prototype, {// 对外暴露的get方法// 维护的数据其实就是 counterValuesgetCounterValues: function() {return counterValues;},// store发送变更的广播消息emitChange: function() {this.emit(CHANGE_EVENT);},// store自己注册广播消息的监听// 当收到广播,调用 callbackaddChangeListener: function(callback) {this.on(CHANGE_EVENT, callback);},// 移除广播监听removeChangeListener: function(callback) {this.removeListener(CHANGE_EVENT, callback);}});
这样 Store 就有了存储数据的能力,通知数据变更以及变更之后处理回调的能力。但是数据是怎样变更的呢?这个也需要根据适当的逻辑来处理。根据 flux 模型,数据变更有且仅有 action 驱动。
那么反应到模型层中就是 new ModelValue = someFunction (action) .
// 这个方法是将处理action的逻辑注册起来// 这个所谓的dispatchToken是一个标识,多用于控制多个store间的顺序操作CounterStore.dispatchToken = FluxDispatcher.register(action => {if (action.type === ActionTypes.ADD) {// 可以看到,由不同的action type驱动counterValues中值得更新// 更新完成后广播更新事件counterValues[action.counterCaption]++;CounterStore.emitChange();} else if (action.type === ActionTypes.SUB) {counterValues[action.counterCaption]--;CounterStore.emitChange();}});
FluxDispatcher 是 flux 库最重要的东西,因为 action 是由 dispatcher 分发的,分发在哪里呢?就是 register 注册的这里。
控制层 Controller
Flux 模型的控制层主要就是 Action 和 Dispatcher。
上文中的 FluxDispatcher,其实就是这个:
// FluxDispatcher.jsimport { Dispatcher } from "flux";/*** 新建一个Dispather*/export default new Dispatcher();
Action.js 的工作是对外提供方法,使得 View 层调用某方法后,某个 Action 对象能够顺利的被派发到 Model 层中,派发的方法就是 dispatch():
// ActionType.js// 定义 Type 类型export const ADD = "add";export const SUB = "sub";// Action.jsimport FluxDispatcher from "./FluxDispatcher";import * as ActionTypes from "./ActionTypes";/*** ActionCreator* 由dispatcher分发*/export const addOne = counterCaption => {FluxDispatcher.dispatch({type: ActionTypes.ADD,counterCaption: counterCaption});};export const subOne = counterCaption => {FluxDispatcher.dispatch({type: ActionTypes.SUB,counterCaption: counterCaption});};
视图层 View
这里粘贴了 Component/Counter.js 的代码,是一个简单的 React 组件,在该组件的生命周期 mount 阶段,调用了 model 层中注册变更监听的方法,并将 this.this.onChange()方法作为变更监听的回调。可想而知,每当 Model 变更,那么 View 层中的回调方法 onChange()会被调用。
那么,在 this.onChange()方法中做了什么?
拿到最新的数据,然后 setState()触发 React 的 render 机制。
view 层想要更新 Model 层的使用,假设按钮的 onClick 方法出发了,就调用的是 Action 中对应的方法,由 Action 将更新的请求传递到 model 层。
这样数据流是不是很清晰的运转着…
import React, { Component } from "react";import CounterStore from "../store/CounterStore";import * as Actions from "../Actions";export default class Counter extends Component {constructor(props) {super(props);//使用Store来初始化值this.state = {number: CounterStore.getCounterValues()[props.name]};this.addOne = this.addOne.bind(this);this.subOne = this.subOne.bind(this);this.onChange = this.onChange.bind(this);}addOne() {Actions.addOne(this.props.name);}subOne() {Actions.subOne(this.props.name);}// 当flux中数据变化的时候// 映射到view层// 那么要自动映射的话,需要注册该函数onChange() {const newNum = CounterStore.getCounterValues()[this.props.name];this.setState({ number: newNum });}// 在CounterStore中注册onchangecomponentDidMount() {CounterStore.addChangeListener(this.onChange);}// 在CounterStore中注销onchangecomponentWillUnmount() {CounterStore.removeChangeListener(this.onChange);}render() {return (<div><button onClick={this.addOne}>+</button>{this.state.number}<button onClick={this.subOne}>-</button></div>);}}
Redux
Redux 是实现单向数据流的另一框架,非 Facebook 出品,但是被 Facebook 乃至全世界认可。
思想的进化
Flux 框架实现了单向数据流的思想,但是不够完美:1. 繁琐,自己实现监听等功能。2.涉及多个 Store 更新数据时,牵扯时机控制问题。
在 Flux 上再增加些限制条件:
- 唯一数据源: 将应用中的 store 做成一个唯一的树结构的对象。
- 状态只读:store 中的数据改变必须来自 Action 的派发。(这和 Flux 是一致的)
- 纯函数来改变数据:纯函数即一个函数的返回结果只依赖于它的参数,并且在执行过程里面没有副作用,我们就把这个函数叫做纯函数(一个函数执行过程对产生了外部可观察的变化那么就说这个函数是有副作用的)。
这里的模型为 :
newState = reducer(oldState, action)
新的模型对象 newState 是 reducer 的返回值,返回的具体值由 action 和旧对象的值决定。
以上就是 Redux 的三个基本原则。
Redux 怎么做
使用 Redux 的项目通常会有这几个角色:
- Store: 和 Flux 中 store 的概念完全一样,是用来存储数据的对象。
- Reducer: 根据旧的状态和 Action 产生新的状态,纯函数。
- Action 与 ActionCreator: Action 相关的对象。
所以,使用 Redux 来实现之前的 Demo 会变成这样。
在线代码编辑 原生 redux 的计数器 Demo
Store
createStore(reducer, initState) 是 redux 构造一棵状态树时所使用的方法。这里构造出的 store 就具有了 dispatch(分发 Action),以及 getState(得到最新的被存储的数据)的能力.
// Store.jsimport { createStore } from "redux";import reducer from "./Reducer";const initState = {c1: 10,c2: 20,c3: 0};const store = createStore(reducer, initState);export default store;
Reducer
reducer 是一个纯函数,核心思想就是
newState = reducer(oldState, action)
import * as ActionTypes from "./ActionTypes";export default (state, action) => {const { counterCaption } = action;switch (action.type) {case ActionTypes.ADD:return {...state,[counterCaption]: state[counterCaption] + 1};case ActionTypes.SUB:return {...state,[counterCaption]: state[counterCaption] - 1};default:return state;}};
ActionCreator
import * as Actions from "./ActionTypes";// redux 的 action creatorexport const add = counterCaption => {return {type: Actions.ADD,counterCaption: counterCaption};};export const sub = counterCaption => {return {type: Actions.SUB,counterCaption: counterCaption};};
View 层的使用
import React, { Component } from "react";import store from "../Store";import * as Actions from "../Action";export default class Counter extends Component {constructor(props) {super(props);this.state = this.getOwnState();this.onChangeCallback = this.onChangeCallback.bind(this);}componentDidMount() {store.subscribe(this.onChangeCallback);}componentWillUnmount() {store.unsubscribe(this.onChangeCallback);}onChangeCallback() {this.setState(this.getOwnState());}getOwnState() {const states = store.getState();return {number: states[this.props.caption]};}addOne() {store.dispatch(Actions.add(this.props.caption));}subOne() {store.dispatch(Actions.sub(this.props.caption));}render() {return (<div><button onClick={() => this.addOne()}>+</button>{this.state.number}<button onClick={() => this.subOne()}>-</button></div>);}}
在这里就用到了 store 的一些核心的 api:subscribe() / unsubscribe()用来订阅/取消订阅 store 中存储的数据; dispatch() 是分发一个 action 给 reducer 来处理的方法; getState()用来获得最新的数据。
树数据结构
不同的业务数据之间需要解耦合,需要在合理设计数据结构之后,将处理不同业务模型的数据分别处理,那就是好几个 reducer 了。在 redux 中可以通过中间件 combineReducers,来将不同的 reducer 合并成一个 reducer。
比如下面,对外输出了一个合并过的 reducer 对象:
import { combineReducers } from 'redux';// 不同的reducers importimport { user } from './reducers/user';import { msgLists } from './reducers/msgLists';import { notes } from './reducers/notes';// combine the reducersexport default combineReducers({ user, msgLists, notes });// 基于合并过了的reducer构建storeconst store = createStore(reducers, initState);
这样实际在 redux 中 store 的,这是什么结构呢?
state:{bizProps1:{}, bizProps2:{}, bizProps3:{} .....}
react-redux
具有 React 特色的进化
Redux,尽管看上去只是在 React 中使用,但是实际是可以应用到其他框架中的,只不过不常见。既然广泛的使用场景是 React 中,不妨加些 React 特色的东西,react-redux 这个库就应运而生。
这个库提供了一个组件 Provider 和一个高阶组件 Connect。
解决了什么问题?
- 原生 redux 在 view 层依赖 store,父组件,子组件,孙子组件都有可能从 store 中 getState()或者 dispatch(),的确有这样的需求,但是每一个组件都 import store 不是一个好办法。(Prvider 组件解决的问题)
- 又增加了限制:从 store 中取到的数据再 react-redux 中默认都是以 Props 的形式拿到的。(Connect 组件解决的问题)
使用react-redux改进Demo
- 最外层组件使用 Provider 包裹,并将 store 注入:
import { Provider } from "react-redux";import store from "./Store";// ...const Root = () => (<Provider store={store}><App /></Provider>);// ...const rootElement = document.getElementById("root");ReactDOM.render(<Root />, rootElement);
- 视图 View 中引入 connect
这些注释掉的都是相较于原生 redux 的不需要的。
import React, { Component } from "react";// import store from "../Store";import { connect } from "react-redux";import * as Actions from "../Action";class Counter extends Component {constructor(props) {super(props);// this.state = this.getOwnState();// this.onChangeCallback = this.onChangeCallback.bind(this);}// componentDidMount() {// store.subscribe(this.onChangeCallback);// }// componentWillUnmount() {// store.unsubscribe(this.onChangeCallback);// }// onChangeCallback() {// this.setState(this.getOwnState());// }// getOwnState() {// const states = store.getState();// return {// number: states[this.props.caption]// };// }// addOne() {// store.dispatch(Actions.add(this.props.caption));// }// subOne() {// store.dispatch(Actions.sub(this.props.caption));// }render() {console.log(this.props);return (<div><button onClick={() => this.props.add(this.props.caption)}>+</button>{this.props.numbers[this.props.caption]}<button onClick={() => this.props.sub(this.props.caption)}>-</button></div>);}}export default connect(state => ({numbers: state}),{add: Actions.add,sub: Actions.sub})(Counter);
react-redux 原理分析
经过与React深度结合的react-redux改造后,应用基本就长成这个样子: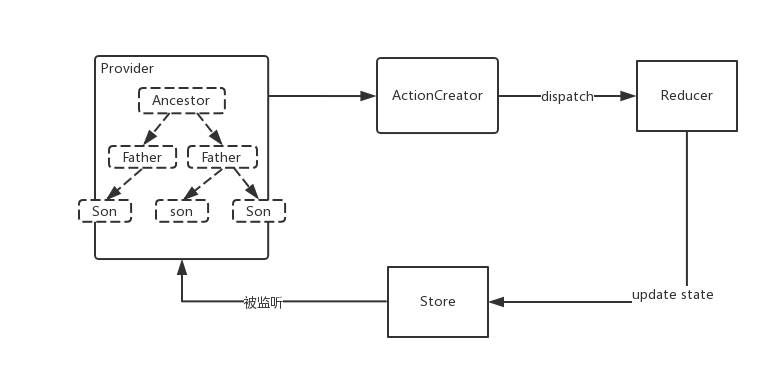
那么,它是怎么做到的呢?
核心知识点:
- Context : Context是 react 的一个功能。组件传递 props 的时候都是由上向下的,就是爷爷传递给父亲,父亲传递给儿子。假设有一个属性父亲拿着确实没用,父亲唯一能做的就是原模原样的传递给儿子,这时候再经过父亲一级就很繁琐。Context 就是为了解决祖先组件跨组件传递 props 的问题。基本原理就是,祖先组件将部分 props 声明为 context 之后, 其后代组件可以直接从 context 中拿到,避免没意义的层层传递。
- Provider 的作用:Provider 就是应用的最顶级组件,在该组件中,store 是必须的要传入的 props,也就是 redux 所创建的存储对象。Provider 将 store 声明为 context,这样保证了凡是 Provider 的后代组件,都有能力拿到 store 的数据和方法。那么因为 Provider 作为顶级组件,整个应用就被赋予了随时获得数据,修改数据的能力。Provider这个组件带来的意义还在于:又增加了一种约束,就是从store中拿到的值强行规定从props中自顶向下传递的,这样数据流更明晰和规范。
- 高阶组件 connect:
OutputComponent = connect(mapStateToProps, mapDispatchToProps, …)(YourComponent)
高阶组件 connect 大致是这样的结构:
function connect(mapStateToProps, mapDispatchToProps){return function X(YourComponent){return class Outer extends Component{// 1. 在加载阶段从context中拿到store并注册监听// store.subscribe();render(){//// 调用mapStateToProps函数,得到newValueProps,// 对应的功能就是将模型层中的值作为props注入组件// 调用mapDispatchToProps函数,得到newActionProps// 对应的功能就是将修改模型层中的值的方法也作为props注入组件// 将这些props都注入到组件中return (<YourComponent ...newValueProps ...newActionProps />)}}}}
基本原理就是上述伪代码,简单文字描述下:实际得到的组件为 Outer, Outer 是对 YourComponent 的包裹,同时增强了他的功能,具体就是,在 Outer 的加载生命周期阶段从 context 中拿到 store,并注册监听。在 render 方法的 return 之前,将这些 store 中的数据或者 actionCrator 方法都以 Props 的形式交给子组件 YourComponent。这样,YourComponent 中使用数据或者改变数据就从,this.props 中拿到。
PS:项目支持装饰器写法的时候,上述例子中:
OutputComponent = connect(mapStateToProps, mapDispatchToProps, ...)(YourComponent)// 可以写成@connect(mapStateToProps, mapDispatchToProps, ...)YourComponent ...
处理异步的问题
实际项目并不像Demo那样简单,在实际项目中会涉及大量的异步操作。最常见的情况是,当想要修改store中存储的state,但无法立即得到将要修改的值是什么,比方说这个值要在后台拿到,那就需要发请求,这是异步的过程。
redux通过使用中间件(Middleware),来增强自身的能力应对这类情况。
所谓Middleware就是当action被分发到reducer之前的拦截器,在构造store的时候使用applyMiddleware()这个API可以设置中间件。
react-thunk
下面是react-thunk的源代码,其实就这么多而已。
// from :https://github.com/reduxjs/redux-thunk/blob/master/src/index.jsfunction createThunkMiddleware(extraArgument) {return ({ dispatch, getState }) => next => action => {if (typeof action === 'function') {return action(dispatch, getState, extraArgument);}return next(action);};}const thunk = createThunkMiddleware();thunk.withExtraArgument = createThunkMiddleware;export default thunk;
使用thunk需要将有异步逻辑的action做成一个函数action,在thunk中间件中,先检查action是否是函数,如果是函数,则执行该函数,如果不是,就进入下一个中间件。
一个具有异步功能的actionCreator可以就像这样:
import { ADD } from "./ActionTypes";// 同步actionCreatorexport const add = () => {return { type: ADD };};// 模拟异步export const addDelay = () => {return dispatch => {setTimeout(() => {// 延迟 模拟异步dispatch(add());}, 1000);};};
redux-saga
redux-saga和thunk目的基本相同,但原理不一样。接触了saga之后会发现sagax比thunk好用。
- saga的设计思想和几个概念
- sages 采用 Generator 函数来 yield Effects(包含指令的文本对象)。Generator 函数的作用是可以暂停执行,再次执行的时候从上次暂停的地方继续执行(异步变同步);
- Effect 是一个简单的对象,该对象包含了一些给 middleware 解释执行的信息。可以通过使用 effects API 如 fork,call,take,put,cancel 等来创建 Effect。
- 一个 Saga 所做的实际上是组合那些所有的 Effect, saga是effect的逻辑组合。
- 更多概念:官网
- saga使用的Demo
和上面thunk的功能一样,两个按钮,一个立即增加数值,另一个延迟增加。
首先最重要的saga部分,每个saga整体就是一个generator函数,函数中用yield将各个effect串联。
// saga.jsimport { take, fork, call, put, takeEvery } from "redux-saga/effects";import { ADD, ADD_DELAY } from "./ActionTypes";import { asyncDelayUtil } from "./FakeAsyncUtil";// 这就是一个sagafunction* addDelay() {const data = yield call(asyncDelayUtil); // 指示中间件调用 fetch 异步任务if (data === "ShangWangZhe") {// 拿到结果后// 中间件发送一个Actionyield put({ type: ADD });} else {console.log("Wrong in Asnyc");}}// 设置rootSaga// root sagas是一种借用takeEvery维持的关联关系设置// 意思就是当收到action type为某的时候调用某某sagafunction* rootSaga() {yield takeEvery(ADD_DELAY, addDelay);}export default rootSaga;// FakeAsyncUtil.js// 延迟来返回结果// 模拟异步function asyncDelayUtil() {const p = new Promise((resolve, reject) => {//做一些异步操作setTimeout(() => {console.log("delayed is ok");resolve("ShangWangZhe");}, 2000);});return p;}export { asyncDelayUtil };
当然,使用effect的方法有很多, take, fork, call, put都是。
- put:指示中间件发起一个 action 到 Store
- call:指示中间件调用 fetch 异步任务
- take: 指示中间件等待 Store 上指定的 action,即监听 action,saga在等待市阻塞。
- fork:fork 函数来创建 task, task与当前任务类似像多线程模型,就是fork之后,不会等待action,不阻塞当前代码的继续下去。
// ...import createSagaMiddleware from "redux-saga";import rootSaga from "./saga.js";// ...// 构造并启动sagaconst sagaMiddleware = createSagaMiddleware();const store = createStore(Reducer, applyMiddleware(sagaMiddleware));sagaMiddleware.run(rootSaga);
saga中间件的构造createSagaMiddleware(), sagaMiddleware.run(rootSaga)不要忘了。
// TestView.jsclass TestView ...//...const TestView = connect(state => ({number: state.number}),{addNow: addNow,// 触发 saga的方法// 在设置rootSaga的时候对应的type和saga的关系addDelay: dispatch => {return { type: ADD_DELAY };}})(TestViewTemp);export default TestView;
视图层的connet部分在上文中。mapStateToProps不变(第一个参数), 第二个参数mapDispatchToProps这里要注意,一定return一个与rootSaga中配置对应Action。
代码架构提一个问题
使用传统React全家桶(React + React Rputer + Redux + react-redux + saga/ thunk)技术栈组织有一定规模的项目时,需要组织代码结构。那么怎么一种划分是合理的?
我自己就曾经按照这样的形式组织过项目:
-src
—Components
—Containers
—Reducer.js
—reduxs
—-BizA.redux.js
—-BizB.redux.js
—Utils
但是,这样真的好吗?真的不好吗?方便使用吗?
一千个程序员有一千种划分方法。但是,有些经验是可以沉淀下来并且分享的。
Dva
简单说下Dvajs。
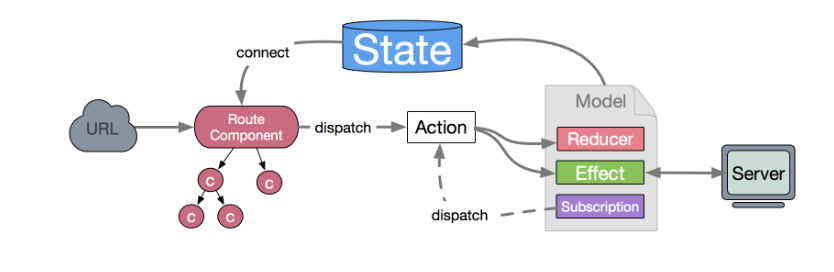
dva 首先是一个基于 redux 和 redux-saga 的数据流方案,然后为了简化开发体验,dva 还额外内置了 react-router 和 fetch,所以也可以理解为一个轻量级的应用框架。(From Dvajs官网)
dva其实是一套解决方案,一个基于React技术栈优秀实践所沉淀下来的东西。
所以,dva中的所有概念都和技术栈中概念一致.Dva官网阐述概念
看看github上dva/packages/dva-core/package.json
// dva/packages/dva-core/package.json{// ...省略"dependencies": {// ..."redux": "^3.7.1","redux-saga": "^0.16.0","warning": "^3.0.0"},}// dva/packages/dva-core/package.json{// ..."dependencies": {// ..."react-redux": "5.0.7","react-router-dom": "^4.1.2","react-router-redux": "5.0.0-alpha.9","redux": "^3.7.2"},}
Dva 做了什么
看下官方的一个简单Demo:
// 创建应用const app = dva();// 注册 Modelapp.model({namespace: 'count',state: 0,reducers: {add(state) { return state + 1 },},effects: {*addAfter1Second(action, { call, put }) {yield call(delay, 1000);yield put({ type: 'add' });},},});// 注册视图app.router(() => <ConnectedApp />);// 启动应用app.start('#root');
以上,官方最简例子,非常粗略的过下dvajs的代码:
在dva-master/packages/dva/src/index.js 中:
// 默认输出的方法export default function (opts = {}) { // ....// 构造 app对象// 利用core.create()来构造// 构造的app对象包含router, start属性其实都是函数const app = core.create(opts, createOpts);const oldAppStart = app.start;app.router = router;app.start = start;return app;
在dva-master/packages/dva/src/index.js 默认的输出方法中构造了app对象,并给app对象的start,router等属性赋值。
调用start方法时:
function start(container) {...if (!app._store) {oldAppStart.call(app);}//得到storeconst store = app._store;// 得到Providerapp._getProvider = getProvider.bind(null, store, app);// render// If has container, render; else, return react componentif (container) {render(container, store, app, app._router);app._plugin.apply('onHmr')(render.bind(null, container, store, app));} else {return getProvider(store, this, this._router);}...
得到store的方法在dva-core/index.js中,主要就是将不同的namespace,reducer,effects整合起来,启动(run)sagas。
而Provider就是来自于react-redux, getProvider方法在同文件中。
import { Provider } from 'react-redux';// ...function getProvider(store, app, router) {const DvaRoot = extraProps => (<Provider store={store}>{ router({ app, history: app._history, ...extraProps }) }</Provider>);return DvaRoot;}
看的很粗略,不过也能感知到,Dva的主要工作在于组织起来React/ Redux /React-Router/ Redux-saga这一套技术栈。
感想
最开始接触,单向数据流模型的思想的时候就觉得很有意思,稍作琢磨,脑子里面就想到一个场景:
一个应用构成的组件树,从根部被赋予了一种得到数据的能力,这种能力把数据的水源注入这个应用树中。“水流”散发着光芒流动,流向每一根树杈和枝叶。当你需要这种能力来得到数据,随时在组件中就能得到,就像打开水龙头接水那样自然。而不需要的时候,它也只是默默的在背后,不会产生任何影响。当数据水源的水需要改变时,只需通过约定的方式来通知水源需要改变数据,而这种改变很快就能被整个应用之树感知,就是这么神奇。
所谓”增加限制“,其实是一件好事,从CMVCvTraditional到Flux单向数据流,到Redux又增加了三个原则,再到Dva按照规范书写使用saga/reducer,正是越来越多的限制,造就了数据流的有序和可维护。实践了所谓:软件 = 组件 + 连接器 + 限制 的思想。
Redux在构建小型应用的时候非常繁琐,但是流程也的确是清晰。这就是为什么redux的作者说:当你不知道你的应用是不是真的需要Redux的时候,那就是不需要的使用的时候,只有遇到 React 实在解决不了的问题,你才需要 Redux 。
Dvajs并不能说是实现单向数据流的集大成者,因为它并没有提出太新的概念,但是它将整个技术栈组织的更加有序,选择它,省去了技术选型,唯一做的就是按照约定,就能高效完成单向数据流的使命。
当然,这没有任何贬低Dvajs, 自己也使用过纯redux,也自己在项目中组织过redux技术栈,曾几何时也不爽过,但怎么没有像Dvajs作者那样洞悉问题,着手解决呢???
所以,见贤思齐,厚积薄发,方为进阶向上的路!自勉~

若有收获,就点个赞吧
0 人点赞
