一、屡一下思路:
大数据:数据的存储,读取,分析,采集(Flume,Sqoop,DataX等)。
大数据分析:MapReduce —> Hive (离线分析) —>spark,flink(实时分析)
本次项目周:电商类型的离线数据分析项目。
用到的技术有:Hive,HDFS,Flume,Azkaban,SuperSet,DataX(Sqoop)
二、实战将三个数据来源导入到数据仓库的ODS层
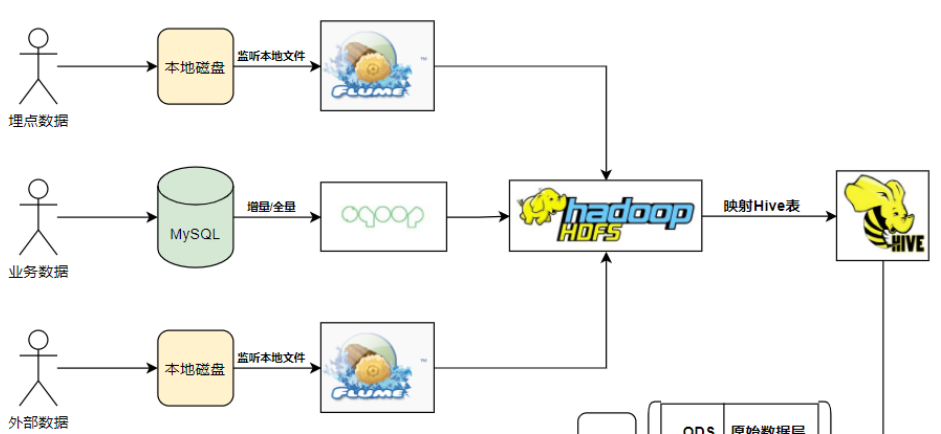
第一步:导入mysql数据到ods层
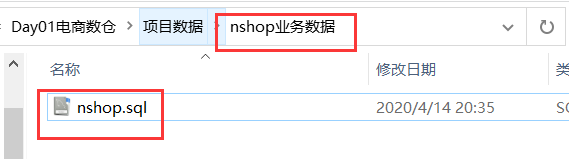
1、在mysql中,创建nshop数据库,导入业务数据。

2、在hive中创建对应的ods层数据库及各种表
hive要想能运行,必须保证集群环境是启动的。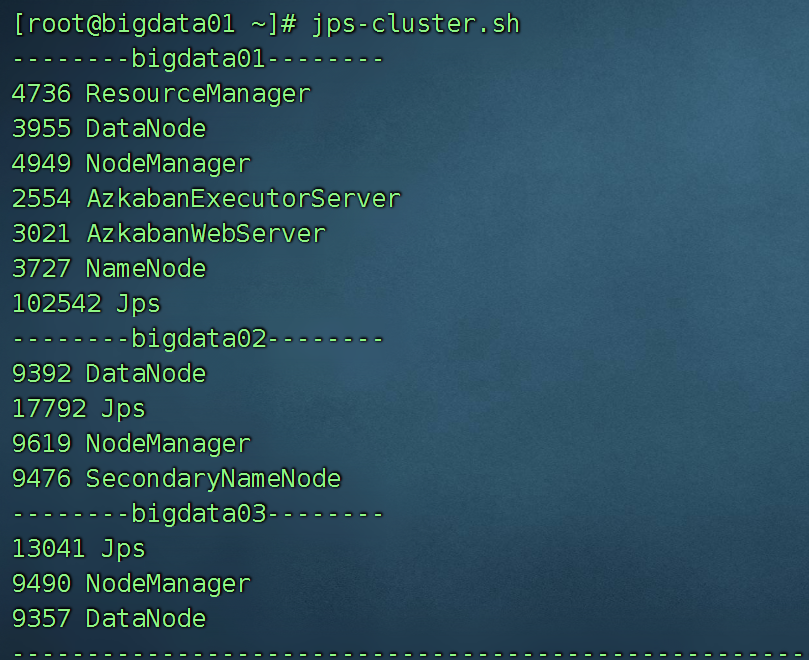
hive 直接接入我们的hive系统。
show databases; //查看所有的数据库
drop database ods_nshop cascade; //级联删除ods_nshop数据库包含里面的表。
我们可以按照mysql中的表字段,创建我们的hive中的表字段。
在hive表中创建mysql对应的表(此处省略)
编写sqoop脚本,将mysql的数据一对一的导入到hive的表中。
案例:
sqoop import \--connect jdbc:mysql://bigdata01:3306/nshop \--username root \--password 123456 \--query "select * from customer where \$CONDITIONS" \--target-dir /data/nshop/ods/ods_02_customer \--hive-import \--hvie-table ods_02_customer \--delete-target-dir \-m 1
编写真正的脚本,大约有12个左右,因为执行时间比较长,所有我们编写为azkaban任务:
#!/bin/bashsqoop import \--connect jdbc:mysql://bigdata01:3306/nshop \--query "select customer_id,customer_login,customer_nickname,customer_name,customer_pass,customer_mobile,customer_idcard,customer_gender,customer_birthday,customer_age,customer_age_range,customer_email,customer_natives,customer_ctime,customer_utime,customer_device_num from customer where \$CONDITIONS" \--username root \--password 123456 \--target-dir /data/nshop/ods/ods_02_customer \--hive-import \--hive-database ods_nshop \--hive-table ods_02_customer \--delete-target-dir \-m 1sqoop import \--connect jdbc:mysql://bigdata01:3306/nshop \--query "select customer_id,attention_id,attention_type,attention_status,attention_ctime from customer_attention where \$CONDITIONS" \--username root \--password 123456 \--target-dir /data/nshop/ods/ods_02_customer_attention \--hive-import \--hive-database ods_nshop \--hive-table ods_02_customer_attention \--delete-target-dir \-m 1sqoop import \--connect jdbc:mysql://bigdata01:3306/nshop \--query "select consignee_id,customer_id,consignee_name,consignee_mobile,consignee_zipcode,consignee_addr,consignee_tag,ctime from customer_consignee where \$CONDITIONS" \--username root \--password 123456 \--target-dir /data/nshop/ods/ods_02_customer_consignee \--hive-import \--hive-database ods_nshop \--hive-table ods_02_customer_consignee \--delete-target-dir \-m 1sqoop import \--connect jdbc:mysql://bigdata01:3306/nshop \--username root \--password 123456 \--query "select category_code,category_name,category_parent_id,category_status,category_utime from category where \$CONDITIONS" \--target-dir /data/nshop/ods/dim_pub_category \--hive-import \--hive-database ods_nshop \--hive-table dim_pub_category \--delete-target-dir \-m 1sqoop import \--connect jdbc:mysql://bigdata01:3306/nshop \--username root \--password 123456 \--query "select supplier_code,supplier_name,supplier_type,supplier_status,supplier_utime from supplier where \$CONDITIONS" \--target-dir /data/nshop/ods/dim_pub_supplier \--hive-import \--hive-database ods_nshop \--hive-table dim_pub_supplier \--delete-target-dir \-m 1sqoop import \--connect jdbc:mysql://bigdata01:3306/nshop \--username root \--password 123456 \--query "select order_id,customer_id,order_status,customer_ip,customer_longitude,customer_latitude,customer_areacode,consignee_name,consignee_mobile,consignee_zipcode,pay_type,pay_code,pay_nettype,district_money,shipping_money,payment_money,order_ctime,shipping_time,receive_time from orders where \$CONDITIONS" \--target-dir /data/nshop/ods/ods_02_orders \--hive-import \--hive-database ods_nshop \--hive-table ods_02_orders \--delete-target-dir \-m 1sqoop import \--connect jdbc:mysql://bigdata01:3306/nshop \--username root \--password 123456 \--query "select order_detail_id,order_id,product_id,product_name,product_remark,product_cnt,product_price,weighing_cost,district_money,is_activity,order_detail_ctime from order_detail where \$CONDITIONS" \--target-dir /data/nshop/ods/ods_02_order_detail \--hive-import \--hive-database ods_nshop \--hive-table ods_02_order_detail \--delete-target-dir \-m 1sqoop import \--connect jdbc:mysql://bigdata01:3306/nshop \--username root \--password 123456 \--query "select page_code,page_remark,page_type,page_target,page_ctime from page_dim where \$CONDITIONS" \--target-dir /data/nshop/ods/dim_pub_page \--hive-import \--hive-database ods_nshop \--hive-table dim_pub_page \--delete-target-dir \-m 1sqoop import \--connect jdbc:mysql://bigdata01:3306/nshop \--username root \--password 123456 \--query "select region_code,region_code_desc,region_city,region_city_desc,region_province,region_province_desc from area_dim where \$CONDITIONS" \--target-dir /data/nshop/ods/dim_pub_area \--hive-import \--hive-database ods_nshop \--hive-table dim_pub_area \--delete-target-dir \-m 1sqoop import \--connect jdbc:mysql://bigdata01:3306/nshop \--username root \--password 123456 \--query "select date_day,date_day_desc,date_day_month,date_day_year,date_day_en,date_week,date_week_desc,date_month,date_month_en,date_month_desc,date_quarter,date_quarter_en,date_quarter_desc,date_year from date_dim where \$CONDITIONS" \--target-dir /data/nshop/ods/dim_pub_date \--hive-import \--hive-database ods_nshop \--hive-table dim_pub_date \--delete-target-dir \-m 1sqoop import \--connect jdbc:mysql://bigdata01:3306/nshop \--username root \--password 123456 \--query "select pay_id,order_id,customer_id,pay_status,pay_type,pay_code,pay_nettype,pay_amount,pay_ctime from orders_pay_records where \$CONDITIONS" \--target-dir /data/nshop/ods/ods_02_orders_pay_records \--hive-import \--hive-database ods_nshop \--hive-table ods_02_orders_pay_records \--delete-target-dir \-m 1sqoop import \--connect jdbc:mysql://bigdata01:3306/nshop \--username root \--password 123456 \--query "select product_code,product_name,product_remark,category_code,supplier_code,product_price,product_weighing_cost,product_publish_status,product_audit_status,product_bar_code,product_weight,product_length,product_height,product_width,product_colors,product_date,product_shelf_life,product_ctime,product_utime from product where \$CONDITIONS" \--target-dir /data/nshop/ods/dim_pub_product \--hive-import \--hive-database ods_nshop \--hive-table dim_pub_product \--delete-target-dir \-m 1
nodes:- name: odstype: commandconfig:command: sh sqoopJob.sh
azkaban-flow-version: 2.0
总共三个脚本,打包成zip,上传至azkaban即可。
192.168.32.100:8081 admin admin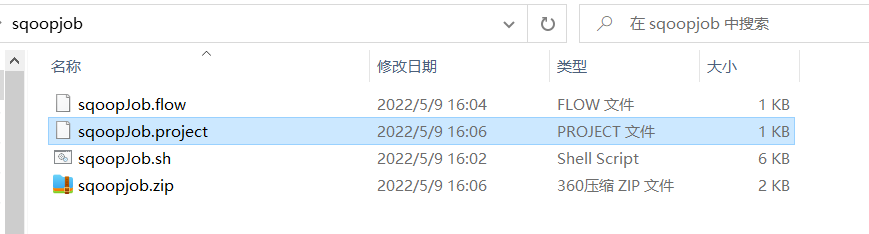
以上这个步骤最重要的是注意字符集,修改为 utf-8 witout no-bom 格式。

修改sqoopJob.sh 中的格式为linux格式。
使用nodepad++ ,中的edit 中的 EOL-Convertion 选择为 Unix / OSX format ,保存,重新打包上传即可。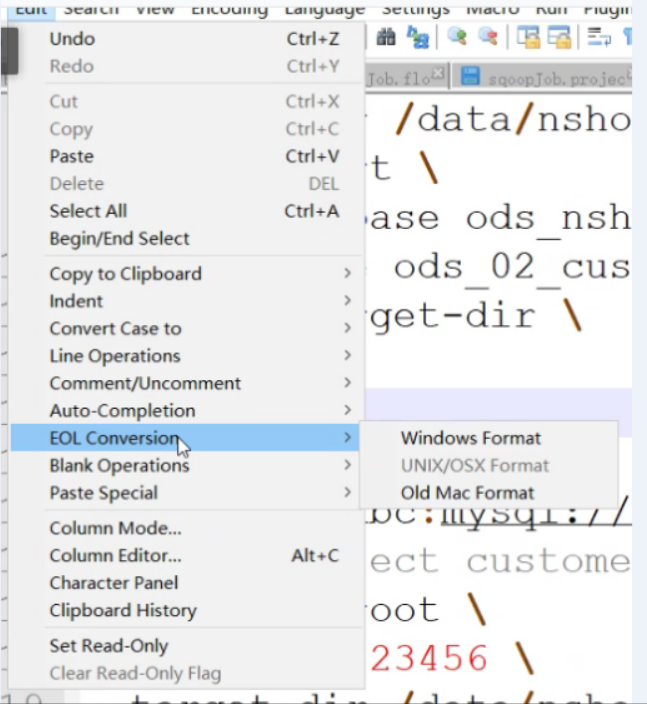

第二步:导入hdfs上的数据到hive中(埋点日志数据)
创建表(根据数据的格式)
create external table if not exists ods_nshop.ods_nshop_01_useractlog(action string comment '行为类型:install安装|launch启动|interactive交互|page_enter_h5页面曝光|page_enter_native页面进入|exit退出',event_type string comment '行为类型:click点击|view浏览|slide滑动|input输入',customer_id string comment '用户id',device_num string comment '设备号',device_type string comment '设备类型',os string comment '手机系统',os_version string comment '手机系统版本',manufacturer string comment '手机制造商',carrier string comment '电信运营商',network_type string comment '网络类型',area_code string comment '地区编码',longitude string comment '经度',latitude string comment '纬度',extinfo string comment '扩展信息(json格式)',duration string comment '停留时长',ct bigint comment '创建时间') partitioned by (bdp_day string)ROW FORMAT SERDE 'org.apache.hive.hcatalog.data.JsonSerDe'STORED AS TEXTFILElocation '/data/nshop/ods/user_action_log/'
因为日志中的数据是json数据,所以需要配置相关的内容:
json格式数据表需要通过serde机制处理在/usr/local/hive/conf 下 找到 hive-site.xml 修改里面的值,不是追加1 在hive-site.xml中设置三方jar包<property><name>hive.aux.jars.path</name><value>/usr/local/hive/lib/</value><description>The location of the plugin jars that contain implementations of user defined functions and serdes.</description></property>2 在hive.aux.jars.path设置的路径中增加hive-hcatalog-core-3.1.2.jar在linux中,将hive 的 hcatalog 中的一个jar包复制到 hive的lib 下cp $HIVE_HOME/hcatalog/share/hcatalog/hive-hcatalog-core-3.1.2.jar /usr/local/hive/lib/
如果之前没有配置过响应的配置,需要hive退出,再进入一次。
将日志数据加载到创建的表中(这个日志数据可以先提交到hdfs再加载,也可以在本地加载,真实的情况应该是在hdfs上加载。)
将本地的000000_0 这个日志数据放入到linux 本地的 /root/hive_data 下
load data local inpath '/root/hivedata/000000_0' into table ods_nshop.ods_nshop_01_useractlog partition(bdp_day="20220509");
第三步:导入第三方数据到hive表中
创建这个表:
create external table if not exists ods_nshop.ods_nshop_01_releasedatas(device_num string comment '设备号',device_type string comment '设备类型',os string comment '手机系统',os_version string comment '手机系统版本',manufacturer string comment '手机制造商',area_code string comment '地区编码',release_sid string comment '投放请求id',release_session string comment '投放会话id',release_sources string comment '投放渠道',release_params string comment '投放请求参数',ct bigint comment '创建时间') partitioned by (bdp_day string)ROW FORMAT DELIMITEDFIELDS TERMINATED BY ','stored as textfilelocation '/data/nshop/ods/release/'
因为第三方数据是由广告方提供的,每天提供一些,通过接口传递过来的,我们可以每天生成一个文件夹,将数据存储到对应的文件夹下,比如/usr/local/flume/data 下。
可以从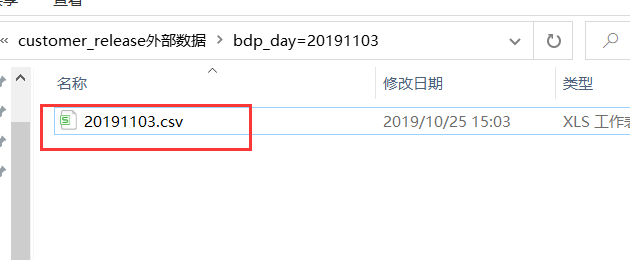
将此数据上传至 /usr/local/flume/data下即可。
编写flume脚本,放在conf下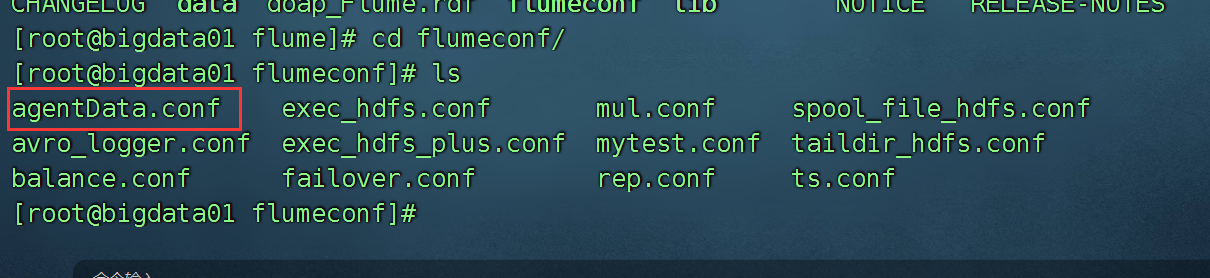
# 命名a1.sources = r1a1.channels = c1a1.sinks = s1# 关联a1.sources.r1.channels = c1a1.sinks.s1.channel = c1# 配置source类型和属性a1.sources.r1.type = TAILDIRa1.sources.r1.filegroups = g1a1.sources.r1.filegroups.g1 = /usr/local/flume/data/.*.csv# 元数据保存位置a1.sources.r1.positionFile = /usr/local/flume/flume-log/taildir_position.json# 配置channel类型属性a1.channels.c1.type = memory# 缓存池大小a1.channels.c1.capacity = 1000# 每个事务sink拉取的大小a1.channels.c1.transactionCapacity = 100# 配置Sink类型和属性a1.sinks.s1.type = hdfsa1.sinks.s1.hdfs.path = hdfs://bigdata01:9820/data/nshop/ods/release/%Y%m%da1.sinks.s1.hdfs.fileSuffix = .log# 下面三个配置参数如果都设置为0,那么表示不执行次参数(失效)a1.sinks.s1.hdfs.rollInterval = 10a1.sinks.s1.hdfs.rollSize = 0a1.sinks.s1.hdfs.rollCount = 0# 设置采集文件格式 如果你是存文本文件,就是用DataStreama1.sinks.s1.hdfs.fileType = DataStreama1.sinks.s1.hdfs.writeFormat = Text# 开启本地时间戳获取参数,因为我们的目录上面已经使用转义符号,所以要使用时间戳a1.sinks.s1.hdfs.useLocalTimeStamp = true
启动脚本进行采集,将数据从文件夹采集到hdfs上。
flume-ng agent -n a1 -c ../conf -f agentData.conf -Dflume.root.logger=INFO,console
这个命令必须在哪里启动: /usr/local/flume/flumeconf 下启动的。
采集到了hdfs上,这个命令不会停止的,因为它监听的是一个文件夹,它要一直观察这个文件夹下的文件是否发送了变化。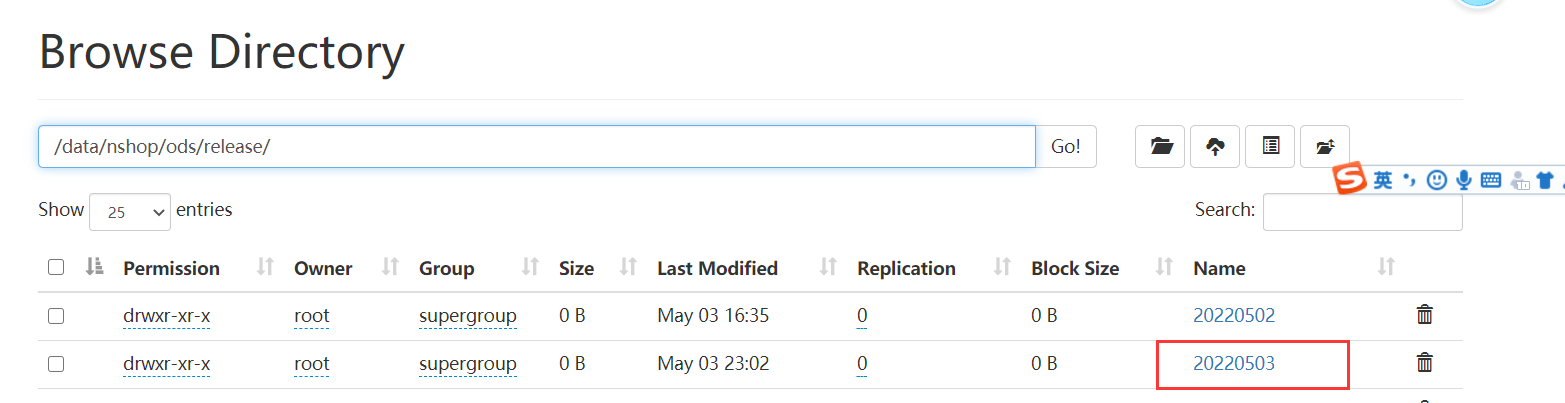
导入hdfs数据到hive表中:
load data inpath "/data/nshop/ods/release/20220503/*" into table ods_nshop.ods_nshop_01_releasedatas partition(bdp_day='20220509');

若有收获,就点个赞吧
0 人点赞
