概述
1、什么是JUC
Java的 并发线程 工具包

2、线程和进程
简单比喻:进程是火车,线程是车厢
一个进程往往可以包含多个线程,至少包含一个线程
java默认有2个线程 :main线程 GC线程
对于java而言,开启线程的三种方式:Thread,Runnable,Callable
java不能真正的开启线程
- java开启线程是通过调用本地方法 底层的C++ 来完成的。
-
3、并发,并行
并发(多线程同时操作一个资源)
- CPU 一核,模拟出来多条线程,添加武功,唯快不破,快速交替,抢占时间片
并行(多个人一起行走)
CPU多核,多个线程可以同时执行,线程池
public class Test {public static void main(String[] args) {// 获取CPU的荷属// CPU 密集型 IO密集型System.out.println(Runtime.getRuntime().availableProcessors());}}
线程
线程状态
线程有五个状态
public enum State {// 新生NEW,// 运行RUNNABLE,// 阻塞BLOCKED,// 等待,死死的等WAITING,// 超时等待TIMED_WAITING,// 终止TERMINATED;}
wait()/sleep()区别① 来自不同的类
wait()方法继承于Object基类sleep()方法是Thread类的静态方法
② 关于锁的释放
wait()会释放锁sleep()不会释放锁
③ 使用的范围不同
wait()必须使用在同步代码快中sleep()可随处使用
Lock锁(重点)
传统的 Synchronized 锁
synchronized 本质就是队列
多线程
概述
1.1 理解线程和进程
- 创建一个类,直接继承
**java.lang.Thread**重写**run()**方法- 在run方法中的代码运行在分支线程中
- 创建一个类,实现
**Runnable**接口(常用)
方法
**start () **//启动线程**setName()**//修改线程名字**getName()**//得到线程名字默认线程名 Thread-0 /1/2
**Thread.currentThread()**静态方法
//得到当前线程在哪里出现获取得就是拿的线程Thread t1 = Thread.currentThread();
**Thread.sleep**``(``毫秒``)静态方法
//让线程睡眠 出现在哪里就是让那个线程睡眠**interrupt()**
//唤醒睡眠的线程
原理就是直接进去catch语句
合理结束线程
打一个布尔标记实现线程的第三种方式 实现Callable接口
这种方式可以获取线程的返回值
1.3 代码-java实现多线程方式1 继承 Thread类
public class TreadTest001 {public static void main(String[] args) {A a = new A();a.start(); // 启动线程for (int i = 0; i < 1000; i++){System.out.println("主线程"+i);}}}class A extends Thread{@Overridepublic void run() {for (int i = 0; i < 1000; i++){System.out.println("分支线程"+i);}}}
1.4 代码—-java实现多线程方式2 实现 Runnable 接口
public class ThreadTest01 {public static void main(String[] args) {Thread s = new Thread(new MyThread02());s.start(); //启动线程for (int i = 0; i < 100; i++){System.out.println("主线程"+i);}}}class MyThread02 implements Runnable{@Overridepublic void run() {for (int i = 0; i < 100; i++){System.out.println("分支线程"+i);}}}
1.5线程的五种状态

多线程并发/守护线程
满足条件
synchronized
线程同步机制语法
synchronized(共享对象) {
    //同步代码块   (和谁同步,填谁和谁的同步对象)
}
synchronized出现在实例方法上,锁的是this(不灵活)public synchronized void doSome(){}
在静态方法上使用synchronized
表示找类锁,类锁永远只有一把
对象锁:一个对象一把锁,一百个对象一百把锁
类锁:100个对象,1把锁
sybchronized 在开发中尽量不要嵌套使用,容易死锁
局部变量不存在线程安全问题
守护线程
后台线程 例如:垃圾回收线程
特点:死循环,用户线程结束守护线程自动结束
语法
**setDaemon(true);** // 变成守护线程**t.setDaemon(true);** //t线程变成守护线程
即使t线程里面是死循环,当主线程结束,守护线程也会结束
生产者和消费者
概述
wait()和notify()- 不是线程对象的方法
- 任何一个java对象都有的方法(Object自带)
wait()和notify()必须建立在synchroniezd基础上wait()Object o = new Object();
- o.wait();
- 表示让正在o对象上活动的线程进入等待状态(无期限)
- 直到调用o.notify()方法
-
notify() o.notify();
- 唤醒正在等待的线程
- 不会释放锁
死锁
//死锁
public class DeadThread {
    public static void main(String[] args) {
        Object a = new Object();
        Object b = new Object();
        MyThread1 one = new MyThread1(a,b); //线程对象one
        MyThread2 two = new MyThread2(a,b); //线程对象two
        one.start(); //启动线程one
        two.start(); //启动线程two
    }
}
class MyThread1 extends Thread{
    Object one;
    Object two;

    public MyThread1(Object one, Object two) {
        this.one = one;
        this.two = two;
    }
    @Override
    public void run() {
        synchronized(one){
            try {
                Thread.sleep(2000); //睡眠2秒
            } catch (InterruptedException e) {
                e.printStackTrace();
            }
            synchronized (two){

            }
        }
    }
}
class MyThread2 extends Thread{
    Object one;
    Object two;

    public MyThread2(Object one, Object two) {
        this.one = one;
        this.two = two;
    }
    @Override
    public void run() {
        synchronized(two){
            try {
                Thread.sleep(2000); //睡眠两秒
            } catch (InterruptedException e) {
                e.printStackTrace();
            }
            synchronized (one){

            }
        }
    }
}
synchronized有三种写法:
第一种:同步代码块 灵活
synchronized(线程共享对象){
    同步代码块;
}
第二种:在实例方法上使用synchronized
表示共享对象一定是this
并且同步代码块是整个方法体
第三种:在静态方法上使用synchronized
表示找类锁。
类锁永远只有1把。
就算创建了100个对象,那类锁也只有一把
对象锁:1个对象1把锁,100个对象100把锁。
类锁:100个对象,也可能只是1把类锁。
辅助类
import org.junit.Test;
import java.util.concurrent.*;

public class AssistClass {

    public static void main(String[] args) {

        /*
         * 默认线程数量
         * 在资源有限时, 按顺序执行
         * 多个共享资源互斥使用,并发限流
         */
        Semaphore semaphore = new Semaphore(6);

        for (int i = 0; i < 9; i++) {
            new Thread(() -> {
                try {
                    semaphore.acquire();
                    System.out.println(Thread.currentThread().getName() + " get Stall!");
                    TimeUnit.SECONDS.sleep(2);

                    System.out.println(Thread.currentThread().getName() + " go out!");
                } catch (InterruptedException e) {
                    e.printStackTrace();
                }finally {
                    semaphore.release();
                }
            }, String.valueOf(i)).start();
        }

    }

    /**
     * 减法计数器
     */
    @Test
    public void countSubtract(){
        CountDownLatch countDownLatch = new CountDownLatch(6);

        for (int i = 0; i < 6; i++) {
            new Thread(() -> {
                System.out.println(Thread.currentThread().getName() + "go out!");
                countDownLatch.countDown();
            }, String.valueOf(i)).start();
        }

        try {
            countDownLatch.await();   // 等待计数器归零   继续执行
        } catch (InterruptedException e) {
            e.printStackTrace();
        }

        System.out.println("Close door!");
    }

    /**
     * 加法计数器
     */
    @Test
    public void countAddition(){

        CyclicBarrier cyclicBarrier = new CyclicBarrier(7, () -> {
            System.out.println("Close door!");
        });

        // 需要执行完毕 7 次
        for (int i = 0; i < 7; i++) {
            final int temp = i;
            new Thread(() -> {
                System.out.println(Thread.currentThread().getName() + "go in!");

                try {
                    cyclicBarrier.await(); // 等待线程执行完毕
                } catch (InterruptedException e) {
                    e.printStackTrace();
                } catch (BrokenBarrierException e) {
                    e.printStackTrace();
                }

            }, String.valueOf(i)).start();
        }
    }

}
读写锁
package com.zy.singleThread.readWriteLock;

import org.junit.Test;

import java.util.HashMap;
import java.util.Map;
import java.util.concurrent.locks.ReadWriteLock;
import java.util.concurrent.locks.ReentrantReadWriteLock;

public class ReadAndWrite {

    @Test
    public void readAndWrite(){

        MyCache myCache = new MyCache();

        for (int i = 0; i < 6; i++) {
            final int temp = i;
            new Thread(() -> {
                myCache.put(temp +"", temp + "");
            }, String.valueOf(i)).start();
        }

        for (int i = 0; i < 6; i++) {
            final int temp = i;
            new Thread(() -> {
                myCache.get(temp +"");
            }, String.valueOf(i)).start();
        }

    }

}

class MyCache{

    private volatile Map<String, Object> map = new HashMap<>();
    // 读写锁  细粒度的控制
    private ReadWriteLock lock = new ReentrantReadWriteLock();

    // Write
    public void put(String key, Object value){
        lock.writeLock().lock();    // 加写锁

        try {
            map.put(key, value);
        } catch (Exception e) {
            e.printStackTrace();
        }finally {
            lock.writeLock().unlock();
        }
    }

    // Read
    public void get(String key){
        lock.readLock().lock();  // 加读锁

        try {
            Object o = map.get(key);
        } catch (Exception e) {
            e.printStackTrace();
        }finally {
            lock.readLock().unlock();
        }
    }

}
并发
阻塞队列
package com.zy.bq;

import java.util.Collection;
import java.util.concurrent.ArrayBlockingQueue;
import java.util.concurrent.TimeUnit;

public class Test {
    public static void main(String[] args) throws InterruptedException {
        test4();
    }
    /**
     * 抛出异常
     */
    public static void test1(){
        // 队列的大小
        ArrayBlockingQueue blockingQueue = new ArrayBlockingQueue<>(3);

        System.out.println(blockingQueue.add("a"));
        System.out.println(blockingQueue.add("b"));
        System.out.println(blockingQueue.add("c"));
        // IllegalStateException: Queue full 抛出异常!
        // System.out.println(blockingQueue.add("d"));

        System.out.println("=-===========");

        System.out.println(blockingQueue.element()); // 查看队首元素是谁
        System.out.println(blockingQueue.remove());


        System.out.println(blockingQueue.remove());
        System.out.println(blockingQueue.remove());

        // java.util.NoSuchElementException 抛出异常!
        // System.out.println(blockingQueue.remove());
    }

    /**
     * 有返回值,没有异常
     */
    public static void test2(){
        // 队列的大小
        ArrayBlockingQueue blockingQueue = new ArrayBlockingQueue<>(3);

        System.out.println(blockingQueue.offer("a"));
        System.out.println(blockingQueue.offer("b"));
        System.out.println(blockingQueue.offer("c"));

        System.out.println(blockingQueue.peek());
        // System.out.println(blockingQueue.offer("d")); // false 不抛出异常!
        System.out.println("============================");
        System.out.println(blockingQueue.poll());
        System.out.println(blockingQueue.poll());
        System.out.println(blockingQueue.poll());
        System.out.println(blockingQueue.poll()); // null  不抛出异常!
    }

    /**
     * 等待,阻塞(一直阻塞)
     */
    public static void test3() throws InterruptedException {
        // 队列的大小
        ArrayBlockingQueue blockingQueue = new ArrayBlockingQueue<>(3);

        // 一直阻塞
        blockingQueue.put("a");
        blockingQueue.put("b");
        blockingQueue.put("c");
        // blockingQueue.put("d"); // 队列没有位置了,一直阻塞
        System.out.println(blockingQueue.take());
        System.out.println(blockingQueue.take());
        System.out.println(blockingQueue.take());
        System.out.println(blockingQueue.take()); // 没有这个元素,一直阻塞

    }


    /**
     * 等待,阻塞(等待超时)
     */
    public static void test4() throws InterruptedException {
        // 队列的大小
        ArrayBlockingQueue blockingQueue = new ArrayBlockingQueue<>(3);

        blockingQueue.offer("a");
        blockingQueue.offer("b");
        blockingQueue.offer("c");
        // blockingQueue.offer("d",2,TimeUnit.SECONDS); // 等待超过2秒就退出
        System.out.println("===============");
        System.out.println(blockingQueue.poll());
        System.out.println(blockingQueue.poll());
        System.out.println(blockingQueue.poll());
        blockingQueue.poll(2,TimeUnit.SECONDS); // 等待超过2秒就退出

    }
}
同步队列
import java.sql.Time;
import java.util.concurrent.BlockingQueue;
import java.util.concurrent.SynchronousQueue;
import java.util.concurrent.TimeUnit;

/**
 * 同步队列
 * 和其他的BlockingQueue 不一样, SynchronousQueue 不存储元素
 * put了一个元素,必须从里面先 take 取出来,否则不能在put进去值!
 */
public class SynchronousQueueDemo {
    public static void main(String[] args) {
        BlockingQueue<String> blockingQueue = new SynchronousQueue<>(); // 同步队列

        new Thread(()->{
            try {
                System.out.println(Thread.currentThread().getName()+" put 1");
                blockingQueue.put("1");
                System.out.println(Thread.currentThread().getName()+" put 2");
                blockingQueue.put("2");
                System.out.println(Thread.currentThread().getName()+" put 3");
                blockingQueue.put("3");
            } catch (InterruptedException e) {
                e.printStackTrace();
            }
        },"T1").start();


        new Thread(()->{
            try {
                TimeUnit.SECONDS.sleep(3);
                System.out.println(Thread.currentThread().getName()+"=>"+blockingQueue.take());
                TimeUnit.SECONDS.sleep(3);
                System.out.println(Thread.currentThread().getName()+"=>"+blockingQueue.take());
                TimeUnit.SECONDS.sleep(3);
                System.out.println(Thread.currentThread().getName()+"=>"+blockingQueue.take());
            } catch (InterruptedException e) {
                e.printStackTrace();
            }
        },"T2").start();
    }
}
线程池
线程池:三大方法、7大参数、4种拒绝策略
程序的运行,本质:占用系统的资源! 优化资源的使用!=>池化技术
线程池、连接池、内存池、对象池///….. 创建、销毁。十分浪费资源
池化技术:事先准备好一些资源,有人要用,就来我这里拿,用完之后还给我。
线程池的好处:
1、降低资源的消耗
2、提高响应的速度
3、方便管理。
线程池的好处: 1、降低资源的消耗 2、提高响应的速度 3、方便管理。
import java.util.ArrayList;
import java.util.List;
import java.util.concurrent.*;

// Executors 工具类、3大方法

/**
 * @author zhangyu
 * new ThreadPoolExecutor.AbortPolicy() // 银行满了,还有人进来,不处理这个人的,抛出异常
 * new ThreadPoolExecutor.CallerRunsPolicy() // 哪来的去哪里!
 * new ThreadPoolExecutor.DiscardPolicy() //队列满了,丢掉任务,不会抛出异常!
 * new ThreadPoolExecutor.DiscardOldestPolicy() //队列满了,尝试去和最早的竞争,也不会抛出异常!
 */
public class Demo01 {
    public static void main(String[] args) {
        // 自定义线程池!工作 ThreadPoolExecutor

        // 最大线程到底该如何定义
        // 1、CPU 密集型,几核,就是几,可以保持CPu的效率最高!
        // 2、IO  密集型   > 判断你程序中十分耗IO的线程,
        // 程序   15个大型任务  io十分占用资源!

        // 获取CPU的核数
        System.out.println(Runtime.getRuntime().availableProcessors());

        List  list = new ArrayList();

        ExecutorService threadPool = new ThreadPoolExecutor(
                2,
                Runtime.getRuntime().availableProcessors(),
                3,
                TimeUnit.SECONDS,
                new LinkedBlockingDeque<>(3),
                Executors.defaultThreadFactory(),
                new ThreadPoolExecutor.DiscardOldestPolicy());  //队列满了,尝试去和最早的竞争,也不会抛出异常!
        try {
            // 最大承载:Deque + max
            // 超过 RejectedExecutionException
            for (int i = 1; i <= 9; i++) {
                // 使用了线程池之后,使用线程池来创建线程
                threadPool.execute(()->{
                    System.out.println(Thread.currentThread().getName()+" ok");
                });
            }

        } catch (Exception e) {
            e.printStackTrace();
        } finally {
            // 线程池用完,程序结束,关闭线程池
            threadPool.shutdown();
        }

    }
}
源码分析
public static ExecutorService newSingleThreadExecutor() {
    return new FinalizableDelegatedExecutorService
        (new ThreadPoolExecutor(1, 1,
                                0L, TimeUnit.MILLISECONDS,
                                new LinkedBlockingQueue<Runnable>()));
}
public static ExecutorService newFixedThreadPool(int nThreads) {
    return new ThreadPoolExecutor(5, 5,
                                  0L, TimeUnit.MILLISECONDS,
                                  new LinkedBlockingQueue<Runnable>());
}
public static ExecutorService newCachedThreadPool() {
    return new ThreadPoolExecutor(0, Integer.MAX_VALUE,
                                  60L, TimeUnit.SECONDS,
                                  new SynchronousQueue<Runnable>());
}

// 本质ThreadPoolExecutor()
public ThreadPoolExecutor(int corePoolSize, // 核心线程池大小
                          int maximumPoolSize, // 最大核心线程池大小
                          long keepAliveTime, // 超时了没有人调用就会释放
                          TimeUnit unit, // 超时单位
                          BlockingQueue<Runnable> workQueue, // 阻塞队列
                          ThreadFactory threadFactory, // 线程工厂:创建线程的,一般
                          不用动
                          RejectedExecutionHandler handle // 拒绝策略) {
if (corePoolSize < 0 ||
    maximumPoolSize <= 0 ||
    maximumPoolSize < corePoolSize ||
    keepAliveTime < 0){
    throw new IllegalArgumentException();
    if (workQueue == null || threadFactory == null || handler == null)
        throw new NullPointerException();
    this.acc = System.getSecurityManager() == null ?
        null :
    AccessController.getContext();
    this.corePoolSize = corePoolSize;
    this.maximumPoolSize = maximumPoolSize;
    this.workQueue = workQueue;
    this.keepAliveTime = unit.toNanos(keepAliveTime);
    this.threadFactory = threadFactory;
    this.handler = handler;
}
JMM
Volatile 是 Java 虚拟机提供轻量级的同步机制
1、保证可见性
2、不保证原子性
3、禁止指令重排
JMM : Java内存模型,不存在的东西,概念!约定!
关于JMM的一些同步的约定:
1、线程解锁前,必须把共享变量立刻刷回主存。
2、线程加锁前,必须读取主存中的最新值到工作内存中!
3、加锁和解锁是同一把锁
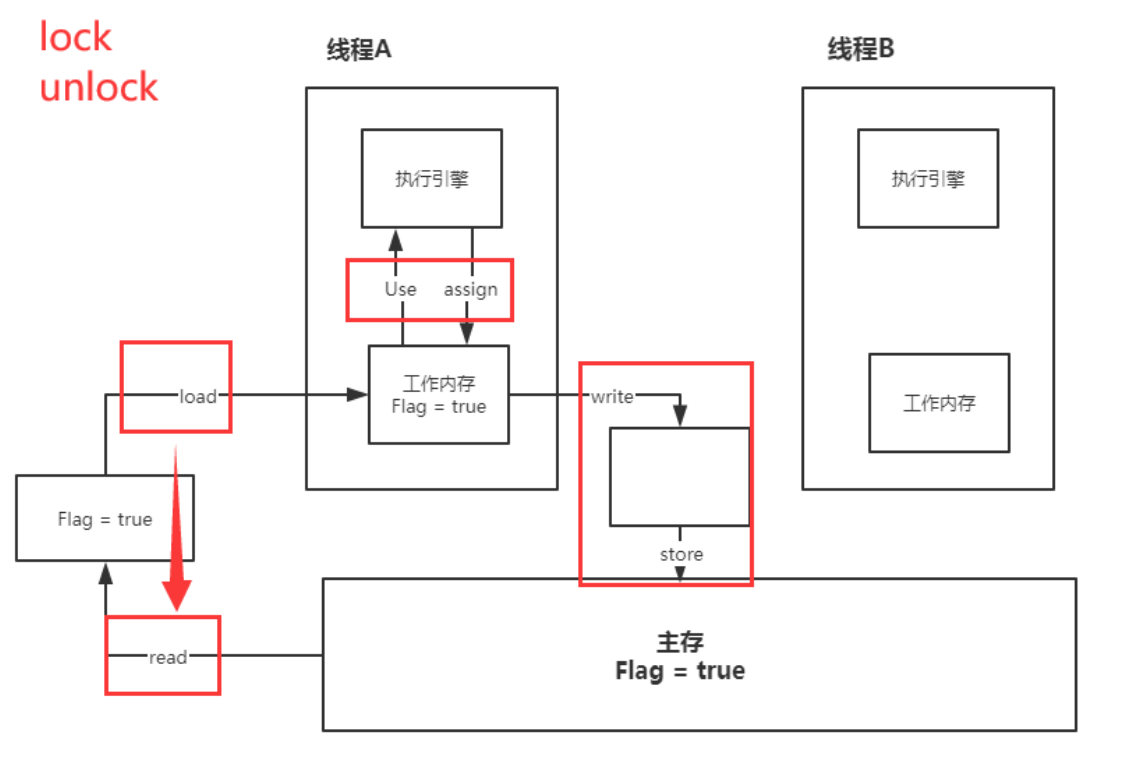

内存交互操作有8种,虚拟机实现必须保证每一个操作都是原子的,不可在分的(对于double和long类 型的变量来说,load、store、read和write操作在某些平台上允许例外)
- lock (锁定):作用于主内存的变量,把一个变量标识为线程独占状态
- unlock (解锁):作用于主内存的变量,它把一个处于锁定状态的变量释放出来,释放后的变量 才可以被其他线程锁定
- read (读取):作用于主内存变量,它把一个变量的值从主内存传输到线程的工作内存中,以便 随后的load动作使用
- load (载入):作用于工作内存的变量,它把 read 操作从主存中变量放入工作内存中
- use (使用):作用于工作内存中的变量,它把工作内存中的变量传输给执行引擎,每当虚拟机 遇到一个需要使用到变量的值,就会使用到这个指令
- assign (赋值):作用于工作内存中的变量,它把一个从执行引擎中接受到的值放入工作内存的变 量副本中
- store (存储):作用于主内存中的变量,它把一个从工作内存中一个变量的值传送到主内存中, 以便后续的write使用
- write (写入):作用于主内存中的变量,它把store操作从工作内存中得到的变量的值放入主内 存的变量中
JMM对这八种指令的使用,制定了如下规则:
- 不允许read和load、store和write操作之一单独出现。即使用了read必须load,使用了store必须 write
- 不允许线程丢弃他最近的assign操作,即工作变量的数据改变了之后,必须告知主存
- 不允许一个线程将没有assign的数据从工作内存同步回主内存
- 一个新的变量必须在主内存中诞生,不允许工作内存直接使用一个未被初始化的变量。就是对变量 实施use、store操作之前,必须经过assign和load操作
- 一个变量同一时间只有一个线程能对其进行lock。多次lock后,必须执行相同次数的unlock才能解 锁
- 如果对一个变量进行lock操作,会清空所有工作内存中此变量的值,在执行引擎使用这个变量前, 必须重新load或assign操作初始化变量的值
- 如果一个变量没有被lock,就不能对其进行unlock操作。也不能unlock一个被其他线程锁住的变量
- 对一个变量进行unlock操作之前,必须把此变量同步回主内存
Volatile
1、保证可见性
import java.util.concurrent.TimeUnit;
public class JMMDemo {
    // 不加 volatile 程序就会死循环!
    // 加 volatile 可以保证可见性
    private volatile static int num = 0;
    // 线程A在执行任务的时候,不能被打扰的,也不能被分割。要么同时成功,要么同时失败。
    public static void main(String[] args) { // main
        new Thread(()->{ // 线程 1 对主内存的变化不知道的
            while (num==0){
            }
        }).start();
        try {
            TimeUnit.SECONDS.sleep(1);
        } catch (InterruptedException e) {
            e.printStackTrace();
        }
        num = 1;
        System.out.println(num);
    }
}
2、不保证原子性
原子性 : 不可分割
线程A在执行任务的时候,不能被打扰的,也不能被分割。要么同时成功,要么同时失败。
// volatile 不保证原子性
public class VDemo02 {
    // volatile 不保证原子性
    private volatile static int num = 0;
    public static void add(){
        num++;
    }
    public static void main(String[] args) {
        //理论上num结果应该为 2 万
        for (int i = 1; i <= 20; i++) {
            new Thread(()->{
                for (int j = 0; j < 1000 ; j++) {
                    add();
                }
            }).start();
        }
        while (Thread.activeCount()>2){ // main gc
            Thread.yield();
        }
        System.out.println(Thread.currentThread().getName() + " " + num);
    }
}
解决 保证原子性的问题
import java.util.concurrent.atomic.AtomicInteger;

// volatile 不保证原子性
public class VDemo02 {

    // volatile 不保证原子性
    // 原子类的 Integer
    private volatile static AtomicInteger num = new AtomicInteger();

    public static void add(){
        // num++; // 不是一个原子性操作
        num.getAndIncrement(); // AtomicInteger + 1 方法, CAS
    }

    public static void main(String[] args) {

        //理论上num结果应该为 2 万
        for (int i = 1; i <= 20; i++) {
            new Thread(()->{
                for (int j = 0; j < 1000 ; j++) {
                    add();
                }
            }).start();
        }

        while (Thread.activeCount()>2){ // main  gc
            Thread.yield();
        }
        System.out.println(Thread.currentThread().getName() + " " + num);
    }
}
指令重排
源代码—>编译器优化的重排—> 指令并行也可能会重排—> 内存系统也会重排—-> 执行
处理器在进行指令重排的时候,考虑:数据之间的依赖性!
int x = 1; // 1
int y = 2; // 2
x = x + 5; // 3
y = x * x; // 4
// 我们所期望的:1234 但是可能执行的时候回变成 2134 1324    - 可不可能是 4123!
| 线程A | 线程B |
|---|---|
| x=a | y=b |
| b=1 | a=2 |
正常的结果: x = 0;y = 0;但是可能由于指令重排
| 线程A | 线程B |
|---|---|
| b=1 | a=2 |
| x=a | y=b |
指令重排导致的诡异结果: x = 2;y = 1;
volatile可以避免指令重排: 内存屏障 CPU指令。作用:
1、保证特定的操作的执行顺序!
2、可以保证某些变量的内存可见性 (利用这些特性volatile实现了可见性)
单例模式
1. 饿汉式
// 饿汉式单例
public class Hungry {

    // 可能会浪费空间
    private byte[] data1 = new byte[1024*1024];
    private byte[] data2 = new byte[1024*1024];
    private byte[] data3 = new byte[1024*1024];
    private byte[] data4 = new byte[1024*1024];

    private Hungry(){

    }

    private final static Hungry HUNGRY = new Hungry();

    public static Hungry getInstance(){
        return HUNGRY;
    }
}
2. 懒汉式
package com.zy.single;

import java.lang.reflect.Constructor;
import java.lang.reflect.Field;

// 懒汉式单例
public class LazyMan {

    private static boolean Single = false;

    private LazyMan(){
        synchronized (LazyMan.class){
            if (Single == false){
                Single = true;
            }else {
                throw new RuntimeException("不要试图使用反射破坏异常");
            }
        }
    }

    private volatile static LazyMan lazyMan;

    // 双重检测锁模式的 懒汉式单例  DCL懒汉式
    public static LazyMan getInstance(){
        if (lazyMan==null){
            synchronized (LazyMan.class){
                if (lazyMan==null){
                    lazyMan = new LazyMan(); // 不是一个原子性操作
                }
            }
        }
        return lazyMan;
    }

    // 反射!
    public static void main(String[] args) throws Exception {
//        LazyMan instance = LazyMan.getInstance();

        Field qinjiang = LazyMan.class.getDeclaredField("Single");
        qinjiang.setAccessible(true);

        Constructor<LazyMan> declaredConstructor = LazyMan.class.getDeclaredConstructor(null);
        declaredConstructor.setAccessible(true);
        LazyMan instance = declaredConstructor.newInstance();

        // 修改 Single 值 破坏单例模式
        qinjiang.set(instance,false);

        LazyMan instance2 = declaredConstructor.newInstance();

        System.out.println(instance);
        System.out.println(instance2);
    }
}
3. 枚举类
import java.lang.reflect.Constructor;
import java.lang.reflect.InvocationTargetException;

public enum EnumSingle {

    INSTANCE;

    public EnumSingle getInstance(){
        return INSTANCE;
    }

}

class Test{

    public static void main(String[] args) throws NoSuchMethodException, IllegalAccessException, InvocationTargetException, InstantiationException {
        EnumSingle instance1 = EnumSingle.INSTANCE;
        Constructor<EnumSingle> declaredConstructor = EnumSingle.class.getDeclaredConstructor(String.class,int.class);
        declaredConstructor.setAccessible(true);
        EnumSingle instance2 = declaredConstructor.newInstance();

        // NoSuchMethodException: com.kuang.single.EnumSingle.<init>()
        System.out.println(instance1);
        System.out.println(instance2);

    }
}
CAS
CAS : 比较当前工作内存中的值和主内存中的值,如果这个值是期望的,那么则执行操作!如果不是就 一直循环!
缺点:
1、 循环会耗时
2、一次性只能保证一个共享变量的原子性
3、ABA问题
// CAS compareAndSet : 比较并交换!
public static void main(String[] args) {
    AtomicInteger atomicInteger = new AtomicInteger(2020);
    // 期望、更新
    // public final boolean compareAndSet(int expect, int update)
    // 如果我期望的值达到了,那么就更新,否则,就不更新, CAS 是CPU的并发原语!
    // ============== 捣乱的线程 ==================
    System.out.println(atomicInteger.compareAndSet(2020, 2021));
    System.out.println(atomicInteger.get());
    System.out.println(atomicInteger.compareAndSet(2021, 2020));
    System.out.println(atomicInteger.get());
    // ============== 期望的线程 ==================
    System.out.println(atomicInteger.compareAndSet(2020, 6666));
    System.out.println(atomicInteger.get());
}
原子引用
思想:乐观锁!
即 在数据更新时 检测是否发生异常
package com.zy.cas;

import java.util.concurrent.TimeUnit;
import java.util.concurrent.atomic.AtomicStampedReference;
import java.util.concurrent.locks.Lock;
import java.util.concurrent.locks.ReentrantLock;

/**
 * @author zhangyu
 */
public class CASDemo {

    //AtomicStampedReference 注意,如果泛型是一个包装类,注意对象的引用问题

    // 正常在业务操作,这里面比较的都是一个个对象
    static AtomicStampedReference<Integer> atomicStampedReference = new AtomicStampedReference<>(1,1);

    // CAS  compareAndSet : 比较并交换!
    public static void main(String[] args) {

        new Thread(()->{
            int stamp = atomicStampedReference.getStamp(); // 获得版本号
            System.out.println("a1=>"+stamp);

            try {
                TimeUnit.SECONDS.sleep(1);
            } catch (InterruptedException e) {
                e.printStackTrace();
            }

            Lock lock = new ReentrantLock(true);

            atomicStampedReference.compareAndSet(1, 2,
                    atomicStampedReference.getStamp(), atomicStampedReference.getStamp() + 1);

            System.out.println("a2=>"+atomicStampedReference.getStamp());


            System.out.println(atomicStampedReference.compareAndSet(2, 1,
                    atomicStampedReference.getStamp(), atomicStampedReference.getStamp() + 1));

            System.out.println("a3=>"+atomicStampedReference.getStamp());

        },"a").start();


        // 乐观锁的原理相同!
        new Thread(()->{
            int stamp = atomicStampedReference.getStamp(); // 获得版本号
            System.out.println("b1=>"+stamp);

            try {
                TimeUnit.SECONDS.sleep(2);
            } catch (InterruptedException e) {
                e.printStackTrace();
            }

            System.out.println(atomicStampedReference.compareAndSet(1, 6,
                    stamp, stamp + 1));

            System.out.println("b2=>"+atomicStampedReference.getStamp());

        },"b").start();

    }
}
注意: Integer 使用了对象缓存机制,默认范围是 -128 ~ 127 ,推荐使用静态工厂方法 valueOf 获取对象实 例,而不是 new,因为 valueOf 使用缓存,而 new 一定会创建新的对象分配新的内存空间; 
- compareAndSet 的源码,里面是使用 == 进行比较的。
- 由于new的时候声明泛型肯定是装箱类,这个时候传入值类型将会自动装箱
- 自动装箱的后果就是地址不一致,使用==判断的结果就为false
总结:最好不使用原子类型,使用原子类型得保证比较时候传入的为同一个装箱类。
锁
1、公平锁、非公平锁
公平锁: 不能插队,必须先来后到!
非公平锁:可以插队 (默认都是非公平)
public ReentrantLock() {
    sync = new NonfairSync();
}

public ReentrantLock(boolean fair) {
    sync = fair ? new FairSync() : new NonfairSync();
}
2、可重入锁
可重入锁(递归锁) 
Synchronized
package com.zy.lock;

import javax.sound.midi.Soundbank;

// Synchronized
public class Demo01 {
    public static void main(String[] args) {
        Phone phone = new Phone();

        new Thread(()->{
            phone.sms();
        },"A").start();


        new Thread(()->{
            phone.sms();
        },"B").start();
    }
}

class Phone{

    public synchronized void sms(){
        System.out.println(Thread.currentThread().getName() + "sms");
        call(); // 这里也有锁
    }

    public synchronized void call(){
        System.out.println(Thread.currentThread().getName() + "call");
    }
}
Lock
package com.zy.lock;

import java.util.concurrent.locks.Lock;
import java.util.concurrent.locks.ReentrantLock;

public class Demo02 {
    public static void main(String[] args) {
        Phone2 phone = new Phone2();

        new Thread(()->{
            phone.sms();
        },"A").start();


        new Thread(()->{
            phone.sms();
        },"B").start();
    }
}

class Phone2{
    Lock lock = new ReentrantLock();

    public void sms(){
        lock.lock(); // 细节问题:lock.lock(); lock.unlock(); // lock 锁必须配对,否则就会死在里面
        lock.lock();
        try {
            System.out.println(Thread.currentThread().getName() + "sms");
            call(); // 这里也有锁
        } catch (Exception e) {
            e.printStackTrace();
        } finally {
            lock.unlock();
            lock.unlock();
        }

    }

    public void call(){

        lock.lock();
        try {
            System.out.println(Thread.currentThread().getName() + "call");
        } catch (Exception e) {
            e.printStackTrace();
        } finally {
            lock.unlock();
        }
    }
}
3、自旋锁
import java.util.concurrent.atomic.AtomicReference;

/**
 * 自旋锁
 */
public class SpinlockDemo {

    // int   0
    // Thread  null
    AtomicReference<Thread> atomicReference = new AtomicReference<>();

    // 加锁
    public void myLock(){
        Thread thread = Thread.currentThread();
        System.out.println(Thread.currentThread().getName() + "==> mylock");

        // 自旋锁
        while (!atomicReference.compareAndSet(null,thread)){

        }
    }

    // 解锁
    // 加锁
    public void myUnLock(){
        Thread thread = Thread.currentThread();
        System.out.println(Thread.currentThread().getName() + "==> myUnlock");
        atomicReference.compareAndSet(thread,null);
    }
}
测试
import java.util.concurrent.TimeUnit;
import java.util.concurrent.locks.ReentrantLock;

public class TestSpinLock {
    public static void main(String[] args) throws InterruptedException {
//        ReentrantLock reentrantLock = new ReentrantLock();
//        reentrantLock.lock();
//        reentrantLock.unlock();

        // 底层使用的自旋锁CAS
        SpinlockDemo lock = new SpinlockDemo();


        new Thread(()-> {
            lock.myLock();

            try {
                TimeUnit.SECONDS.sleep(5);
            } catch (Exception e) {
                e.printStackTrace();
            } finally {
                lock.myUnLock();
            }

        },"T1").start();

        TimeUnit.SECONDS.sleep(1);

        new Thread(()-> {
            lock.myLock();

            try {
                TimeUnit.SECONDS.sleep(1);
            } catch (Exception e) {
                e.printStackTrace();
            } finally {
                lock.myUnLock();
            }

        },"T2").start();
    }
}
4、死锁
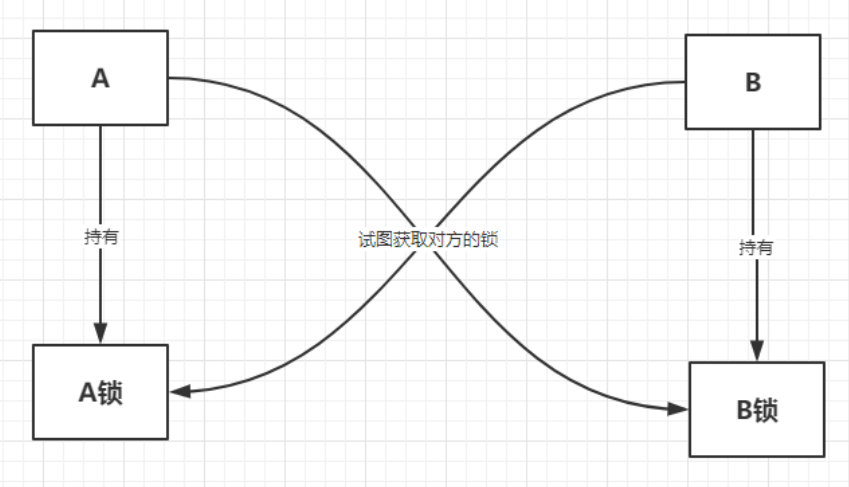
import com.sun.org.apache.xpath.internal.SourceTree;
import java.util.concurrent.TimeUnit;

public class DeadLockDemo {
    public static void main(String[] args) {

        String lockA = "lockA";
        String lockB = "lockB";

        new Thread(new MyThread(lockA, lockB), "T1").start();
        new Thread(new MyThread(lockB, lockA), "T2").start();
    }
}


class MyThread implements Runnable{

    private String lockA;
    private String lockB;

    public MyThread(String lockA, String lockB) {
        this.lockA = lockA;
        this.lockB = lockB;
    }

    @Override
    public void run() {
        synchronized (lockA){
            System.out.println(Thread.currentThread().getName() + "lock:"+lockA+"=>get"+lockB);

            try {
                TimeUnit.SECONDS.sleep(2);
            } catch (InterruptedException e) {
                e.printStackTrace();
            }

            synchronized (lockB){
                System.out.println(Thread.currentThread().getName() + "lock:"+lockB+"=>get"+lockA);
            }
        }
    }
}
解决死锁
1、使用 jps -l定位进程号
2、使用 jstack 进程号 找到死锁问题

若有收获,就点个赞吧
0 人点赞


