1. Kong介绍
1.1 Kong网关的特性
1.2 Kong网关架构
2.Kong环境搭建
2.1 基于centos7搭建
2.1.1 Postgressql
安装命令:
安装地址
选择: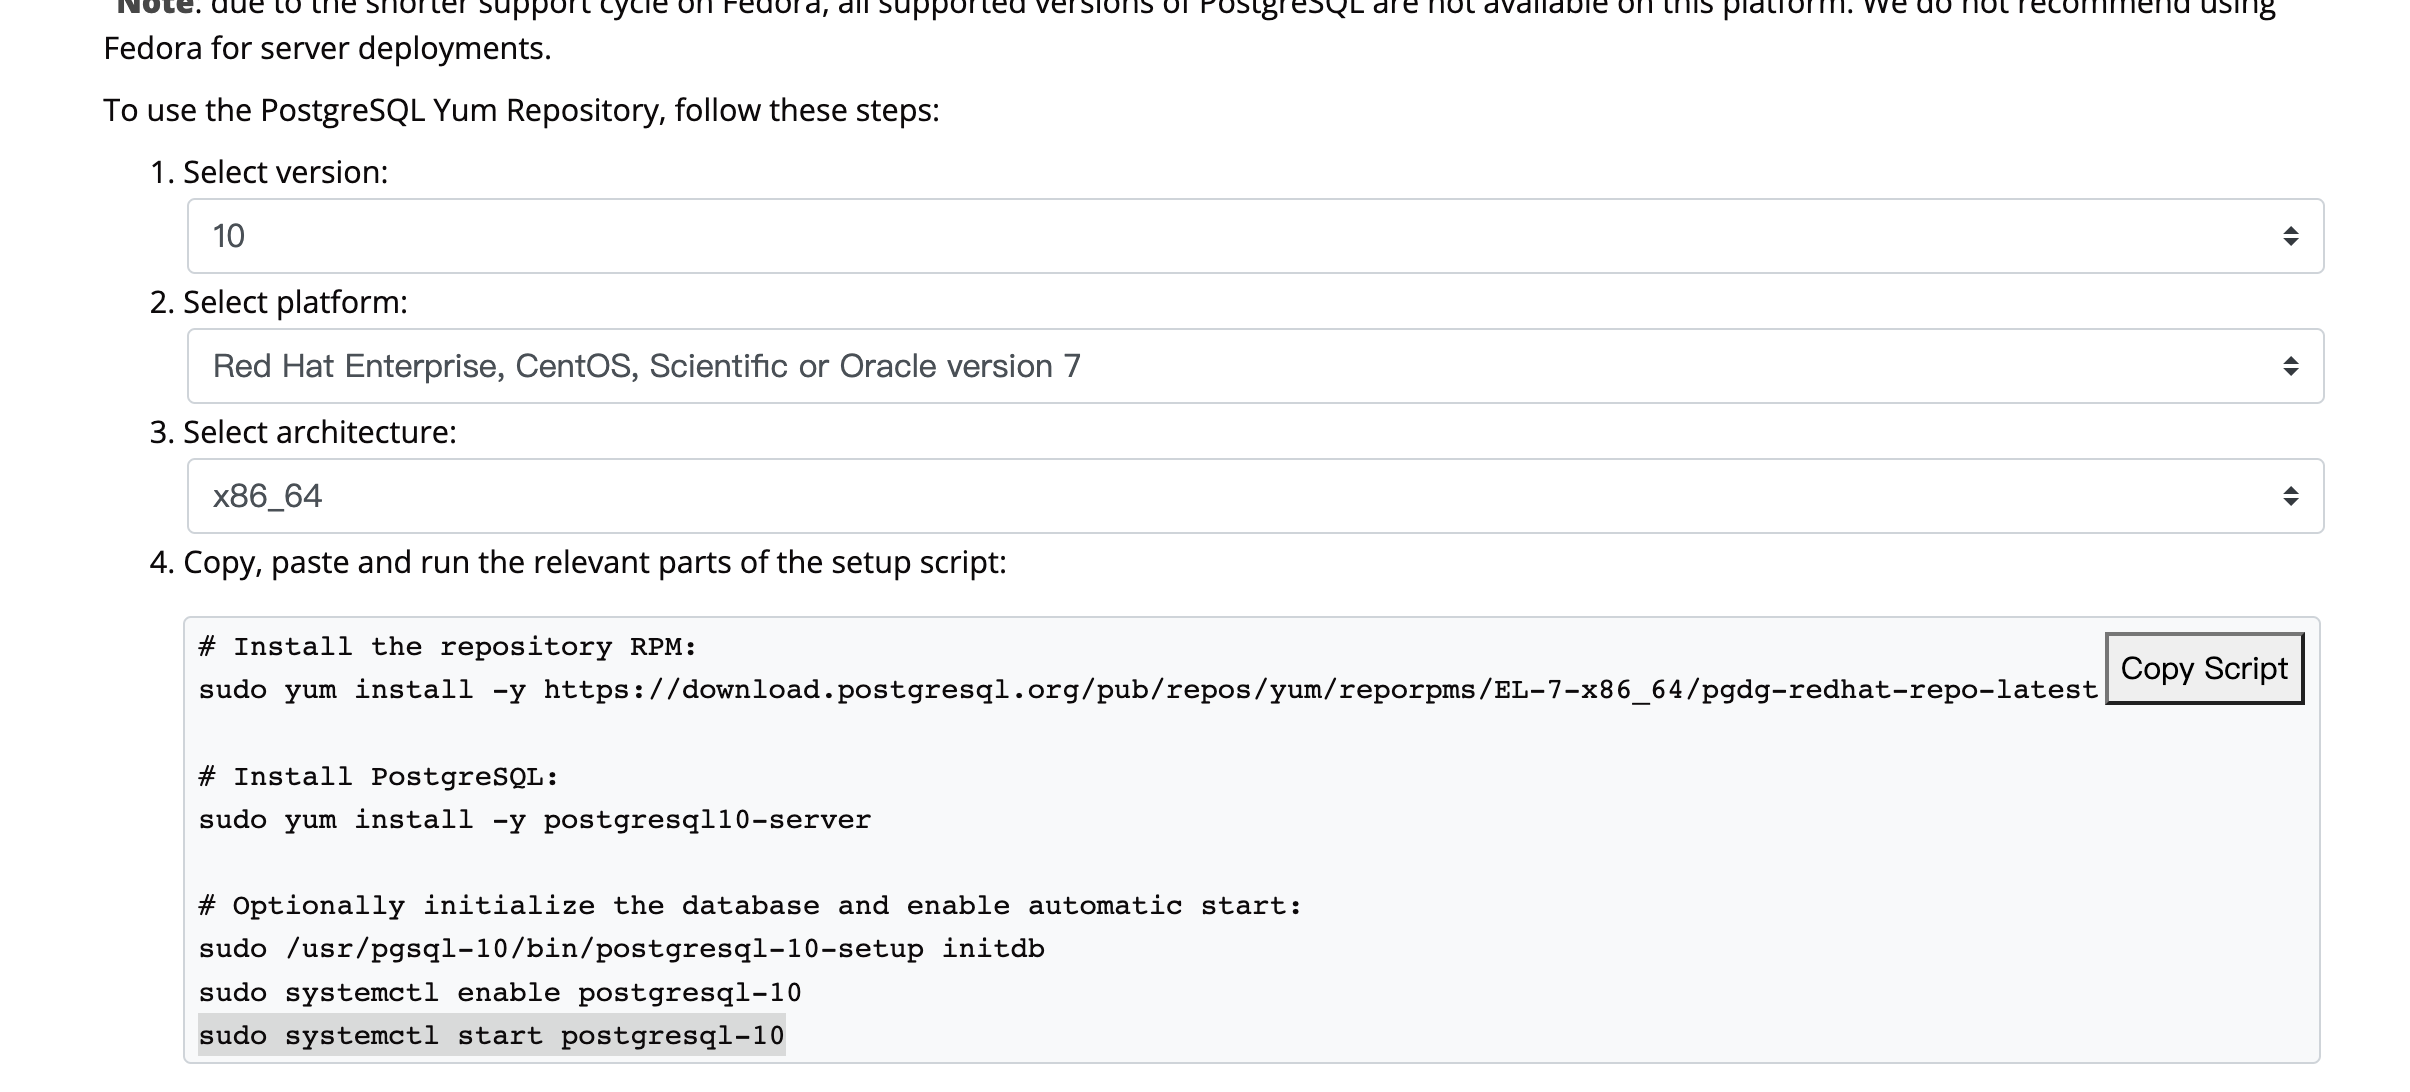
配置Postgressql
# 创建一个linux 用户 kongadduser kong#切换到linux系统用户 'postgres', 因为他是postgressql 数据库的系统管理员su postgres# 进入Postgreqsql控制台psql#设置用户postgres的密码【仅首次需要】\password postgres#创建一个Postgressql用户 ‘kong’, 和上面创建的Linux用户 'kong'对应create user kong with password '123456'# 创建一个postgressql的数据库‘kong’create database kong owner kong;#将数据库kong授权给postgressql用户 ‘kong’grant all privileges on database kong to kong;#退出PostgresSql控制台\q
PostgresSQL的四种身份认证方式:
trust:
password 和 md5:
ident:
peer:
开启远程访问:
修改 /var/lib/pgsql/10/data/pg_hba.conf文件,注释掉所有默认配置,增加一条配置:
host all all 0.0.0.0/0 trust, 认证方式改成trust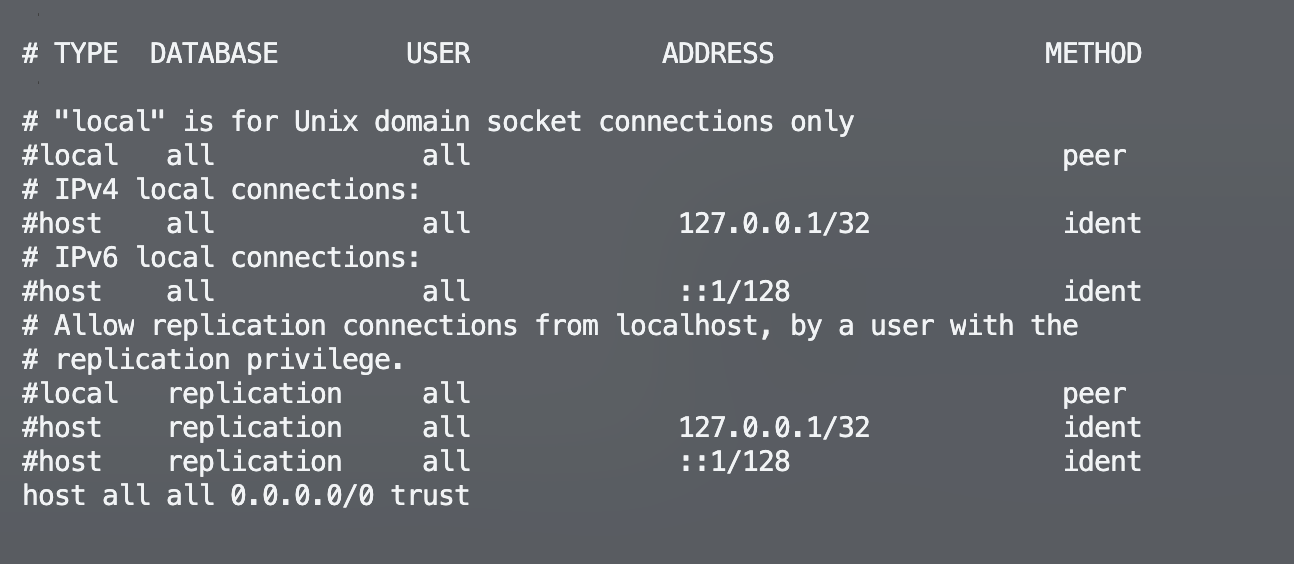
默认配置在。postgressql只允许本地连接,所以需要修改/var/lib/pgsql/10/data/postgresql.conf
文件,增加listen_addresses = ‘*’,允许远程连接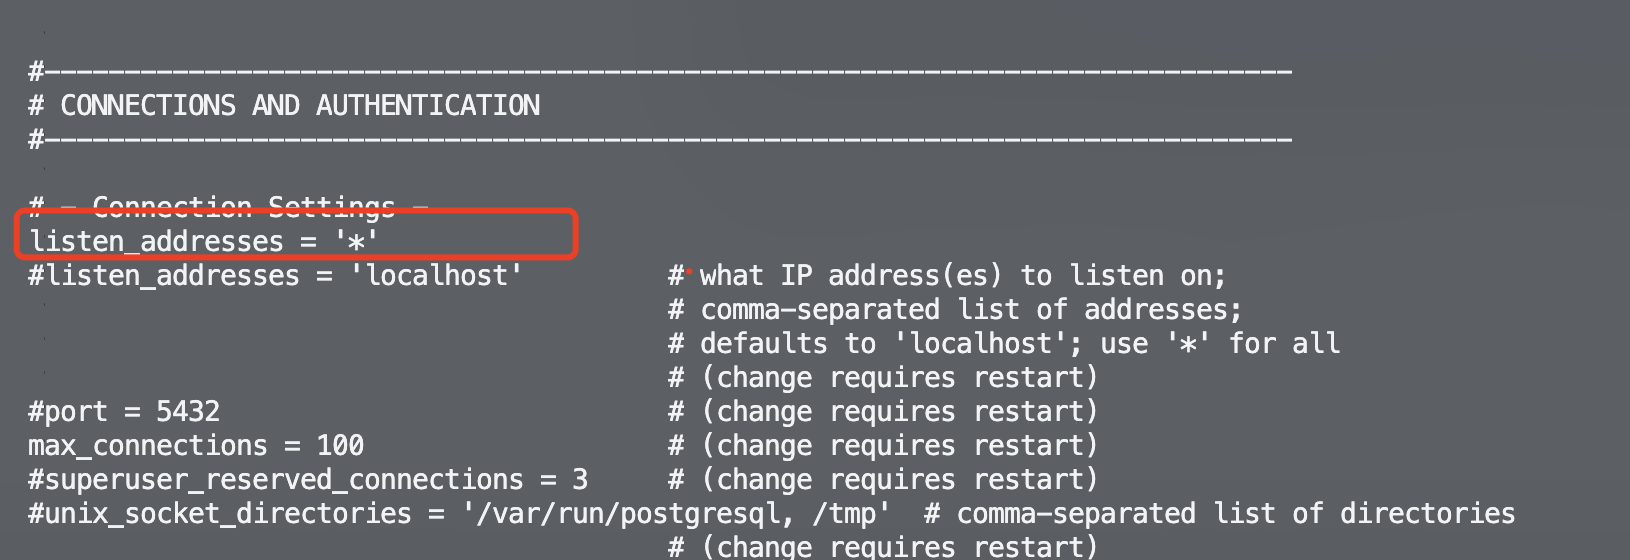
telnet测试网络是否连通:
telnet 172.16.219.128 5432
若网络不通,检查服务器防火墙配置,本地开发默认关闭防火墙 systemctl stop firewalld
即时生效,重启后失效:启动: systemctl start firewalld查看状态: systemctl status firewalld停止:systemctl stop firewalld禁用:systemctl disable firewalld
数据库工具(navcat、dbeaver……)链接:
ip:172.16.219.128port:5432user:kongpwd:123456
2.1.2 安装Kong
centos下安装kong:
下载地址:https://docs.konghq.com/gateway/2.8.x/install-and-run/centos/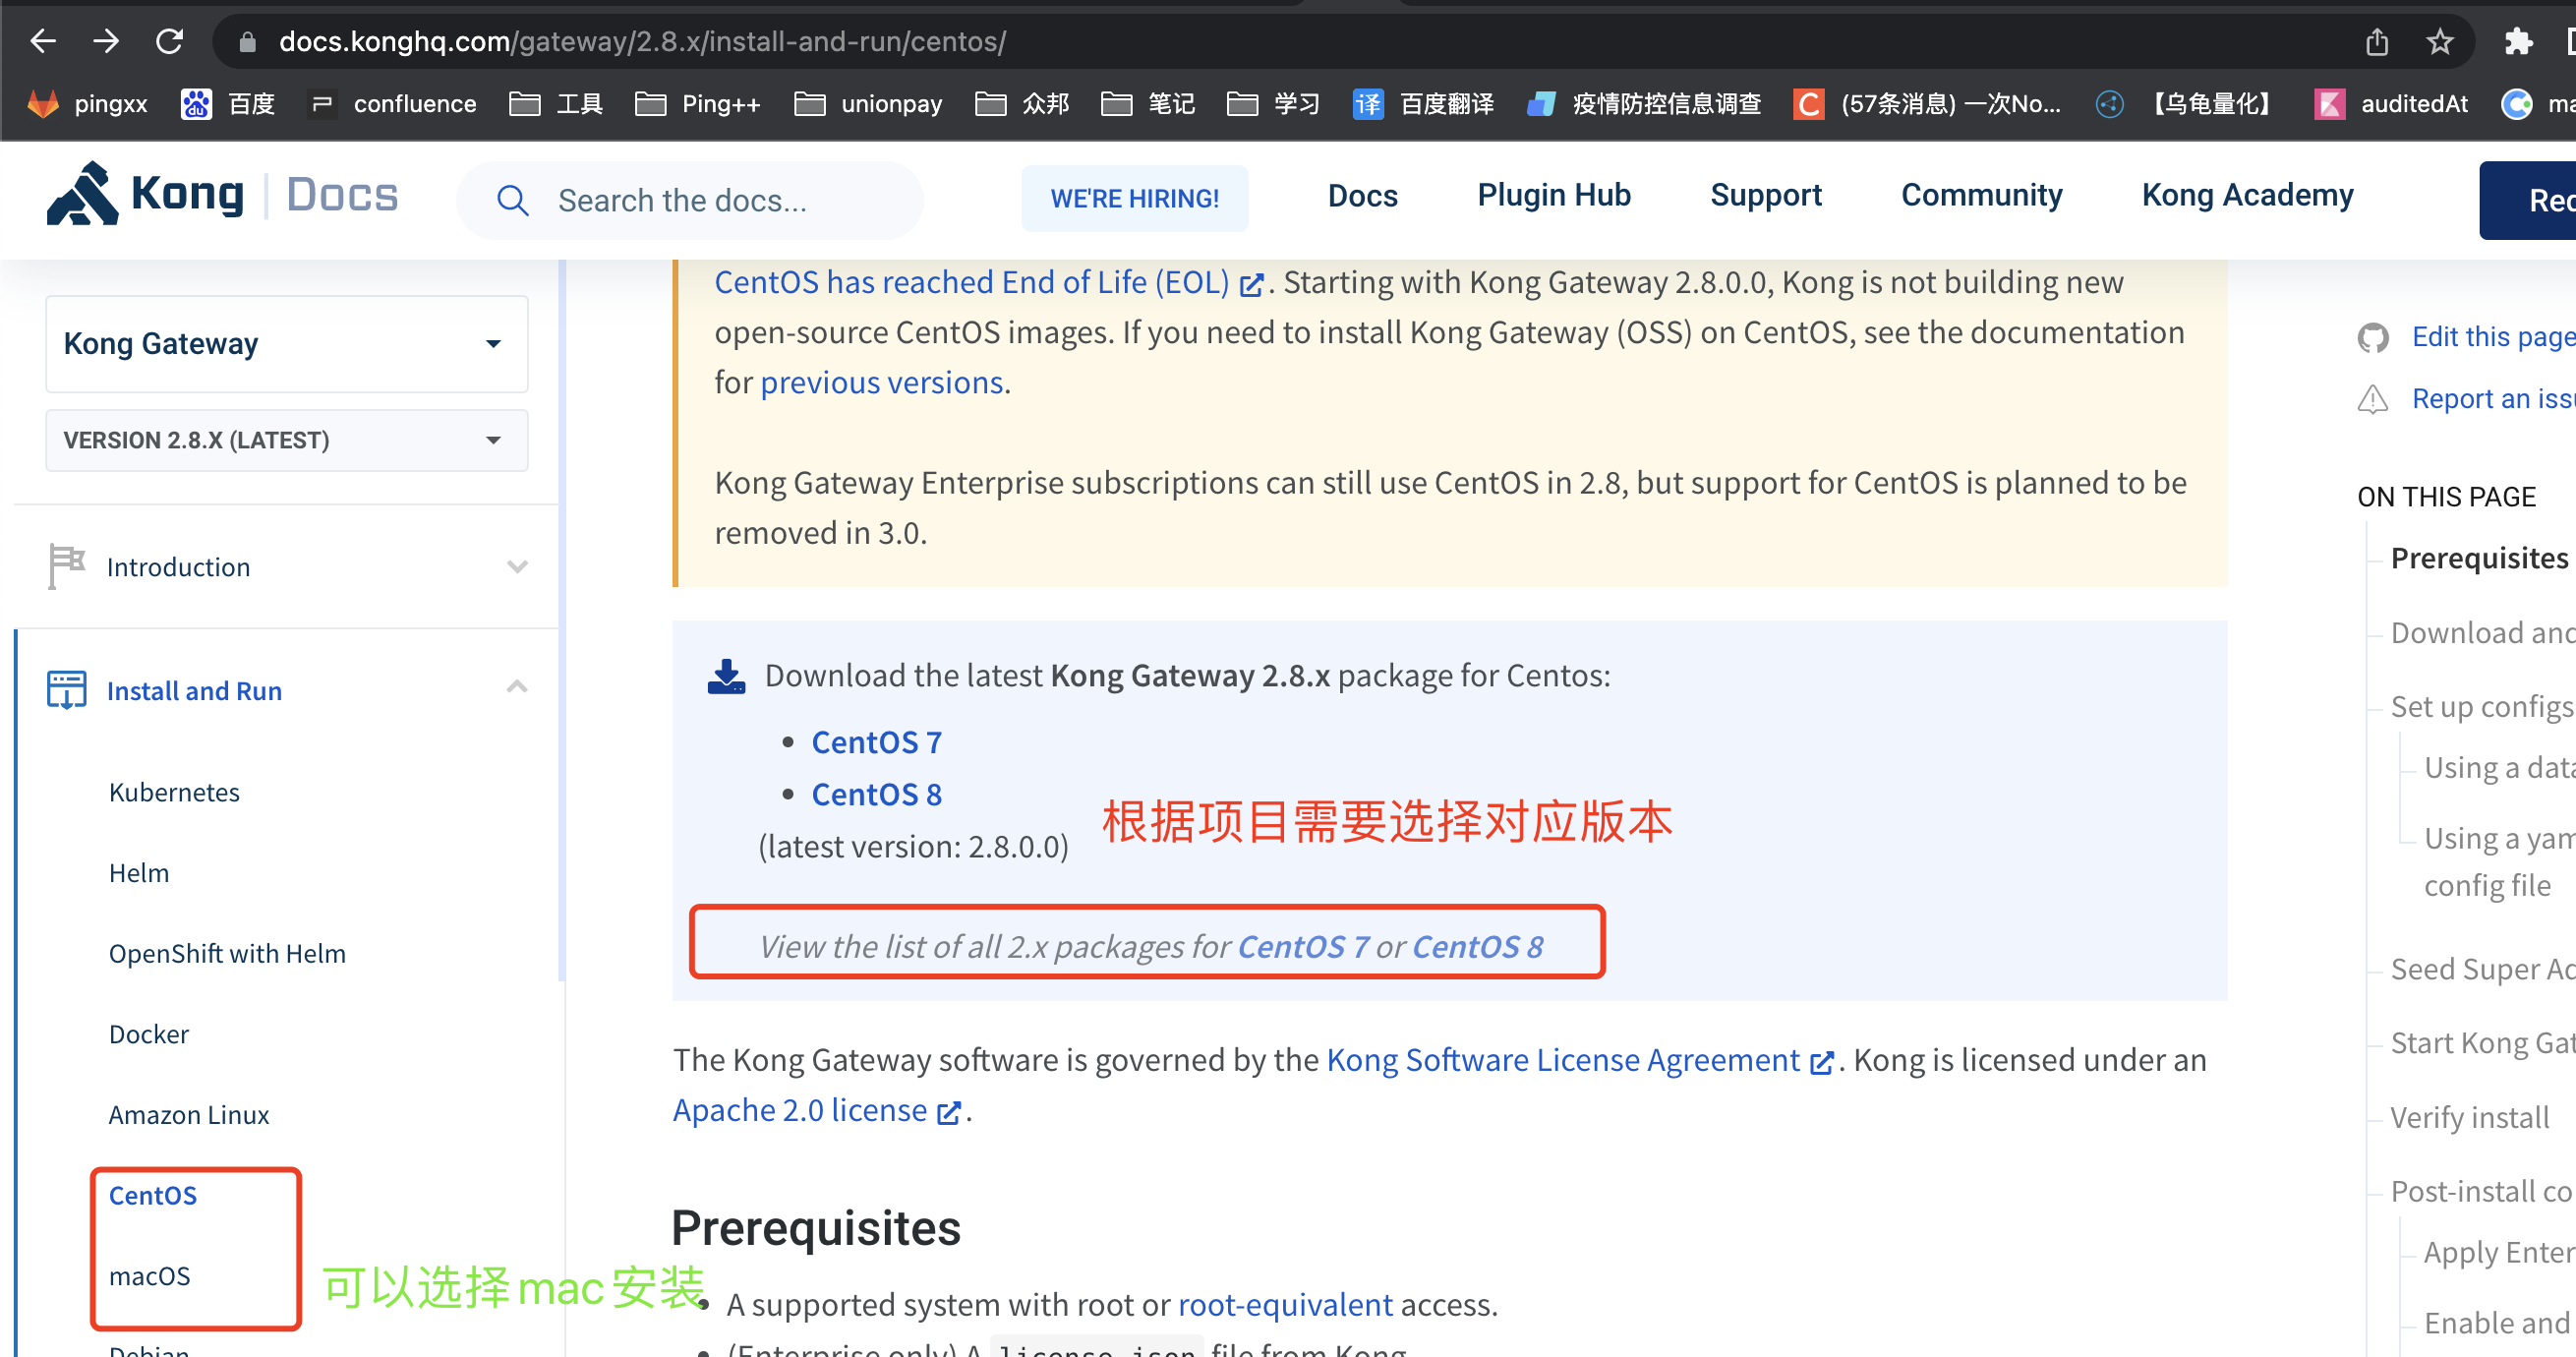
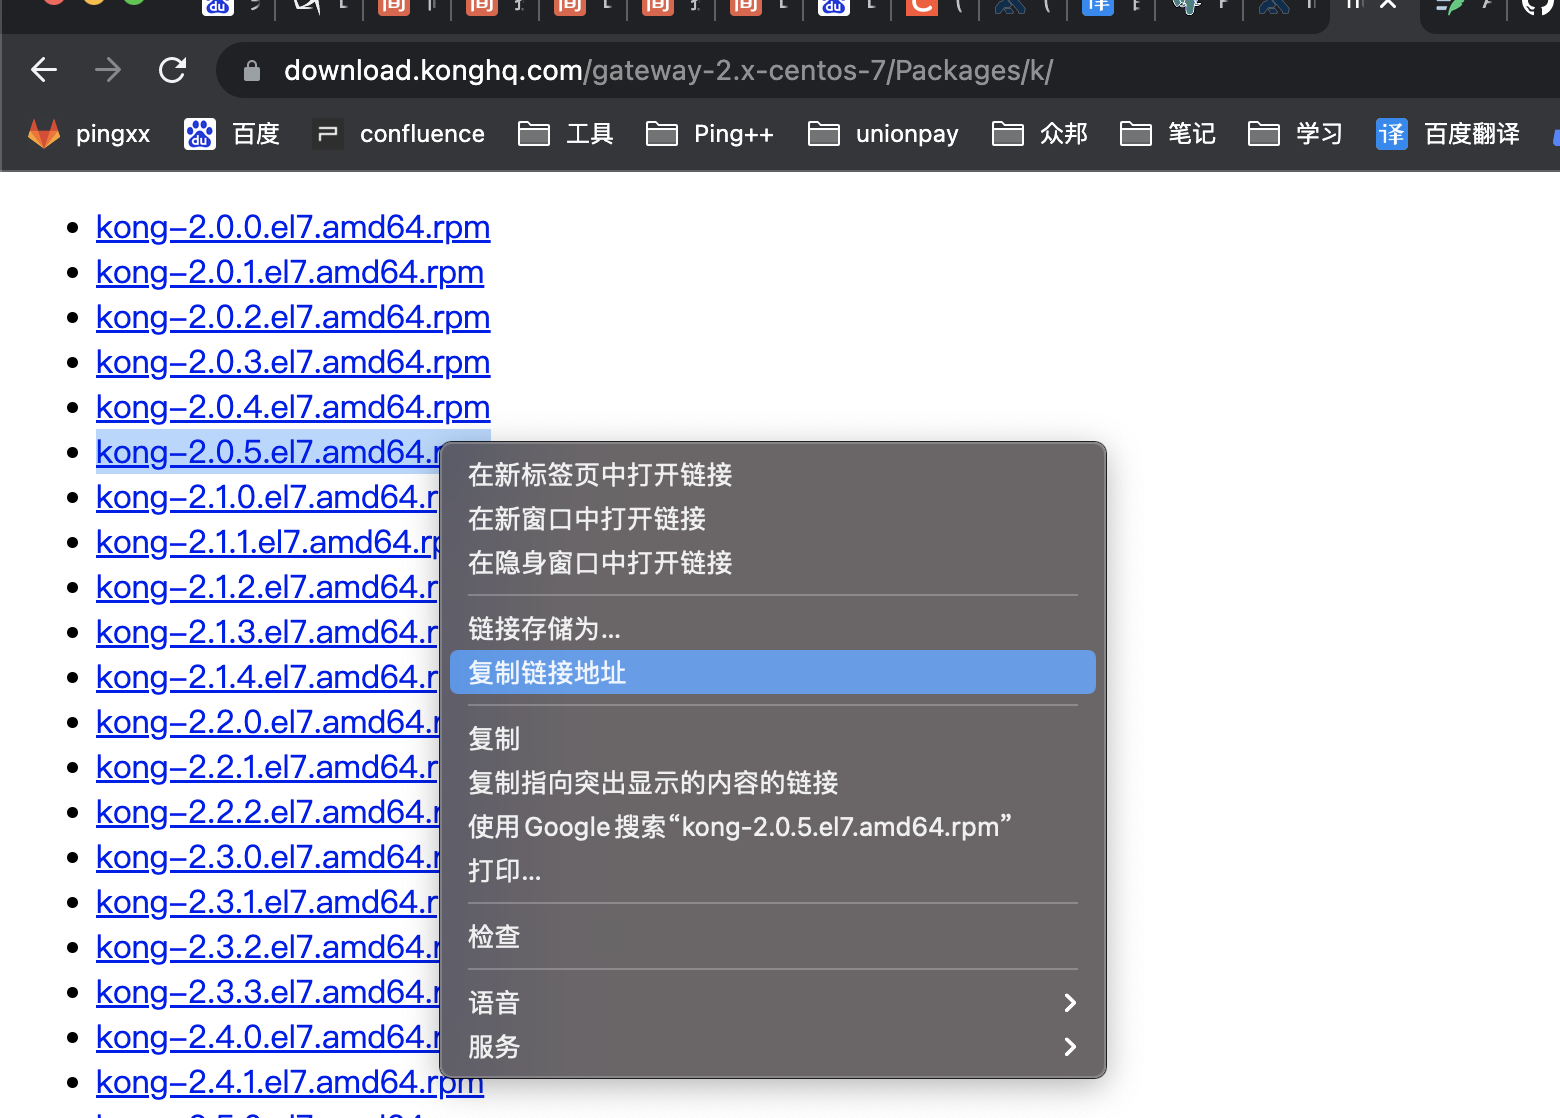
安装命令:
# 获取安装文件wget https://download.konghq.com/gateway-2.x-centos-7/Packages/k/kong-2.0.5.el7.amd64.rpm# 安装sudo yum install kong-2.0.5.el7.amd64.rpm
配置Kong:
Kong的默认配置文件/etc/kong/kong.conf.default,使用cp /etc/kong/kong.conf.default /etc/kong/kong.conf 命令,拷贝一份新的配置文件
拷贝完成后,修改/etc/kong/kong.conf 配置文件,设置kong使用的数据源:
vim /etc/kong/kong.conf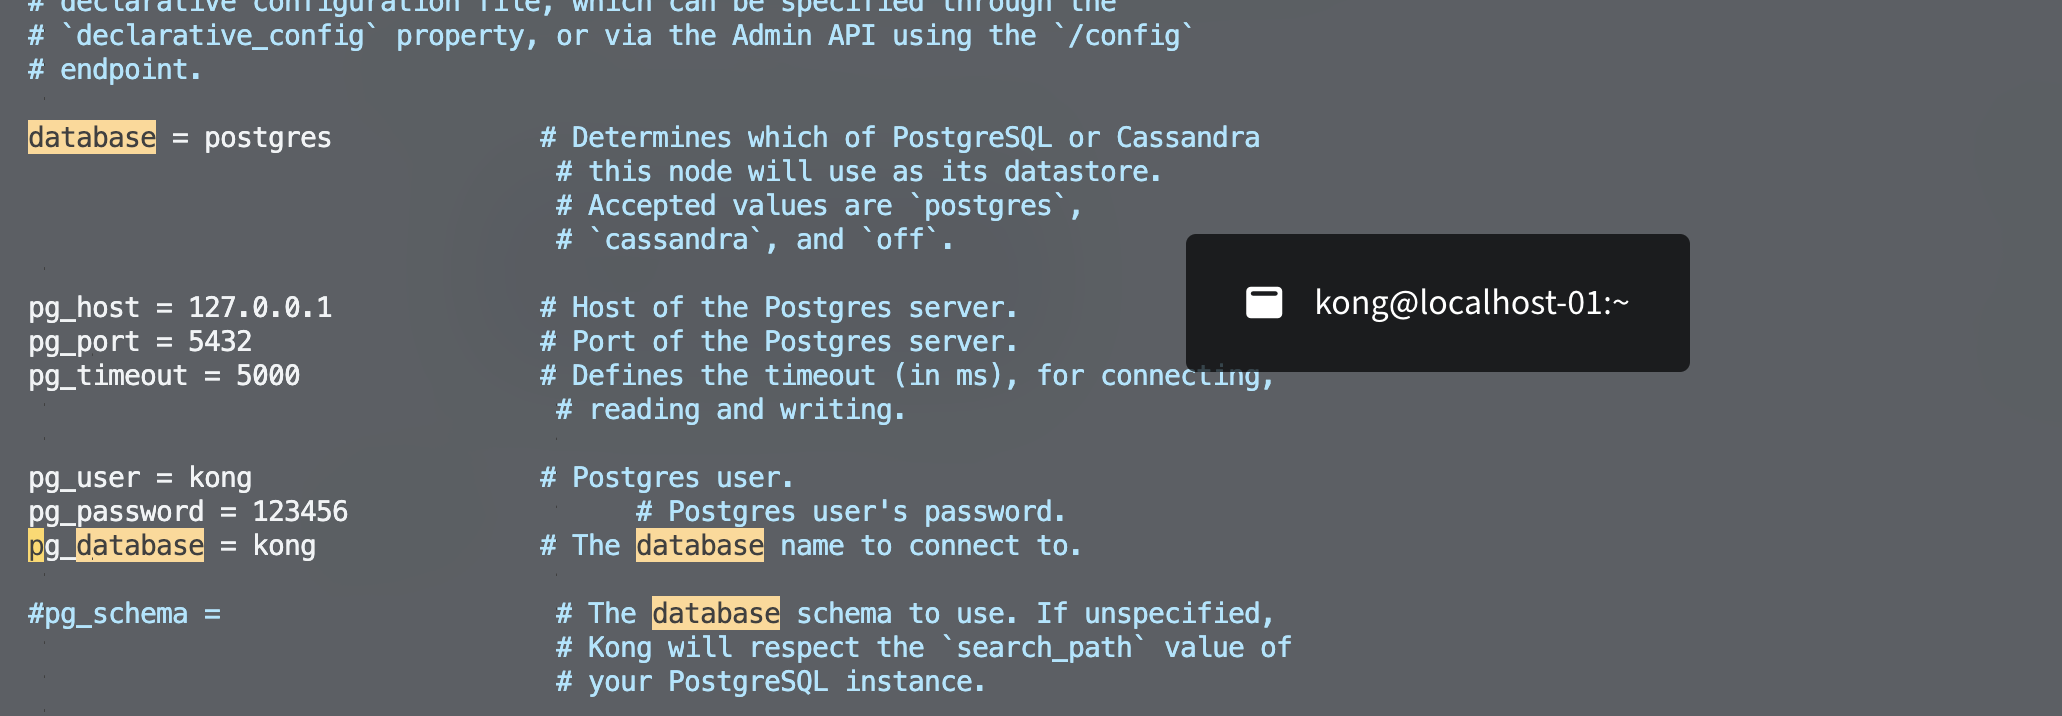
执行 kong migrations bootstrap -c /etc/kong/kong.conf 命令,进行kong 的PostgreSQL数据库的表初始化。
表创建完成: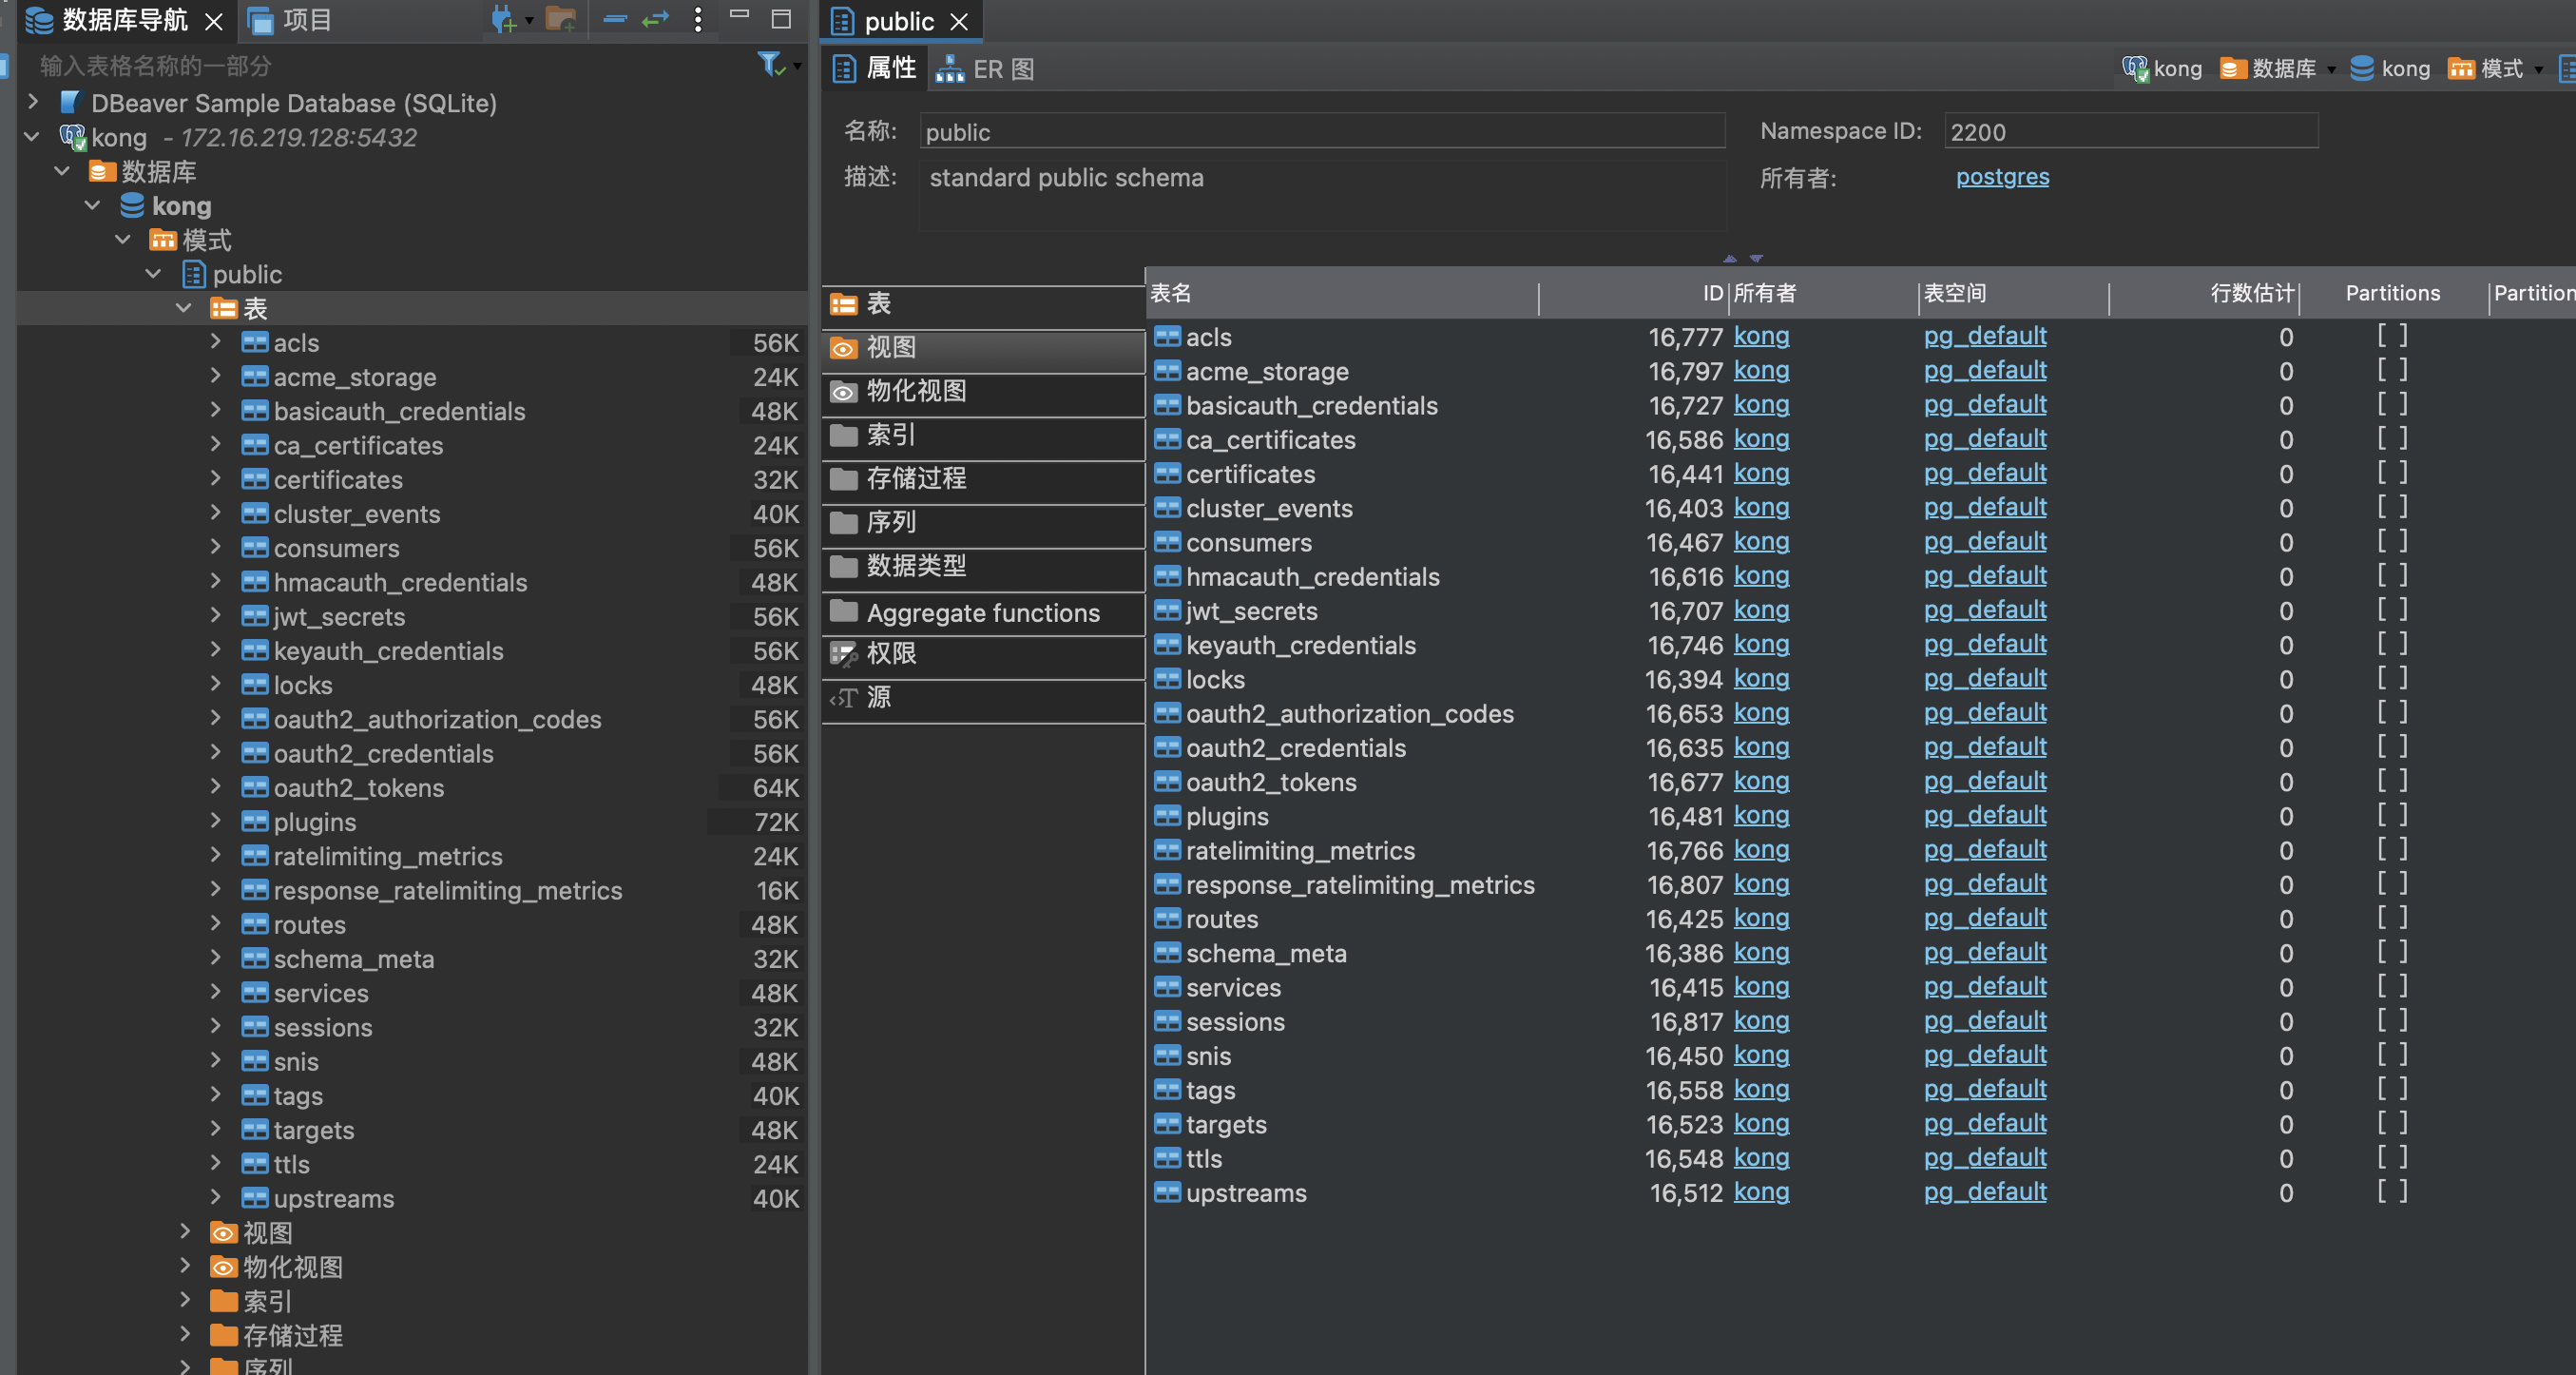
开启kong远程访问:
vim /etc/kong/kong.conf, 将127.0.0.1改成0.0.0.0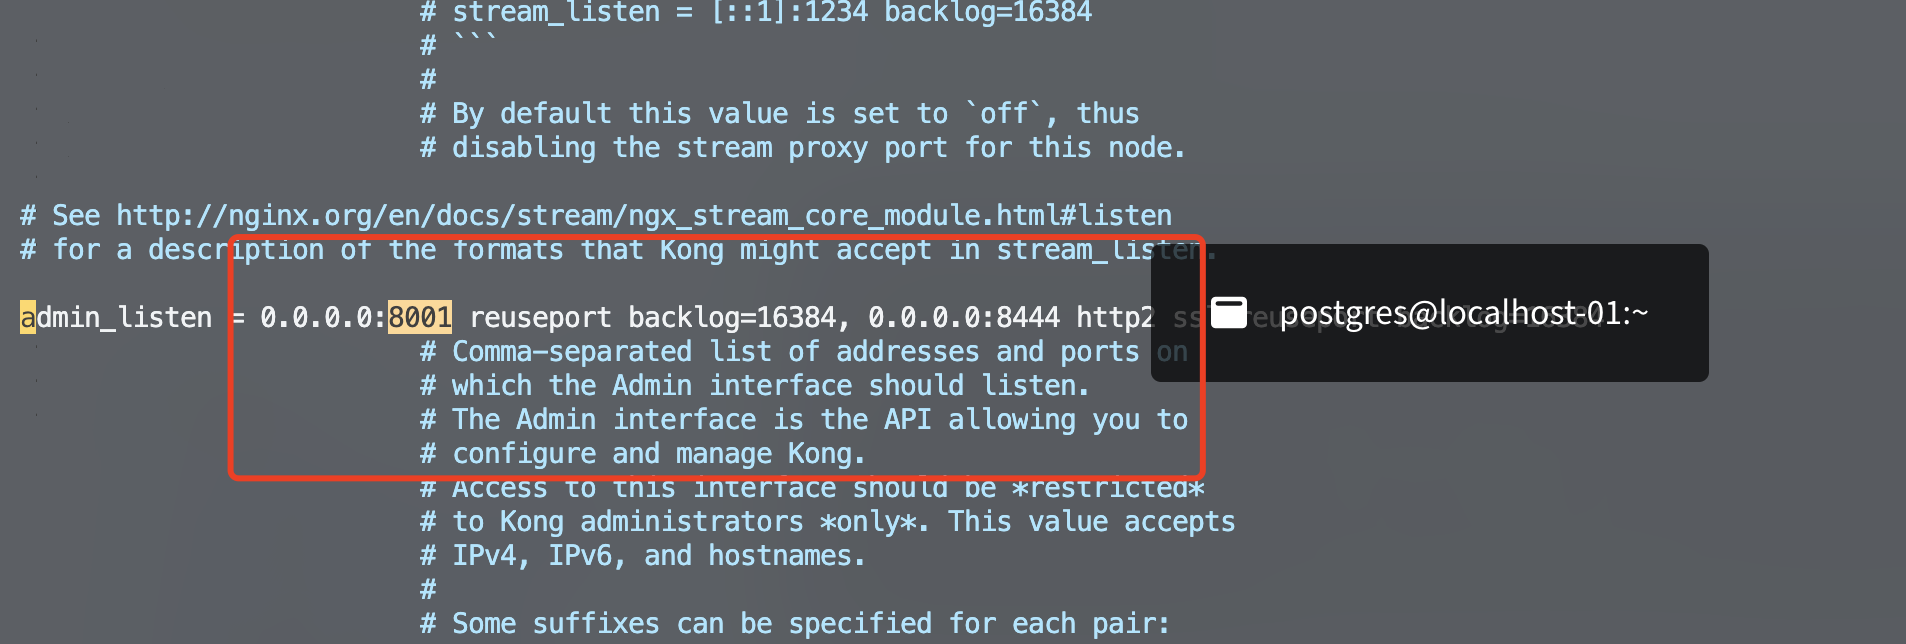
执行kong start -c /etc/kong/kong.conf 命令,启动kong
# 启动命令kong start -c /etc/kong/kong.conf# 停止kong stop# 重新加载kong reload
启动成功后,会看到kong started日志。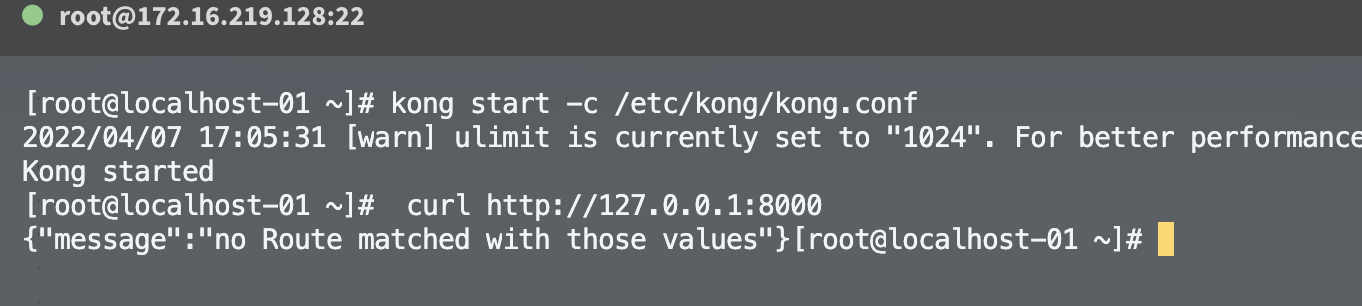
默认情况下,kong绑定4个接口:
- Proxy 8000: 接受客户端的http请求, 并转发到后段的Upstream
- Proxy 8443: 接受客户端的https请求, 并转发到后段的Upstream
- Proxy 8001: 接受客户端的http请求,进行kong的管理
- Proxy 8444: 接受客户端的https请求, 进行kong的管理
```shell
请求 Proxy 端口
curl http://127.0.0.1:8000 {“message”:”no Route matched with those values”}暂时没有配置kong的路由
请求Adming组件
注意: 考虑到安全性, Admin 端口只允许本机访问
curl http://127.0.0.1:8001 {“plugins”:{“enabled_in_cluster”:[],”available_on_server”:{……
<a name="i7hBq"></a>### 2.1.3安装Konga> <a name="jAngK"></a>#### 我这里使用docker安装Konga,npm安装各种失败,真让人崩溃。<a name="A7QA7"></a>#### 拉取konga> kong目前使用`Cassandra`、`Postgres`来存储数据```shelldocker pull pantsel/konga
创建一个自定义网络,允许多个容器之间相互发现和通讯。
docker network create kong-net
准备kong的数据库(初始化kona数据库,我这里是用的外部postgres)
docker run --network=kong-net \--rm pantsel/konga -c prepare -a postgres \-u postgresql://kong:123456@172.16.219.128:5432/konga
启动konga
docker run -d -p 1337:1337 \--network=kong-net \--name konga \-e "DB_ADAPTER=postgres" \-e "DB_URI=postgresql://kong:123456@172.16.219.128:5432/konga" \-e "NODE_ENV=production" \pantsel/konga
登陆konga
http://172.16.219.128:1337/
首次登陆需要设置用户名(kong)、密码(kong@123)
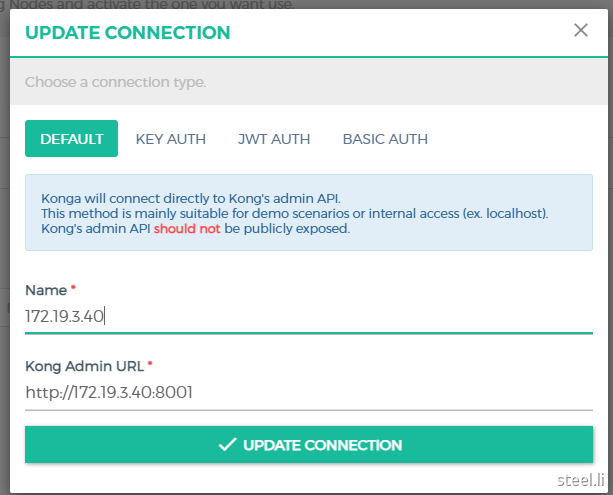
首次需要配置kong admin连接地址: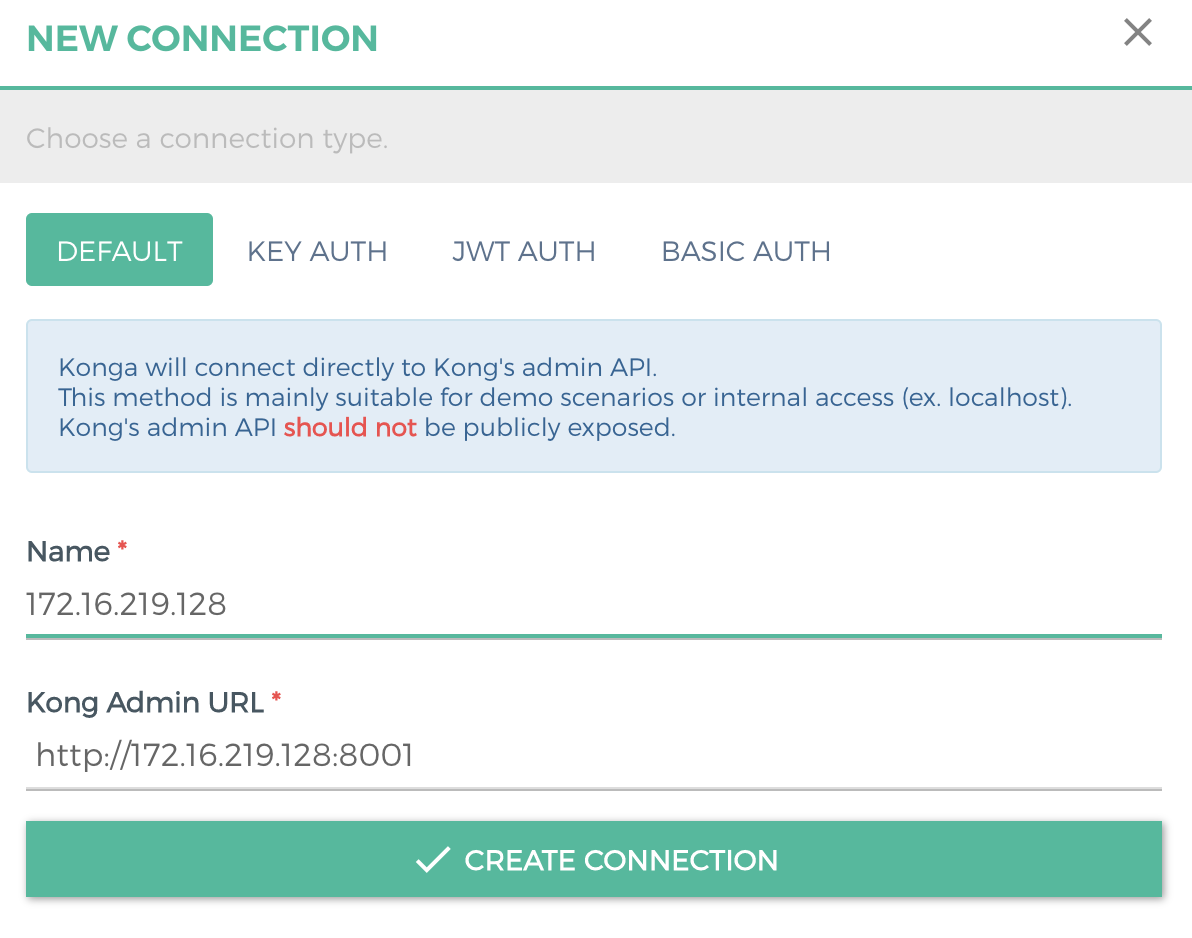
至此konga配置完成: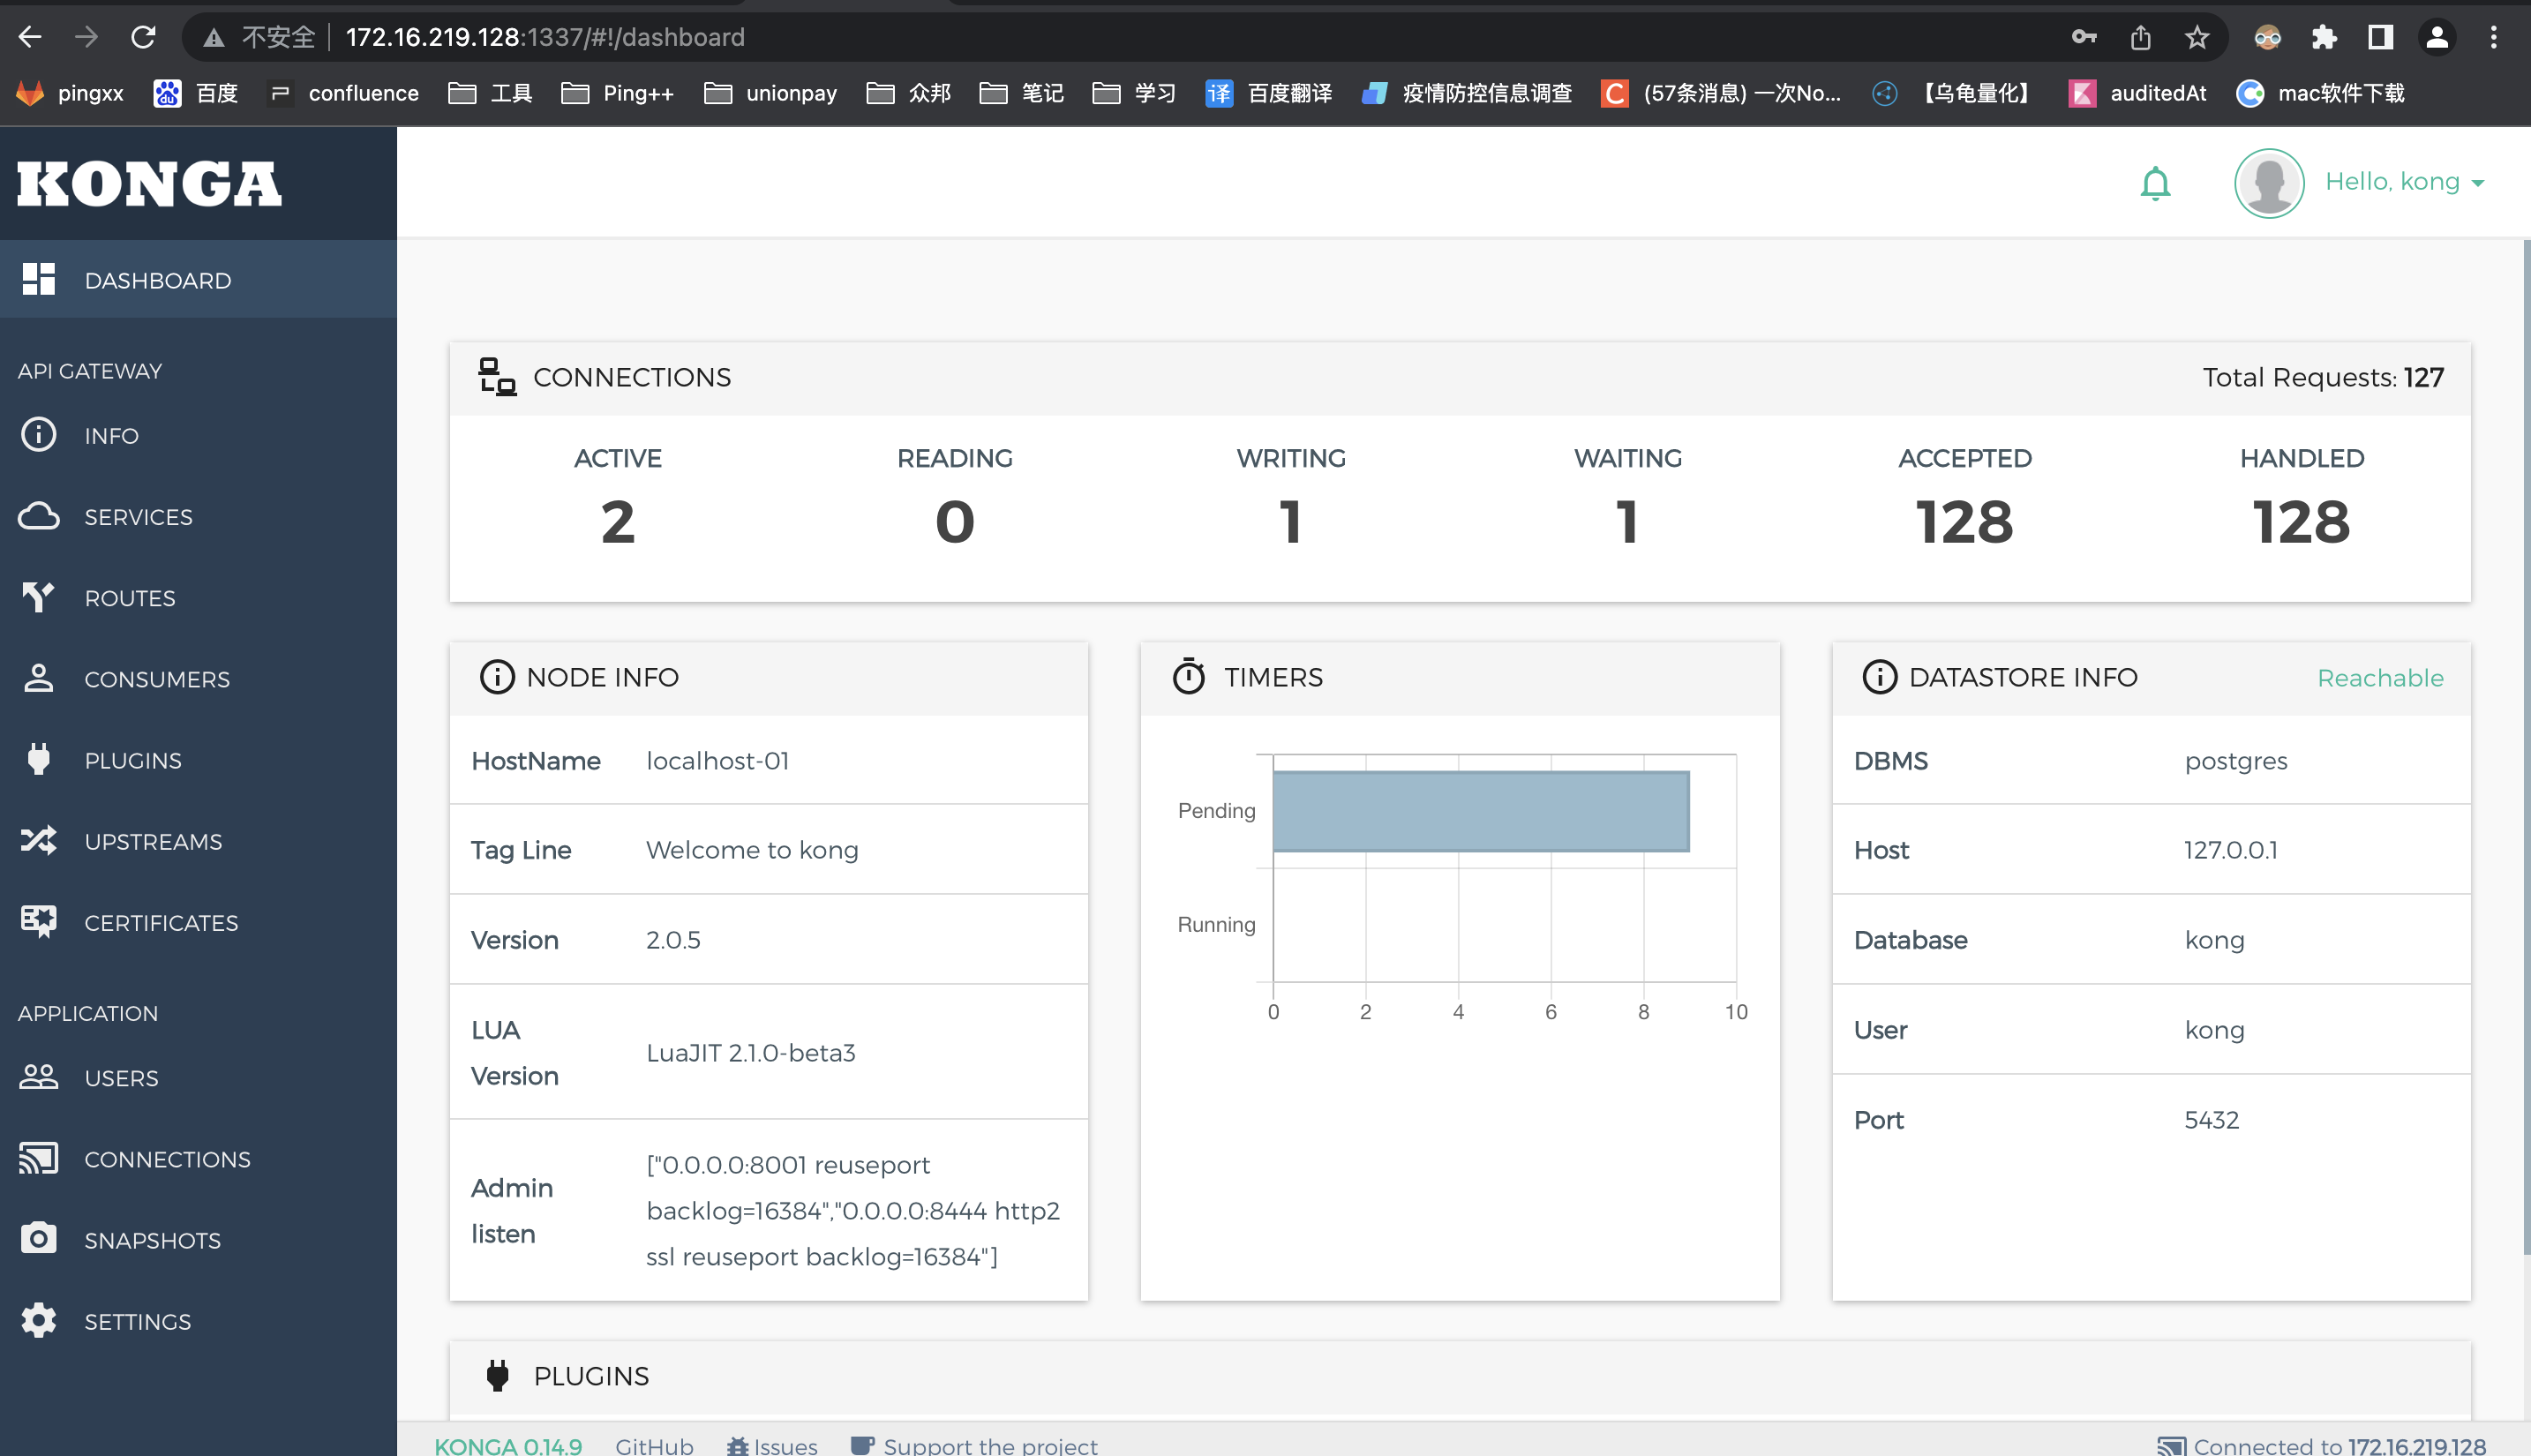
2.2 基于docker 安装kong,konga
引用:https://www.yuque.com/steel.li/docker/zqeyyn
搭建环境: docker 20.10.6 centos7
2.2.1 拉取kong、konga、postgres
kong目前使用Cassandra、Postgres来存储数据
$ docker pull kong$ docker pull pantsel/konga$ docker pull postgres:9.6
2.2.2 创建一个自定义网络,允许多个容器之间相互发现和通讯。
$ docker network create kong-net
2.2.3 启动数据库
$ docker run -d --name kong-database \--restart=always \--network=kong-net \-p 5432:5432 \-e "POSTGRES_USER=kong" \-e "POSTGRES_DB=kong" \-e "POSTGRES_PASSWORD=kong" \postgres:9.6
2.2.4 准备kong的数据库
$ docker run --rm --network=kong-net \-e "KONG_DATABASE=postgres" \-e "KONG_PG_HOST=kong-database" \-e "KONG_PG_PASSWORD=kong" \-e "KONG_PASSWORD=kong" \kong:latest kong migrations bootstrap
2.2.5 kong启动网关
$ docker run -d --name kong-oss --network=kong-net \--restart=always \-e "KONG_DATABASE=postgres" \-e "KONG_PG_HOST=kong-database" \-e "KONG_PG_PASSWORD=kong" \-e "KONG_PROXY_ACCESS_LOG=/dev/stdout" \-e "KONG_ADMIN_ACCESS_LOG=/dev/stdout" \-e "KONG_PROXY_ERROR_LOG=/dev/stderr" \-e "KONG_ADMIN_ERROR_LOG=/dev/stderr" \-e "KONG_ADMIN_LISTEN=0.0.0.0:8001" \-p 8000:8000 \-p 8443:8443 \-p 8001:8001 \-p 8444:8444 \-p 8002:8002 \-p 8445:8445 \-p 8003:8003 \-p 8004:8004 \kong:latest
2.2.6 安装kong管理UI(konga)
kong官网提供了管理UI,但是开源版本并没有看到,有许多的开源UI,我这里选择的konga
2.2.7 初始化konga数据库
$ docker run --network=kong-net \--rm pantsel/konga -c prepare -a postgres \-u postgresql://kong:kong@172.19.3.40:5432/konga
2.2.8 启动konga
$ docker run -d -p 1337:1337 \--network=kong-net \--name konga \-e "DB_ADAPTER=postgres" \-e "DB_URI=postgresql://kong:kong@172.19.3.40:5432/konga" \-e "NODE_ENV=production" \pantsel/konga
2.2.9 查看安装的kongaUI界面
浏览器打开http://172.19.3.40:1337/
注册、登录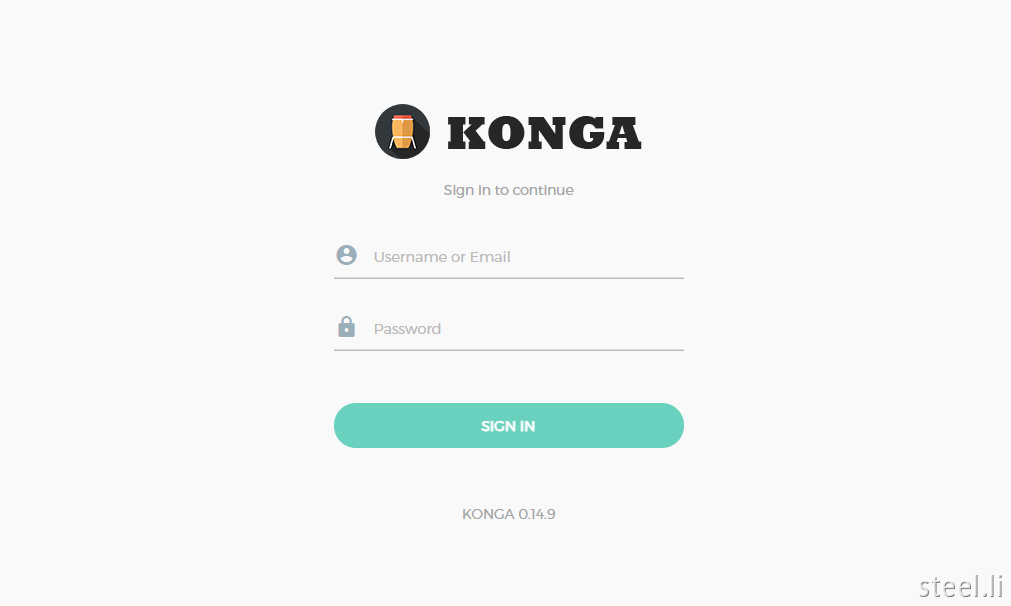
登录进来后界面
2.2.10添加连接
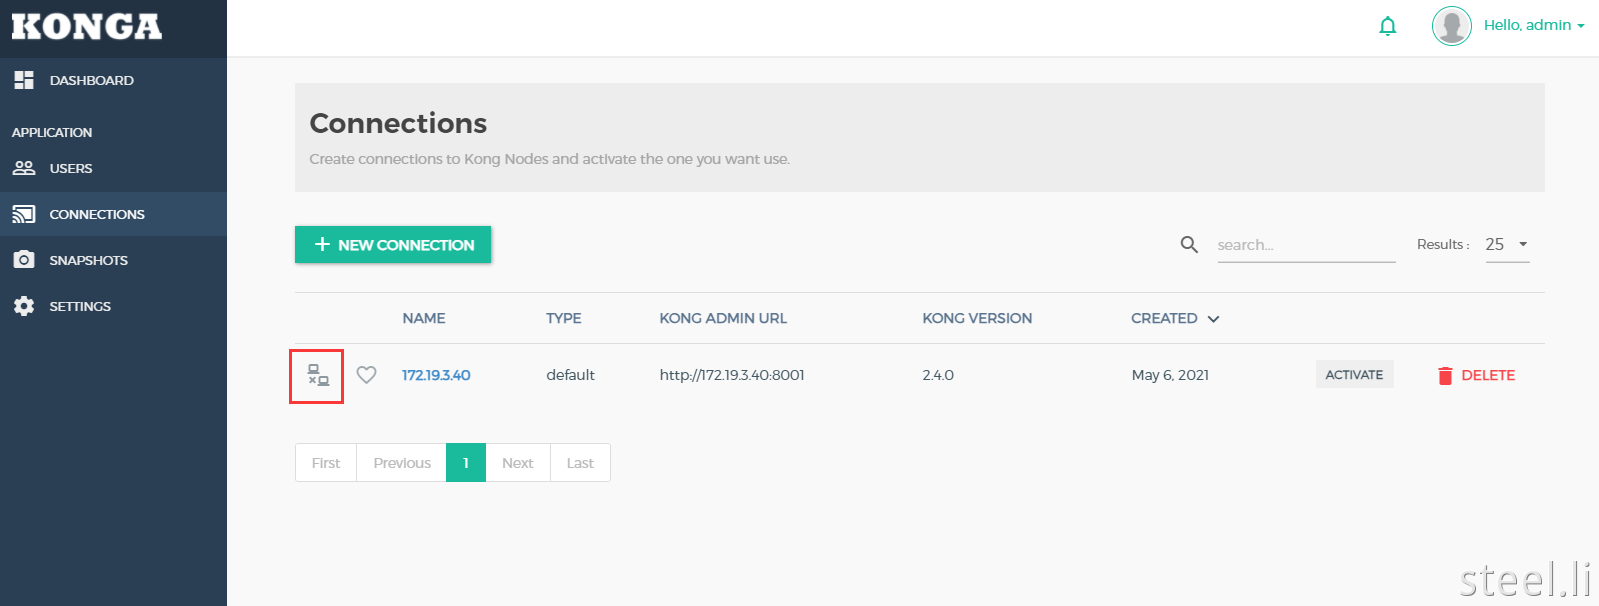
点击上方红色框中图标,激活服务
激活后会显示出api gateway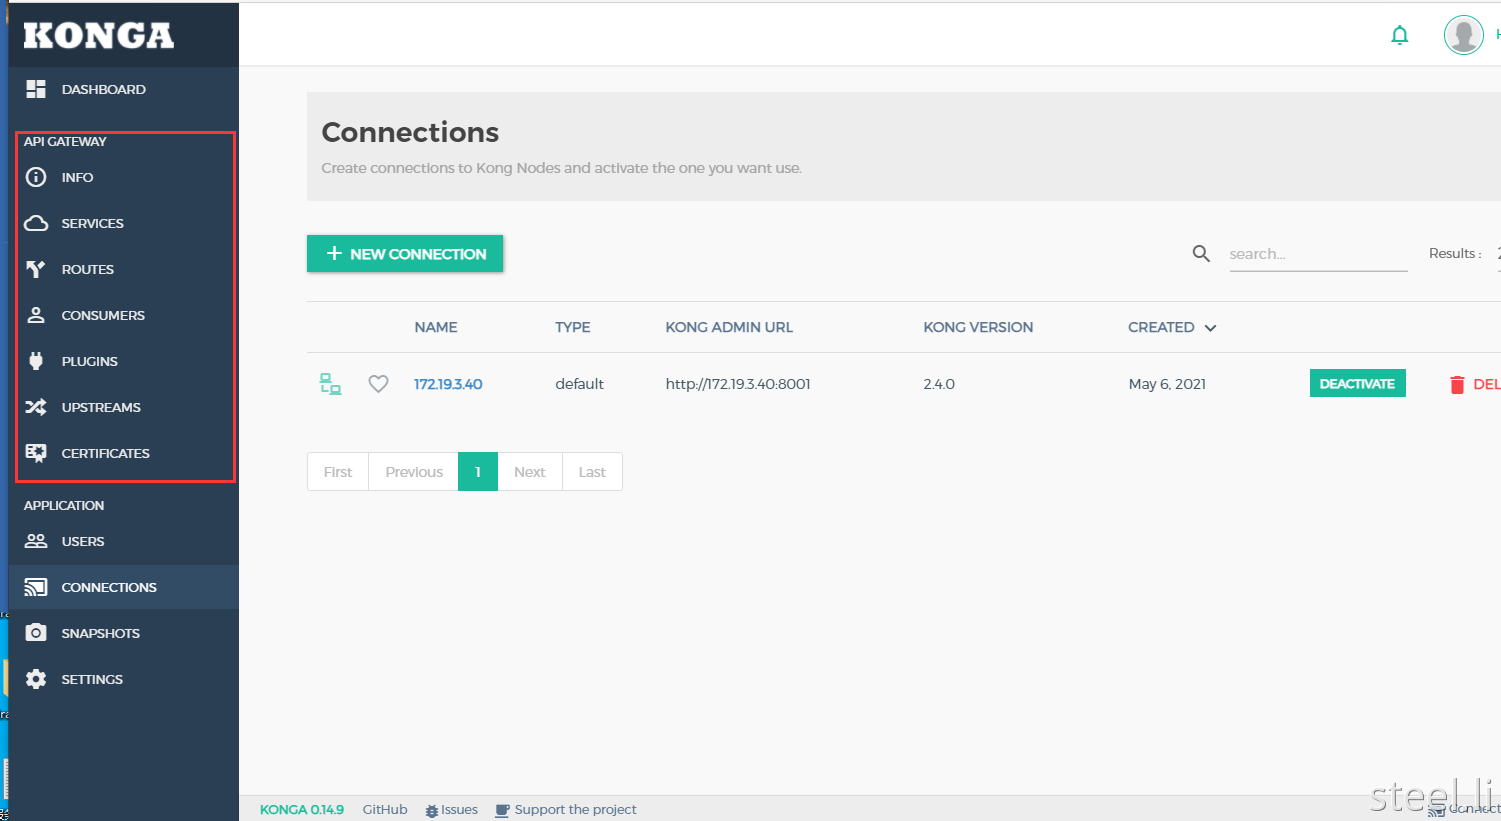
3、kong的使用:
https://segmentfault.com/a/1190000019758461?utm_source=tag-newest
3.1 Add a Service
使用adming API的方式:
curl -i -X POST http://localhost:8001/services \--data name=example_service \--data url='http://mockbin.org'#应答:HTTP/1.1 201 CreatedDate: Tue, 12 Apr 2022 16:24:17 GMTContent-Type: application/json; charset=utf-8Connection: keep-aliveAccess-Control-Allow-Origin: *Server: kong/2.0.5Content-Length: 296X-Kong-Admin-Latency: 202{"host":"mockbin.org","created_at":1649780656,"connect_timeout":60000,"id":"7ea02d93-2efd-44e8-9fbb-17897c16be9d","protocol":"http","name":"example_service","read_timeout":60000,"port":80,"path":null,"updated_at":1649780656,"retries":5,"write_timeout":60000,"tags":null,"client_certificate":null}
验证service:
curl -i http://localhost:8001/services/example_service# 应答如下:HTTP/1.1 200 OKDate: Tue, 12 Apr 2022 16:28:41 GMTContent-Type: application/json; charset=utf-8Connection: keep-aliveAccess-Control-Allow-Origin: *Server: kong/2.0.5Content-Length: 296X-Kong-Admin-Latency: 5{"host":"mockbin.org","created_at":1649780656,"connect_timeout":60000,"id":"7ea02d93-2efd-44e8-9fbb-17897c16be9d","protocol":"http","name":"example_service","read_timeout":60000,"port":80,"path":null,"updated_at":1649780656,"retries":5,"write_timeout":60000,"tags":null,"client_certificate":null}
3.2 Add a Route
curl -i -X POST http://localhost:8001/services/example_service/routes \--data 'paths[]=/mock' \--data name=mocking# 应答如下:HTTP/1.1 201 CreatedDate: Tue, 12 Apr 2022 16:34:01 GMTContent-Type: application/json; charset=utf-8Connection: keep-aliveAccess-Control-Allow-Origin: *Server: kong/2.0.5Content-Length: 429X-Kong-Admin-Latency: 44{"id":"ef2ff070-e864-4828-8169-cca250b51f58","path_handling":"v0","paths":["\/mock"],"destinations":null,"headers":null,"protocols":["http","https"],"methods":null,"snis":null,"service":{"id":"7ea02d93-2efd-44e8-9fbb-17897c16be9d"},"name":"mocking","strip_path":true,"preserve_host":false,"regex_priority":0,"updated_at":1649781241,"sources":null,"hosts":null,"https_redirect_status_code":426,"tags":null,"created_at":1649781241}
验证Kong是否正确地通过Route将请求转发给Service。请注意,默认情况下,Kong在端口8000上处理代理请求:
curl -i -X GET http://localhost:8000/mock/request# 应答如下HTTP/1.1 200 OKContent-Type: application/json; charset=utf-8Content-Length: 1002Connection: keep-aliveDate: Sun, 24 Apr 2022 16:17:48 GMTAccess-Control-Allow-Origin: *Access-Control-Allow-Methods: GETAccess-Control-Allow-Headers: host,connection,accept-encoding,x-forwarded-for,cf-ray,x-forwarded-proto,cf-visitor,x-forwarded-host,x-forwarded-port,user-agent,accept,cf-connecting-ip,cdn-loop,x-request-id,via,connect-time,x-request-start,total-route-timeAccess-Control-Allow-Credentials: trueX-Powered-By: mockbinVary: Accept, Accept-EncodingEtag: W/"3ea-w1aFHW79jWrxyjLH+mtaBGsSbCQ"Via: kong/2.0.5CF-Cache-Status: DYNAMICReport-To: {"endpoints":[{"url":"https:\/\/a.nel.cloudflare.com\/report\/v3?s=DHOIH3T1QFJfOjML7w3neA0X4mlQW4LCixp042lVo3Qtz60xh8%2FEQNXdV3EVYEAA2d%2F%2FE%2F5qxIPj3t54x3IhI0wW8UBTW7BwXAu3PRwUeS%2BRfR0%2BonzmqNuPwicfjg%3D%3D"}],"group":"cf-nel","max_age":604800}NEL: {"success_fraction":0,"report_to":"cf-nel","max_age":604800}Server: cloudflareCF-RAY: 701026b59dc58b4d-HKGalt-svc: h3=":443"; ma=86400, h3-29=":443"; ma=86400X-Kong-Upstream-Latency: 701X-Kong-Proxy-Latency: 225{"startedDateTime": "2022-04-24T16:17:48.869Z","clientIPAddress": "127.0.0.1","method": "GET","url": "http://localhost/request","httpVersion": "HTTP/1.1","cookies": {},"headers": {"host": "mockbin.org","connection": "close","accept-encoding": "gzip","x-forwarded-for": "127.0.0.1,180.167.221.114, 172.68.253.55","cf-ray": "701026b59dc58b4d-HKG","x-forwarded-proto": "http","cf-visitor": "{\"scheme\":\"http\"}","x-forwarded-host": "localhost","x-forwarded-port": "80","user-agent": "curl/7.29.0","accept": "*/*","cf-connecting-ip": "180.167.221.114","cdn-loop": "cloudflare","x-request-id": "ca5e4735-13c0-4288-ab0e-90df8adc1cbd","via": "1.1 vegur","connect-time": "0","x-request-start": "1650817068858","total-route-time": "0"},"queryString": {},"postData": {"mimeType": "application/octet-stream","text": "","params": []},"headersSize": 531,"bodySize": 0}
为了验证路由结果的正确性,我们对比直接访问https://mockbin.org/request的结果:
curl https://mockbin.org/request# 应答如下:{"startedDateTime": "2022-04-24T16:23:53.152Z","clientIPAddress": "180.167.221.114","method": "GET","url": "https://mockbin.org/request","httpVersion": "HTTP/1.1","cookies": {},"headers": {"host": "mockbin.org","connection": "close","accept-encoding": "gzip","x-forwarded-for": "180.167.221.114, 162.158.179.104","cf-ray": "70102f9a8e033d42-HKG","x-forwarded-proto": "http","cf-visitor": "{\"scheme\":\"https\"}","user-agent": "curl/7.29.0","accept": "*/*","cf-connecting-ip": "180.167.221.114","cdn-loop": "cloudflare","x-request-id": "994bf765-8aa9-4ff9-bc8e-adf359277088","x-forwarded-port": "80","via": "1.1 vegur","connect-time": "0","x-request-start": "1650817433155","total-route-time": "0"},"queryString": {},"postData": {"mimeType": "application/octet-stream","text": "","params": []},"headersSize": 495,"bodySize": 0}
4. 插件开发
4.1 安装luarocks
wget https://luarocks.org/releases/luarocks-2.4.1.tar.gztar zxpf luarocks-2.4.1.tar.gzcd luarocks-2.4.1./configure --with-lua-include=/usr/local/openresty/luajit/include/luajit-2.1/sudo make bootstrap
mkdir -p "/usr/local/share/lua/5.1//luarocks"cp src/luarocks/site_config.lua "/usr/local/share/lua/5.1//luarocks"mkdir -p "/usr/local"查看which luarocks/usr/local/bin/luarocks
4.2 给Service设置自定义插件[pre-processor]
先看效果:我们给请求头新增了【”x-root-mch-id”: “8988979087897879879879879”】
curl -X POST http://localhost:8001/services/example_service/plugins \-d "name=pre-processor"# 应答如下:{"created_at":1649798158,"config":{},"id":"e1d8ecda-e94c-4b1a-8c35-13d842e6698b","service":{"id":"7ea02d93-2efd-44e8-9fbb-17897c16be9d"},"enabled":true,"protocols":["grpc","grpcs","http","https"],"name":"pre-processor","consumer":null,"route":null,"tags":null}
再次访问:http://localhost:8000/mock/request
curl http://localhost:8000/mock/request应答如下:{"startedDateTime": "2022-04-24T21:30:19.671Z","clientIPAddress": "127.0.0.1","method": "GET","url": "http://localhost/request","httpVersion": "HTTP/1.1","cookies": {},"headers": {"host": "mockbin.org","connection": "close","accept-encoding": "gzip","x-forwarded-for": "127.0.0.1,101.93.124.5, 172.70.214.133","cf-ray": "7011f0804c477d82-LAX","x-forwarded-proto": "http","cf-visitor": "{\"scheme\":\"http\"}","x-forwarded-host": "localhost","x-forwarded-port": "80","user-agent": "curl/7.29.0","accept": "*/*","x-root-mch-id": "8988979087897879879879879","cf-connecting-ip": "101.93.124.5","cdn-loop": "cloudflare","x-request-id": "612f5ead-cc1a-49e7-a5bf-a07cdf56b61c","via": "1.1 vegur","connect-time": "0","x-request-start": "1650835819671","total-route-time": "0"},"queryString": {},"postData": {"mimeType": "application/octet-stream","text": "","params": []},"headersSize": 568,"bodySize": 0}# 可以看到我们设置的 x-root-mch-id 生效了
实现代码如下:
local plugin = {PRIORITY = 1000, -- set the plugin priority, which determines plugin execution orderVERSION = "0.1.0", -- version in X.Y.Z format. Check hybrid-mode compatibility requirements.}-- runs in the 'access_by_lua_block'function plugin:access(plugin_conf)kong.service.request.set_header("X-Root-Mch-Id", "8988979087897879879879879")end --]]-- return our plugin objectreturn plugin
源码位置:
插件部署:
cd /etc/kong/kong-plugin/pre-processor/# 卸载luarocks remove kong-plugin-pre-processor-0.1.0-1.rockspec# 编译luarocks make kong-plugin-pre-processor-0.1.0-1.rockspec# 重新加载kongkong reloadvim /etc/kong/kong-plugin/pre-processor/kong/plugins/pre-processor/handler.lua

若有收获,就点个赞吧
0 人点赞
