一、 Nacos
1. 了解Nacos
常见的注册中心:
- Eureka(原生,2.0遇到性能瓶颈,停止维护)
- Zookeeper(支持,专业的独立产品。例如:dubbo)
- Consul(原生,GO语言开发)
- Nacos
相对于 Spring Cloud Eureka 来说,Nacos 更强大。
Nacos = Spring Cloud Eureka + Spring Cloud Config
Nacos 可以与 Spring, Spring Boot, Spring Cloud 集成,并能代替 Spring Cloud Eureka, Spring Cloud Config。
- 通过 Nacos Server 和 spring-cloud-starter-alibaba-nacos-config 实现配置的动态变更。
- 通过 Nacos Server 和 spring-cloud-starter-alibaba-nacos-discovery 实现服务的注册与发现。
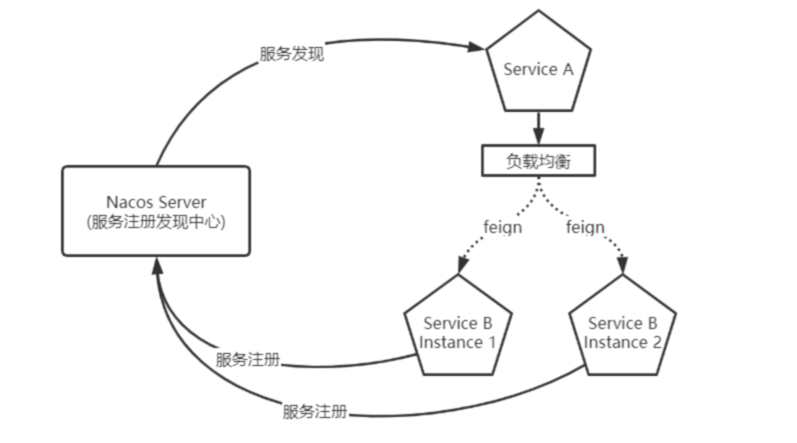
Nacos是以服务为主要服务对象的中间件,Nacos支持所有主流的服务发现、配置和管理。
Nacos主要提供以下四大功能:
- 服务发现和服务健康监测
- 动态配置服务
- 动态DNS服务
- 服务及其元数据管理
2. 使用Nacos
最佳实践:**命名空间区分业务功能,分组区分环境。**
- 添加依赖:spring-cloud-starter-alibaba-nacos-discovery及springCloud
```xml
2.2.5.RELEASE Hoxton.SR3 2.2.1.RELEASE
2. 创建bootstrap.yml文件,该配置文件会优先于“application.yml”加载。```propertiesspring:application:name: data-reportcloud:nacos:discovery:server-addr: 127.0.0.1:8848config:server-addr: 127.0.0.1:8848#nacos的完整格式: ${prefix}-${spring.profiles.active}.${file-extension}#优先级最高#prefix 默认为 spring.application.name 的值file-extension: yamlprefix: data-reportnamespace: ad80a1ee-a96e-4697-81c3-1edc36576678group: DEFAULT_GROUP#额外的dataID; 可以配置多个,从[0]开始,优先级第二高,本身以数组数字越大优先级越高ext-config[0]:data-id: ext-config-common01.yamlrefresh: true # 动态刷新配置默认不刷新group: REFRESH_GROUP#共享 dataID 即配置文件,但只能共享 DEFAULT_GROUP 中的配置文件,多个文件逗号隔开#优先级最后# shared-dataids: ext-config-common01.yaml# refreshable-dataids: ext-config-common01.yamlprofiles:active: dev
通过Spring Cloud原生注解
@EnableDiscoveryClient开启服务注册发现功能 ```java @SpringBootApplication @EnableDiscoveryClient public class NacosProviderApplication {public static void main(String[] args) {
SpringApplication.run(NacosProviderApplication.class, args);
}
}
注:可以修改“Controller”类,添加“@RefreshScope”注解```java@RestController@RequestMapping("xx/xx")@RefreshScopepublic class XXXController {
这样就会动态的从配置中心读取配置.
二、feign 英[feɪn]
1. 了解feign
**feign **和 **ribbon** 是Spring Cloud的Netflix中提供的两个实现**软负载均衡**的组件,Ribbon和Feign都是用于调用其他服务的,方式不同。Feign则是在Ribbon的基础上进行了一次改进,采用接口的方式。
只需要创建一个接口,然后在上面添加注解即可 ,将需要调用的其他服务的方法定义成抽象方法即可
Ribbon 是一个基于 HTTP 和 TCP 客户端 的负载均衡的工具。它可以 在客户端 配置 RibbonServerList(服务端列表),使用 HttpClient 或 RestTemplate 自己构建 http 请求,步骤相当繁琐。
2. 使用feign
- 在两个项目中都加入下面依赖
<dependency><groupId>org.springframework.cloud</groupId><artifactId>spring-cloud-starter-openfeign</artifactId></dependency>
- 调用提供者(provider)项目的接口如下:
/*** @Description ProviderController* @Author Zhang Xin* @Date 2020/7/23*/@RestControllerpublic class ProviderController {@GetMapping("/hi")public String hi(@RequestParam(value = "name",defaultValue = "ZX")String name){return "hi "+name;}}
- 在发请求的消费者(consumer)项目的 Application 类上添加@EnableFeignClients注解:
@SpringBootApplication@EnableDiscoveryClient@EnableFeignClientspublic class NacosConsumerApplication {public static void main(String[] args) {SpringApplication.run(NacosConsumerApplication.class, args);}}
- 编写feignClient:
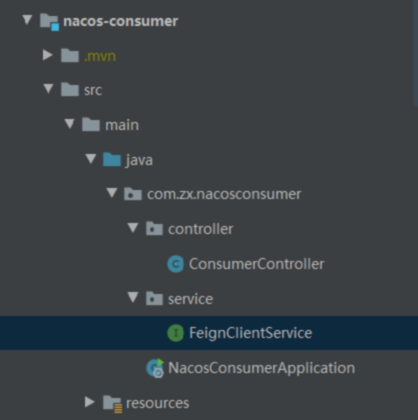
代码:
/*** @Description FeignClient* 通过注解表明服务和接口* @Author Zhang Xin* @Date 2020/7/23*/@FeignClient("nacos-provider")public interface FeignClientService {@GetMapping("/hi")String hi(@RequestParam(value = "name", defaultValue = "ZX") String name);}
- 在ConsumerController中使用feignClient:
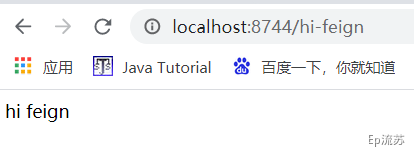
@RestControllerpublic class ConsumerController {@AutowiredFeignClientService feignClientService;@GetMapping("/hi-feign")public String hiFeign(){return feignClientService.hi("feign");}}
测试结果:
- feign整合了 Hystrix (断路器),具有熔断的能力
可以利用以下配置打开使用,使用方法与 Sentinel整合Feign 一样,详见第四章第3节
feign:hystrix:enabled: true
三、网关
1. 了解网关
API 网关是介于客户端和服务器端之间的中间层,所有的外部请求都会先经过 API 网关这一层。也就是说,API 的实现方面更多的考虑业务逻辑,而安全、性能、监控可以交由 API 网关来做,这样既提高业务灵活性又不缺安全性,典型的架构图如图所示:<br />
2. 网关知识
- 添加依赖
<dependency><groupId>org.springframework.cloud</groupId><artifactId>spring-cloud-starter-gateway</artifactId></dependency>
- 编写路由规则
为了演示路由到不同服务,这里把消费者和生产者都配置在网关中
application.yml
server:port: 8090spring:cloud:gateway:routes:- id: nacos-consumeruri: http://127.0.0.1:8744predicates:- Path=/hi- id: nacos-provideruri: http://127.0.0.1:8733predicates:- Path=/hello
2.1. 基本概念:
- Routes:路由网关的基本构建块。它由ID,目的URI,断言(Predicate)集合和过滤器(filter)集合组成。如果断言聚合为真,则匹配该路由。
- Predicates 断言:这是一个 Java 8函数式断言。允许开发人员匹配来自HTTP请求的任何内容,例如请求头或参数。
- Filters 过滤器:可以在发送下游请求之前或之后修改请求和响应。
路由根据断言进行匹配,匹配成功就会转发请求给URI,在转发请求之前或者之后可以添加过滤器。
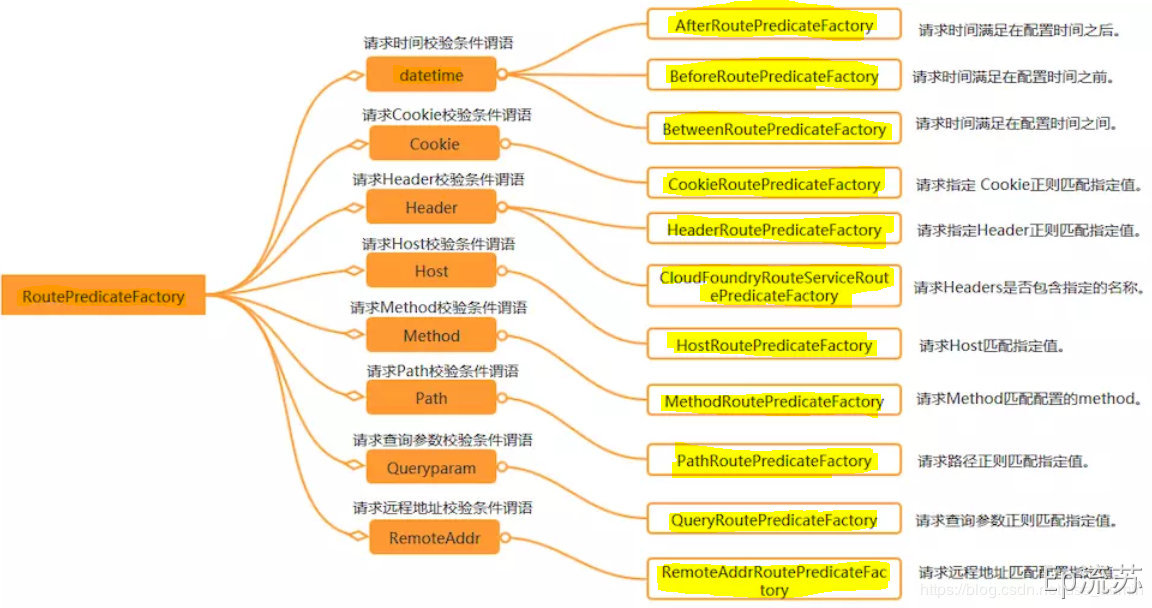
2.2. 断言工厂
Spring Cloud Gateway包含许多内置的Route Predicate工厂。所有这些断言都匹配HTTP请求的不同属性。多路由断言工厂通过and组合。
官方提供的路由工厂:
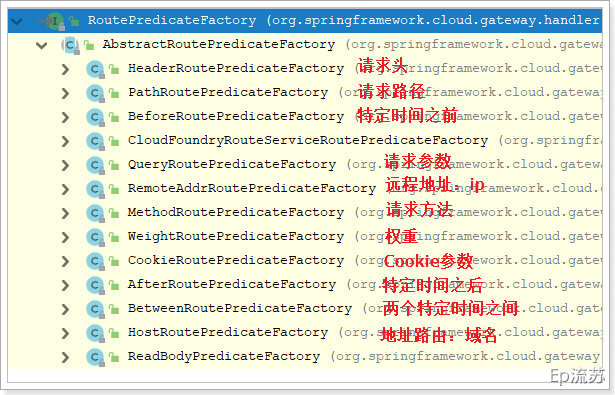
这些断言工厂的配置方式,参照官方文档:https://cloud.spring.io/spring-cloud-static/spring-cloud-gateway/2.1.0.RELEASE/single/spring-cloud-gateway.html
这里重点掌握请求路径路由断言的配置方式:
spring:cloud:gateway:routes:- id: host_routeuri: https://www.baidu.com/predicates:- Path=/foo/{segment},/bar/{segment}
这个路由匹配以/foo或者/bar开头的路径,转发到https://www.baidu.com/。例如 /foo/1 or /foo/bar or /bar/baz.
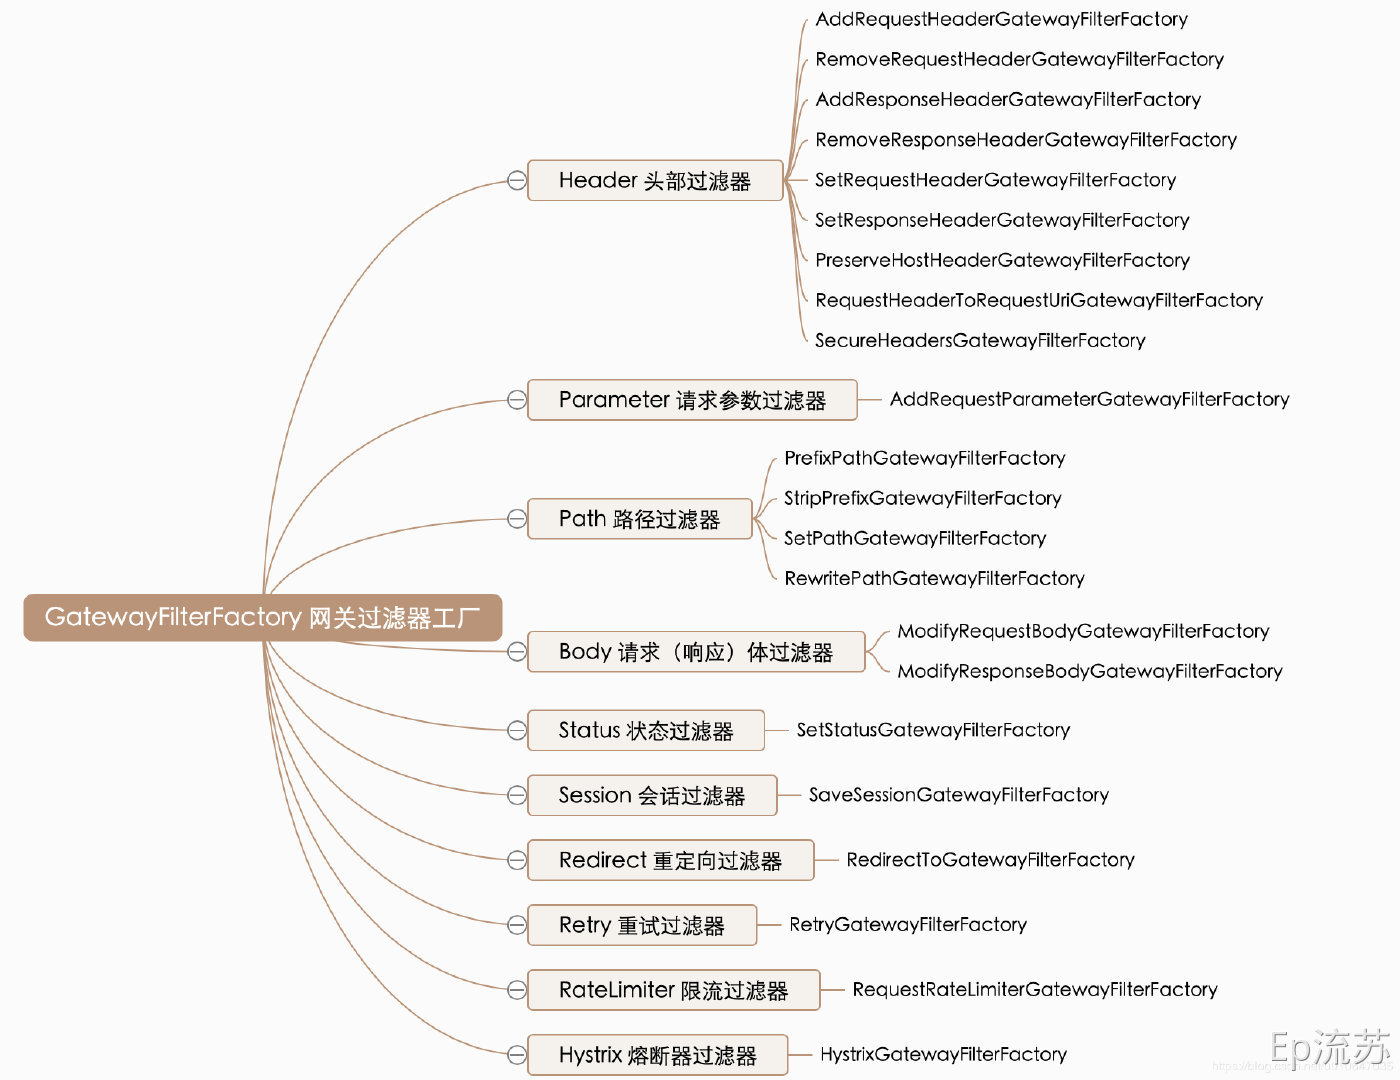
2.3. 过滤器工厂
路由过滤器允许以某种方式修改传入的HTTP请求或传出的HTTP响应。路径过滤器的范围限定为特定路由。Spring Cloud Gateway包含许多内置的GatewayFilter工厂。
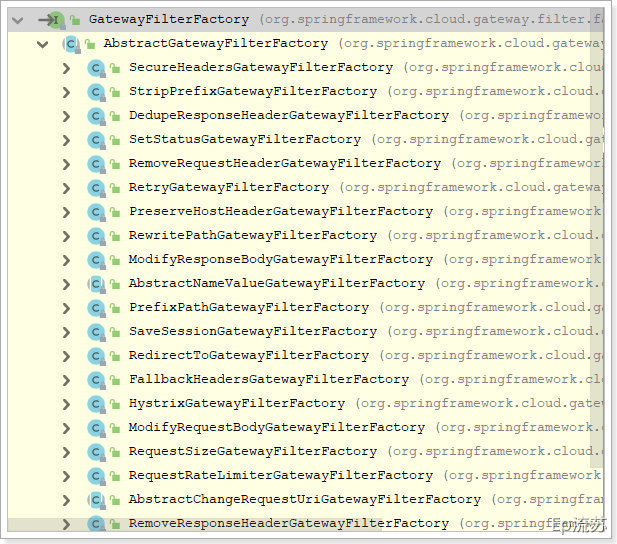
这些过滤器工厂的配置方式,同样参照官方文档:https://cloud.spring.io/spring-cloud-static/spring-cloud-gateway/2.1.0.RELEASE/single/spring-cloud-gateway.html
过滤器 有 20 多个 实现类,根据过滤器工厂的用途来划分,可以分为以下几种:Header、Parameter、Path、Body、Status、Session、Redirect、Retry、RateLimiter和Hystrix
这里重点掌握PrefixPath GatewayFilter Factory
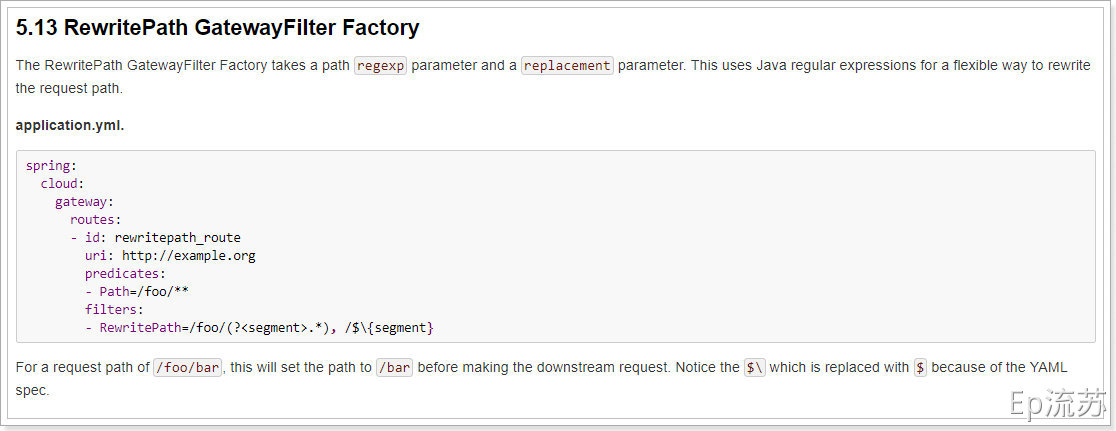
上面的配置中,所有的/foo/**开始的路径都会命中配置的router,并执行过滤器的逻辑,在本案例中配置了RewritePath过滤器工厂,此工厂将/foo/(?.*)重写为{segment},然后转发到http://example.org。比如在网页上请求localhost:8090/foo/forezp,此时会将请求转发到 http://example.org/forezp 的页面
2.4. 路由的java代码配置方式(了解)
参见官方文档:

代码如下:
@Beanpublic RouteLocator customRouteLocator(RouteLocatorBuilder builder, ThrottleGatewayFilterFactory throttle) {return builder.routes().route(r -> r.host("**.abc.org").and().path("/image/png").filters(f ->f.addResponseHeader("X-TestHeader", "foobar")).uri("http://httpbin.org:80")).route(r -> r.path("/image/webp").filters(f ->f.addResponseHeader("X-AnotherHeader", "baz")).uri("http://httpbin.org:80")).route(r -> r.order(-1).host("**.throttle.org").and().path("/get").filters(f -> f.filter(throttle.apply(1,1,10,TimeUnit.SECONDS))).uri("http://httpbin.org:80")).build();}
3. 注册到nacos,负载均衡
- 依赖配置
<dependency><groupId>com.alibaba.cloud</groupId><artifactId>spring-cloud-starter-alibaba-nacos-discovery</artifactId></dependency><dependency><groupId>com.alibaba.cloud</groupId><artifactId>spring-cloud-starter-alibaba-nacos-config</artifactId></dependency><dependency><groupId>org.springframework.cloud</groupId><artifactId>spring-cloud-starter-gateway</artifactId></dependency>
- 配置文件:
spring:cloud:nacos:discovery:server-addr: 127.0.0.1:8848gateway:routes:#Query A 参数有A就行,Query B,C 参数B的值为C即可#实现针对于“http://localhost:88/hello?url=baidu”,转发到“https://www.baidu.com/hello”,#针对于“http://localhost:88/hello?url=qq”的请求,转发到“https://www.qq.com/hello”- id: test_routeuri: https://www.baidu.compredicates:- Query=url,baidu- id: qq_routeuri: https://www.qq.compredicates:- Query=url,qq# id:独有身份 uri:地址 predicates:断言 filters:过滤# lb: LoadBalanced 负载均衡的作用 RewritePath A,B:重写路径将A重写为B- id: product_routeuri: lb://gulimall-productpredicates:- Path=/api/product/**filters:- RewritePath=/api/(?<segment>.*),/$\{segment}- id: third_party_routeuri: lb://gulimall-third-partypredicates:- Path=/api/thirdparty/**filters:- RewritePath=/api/thirdparty/(?<segment>.*),/$\{segment}- id: member_routeuri: lb://gulimall-memberpredicates:- Path=/api/member/**filters:- RewritePath=/api/(?<segment>.*),/$\{segment}- id: ware_routeuri: lb://gulimall-warepredicates:- Path=/api/ware/**filters:- RewritePath=/api/(?<segment>.*),/$\{segment}# 默认有 /api/ 前缀先路由负载均衡到 renren-fast,放到最后优先级最后- id: admin_routeuri: lb://renren-fastpredicates:- Path=/api/**filters:- RewritePath=/api/(?<segment>.*),/renren-fast/$\{segment}## 前端项目,/api 访问验证码## http://localhost:88/api/captcha.jpg =>> http://localhost:8080/renren-fast/captcha.jpg## http://localhost:88/api/product/category/list/tree =>> http://localhost:10000/product/category/list/tree
- 把网关注入到nacos @EnableDiscoveryClient
@EnableDiscoveryClient@SpringBootApplicationpublic class GulimallGatewayApplication {public static void main(String[] args) {SpringApplication.run(GatewayDemoApplication.class, args);}}
四、Sentinel 英[ˈsentɪnl]
哨兵,分布式系统的流量防卫兵
官方文档:https://github.com/alibaba/spring-cloud-alibaba/wiki/Sentinel
1. 了解 Sentinel
随着微服务的流行,服务和服务之间的稳定性变得越来越重要。Sentinel 以流量为切入点,从流量控制、熔断降级、系统负载保护等多个维度保护服务的稳定性。
Sentinel 分为两个部分:
- 核心库(Java 客户端)不依赖任何框架/库,能够运行于所有 Java 运行时环境,同时对 Dubbo / Spring Cloud 等框架也有较好的支持。
- 控制台(Dashboard)基于 Spring Boot 开发,打包后可以直接运行,不需要额外的 Tomcat 等应用容器。
Sentinel 可以简单的分为 Sentinel 核心库和 Dashboard。核心库不依赖 Dashboard,但是结合 Dashboard 可以取得最好的效果
1.1 基本概念:
资源:是 Sentinel 的关键概念。它可以是 Java 应用程序中的任何内容,例如,由应用程序提供的服务,或由应用程序调用的其它应用提供的服务,甚至可以是一段代码。在接下来的文档中,我们都会用资源来描述代码块。
只要通过 Sentinel API 定义的代码,就是资源,能够被 Sentinel 保护起来。大部分情况下,可以使用方法签名,URL,甚至服务名称作为资源名来标示资源。
规则:围绕资源的实时状态设定的规则,可以包括流量控制规则、熔断降级规则以及系统保护规则。所有规则可以动态实时调整。
主要作用:
- 流量控制
- 熔断降级
- 系统负载保护
1.2 主要步骤:
- 定义资源
- 定义规则
- 检验规则是否生效
先把可能需要保护的资源定义好,之后再配置规则。
2. 使用 Sentinel
- 搭建Dashboard控制台
您可以从 release 页面 下载最新版本的控制台 jar 包。copy到一个没有空格或者中文的路径下
https://github.com/alibaba/Sentinel/releases
执行:java -jar sentinel-dashboard-xxx.jar- http://localhost:8080/ 进入登录页面,管理页面用户名和密码:sentinel/sentinel
- sentinel是懒加载的,如果服务没有被访问,看不到该服务信息。
- 引入 sentinel 依赖
<dependency><groupId>com.alibaba.cloud</groupId><artifactId>spring-cloud-starter-alibaba-sentinel</artifactId></dependency>
spring:cloud:sentinel:transport:# 指定dashboard地址dashboard: localhost:8080# 启动该服务,会在应用程序的相应服务器上启动HTTP Server,# 并且该服务器将与Sentinel dashboard进行交互port: 8719
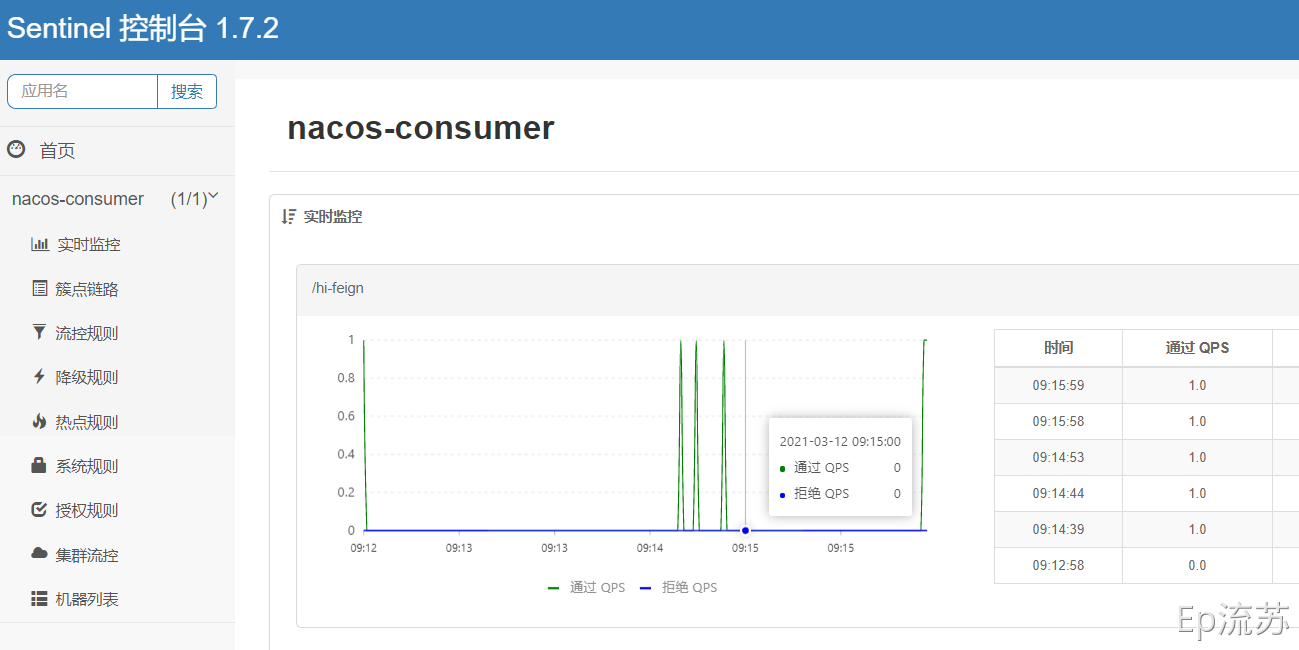
启动项目,访问接口,查看 sentinel 控制台页面:
3. 整合Feign组件
- 引入依赖
<dependency><groupId>com.alibaba.cloud</groupId><artifactId>spring-cloud-starter-alibaba-sentinel</artifactId></dependency><dependency><groupId>org.springframework.cloud</groupId><artifactId>spring-cloud-starter-openfeign</artifactId></dependency>
- 开启sentinel监控功能
# 在上文配置的基础上加上如下配置feign:sentinel:enabled: true
- 代码实现
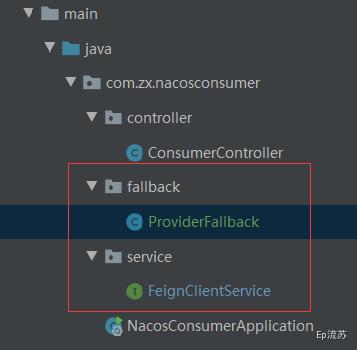
/*** @Description ProviderFallback 熔断类* @Author Zhang Xin* @Date 2020/7/23*/@Componentpublic class ProviderFallback implements FeignClientService {@Overridepublic String hi(String name) {return "现在服务器忙,请稍后再试!";}}
/*** @Description FeignClient* 通过注解表明服务和接口* @Author Zhang Xin* @Date 2020/7/23*/// 在feign接口 FeignClientService 中指定熔断类:@FeignClient(value = "nacos-provider", fallback = ProviderFallback.class)public interface FeignClientService {@GetMapping("/hi")String hi(@RequestParam(value = "name", defaultValue = "ZX", required = false) String name);}
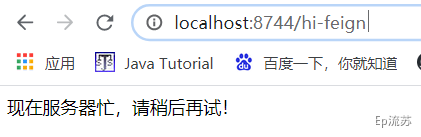
- 测试前,在服务提供方的controller方法中添加异常
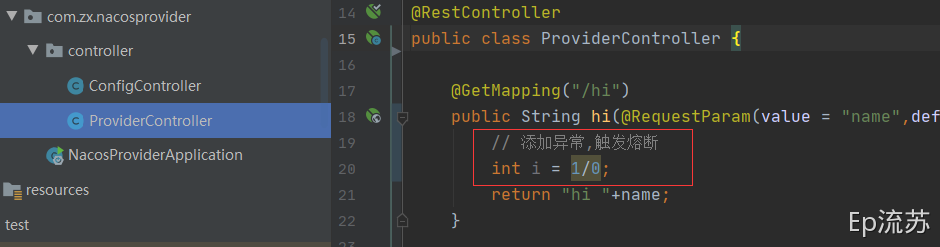
重启nacos-provider和nacos-consumer服务并测试:
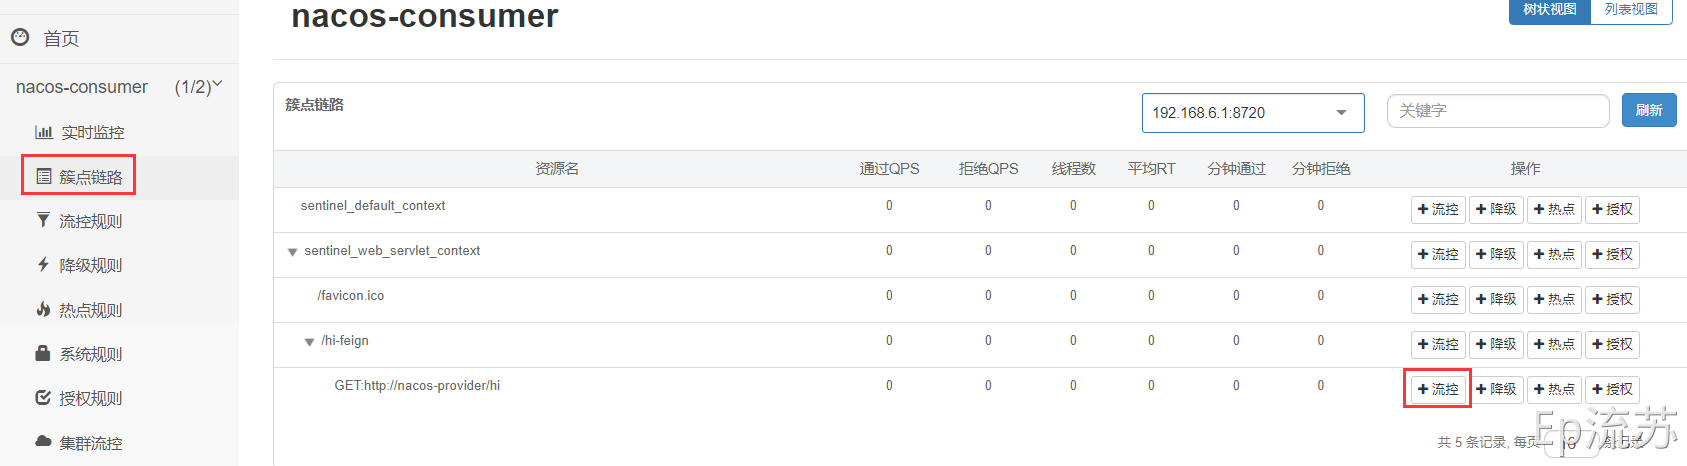
4. 流量控制
4.1 基本概念
流量控制在网络传输中是一个常用的概念,它用于调整网络包的发送数据。然而,从系统稳定性角度考虑,在处理请求的速度上,也有非常多的讲究。任意时间到来的请求往往是随机不可控的,而系统的处理能力是有限的。我们需要根据系统的处理能力对流量进行控制。Sentinel 作为一个调配器,可以根据需要把随机的请求调整成合适的形状,如下图所示:
流量控制有以下几个角度:
- 资源的调用关系,例如资源的调用链路,资源和资源之间的关系;
- 运行指标,例如 QPS、线程数等;
- 控制的效果,例如直接限流(快速失败)、冷启动(Warm Up)、匀速排队(排队等待)等。
Sentinel 的设计理念是让您自由选择控制的角度,并进行灵活组合,从而达到想要的效果。
4.2 QPS流量控制
当 QPS 超过某个阈值的时候,则采取措施进行流量控制。流量控制的效果包括以下几种:直接拒绝、Warm Up、匀速排队。
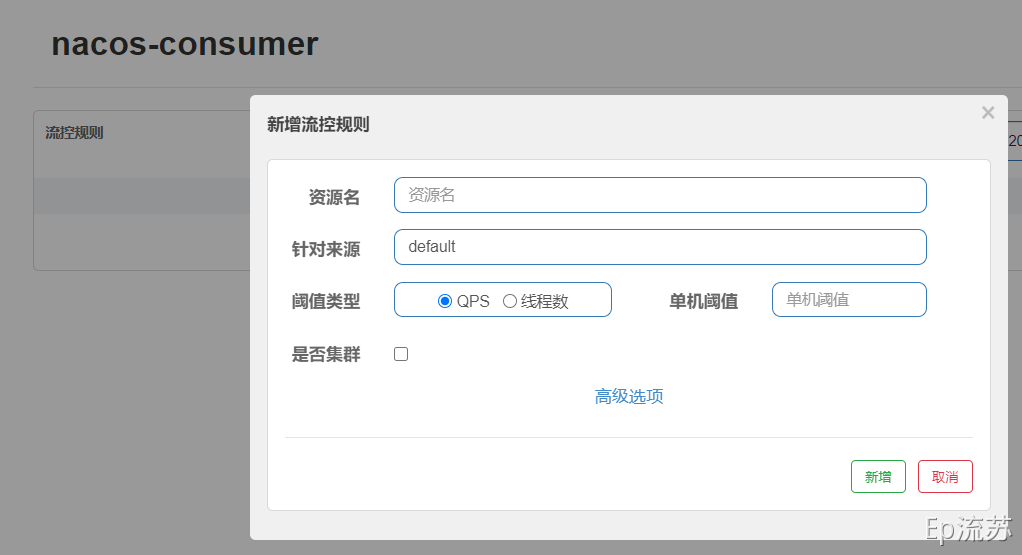
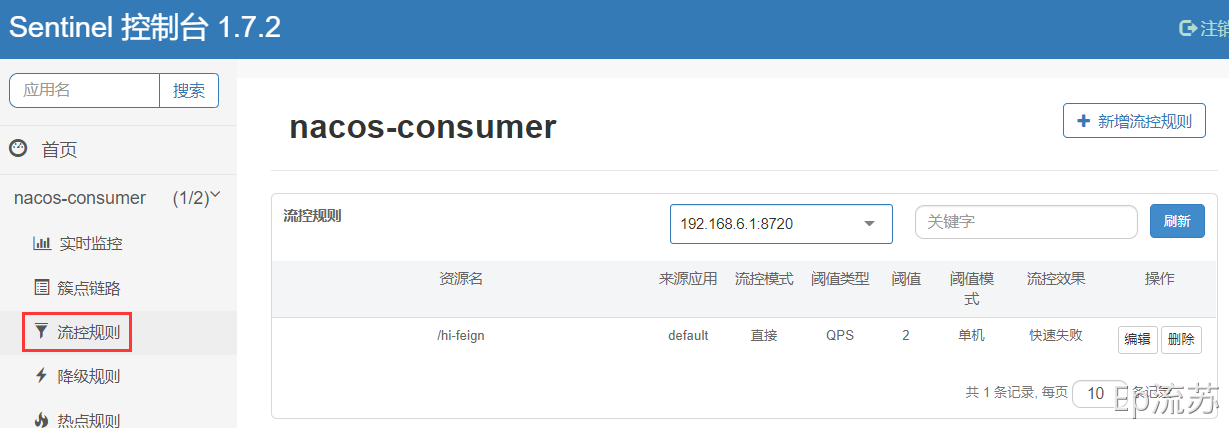
4.2.1 直接拒绝
直接拒绝(RuleConstant.CONTROL_BEHAVIOR_DEFAULT)方式是默认的流量控制方式,当QPS超过任意规则的阈值后,新的请求就会被立即拒绝,拒绝方式为抛出FlowException。
这种方式适用于对系统处理能力确切已知的情况下,比如通过压测确定了系统的准确水位时。
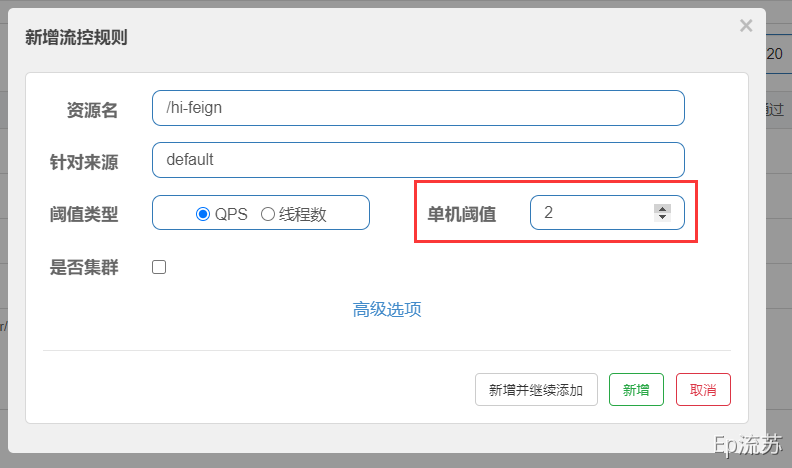
- 阈值类型选择:QPS
- 单机阈值:2
综合起来的配置效果就是,该接口的限流策略是每秒最多允许2个请求进入。
新增之后:
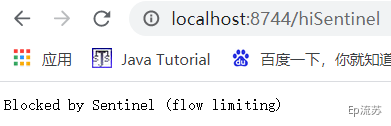
疯狂访问 http://localhost:8744/hi-feign 出现如下信息
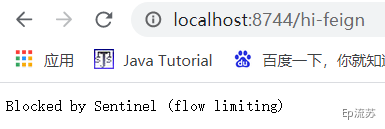
4.2.2 Warm Up(预热)
Warm Up(`RuleConstant.CONTROL_BEHAVIOR_WARM_UP`)方式,即预热/冷启动方式。当系统长期处于低水位的情况下,当流量突然增加时,直接把系统拉升到高水位可能瞬间把系统压垮。通过"冷启动",让通过的流量缓慢增加,在一定时间内逐渐增加到阈值上限,给冷系统一个预热的时间,避免冷系统被压垮。
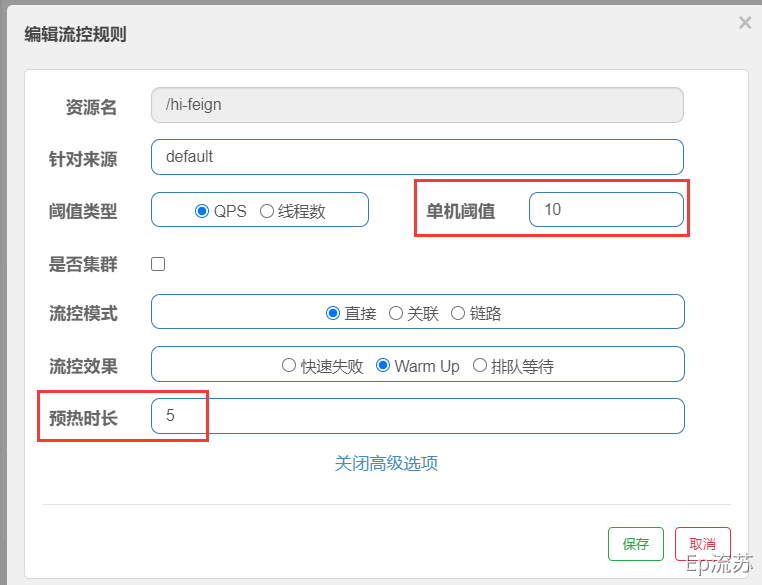
疯狂访问 http://localhost:8744/hi-feign
可以发现前几秒会发生熔断,之后就不会
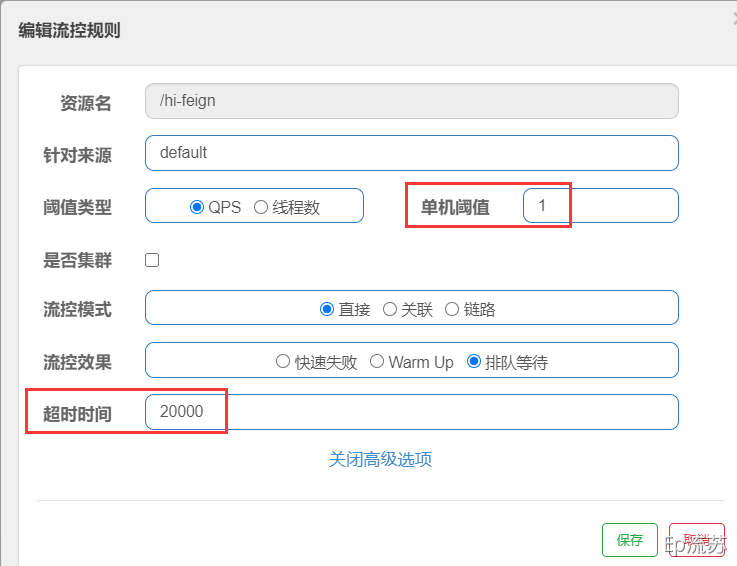
4.2.3 匀速排队
匀速排队(`RuleConstant.CONTROL_BEHAVIOR_RATE_LIMITER`)方式会严格控制请求通过的间隔时间,也即是让请求以均匀的速度通过,对应的是漏桶算法。
测试配置如下:1s处理一个请求,排队等待,等待时间20s。
利用 postman 测试:
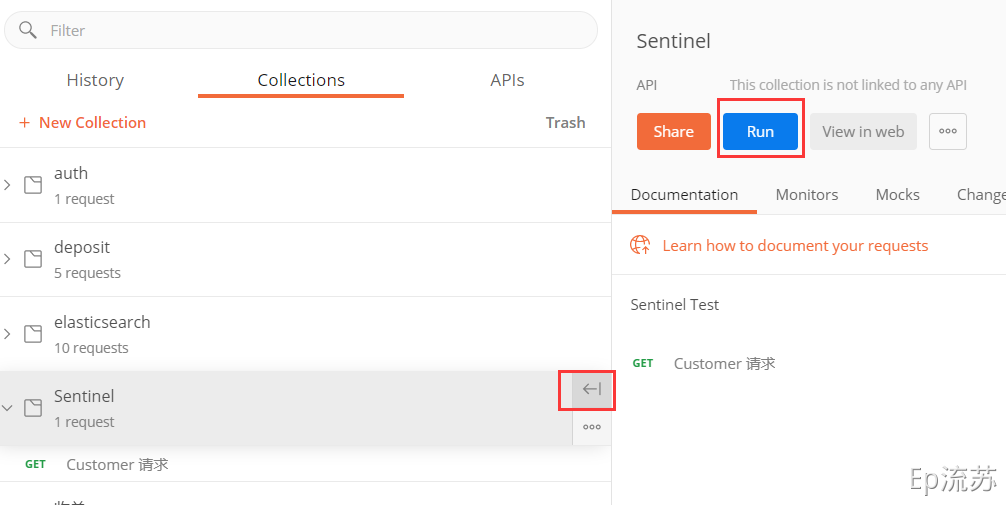
配置每隔100ms发送一次请求,一共发送20个请求:
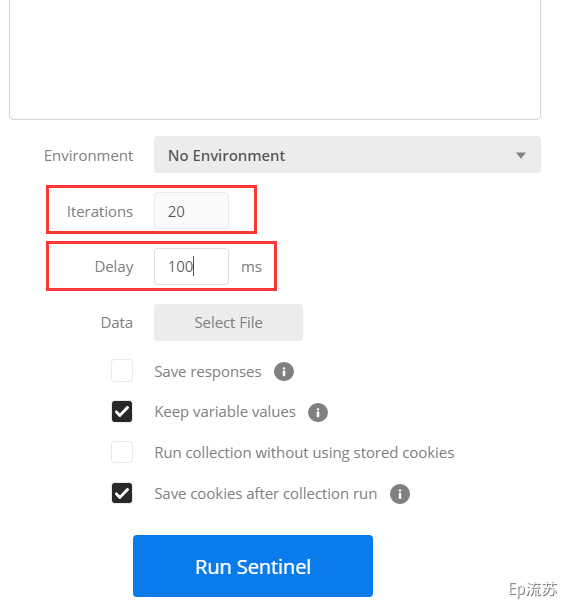
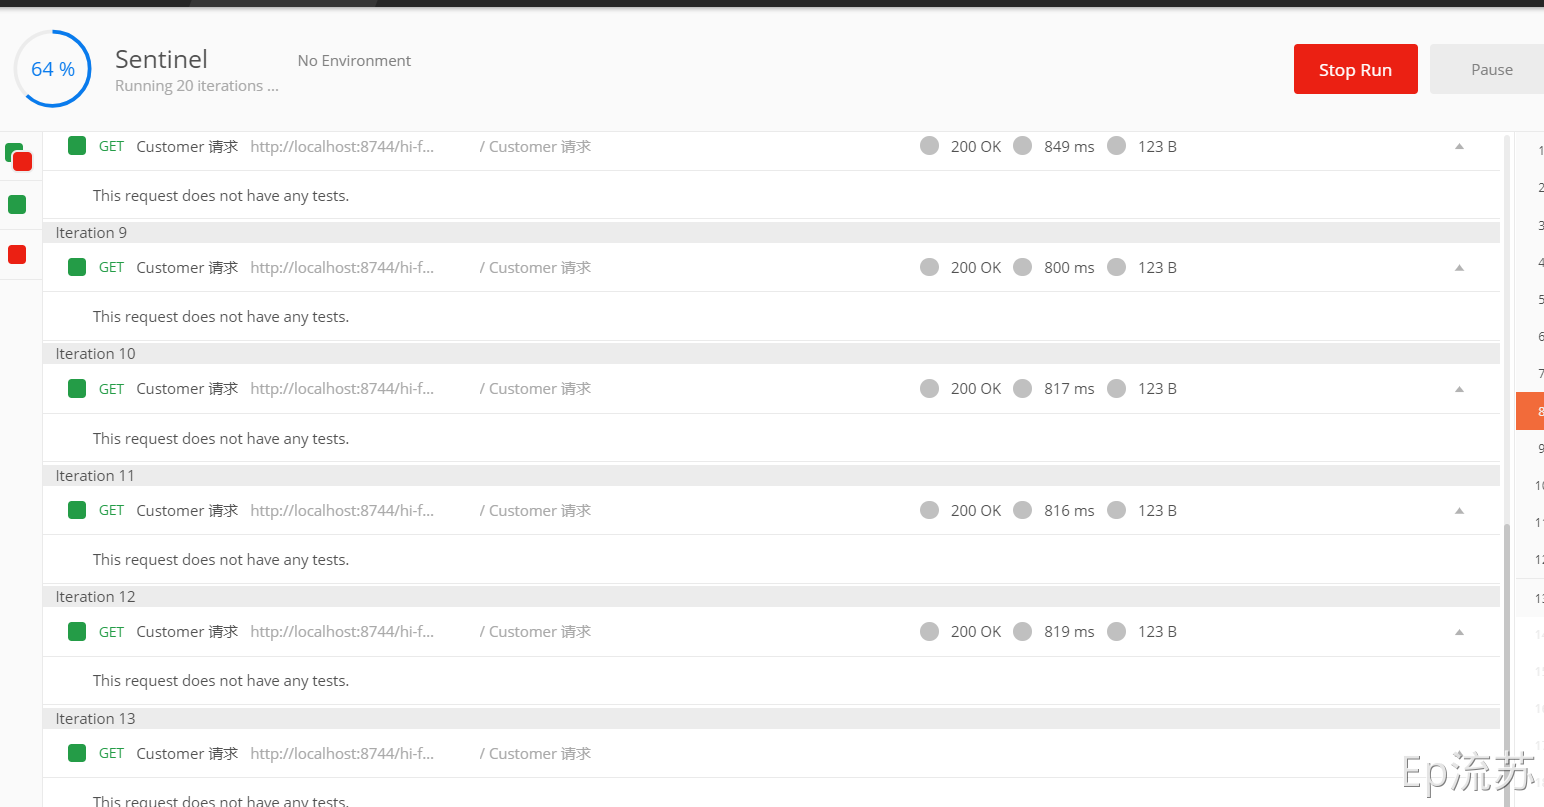
基本是每隔一秒运行一次
4.3 关联限流
关联限流:当关联的资源请求达到阈值时,就限流自己。
如下配置:/hi2的关联资源/hi,当 /hi 一秒并发数超过2时,/hi2就限流

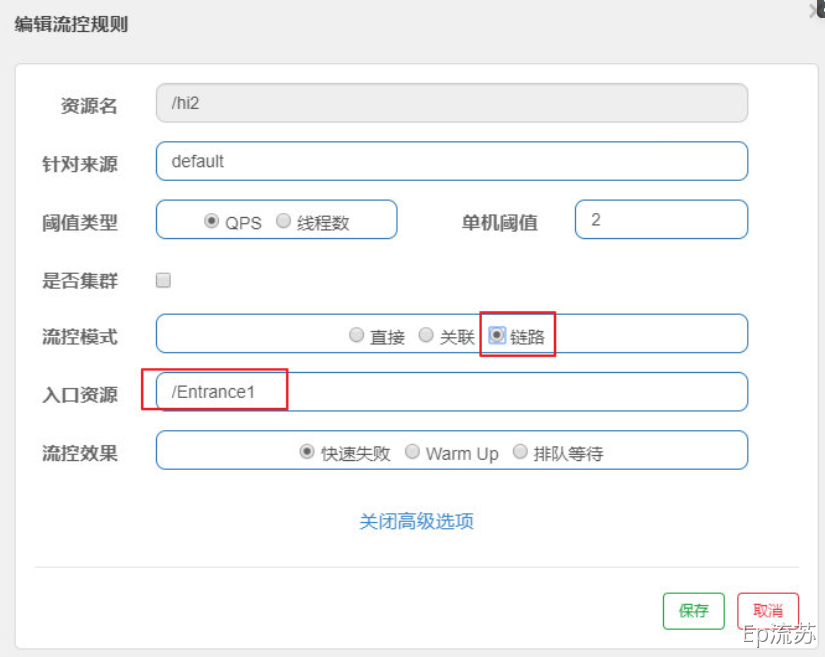
4.4 链路限流
一棵典型的调用树如下图所示:
machine-root/ \/ \Entrance1 Entrance2/ \/ \DefaultNode(nodeA) DefaultNode(nodeA)
上图中来自入口 Entrance1 和 Entrance2 的请求都调用到了资源 NodeA,Sentinel 允许只根据某个入口的统计信息对资源限流。
配置如下:表示只针对Entrance1进来的请求做限流限制
4.5. 线程数限流
并发线程数限流用于保护业务线程数不被耗尽。例如,当应用所依赖的下游应用由于某种原因导致服务不稳定、响应延迟增加,对于调用者来说,意味着吞吐量下降和更多的线程数占用,极端情况下甚至导致线程池耗尽。为应对太多线程占用的情况,业内有使用隔离的方案,比如通过不同业务逻辑使用不同线程池来隔离业务自身之间的资源争抢(线程池隔离)。这种隔离方案虽然隔离性比较好,但是代价就是线程数目太多,线程上下文切换的 overhead 比较大,特别是对低延时的调用有比较大的影响。Sentinel 并发线程数限流不负责创建和管理线程池,而是简单统计当前请求上下文的线程数目,如果超出阈值,新的请求会被立即拒绝,效果类似于信号量隔离。
配置如下:如果请求的并发数超过一个就限流
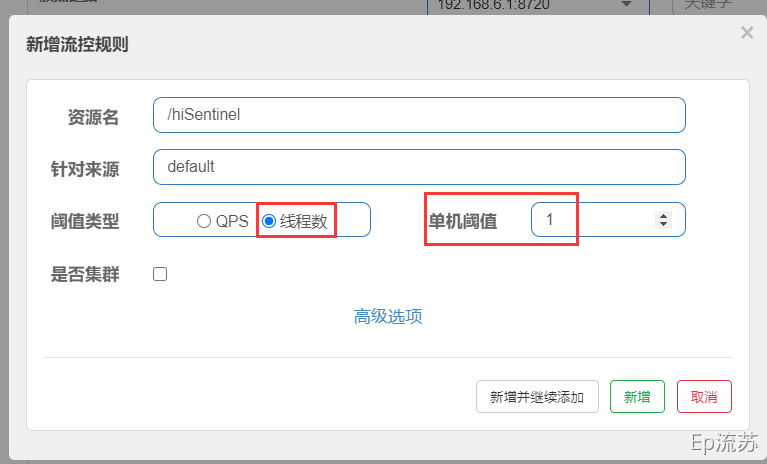
controller中的方法:
@AutowiredFeignClientService feignClientService;@GetMapping("/hiSentinel")public String hiSentinel(){try {Thread.sleep(1000);} catch (InterruptedException e) {e.printStackTrace();}return feignClientService.hi("Sentinel");}
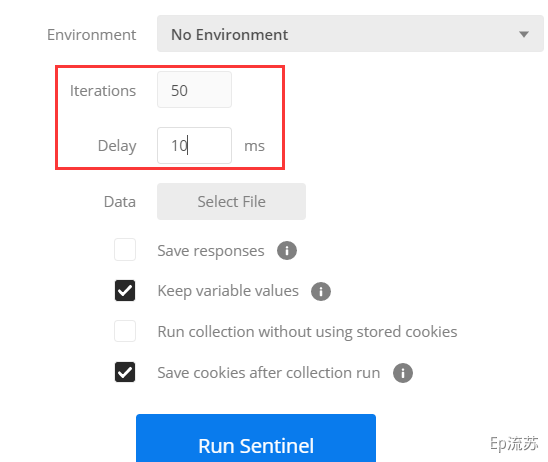
配置每隔10ms发送一次请求,一共发送50个请求:
如果同时在浏览器访问:

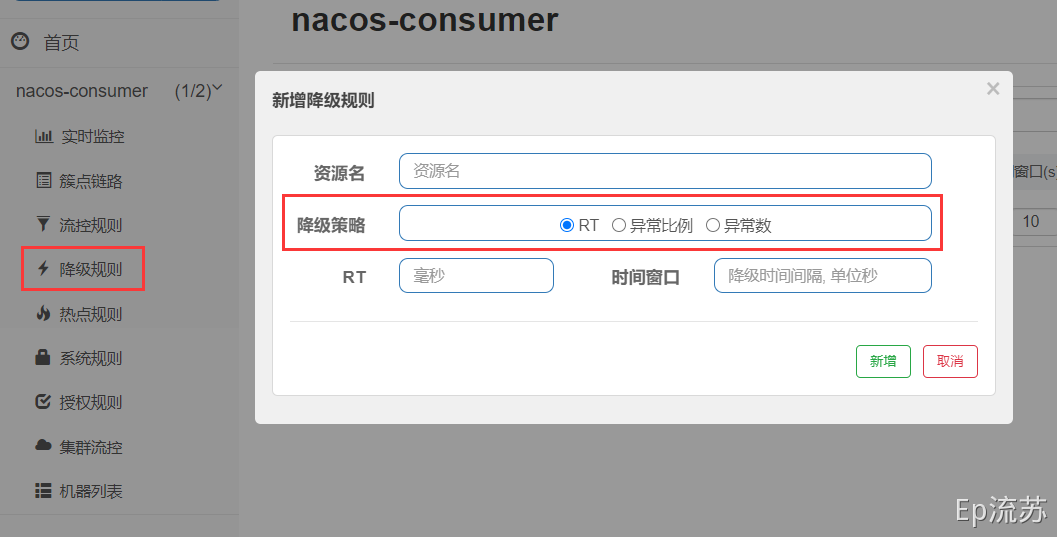
5. 熔断降级
Sentinel除了流量控制以外,对调用链路中不稳定的资源进行熔断降级也是保障高可用的重要措施之一。
5.1 基本概念
Sentinel 熔断降级会在调用链路中某个资源出现不稳定状态时(例如调用超时或异常比例升高),对这个资源的调用进行限制,让请求快速失败,避免影响到其它的资源而导致级联错误。当资源被降级后,在接下来的降级时间窗口之内,对该资源的调用都自动熔断(默认行为是抛出 DegradeException)。
Sentinel 和 Hystrix 的原则是一致的: 当调用链路中某个资源出现不稳定,例如,表现为 timeout,异常比例升高的时候,则对这个资源的调用进行限制,并让请求快速失败,避免影响到其它的资源,最终产生雪崩的效果。
限流降级指标有三个:
- 平均响应时间(RT)
- 异常比例
- 异常数
5.1.1 平均响应时间(RT)
平均响应时间 (DEGRADE_GRADE_RT):当资源的平均响应时间超过阈值(DegradeRule 中的 count,以 ms 为单位,默认上限是4900ms)之后,资源进入准降级状态。如果1s之内持续进入 5 个请求,它们的 RT 都持续超过这个阈值,那么在接下来的时间窗口(DegradeRule 中的 timeWindow,以 s 为单位)之内,对这个方法的调用都会自动地返回(抛出 DegradeException)。在下一个时间窗口到来时, 会接着再放入5个请求, 再重复上面的判断。
配置如下:超时时间100ms,熔断时间10s
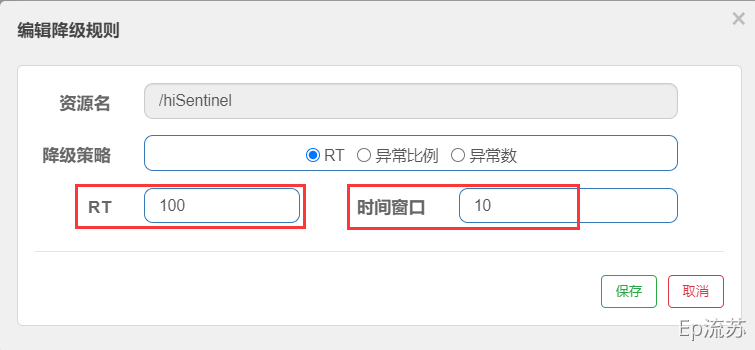
代码依然睡了一秒,必超时
@AutowiredFeignClientService feignClientService;@GetMapping("/hiSentinel")public String hiSentinel(){try {Thread.sleep(1000);} catch (InterruptedException e) {e.printStackTrace();}return feignClientService.hi("Sentinel");}
结果,10s之内都是熔断界面
5.1.2. 异常比例
异常比例 (DEGRADE_GRADE_EXCEPTION_RATIO):当资源的每秒请求量 >= 5,且每秒异常总数占通过量的比值超过阈值(DegradeRule 中的 count)之后,资源进入降级状态,即在接下的时间窗口(DegradeRule中的 timeWindow,以 s 为单位)之内,对这个方法的调用都会自动地返回。异常比率的阈值范围是 [0.0, 1.0],代表 0% - 100%。
5.1.3. 异常数
异常数 (DEGRADE_GRADE_EXCEPTION_COUNT):当资源近 1 分钟的异常数目超过阈值之后会进行熔断。
6. 规则持久化步骤
默认情况下规则是保存在内存中的,服务重启后,规则就丢失了
持久化配置分以下3步:
- 引入依赖
<dependency><groupId>com.alibaba.csp</groupId><artifactId>sentinel-datasource-nacos</artifactId></dependency>
- 添加配置:
# 这里datasource后的consumer是数据源名称,可以随便写,推荐使用服务名spring.cloud.sentinel.datasource.consumer.nacos.server-addr=localhost:8848spring.cloud.sentinel.datasource.consumer.nacos.dataId=${spring.application.name}-sentinel-rulesspring.cloud.sentinel.datasource.consumer.nacos.groupId=SENTINEL_GROUPspring.cloud.sentinel.datasource.consumer.nacos.data-type=json# 规则类型,取值见:org.springframework.cloud.alibaba.sentinel.datasource.RuleTypespring.cloud.sentinel.datasource.consumer.nacos.rule_type=flow# yml写法spring:application:name: nacos-consumercloud:sentinel:datasource:# 这里 datasource 后的 consumer 是数据源名称,可以随便写,推荐使用服务名consumer:nacos:server-addr: localhost:8848dataId: ${spring.application.name}-sentinel-rulesgroupId: SENTINEL_GROUPdata-type: json# 不指明默认publicnamespace: 758b7afb-9aa8-4111-95d8-96a48e85abcd# 规则类型,取值见:# org.springframework.cloud.alibaba.sentinel.datasource.RuleTyperule_type: flow
Nacos对应配置
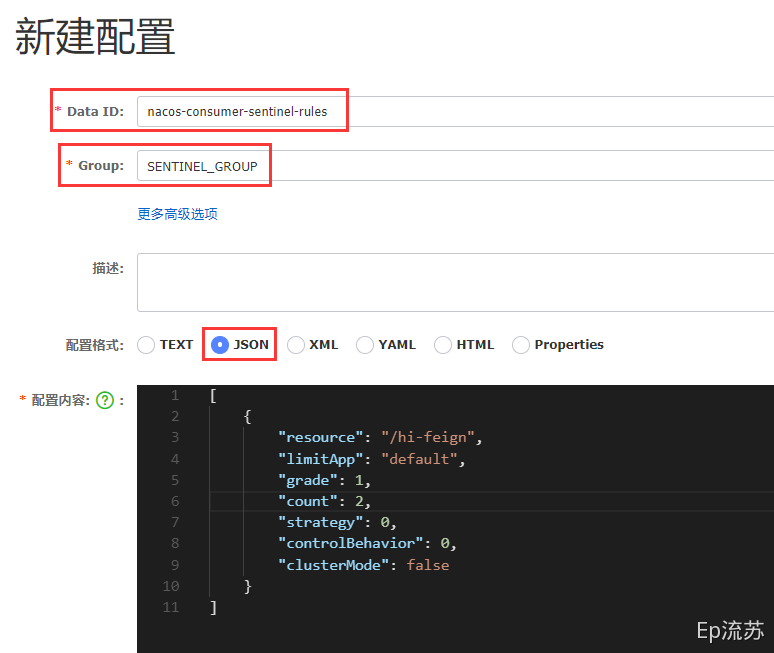
[{"resource": "/hi-feign","limitApp": "default","grade": 1,"count": 2,"strategy": 0,"controlBehavior": 0,"clusterMode": false}]
- resource:资源名称
- limitApp:限流应用,就是用默认就可以
- grade:阈值类型,0表示线程数,1表示qps
- count:单机阈值
- strategy:流控模式,0-直接,1-关联, 2-链路
- controlBehavior:流控效果。0-快速失败,1-warm up 2-排队等待
- clusterMode:是否集群
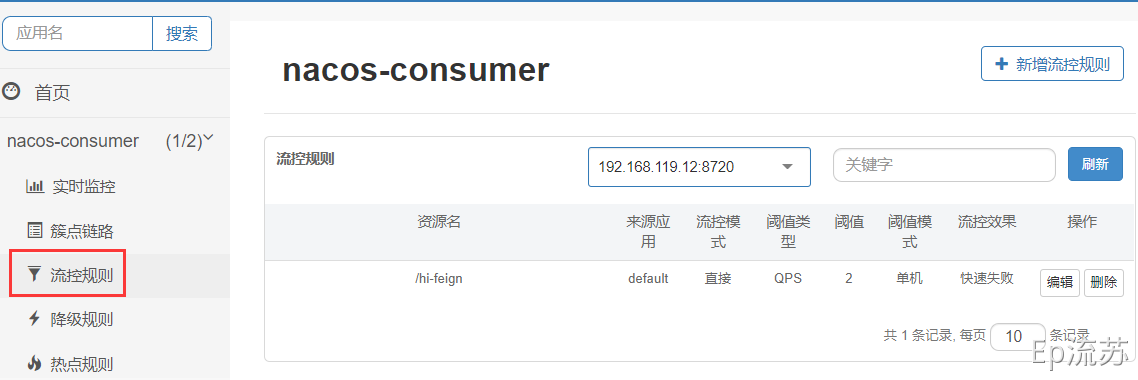
重启consumser,并多次访问:http://localhost:8744/hi-feign
查看sentinel客户端:就有了限流配置了
7. 综上完整配置
依赖:
<!--feign依赖--><dependency><groupId>org.springframework.cloud</groupId><artifactId>spring-cloud-starter-openfeign</artifactId></dependency><!--Sentinel依赖--><dependency><groupId>com.alibaba.cloud</groupId><artifactId>spring-cloud-starter-alibaba-sentinel</artifactId></dependency><!--Sentinel规则持久化需求依赖--><dependency><groupId>com.alibaba.csp</groupId><artifactId>sentinel-datasource-nacos</artifactId></dependency>
配置文件:
spring:application:name: nacos-consumercloud:nacos:discovery:server-addr: 127.0.0.1:8848sentinel:transport:# 指定dashboard地址dashboard: localhost:8080# 启动该服务,会在应用程序的相应服务器上启动HTTP Server,# 并且该服务器将与Sentinel dashboard进行交互port: 8719# 规则持久化datasource:# 这里 datasource 后的 consumer 是数据源名称,可以随便写,推荐使用服务名consumer:nacos:server-addr: localhost:8848dataId: ${spring.application.name}-sentinel-rulesgroupId: SENTINEL_GROUPdata-type: json# 不指明默认publicnamespace: 758b7afb-9aa8-4111-95d8-96a48e85abcd# 规则类型,取值见:# org.springframework.cloud.alibaba.sentinel.datasource.RuleTyperule_type: flow# 整合Feign组件,开启sentinel监控功能feign:sentinel:enabled: true
五、Sleuth 英[sluːθ]、Zipkin 英[‘zɪp kɪn]
侦探
1. 基本概念
Spring Cloud Sleuth为springCloud实现了一个分布式链路追踪解决方案,大量借鉴了Dapper,Zipkin和HTrace等链路追踪技术。对于大多数用户而言,Sleuth应该是不可见的,并且您与外部系统的所有交互都应自动进行检测。您可以简单地在日志中捕获数据,也可以将其发送到远程收集器服务。
随着分布式系统越来越复杂,你的一个请求发过发过去,各个微服务之间的跳转,有可能某个请求某一天压力太大了,一个请求过去没响应,一个请求下去依赖了三四个服务,但是你去不知道哪一个服务出来问题,这时候我是不是需要对微服务进行追踪呀?监控一个请求的发起,从服务之间传递之间的过程,我最好记录一下,记录每一个的耗时多久,一旦出了问题,我们就可以针对性的进行优化,是要增加节点,减轻压力,还是服务继续拆分,让逻辑更加简单点呢?这时候**springcloud-sleuth集成zipkin**能帮我们解决这些服务追踪问题。
Linux:
1.获取镜像
docker pull openzipkin/zipkin
2.启动
docker run --name zipkin -d -p 9411:9411 openzipkin/zipkin
Windows
通过jar包:java -jar zipkin-server-*exec.jar
jar包下载地址:https://search.maven.org/remote_content?g=io.zipkin&a=zipkin-server&v=LATEST&c=exec
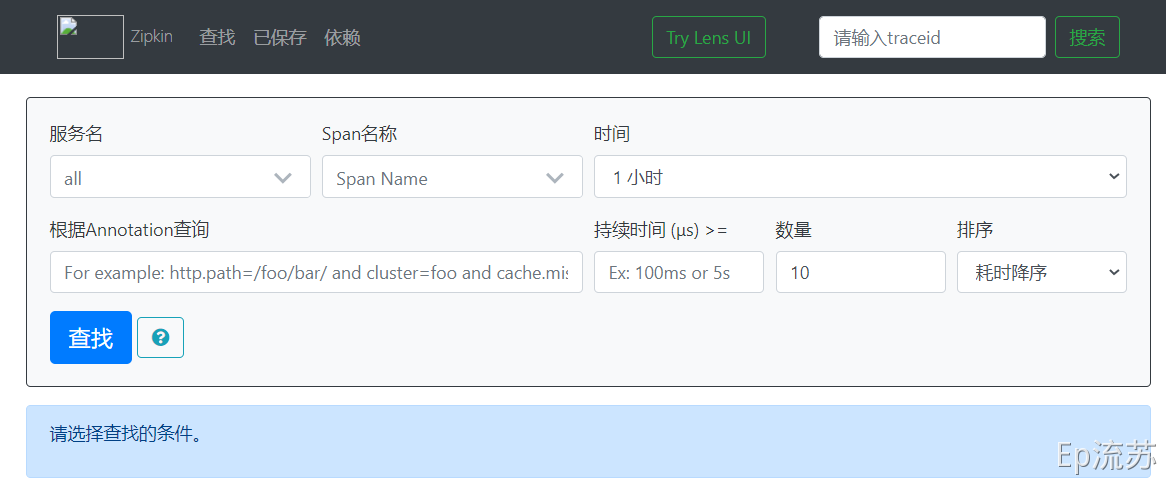
在浏览器端访问:http://localhost:9411
1. zipkin、sleuth使用
- 引入sleuth的依赖
<dependency><groupId>org.springframework.cloud</groupId><artifactId>spring-cloud-starter-zipkin</artifactId></dependency>
zipkin的启动器包含了sleuth的依赖。
- 配置zipkin的相关信息
# zipkin服务器的地址spring.zipkin.base-url=http://localhost:9411# 关闭服务发现,否则springCloud会把zipkin的url当作服务名称spring.zipkin.discovery-client-enabled=false# 数据发送的方式:ACTIVEMQ RABBIT KAFKA WEBspring.zipkin.sender.type=web# 设置抽样采集率,默认0.1(即10%),这里设置为100%spring.sleuth.sampler.probability=1
yml格式:
spring:zipkin:# zipkin服务器的地址base-url: http://localhost:9411# 关闭服务发现,否则springCloud会把zipkin的url当作服务名称discovery-client-enabled: false# 数据发送的方式:ACTIVEMQ RABBIT KAFKA WEBsender:type: web# 设置抽样采集率,默认0.1(即10%),这里设置为100%sleuth:sampler:probability: 1
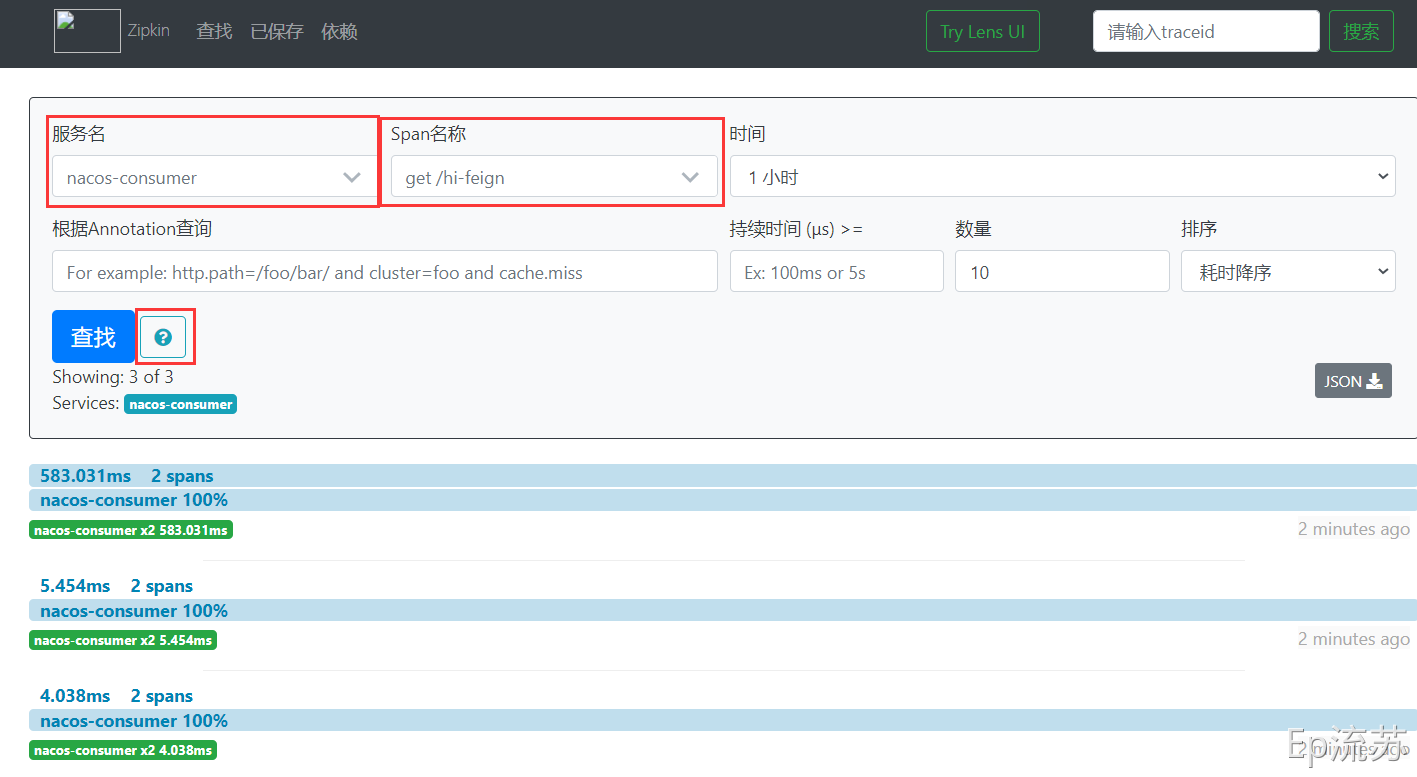
- 结果:
3. zipkin基本概念
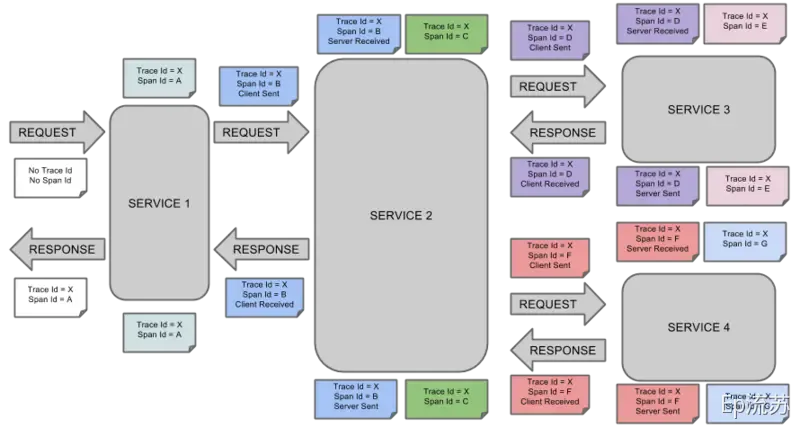
Span:基本工作单元。发送一个远程请求就会产生一个span,span通过一个64位ID唯一标识,trace以另一个64位ID表示,span还有其他数据信息,比如摘要、时间戳事件、关键值注释(tags)、span的ID、以及进度ID(通常是IP地址)。span在不断的启动和停止,同时记录了时间信息,当你创建了一个span,你必须在未来的某个时刻停止它。
Trace:一系列spans组成的一个树状结构。例如:发送一个请求,需要调用多个微服务,每调用一个微服务都会产生一个span,这些span组成一个trace
Annotation:用来及时记录一个事件的存在,一些核心annotations用来定义一个请求的开始和结束
- cs - Client Sent -客户端发起一个请求,这个annotion描述了这个span的开始
- sr - Server Received -服务端获得请求并准备开始处理它,如果将其sr减去cs时间戳便可得到网络延迟
- ss - Server Sent -注解表明请求处理的完成(当请求返回客户端),如果ss减去sr时间戳便可得到服务端需要的处理请求时间
- cr - Client Received -表明span的结束,客户端成功接收到服务端的回复,如果cr减去cs时间戳便可得到客户端从服务端获取回复的所有所需时间
例如一个请求如下:

使用zipkin跟踪整个请求过程如下:
上图表示一请求链路,一条链路通过Trace Id唯一标识,Span标识发起的请求信息,各span通过parent id 关联起来,如图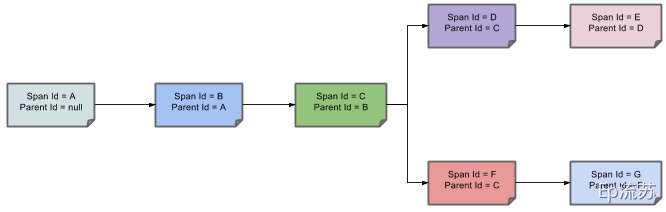
六、Eureka 英[juˈriːkə]
1. Eureka使用
1.1 创建服务注册中心(eureka server)
加入依赖
<dependency><groupId>org.springframework.cloud</groupId><artifactId>spring-cloud-starter-netflix-eureka-server</artifactId></dependency>
加上注解 ```java /**
- @Description 服务注册与发现的组件
- eureka是一个高可用的组件,它没有后端缓存,
- 每一个实例注册之后需要向注册中心发送心跳(因此可以在内存中完成),
- 在默认情况下erureka server也是一个eureka client ,必须要指定一个 server。
- @Author Zhang Xin
@Date 2020/7/22 */ @SpringBootApplication @EnableEurekaServer public class EurekaServerApplication {
public static void main(String[] args) { SpringApplication.run(EurekaServerApplication.class, args); }
}
3. 配置文件```propertiesserver:port: 8001eureka:instance:hostname: localhost#通过eureka.client.registerWithEureka:false#和fetchRegistry:false来表明自己是一个eureka server.client:registerWithEureka: falsefetchRegistry: falseserviceUrl:defaultZone: http://${eureka.instance.hostname}:${server.port}/eureka/spring:application:name: eurka-server
- 启动 http://localhost:8001/ 结果:
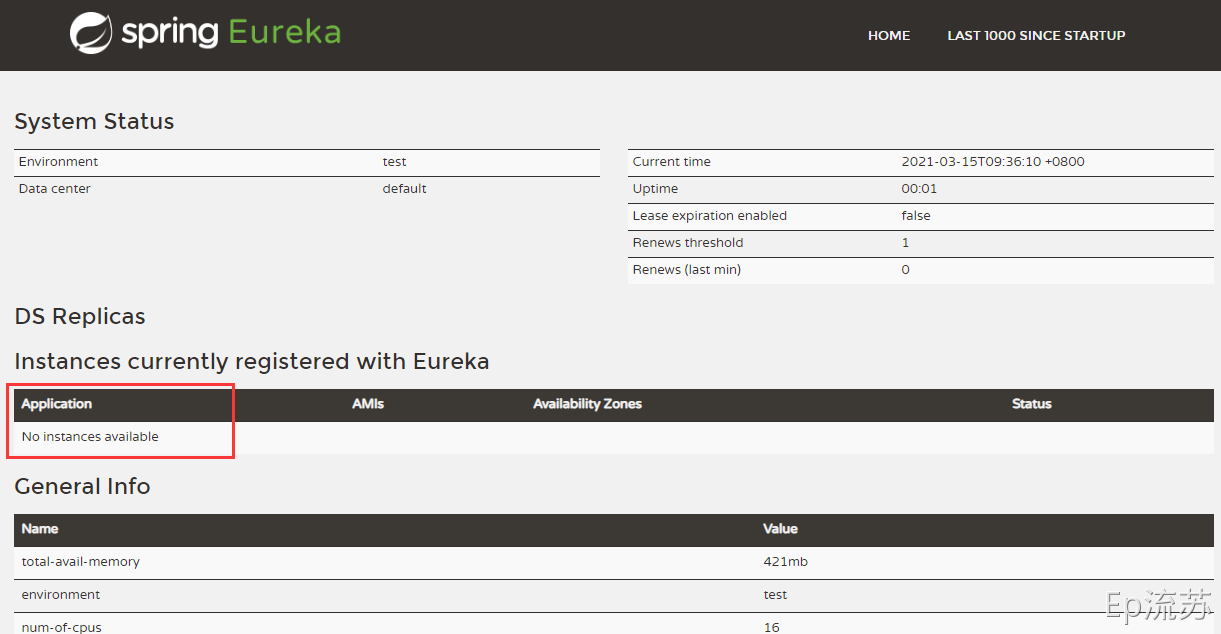
没有服务被发现,因为没注册服务
1.2 创建一个服务提供者 (eureka client)
当client向server注册时,它会提供一些元数据,例如主机和端口,URL,主页等。Eureka server 从每个client实例接收心跳消息。 如果心跳超时,则通常将该实例从注册server中删除。
- 导入依赖
<dependency><groupId>org.springframework.cloud</groupId><artifactId>spring-cloud-starter-netflix-eureka-client</artifactId></dependency><dependency><groupId>org.springframework.boot</groupId><artifactId>spring-boot-starter-web</artifactId></dependency>
- 通过注解@EnableEurekaClient 表明自己是一个eurekaclient.
@SpringBootApplication@EnableEurekaClientpublic class EurekaClientServiceApplication {public static void main(String[] args) {SpringApplication.run(EurekaClientServiceApplication.class, args);}}
配置文件
详细配置见 https://www.cnblogs.com/april-chen/p/10617066.html ```properties server: port: 8003
服务与服务之间相互调用一般都是根据这个name
spring: application: name: eureka-client-service
eureka: client: serviceUrl: defaultZone: http://localhost:8001/eureka/ ```
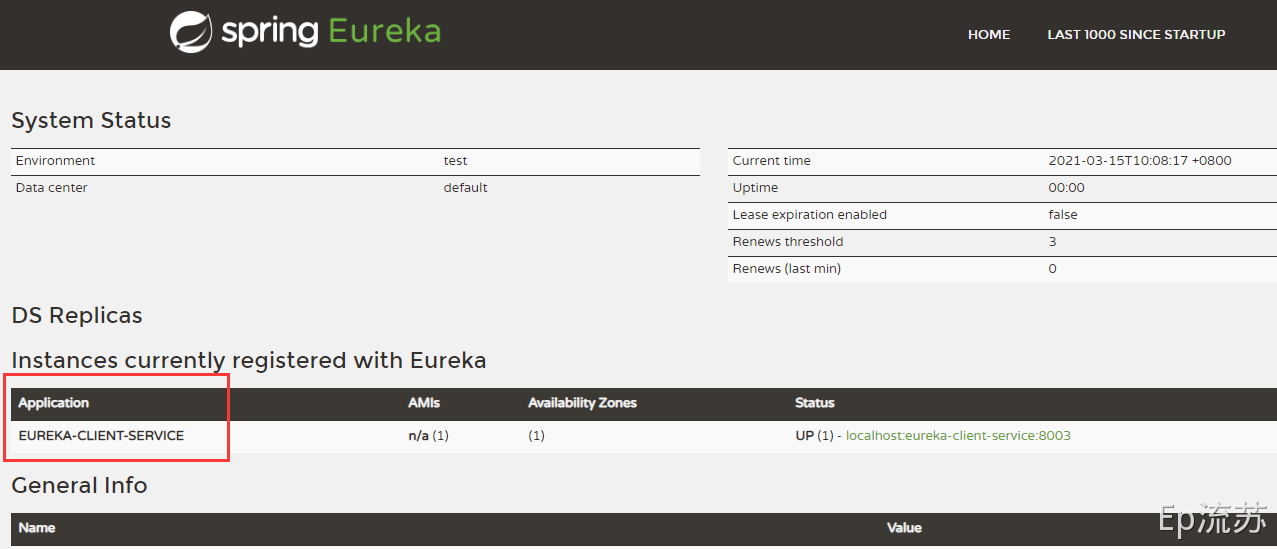
结果:

若有收获,就点个赞吧
0 人点赞
