setup()函数是组合式 API 的入口函数,所有的组合式 API 都需要放到setup()函数内部执行。
export default{setup(props, context){// do...}}
setup()函数是在beforCreate()和created()之前执行的,所以setup()内部不能调用beforCreate()和created()这两个生命周期函数,而是使用setup()来代替。
Vue3 没有完全去除选项 API,而是做了向下兼容,新增了组合式 API,开发者完全可以自由的选择任意一种或者混合性的编写开发项目。
export default{setup(props, { attrs, slots, emit, expose }) {console.log(props);return {msg: "Hello setup!"}}}
setup()函数的第一个参数是props,其实就是对选项 API 中props的引用。setup()函数的第二个参数是context,表示上下文的意思,该对象内部有attrs、slots、emit和expose这 4 个对象。
在**setup()**函数中返回的对象会暴露给模板和组件实例。其他的选项也可以通过组件实例来获取**setup()**暴露的属性。
在setup()函数内部,是无法像选项 API 那样获取this对象的,当访问this的时候会得到undefinde,你可以在选项式 API 中访问setup()暴露的值,但反过来则不行。
:::info
为什么无法访问this对象呢?
1、因为setup()函数是在组件创建之前执行的,执行的时候还没有组件实例,所以也就没有this,所以 Vue3 会把一些对象封装作为setup()函数的参数。
2、使用组合式 API 编程的时候,一些函数都是通过 ESModule 导入的而不是挂载到实例上的,所以也就没有this的必要了。
:::
props
<template><VSetuptitle="This is title."author="Xiechen":content="content" /></template><script>import VSetup from "./components/VSetup.vue";export default {components:{VSetup},data() {return {content: "This is content."};}}</script>
<template><div class=""><h1>{{ title }}</h1><p>{{ author }}</p><p>{{ content }}</p></div></template><script>export default{pprops: {title: String,author: String,content: String},setup(props, context){console.log(props);}}</script>

你可以完全的把选项 API 和组合 API 混合使用。
props是一个响应式的对象,你不能把该对象的属性进行解构使用,这会丢失数据的响应式。
<script>export default{mounted() {setTimeout(() => {this.content = "This is my content.";}, 1000);}}</script>
<template><div class=""><h1>{{ title }}</h1><p>{{ author }}</p><p>{{ content }}</p><p>{{ myContent }}</p></div></template><script>// 把 computed 导入进来import { computed } from "vue"export default{pprops: {title: String,author: String,content: String},setup(props, context){const { title, author, content } = props;const myContent = computed(() => "Content:" + content);// setup() 中的数据必须 return 出去,模版才能进行使用return {myContent}}}</script>

可以看到,模版中的content发生了变化,而解构后的myContent却没有变。
如果你非要进行解构props对象中的属性,可以使用toRefs方法进行解构:
<script>import { computed, toRefs } from "vue"export default{pprops: {title: String,author: String,content: String},setup(props, context){const { title, author, content } = toRefs(props);console.log(title, author, content);// 因为 content 被包装为 ref 对象,所以需要使用 .value 来获取值const myContent = computed(() => "Content:" + content.value);return {myContent};}}</script>
这样得到的属性就全部都是响应式的了。
同样的,如果你只想把一个属性进行解构出来可以使用toRef()方法来这么操作:
<script>import { computed, toRefs, toRef } from "vue"export default{pprops: {title: String,author: String,content: String},setup(props, context){const content = toRef(props, "content");const myContent = computed(() => "Content:" + content.value);return {myContent};}}</script>
context
context对象里面包含了attrs、emit、slots、expose这 4 个对象。
其中,attrs对应着选项 API 中的this.$attrs,slots对应着选项 API 中的this.$slots,emit对应着选项 API 中的this.$emit。而expose是 Vue3 新增的一个方法,这个本篇的后面再说。
<script>export default{pprops: {title: String,author: String,content: String},setup(props, { attrs, slots, emit, expose }) {console.log(attrs);console.log(slots);console.log(emit);console.log(expose);}}</script>
其中attrs和slots是对象,emit和expose是方法。attrs和slots都是有状态的对象,它们总是会随着组件自身的更新而更新。这意味着你应当避免解构它们,并始终通过attrs.x或slots.x的形式使用其中的属性。
此外还需注意,和props不同,attrs和slots的属性都不是响应式的。如果你想要基于attrs或slots的改变来执行副作用,那么你应该在onBeforeUpdate生命周期钩子中编写相关逻辑。
expose
expose()是干什么的?expose()函数用于显式地限制该组件暴露出的属性,当父组件通过模板引用访问该组件的实例时,将仅能访问expose函数暴露出的内容:
export default {setup(props, { expose }) {// 让组件实例处于 “关闭状态”// 即不向父组件暴露任何东西expose()const publicCount = ref(0)const privateCount = ref(0)// 有选择地暴露局部状态expose({ count: publicCount })}}
setup()函数也可以返回一个渲染函数,此时在渲染函数中可以直接使用当前作用域下的响应式状态,但是当setup()函数返回一个渲染函数将会阻止我们返回其他东西。这对于组件内部来说,这样没有问题,但如果我们想通过模板引用将这个组件的方法暴露给父组件,那就有问题了。
<!-- 父组件通过插槽的形式调用 --><template><VSetup ref="VSetupRef"><template #default>This is title.</template><template #author>Xiechen</template><template #content>{{ content }}</template></VSetup></template><script>import { ref, onMounted } from "vue";import VSetup from "./components/VSetup.vue";export default {components: {VSetup},data() {return {content: "This is content."};},setup() {const VSetupRef = ref(null);onMounted(() => {console.log(VSetupRef.value);});return {VSetupRef};}};</script>
<script>import { h } from "vue";export default {setup(props, context) {const testStr = "This is test str."return () =>h("div", null, [h("h1", null, context.slots.default()),h("p", null, context.slots.author()),h("p", null, context.slots.content()),h("p", null, testStr)]);}}</script>
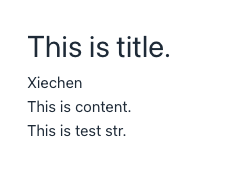
就目前的结构来说,父组件是拿不到子组件中的testStr属性的。
我们可以通过调用expose()解决这个问题:
<script>import { h } from "vue";export default {setup(props, context) {const testStr = "This is test str."context.expose({testStr})return () =>h("div", null, [h("h1", null, context.slots.default()),h("p", null, context.slots.author()),h("p", null, context.slots.content()),h("p", null, testStr)]);}}</script>
然后父组件就可以拿到这个属性了:
getCurrentInstance()
在setup()函数中,我们可以通过导入getCurrentInstance()方法来获取当前组件的实例对象:
<script>import { getCurrentInstance } from "vue";export default {setup(props, context) {console.log(getCurrentInstance());}}</script>
 :::warning
⚠️ 注意
:::warning
⚠️ 注意
但是 Vue3 不建议在应用代码中进行使用,也不建议使用getCurrentInstance()来代替this对象!!!
另外,getCurrentInstance()函数只能在setup()内部执行。
:::

若有收获,就点个赞吧
0 人点赞
