springBoot学习笔记(1)—— 搭建springBoot项目
一、搭建项目
1.步骤说明
- 点击“File”->”New”->”Module”。
- 选择”Spring Initializr”,选择JDK8环境,点击“Next”
- 填入项目名Name,这里我填写的是springbootdemo,选择Java Version为8。
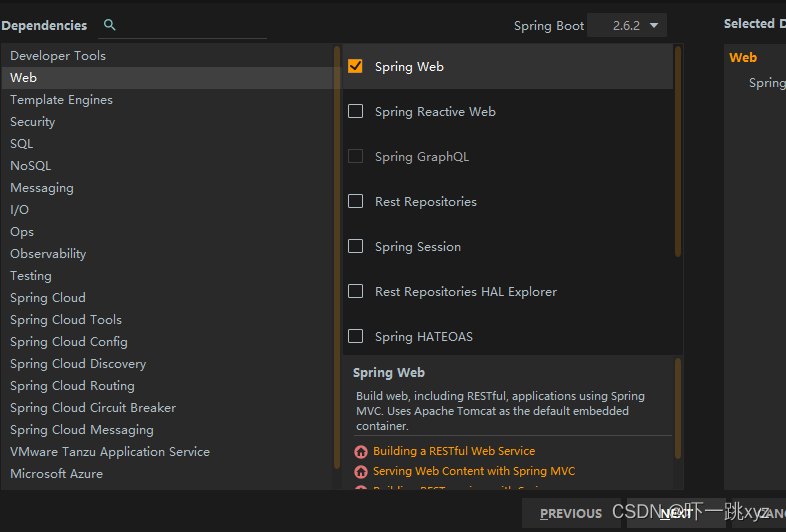
- Web中引入Spring Web的jar包。
2.步骤截图


二、项目代码
1.引入jar包
代码如下(示例):
<?xml version="1.0" encoding="UTF-8"?><project xmlns="http://maven.apache.org/POM/4.0.0" xmlns:xsi="http://www.w3.org/2001/XMLSchema-instance"xsi:schemaLocation="http://maven.apache.org/POM/4.0.0 https://maven.apache.org/xsd/maven-4.0.0.xsd"><modelVersion>4.0.0</modelVersion><parent><groupId>org.springframework.boot</groupId><artifactId>spring-boot-starter-parent</artifactId><version>2.6.2</version><relativePath/> <!-- lookup parent from repository --></parent><groupId>com.example</groupId><artifactId>demo</artifactId><version>0.0.1-SNAPSHOT</version><name>springbootdemo</name><description>Demo project for Spring Boot</description><properties><java.version>1.8</java.version></properties><dependencies><dependency><groupId>org.springframework.boot</groupId><artifactId>spring-boot-starter</artifactId></dependency><dependency><groupId>org.springframework.boot</groupId><artifactId>spring-boot-starter-test</artifactId><scope>test</scope></dependency><dependency><groupId>org.springframework.boot</groupId><artifactId>spring-boot-starter-web</artifactId></dependency></dependencies><build><plugins><plugin><groupId>org.springframework.boot</groupId><artifactId>spring-boot-maven-plugin</artifactId></plugin></plugins></build></project>
2.java代码
代码如下(示例):
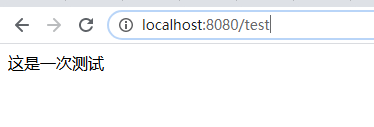
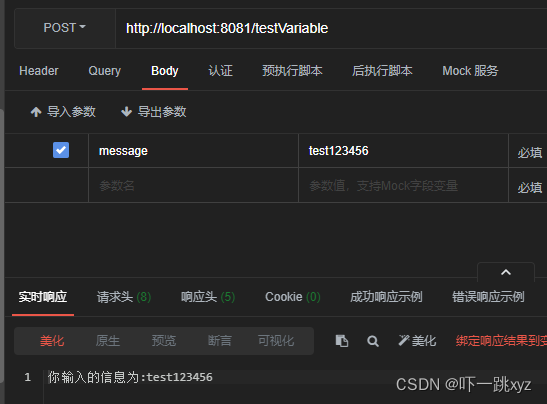
package com.example.demo;import org.springframework.boot.SpringApplication;import org.springframework.boot.autoconfigure.SpringBootApplication;import org.springframework.context.annotation.Description;import org.springframework.stereotype.Controller;import org.springframework.web.bind.annotation.*;@SpringBootApplication@Controllerpublic class SpringbootdemoApplication {public static void main(String[] args) {SpringApplication.run(SpringbootdemoApplication.class, args);}/***** description: 返回字符串* version: 1.0 ->* date: 2021/12/24 16:32* author: xiaYZ* iteration: 迭代说明* @param* @return java.lang.String*/@ResponseBody@GetMapping("test")public String test(){return "这是一次测试";}/*** description: 传入变量,并接收* version: 1.0* date: 2021/12/24 16:42* author: xiaYZ* iteration: 迭代说明* @param message* @return*/@ResponseBody@PostMapping("testVariable")public String testVariable(String message){return "你输入的信息为:" + message;}/*** description: 从访问路径中获取变量信息* version: 1.0* date: 2021/12/24 16:44* author: xiaYZ* iteration: 迭代说明* @param* @return*/@GetMapping("testPathVariable/{id}")@ResponseBodypublic String testPathVariable(@PathVariable(value = "id") String id){return "传入变量id为:" + id;}}
代码说明
- @ResponseBody表示返回的数据为JSON格式,防止乱码。
- @SpringBootApplication注解是springboot的核心注解,目的是开启注解配置。
- @SpringBootApplication注解包含@ComponentScan,@EnableAutoConfiguration,@SpringBootConfiguration ,@Inherited 四个注解。
- @PathVariable标签必须和@ResponseBody配合使用,不然容易引起异常,或者在控制层使用@RestController标签,两者效果一致。
3. 运行截图

若有收获,就点个赞吧
0 人点赞
