- 前言
- 01-使用VueCLI创建项目
- 02-加入Git版本管理
- 03-初始目录结构说明
- 04-调整初始目录结构
- 05-TS-环境说明
- 06-TS-相关配置说明
- 07-TS-使用OptionsAPI定义Vue组件
- 08-TS-使用ClassAPIs定义Vue组件
- 09-TS-关于装饰器语法
- 10-TS-使用VuePropertyDecorator创建Vue组件
- 11-TS-总结创建组件的方式
- 12-代码格式规范-介绍
- 13- 代码格式规范-项目中的代码规范说明
- 14-代码格式规范-自定义校验规则
- 15-导入Element组件库
- 16-样式处理
- 17-样式处理-共享全局样式变量
- 18-接口处理-配置后端代理
- 19-接口处理-封装请求模块
- 21-布局-Layout和嵌套路由
- 22-布局-Container布局容器
- 28-登录-处理请求结果
- 29-登录-请求期间禁用按钮点击
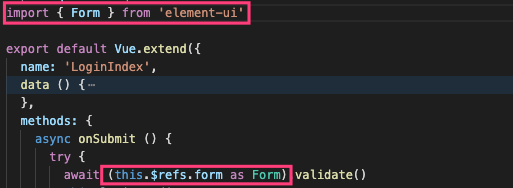
- 30-登录-表单验证
- 31-登录-封装请求方法
- 32-登录-关于请求体data和ContentType的问题
- 33-身份认证-把登录状态存储到Vuex容器中
- 34-身份认证-校验页面访问权限
- 35-身份认证-测试获取当前登录用户信息接口
- 36-身份认证-登录成功跳转回原来页面
- 37-身份认证-展示当前登录用户信息
- 38-身份认证-使用请求拦截器统一设置Token
- 39-身份认证-用户退出
前言
- Boss API:http://113.31.105.128/boss/doc.html#/home
- Front API:http://113.31.105.128/front/doc.html#/home
- 前台地址:http://edufront.lagou.com/#/
- 后台地址:http://eduboss.lagou.com/#/
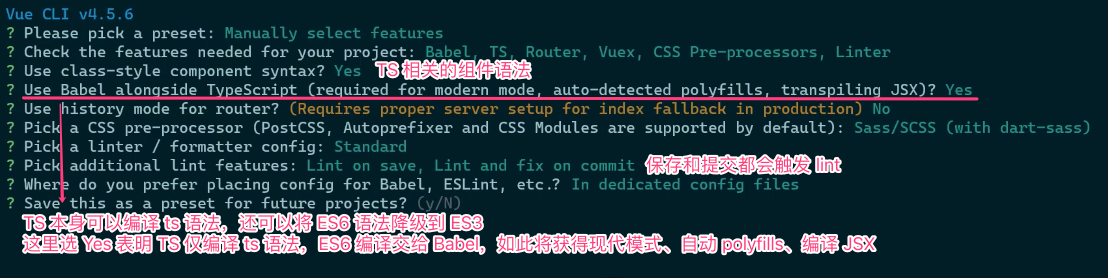
01-使用VueCLI创建项目
- vue create edu-boss-fed
- 教育管理后台
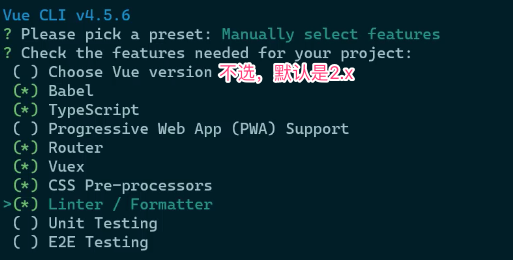
- TS => class-style component syntax
02-加入Git版本管理
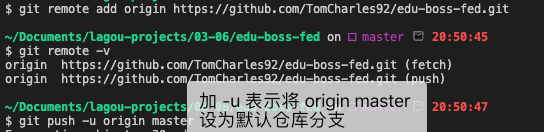
# -u 相当于设置上流服务器git push -u origin master# 效果相同git push origin master ; git branch --set-upstream master origin/master
03-初始目录结构说明
## .browserslistrc# 1% 的人用的浏览器也要做兼容> 1%# 兼容到最新的2个版本last 2 versionsnot dead## .editorconfig 编辑器的配置信息[*.{js,jsx,ts,tsx,vue}]indent_style = spaceindent_size = 2trim_trailing_whitespace = trueinsert_final_newline = true
04-调整初始目录结构
- 全新项目:使用 Vue CLI 脚手架创建,并选择 TS
- 已有项目:添加 Vue 官方配置的 Typescript 适配插件
- 使用 @vue/cli 安装 TS 插件
- vue add @vue/typescript
06-TS-相关配置说明
i-TypeScript 相关的依赖项
dependencies 依赖:
| 依赖项 | 说明 |
|---|---|
| vue-class-component | 使用 Class 写 Vue 组件 |
| vue-property-decorator | 在 Class 语法基础之上提供了一些辅助装饰器 |
devDependencies 依赖:
| 依赖项 | 说明 |
|---|---|
| @typescript-eslint/eslint-plugin | 使用 ESLint 校验 TypesScript 代码 |
| @typescript-eslint/parser | 将 TypeScript 转为 AST 供 ESLint 校验使用 |
| @vue/cli-plugin-typescript | 调度 TypeScript 和 ESLint 相关插件,使用 TypeScript + ts-loader + fork-ts-checker-webpack-plugin 进行更快的类型检查 |
| @vue/eslint-config-typescript | 兼容 ESLint 的 TypeScript 校验规则 |
| typescript | TypeScript 编译器,提供类型校验和转换 JavaScript 的功能 |
ii-TypeScript 配置文件 tsconfig.json
iii-shims-vue.d.ts
// 用于 TypeScript 识别 .vue 文件模块// .vue 文件模块都按 VueConstructor<vue> 类型识别处理declare module '*.vue' {import Vue from 'vue'export default Vue}
iv-shims-tsx.d.ts
// 为 jsx 组件模板补充类型说明import Vue, { VNode } from 'vue'declare global {namespace JSX {// tslint:disable no-empty-interfaceinterface Element extends VNode {}// tslint:disable no-empty-interfaceinterface ElementClass extends Vue {}interface IntrinsicElements {[elem: string]: any;}}}
07-TS-使用OptionsAPI定义Vue组件
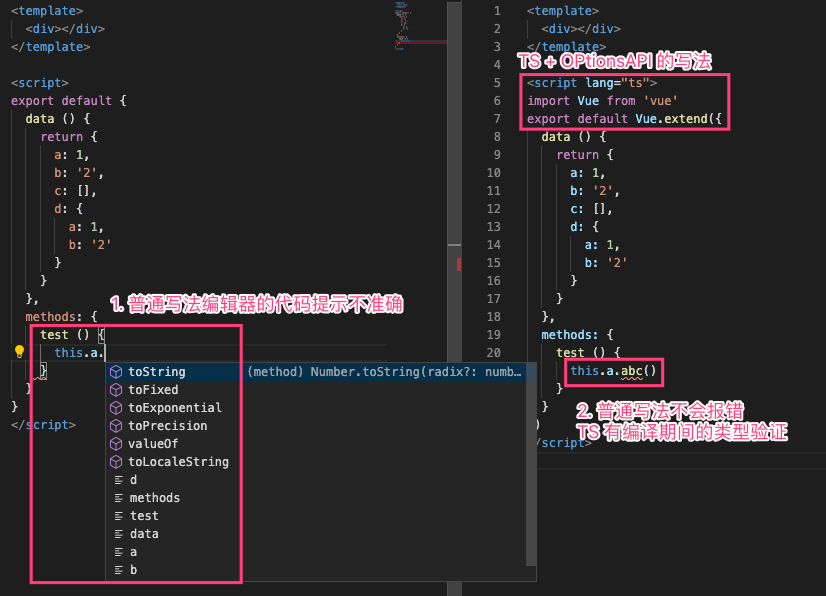
08-TS-使用ClassAPIs定义Vue组件
参考文档:https://class-component.vuejs.org/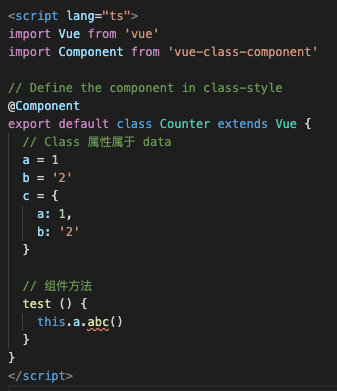
09-TS-关于装饰器语法
- 装饰器是 ES 草案中的新特性,不建议在生产环境使用
- 参考文档:https://es6.ruanyifeng.com/#docs/decorator ```javascript @testable class MyTestableClass { // … }
function testable(target) { target.isTestable = true; }
MyTestableClass.isTestable // true
将 Class MyTestableClass 作为参数传给函数 testable,这里给类赋值了静态属性 MyTestableClass.isTestable```javascript@decoratorclass A {}// 等同于class A {}A = decorator(A) || A;
装饰器是一个对类进行处理的函数,装饰器函数的第一个参数就是类
10-TS-使用VuePropertyDecorator创建Vue组件
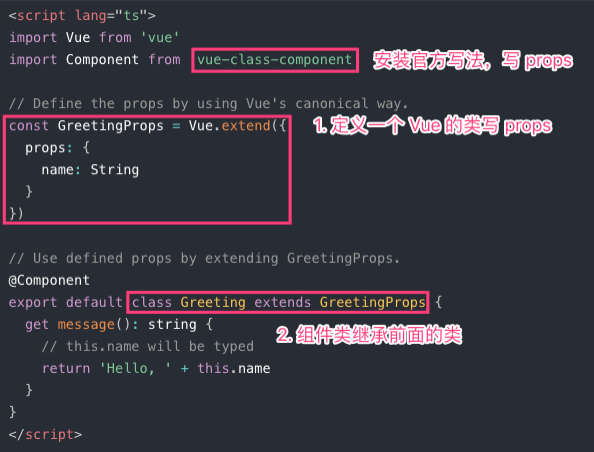
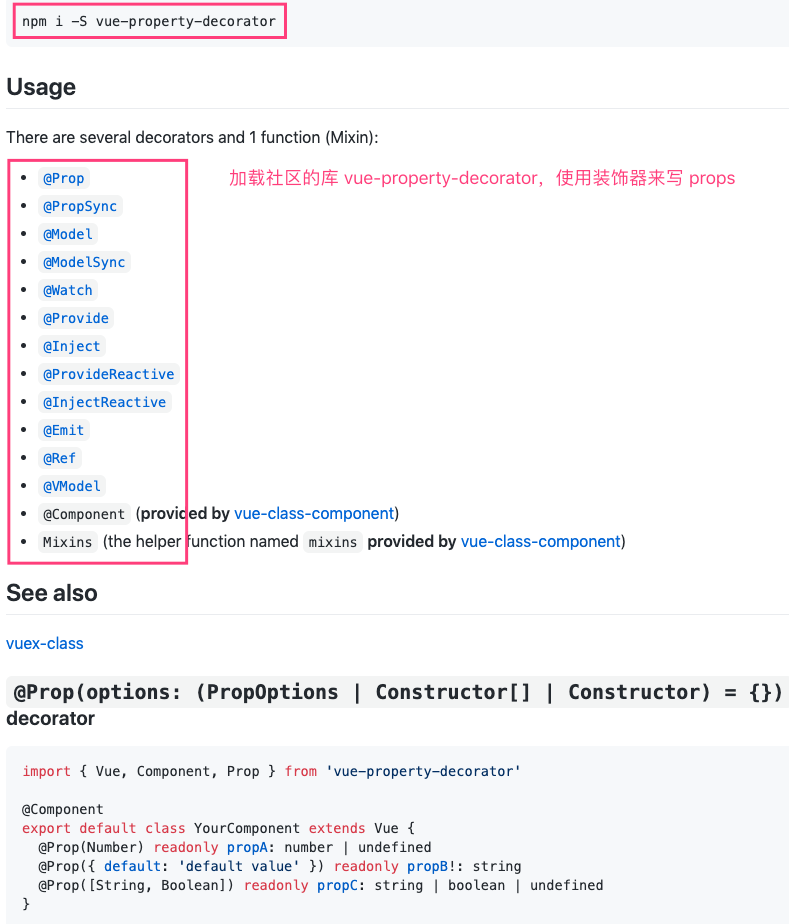
- 参考文档:https://github.com/kaorun343/vue-property-decorator
- 缺点:装饰器还是 ES 草案阶段,不建议上生产环境
11-TS-总结创建组件的方式
- Options APIs
- export default Vue.extend({ … })
- Class APIs(包含 @Component)
- Class APIs + decorator(@Prop等)
建议:只用 Options APIs,因为装饰器语法还没正式发布
12-代码格式规范-介绍
- 更好的多人协作
- 提高可读性
-
三个大厂标准
- Airbnb JavaScript Style
- Google JavaScript Style
本项目使用的是 JavaScript Standard Style,特点是规则相对宽松,以下是它的部分规则: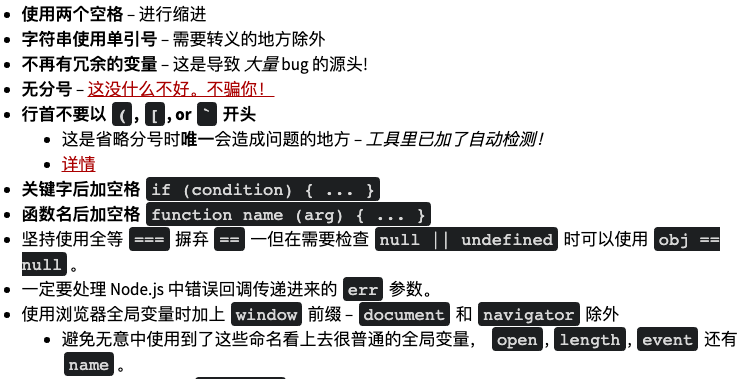
13- 代码格式规范-项目中的代码规范说明
module.exports = {root: true,env: {node: true},// 使用插件的编码规则extends: ['plugin:vue/essential','@vue/standard','@vue/typescript/recommended'],parserOptions: {ecmaVersion: 2020},// 自定义编码校验规则rules: {'no-console': process.env.NODE_ENV === 'production' ? 'warn' : 'off','no-debugger': process.env.NODE_ENV === 'production' ? 'warn' : 'off'}}
- eslint-plugin-vue
- 官方文档:https://eslint.vuejs.org/
- 使用 ESLint 检查 .vue 文件的 template 和 script
- 参考官方风格指南文档
- @vue/eslint-config-standard
- eslint-plugin-standard
- JavaScript Standard Style
-
14-代码格式规范-自定义校验规则
- ESLint 规则文档
- TypeScript 结合 ESLint 的规则文档
要让规则生效
-
16-样式处理
src/styles|-- index.scss # 全局样式,需要在 main.js 中导入|-- mixin.scss # 重复的公共样式,用于 mixin 混入|-- reset.scss # 重置基础样式|-- variables.scss #
variables.scss ```css $primary-color: #40586F; $success-color: #51cf66; $warning-color: #fcc419; $danger-color: #ff6b6b; $info-color: #868e96; // #22b8cf;
$body-bg: #E9EEF3; // #f5f5f9;
$sidebar-bg: #F8F9FB; $navbar-bg: #F8F9FB;
$font-family: system-ui, -apple-system, “Segoe UI”, Roboto, Helvetica, Arial, sans-serif;
index.scss```css@import './variables.scss';// custom element theme$--color-primary: $primary-color;$--color-success: $success-color;$--color-warning: $warning-color;$--color-danger: $danger-color;$--color-info: $info-color;// change font path, required$--font-path: '~element-ui/lib/theme-chalk/fonts';// import element default theme@import '~element-ui/packages/theme-chalk/src/index';
17-样式处理-共享全局样式变量
每次使用都要导入,比较麻烦
<style lang="scss" scoped>@import "~@/styles/variables.scss";.text {color: $success-color}</style>
将指定样式文件全局混入,在每个组件中都可以使用,不用 import
module.exports = {css: {loaderOptions: {scss: {prependData: '@import "~@/styles/variables.scss";'}}}}
18-接口处理-配置后端代理
数据接口
- http://eduboss.lagou.com
- http://edufront.lagou.com
proxy: {'/boss': {target: 'http://eduboss.lagou.com',changeOrigin: true // 把请求中的 host 配置为 target}}
19-接口处理-封装请求模块
```javascript import axios from ‘axios’
const request = axios.create({ // 配置选项 })
// 请求拦截器
// 响应拦截器
export default request
<a name="prJXo"></a>## 20-布局-初始化路由组件| **路径** | **说明** || --- | --- || / | 首页 || /login | 用户登录 || /role | 角色管理 || /menu | 菜单管理 || /resource | 资源管理 || /course | 课程管理 || /user | 用户管理 || /advert | 广告管理 || /advert-space | 广告位管理 |```bashsrc/views|--home|--index.vue|--login|--index.vue|--role|--index.vue|--menu|--index.vue
{path: '/login',name: 'login',component: () => import(/* webpackChunkName: 'login' */ '@/views/login/index.vue')},
21-布局-Layout和嵌套路由
22-布局-Container布局容器
- 使用 Element 的布局容器组件
- height: 100vh; 获得 100% 的高度 ```css .el-header { background-color: #B3C0D1; }
.el-aside { background-color: #D3DCE6; height: 100vh; }
.el-main { background-color: #E9EEF3; }
<a name="yMfNI"></a>## 23-布局-侧边栏菜单- el-menu<a name="8UGsi"></a>## 24-布局-头部Header- el-breadcrumb- el-dropdown- el-avatar<a name="KIMQk"></a>## 25-登录-页面布局- el-form<a name="JpVjz"></a>## 26-登录-登录接口测试- 接口文档:[http://113.31.105.128/front/doc.html#/home](http://113.31.105.128/front/doc.html#/home)- 该站点即可测试登录接口- phone: 15510792995- password: 111111- Postman 测试接口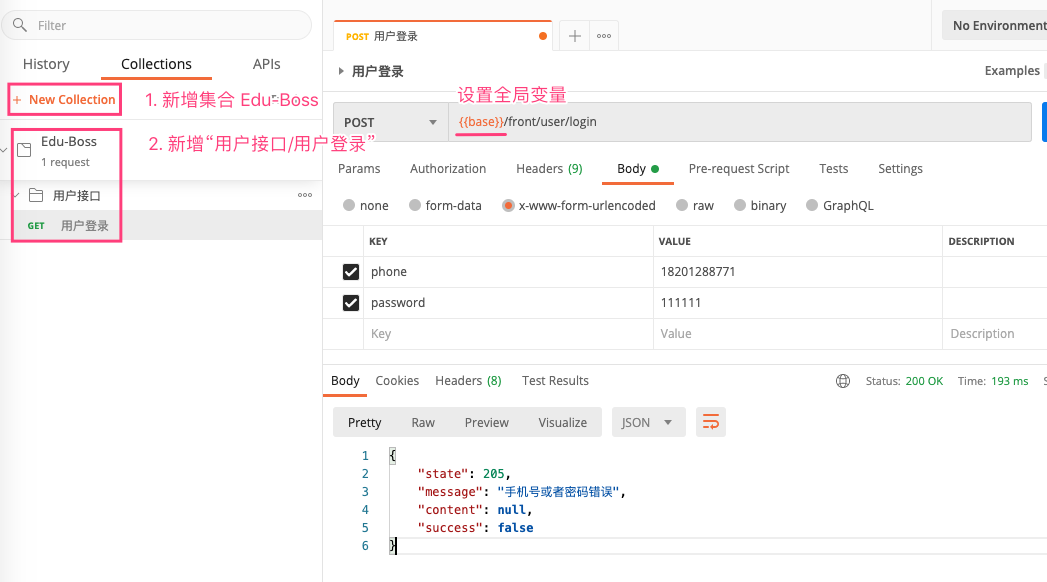<a name="NW5Qo"></a>## 27-登录-请求登录<br />axios 设置 TypeScript Type```javascriptimport axios, { AxiosInstance } from 'axios'const request: AxiosInstance = axios.create({// 配置选项})
28-登录-处理请求结果
31-登录-封装请求方法
src/utils/request.ts
import axios, { AxiosInstance } from 'axios'const request: AxiosInstance = axios.create({// 配置选项})// 请求拦截器// 响应拦截器export default request
src/services/user.ts
import request from '@/utils/request'import qs from 'qs'interface User {phone: string;password: string;}export const login = (data: User) => {return request({method: 'POST',url: '/front/user/login',headers: { 'content-type': 'application/x-www-form-urlencoded' },data: qs.stringify(data)})}
src/views/login/index.vue
const { data } = await login(this.form)
32-登录-关于请求体data和ContentType的问题
axios 跟根据数据类型会自动设置 content-type
- qs.stringfy(data) => application/x-www-form-urlencoded
- FormaData 对象 => multipart/form-data
- 普通对象 => application/json
33-身份认证-把登录状态存储到Vuex容器中
- 登录成功,在 Vuex 中存储登录信息
- localStorage
- 在路由拦截器中判断登录信息
state: {user: JSON.parse(window.localStorage.getItem('user') || 'null')},mutations: {setUser (state, payload) {state.user = JSON.parse(payload)window.localStorage.setItem('user', payload)}},
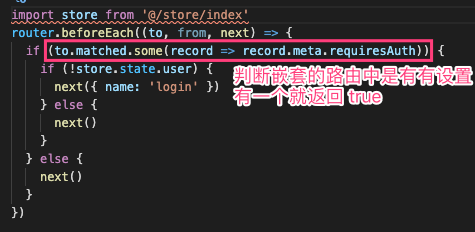
34-身份认证-校验页面访问权限
35-身份认证-测试获取当前登录用户信息接口
在 Postman 中给文件夹下的所有请求添加 Header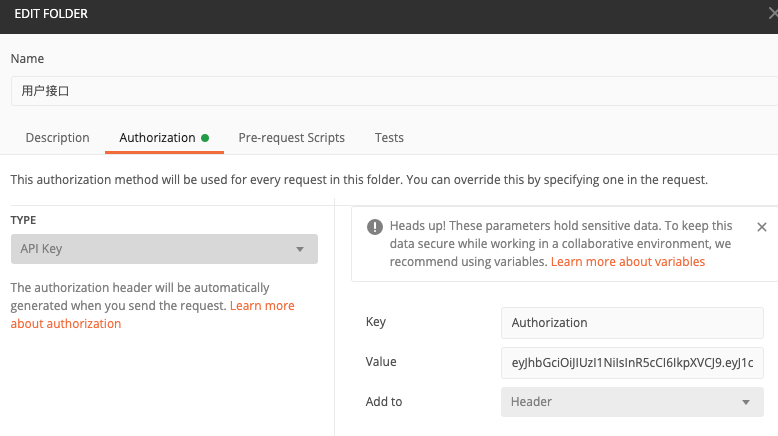
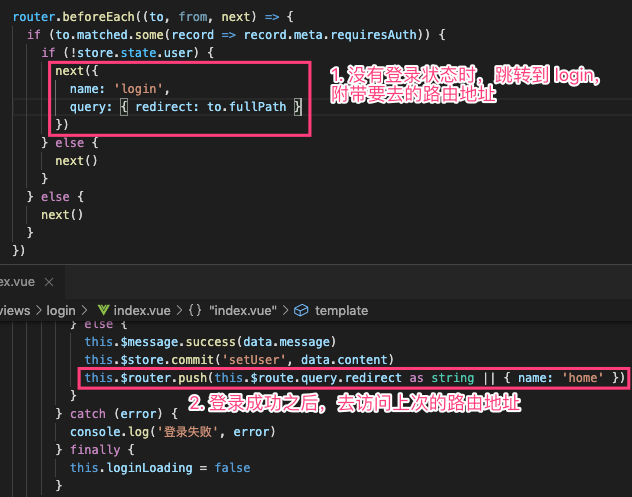
36-身份认证-登录成功跳转回原来页面
37-身份认证-展示当前登录用户信息
设置头像,访问本地图片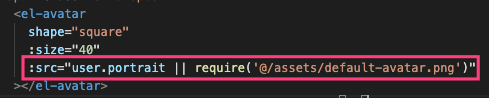
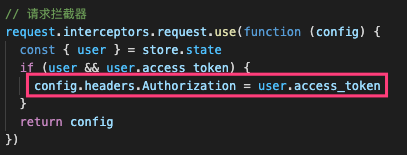
38-身份认证-使用请求拦截器统一设置Token
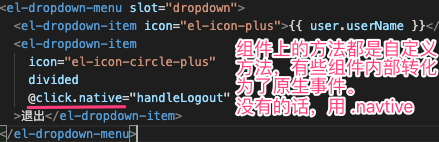
39-身份认证-用户退出

若有收获,就点个赞吧
0 人点赞
