scrapy使用了Twisted异步网络框架 可并发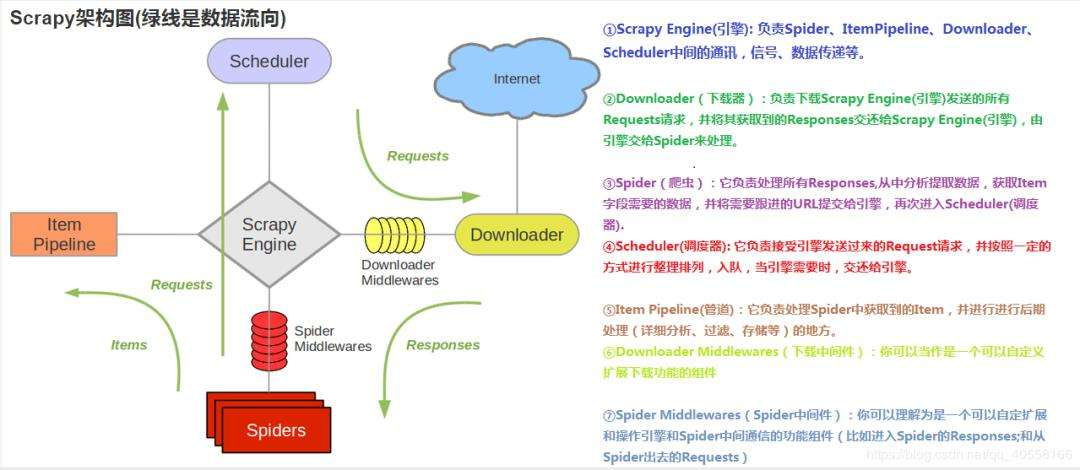
- itempipeline 定制保存数据
- downloader下载数据并返回给spider
- 调度器scheduler 作用 1、请求去重 2、调度请求 依次进队列 出队列 例如把request请求排序入队
- engine 中心请求调度
- spider 即爬虫文件 定义要爬取的url地址 先爬取包含子地址总地址,返回相应文件之后再提取子类的url
- item字段 即 字典 填入 键值
- downloader middlewares下载中间件 中加 user-agent之类的
- def parse( ) 为自动生成好的返回文件默认放入的方法
scrapy抓取流程:spider发请求给scheduler入队列,交给downloader下载,下载完数据交给spider提取,如果提取到url地址继续去重复下载,如果提取到item数据就在item pipeline存储
当调度器中不再有请求时整个scrapy程序才会停止
scrapy四步:
- 新建项目 scrapy startproject xxx
- 明确目标 编写item.py 明确要抓取的目标
- 制作爬虫 编写spiders.py 制作爬虫开始爬取网页
- 存储内容 编写 pipelines.py 设计管道存取爬取内容
scrapy.cfg item.py 此类文件在新建项目后自动生成,item.py中有提示的用法
例如:name = scrapy.field() 需要注意观察
setting.py配置文件中注释掉是否遵循robots协议一栏,或改为false
robots协议中标识了网站中不允许被爬取的内容,也可通过url/robots.txt查看当前网站的robots协议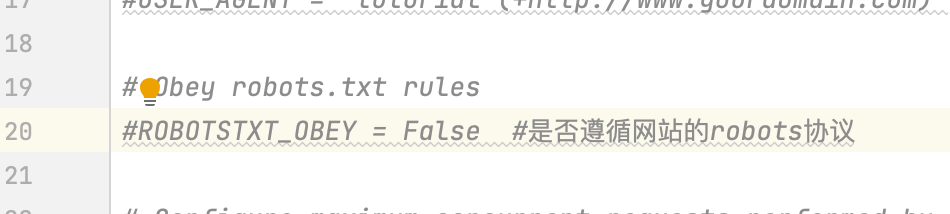
研读整理官方文档
xss、xpath语句
def parse_question(self, response):yield {'title': response.css('h1 a::text').extract()[0],'votes': response.css('.question .vote-count-post::text').extract()[0],'body': response.css('.question .post-text').extract()[0],'tags': response.css('.question .post-tag::text').extract(),'link': response.url,}
parse为回调函数,yield为产生,此处自定义一个对question的回调函数,产生一个dict字典
scrapy中有其特有的数据类型Item和Field,其中Item类似字典,一般与Field配合使用,Field能够携带元数据,携带的元数据能够指导scrapy的pipeline工具类对数据进行处理,元数据的获得用fields属性,其类型还是类似字典。
爬虫设计:
Spider是用户编写用于从单个网站(或者一些网站)爬取数据的类。
其包含了一个用于下载的初始URL,如何跟进网页中的链接以及如何分析页面中的内容, 提取生成 item 的方法。
page = response.url.split("/")[-2]#根据上面的链接提取分页,如:/page/1/,提取到的就是:1filename = 'mingyan-%s.html' % page#拼接文件名,如果是第一页,最终文件名便是:mingyan-1.html#同时利用%s这样的操作符,这就是python中字符串格式化的符号page = response.url.split("/")[-2] #请求的url中利用"/"分离出的倒数第二个"/"后的数据#此处代码应按照url中的样式进行动态调整的
with open(filename, 'wb') as f:#python文件操作,不多说了;f.write(response.body) #response 为请求到的数据#刚才下载的页面去哪里了?response.body就代表了刚才下载的页面!self.log('保存文件: %s' % filename) # 打个日志
scrapy.request 相关知识:https://www.cnblogs.com/heymonkey/p/11818495.html
yield scrapy.Request(url=url, callback=self.parse)<br /> _#callback调用函数设置为self.parse不加括号意为把callback设置为parse()的函数地址即调用parse()函数_
def函数:
def function_name(parameters):
    expressions
parameters 为函数参数,调用时传入即可
到此,可抓取witherc.top中博客的spider.py为:
import scrapy

class DmozSpider(scrapy.Spider):
    name = "witherc"
    allowed_domains = ["witherc.top"]  #允许爬取的域
    start_urls = [       #将要爬取的url以列表形式存入
        "https://witherc.top/2019/03/07/NCRE-2-C%E6%95%B4%E5%90%88/#more",
        "https://witherc.top/2019/07/22/MAC%E4%B8%8Bsqlmap%E7%8E%AF%E5%A2%83%E6%90%AD%E5%BB%BA/#more"
    ]

    def parse(self, response):
        page = response.url.split("/")[-2]  # 请求的url中利用"/"分离出的倒数第二"/"后的数据
        filename = 'blog-%s.html' % page
        with open(filename, 'wb') as f:
            f.write(response.body)
        self.log('Saved file %s' % filename)

若有收获,就点个赞吧
0 人点赞
