概述
在 Istio 中,Ingress 是服务的访问入口,用于接收外部请求并转发到后端服务。
相比 Kubernetes 而言,Istio Ingress Gateway 相对更加强大。
具体来说:
- Kubernetes 的 Ingress 仅支持 7 层协议(功能有限),可定义路由规则;
- Istio 的 Ingress 支持 4-6 层协议,只定义接入点,路由规则复用 VirtualService 的路由定义。
那么 Ingress 和上文中我们提到的网关 Gateway 有什么区别和联系呢?
在 Istio 中,Gateway 是一种 API 资源对象,而 Ingress 是一组真实存在的 Pod。正是 Ingress Pod 实现了我们定义的 Gateway API 资源对象的功能。
实战
场景描述
在本文中,我们会引入一个新的服务 httpbin,并为该服务配置 Ingress 网关。
希望通过本文的学习,你能够:
- 理解 Istio 实现自己的 Ingress 的意义
- 复习 Gateway 的配置方法
- 复习 VirtualService 的配置方法
StepByStep
Step1:部署 httpbin 服务
kubectl apply -f ./samples/httpbin/httpbin.yaml -n istio-demo# serviceaccount/httpbin created# service/httpbin created# deployment.apps/httpbin created
Step2:创建Ingress的Gateway配置
我们创建一个 httpbin-gateway.yaml 文件来描述需要的 Ingress Gateway 和对应的 VirtualService 配置:
apiVersion: networking.istio.io/v1alpha3kind: Gatewaymetadata:name: httpbin-gatewayspec:selector:istio: ingressgatewayservers:- port:number: 80name: httpprotocol: HTTPhosts:- "httpbin.example.com"---apiVersion: networking.istio.io/v1alpha3kind: VirtualServicemetadata:name: httpbinspec:hosts:- "httpbin.example.com"gateways:- httpbin-gatewayhttp:- match:- uri:prefix: /status- uri:prefix: /delayroute:- destination:host: httpbinport:number: 8000
然后安装一下:
kubectl apply -f ./samples/httpbin/httpbin-gateway.yaml -n istio-demo# gateway.networking.istio.io/httpbin-gateway created# virtualservice.networking.istio.io/httpbin created
Step3:测试一下
下面,我们再来测试一下如果 Ingress 入口是否能够正常访问对应的服务:
# 获取 ingress 的 HostIPexport INGRESS_HOST=$(kubectl get po -l istio=ingressgateway -n istio-system -o jsonpath='{.items[0].status.hostIP}')# 获取 ingress 的 HTTP Portexport INGRESS_PORT=$(kubectl -n istio-system get service istio-ingressgateway -o jsonpath='{.spec.ports[?(@.name=="http2")].nodePort}')# 具体的访问地址export GATEWAY_URL=$INGRESS_HOST:$INGRESS_PORTecho "$GATEWAY_URL"
首先,我们访问一下 status 接口看看:
curl -I -HHost:httpbin.example.com http://$GATEWAY_URL/status/200
如下图所示,我们创建的 Gateway 和对应的 VirtualService 已经正常生效了!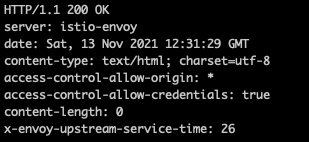
下面,我们再来看一下访问 delay 的效果呢:
curl -I -HHost:httpbin.example.com http://$GATEWAY_URL/delay/5
delay/ 后传入的数字表示接口响应的延迟时间,单位是秒,体验一下,是不是已经生效了呢!

若有收获,就点个赞吧
0 人点赞
