一. 快速认识线程
1.1 快速创建一个线程
public class TryConcurrency {public static void main(String[] args) {/*new Thread() {@Overridepublic void run() {listenMusic();}}.start();*/// lambda写法new Thread(TryConcurrency::listenMusic).start();browseNews();}public static void browseNews() {while (true) {System.out.println("看新闻");sleep(10);}}public static void listenMusic() {while (true) {System.out.println("听音乐");sleep(10);}}public static void sleep(int seconds) {try {Thread.sleep(seconds);} catch (InterruptedException e) {e.printStackTrace();}}}
1.2 线程的生命周期:
1.2.1 通用的生命周期:
通常来说, 线程生命周期有new, ready, running, waiting, terminated这么几个状态, 并且这几个状态关系如下:
new: 线程被创建, 但是还没有分配cpu执行. 因为它还没有在操作系统中创建。
ready: 在操作系统里面创建了, 需要等待cpu分配资源。
running: 拿到cpu分配的资源, 正式进入执行阶段。
waiting: (出现I/O操作, 等待事件…) 释放cpu资源, 进入waiting状态。
terminated: 线程结束。
1.2.2 java生命周期:
java线程周期有如下几个状态:
    public enum State {
        NEW,
        RUNNABLE,    -- 包括ready和running
        BLOCKED,
        WAITING,
        TIMED_WAITING,
        TERMINATED;
    }
NEW -> RUNNABLE: 调用start方法, 启动该线程, 并且该线程进入Runnable状态。
疑问🤔️: 我们重写的是run方法, 但却是调用start方法开启线程, run方法和start方法有什么联系呢?? 详见 线程start方法剖析模块。
Runnable -> Blocked: 如果线程出现等待锁的情况, 就会从Runnable状态变为Blocked状态, 在获取到锁后, 就会进入就绪状态。
Runable -> Waiting: 如果线程中调用wait, join, park等函数, 当前线程就会进入等待状态, 进入等待状态的线程需要等待其他线程去唤醒。
Runable -> Timed_Waiting: 如果线程中调用sleep方法或者调用wait, join, park等方法但是设置超时等待时间, 当前线程就会进入超时等待状态, 进入等待状态的线程需要等时间过后就会进入就绪状态。
二. Thread API详解:
2.1 线程的父子关系:
任何一个线程都有一个父线程, 当前线程的父线程就是创建它的线程。
2.2 Thread和ThreadGroup:
在新建线程的时候, 我们可以显示的指定线程组。如果没显示的指定一个线程组, 那么子线程将加入父线程所在的组。测试代码如下:
public static void main(String[] args) {
    Thread thread1 = new Thread("halooing1");

    ThreadGroup group1 = new ThreadGroup("thread group1");
    Thread thread2 = new Thread(group1, "haloong2");

    System.out.println("main thread group: " + Thread.currentThread().getThreadGroup());
    System.out.println("thread1 group: " + thread1.getThreadGroup());
    System.out.println("thread2 group: " + thread2.getThreadGroup());
}

结果:
main thread group: java.lang.ThreadGroup[name=main,maxpri=10]
thread1 group: java.lang.ThreadGroup[name=main,maxpri=10]
thread2 group: java.lang.ThreadGroup[name=thread group1,maxpri=10]
2.3 守护线程:
概念: 是运行在后台的一种特殊进程。它独立于控制终端并且周期性地执行某种任务或等待处理某些发生的事件。也就是说守护线程不依赖于终端,但是依赖于系统,与系统“同生共死”。 比如: jdk的垃圾回收线程就是一个守护线程。
补充: jvm程序什么情况会结束: 若jvm中没有一个非守护线程, 那么jvm进程会退出。
public static void main(String[] args) throws InterruptedException {
    Thread thread = new Thread(() -> {
        while (true) {
            try {
                TimeUnit.MILLISECONDS.sleep(100);
                System.out.println(Thread.currentThread().getName() + " do not finished son thread is daemon thread:" + Thread.currentThread().isDaemon());
            } catch (InterruptedException e) {
                e.printStackTrace();
            }
        }
    });
    thread.setName("子线程");
    /**
         * 设置守护线程只需要 在线程启动之前调setDaemon(true) 即可
         */
    thread.setDaemon(true);
    thread.start();
    TimeUnit.SECONDS.sleep(1);
    Thread.sleep(1000);
    System.out.println("Main Thread finished... main thread is daemon thread:" + Thread.currentThread().isDaemon());
}
2.4 sleep方法介绍:
sleep方法会使当前线程进入指定毫秒数的休眠, 即使休眠也不会释放锁的所有权。 并且我们建议使用TimeUnit代替Thread.sleep方法。
Thread thread = new Thread(() -> {
    try {
        TimeUnit.MINUTES.sleep(1);
    } catch (InterruptedException e) {
        ...
    }
});
thread.start();
TimeUnit.SECONDS.sleep(1);
补充: 一个线程sleep另外一个线程调用interrupt会捕获中断信号并且擦除阻断信息。在后面的interrupt部分会详细讲解。
2.5 线程interrupt:
2.5.1 可使线程进入等待状态的方法:
Object的wait方法, Thread的sleep方法, Thread的join方法…这些方法可使当前线程进入阻塞状态, 若另外一个线程调用被阻塞线程的interrupt方法, 会打断这种阻塞。并且会抛出InterruptedException异常。例子如下:
public static void main(String[] args) throws InterruptedException {
    Thread thread = new Thread(() -> {
        try {
            /**
                 * 子线程是阻塞状态, 主线程对子线程执行interrupt中断操作, sleep抛异常,其实就是这种被中断了以后产生的异常
                 */
            TimeUnit.MINUTES.sleep(1);
        } catch (InterruptedException e) {
            System.out.println("i am be interrupted.");
        }
    });
    thread.start();
    TimeUnit.SECONDS.sleep(1);
    thread.interrupt();
}
在一个线程内部有一个interrupt flag的标签, 如果一个线程被interrupt了, 那么flag会被设置.但是当前线程正在执行可中断方法(sleep方法)。那么在捕获到程序中断后, 会将该flag标识清除。例子如下:
public static void main(String[] args) throws InterruptedException {
    Thread thread = new Thread(() -> {
        while (true) {
            try {
                TimeUnit.MINUTES.sleep(1);
            } catch (InterruptedException e) {
                /**
                     * sleep方法 在捕获到中断信号后, 会擦除interrupt标识
                     */
                System.out.println("I am son Thread And I am interrupted:" + Thread.currentThread().isInterrupted());
            }
        }
    });
    thread.setDaemon(true);
    thread.start();
    TimeUnit.SECONDS.sleep(1);
    System.out.println("son Thread is interrupted:" + thread.isInterrupted());
    thread.interrupt();
    TimeUnit.SECONDS.sleep(1);
    System.out.println("now son Thread is interrupted:" + thread.isInterrupted());
}
2.5.2 有哪些中断方法:
interrupt: 中断线程的阻塞。是Thread的成员方法. 代码示例如2.5.2
isInterrupted: 判断当前线程时候中断, 是Thread的成员方法.
interrupted:interrupted是一个静态方法, 也是判断当前线程是否中断, 它和isInterrupted最大的区别在于它在调用后会擦除中断标识。原因是因为该方法在调用JNI方法的时候传入了是否擦除线程中断的标识:

    public static void main(String[] args) throws InterruptedException {
        Thread thread = new Thread(() -> {
            while (true) {
                /**
                 * Thread.interrupted() 与 thread.isInterrupted()区别:
                 * 1. Thread.interrupted() 是静态的
                 * 2. Thread.interrupted() 执行完以后, 会擦除interupt标识, 而 isInterrupted 不会, 原因是: 两者传入的参数不一样, 可参考源码
                 */
                System.out.println("I am son Thread " + Thread.interrupted());
            }
        });
        thread.setDaemon(true);
        thread.start();
        TimeUnit.MILLISECONDS.sleep(2);
        thread.interrupt();
    }
2.6 线程join:(join也是一个可中断的方法)
join线程A, 会使当前线程B进入等待状态, 知道A的生命周期结束或者达到指定时间,那么此期间, 线程B处于等待状态. 例子如下:
/**
 * join 某一个线程A 就会使得当前线程B处于等待状态, 知道A的生命周期结束或者达到给定时间, 此期间 B线程处于Blocked状态。
 */
public class ThreadJoin {
    public static void main(String[] args) throws InterruptedException {
        List<Thread> threads =
                IntStream.range(1, 3).mapToObj(ThreadJoin::create).collect(Collectors.toList());
        threads.forEach(Thread::start);
        for (Thread thread : threads) {
            thread.join();
        }

        for (int i = 0; i < 10; i++) {
            System.out.println(Thread.currentThread().getName() + "#" + i);
            try {
                TimeUnit.SECONDS.sleep(1);
            } catch (InterruptedException e) {
                e.printStackTrace();
            }
        }
    }

    private static Thread create(int req) {
        return new Thread(() -> {
            for (int i = 0; i < 10; i++) {
                System.out.println(Thread.currentThread().getName() + "#" + i);
                try {
                    TimeUnit.SECONDS.sleep(1);
                } catch (InterruptedException e) {
                    e.printStackTrace();
                }
            }
        }, String.valueOf(req));
    }
}

---------
子线程全部打印完毕, 才打印主线程...
2.6.1 原理:
通过源码可知, join方法底层使用的是wait方法。详见4.2
且join方法是同步方法, 拿的锁对象是调用该方法的对象。
疑问❓ 既然有wait就一定有notify, 不然线程将无限期等待下去?? 其实在线程结束后, jvm在关闭线程之前, 会检测阻塞在该线程对象上的线程, 然后执行notifyAll。
2.6.2 join(long)与sleep(long)区别:
join方法内部实现是wait, 会释放锁。而sleep方法不释放锁。
2.7 线程yield:
该方法会提醒调度器, 表明当前线程愿意放弃CPU资源, 使用yield方法会使当前线程从running状态变为ready状态。yield只是一个提示, cpu并不会每次都释放资源. 使用方式如下:
class MyThread extends Thread {
    int index;

    public MyThread(int index) {
        this.index = index;
    }

    @Override
    public void run() {
        if (index == 0) {
            Thread.yield();
        }
        System.out.println(index);
    }
}
2.8 如何关闭一个线程:
2.8.1 捕获中断信号关闭线程:
我们可以在线程里面使用isinterrupted方法来判断是否结束, 当然了, 对于使用了中断方法的逻辑, 我们可以加一个用volatile(线程间可见)修饰的变量充当开关来判断。代码如下:
class FlagThreadExit {
    public static void main(String[] args) throws InterruptedException {
        ExistThread thread = new ExistThread();
        thread.start();
        TimeUnit.SECONDS.sleep(1);
        System.out.println("System will be shutdown");
        thread.close();
    }
}

class ExistThread extends Thread {
    private volatile boolean closed = false;

    @Override
    public void run() {
        System.out.println("i will start work");
        while (!closed && !isInterrupted()) {
        }
        System.out.println("i will be existing");
    }

    public void close() {
        Thread.currentThread().interrupt();
        closed = true;
    }
}
2.8.2 抛异常来关闭线程
通过Thread的interrupted方法来判断, 并适时的抛出异常, 程序捕获异常时候, 会中断线程。
class ThreadInterruptTest {
    public static void main(String[] args) throws InterruptedException {
        Thread thread = new Thread(() -> {
            try {
                int i = 0;
                while(true) {
                    // 捕获线程标识 为中断, 抛出中断异常
                    if(Thread.interrupted()) {
                        throw new InterruptedException("interrupted");
                    }
                    System.out.println(i++ + " isInterrupted " + Thread.currentThread().isInterrupted());
                }
            } catch (InterruptedException e) {
                System.out.println("interrupted yes... " + Thread.currentThread().isInterrupted());
                e.printStackTrace();
            }
        });
        thread.start();
        TimeUnit.MILLISECONDS.sleep(10);
        thread.interrupt();
    }
}
2.9 Alive介绍:
判断当前线程是否属于活动状态(线程已经启动, 尚未终止, 线程属于运行或者准备开始运行状态)
public class ActiveTest {
    public static void main(String[] args) {
        ActiveThread activeThread = new ActiveThread();
        Thread thread = new Thread(activeThread);
        // 新线程 但是没有start 不是活跃状态
        System.out.println("main isAlive " + thread.isAlive());
        thread.start();
        // 已开启, 并且线程没有执行完毕, 属于活跃状态
        System.out.println("main end isAlive " + thread.isAlive());
    }
}

class ActiveThread extends Thread {
    public ActiveThread() {
        System.out.println("ActiveThread - begin");
        // 调用构造函数, 创建对象阶段, 当前线程还属于主线程 肯定是活跃的
        System.out.println("ActiveThread currentThread.getName " + Thread.currentThread().getName());
        System.out.println("ActiveThread currentThread.isActive " + Thread.currentThread().isAlive());
        // this 是新建的线程对象 线程名-> Thread-0。由于没有调用start方法, 还不是活跃状态。
        System.out.println("ActiveThread this.getName " + this.getName());
        System.out.println("ActiveThread this.isActive " + this.isAlive());
        System.out.println("ActiveThread - end");
    }
    @Override
    public void run() {
        System.out.println("run  - begin");
        System.out.println("run currentThread.getName " + Thread.currentThread().getName());
        System.out.println("run currentThread.isActive " + Thread.currentThread().isAlive());
        // this 是新建的线程对象 线程名-> Thread-0。由于没有调用start方法, 还不是活跃状态。
        System.out.println("run this.getName " + this.getName());
        System.out.println("run this.isActive " + this.isAlive());
        System.out.println("run - end");
    }
}
三.线程安全与数据同步
3.1 synchronized介绍:
synchronized关键字提供了一种锁的机制, 确保共享变量的互斥访问, 从而防止数据不一致问题的出现。
3.1.1 synchronized 可重入:
当一个线程在得到一个对象锁的时候, 再次请求获取此对象锁, 是允许获取的。(在一个synchronized方法/代码块内部, 调用本类的其他同步方法/代码块. 是永远可以得到锁的)
public class ReentrantService {
    public synchronized void say1() {
        System.out.println("this is method say1...next invoke say2");
        say2();
    }

    public synchronized void say2() {
        System.out.println("this is method say2...next invoke say3");
        say3();
    }

    public synchronized void say3() {
        System.out.println("this is method say3...next invoke null");
        try {
            TimeUnit.SECONDS.sleep(1);
        } catch (InterruptedException e) {
            e.printStackTrace();
        }
    }

    public static void main(String[] args) {
        ReentrantService service = new ReentrantService();
        ReentrantThread thread = new ReentrantThread(service);
        thread.start();
        ReentrantThread thread2 = new ReentrantThread(service);
        thread2.start();
        System.out.println("main end...");
    }
}

class ReentrantThread extends Thread {
    private ReentrantService reentrantService;

    public ReentrantThread(ReentrantService service) {
        reentrantService = service;
    }

    @Override
    public void run() {
        reentrantService.say1();
    }
}
3.2 synchronized关键字用法:
public class Mutex {
    private final static Object MUTEX = new Object();

    public void accessResource() {
        synchronized (MUTEX) {
            try {
                TimeUnit.MINUTES.sleep(10);
            } catch (InterruptedException e) {
                e.printStackTrace();
            }
        }
    }

    public static void main(String[] args) {
        final Mutex mutex = new Mutex();
        for (int i = 0; i < 5; i++) {
            new Thread(() -> {
                mutex.accessResource();
            }).start();
        }
    }
}
任意对象都可以作为锁(this对象, 属性值<非this对象>…) 这样做的好处: 不与同对象的其他方法争抢this锁, 提高运行效率。
3.3 深入理解synchronized关键字:
3.3.1 线程堆栈分析:
拿3.2 的例子来举例, 上述代码使用同步代码块对accessResource进行了同步, 同时定义了五个线程来调用该方法, 由于同步代码块的互斥性, 只能有一个线程能获取monitor锁, 其他线程只能进入阻塞状态, 等待monitor锁释放。我们进入jconsole控制台查看.
输入: jconsole命令

thread-2,thread-3,thread-4…同理
此外, 我们可以使用jstack来打印线程的堆栈信息: 输入命令 jstack pid
3.3.2 JVM指令分析:
使用jdk命令javap 对Mutex类进行反汇编,会发现monitor enter 与 monitor exit是成对出现的,

重点: 每一个对象与一个monitor相关联, 一个monitor锁只能被一个线程在同一时间获取, 一个线程尝试获取对象关联的monitor所有权时会发生如下几件事:
- monitor计数器是0, 意味着该monitor的所有权还没有获取, 某一线程获取后会该计数器+1, 从此该线程就是该monitor线程的所有者了。
- 如果获取了monitor的线程重入, 该monitor会再次累加.
线程重入: 一个线程试图去获取一个由自己持有的锁, 那么这个请求也是会允许的。比如: 某一个方法声明为synchronized, 如果递归去调用, 就会不断遇到synchronized, 这种情况一定要允许进入代码块(线程重入), 不然会死锁。
c. 如果某一对象关联的monitor(锁)被A线程拥有,B线程在尝试获取获取锁的时候就会阻塞, 直到monitor所有权释放(monitor计数为0), 才能再次尝试获取monitor所有权。
3.3.3 使用synchronized注意的问题:
  1. 与monitor关联的对象不能为空
  1. synchronized作用域太大
  1. 不同的monitor去锁同一代码块
  1. 多个锁交叉导致死锁
3.4 类锁和对象锁(this monitor & class monitor)
public class ThisMonitor {
    // 对象锁
    public synchronized void method1() {
        System.out.println(Thread.currentThread().getName() + " enter method1");
        try {
            TimeUnit.MINUTES.sleep(10);
        } catch (InterruptedException e) {
            e.printStackTrace();
        }
    }

    // 对象锁
    public synchronized void method2() {
        System.out.println(Thread.currentThread().getName() + " enter method2");
        try {
            TimeUnit.MINUTES.sleep(10);
        } catch (InterruptedException e) {
            e.printStackTrace();
        }
    }

    // 对象锁
    public void method3() {
        synchronized (this) {
            System.out.println(Thread.currentThread().getName() + " enter method3");
            try {
                TimeUnit.MINUTES.sleep(10);
            } catch (InterruptedException e) {
                e.printStackTrace();
            }
        }
    }

    // 类锁
    public static synchronized void method4() {
        System.out.println(Thread.currentThread().getName() + " enter method4");
        try {
            TimeUnit.MINUTES.sleep(10);
        } catch (InterruptedException e) {
            e.printStackTrace();
        }
    }

    // 类锁
    public static void method5() {
        synchronized (ThisMonitor.class) {
            System.out.println(Thread.currentThread().getName() + " enter method5");
            try {
                TimeUnit.MINUTES.sleep(10);
            } catch (InterruptedException e) {
                e.printStackTrace();
            }
        }
    }

    public static void main(String[] args) {
        ThisMonitor thisMonitor = new ThisMonitor();
        new Thread(() -> {
            thisMonitor.method1();
        }, "method1").start();
        new Thread(() -> {
            thisMonitor.method2();
        }, "method2").start();
        new Thread(() -> {
            thisMonitor.method3();
        }, "method3").start();
        new Thread(() -> {
            ThisMonitor.method4();
        }, "method4").start();
        new Thread(() -> {
            ThisMonitor.method5();
        }, "method5").start();
    }
}
结果如下:
3.5 程序死锁以及如何诊断:
3.5.1 程序死锁的原因以及举例:
- 交叉锁导致程序死锁 详见例子
- 内存不足: 如果线程A和线程B, 线程A获取了10M内存, B获取了20M内存, 每个线程执行单元需要30M内存, 此时剩余的内存只有20M, 那么两个线程就可能都在等待彼此释放内存资源。
- 一问一答式: 服务端开启端口, 等待客户端访问, 客户端发送请求等待接收, 由于某种原因, 服务端错过了客户端的请求, 此时服务端和客户端都在等待双方发送数据。
- 数据库锁: 某一线程执行for update语句退出了事务, 其他线程访问都陷入了死锁。
- 文件锁: 某一线程获得文件锁意外退出, 其他读取该文件的线程都在等待系统释放文件句柄资源。
死循环引起死锁.
public class DeadLock {
 private final Object MUTEX_READ = new Object();
 private final Object MUTEX_WRITE = new Object();

 public void read() {
     synchronized (MUTEX_READ) {
         try {
             TimeUnit.MILLISECONDS.sleep(100);
         } catch (InterruptedException e) {
             e.printStackTrace();
         }
         System.out.println(Thread.currentThread().getName() + " get read lock");
         synchronized (MUTEX_WRITE) {
             System.out.println(Thread.currentThread().getName() + " get write lock");
         }
         System.out.println(Thread.currentThread().getName() + " release write lock");
     }
     System.out.println(Thread.currentThread().getName() + " release read lock");
 }

 public void write() {
     synchronized (MUTEX_WRITE) {
         try {
             TimeUnit.MILLISECONDS.sleep(200);
         } catch (InterruptedException e) {
             e.printStackTrace();
         }
         System.out.println(Thread.currentThread().getName() + " get write lock");
         synchronized (MUTEX_READ) {
             System.out.println(Thread.currentThread().getName() + " get read lock");
         }
         System.out.println(Thread.currentThread().getName() + " release read lock");
     }
     System.out.println(Thread.currentThread().getName() + " release write lock");
 }

 public static void main(String[] args) {
     final DeadLock deadLock = new DeadLock();
     new Thread(() -> {
         while (true) {
             deadLock.read();
         }
     }, "READ-LOCK").start();

     new Thread(() -> {
         while (true) {
             deadLock.write();
         }
     }, "WRITE-LOCK").start();
 }
}
3.5.2 打印线程的堆栈信息进行问题的排查(jstack)
3.6 volatile关键字
3.6.1 遇到的问题
public class PrintString implements Runnable {
    private boolean isContinuePrint = true;

    public boolean isContinuePrint() {
        return isContinuePrint;
    }

    public void setContinuePrint(boolean continuePrint) {
        isContinuePrint = continuePrint;
    }

    public void printStringMethod() {
        System.out.println("进入 printStringMethod");
        while (isContinuePrint) {
        }
        System.out.println("printStringMethod 方法结束");
    }

    @Override
    public void run() {
        printStringMethod();
    }

    public static void main(String[] args) throws InterruptedException {
        PrintString string = new PrintString();
        Thread thread = new Thread(string);
        thread.start();
        Thread.sleep(1000);
        string.setContinuePrint(false);
        System.out.println("已经赋值为false 方法会结束");
    }
}
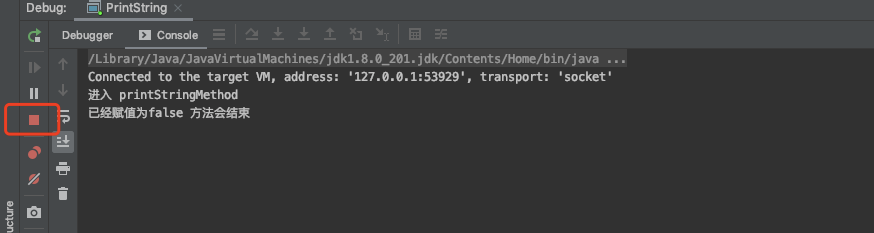
上述结果进入了死循环。原因: 对象属性存在于公共堆栈和线程的私有堆栈中。线程在取数据的时候一种从私有堆栈中取数据,私有堆栈是true, 而代码string.setContinuePrint(false); 虽然被执行, 但是更新的却是公共堆栈。公共堆栈是false。所以就一直陷入死循环。
3.6.2 解决方案:
通过使用volatile关键字(volatile private boolean isContinuePrint = true), 强制从公共内存中读取变量的值。增加了实例变量在多个线程之间的可见性。
3.6.3 synchronized关键字 VS volatile关键字
volatile关键字只能修饰变量, synchronized能修饰方法, 代码块。
多线程访问volatile不会发生堵塞, 而synchronized会发生阻塞。
volatile保证的是数据的可见性, 但是不保证原子性, synchronized能保证原子性, 也能间接保证数据可见性(将私有堆栈和公共堆栈数据进行同步)
volatile不同步分析: 在多线程环境中, 线程1和线程2同时进行read和load操作, 发现主内存中的count值是5, 那么都会加载这个值(volatile保证了可见性问题) 但是后续的use和assign操作不是原子性的, 这里就会产生线程不安全的问题(还是需要加锁同步或者使用原子类)。
3.6.4 synchronized 也能保证可见性:
JMM关于synchronized的两条规定:
1)线程解锁前,必须把共享变量的最新值刷新到主内存中
2)线程加锁时,将清空工作内存中共享变量的值,从而使用共享变量时需要从主内存中重新获取最新的值.
通过以上两点,synchronized能够实现可见性.
四. 线程间通信:
4.1 异步非阻塞消息处理模式:
异步非阻塞消息处理模式, 大概思路是: 当客户端发起一个请求, 就会马上返回给客户端一个工单号, 然后将该请求丢到任务队列里, 然后服务端有若干线程, 不断的从任务队列里获取任务并进行异步处理, 最后将返回处理结果丢到一个结果集中, 如果客户端想要获取处理结果, 可以凭借工单号查询。
4.2 wait和notify介绍(日常使用&注意事项)
wait和notify方法不是Thread特有的方法, 而是Object中的方法。
wait方法使用的时候, 必须拥有该对象的monitor, 也就是wait方法必须在同步方法内。原因: 当前线程A调用该对象Object1的wait方法之后, A就会放弃Object1的monitor所有权, 并且会被放到一个wait set集合中, 其他线程有机会去争抢Object1的monitor所有权。同理, 在使用notify的时候, 也必须拥有该对象的monitor 也就是notify方法也必须在同步方法中 , 原因: 当线程B调用了对象Object1的notify方法之后, 可将之前wait的线程A从该对象Object1的wait set集合中弹出。然后线程A也将会被唤醒.
补充:wait方法和notify方法操作的对象应该是同一个对象, 也和同步方法块锁住的对象是同一个对象。
下面有一些错误例子:
/**
 * 错误案例1:
 * wait和notify方法必须在同步方法内
 * 不在同步代码块内会抛IllegalMonitorStateException异常
 */
public class WaitTest {
    private void testWait() {
        try {
            this.wait();
        } catch (InterruptedException e) {
            e.printStackTrace();
        }
    }

    private void testNotify() {
        this.notify();
    }

    public static void main(String[] args) {
        WaitTest waitTest = new WaitTest();
        new Thread(() -> {
            waitTest.testWait();
        }, "waitTest").start();
        new Thread(() -> {
            waitTest.testNotify();
        }, "notifyTest").start();
    }
}

/**
 * 错误案例2:
 * 同步代码块monitor必须与执行wait和notify方法的对象一致.
 * 这里同步代码块拿到的是WaitTest2 这个对象的monitor
 * 但是使用的是MUTEX这个对象的wait和notify方法, 会抛IllegalMonitorStateException异常
 */
class WaitTest2 {
    private final Object MUTEX = new Object();

    private synchronized void testWait() {
        try {
            MUTEX.wait();
        } catch (InterruptedException e) {
            e.printStackTrace();
        }
    }

    private synchronized void testNotify() {
        MUTEX.notify();
    }

    public static void main(String[] args) {
        WaitTest2 waitTest = new WaitTest2();
        new Thread(() -> {
            waitTest.testWait();
        }, "waitTest").start();
        new Thread(() -> {
            waitTest.testNotify();
        }, "notifyTest").start();
    }
}


/**
 * 错误案例
 * 执行wait方法和notify的对象不是同一个, 导致无法唤醒wait的线程。
 */
class WaitTest2_1 {
    private final Object MUTEX = new Object();

    private void testWait() {
        synchronized (MUTEX) {
            try {
                MUTEX.wait(2000);
            } catch (InterruptedException e) {
                e.printStackTrace();
            }
        }
    }

    private synchronized void testNotify() {
        this.notify();
    }

    public static void main(String[] args) {
        WaitTest2_1 waitTest = new WaitTest2_1();
        Thread thread = new Thread(() -> {
            waitTest.testWait();
        }, "waitTest");
        thread.start();
        new Thread(() -> {
            waitTest.testNotify();
        }, "notifyTest").start();
        try {
            thread.join();
            System.out.println("ending...");
        } catch (InterruptedException e) {
            e.printStackTrace();
        }
    }
}


/**
 * 正确案例
 */
class WaitTest3 {
    private final Object MUTEX = new Object();

    private void testWait() {
        synchronized (MUTEX) {
            try {
                MUTEX.wait();
            } catch (InterruptedException e) {
                e.printStackTrace();
            }
        }
    }

    private void testNotify() {
        synchronized (MUTEX) {
            MUTEX.notify();
        }
    }

    public static void main(String[] args) {
        WaitTest3 waitTest = new WaitTest3();
        new Thread(() -> {
            waitTest.testWait();
        }, "waitTest").start();
        new Thread(() -> {
            waitTest.testNotify();
        }, "notifyTest").start();
    }
}


/**
 * 当线程是wait状态的时候, 调用interrupt方法,会出现InterruptedException异常
 */
class WaitTest4 {
    private final Object MUTEX = new Object();

    private void testWait() {
        synchronized (MUTEX) {
            try {
                System.out.println("我即将被wait啦");
                MUTEX.wait();
            } catch (InterruptedException e) {
                System.out.println("有人把我打断啦");
                e.printStackTrace();
            }
            System.out.println("我又可以继续执行啦 我现在被打断了么:" + Thread.currentThread().isInterrupted());
        }
    }

    public static void main(String[] args) {
        WaitTest4 waitTest = new WaitTest4();
        Thread thread = new Thread(() -> {
            waitTest.testWait();
        }, "waitTest");
        thread.start();
        try {
            TimeUnit.SECONDS.sleep(1);
            thread.interrupt();
            TimeUnit.SECONDS.sleep(1);
            System.out.println("all task is over");
        } catch (InterruptedException e) {
            e.printStackTrace();
        }
    }
}

/**
 * wait(1000) 等待某一时间是否有线程对锁进行唤醒, 超过这个时间就自动唤醒。
 */
class WaitTest5 {
    private final Object MUTEX = new Object();

    private void testWait() {
        synchronized (MUTEX) {
            try {
                System.out.println("will be wait moment...");
                MUTEX.wait(1000);
                System.out.println("wait end...");
            } catch (InterruptedException e) {
                e.printStackTrace();
            }
        }
    }

    private void testNotify() {
        synchronized (MUTEX) {
            System.out.println("i will notify waitTest thread");
            MUTEX.notify();
            System.out.println("notify waitTest thread end");
        }
    }

    public static void main(String[] args) throws InterruptedException {
        WaitTest5 waitTest = new WaitTest5();
        new Thread(() -> {
            waitTest.testWait();
        }, "waitTest").start();
        Thread.sleep(3000);
        new Thread(() -> {
            waitTest.testNotify();
        }, "notifyTest").start();
    }
}
4.3 wait和sleep的区别:
- wait和sleep方法都可以使线程进入阻塞状态, 并且wait和sleep方法均是可中断方法。
- wait是Object方法, sleep是Thread特有的方法.
- wait执行时候会释放对象锁, 所以必须在同步方法块内, 而sleep不需要释放锁, 所以也不需要在同步代码块中。
- sleep方法在短暂休眠后, 会主动退出阻塞,wait方法在没有指定wait时间的时候, 需要被其他线程中断或唤醒才能退出阻塞。
4.4 生产者/消费者:
public class ContainerQueue<T> {

    // 容器最大限制
    private int max;

    private LinkedList<T> queue = new LinkedList<>();

    public ContainerQueue(int max) {
        this.max = max;
    }

    public void push(T param) {
        /**
         * 如果这里wait和notify的对象是queue, 那么代码块锁住的对象一定是queue对象
         * 再进行wait或者是notify需要操作锁, 如果要操作的锁和拿到的锁不是同一把锁, 会抛异常: IllegalMonitorStateException
         */
        synchronized (queue) {
            try {
                while (queue.size() == max) {
                    System.out.println("queue is full...");
                    queue.wait();
                }
                queue.add(param);
                System.out.println("queue add param -> " + param + " and now queue.size:" + queue.size());
                queue.notifyAll();
            } catch (InterruptedException e) {
                e.printStackTrace();
            }
        }
    }

    public T pop() {
        synchronized (queue) {
            try {
                /**
                 * 这里使用while,不使用if的原因:
                 * 多个消费者情况下, 如果线程A和线程B在进行消费的时候, 发现queue是空, 被阻塞了.
                 * 此时线程C生产了数据, 唤醒了A进行消费, 然后A进行了唤醒操作, 唤醒了B。 B去消费, 但是此时queue是空, 存在报错的问题。
                 */
                while (queue.isEmpty()) {
                    System.out.println("queue is empty...");
                    queue.wait();
                }
                T param = queue.removeFirst();
                System.out.println("queue remove param -> " + param + " and now queue.size:" + queue.size());
                queue.notifyAll();
                return param;
            } catch (InterruptedException e) {
                e.printStackTrace();
                return null;
            }
        }
    }
}


class producer implements Runnable {

    private ContainerQueue queue;

    public producer(ContainerQueue queue) {
        this.queue = queue;
    }

    @Override
    public void run() {
        while (true) {
            try {
                Thread.sleep(50);
            } catch (InterruptedException e) {
                e.printStackTrace();
            }
            int num = ThreadLocalRandom.current().nextInt(100);
            System.out.println("当前线程: " + Thread.currentThread().getName() + ", 生产随机数:" + num);
            queue.push(num);
        }
    }
}

class consumer implements Runnable {

    private ContainerQueue queue;

    public consumer(ContainerQueue queue) {
        this.queue = queue;
    }

    @Override
    public void run() {
        while (true) {
            try {
                Thread.sleep(50);
            } catch (InterruptedException e) {
                e.printStackTrace();
            }
            System.out.println("当前线程: " + Thread.currentThread().getName() + ", 消费数据:" + queue.pop());
        }
    }
}


class QueueClient {
    public static void main(String[] args) {
        ContainerQueue queue = new ContainerQueue(5);

        producer producer = new producer(queue);
        Thread producer1 = new Thread(producer);
        Thread producer2 = new Thread(producer);

        consumer consumer = new consumer(queue);
        Thread consumer1 = new Thread(consumer);
        Thread consumer2 = new Thread(consumer);

        producer1.start();
        producer2.start();
        consumer1.start();
        //consumer2.start();
    }
}
4.5 自定义锁BooleanLock
synchronized提供了一种排他式的线程同步机制, 有两个缺陷: 1. 无法控制阻塞时长, 2. 阻塞不可中断。基于上面学习的wait和notify的知识, 我们可以自定义锁. 代码如下:
package com.halooing.chapter5;

import java.util.ArrayList;
import java.util.Collections;
import java.util.List;
import java.util.concurrent.ThreadLocalRandom;
import java.util.concurrent.TimeUnit;
import java.util.concurrent.TimeoutException;
import java.util.stream.IntStream;

/**
 * synchronized 缺陷:
 * 1. 无法控制阻塞时长
 * 2. 阻塞不可以中断
 */
public class BooleanLock implements MyLock {
    // 当前拥有锁的线程
    private Thread currentThread;
    // 开关: false: 当前该锁没有被任何线程获取或者已经释放 true:该锁已经被某一个线程获取
    private boolean locked = false;
    // 尝试获取锁但没有获取,进入阻塞状态的线程
    private final List<Thread> blockedList = new ArrayList<>();

    @Override
    public void lock() throws InterruptedException {
        synchronized (this) {
            while (locked) {
                // 没有获取到锁 进入阻塞队列
                try {
                    if (!blockedList.contains(Thread.currentThread())) {
                        blockedList.add(Thread.currentThread());
                    }
                    this.wait();
                } catch (InterruptedException e) {
                    // 捕获到中断后, 从阻塞队列移除当前线程 并向上抛出
                    blockedList.remove(Thread.currentThread());
                    throw e;
                }

            }
            blockedList.remove(Thread.currentThread());
            locked = true;
            currentThread = Thread.currentThread();
        }
    }

    @Override
    public void lock(long mills) throws InterruptedException, TimeoutException {
        synchronized (this) {
            if (mills <= 0) {
                // 时间不合法 默认调用lock() 无限期阻塞, 直到被中断或唤醒
                this.lock();
            } else {
                long remainMills = mills;
                long endMills = System.currentTimeMillis() + remainMills;
                while (locked) {
                    // 当前线程在指定wait时间完毕 都没有获的锁 抛异常
                    if (remainMills <= 0) {
                        throw new TimeoutException("can not get the lock during " + mills + " ms");
                    }
                    if (!blockedList.contains(Thread.currentThread())) {
                        blockedList.add(Thread.currentThread());
                    }
                    this.wait(remainMills);
                    remainMills = endMills - System.currentTimeMillis();
                }
                blockedList.remove(Thread.currentThread());
                locked = true;
                currentThread = Thread.currentThread();
            }
        }
    }

    @Override
    public void unlock() {
        synchronized (this) {
            if (currentThread == Thread.currentThread()) {
                locked = false;
                this.notifyAll();
            }
        }
    }

    @Override
    public List<Thread> getBlockedThreads() {
        return Collections.unmodifiableList(blockedList);
    }
}

interface MyLock {
    // 永远处于阻塞, 但是是可以被中断的
    void lock() throws InterruptedException;

    // 阻塞时长到了以后, 会停止阻塞, 并且是可以被中断的
    void lock(long mills) throws InterruptedException, TimeoutException;

    // 释放锁
    void unlock();

    // 获取当前有哪些线程被阻塞
    List<Thread> getBlockedThreads();
}


class BooleanLockTest {
    private final MyLock lock = new BooleanLock();

    public void syncMethod() {
        try {
            lock.lock();
            int random = ThreadLocalRandom.current().nextInt(5);
            System.out.println(Thread.currentThread().getName() + " get the lock");
            TimeUnit.SECONDS.sleep(random);
        } catch (InterruptedException e) {
            e.printStackTrace();
        } finally {
            lock.unlock();
        }
    }

    public void syncMethodTimeoutable() {
        try {
            lock.lock(1000);
            System.out.println(Thread.currentThread().getName() + " get the lock");
            int random = ThreadLocalRandom.current().nextInt(5);
            TimeUnit.SECONDS.sleep(random);
        } catch (InterruptedException | TimeoutException e) {
            e.printStackTrace();
        } finally {
            lock.unlock();
        }
    }

    public static void main(String[] args) {
        BooleanLockTest test = new BooleanLockTest();
        // 可中断
        try {
            new Thread(test::syncMethod).start();
            TimeUnit.MILLISECONDS.sleep(10);
            Thread t2 = new Thread(test::syncMethod);
            t2.start();
            TimeUnit.MILLISECONDS.sleep(10);
            t2.interrupt();
        } catch (InterruptedException e) {
            e.printStackTrace();
        }

        // 阻塞可超时
        BooleanLockTest test2 = new BooleanLockTest();
        try {
            new Thread(test2::syncMethodTimeoutable).start();
            TimeUnit.MILLISECONDS.sleep(4);
            Thread t2 = new Thread(test2::syncMethodTimeoutable);
            t2.start();
            TimeUnit.MILLISECONDS.sleep(10);
        } catch (InterruptedException e) {
            e.printStackTrace();
        }

    }
}
补充:
A. 线程start方法剖析:
在start方法源码中写到, 会调用一个start0() 这个JNI方法(本地方法), 该方法才会真正的开启线程, 并且调用run方法。由此可知, run() 方法只是一个包含业务逻辑普通的方法;start是启动多线程的唯一方式,其使得线程由创建态到就绪态,而这个线程是否被运行是由系统调度所决定的。
(启新线程为什么调用start方法, 而不是run方法)另外一种解释:
调用了start方法会通知”线程规划器”,此线程已准备就绪. 让线程安排一个时间来调用Thread对象的run方法. 也就有了异步的效果。但是如果直接调用run方法, 此线程对象不会交给”线程规划器”处理, 而是当前线程调用run方法, 是同步执行。

若有收获,就点个赞吧
0 人点赞


