轻量级提示
这里提到的轻量级提示指的是在提示出现的过程中不会打断用户当前正在进行中的操作,只是在UI上有一小段时间的提示,隔一段时间之后提示内容自动消失,例如原生Android的Toast、SnackBar一样,并不会像Dialog一样出现之后用户必须停止正在进行的操作去完成Dialog引发的逻辑操作之后才能继续在dialog出现之前的操作。
1.Tooltip
Tooltip支持用户传入任意一个child作为显示的Widget,并且在用户长按Widget时,会在上方或者下方出现类似Toast的提示,隔一段时间自动消失,由于使用起来比较简单,我就在代码注释里讲解就不展开赘述了。
import 'package:flutter/material.dart';void main() {runApp(new MaterialApp(home: new MyApp(),));}class MyApp extends StatelessWidget {@overrideWidget build(BuildContext context) {return Scaffold(appBar: AppBar(title: Text("Tooltips"),),body: Center(child: Tooltip(message: "显示提示内容",height: 60.0,verticalOffset: 50.0,preferBelow:false,padding: EdgeInsets.all(20.0),child: Icon(Icons.android,size: 50.0,color: Colors.green,)),),);}}
效果图
2.SnackBar
SnackBar无论是用法还是功能使用几乎都跟原生Android一样 ,唯一有一点需要留意的是在 Scaffold.of(context).showSnackBar()中传递的context必须不能是Scaffold下面的Context
原因解释
因为Scaffold.of() 方法需要从Widget树中去找到Scaffold的Context,所以如果直接在Scaffold中使用showSnackBar,需要在外层包括上Builder Widget,这个Builder不做任何的其他操作,只不过把Widget树往下移了一层而已,这里也是很多初学者照着网上的Demo写完之后怎么写弹不出来SnackBar的原因,所以这里特此说明一下。
来看下SnackBar的效果图,你会发现跟原生Android如出一辙。
样例代码
import 'package:flutter/material.dart';void main() {runApp(new MaterialApp(home: new MyApp()));}class MyApp extends StatelessWidget {@overrideWidget build(BuildContext context) {return new Scaffold(appBar: new AppBar(title: new Text("SnackBar"),),body: new Center(child: new Builder(builder: (BuildContext context) {return new RaisedButton(onPressed: () {Scaffold.of(context).showSnackBar(new SnackBar(content: new Text("SanckBar is Showing "),action: new SnackBarAction(label: "撤销",onPressed: () {print("点击撤回---------------");}),));},child: new Text("SnackBar提示"),color: Colors.cyan,highlightColor: Colors.lightBlueAccent,disabledColor: Colors.lightBlueAccent,);}),),);}}
Dialog&Toast
上面介绍了Tooltip跟SnackBar,在介绍此二者的时候笔者也提到它们定位为轻量级的提示Widget,那对应的就会有非轻量级的提示组件,意思就是在此类提示出现的过程中,会打断用户正在进行的操作,强制用户处处理对话框上的逻辑之后才能回过头来继续原有的用户操作,例如AlertDialog、BottomSheetDialog等,接下来笔者就带大家一起体验一下这类提示操作的用法。
Flutter中要求开发者通过
showDialog(context,child),来唤起各种不同类型的dialog显示,context为上下文参数,child为要显示的对话框类型,例如,SimpleDialog、AlertDialog、AboutDialog、BottomSheetDialog等都需要借助showDialog来唤起。
1.SimpleDialog
SimpleDialog跟它的名字一样,它就是一个简单的对话框,开发者只需传入title跟child就可以使用它,其中child是一个Widget数组,用户可以根据业务需求传入任意的Widget,然后借助showDialog唤起即可。
效果图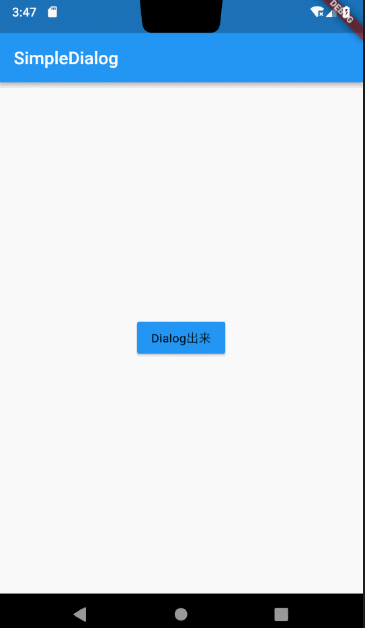
样例代码
import 'package:flutter/material.dart';void main() {runApp(new MaterialApp(home: new MyApp()));}class MyApp extends StatelessWidget {@overrideWidget build(BuildContext context) {return new Scaffold(appBar: new AppBar(title: new Text("SimpleDialog"),),body: new Center(child: new RaisedButton(onPressed: () {showDialog(context: context,child: new SimpleDialog(title: new Text("标题"),contentPadding: const EdgeInsets.all(10.0),children: <Widget>[new Text("文字内容1"),new ListTile(leading: new Icon(Icons.android),title: new Text("android"),),new Text("文字内容2"),new Text("文字内容3"),new Text("文字内容4"),],));},child: new Text("Dialog出来"),color: Colors.blue,highlightColor: Colors.lightBlueAccent,disabledColor: Colors.lightBlueAccent),),);}}
2.AlertDialog
AlertDialog其实就是simpleDialog的封装,更加方便开发者使用,只不过在SimpleDialog的基础上新增了action操作而已,用户可以定制具体类似,”取消”、”确定”等一切可能存在dialog上的逻辑处理。其余没有什么需要特别强调的知识点,也是跟simpledialog一样,需要借助showDialog唤起,使用起来比较简单,直接从代码里说明了。
样例代码
import 'package:flutter/material.dart';void main() {runApp(new MaterialApp(home: new MyApp()));}class MyApp extends StatelessWidget {@overrideWidget build(BuildContext context) {return new Scaffold(appBar: new AppBar(title: new Text("AlertDialog"),),body: new Center(child: new Builder(builder: (BuildContext context) {return new RaisedButton(onPressed: () {showDialog(context: context,child: new AlertDialog(title: new Text("标题"),content: new Text("内容区域"),actions: <Widget>[new FlatButton(onPressed: () {Navigator.of(context);},child: new Text("确定")),new FlatButton(onPressed: () {print("点击取消------");},child: new Text("取消")),],));},color: Colors.lightBlueAccent,child: new Icon(Icons.phone),);}),),);}}
效果图
文章开头的效果图上提到的aboutDialog跟alertDialog类似,同样也是封装了simpleDialog,读者可自行阅读尝试具体用法,我就不在此详细解说了,下面我想说一下BottomSheetDialog跟ModalBottomSheetDialog。
3.BottomSheetDialog、ModalBottomSheetDialog
BottomSheetDialog、ModalBottomSheetDialog同样也是需要借助showDialog唤起,就跟它名字一样,这两种dialog是从屏幕下方向上弹出的,不同的是BottomSheetDialog默认会铺满全屏显示,而ModalBottomSheetDialog半屏显示,二者都支持随用户手指拖动上下移动。
方法签名
showBottomSheet(context,child)上下文参数,Widget数组
showModalBottomSheet(context,child)上下文参数,Widget数组
来一起体验一下这俩东西怎么使用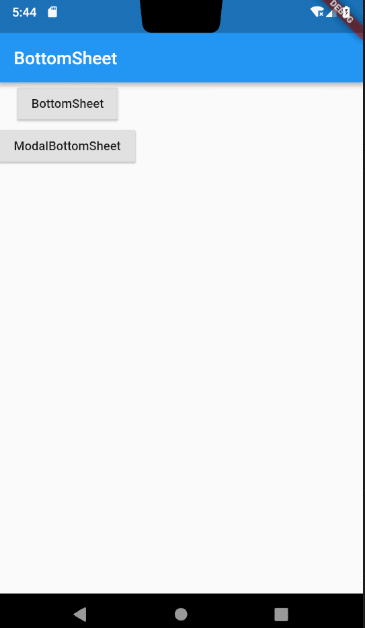
样例代码
import 'package:flutter/material.dart';void main() {runApp(new MaterialApp(home: new MyApp()));}class MyApp extends StatelessWidget {@overrideWidget build(BuildContext context) {return new Scaffold(appBar: new AppBar(title: new Text("BottomSheet"),),body: new Column(children: <Widget>[new Builder(builder: (BuildContext context){return new RaisedButton(onPressed: () {showBottomSheet(context: context,builder: (BuildContext context) {return new Container(child: new Padding(padding: const EdgeInsets.all(10.0),child: new Column(children: <Widget>[new ListTile(leading: new Icon(Icons.chat),title: new Text("对话框列表1"),),new ListTile(leading: new Icon(Icons.help),title: new Text("对话框列表2"),),new ListTile(leading: new Icon(Icons.settings),title: new Text("对话框列表3"),),new ListTile(leading: new Icon(Icons.more),title: new Text("对话框列表4"),),],),),);});},child: new Text("BottomSheet"),);}),new RaisedButton(onPressed: () {showModalBottomSheet(context: context,builder: (BuildContext context) {return new Container(child: new Padding(padding: const EdgeInsets.all(10.0),child: new Column(children: <Widget>[new ListTile(leading: new Icon(Icons.chat),title: new Text("对话框列表1"),),new ListTile(leading: new Icon(Icons.help),title: new Text("对话框列表2"),),new ListTile(leading: new Icon(Icons.settings),title: new Text("对话框列表3"),),new ListTile(leading: new Icon(Icons.more),title: new Text("对话框列表4"),),],),),);});},child: new Text("ModalBottomSheet"),),],),);}}

若有收获,就点个赞吧
0 人点赞
