一、概述
组件是带有名称的可复用实例, 是 Vue 最强大的功能之一。组件可以扩展 HTML 元素,封装可重用的代码。在较高层面上,组件是自定义元素,Vue 的编译器为它添加特殊功能。
通常一个应用会以一棵嵌套的组件树的形式来组织:

例如,你可能会有页头、侧边栏、内容区等组件,每个组件又包含了其它的像导航链接、博文之类的组件。
为了能在模板中使用,这些组件必须先注册以便 Vue 能够识别。这里有两种组件的注册类型:全局注册 和 局部注册。
二、 组件注册
1. 组件名
在字符串模板或单文件组件中定义组件时,定义组件名的方式有两种:
@使用 kebab-case
app.component('my-component-name', {/* ... */})
当使用 kebab-case (短横线分隔命名) 定义一个组件时,你在引用这个自定义元素时也必须使用 kebab-case
@使用 PascalCase
app.component('MyComponentName', {/* ... */})
当使用 PascalCase (首字母大写命名) 定义一个组件时,你在引用这个自定义元素时两种命名法都可以使用。尽管如此,还是建议使用 kebab-case。
2. 全局注册
// Create a Vue applicationconst app = Vue.createApp({})// Define a new global component called button-counterapp.component('button-counter', {data() {return {count: 0}},template: `<button @click="count++">You clicked me {{ count }} times.</button>`})
注意:
data必须是函数,且必须返回一个对象。
使用组件:
<div id="app"><button-counter /><button-counter /><button-counter /></div>
3. 局部注册
const ComponentA = {/* ... */}const ComponentB = {components: {'component-a': ComponentA}// ...}
4. 模版字符串异常
在 Vue3 中,如果你使用 template 模板字符串定义组件,会抛出如下异常:
[Vue warn]: Component provided template option but runtime compilation is not supported in this build of Vue. Configure your bundler to alias "vue" to "vue/dist/vue.esm-bundler.js".
异常解读:组件提供了模板选项,但在此Vue构建中不支持运行时编译。 将你的 bundler 的别名 vue 配置为 vue/dist/vue.esm-bundle .js。
解决方案:由于本教程主要基于 Vite 构建,所以这里主要讲解在 vite 中的处理方案。根据异常解读,不难发现,我们只需要配置 vue 别名即可。在 vite.config.js 文件中添加如下代码:
import { defineConfig } from 'vite';import vue from '@vitejs/plugin-vue';// https://vitejs.dev/config/export default defineConfig({plugins: [vue()],// +++resolve: {alias: {vue: 'vue/dist/vue.esm-bundler.js',},},// +++});
5. 单文件组件(推荐)
5.1. 介绍
Vue 单文件组件(又名 *.vue 文件,缩写为 SFC)是一种特殊的文件格式,它允许将 Vue 组件的 模板、逻辑 与 样式 封装在单个文件中。下面是 SFC 示例:
<!-- 脚本 --><script setup lang="ts">import { ref } from 'vue';const greeting = ref('Hello World!');</script><!-- 模板 --><template><p class="greeting">{{ greeting }}</p></template><!-- 样式 --><style scoped>.greeting {color: red;font-weight: bold;}</style>
提示:上述示例中,使用
Composition API风格演示 ,因为 使用 Composition API 时更符合人体工程学的语法 >>
单文件组件由以下三种类型的顶层代码块组成:
<script setup>:JavaScript 模块(脚本,处理业务逻辑)- 每个
*.vue文件最多可同时包含一个<script setup>块 - 该脚本会被预处理并作为组件的
setup()函数使用,也就是说它会在每个组件实例中执行。<script setup>的顶层绑定会自动暴露给模板。
- 每个
<template>: 组件模板(视图)- 每个
*.vue文件最多可同时包含一个顶层<template>块。 - 其中的内容会被提取出来并传递给
@vue/compiler-dom,预编译为 JavaScript 的渲染函数,并附属到导出的组件上作为其render选项。
- 每个
<style>:样式- 一个
*.vue文件可以包含多个<style>标签。 <style>标签可以通过scoped或module属性将样式封装在当前组件内。
- 一个
查阅 SFC语法规范 >> 查看更多细节。
提示:推荐使用单文件组件~
5.2. 使用流程
单文件组件使用流程:创建单文件组件 → 导入组件 → 注册组件 → 使用组件
提示:如果你使用
<script setup>,则无需注册,导入之后直接使用即可。
5.3. 关注点分离?
一些来自传统 Web 开发背景的用户可能会担心 SFC 在同一个地方混合了不同的关注点——HTML/CSS/JS 应该分开!
要回答这个问题,我们必须同意关注点分离不等于文件类型分离。工程原理的最终目标是提高代码库的可维护性。关注点分离,当墨守成规地应用为文件类型的分离时,并不能帮助我们在日益复杂的前端应用程序的上下文中实现该目标。
在现代 UI 开发中,我们发现与其将代码库划分为三个相互交织的巨大层,不如将它们划分为松散耦合的组件并进行组合更有意义。在组件内部,它的模板、逻辑和样式是内在耦合的,将它们搭配起来实际上可以使组件更具凝聚力和可维护性。
三、组件交互
1. defineProps & defineEmits
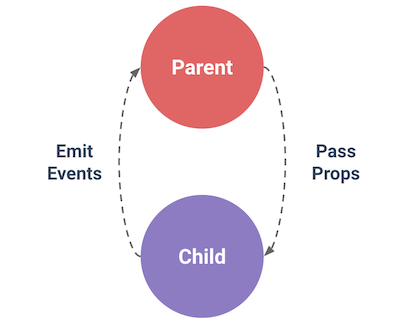
组件交互尽可能将父子组件解耦是很重要的,这保证了每个组件的代码可以在相对隔离的环境中书写和理解,从而提高了其可维护性和复用性。
在 Vue 中,父子组件的交互可以总结为:
- 父组件通过属性(
[props →](https://v3.cn.vuejs.org/guide/component-props.html)) 向子组件传递数据; - 子组件通过事件(
[emits →](https://v3.cn.vuejs.org/guide/component-custom-events.html)) 向父组件传递数据;
在 <script setup> 中必须使用 defineProps 和 defineEmits API 来声明 props 和 emits ,它们具备完整的类型推断并且在 <script setup> 中是直接可用的。
defineProps和defineEmits都是只在<script setup>中才能使用的编译器宏。他们不需要导入且会随着<script setup>处理过程一同被编译掉。defineProps接收与[props](https://v3.cn.vuejs.org/api/options-data.html#props)选项 相同的值,defineEmits也接收[emits](https://v3.cn.vuejs.org/api/options-data.html#emits)选项 相同的值。
@**defineProps**
接下来我们来看一组示例:
子组件
<!-- child.vue --><script setup lang="ts">// -- 声明属性类型(TS)interface IProps {name: string;age: number;job?: string;}// -- 定义属性const props = defineProps<IProps>();console.log(props);</script><template><div>{{ name }} - {{ age }} - {{ job }}</div></template>
父组件
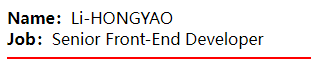
<!-- parent.vue --><script setup lang="ts">// 导入子组件(无需注册)import Child from './Child.vue';</script><template><!-- 使用子组件 --><Child name="Li-HONGYAO" :age="28" job="前端工程师" /></template>
页面输出:
Li-HONGYAO - 28 - 前端工程师
@属性默认值:**withDefaults**
使用 defineProps 定义属性时无法设置默认值,为了解决这个问题,提供了 withDefaults 编译器宏:
const props = withDefaults(defineProps<IProps>(), {name: 'Muzili',age: 18,job: '未知',});
@**defineEmits**
1)首先,我们在 子组件 中定义事件:
const emit = defineEmits<{(e: 'change', id: number):void;(e: 'update', value: string):void;}>();
上述示例中,e 对应事件名称,该名称可自行定义,id 和 value 表示触发时间传递的参数。
2)在 子组件 模板中触发事件:
<button type="button" @click="emit('change', 1)">触发[change]事件</button><button type="button" @click="emit('update', 'Hello')">触发[update]事件</button>
3)在 父组件 中接收事件
<script setup lang="ts">// -- 引入子组件import Child from './Child.vue';// -- 监听子组件[change]事件const onChange = (id: number) => {console.log(id);};// -- 监听子组件[update]事件const onUpdate = (value: string) => {console.log(value);};</script><template><Child name="Li-HONGYAO" :age="28" @change="onChange" @update="onUpdate" /></template>
2. defineExpose
暴露属性或方法给父组件使用,通过 defineExpose 实现:
子组件
<script setup lang="ts">// -- 变量const name = 'Li-HONGYAO';// -- 方法const sayHello = (name: string) => {console.log(`Hello, ${name}!`);};// -- 定义子子组件暴露出去的属性的类型声明export interface ExposeProps {name: string;sayHello: (name: string) => void;}// -- 将变量 name 和方法 sayHello 暴露给父组件// -- 父组件可通过 ref 访问defineExpose({name,sayHello,});</script><template></template>
父组件
<script setup lang="ts">import { onMounted, ref } from 'vue';import Child, { ExposeProps } from './Child.vue';const childRef = ref<ExposeProps>();onMounted(() => {// 访问子组件属性:nameconsole.log(childRef.value?.name); // Li-HONGYAO// 调用子组件方法:sayHellochildRef.value?.sayHello('Li-HONGYAO'); // Hello, Li-HONGYAO!});</script><template><Child ref="childRef" /></template>
3. v-mode
默认情况下,组件上的 v-model 使用 modelValue 作为 prop 和 update:modelValue 作为事件。
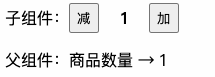
当需要使用多个 v-model 或者说你想要实现子组件某个特定属性的 v-model 时,比如 count 属性,我们可以这样做,这里以简单封装一个 Counter 组件为例:
子组件:
**src/components/Counter.vue**
<script setup lang="ts">interface IProps {min?: number;max?: number;count?: number;}const props = withDefaults(defineProps<IProps>(), {min: 1,max: 5,count: 1,});const emit = defineEmits<{(e: 'update:count', count: number): void;}>();// eventsconst plus = () => {const { count, max } = props;emit('update:count', count + 1 > max ? max : count + 1);};const minus = () => {const { count, min } = props;emit('update:count', count - 1 < min ? min : count - 1);};</script><template><div class="wrap"><span>子组件:</span><button type="button" @click="minus">减</button><div class="v">{{ count }}</div><button type="button" @click="plus">加</button></div></template><style scoped>.wrap {display: flex;justify-content: flex-start;align-items: center;}button {width: 30px;height: 30px;display: flex;justify-content: space-between;align-items: center;cursor: pointer;}.v {text-align: center;width: 50px;font-weight: bold;}</style>
父组件:
**src/App.vue**
<script setup lang="ts">import { ref } from 'vue';import Counter from './components/Counter.vue';const count = ref(1);</script><template><Counter v-model:count="count" /><p>父组件:商品数量 → {{ count }}</p></template>
演示效果:
4. 单向数据流
数据总是从父组件传到子组件,子组件没有权利修改父组件传过来的数据,只能请求父组件对原始数据进行修改。这样会防止从子组件 意外改变 父组件的状态,从而导致你的应用的数据流向难以理解。
注意:在子组件直接用 v-model 绑定父组件传过来的 props 这样是不规范的写法,开发环境会报警告。
如果实在要改变父组件的 props 值可以再 data 里面定义一个变量,并用 prop 的值初始化它,之后用 $emit 通知父组件去修改。
5. Provide & Inject
通常,当我们需要从父组件向子组件传递数据时,我们使用 props,想象一下这样的结构:有一些深度嵌套的组件,而深层的子组件需要访问顶层组件的属性。在这种情况下,如果仍然将 prop 沿着组件链逐级传递下去,可能会很麻烦。
对于这种情况,我们可以使用一对 provide 和 inject。无论组件层次结构有多深,父组件都可以作为其所有子组件的依赖提供者。这个特性有两个部分:父组件有一个 provide 选项来提供数据,子组件有一个 inject 选项来开始使用这些数据。
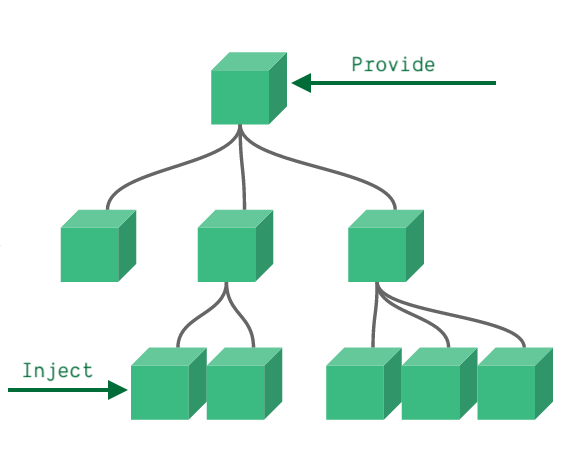
接下来,我们看一组示例,在顶层组件中通过 Provide 传递一组数据,在子组件中通过 Inject 接收:
顶层组件:
<script setup lang="ts">import { provide } from 'vue';provide("global", {env: "development",appID: 'xxx'});</script>
其中,global 表示 key,底层组件可通过 inject(key) 访问, 后面跟的对象表示传递的值。
底层组件:
<script setup lang="ts">import { inject } from 'vue';const global = inject('global');console.log(global); // → {env: 'development', appID: 'xxx'}</script>
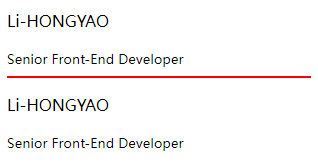
6. $attrs
$attr 主要用于获取没有在组件内部通过 props 或者 emits 明确定义的属性。我们来看一组示例:
子组件
<script setup lang="ts">defineProps<{ name: string }>();</script>
在子组件中,定义了 name 属性。
父组件
<child-comp name="Li-HONGYAO" job="Senior Front-End Developer" />
父组件在调用子组件时,除了传递子组件需要的 name 属性之外,还传递了 job 属性,该属性并没有在 props 中定义,接下来我们通过 useAttrs 来访问它。
<script setup lang="ts">// +++import { useAttrs } from 'vue';// +++defineProps<{ name: string }>();// +++// -- 获取非props属性const attrs = useAttrs();console.log(attrs); // → Proxy {job: 'Senior Front-End Developer', __vInternal: 1}// +++</script>
可以看到,访问 attrs 变量,输出了 job 信息。
@Attribute 继承
非props属性具有 隐式贯穿 行为, 如果你在根组件中(或者任意父组件中)使用非props属性,那么它将会传递给其所有的子组件。如果你想要的禁用 attribute 继承,可以在组件的选项中设置 inheritAttrs: false。
<!-- <script setup> & <script> --><script>export default {inheritAttrs: false,};</script><script setup lang="ts"></script>
注意:
<script setup>可以和普通的<script>一起使用。普通的<script>在有这些需要的情况下或许会被使用到:
- 无法在
<script setup>声明的选项,例如inheritAttrs或通过插件启用的自定义的选项。- 声明命名导出。
- 运行副作用或者创建只需要执行一次的对象。
7. $parent & $children
在vue2.x 以及 vue3.x 的选项式API中,允许使用 this.$parent 和 this.$children 获取当前组件的父组件和当前组件的子组件。但是在 vue3.x setup 中,想要调用父组件的方法,我们需要用 provide & inject 来实现。
四、插槽
Vue 实现了一套内容分发的 API,这套 API 的设计灵感源自 Web Components 规范草案,将 <slot> 元素作为承载分发内容的出口。
1. 插槽内容
<script setup lang="ts">defineProps<{ url: string }>();</script><template><a :href="url"><!-- 接收插槽内容 --><slot /></a></template>
<navigation-link url="/login">前往登录</navigation-link><navigation-link url="/register">前往注册</navigation-link>
渲染效果:
<a href="/login">前往登录</a><a href="/register">前往注册</a>
提示:插槽样式在子父组件中都可以设置,所以在命名class时一定要注意。
2. 渲染作用域
当你想在一个插槽中使用数据时,例如:
<navigation-link url="/profile">Logged in as {{ user.name }}</navigation-link>
该插槽可以访问与模板其余部分相同的实例属性 (即相同的“作用域”),所以这里不能访问 <navigation-link > 的作用域。例如 url 是访问不到的:
<navigation-link url="/profile"><!-- → Property "url" was accessed during render but is not defined on instance. --><span>Clicking here will send you to: {{ url }}</span></navigation-link>
简单理解就是,现有组件 A 和 B,在 A 组件中通过插槽的形式将内容分发给组件 B,尽管插槽内容最终是在 B 组件中渲染的,但是在插槽内容也只能访问组件 A 中的属性,不能访问组件 B 中的属性。
请记住这条规则:
父级模板里的所有内容都是在父级作用域中编译的;子模板里的所有内容都是在子作用域中编译的。
3. 后备内容
为插槽指定默认值,它只会在没有提供内容的时候被渲染
<a :href="url"><!-- 接收插槽内容 --><slot>默认内容</slot></a>
<navigation-link url="/orders"></navigation-link>
渲染效果:
<a href="/orders">默认内容</a>
4. 具名插槽
有时我们需要多个插槽,但是插槽内容会重复,如下所示:
<template><!-- 期望在这里展示姓名 --><slot></slot><hr color="red" /><!-- 期望在这里展示职位 --><slot></slot></template>
<template><Layout><p>Li-HONGYAO</p><small>Senior Front-End Developer</small></Layout></template>
运行效果:
可以看到,上述示例展示的效果并没有根据期望来渲染,为了解决这个问题,我们可以给插槽命名,进行相应绑定,我们修改一下示例:
<template><div><b>Name:</b><!-- 具名插槽:name --><slot name="name"></slot></div><div><b>Gender:</b><!-- 默认插槽:default --><slot></slot></div><div><b>job:</b><!-- 具名插槽:job --><slot name="job"></slot></div><hr color="red" /></template>
<template><Layout><span>male</span><template v-slot:name>Li-HONGYAO</template><template v-slot:job>Senior Front-End Developer</template></Layout></template>
运行效果:

提示:
v-slot指令可以使用#替代,比如:v-slot:job可以缩写为#job注意:
**v-slot**只能添加在**<template>**上
5. 作用域插槽
作用域插槽是一种特殊类型的插槽,有时让插槽内容能够访问子组件中才有的数据是很有用的。
简单理解就是:父组件决定布局,数据由子组件提供。先来看示例:
<script setup lang="ts">import { reactive } from 'vue';const state = reactive({name: 'Li-HONGYAO',job: 'Senior Front-End Developer',});</script><template><!-- 通过属性将state数据传递出去 --><slot :scope="state" /></template>
<template><Layout><template #default="{ scope: { name, job } }"><!-- name --><div><b>Name:</b><span>{{ name }}</span></div><!-- job --><div><b>Job:</b><span>{{ job }}</span></div><hr color="red" /></template></Layout></template>
运行效果:
注意:作用域插槽不能和具名插槽混合使用。
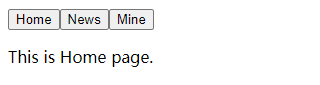
五、动态组件
通过使用保 <component> 元素,动态地绑定到它的 is 特性,可以实现组件的动态切换,这对于多标签页是非常有用的。
<script setup lang="ts">import { reactive, shallowRef, defineComponent } from 'vue';// -- 定义组件const Home = defineComponent({template: `<div class="page">This is Home page.</div>`})const News = defineComponent({template: `<div class="page">This is News page.</div>`})const Mine = defineComponent({template: `<div class="page">This is Mine page.</div>`})// -- 定义状态const state = reactive({currentTab: shallowRef(Home),tabs: ['Home', 'News', 'Mine'],});// -- 时间处理const switchTab = (key: string) => {switch(key) {case 'Home': state.currentTab = Home; break;case 'News': state.currentTab = News; break;case 'Mine': state.currentTab = Mine; break;}}</script><template><div class="wrap"><buttontype="button"v-for="(item, index) in state.tabs":key="index"@click="switchTab(item)">{{ item }}</button><component :is="state.currentTab"></component></div></template><style scoped>button {margin-bottom: 16px;}</style>
展示效果:
keep-alive
当在这些组件之间切换的时候,你有时会想保持这些组件的状态,以避免反复渲染导致的性能问题。为此可以用一个 <keep-alive> 元素将其动态组件包裹起来。
<keep-alive><component :is="state.currentTab"></component></keep-alive>
六、生命周期钩子函数执行顺序
接下来我们讨论父子组件生命周期钩子函数的执行顺序,当然,这里不以 <script setup> 来讲,主要以 Options API 来讲。
为了便于大家可以更加直观的去观察生命周期的执行顺序,我们先通过 Options API 构建如下组件:
子组件:
src/components/Child.vue
<script lang="ts">import { defineComponent } from 'vue';export default defineComponent({props: {msg: String,},beforeCreate() {console.log('子:__beforeCreate__');},created() {console.log('子:__created__');},beforeMount() {console.log('子:__beforeMount__');},mounted() {console.log('子:__mounted__');},beforeUpdate() {console.log('子:__beforeUpdate__');},updated() {console.log('子:__updated__');},beforeUnmount() {console.log('子:__beforeUnmount__');},unmounted() {console.log('子:__unmounted__');},});</script><template><div>This is Child Component.</div><p>msg:{{ msg }}</p></template>
父组件:
src/components/Parent.vue
<script lang="ts">import { defineComponent } from 'vue';import Child from './Child.vue';export default defineComponent({components: {Child,},data() {return {msg: 'Hello, vue!',};},beforeCreate() {console.log('父:__beforeCreate__');},created() {console.log('父:__created__');},beforeMount() {console.log('父:__beforeMount__');},mounted() {console.log('父:__mounted__');},beforeUpdate() {console.log('父:__beforeUpdate__');},updated() {console.log('父:__updated__');},beforeUnmount() {console.log('父:__beforeUnmount__');},unmounted() {console.log('父:__unmounted__');},});</script><template><Child :msg="msg" /><button type="button" @click="msg = 'Hello, world!'">更新属性:msg</button></template>
根组件:
src/App.vue
<script setup lang="ts">import { ref } from 'vue';const removeParent = ref(false);</script><template><Parent v-if="!removeParent" /><button type="button" @click="removeParent = true">销毁父组件</button></template>
注意:由于根组件只用于销毁父组件(Parent),所以这个组件我使用的是 组合式API(<script setup>).
接下来,我们启动项目,观察父子组件在渲染、更新和销毁时,钩子函数的执行顺序,请看示例动图:

通过上述示例,可以得出如下结论:
加载渲染过程:
父:beforeCreate→父:created→父:beforeMount→子:beforeCreate→子:created→子:beforeMount→子:mounted→父:mounted子组件更新过程:
父:beforeUpdate→子:beforeUpdate→子:updated→父:updated父组件更新过程:
父:beforeUpdate→父:updated销毁过程:
父:beforeUnmount→子:beforeUnmount→子:unmounted→父:unmounted

若有收获,就点个赞吧
0 人点赞
