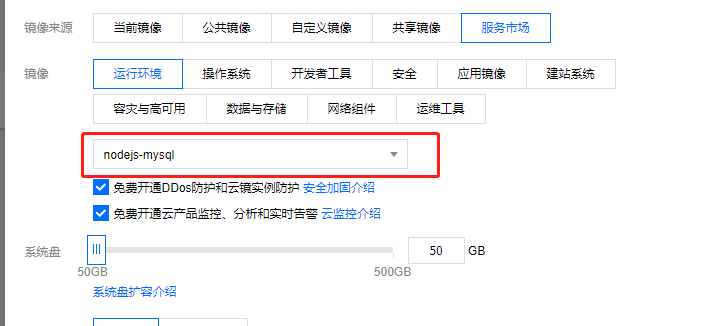
环境
配置node.js的环境,选择下面的环境直接重新安装。
安全组
什么是安全组:
安全组是一种虚拟防火墙,具备有状态的数据包过滤功能,用于设置云服务器、负载均衡、数据库等实例的网络访问控制,是重要的网络安全隔离手段。
您可以通过配置安全组规则,允许或禁止安全组内的实例对公网或私网的访问:
- 安全组是一个逻辑上的分组,您可以将同一地域内具有相同网络安全隔离需求的基础网络云服务器或弹性网卡实例加到同一个安全组内。
- 您可以通过安全组策略对实例的出入流量进行安全过滤,实例可以是基础网络云服务器或弹性网卡实例 。
- 您可以随时修改安全组的规则。新规则立即生效。
安全组的配置

安全组不是很会配置,所以全部放开了。如果有多个实例,将安全组和实例关联
遇到的问题
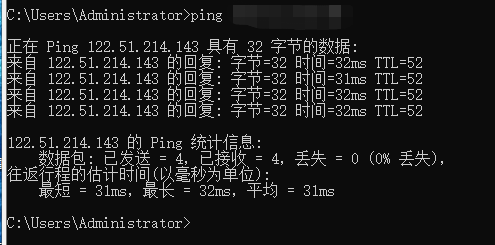
- 使用ping 可以ping通服务器
- 使用telnet 端口的是不可以,具体什么原因不知道,但是xshell和xfp可以上传文件

- 可能原因:
- 公司局域网的防火墙
- 服务器防火墙没有关闭
- 关闭服务器防火墙
- 查看系统是centos7还是centos6: 输入 cat /etc/redhat-release,即可显示系统版本。

- Centos 6.x版本 iptables
- 查看防火墙状态:
- 查看系统是centos7还是centos6: 输入 cat /etc/redhat-release,即可显示系统版本。
[root@centos6 ~]# service iptables status
iptables: Firewall is not running. 说明防火墙没有开启。
- 开启防火墙:
[root@centos6 ~]# service iptables start
- 关闭防火墙:
[root@centos6 ~]# service iptables stop
- Centos 7.x版本 firewall
- 停止firewall
systemctl stop firewalld.service - 禁止firewall开机启动
systemctl disable firewalld.service - 查看默认防火墙状态(关闭后显示notrunning,开启后显示running)
firewall-cmd —state
- 停止firewall
nginx
nginx的安装
nginx -t 查看nginx的地址
# 全局块...# events块events {...}# http块http{# http全局块...# 虚拟主机server块server{# server全局块...# location块location [PATTERN]{...}location [PATTERN]{...}}server{...}# http全局块...}
- 配置详解
########### 每个指令必须有分号结束。##################user administrator administrators; #配置用户或者组,默认为nobody nobody。#worker_processes 2; #允许生成的进程数,默认为1#pid /nginx/pid/nginx.pid; #指定nginx进程运行文件存放地址error_log log/error.log debug; #制定日志路径,级别。这个设置可以放入全局块,http块,server块,级别以此为:debug|info|notice|warn|error|crit|alert|emergevents {accept_mutex on; #设置网路连接序列化,防止惊群现象发生,默认为onmulti_accept on; #设置一个进程是否同时接受多个网络连接,默认为off#use epoll; #事件驱动模型,select|poll|kqueue|epoll|resig|/dev/poll|eventportworker_connections 1024; #最大连接数,默认为512}http {include mime.types; #文件扩展名与文件类型映射表default_type application/octet-stream; #默认文件类型,默认为text/plain#access_log off; #取消服务日志log_format myFormat '$remote_addr–$remote_user [$time_local] $request $status $body_bytes_sent $http_referer $http_user_agent $http_x_forwarded_for'; #自定义格式access_log log/access.log myFormat; #combined为日志格式的默认值sendfile on; #允许sendfile方式传输文件,默认为off,可以在http块,server块,location块。sendfile_max_chunk 100k; #每个进程每次调用传输数量不能大于设定的值,默认为0,即不设上限。keepalive_timeout 65; #连接超时时间,默认为75s,可以在http,server,location块。# 定义常量upstream mysvr {server 127.0.0.1:7878;server 192.168.10.121:3333 backup; #热备}error_page 404 https://www.baidu.com; #错误页#定义某个负载均衡服务器#root 是指定项目的根目录,适用与server和location。可以指定多个,如果locaiton没有指定,会往其外层的server或http中寻找继承。server {keepalive_requests 120; #单连接请求上限次数。listen 4545; #监听端口,服务器默认接口是8080不会可以不需要修改server_name 127.0.0.1; #监听地址root /data/gezhinode; # 指定项目的根目录,配置你项目的更目录(默认是这个)location ~*^.+$ { #请求的url过滤,正则匹配,~为区分大小写,~*为不区分大小写。#root path; #根目录(自己可以设置)#index vv.txt; #设置默认页proxy_pass http://mysvr; #请求转向mysvr 定义的服务器列表deny 127.0.0.1; #拒绝的ipallow 172.18.5.54; #允许的ip}}}
nginx内置的全局变量
$args :这个变量等于请求行中的参数,同$query_string$content_length : 请求头中的Content-length字段。$content_type : 请求头中的Content-Type字段。$document_root : 当前请求在root指令中指定的值。$host : 请求主机头字段,否则为服务器名称。$http_user_agent : 客户端agent信息$http_cookie : 客户端cookie信息$limit_rate : 这个变量可以限制连接速率。$request_method : 客户端请求的动作,通常为GET或POST。$remote_addr : 客户端的IP地址。$remote_port : 客户端的端口。$remote_user : 已经经过Auth Basic Module验证的用户名。$request_filename : 当前请求的文件路径,由root或alias指令与URI请求生成。$scheme : HTTP方法(如http,https)。$server_protocol : 请求使用的协议,通常是HTTP/1.0或HTTP/1.1。$server_addr : 服务器地址,在完成一次系统调用后可以确定这个值。$server_name : 服务器名称。$server_port : 请求到达服务器的端口号。$request_uri : 包含请求参数的原始URI,不包含主机名,如:”/foo/bar.php?arg=baz”。$uri : 不带请求参数的当前URI,$uri不包含主机名,如”/foo/bar.html”。$document_uri : 与$uri相同。
nginx中路径配置的规则
在nginx中配置proxy_pass代理转发时,如果在proxy_pass后面的ur加 /,表示绝对路径;没有 / 表示相对路径,表示吧匹配的路径部分给代理走了。
假如下面四种情况分别用 http://192.168.1.1/proxy/test.html访问。
{// 第一种location /proxy/{pxoxy_pass 127.0.0.1/;// 代理到url:127.0.0.1/test.html};// 第二种(相对于第一种,少了url 后面少了 / )location /proxy/{proxy_pass 127.0.0.1;// 代理到url:127.0.0.1/proxy/test.html};// 第三种location /proxy/{proxy_pass 127.0.0.1/aaa/;// 代理到url:127.0.0.1/aaa/test.html};// 第四种location /proxy/{proxy_pass 127.0.0.1/aaa// 代理到url:127.0.0.1/proxy/aaatest.html};}
xfp:用来上传文件的,好像可以git直接上传不会。
Xshell: 用来控制服务器的
升级node
- 因为使用了egg框架来做后台,但是安装的node的版本太低。
- 升级node后发现有两个node
- 修改vim ~/.bash_profile 文件加
export N_PREFIX=/data/home/server/nodejs #node实际安装位置export PATH=$N_PREFIX/bin:$PATH // 退出保存就可以,
引用连接 : https://blog.csdn.net/qq_16339527/article/details/73008708
使用PM2管理
pm2的作用
- 监听文件变化,自动重启程序
- 支持性能监控
- 负载均衡
- 程序崩溃自动重启
- 服务器重新启动时自动重新启动
- 自动化部署项目
安装
npm install -g pm2
配置
在工程目录输入:$ pm2 ecosystem
{"apps": {"name": "pm2-test-server","script": "app.js","watch": true, // 监听文件改变,自动重启服务"ignore_watch": [ // 忽略监听目录"node_modules","logs"],"instances": 4, // 多进程"error_file": "logs/error.log", // 错误日志"out_file": "logs/out.log", // 日志"log_date_format": "YYYY-MM-DD HH-mm-ss" // 日志时间格式}}
PM2常用命令
- pm2 list 查看

- pm2 start … 开始
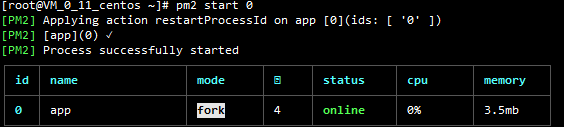
- pm2 restart / 重启
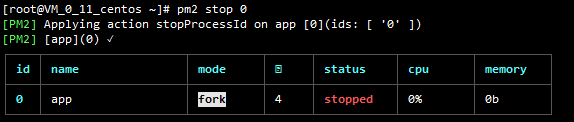
- pm2 stop / 停止
- pm2 delete / 删除
- pm2 info / 基本信息
- pm2 log / 日志
- pm2 monit / 查看cup和内存
显示面板解析

| 字段 | 解释 |
|---|---|
| app name / id | 进程的标识,可以对他们进行别的操作,比如stop,delete |
| mode | 进程模式,cluster或fork。cluster有多个进程,而fork只有一个。 |
| status | 进程是否在线 |
| restart | 重启次数 |
| uptime | 运行时间 |
| cpu | cpu占用率 |
| mem | 内存占用大小 |
egg项目需要配置
ecosystem.config.js 配置
作用: 可以同时管理多个node服务器,不用一个个手动启动node
module.exports = {apps : [{name:'gezhi', // 服务器名字script: '/data/gezhi/node/app.js', // 启动文件的地址,egg app.js express 是 bin/wwwwatch: '.' // 监听文件的变化},// 第二个项目{name:'gezhi2',script:'/data/gezhinode/app.js',watch:'.'}],// 没有用到不知道deploy : {production : {user : 'SSH_USERNAME',host : 'SSH_HOSTMACHINE',ref : 'origin/master',repo : 'GIT_REPOSITORY',path : 'DESTINATION_PATH','pre-deploy-local': '','post-deploy' : 'npm install && pm2 reload ecosystem.config.js --env production','pre-setup': ''}}};
查看启动的端口
使用 netstat -nelp 来查看哪些端口被使用: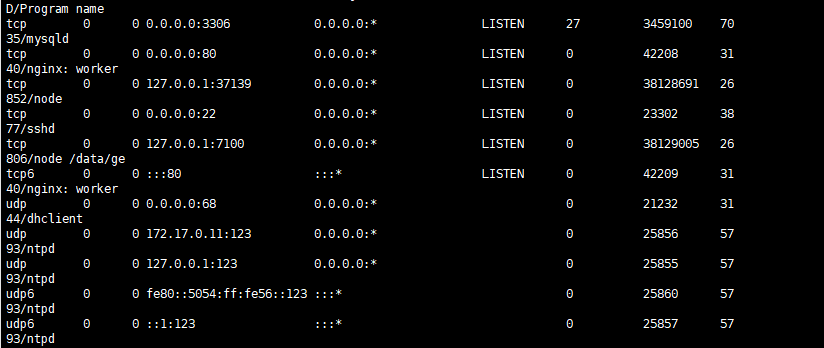 我的node 服务器使用了7100端口
curl的使用
- 用法: 用来URL规则在命令行下工作的文件传输工具,是一个很强大的HTTP命令行工具。可以用来检测服务是不是启动,端口是不是可以访问。
- 语法
# curl [option ] url 基本用法 # curl 127.0.0.1可以用来检测本机的8080端口是不是开启,用来检测nginx是不是有效

访问: ip+端口 直接访问
启动成功后看到端口,ip是服务器公网ip

若有收获,就点个赞吧
0 人点赞
