TF2.0 TensorFlow 2 / 2.0 中文文档:卷积神经网络分类 CIFAR-10 Convolutional Neural Networks
主要内容:使用卷积神经网络(Convolutional Neural Network, CNN)分类CIFAT-10数据集
官方文档使用的是MNIST数据集,之前在mnist手写数字识别(CNN卷积神经网络)这篇文章中已经有详细的介绍了,包括训练模型、使用真实图片预测等。这篇文章选用 CIFAR-10 数据集来验证简单的卷积神经网络在图像分类问题上的表现。
CIFAR-10 数据集简介
与 MNIST 手写数字一样,CIFAR-10 包含了60,000张图片,共10类。训练集50,000张,测试集10,000张。但与MNIST不同的是,CIFAR-10 数据集中的图片是彩色的,每张图片的大小是 32x32x3 ,3代表 R/G/B 三个通道,每个像素点的颜色由 R/G/B 三个值决定,R/G/B 的取值范围为0-255。熟悉计算机视觉的童鞋应该了解,图片像素点的值还可以由 R/G/B/A 四个值决定,A 代表透明度,取值范围为0-1。比如下面2个颜色,同样是黑色,透明度不同,感官上会有很大差别:
rgba(0, 0, 0, 1)
rgba(0, 0, 0, 0.5)
下载 CIFAR-10 数据集
# geektutu.comimport matplotlib.pyplot as pltimport tensorflow as tffrom tensorflow.keras import layers, datasets, models(train_x, train_y), (test_x, test_y) = datasets.cifar10.load_data()
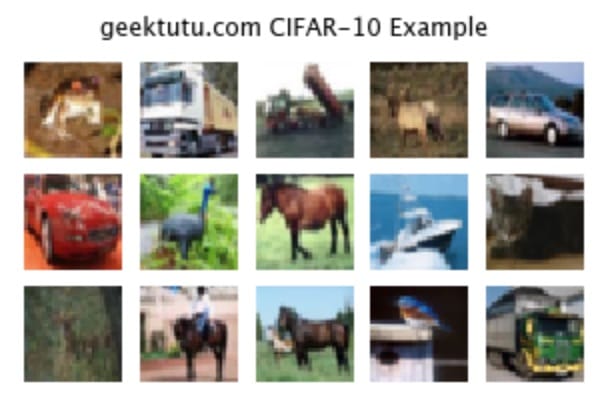
看一看前15张图片长啥样吧。
# geektutu.complt.figure(figsize=(5, 3))plt.subplots_adjust(hspace=0.1)for n in range(15):plt.subplot(3, 5, n+1)plt.imshow(train_x[n])plt.axis('off')_ = plt.suptitle("geektutu.com CIFAR-10 Example")
将0-255的像素值转换到0-1
# geektutu.comtrain_x, test_x = train_x / 255.0, test_x / 255.0print('train_x shape:', train_x.shape, 'test_x shape:', test_x.shape)# (50000, 32, 32, 3), (10000, 32, 32, 3)
卷积层
# geektutu.commodel = models.Sequential()model.add(layers.Conv2D(32, (3, 3), activation='relu', input_shape=(32, 32, 3)))model.add(layers.MaxPooling2D((2, 2)))model.add(layers.Conv2D(64, (3, 3), activation='relu'))model.add(layers.MaxPooling2D((2, 2)))model.add(layers.Conv2D(64, (3, 3), activation='relu'))model.summary()
Model: "sequential_1"_________________________________________________________________Layer (type) Output Shape Param #=================================================================conv2d_3 (Conv2D) (None, 30, 30, 32) 896_________________________________________________________________max_pooling2d_2 (MaxPooling2 (None, 15, 15, 32) 0_________________________________________________________________conv2d_4 (Conv2D) (None, 13, 13, 64) 18496_________________________________________________________________max_pooling2d_3 (MaxPooling2 (None, 6, 6, 64) 0_________________________________________________________________conv2d_5 (Conv2D) (None, 4, 4, 64) 36928=================================================================Total params: 56,320Trainable params: 56,320Non-trainable params: 0_________________________________________________________________
CNN 的输入是三维张量 (image_height, image_width, color_channels),即 input_shape。每一层卷积层使用tf.keras.layers.Conv2D来搭建。Conv2D 共接收2个参数,第2个参数是卷积核大小,第1个参数是卷积核的个数。
关于 CNN 更详细的内容,可以参考mnist手写数字识别(CNN卷积神经网络),这里有卷积的动态效果图和推荐的视频。
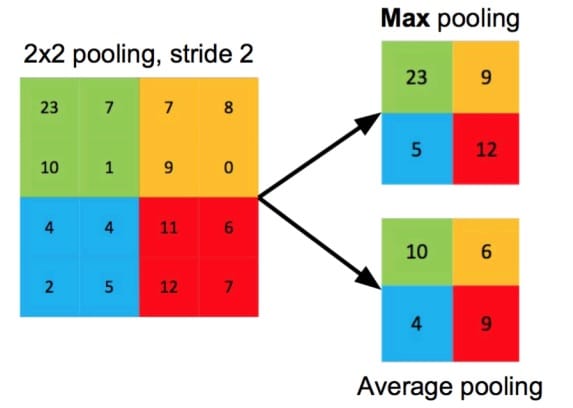
第1、2卷积层后紧跟了最大池化层(MaxPooling2D),最大池化即选择图像区域的最大值作为该区域池化后的值,另一个常见的池化操作是平均池化,即计算图像区域的平均值作为该区域池化后的值。
每一轮卷积或池化后,图像的宽和高的值都会减小,假设图像的高度为h,卷积核大小为 m,那么很容易得出卷积后的高度 h1 = h - m + 1。池化前的高度为 h1,池化滤波器大小为 s,那么池化后的高度为 h1 / s。对应到model.summary()的输出,输入大小为 (32, 32),经过32个3x3的卷积核卷积后,大小为 (30, 30),紧接着池化后,大小变为(15, 15)。
全连接层
我们的目的是对图像进行分类,即期望输出一个长度为10的一维向量,第k个值代表输入图片分类为k的概率。因此需要通过 Dense 层,即全连接层,将3维的卷积层输出,转换为一维。这里可以使用tf.keras.layers.Flatten()。
# geektutu.commodel.add(layers.Flatten())model.add(layers.Dense(64, activation='relu'))model.add(layers.Dense(10, activation='softmax'))model.summary()
看一下最终的模型。
Model: "sequential_1"_________________________________________________________________Layer (type) Output Shape Param #=================================================================conv2d_3 (Conv2D) (None, 30, 30, 32) 896_________________________________________________________________max_pooling2d_2 (MaxPooling2 (None, 15, 15, 32) 0_________________________________________________________________conv2d_4 (Conv2D) (None, 13, 13, 64) 18496_________________________________________________________________max_pooling2d_3 (MaxPooling2 (None, 6, 6, 64) 0_________________________________________________________________conv2d_5 (Conv2D) (None, 4, 4, 64) 36928_________________________________________________________________flatten_1 (Flatten) (None, 1024) 0_________________________________________________________________dense_2 (Dense) (None, 64) 65600_________________________________________________________________dense_3 (Dense) (None, 10) 650=================================================================Total params: 122,570Trainable params: 122,570Non-trainable params: 0_________________________________________________________________
编译训练模型
# geektutu.commodel.compile(optimizer='adam',loss='sparse_categorical_crossentropy',metrics=['accuracy'])model.fit(train_x, train_y, epochs=5)
评估模型
# geektutu.comtest_loss, test_acc = model.evaluate(test_x, test_y)test_acc # 0.683
卷积神经网络非常适合用来处理图像,这个模型如果用来训练 MNIST 手写数字数据集,可以达到 99% 的正确率,但是在 CIFAR10 数据集上,只有 68.3% 的正确率,我们将在后面的文章中,使用复杂网络模型或者迁移学习来提高准确率。
返回文档首页
完整代码:Github - cnn-cifar-10.ipynb 参考文档:Convolutional Neural Networks
附 推荐

若有收获,就点个赞吧
0 人点赞
