原文地址 https://blog.csdn.net/pengjunlee/article/details/80135271
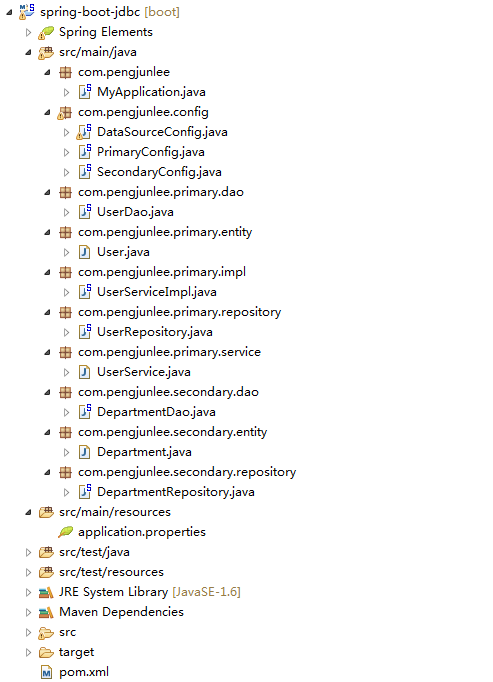
本文仅对如何在 Springboot 中使用 Spring Data JPA 和 JdbcTemplate 去操作多个 HikariCP 数据源进行简单示例和介绍,项目的完整目录层次如下图所示。
添加依赖与配置
为了使用 Spring Data JPA 和 HikariCP 数据源,需要在工程 POM 文件中引入它们的 Maven 依赖。
<parent><groupId>org.springframework.boot</groupId><artifactId>spring-boot-starter-parent</artifactId><version>1.4.1.RELEASE</version></parent><dependencies><!-- 添加MySQL依赖 --><dependency><groupId>mysql</groupId><artifactId>mysql-connector-java</artifactId></dependency><!-- 添加JDBC依赖 --><dependency><groupId>org.springframework.boot</groupId><artifactId>spring-boot-starter-data-jpa</artifactId><exclusions><!-- 排除Tomcat-JDBC依赖 --><exclusion><groupId>org.apache.tomcat</groupId><artifactId>tomcat-jdbc</artifactId></exclusion></exclusions></dependency><!-- 添加HikariCP依赖 --><dependency><groupId>com.zaxxer</groupId><artifactId>HikariCP</artifactId></dependency></dependencies>
在 application.properties 核心配置文件中除了要定义 MYSQL 数据库连接信息外,还需要添加如下 JPA 相关配置。
############################################################ Primary DataSource -- DataSource 1 configuration ############################################################primary.datasource.jdbc-url=jdbc:mysql://localhost:3306/dev1?useUnicode=true&characterEncoding=utf8primary.datasource.driverClassName=com.mysql.jdbc.Driverprimary.datasource.username=rootprimary.datasource.password=123456############################################################ Secondary DataSource -- DataSource 2 configuration ###########################################################secondary.datasource.url=jdbc:mysql://localhost:3306/dev2?useUnicode=true&characterEncoding=utf8secondary.datasource.driverClassName=com.mysql.jdbc.Driversecondary.datasource.username=rootsecondary.datasource.password=123456secondary.datasource.type=com.zaxxer.hikari.HikariDataSource############################################################ Java Persistence Api -- Spring jpa configuration ############################################################# Specify the DBMSspring.jpa.database = MYSQL# Show or not log for each sql queryspring.jpa.show-sql = true# Hibernate ddl auto (create, create-drop, update)spring.jpa.hibernate.ddl-auto = update# Naming strategy#[org.hibernate.cfg.ImprovedNamingStrategy #org.hibernate.cfg.DefaultNamingStrategy]spring.jpa.hibernate.naming-strategy = org.hibernate.cfg.ImprovedNamingStrategy# stripped before adding them to the entity manager)spring.jpa.properties.hibernate.dialect = org.hibernate.dialect.MySQL5Dialect
配置数据源与 JdbcTemplate
首先,在 DataSourceConfig 配置类中定义两个数据源,同时为每一个数据源创建一个 JdbcTemplate。
@Configurationpublic class DataSourceConfig {/*** 数据源 1*/@Primary@Bean(name = "primaryDataSource")@ConfigurationProperties(prefix = "primary.datasource")public DataSource primaryDataSource() {return DataSourceBuilder.create().build();}@Primary@Bean(name = "secondaryDataSourceProperties")@ConfigurationProperties(prefix = "secondary.datasource")public DataSourceProperties secondaryDataSourceProperties() {return new DataSourceProperties();}/*** 数据源 2*/@Bean(name = "secondaryDataSource")public DataSource thirdDataSource(@Qualifier("secondaryDataSourceProperties") DataSourceProperties dataSourceProperties) {return dataSourceProperties.initializeDataSourceBuilder().build();}/*** 数据源 1 的 JdbcTemplate*/@Bean(name = "primaryJdbcTemplate")public JdbcTemplate primaryJdbcTemplate(@Qualifier("primaryDataSource") DataSource dataSource) {return new JdbcTemplate(dataSource);}/*** 数据源 2 的 JdbcTemplate*/@Bean(name = "secondaryJdbcTemplate")public JdbcTemplate secondaryJdbcTemplate(@Qualifier("secondaryDataSource") DataSource dataSource) {return new JdbcTemplate(dataSource);}}
使用 JdbcTemplate 操作数据源
在 Dao 层中通过注入不同的 JdbcTemplate 来操作对应的数据源。
/*** 使用 JdbcTemplate 操作数据源 1*/@Repositorypublic class UserDao {@Autowired@Qualifier("primaryJdbcTemplate")private JdbcTemplate jdbcTemplate;@Transactionalpublic void addUser(Integer userAge, String userName) {String sql = "insert into tbl_user (age,name) values ('" + userAge + "','" + userName + "');";jdbcTemplate.execute(sql);}}
/*** 使用 JdbcTemplate 操作数据源 2*/@Repositorypublic class DepartmentDao {@Autowired@Qualifier("secondaryJdbcTemplate")private JdbcTemplate jdbcTemplate;@Transactionalpublic void addDept(String userName) {String sql = "insert into tbl_dept (name) values ('" + userName + "');";jdbcTemplate.execute(sql);}}
配置 JPA
通过注解 @EnableJpaRepositories 来为不同包下的 Repository 分别创建不同 TransactionManager 和 EntityManagerFactory,用来操作不同的数据源。
/*** 数据源 1 JPA配置*/@Configuration@EnableTransactionManagement@EnableJpaRepositories(entityManagerFactoryRef = "primaryEntityManagerFactory", transactionManagerRef = "primaryTransactionManager", basePackages = {"com.pengjunlee.primary.repository" }) // 设置Repository所在位置public class PrimaryConfig {@Autowired@Qualifier("primaryDataSource")private DataSource primaryDataSource;@Autowiredprivate JpaProperties jpaProperties;@Primary@Bean(name = "primaryEntityManager")public EntityManager entityManager(EntityManagerFactoryBuilder builder) {return primaryEntityManagerFactory(builder).getObject().createEntityManager();}@Primary@Bean(name = "primaryEntityManagerFactory")public LocalContainerEntityManagerFactoryBean primaryEntityManagerFactory(EntityManagerFactoryBuilder builder) {return builder.dataSource(primaryDataSource).properties(getVendorProperties(primaryDataSource)).packages("com.pengjunlee.primary.entity") // 设置实体类所在位置.persistenceUnit("primaryPersistenceUnit").build();}private Map<String, String> getVendorProperties(DataSource dataSource) {return jpaProperties.getHibernateProperties(dataSource);}@Primary@Bean(name = "primaryTransactionManager")public PlatformTransactionManager primaryTransactionManager(EntityManagerFactoryBuilder builder) {return new JpaTransactionManager(primaryEntityManagerFactory(builder).getObject());}}
/*** 数据源 2 JPA配置*/@Configuration@EnableTransactionManagement@EnableJpaRepositories(entityManagerFactoryRef = "secondaryEntityManagerFactory", transactionManagerRef = "secondaryTransactionManager", basePackages = {"com.pengjunlee.secondary.repository" }) // 设置Repository所在位置public class SecondaryConfig {@Autowired@Qualifier("secondaryDataSource")private DataSource secondaryDataSource;@Autowiredprivate JpaProperties jpaProperties;@Bean(name = "secondaryEntityManager")public EntityManager entityManager(EntityManagerFactoryBuilder builder) {return secondaryEntityManagerFactory(builder).getObject().createEntityManager();}@Bean(name = "secondaryEntityManagerFactory")public LocalContainerEntityManagerFactoryBean secondaryEntityManagerFactory(EntityManagerFactoryBuilder builder) {return builder.dataSource(secondaryDataSource).properties(getVendorProperties(secondaryDataSource)).packages("com.pengjunlee.secondary.entity") // 设置实体类所在位置.persistenceUnit("secondaryPersistenceUnit").build();}private Map<String, String> getVendorProperties(DataSource dataSource) {return jpaProperties.getHibernateProperties(dataSource);}@Bean(name = "secondaryTransactionManager")public PlatformTransactionManager secondaryTransactionManager(EntityManagerFactoryBuilder builder) {return new JpaTransactionManager(secondaryEntityManagerFactory(builder).getObject());}}
使用 JPA 操作数据源
由于是通过包名来区分哪些 Repository 用来操作哪个数据源,故而需要将不同数据源的 Entity 和 Repository 类放入不同的包中。
此处定义了 User(用户)和 Department(部门)两个实体类,分别对应数据源一和数据源二。
@Entity@Table(name = "tbl_user")public class User {@Id@GeneratedValue(strategy = GenerationType.IDENTITY)private Long id;private String name;private Integer age;// 此处省略get和set方法}
@Entity@Table(name = "tbl_dept")public class Department {@Id@GeneratedValue(strategy = GenerationType.IDENTITY)private Long id;private String name;// 此处省略get和set方法}
/*** 使用 JPA 操作数据源 1*/@Repositorypublic interface UserRepository extends CrudRepository<User, Long> {}
/*** 使用 JPA 操作数据源 2*/@Repositorypublic interface DepartmentRepository extends CrudRepository<Department, Long> {}
启动类中测试
在启动类中进行数据源测试,并分别向两个数据库中添加记录。
@SpringBootApplication@EnableTransactionManagement // 只会回滚运行期异常public class MyApplication {public static void main(String[] args) throws SQLException {ConfigurableApplicationContext context = SpringApplication.run(MyApplication.class, args);Object ds1 = context.getBean("primaryDataSource");System.out.println(ds1.getClass().getName());Object ds2 = context.getBean("secondaryDataSource");System.out.println(ds2.getClass().getName());UserRepository userRepository = context.getBean(UserRepository.class);User user1 = new User();user1.setAge(21);user1.setName("Tracy");userRepository.save(user1);DepartmentRepository deptRepository = context.getBean(DepartmentRepository.class);Department dept1 = new Department();dept1.setName("集团事业部");deptRepository.save(dept1);UserDao userDao = context.getBean(UserDao.class);userDao.addUser(30, "pengjunlee");DepartmentDao deptDao = context.getBean(DepartmentDao.class);deptDao.addDept("总裁办公室");}}
启动程序,两个数据库中的用户表和部门表中数据都能正常添加成功。
在实际项目中我们一般都会将定义好的 Repository 自动装配到 Service 层进行调用,此时要格外注意事务。
@Service@Transactional("primaryTransactionManager")public class UserServiceImpl implements UserService {@Autowiredprivate UserRepository userRepository;public void deleteUserById(Long id) {userRepository.delete(id);}}

若有收获,就点个赞吧
0 人点赞
