WHAT YOU’LL LEARN
- How to use the Redux “thunk” middleware for async logic
- Patterns for handling async request state
- How to use the Redux Toolkit
createAsyncThunkAPI to simplify async callsPREREQUISITES
- Familiarity with using AJAX requests to fetch and update data from a server
Introduction
In Part 4: Using Redux Data, we saw how to use multiple pieces of data from the Redux store inside of React components, customize the contents of action objects before they’re dispatched, and handle more complex update logic in our reducers.
在第四部分:使用Redux数据,我们了解到如何在React组件中从Redux store使用多个数据片段 ,如何派发action之前自定义内容action 对象,如何在reducers中处理更复杂的更新逻辑。
So far, all the data we’ve worked with has been directly inside of our React client application. However, most real applications need to work with data from a server, by making HTTP API calls to fetch and save items.
迄今,我们工作的所有数据直接在我们的React客户端应用程序内部。然后,大多数真实的应用程序需要和服务端数据一起工作,通过使用HTTP API 调用获取和保存项目。
In this section, we’ll convert our social media app to fetch the posts and users data from an API, and add new posts by saving them to the API.
在这个部分,我们将转换我们的社交媒体应用程序通过API获取帖子和用户数据,并通过API保存他们增加新帖子。
Example REST API and Client
To keep the example project isolated but realistic, the initial project setup already included a fake in-memory REST API for our data (configured using the Mirage.js mock API tool). The API uses /fakeApi as the base URL for the endpoints, and supports the typical GET/POST/PUT/DELETE HTTP methods for /fakeApi/posts, /fakeApi/users, and fakeApi/notifications. It’s defined in src/api/server.js.
为了使项目保持隔离但契合实际,初始项目设置已经包含伪造的内存REST API提供我们数据(配置使用Mirage.js 模拟API工具)。API 使用/fakeApi作为端点的基础URL,并支持经典的 GET/POST/PUT/DELETE HTTP方法为
/fakeApi/posts, /fakeApi/users, 和 fakeApi/notifications. 它被定义在 src/api/server.js
The project also includes a small HTTP API client object that exposes client.get() and client.post() methods, similar to popular HTTP libraries like axios. It’s defined in src/api/client.js.
项目也包含小的HTTP API 客户端对象,暴露client.get()和client.post()方法,类似于诸如axios之类的流行HTTP库。他被定义在 src/api/client.js。
We’ll use the client object to make HTTP calls to our in-memory fake REST API for this section.
在本节中,我们使用客户端对象使用我们内存中的伪造REST API进行HTTP调用。
Also, the mock server has been set up to reuse the same random seed each time the page is loaded, so that it will generate the same list of fake users and fake posts. If you want to reset that, delete the ‘randomTimestampSeed’ value in your browser’s Local Storage and reload the page, or you can turn that off by editing src/api/server.js and setting useSeededRNG to false.
此外,已将模拟服务器设置为在每次加载页面时重用相同的随机种子,以至于它将生成相同虚假用户和虚假帖子列表,如果你想要重置那些,在你的浏览器Local Storage删除 ‘randomTimestampSeed’值并重新加载页面,或者你可以通过编辑 src/api/server.js并设置useSeededRNG为false关闭它。
INFO
As a reminder, the code examples focus on the key concepts and changes for each section. See the CodeSandbox projects and the
tutorial-stepsbranch in the project repo for the complete changes in the application.信息 作为提醒,代码示例聚焦在每部分的关键概念和变化上。查看应用程序的完整变化在CodeSandbox项目和教程步骤分支在项目仓库。
Thunks and Async Logic
Using Middleware to Enable Async Logic
使用中间件启动异步逻辑
By itself, a Redux store doesn’t know anything about async logic. It only knows how to synchronously dispatch actions, update the state by calling the root reducer function, and notify the UI that something has changed. Any asynchronicity has to happen outside the store.
通过它自己,Redux store不知道任何关于异步逻辑。它仅仅知道如何去同步地派发actions,通过调用根reducer函数更新状态,和通知UI某些被修改。任何异步都必须在store之外发生。
But, what if you want to have async logic interact with the store by dispatching or checking the current store state? That’s where Redux middleware come in. They extend the store, and allow you to:
- Execute extra logic when any action is dispatched (such as logging the action and state)
- Pause, modify, delay, replace, or halt dispatched actions
- Write extra code that has access to dispatch and getState
- Teach dispatch how to accept other values besides plain action objects, such as functions and promises, by intercepting them and dispatching real action objects instead
但是,如果你想要有异步逻辑和store相互作用,通过dispatching或者checking当前store状态?这就是Redux出现的地方。他们继承store,并允许你去
- 当任何actions被派发时执行额外逻辑(比如打印action和state)
- 暂停,修改,延迟,替换,或者停止派发actions
- 编写可以访问dispatch和getState的额外代码
- 教dispatch 如何接收除了普通action对象之外的其他值 ,比如作为一个函数和promises, 通过截取他们并派发真实action对象代替。
The most common reason to use middleware is to allow different kinds of async logic to interact with the store. This allows you to write code that can dispatch actions and check the store state, while keeping that logic separate from your UI.
使用中间件最常见原因是允许不同种类的异步逻辑和store交互。这允许你去编写可以派发action和检查store状态的代码,同时保持逻辑和UI分开。
There are many kinds of async middleware for Redux, and each lets you write your logic using different syntax. The most common async middleware is redux-thunk, which lets you write plain functions that may contain async logic directly. Redux Toolkit’s configureStore function automatically sets up the thunk middleware by default, and we recommend using thunks as the standard approach for writing async logic with Redux.
有许多种Redux异步中间件,并且每种让你使用不同的语法编写你的逻辑。最常见异步中间件是redux-thunk,让你编写可以直接包含异步逻辑plain function(普通函数)。Redux Toolkit的configureStore函数默认自动设置thunk中间件,并且我们推荐使用thunks作为编写Redux异步逻辑的标准方法。
Thunk Functions
Once the thunk middleware has been added to the Redux store, it allows you to pass thunk functions directly to store.dispatch. A thunk function will always be called with (dispatch, getState) as its arguments, and you can use them inside the thunk as needed.
一旦thunk中间件添加到Redux store,它允许你直接传入thunk函数给store.dispatch。thunk函数将允许被调用(dispatch, getState)作为它的参数,然后你可以根据需要在thunk使用它们。
Thunks typically dispatch plain actions using action creators, like dispatch(increment()):
Thunks 通常的使用action creators 派发纯action,比如dispatch(increment()):
const store = configureStore({ reducer: counterReducer })const exampleThunkFunction = (dispatch, getState) => {const stateBefore = getState()console.log(`Counter before: ${stateBefore.counter}`)dispatch(increment())const stateAfter = getState()console.log(`Counter after: ${stateAfter.counter}`)}store.dispatch(exampleThunkFunction)
For consistency with dispatching normal action objects, we typically write these as thunk action creators, which return the thunk function. These action creators can take arguments that can be used inside the thunk.
为了和派发普通action对象保持一致,我们通常编写这些作为thunk action creators,返回thunk函数。这些action creators携带可以被用在thunk里的参数。
const logAndAdd = amount => {return (dispatch, getState) => {const stateBefore = getState()console.log(`Counter before: ${stateBefore.counter}`)dispatch(incrementByAmount(amount))const stateAfter = getState()console.log(`Counter after: ${stateAfter.counter}`)}}store.dispatch(logAndAdd(5))
Thunks are typically written in “slice” files. createSlice itself does not have any special support for defining thunks, so you should write them as separate functions in the same slice file. That way, they have access to the plain action creators for that slice, and it’s easy to find where the thunk lives.
Thunks通常被写在“slice”文件中。createSlice本身对定义thunk没有任何特殊支持 ,所以你应该在同一个slice文件中作为独立函数编写他们。这样,它们访问slice的纯action creators,容易找到thunk在哪儿。
Writing Async Thunks
Thunks may have async logic inside of them, such as setTimeout, Promises, and async/await. This makes them a good place to put AJAX calls to a server API.
Thunks里面可能有异步逻辑,比如setTimeout,Promises,和async/awit。这使得它们成了放AJAX调用服务器API好地方。
Data fetching logic for Redux typically follows a predictable pattern:
- A “start” action is dispatched before the request, to indicate that the request is in progress. This may be used to track loading state to allow skipping duplicate requests or show loading indicators in the UI.
- The async request is made
- Depending on the request result, the async logic dispatches either a “success” action containing the result data, or a “failure” action containing error details. The reducer logic clears the loading state in both cases, and either processes the result data from the success case, or stores the error value for potential display.
Redux数据获取逻辑通常遵循可预测的模式:
- 一个“开始”action被派发在请求前,表明请求是进行中。这可以被用于跟踪加载状态,允许跳过重复请求或者在UI展示加载指示。
- 发出异步请求
- 根据请求结果,异步逻辑派发要么一个“success”action包含结果数据,或者一个“failure”action包含错误详情。在这两种情况下reducer逻辑都清除加载状态,并要么处理成功案例的结果数据,或者存储错误值以供潜在显示。
These steps are not required, but are commonly used. (If all you care about is a successful result, you can just dispatch a single “success” action when the request finishes, and skip the “start” and “failure” actions.)
这些步骤不是请求,但很常用。(如果你只关心成功的结果,当请求完成你仅派发单独“success”action,而跳过”start”和“failure”actions)。
Redux Toolkit provides a createAsyncThunkAPI to implement the creation and dispatching of these actions, and we’ll look at how to use it shortly.
Redux Toolkit 提供 createAsyncThunk API 实施创建和派发这些actions,并我们将很快讨论如何用它。
Detailed Explanation: Dispatching Request Status Actions in Thunks
详细说明:在Thunks派发请求状态 Actions
If we were to write out the code for a typical async thunk by hand, it might look like this:
如果我们手写典型异步thunk代码,它可能看起来像这样:
const getRepoDetailsStarted = () => ({type: 'repoDetails/fetchStarted'})const getRepoDetailsSuccess = repoDetails => ({type: 'repoDetails/fetchSucceeded',payload: repoDetails})const getRepoDetailsFailed = error => ({type: 'repoDetails/fetchFailed',error})const fetchIssuesCount = (org, repo) => async dispatch => {dispatch(getRepoDetailsStarted())try {const repoDetails = await getRepoDetails(org, repo)dispatch(getRepoDetailsSuccess(repoDetails))} catch (err) {dispatch(getRepoDetailsFailed(err.toString()))}}
However, writing code using this approach is tedious. Each separate type of request needs repeated similar implementation:
- Unique action types need to be defined for the three different cases
- Each of those action types usually has a corresponding action creator function
- A thunk has to be written that dispatches the correct actions in the right sequence
然而,用这种方法编写代码太乏味,每个独立请求类型都需要重复类似操作:
- 独一无二的action types需要被3个不同的案例定义
- 每个这些action类型通常有一个相应action creator 函数
- thunk已经被编写 在正确的顺序下派发正确action
createAsyncThunkabstracts this pattern by generating the action types and action creators, and generating a thunk that dispatches those actions automatically. You provide a callback function that makes the async call and returns a Promise with the result.
createAsyncThunk提取这些生成action types和action creators的模式,并生成自动派发这些action的thunk。你提供一个回调函数,进行异步调用并返回Promise结果。
Loading Posts
So far, our postsSlice has used some hardcoded sample data as its initial state. We’re going to switch that to start with an empty array of posts instead, and then fetch a list of posts from the server.
迄今,我们的postsSlice已使用一些硬编码的样本数据作为它的初始状态。我们将切换其用一个空帖子数组代替开始,然后从服务器获取帖子列表。
In order to do that, we’re going to have to change the structure of the state in our postsSlice, so that we can keep track of the current state of the API request.
为了做到那些,我们将改变我们postsSlice的状态结构,以便我们持续跟踪API请求的当前状态。
Extracting Posts Selectors
Right now, the postsSlicestate is a single array of posts. We need to change that to be an object that has the postsarray, plus the loading state fields.
现在,postsSlice状态是一个posts数组,我们需要改变成一个有posts数组的对象,加上加载状态字段。
Meanwhile, the UI components like <PostsList> are trying to read posts fromstate.postsin their useSelectorhooks, assuming that that field is an array. We need to change those locations also to match the new data.
与此同时,UI组件比如<PostsList>用他们的useSelector钩子尝试从state.posts读取posts,假设该字段是一个数组,我们需要改变这些位置也以匹配新数据。
It would be nice if we didn’t have to keep rewriting our components every time we made a change to the data format in our reducers. One way to avoid this is to define reusable selector functions in the slice files, and have the components use those selectors to extract the data they need instead of repeating the selector logic in each component. That way, if we do change our state structure again, we only need to update the code in the slice file.
如果我们不必每次都对Reducer中的数据格式进行更改时都必须继续重写组件,那就太好了。避免这种情况的一种方式是在slice文件中定义可重用selector函数,并让组件使用这些selectors提取所需的数据,而不是在每个组件中重复selectors逻辑。那样,如果我们再次改变我们的状态结构,我们仅仅需要更新slice文件的代码
The <PostsList> component needs to read a list of all the posts, and the <SinglePostPage>and <EditPostForm>components need to look up a single post by its ID. Let’s export two small selector functions from postsSlice.js to cover those cases:
features/posts/postsSlice.js
const postsSlice = createSlice(/* omit slice code*/)export const { postAdded, postUpdated, reactionAdded } = postsSlice.actionsexport default postsSlice.reducerexport const selectAllPosts = state => state.postsexport const selectPostById = (state, postId) =>state.posts.find(post => post.id === postId)
…未完待续
Loading State for Requests
When we make an API call, we can view its progress as a small state machine that can be in one of four possible states:
- The request hasn’t started yet
- The request is in progress
- The request succeeded, and we now have the data we need
- The request failed, and there’s probably an error message
当我们调用API时,我们将它的进度视为小状态器,可能处于以下四个状态之一:
- 请求还没开始
- 请求进行中
- 请求成功,我现在们有了需要的数据
- 请求失败,可能有一条错误信息
We could track that information using some booleans, like isLoading: true, but it’s better to track these states as a single enum value. A good pattern for this is to have a state section that looks like:
我们能使用一些布尔信息跟踪,比如isLoading:true,但是他最好跟踪这些状态作为一个单独枚举值。有一个状态部分是好的模式,看起来像:
{status: 'idle' | 'loading' | 'succeeded' | 'failed',error: string | null}
These fields would exist alongside whatever actual data is being stored. These specific string state names aren’t required - feel free to use other names if you want, like ‘pending’ instead of ‘loading’, or ‘complete’ instead of ‘succeeded’.
无论存储了什么实际数据,这些字段将并存。这些特殊字符串状态命名不是必须的 - 如果你使用其他命名感觉自在,比如‘pending’代替‘loading’,或者‘complete’代替‘successded’。
We can use this information to decide what to show in our UI as the request progresses, and also add logic in our reducers to prevent cases like loading data twice.
我们能在UI中使用这些信息决定展示什么作为请求进度,也在reducers增加逻辑,防止加载数据两次的情况。
Let’s update our postsSlice to use this pattern to track loading state for a “fetch posts” request. We’ll switch our state from being an array of posts by itself, to look like {posts, status, error}. We’ll also remove the old sample post entries from our initial state. As part of this change, we also need to change any uses of state as an array to be state.posts instead, because the array is now one level deeper:
我们更新postsSlice,用这个模式跟踪“获取帖子”请求的加载状态。我们将从开始一个帖子数组切换我们的状态,比如{posts,status,error}. 我们也将从我们初始状态移除老的帖子条目样本。作为本次修改的一部分,我们需要改变一些用户的状态作为数组 state.posts 代替,因为数组是现在一级深度。
features/posts/postsSlice.js
import { createSlice, nanoid } from '@reduxjs/toolkit'const initialState = {posts: [],status: 'idle',error: null}const postsSlice = createSlice({name: 'posts',initialState,reducers: {postAdded: {reducer(state, action) {state.posts.push(action.payload)},prepare(title, content, userId) {// omit prepare logic}},reactionAdded(state, action) {const { postId, reaction } = action.payloadconst existingPost = state.posts.find(post => post.id === postId)if (existingPost) {existingPost.reactions[reaction]++}},postUpdated(state, action) {const { id, title, content } = action.payloadconst existingPost = state.posts.find(post => post.id === id)if (existingPost) {existingPost.title = titleexistingPost.content = content}}}})export const { postAdded, postUpdated, reactionAdded } = postsSlice.actionsexport default postsSlice.reducerexport const selectAllPosts = state => state.posts.postsexport const selectPostById = (state, postId) =>state.posts.posts.find(post => post.id === postId)
Yes, this does mean that we now have a nested object path that looks likestate.posts.posts, which is somewhat repetitive and silly :) We could change the nested array name to be items or data or something if we wanted to avoid that, but we’ll leave it as-is for now.
是的,这意味着我们现在有一个嵌套对象路径 像state.posts.posts,这个有点重复和愚蠢:) 我们应该改变嵌套数组名为items或者data或者其他,如果我们想要避免的这种情况,但我们暂时将其保留。
Fetching Data with createAsyncThunk
使用createAsyncThunk获取数据
Redux Toolkit’s createAsyncThunkAPI generates thunks that automatically dispatch those “start/success/failure” actions for you.
Redux Toolkit的createAsyncThunk API 自动生成帮你派发这些“start/success/failure”actions 的thunks。
Let’s start by adding a thunk that will make an AJAX call to retrieve a list of posts. We’ll import the client utility from the src/api folder, and use that to make a request to ‘/fakeApi/posts’.
让我们从增加一个thunk开始,thunk制造AJAX调用取回帖子列表。我们将从 src/api 文件夹引入client实用程序,并用它发起请求‘/fakeApi/posts’。
features/posts/postsSlice
import { createSlice, nanoid, createAsyncThunk } from '@reduxjs/toolkit'import { client } from '../../api/client'const initialState = {posts: [],status: 'idle',error: null}export const fetchPosts = createAsyncThunk('posts/fetchPosts', async () => {const response = await client.get('/fakeApi/posts')return response.posts})
createAsyncThunk accepts two arguments:
- A string that will be used as the prefix for the generated action types
- A “payload creator” callback function that should return a Promise containing some data, or a rejected Promise with an error
createAsyncThunk接收两个参数:
- 一个字符串,用作生成action类型的前缀
- “有效负载创建者”回调函数应该返回一个Promise包含一些数据,或者因为错误而被拒绝Promise
The payload creator will usually make an AJAX call of some kind, and can either return the Promise from the AJAX call directly, or extract some data from the API response and return that. We typically write this using the JSasync/awaitsyntax, which lets us write functions that use Promises while using standard try/catch logic instead of somePromise.then()chains.
payload creator 通常进行某种AJAX调用,并能要么直接从AJAX调用返回Promise,或者从API响应和返回那些提取一些数据。我们通常使用JS的**async/await**语句编写,它让我们编写可以使用Promises的函数,同时使用标准**try/catch**逻辑代替一些 **Promise.then()**链式。
In this case, we pass in 'posts/fetchPosts' as the action type prefix. Our payload creation callback waits for the API call to return a response. The response object looks like {posts: []}, and we want our dispatched Redux action to have a payload that is just the array of posts. So, we extract response.posts, and return that from the callback.
本例中,我们传入‘posts/fetchPosts’作为action type 前缀。我们的payload creation回调等待API调用返回响应。响应对象看起来像{posts:[]},并且我们想要派发Redux action有一个payload是刚刚帖子的数组。所以,我们提取response.posts,并从回调返回。
If we try calling dispatch(fetchPosts()), the fetchPoststhunk will first dispatch an action type of ‘posts/fetchPosts/pending‘:
如果我们尝试调用 **dispatch(fetchPosts())**,**fetchPosts **thunk将第一次派发一个“**posts/fetchPost/pending**”的action type:
We can listen for this action in our reducer and mark the request status as ‘loading’.
我们可以在reducer监听这个action,并使请求状态为‘loading’。
Once the Promise resolves, the fetchPosts thunk takes the response.posts array we returned from the callback, and dispatches a 'posts/fetchPosts/fulfilled' action containing the posts array as action.payload:
一旦Promise resolves,fetchPosts thunk携带response.posts数组,并派发一个posts/fetchPosts/fulfilled action 包含帖子数组作为 action.payload: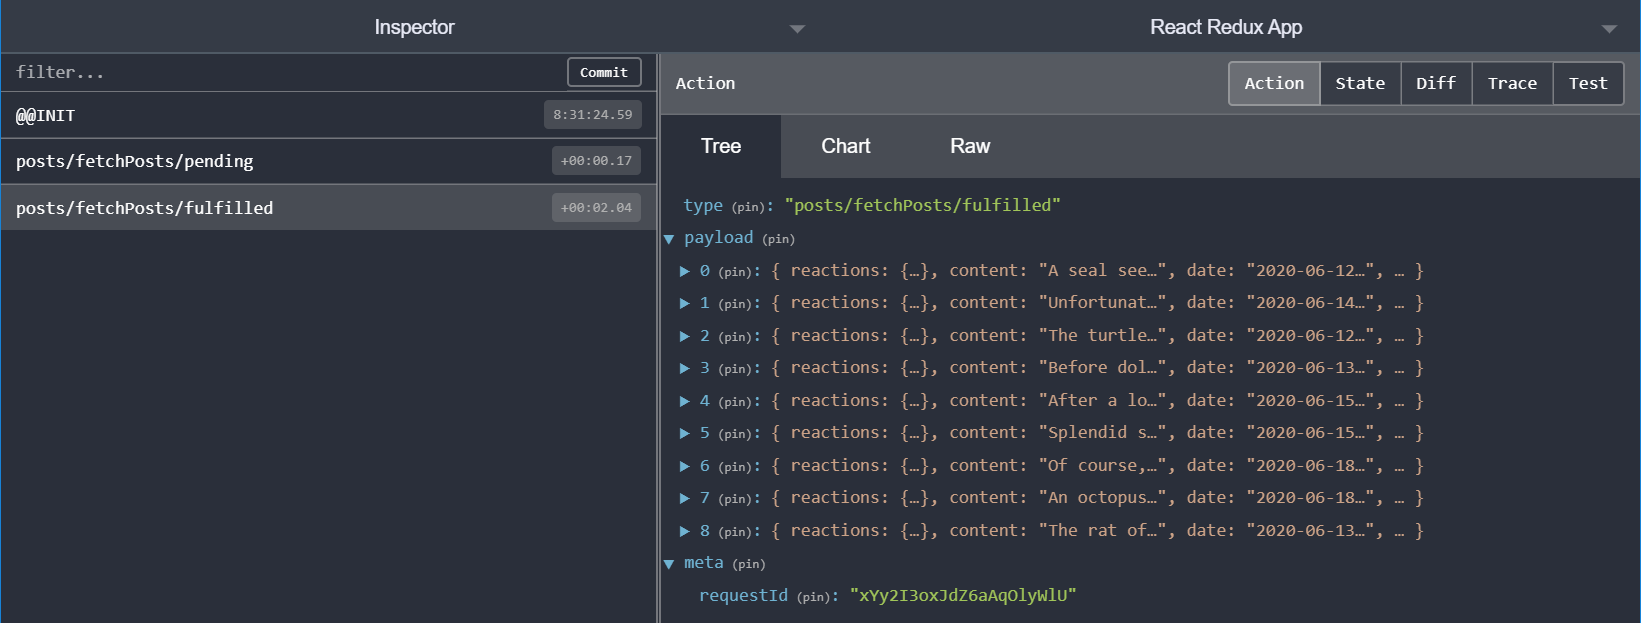
Dispatching Thunks from Components
从组件派发Thunks
So, let’s update our
所以,让我们更新
We’ll import the fetchPoststhunk into the component. Like all of our other action creators, we have to dispatch it, so we’ll also need to add the useDispatch hook. Since we want to fetch this data when
我们把fetchPosts thunk引入组件。像我们其他action creators一样,我们必须dispatch它,所以我们也需要增加useDispatch钩子,因为当useEffect钩子:
import React, { useEffect } from 'react'
import { useSelector, useDispatch } from 'react-redux'
// omit other imports
import { selectAllPosts, fetchPosts } from './postsSlice'

export const PostsList = () => {
  const dispatch = useDispatch()
  const posts = useSelector(selectAllPosts)

  const postStatus = useSelector(state => state.posts.status)

  useEffect(() => {
    if (postStatus === 'idle') {
      dispatch(fetchPosts())
    }
  }, [postStatus, dispatch])

  // omit rendering logic
}
It’s important that we only try to fetch the list of posts once. If we do it every time the posts.status enum to help decide if we need to actually start fetching, by selecting that into the component and only starting the fetch if the status is ‘idle’.
我们只获取帖子列表一次,这很重要。如果每次posts.status枚举帮助我们决定,通过选择组件和仅仅如果状态是‘idle’时开始获取。
Reducers and Loading Actions
Reducers和加载Actions
Next up, we need to handle both these actions in our reducers. This requires a bit deeper look at the createSlice API we’ve been using.
接下来,我们需要在reducers中处理两种actions,这个需要更深入了解一下我们用过的createSlice API。
We’ve already seen that createSlice will generate an action creator for every reducer function we define in the reducers field, and that the generated action types include the name of the slice, like:
我们已经看到createSlice为每个我们定义在reducers字段中的reducer函数生成一个action creator,生成action类型包含slice的名字,比如:
console.log(
  postUpdated({ id: '123', title: 'First Post', content: 'Some text here' })
)
/*
{
  type: 'posts/postUpdated',
  payload: {
    id: '123',
    title: 'First Post',
    content: 'Some text here'
  }
}
*/
However, there are times when a slice reducer needs to respond to other actions that weren’t defined as part of this slice’s reducersfield. We can do that using the slice extraReducersfield instead.
然而,有时候当slice reducer需要响应其他slice的reducers字段没有定义的actions。我们能用slice 的extraReducers字段代替。
**
Detailed Explanation: Adding Extra Reducers to Slices
详细说明:增加额外Reducers给Slices
暂时省略….
In this case, we need to listen for the “pending” and “fulfilled” action types dispatched by our fetchPoststhunk. Those action creators are attached to our actual fetchPostfunction, and we can pass those to extraReducersto listen for those actions:
本例中,通过我们的fetchPoststhunk派发时,我们需要监听“pending”和“fulfilled”action 类型 。这些action creator被附在我们的实际fetchPost函数,并且我们可以通过这些extraReducers监听这些actions:
export const fetchPosts = createAsyncThunk('posts/fetchPosts', async () => {
  const response = await client.get('/fakeApi/posts')
  return response.posts
})

const postsSlice = createSlice({
  name: 'posts',
  initialState,
  reducers: {
    // omit existing reducers here
  },
  extraReducers: {
    [fetchPosts.pending]: (state, action) => {
      state.status = 'loading'
    },
    [fetchPosts.fulfilled]: (state, action) => {
      state.status = 'succeeded'
      // Add any fetched posts to the array
      state.posts = state.posts.concat(action.payload)
    },
    [fetchPosts.rejected]: (state, action) => {
      state.status = 'failed'
      state.error = action.error.message
    }
  }
})
We’ll handle all three action types that could be dispatched by the thunk, based on the Promise we returned:
- When the request starts, we’ll set the status enum to ‘loading’
- If the request succeeds, we mark the status as ‘succeeded’, and add the fetched posts to
state.posts - If the request fails, we’ll mark the status as ‘failed’, and save any error message into the state so we can display it
我们将处理所有三个action类型,可以派发thunk,基于Promise 我们返回:
- 请求开始时,我们设置status枚举为‘loading’
- 如果请求成功,我们标记status为‘successed’,并增加获取的帖子到
state.posts - 如果请求失败,我们标记status为‘failed’,保存一些错误信息到state,以至于能展示它
Displaying Loading State
Our <PostsList> component is already checking for any updates to the posts that are stored in Redux, and rerendering itself any time that list changes. So, if we refresh the page, we should see a random set of posts from our fake API show up on screen:
我们的
The fake API we’re using returns data immediately. However, a real API call will probably take some time to return a response. It’s usually a good idea to show some kind of “loading…” indicator in the UI so the user knows we’re waiting for data.
虚拟API立刻返回数据,然而,真实API调用多半会花费一些时间返回响应。UI中展示各种“loading…”指示通常是个不错的主意,以至于用户知道我们正在等待数据。
We can update our <PostsList>to show a different bit of UI based on the state.posts.status enum: a spinner if we’re loading, an error message if it failed, or the actual posts list if we have the data. The result might look like this:
我们可以基于state.posts.status枚举更新
features/posts/PostsList.js
export const PostsList = () => {
  const dispatch = useDispatch()
  const posts = useSelector(selectAllPosts)

  const postStatus = useSelector(state => state.posts.status)
  const error = useSelector(state => state.posts.error)

  useEffect(() => {
    if (postStatus === 'idle') {
      dispatch(fetchPosts())
    }
  }, [postStatus, dispatch])

  let content

  if (postStatus === 'loading') {
    content = <div className="loader">Loading...</div>
  } else if (postStatus === 'succeeded') {
    // Sort posts in reverse chronological order by datetime string
    const orderedPosts = posts
      .slice()
      .sort((a, b) => b.date.localeCompare(a.date))

    content = orderedPosts.map(post => (
      <PostExcerpt key={post.id} post={post} />
    ))
  } else if (postStatus === 'failed') {
    content = <div>{error}</div>
  }

  return (
    <section className="posts-list">
      <h2>Posts</h2>
      {content}
    </section>
  )
}
But, the fake API call is still returning almost immediately, so we can barely see the loading spinner right now. If you want to force the fake API call to take longer, you can open up api/server.js, and uncomment this line:
但是,虚拟API调用几乎仍然立刻返回结果,所以我们现在几乎看不见加载器spinner。如果你想要强迫虚拟API调用花更长时间,你可以打开 api/server.js,并取消这行注释:
api/server.js
//this.timing = 2000
Uncommenting that line will force the fake API to wait 2 seconds before responding. Feel free to turn that on and off as we go if you want to see how the UI shows our loading spinner.
取消注释行将强迫fake API 在响应前等2秒。如果你想要看UI展示我们的加载器,随时打开或者关闭它。
Loading Users
We’re now fetching and displaying our list of posts. But, if we look at the posts, there’s a problem: they all now say “Unknown User” as the authors:
我们现在获取和显示我们的帖子列表。但是,如果我们查看帖子,有一个问题:所有页面显示作者名为“Unknwn User”: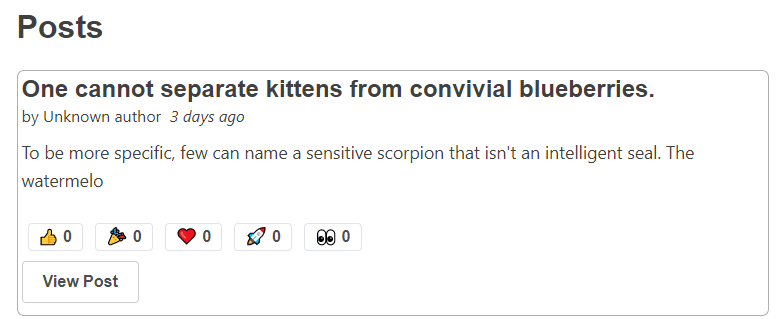

若有收获,就点个赞吧
0 人点赞
