开发笔记 后端架构
我会在闲暇时间来分享一些Rust的学习体会,内容尽可能是时下最新的,也欢迎各位来与我一起交流,内容喜欢的话可以点赞关注我❤️️
✏️ 前言
说到Rust在服务端的开发,我觉得Actix-web + Diesel是目前来说最为通用的一个组合,高效的Web框架,搭配简单好用的ORM,掌握技巧之后,开发的舒适程度已经相当不错了,速度上因为Diesel的原因肯定会差一些(具体可以参考TechEmpower,actix-diesel在大多数栏目里还是处于一个相对靠前的位置),但是我觉得这是一个开发难度和性能上非常不错的均衡了。
本文概要
本文会分别展示我在SHUpdtp和初代项目online_judge使用的两套与数据库连接的方案,并比较它们的优劣。最后我也会分享Actix + Diesel这个组合在项目架构上的一些经验总结,帮助大家更好的去构建后端项目。
canduma是我非常喜欢的一个项目,是一个简单的鉴权服务的demo。SHUpdtp和online_judge都是相当程度上参考了canduma之后才搭建起来的,网上推荐这个项目的文章并不多,所以这里我还是要强烈推荐一下这个项目,希望看完文章以后,大家能花更多的时间多看看这个项目,会很有帮助的。
🎓 数据库连接
为实现高效的数据库连接,可异步的数据库查询时十分有必要的。online_judge采用的是SyncArbiter分配任务的方式,而SHUpdtp采用的是阻塞函数访问连接池的方式,这个栏目我将具体介绍它们的实现细节。
Actor管理连接
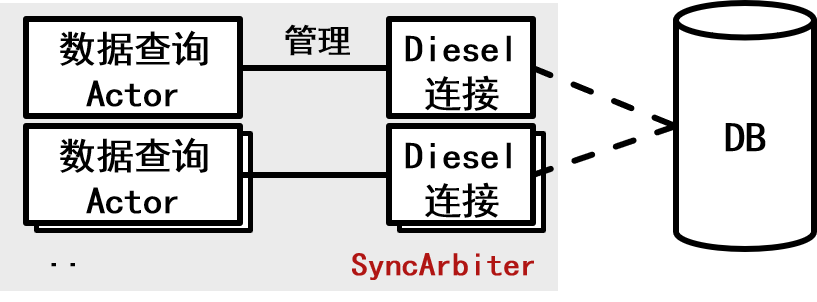
Actor管理连接的原理是将数据库操作定义为Actor的一种动作,由SyncArbiter创建多个线程级别的Actor,使它们能够并发的处理数据库操作,示意图如上。
首先我们准备数据查询Actor(名为DbExecutor),Actor当中存放数据库连接,并设定一个SyncArbiter的启动函数,方便我们批量启动多个同步Actor(SyncArbiter用法,可以参考👈)。
use diesel::prelude::*;use actix::prelude::*;use crate::statics::DATABASE_URL;pub struct DbExecutor(pub PgConnection);impl Actor for DbExecutor {type Context = SyncContext<Self>;}/// This is state where we will store *DbExecutor* address.pub struct DBState {pub db: Addr<DbExecutor>,}pub fn create_db_executor() -> Addr<DbExecutor> {let database_url = (*DATABASE_URL).clone();SyncArbiter::start(4, move || {DbExecutor(PgConnection::establish(&database_url).unwrap())})}
做好上述准备以后,就可以在main.rs当中准备主函数,启动时获得数据查询Actor的addr方便在需要时对其发送工作指令。
#[actix_web::main]async fn main() -> io::Result<()> {// ..let db_addr = create_db_executor();HttpServer::new(move || {App::new().data(DBState { db: db_addr.clone() })// ..}).bind("0.0.0.0:8080")?.run().await}
之后定义数据查询Actor的工作行为,这里以login为例子,先定义工作指令。
#[derive(Debug, Clone, Deserialize)]pub struct LoginMessage {pub identity_info: String,pub password: String,}impl Message for LoginMessage {type Result = Result<OutUser, String>;}
再为DbExecutor实现Handler使其在接收到工作指令LoginMessage时能做出相应的动作。
impl Handler<LoginMessage> for DbExecutor {type Result = Result<OutUser, String>;fn handle(&mut self, msg: LoginMessage, _: &mut Self::Context) -> Self::Result {use crate::schema::users::dsl::*;let operation_result =if msg.identity_info.is_email() {users.filter(email.eq(msg.identity_info)).limit(1).load::<User>(&self.0)} else if msg.identity_info.is_mobile() {users.filter(mobile.eq(msg.identity_info)).limit(1).load::<User>(&self.0)} else {users.filter(username.eq(msg.identity_info)).limit(1).load::<User>(&self.0)}.expect("Error loading user.").pop();if !operation_result.is_none() {let user = operation_result.unwrap();if make_hash(&msg.password, &user.salt) == user.hash.as_ref() {Ok(OutUser::from(user))} else {Err("Wrong password.".to_owned())}} else {Err("Can't find your Account.".to_owned())}}}
在服务层,若需要进行login操作,则需要发送LoginMessage委托DbExecutor完成。
pub async fn login(data: web::Data<DBState>,form: web::Form<LoginMessage>,id: Identity,) -> HttpResponse {// Send message to `DbExecutor` actorlet res = data.db.send(form.to_owned()).await;// ..}
以上便是使用Actor管理连接对应一个API接口所要做的全部内容,文中我启动了4个同步的的Actor相比1个Actor确实可以达到将近4倍的吞吐。
然而这样的写法有两个缺点:
- Actor若发送异常阻塞则会一直占用一条数据查询生产线,导致后端效能的下降,甚至到最后完全丧失查询能力。
- Handler实现起来相对来说较为繁琐,若设计不当,则会增加编程负担。
阻塞函数访问连接池
为了改进上述两个问题,我最终在SHUpdtp(也就是online_judge的重构版本)中采用了和canduma一样的方式,具体方法是将,一次数据库操作分配到actix-web运行时中的一个线程池中去,由运行时自行处理异步。在进行数据库操作时,先从r2d2连接池当中获取一个一个连接,再进行既定操作。
我们先准备数据库的连接池,准备好初始化办法和获取连接的函数。
use crate::errors::ServiceError;pub mod pool;use diesel::r2d2::PoolError;type ConnectionManager = diesel::r2d2::ConnectionManager<diesel::pg::PgConnection>;pub type Pool = diesel::r2d2::Pool<ConnectionManager>;pub type PooledConnection = diesel::r2d2::PooledConnection<ConnectionManager>;pub fn db_connection(pool: &Pool) -> Result<PooledConnection, ServiceError> {Ok(pool.get().map_err(|_| ServiceError::UnableToConnectToDb)?)}
use super::{ConnectionManager, Pool, PoolError};fn init_pool(database_url: &str) -> Result<Pool, PoolError> {let manager = ConnectionManager::new(database_url);Pool::builder().build(manager)}pub(crate) fn establish_connection(opt: crate::cli_args::Opt) -> Pool {init_pool(&opt.database_url).expect("Failed to create pool")}
启动时将连接池作为静态量存放在服务运行时当中。
#[actix_web::main]async fn main() -> std::io::Result<()> {//..let pool = database::pool::establish_connection(opt.clone());// ..HttpServer::new(move || {App::new().data(pool.clone())// ..}).bind(("0.0.0.0", opt.port)).unwrap().run().await}
以login服务为例,先通过db_connection方法获取数据库连接,在进行后续操作。
pub fn login(account: String,password: String,pool: web::Data<Pool>,) -> ServiceResult<SlimUser> {let conn = &db_connection(&pool)?;use crate::schema::users as users_schema;let user: User = users_schema::table.filter(users_schema::account.eq(account)).first(conn)?;if user.hash.is_none() || user.salt.is_none() {let hint = "Password was not set.".to_string();Err(ServiceError::BadRequest(hint))} else {let hash = utils::make_hash(&password, &user.clone().salt.unwrap()).to_vec();if Some(hash) == user.hash {Ok(SlimUser::from(user))} else {let hint = "Password is wrong.".to_string();Err(ServiceError::BadRequest(hint))}}}
调用时通过web::block方法,使得数据查询服务在线程池当中运行。
#[post("/login")]pub async fn login(body: web::Json<LoginBody>,identity: Identity,pool: web::Data<Pool>,) -> Result<HttpResponse, ServiceError> {let res = web::block(move || user::login(body.account.clone(),body.password.clone(),pool)).await.map_err(|e| {eprintln!("{}", e);e})?;// ..}
不难看出,这种方法相较前者节省了大量的代码量,从开发流程上来讲,将异步行为通过web::block透明化了,降低了结构管理的难度。
💼项目结构建议
根据常用的后端三层架构(控制层、服务层、持久层),我依旧推荐大家,将这三层分为三个目录进行编写,如果按照功能类别进行划分(如user、problem、contest…)虽然不影响三层架构,但是一旦出现跨包的模块使用,会使代码变得非常的混乱(以上经验是通过online_judge和SHUpdtp两个项目比较得出的)。
持久层当中,我们主要做的就是为ORM准备映射用的结构体,我推荐准备一下四类结构:
查询原始数据时所需要的Raw类型结构体
#[derive(Debug, Clone, Serialize, Deserialize, Queryable)]pub struct User {pub id: i32,pub salt: Option<String>,pub hash: Option<Vec<u8>>,pub account: String,pub mobile: Option<String>,pub role: String,}
插入数据时所需要的Insert类型结构体
#[derive(Debug, Insertable)]#[table_name = "users"]pub struct InsertableUser {pub salt: Option<String>,pub hash: Option<Vec<u8>>,pub account: String,pub mobile: Option<String>,pub role: String,}
更新时涉及的Changeset类型结构体
#[derive(AsChangeset)]#[table_name="users"]pub struct UserForm {pub salt: Option<String>,pub hash: Option<Vec<u8>>,pub account: Option<String>,pub mobile: Option<String>,pub role: Option<String>,}
暴露给用户的Slim、Detail或者Out类型结构体(它们通过实现From特征可以实现一个从Raw类型的快速的形式转换) ```rust
[derive(Serialize)]
pub struct OutUser { pub id: i32, pub account: String, pub mobile: Option
, pub role: String, }
impl From

若有收获,就点个赞吧
0 人点赞
