渲染函数和template区别
渲染函数h在vue3中被单独抽离出来,可以单独引入使用。
- 渲染函数可以处理一些强逻辑性展示的组件,比如渲染嵌套的列表。
- template多用于简单的纯展示组件,没有强逻辑处理。
渲染函数h用于处理一些无法用template解决的组件。
<script src="https://unpkg.com/vue"></script><style>.mt-4 {margin: 10px;}</style><div id="app"></div><script>const {h, createApp} = Vue// 定义 Stack 组件const Stack = {props: ['size'],render() {// 获取默认插槽const slot = this.$slots.default? this.$slots.default(): []// 将插槽中的所有内容套上 div,并且读取 props 上的 size 属性,// 并构成类名return h('div', {class: 'stack'}, slot.map(child => {return h('div', {class: `mt-${this.$props.size}`}, [child])}))}}// App 组件const App = {template: `<Stack size="4"><div>hello</div><Stack size="4"><div>hello</div><div>hello</div></Stack></Stack>`,components: {Stack}}// 创建 vue 实例并挂载到 DOM 上createApp(App).mount('#app')</script>
h函数生成虚拟DOM
h函数是vue3暴露的一个公开API,可以拥有生成vnode.
// vnode的格式{tag:"div,props: "",children: []}
```javascript import {h} from “vue” const App = { render() { return h(“div”, {
id: "foo",onClick: this.handleClick
}, “vue3”) } }
<a name="LsqtW"></a>## Compiler & Renderer使用[ Vue 3 Template Explorer](https://template-explorer.vuejs.org/)可以看到 Vue 3 把模板template编译成的渲染函数.<br />在处理template到渲染函数的过程,vue3内部进行了很多性能优化设置。给节点标记属性,下次更新时是否进行更新。- 标记出静态节点,下次更新时,不进行diff操作对比。- 标记动态属性,供后边diff使用- 对event进行缓存,在子组件上触发事件时,在patch阶段,不会触发整个子组件的重新渲染。- 引入 block 的概念;动态更新的节点会被添加到 block 上,无论这个节点有多深,v-if 会开启一个新的 block,这个 block 又被其父 block 跟踪;总的来说就是在 diff 的时候不需要在去深度遍历判断,而是从 block 记录的动态节点数组上,去遍历会变化的 vNode```html<div id="app"></div><script>function h(tag, props, children) {}function mount(vnode, container) {}const vdom = h('div', {class: 'red'}, [h('span', null, ['hello'])])mount(vdom, document.getElementById('app'))</script>
mount函数的实现
mount参数:
- VNode:虚拟节点,由h函数生成
- container:把虚拟节点挂在的dom元素
mount实现的操作流程
- 根据vnode创建出真实dom
- 设置props属性到dom上
- 处理children
- 将生成的el,append到container上
```html
hello
<a name="yrkMU"></a>## patch函数,对比节点并进行更新`patch(oldNode, newNode)`,patch参数:- 第一个为旧虚拟节点- 第二个为新的虚拟节点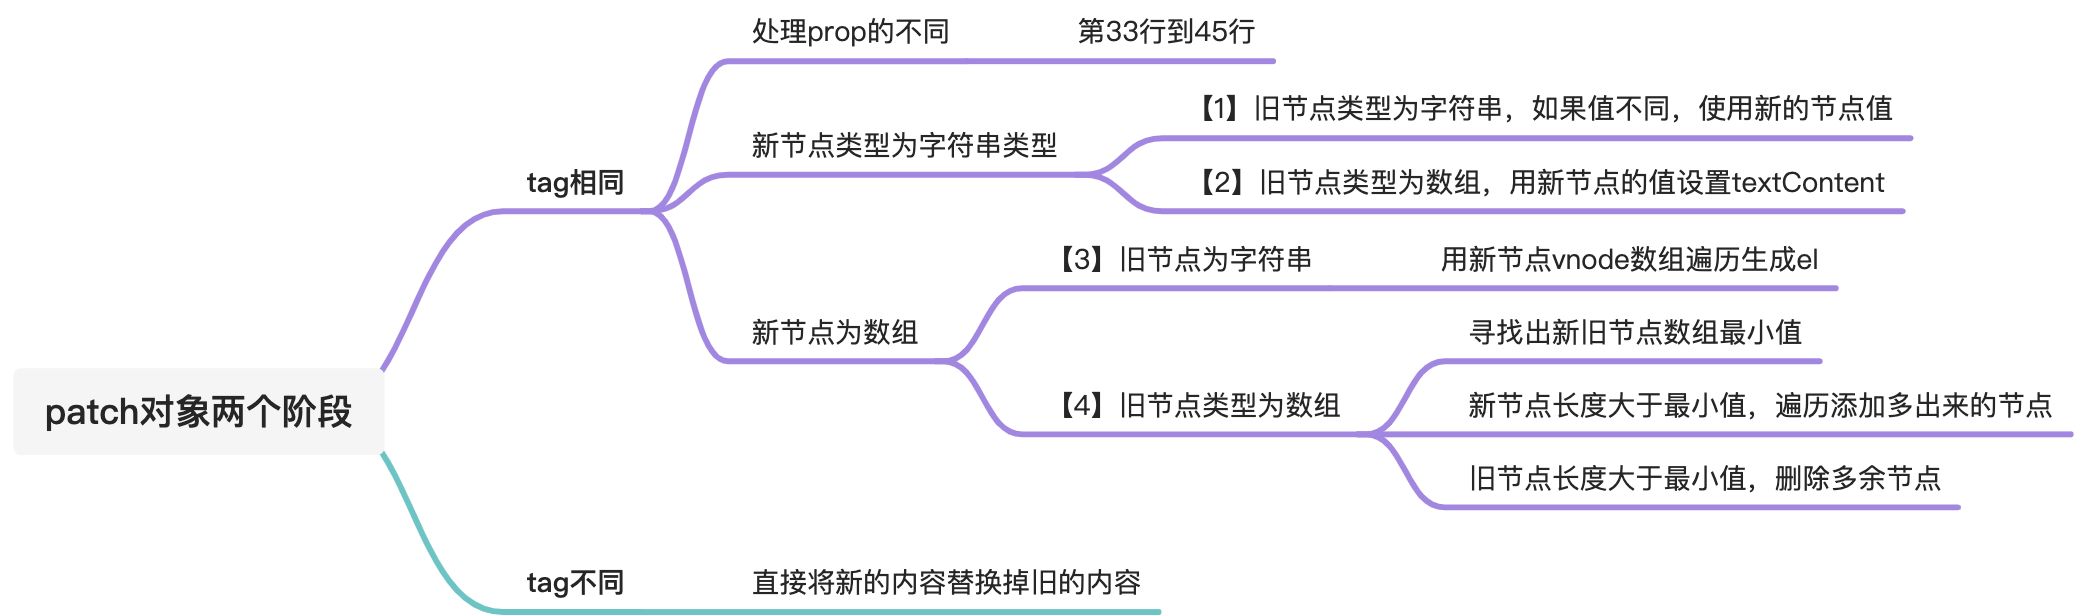```javascript// 将虚拟dom节点转为真实domfunction createElm(vnode) {let {tag,props,children} = vnode;if (typeof tag === "string") {vnode.el = document.createElement(tag);}if (props) {for (let key in props) {let value = props[key];vnode.el.setAttribute(key, value);}}if (typeof vnode.children === "string") {vnode.el.textContent = vnode.children;} else {children.forEach(child => {return vnode.el.appendChild(createElm(child));})}return vnode.el;}// dom diff过程function patch(n1, n2) {if (n1.tag === n2.tag) {// n1.el,此处的el属性就是在mount方法中,第21行设置的。const el = n2.el = n1.el; //把n1的el真实dom内容,赋值给n2的el属性和单独的el对象上const oldProps = n1.props || {};const newProps = n2.props || {};for (const key in newProps) {const oldValue = oldProps[key];const newValue = newProps[key];if (newValue !== oldValue) {el.setAttribute(key, newValue)}}// 处理新节点中不存在的属性,直接将属性移除for (const key in oldProps) {if (!(key in newProps)) {el.removeAttribute(key)}}const oldChildren = n1.children;const newChildren = n2.children;if (typeof newChildren === "string") { // 新节点是字符串,直接删除旧节点,并使新接的文本if (typeof oldChildren === "string") {if (newChildren !== oldChildren) {el.textContent = newChildren}} else { //旧节点不是字符串,说明包含多个子节点。同样也直接删除el.textContent = newChildren}} else { //if (typeof oldChildren === "string") { //旧节点是字符串,新节点是多个子元素el.innerHTML = '';newChildren.forEach(child => {mount(child, el)})} else { //旧节点多个子元素,新节点多个子元素// 找出新旧节点最长的共用长度const commonLength = Math.min(oldChildren.length, newChildren.length);// 比对公共长度的节点for(let i = 0; i < commonLength; i++) {patch(oldChildren[i], newChildren[i]);}// 如果新节点长度大于旧节点长度if(newChildren.length > oldChildren.length){newChildren.slice(oldChildren.length).forEach(child=>{mount(child, el)})}// 如果旧节点长度大于新节点长度if(newChildren.length < oldChildren.length){oldChildren.slice(newChildren).forEach(child=>{el.removeChild(child.el)})}}}} else {// 直接替换replacen1.el.parentNode.replaceChild(createElm(vdom2), n1.el);}}const vdom = h('div', {class: 'red'}, [h('span', null, 'hello')])const vdom2 = h('p', {class: 'blue'}, [h('span', null, 'changed'),h('p', {class: 'red'}, 'changed1'),])// console.log(createElm(vdom2), 'dom2');mount(vdom, document.getElementById('app'))
Reactive响应式
一个值发生变化,依赖该值的数据会自动发生变化。
// let a = 10;// let b = a *2;// console.log(b) //20// a = 15;// 如何让b的值变成30;// console.log(b) ?==30onAChanged(() => {b = a *2;})
vue3响应式示例
import { ractive, watchEffect } from 'vue'// 创建一个响应式对象const state = reactive({count: 0})// 会收集所有的依赖,在执行过程,如果某个响应式属性被使用,那么整个函数就会执行// 相当于上面提到的 onAChangedwatchEffect(() => {console.log(state.count)}) // 0state.count++ // 1
Dep类的实现
Dep类的两个方法:depend和notify;
- depend:用于添加追踪依赖
-
初步实现Dep类,手动收集依赖和派发更新
let activeEffect = null;class Dep {constructor(value){this.subscribers = new Set();this.value = value;}depend() {if (activeEffect) {this.subscribers.add(activeEffect);}}notify() {this.subscribers.forEach((effect) => effect());}}// 和onAChanged作用一样,自动更新依赖属性function watchEffect(effect) {activeEffect = effect;effect(); //首次是 自己执行 触发effect,以后数据发生变化就走notify中触发effectactiveEffect = null;}const dep = new Dep('hello');watchEffect(() => {dep.depend();console.log("effect run", dep.value);});// 手动执行的更新dep.value = "world";dep.notify();
vue中采用的自动更新
let activeEffect = null;class Dep {constructor(value){this.subscribers = new Set();this._value = value;}get value(){this.depend(); //自动执行depend,收集依赖return this._value;}set value(newValue){this._value = newValue;this.notify(); //自动执行派发更新, notify}depend() {if (activeEffect) {this.subscribers.add(activeEffect);}}notify() {this.subscribers.forEach((effect) => effect());}}// 和onAChanged作用一样,自动更新依赖属性function watchEffect(effect) {activeEffect = effect;// 这里就是watchEffect中的监听会默认先执行一次;watch不能执行,必须设置immdiate才能立即执行effect(); //首次是 自己执行 触发effect,以后数据发生变化就走notify中触发effectactiveEffect = null;}const dep = new Dep('hello');watchEffect(() => {dep.depend();console.log("effect run", dep.value);});// 手动执行的更新dep.value = "world";dep.notify();
Reactive类的实现
利用上面实现的Dep类,完成数据响应式的方法函数reactive。响应式数据的值是数据本身,所以创建的Dep类可以简化,不需要value值。
let activeEffect = null;class Dep{subscribers = new Set();depend() {if (activeEffect) {this.subscribers.add(activeEffect);}}notify() {this.subscribers.forEach((effect) => effect());}}function watchEffect(effect) {activeEffect = effect;effect();activeEffect = null;}
ES5的defineProperty实现
在Object.defineProperty的get/set中 进行依赖收集/派发更新。
<div id="app"></div><script>let activeEffect = null;class Dep {subscribers = new Set();depend() {if (activeEffect) {this.subscribers.add(activeEffect);}}notify() {this.subscribers.forEach((effect) => effect());}}function watchEffect(effect) {activeEffect = effect;effect();activeEffect = null;}function reactive(raw) {// 获取对象keyObject.keys(raw).forEach((key) => {let value = raw[key];let dep = new Dep();Object.defineProperty(raw, key, {get() {dep.depend();return value;},set(newValue) {// 先进行 赋值value = newValue;// 再进行更新dep.notify();},});});return raw;}let state = reactive({count: 0,});watchEffect(() => {console.log(state.count);});state.count++;</script>
defineProperty的缺陷,无法拦截新增属性,和数组的push、pop、shift、unshfit、sort、reverse、splice方法。
ES6的Proxy实现
使用Proxy对象进行代理,代理的是整个对象的值,可以解决defineProperty的缺陷。
<div id="app"></div><script>let activeEffect = null;class Dep {subscribers = new Set();depend() {if (activeEffect) {this.subscribers.add(activeEffect);}}notify() {this.subscribers.forEach((effect) => effect());}}function watchEffect(effect) {activeEffect = effect;effect();activeEffect = null;}function searchDep(target, key) {let depsMap = targetMap.get(target);if (!depsMap) {targetMap.set(target, (depsMap = new Map()));}let dep = depsMap.get(key);if (!dep) {depsMap.set(key, (dep = new Dep()));}return dep;}// 创建一个存放 deps 的弱引用 Map,key 为 target 本身// 即需要响应式处理的对象本身// WeakMap 只能用 object 作为 key,并且无法被遍历// 当 target 不再需要的时候,可以正确地被垃圾处理机制回收let targetMap = new WeakMap();function reactive(raw) {return new Proxy(raw, {get(target, key, receiver) {let dep = searchDep(target, key);dep.depend();return Reflect.get(target, key, receiver);},set(target, key, value, receiver) {let dep = searchDep(target, key);let res = Reflect.set(target, key, value, receiver);dep.notify();return res;},});}let state = reactive({count: 0,});watchEffect(() => {console.log(state.count, "watchEffect");});state.count++;</script>
miniVue
基本架构:
```html
<a name="gNeCR"></a>### 具体实现<a name="SM1t0"></a>#### 修正mount方法,满足处理事件```javascriptfunction mount(vnode, container) {const tag = vnode.tag;const el = (vnode.el = document.createElement(tag)); // 在vnode上添加el属性,用来存储原dom结构// propsif (vnode.props) {for (let key in vnode.props) {let value = vnode.props[key];// 添加对事件属性的处理+ if (key.startsWith("on")) {+ el.addEventListener(key.slice(2).toLowerCase(), value);+ } else {el.setAttribute(key, value);+ }}}// childrenif (vnode.children) {if (typeof vnode.children === "string") {el.textContent = vnode.children;} else {vnode.children.forEach((child) => {mount(child, el);});}}container.appendChild(el);}
完整miniVue
<div id="app"></div><script>// vDomfunction h(tag, props, children) {return {tag,props,children,};}function mount(vnode, container) {const tag = vnode.tag;// 在vnode上添加el属性,用来存储原dom结构const el = (vnode.el = document.createElement(tag));// propsif (vnode.props) {for (let key in vnode.props) {let value = vnode.props[key];// 添加对事件属性的处理if (key.startsWith("on")) {el.addEventListener(key.slice(2).toLowerCase(), value);} else {el.setAttribute(key, value);}}}// childrenif (vnode.children) {if (typeof vnode.children === "string") {el.textContent = vnode.children;} else {vnode.children.forEach((child) => {mount(child, el);});}}container.appendChild(el);}// 将虚拟dom节点转为真实domfunction createElm(vnode) {let { tag, props, children } = vnode;if (typeof tag === "string") {vnode.el = document.createElement(tag);}if (props) {for (let key in props) {let value = props[key];vnode.el.setAttribute(key, value);}}if (typeof vnode.children === "string") {vnode.el.textContent = vnode.children;} else {children.forEach((child) => {return vnode.el.appendChild(createElm(child));});}return vnode.el;}// dom diff过程function patch(n1, n2) {if (n1.tag === n2.tag) {//把n1的el真实dom内容,赋值给n2的el属性和单独的el对象上const el = (n2.el = n1.el);const oldProps = n1.props || {};const newProps = n2.props || {};for (const key in newProps) {const oldValue = oldProps[key];const newValue = newProps[key];if (newValue !== oldValue) {el.setAttribute(key, newValue);}}// 处理新节点中不存在的属性,直接将属性移除for (const key in oldProps) {if (!(key in newProps)) {el.removeAttribute(key);}}const oldChildren = n1.children;const newChildren = n2.children;if (typeof newChildren === "string") {// 新节点是字符串,直接删除旧节点,并使新接的文本if (typeof oldChildren === "string") {if (newChildren !== oldChildren) {el.textContent = newChildren;}} else {//旧节点不是字符串,说明包含多个子节点。同样也直接删除el.textContent = newChildren;}} else {if (typeof oldChildren === "string") {//旧节点是字符串,新节点是多个子元素el.innerHTML = "";newChildren.forEach((child) => {mount(child, el);});} else {//旧节点多个子元素,新节点多个子元素// 找出新旧节点最长的共用长度const commonLength=Math.min(oldChildren.length, newChildren.length);// 比对公共长度的节点for (let i = 0; i < commonLength; i++) {patch(oldChildren[i], newChildren[i]);}// 如果新节点长度大于旧节点长度if (newChildren.length > oldChildren.length) {newChildren.slice(oldChildren.length).forEach((child) => {mount(child, el);});}// 如果旧节点长度大于新节点长度if (newChildren.length < oldChildren.length) {oldChildren.slice(newChildren).forEach((child) => {el.removeChild(child.el);});}}}} else {// 直接替换replacen1.el.parentNode.replaceChild(createElm(vdom2), n1.el);}}// reactivitylet activeEffect = null;class Dep {subscribers = new Set();depend() {if (activeEffect) {this.subscribers.add(activeEffect);}}notify() {this.subscribers.forEach((effect) => effect());}}function watchEffect(effect) {activeEffect = effect;effect();activeEffect = null;}function searchDep(target, key) {let depsMap = targetMap.get(target);if (!depsMap) {targetMap.set(target, (depsMap = new Map()));}let dep = depsMap.get(key);if (!dep) {depsMap.set(key, (dep = new Dep()));}return dep;}let targetMap = new WeakMap();function reactive(raw) {return new Proxy(raw, {get(target, key, receiver) {let dep = searchDep(target, key);dep.depend();return Reflect.get(target, key, receiver);},set(target, key, value, receiver) {let dep = searchDep(target, key);let res = Reflect.set(target, key, value, receiver);dep.notify();return res;},});}// App 组件const App = {data: reactive({count: 0,}),render() {return h("div",{// 这里需要在 mount 中添加事件处理onClick: () => {this.data.count++;},},String(this.data.count)); // 第三个参数这里暂时只支持 String类型},};// 挂载 Appfunction createApp(component, container) {let isMounted = false;let prevVdom;// component 组件中有响应式对象发生变化,便会执行以下函数watchEffect(() => {if (!isMounted) {// 没有挂载,即初始化// 记录旧的 vdomprevVdom = component.render();// 挂载mount(prevVdom, container);isMounted = true;} else {// 获取新的 vdomconst newVdom = component.render();// patchpatch(prevVdom, newVdom);prevVdom = newVdom;}});}createApp(App, document.getElementById("app"));</script>
新增App组件,和createApp的方法。
App组件包含:data数据,render方法。
createApp:创建并挂载实例
代码组织和重用 CompositionAPI
composition组合式API,可以任意复用,实质上就是函数的调用。
function useFeature(){onMounted(()=> console.log("mounted"))}export default{tempalte: `{{event.count}}`,props: ["id"],setup(props){// 方便复用useFeature();return {event: {count: ref(0)}}}}
对比optionAPI和Composite API建立鼠标移动
<script src="http://unpkg.com/vue"></script><div id="app"></div><script>const { createApp } = Vue;const App = {template: `{{x}} {{y}}`,data() {return {x: 0,y: 0,};},methods: {update(e) {this.x = e.clientX;this.y = e.clientY;},},mounted() {window.addEventListener("mousemove", this.update);},unmounted() {window.addEventListener("mousemove", this.update);},};createApp(App).mount("#app");</script>
optionAPI逻辑复用mixin
为了实现逻辑复用,可以使用mixin,但是当存在多个mixin引入使用时,没法区分变量来自哪个mixin。
<script src="http://unpkg.com/vue"></script><div id="app"></div><script>const { createApp } = Vue;const mouseMoveMixin = {data() {return {x: 0,y: 0,};},methods: {update(e) {this.x = e.clientX;this.y = e.clientY;},},mounted() {window.addEventListener("mousemove", this.update);},unmounted() {window.addEventListener("mousemove", this.update);},};const otherMixin = {data() {return {x: 0,y: 0,};},methods: {update(e) {this.x = e.clientX + 'px';this.y = e.clientY + 'px';},},mounted() {window.addEventListener("mousemove", this.update);},unmounted() {window.addEventListener("mousemove", this.update);},};const App = {// 多个mixin同时存在,如果变量名重复出现,后边的会覆盖前面。template: `{{x}} {{y}}`,mixins: [mouseMoveMixin, otherMixin],};createApp(App).mount("#app");</script>
使用slot解决复用变量重名问题
<script src="http://unpkg.com/vue"></script><div id="app"></div><script>const { createApp } = Vue;const Mouse = {data() {return {x: 0,y: 0,};},methods: {update(e) {this.x = e.clientX;this.y = e.clientY;},},mounted() {window.addEventListener("mousemove", this.update);},unmounted() {window.addEventListener("mousemove", this.update);},render() {return (this.$slots.default &&this.$slots.default({x: this.x,y: this.y,}));},};const Other = {data() {return {x: 0,y: 0,};},methods: {update(e) {this.x = e.clientX + "px";this.y = e.clientY + "px";},},mounted() {window.addEventListener("mousemove", this.update);},unmounted() {window.addEventListener("mousemove", this.update);},render() {return (this.$slots.default &&this.$slots.default({x: this.x,y: this.y,}));},};const App = {components: { Mouse, Other },template: `<Mouse v-slot='{x, y}'><Other v-slot='{x: otherX, y: otherY}'>{{x}} {{y}} --- {{otherX}} {{otherY}}</Other></Mouse>`,};createApp(App).mount("#app");</script>
Composite API逻辑复用
<script src="http://unpkg.com/vue"></script><div id="app"></div><script>const { createApp, ref, onUnmounted, onMounted } = Vue;const useMouse = () => {const x = ref(0);const y = ref(0);const update = (e) => {x.value = e.clientX;y.value = e.clientY;};onMounted(() => {window.addEventListener("mousemove", update);});onUnmounted(() => {window.removeEventListener("mousemove", update);});return { x, y };};const App = {template: `{{x}} {{y}}`,setup() {// 可以在此处修改引入的变量名let { x, y } = useMouse();return { x, y };},};createApp(App).mount("#app");</script>
Composition API Example
<script src="https://unpkg.com/vue"></script><div id="app"></div><script>const { createApp, ref, watchEffect } = Vue;// 进一步简化在组件中的 usefunction usePost(getId) {return useFetch(() => `https://jsonplaceholder.typicode.com/todos/${getId()}`);}// 抽出 fetch,并且你可以在的 useFetch 中使用 watchEffect 来监听传进来的值的变化function useFetch(getUrl) {const data = ref(null);const error = ref(null);const isPending = ref(true);watchEffect(() => {// resetdata.value = null;error.value = null;isPending.value = true;// fetchfetch(getUrl()).then((res) => res.json()).then((_data) => {data.value = _data;}).catch((err) => {error.value = err;}).finally(() => {isPending.value = false;});});return {data,error,isPending,};}const Post = {template: `<div v-if="isPending">loading</div><div v-else-if="data">{{ data }}</div><div v-else-if="error">Something went Wrong: {{ error.message }}</div>`,props: ["id"],setup(props) {// prop.id 被传到了 useFetch 的 watchEffect 中// 所以 prop.id 变化,即可重新 fetchconst { data, error, isPending } = usePost(() => props.id);return {data,error,isPending,};},};const App = {components: { Post },data() {return {id: 1,};},template: `<button @click="id++">change ID</button><Post :id="id"></Post>`,};createApp(App).mount("#app");</script>

若有收获,就点个赞吧
0 人点赞
