Visual

接口
abstract 中的抽象方法只规定了不能是 private 的,而接口中的“抽象方法”只能是 public 的。
这样的成员访问级别就决定了接口的本质:接口是服务消费者和服务提供者之间的契约。
既然是契约,那就必须是透明的,对双方都是可见的。
除了 public,abstract 的抽象方法还可以是 protected 和 internal,它们都不是给功能调用者准备的,各自有特定的可见目标。
接口即契约(contract)
契约使自由合作成为可能,所谓自由合作就是一份合同摆在这里,它即约束服务的使用者也约束服务的提供者。如果该契约的使用者和提供者有多个,它们之间还能自由组合。
接口契约示例
未使用接口时:
class Program{static void Main(string[] args){int[] nums1 = new int[] { 1, 2, 3, 4, 5 };ArrayList nums2 = new ArrayList { 1, 2, 3, 4, 5 };Console.WriteLine(Sum(nums1));Console.WriteLine(Avg(nums1));Console.WriteLine(Sum(nums2));Console.WriteLine(Avg(nums2));}static int Sum(int[] nums){int sum = 0;foreach (var n in nums){sum += n;}return sum;}static double Avg(int[] nums){int sum = 0;double count = 0;foreach (var n in nums){sum += n;count++;}return sum / count;}static int Sum(ArrayList nums){int sum = 0;foreach (var n in nums){sum += (int)n;}return sum;}static double Avg(ArrayList nums){int sum = 0;double count = 0;foreach (var n in nums){sum += (int)n;count++;}return sum / count;}}
供方是 nums1 和 nums2,需方是 Sum 和 Avg 这两函数。
需方需要传进来的参数可以迭代就行,别的不关心也用不到。
整型数组的基类是 Array,Array 和 ArrayList 都实现了 IEnumerable。
static int Sum(IEnumerable nums){int sum = 0;foreach (var n in nums){sum += (int)n;}return sum;}static double Avg(IEnumerable nums){int sum = 0;double count = 0;foreach (var n in nums){sum += (int)n;count++;}return sum / count;}
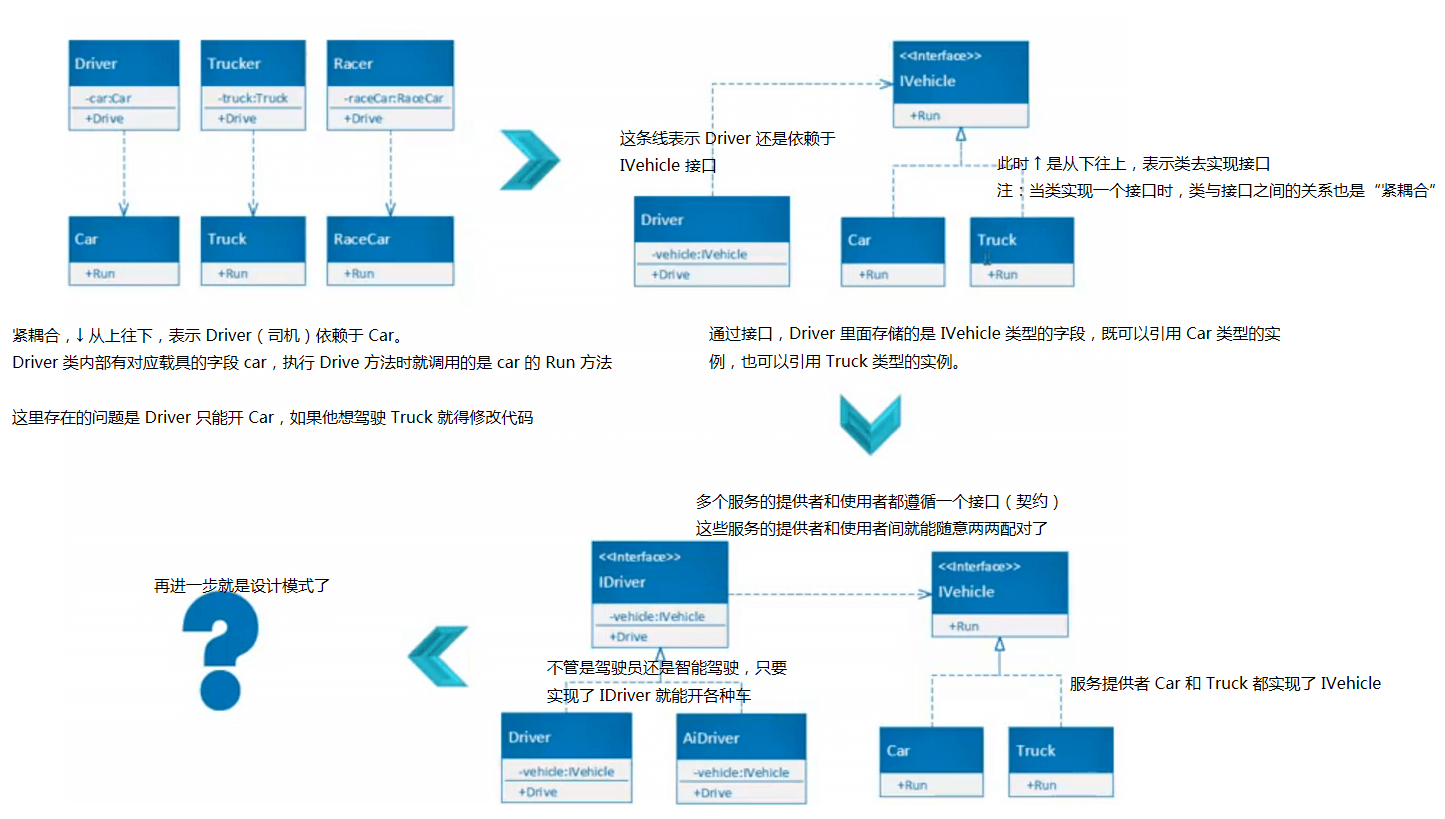
依赖与耦合
现实世界中有分工、合作,面向对象是对现实世界的抽象,它也有分工、合作。
类与类、对象与对象间的分工、合作。
在面向对象中,合作有个专业术语“依赖”,依赖的同时就出现了耦合。依赖越直接,耦合就越紧。
Car 与 Engine 紧耦合的示例:
class Program{static void Main(string[] args){var engine = new Engine();var car = new Car(engine);car.Run(3);Console.WriteLine(car.Speed);}}class Engine{public int RPM { get; private set; }public void Work(int gas){this.RPM = 1000 * gas;}}class Car{// Car 里面有个 Engine 类型的字段,它两就是紧耦合了// Car 依赖于 Engineprivate Engine _engine;public int Speed { get; private set; }public Car(Engine engine){_engine = engine;}public void Run(int gas){_engine.Work(gas);this.Speed = _engine.RPM / 100;}}
紧耦合的问题:
- 基础类一旦出问题,上层类写得再好也没辙
- 程序调试时很难定位问题源头
- 基础类修改时,会影响写上层类的其他程序员的工作
所以程序开发中要尽量避免紧耦合,解决方法就是接口。
接口:
- 约束调用者只能调用接口中包含的方法
- 让调用者放心去调,不必关心方法怎么实现的、谁提供的
接口解耦示例
以老式手机举例,对用户来说他只关心手机可以接(打)电话和收(发)短信。
对于手机厂商,接口约束了他只要造的是手机,就必须可靠实现上面的四个功能。
用户如果丢了个手机,他只要再买个手机,不必关心是那个牌子的,肯定也包含这四个功能,上手就可以用。用术语来说就是“人和手机是解耦的”。
class Program{static void Main(string[] args){//var user = new PhoneUser(new NokiaPhone());var user = new PhoneUser(new EricssonPhone());user.UsePhone();Console.ReadKey();}}class PhoneUser{private IPhone _phone;public PhoneUser(IPhone phone){_phone = phone;}public void UsePhone(){_phone.Dail();_phone.PickUp();_phone.Receive();_phone.Send();}}interface IPhone{void Dail();void PickUp();void Send();void Receive();}class NokiaPhone : IPhone{public void Dail(){Console.WriteLine("Nokia calling ...");}public void PickUp(){Console.WriteLine("Hello! This is Tim!");}public void Send(){Console.WriteLine("Nokia message ring ...");}public void Receive(){Console.WriteLine("Hello!");}}class EricssonPhone : IPhone{public void Dail(){Console.WriteLine("Ericsson calling ...");}public void PickUp(){Console.WriteLine("Hello! This is Tim!");}public void Send(){Console.WriteLine("Ericsson ring ...");}public void Receive(){Console.WriteLine("Good evening!");}}
没有用接口时,如果一个类坏了,你需要 Open 它再去修改,修改时可能产生难以预料的副作用。引入接口后,耦合度大幅降低,换手机只需要换个类名,就可以了。
等学了反射后,连这里的一行代码都不需要改,只要在配置文件中修改一个名字即可。
在代码中只要有可以替换的地方,就一定有接口的存在;接口就是为了解耦(松耦合)而生。
松耦合最大的好处就是让功能的提供方变得可替换,从而降低紧耦合时“功能的提供方不可替换”带来的高风险和高成本。
- 高风险:功能提供方一旦出问题,依赖于它的功能都挂
- 高成本:如果功能提供方的程序员崩了,会导致功能使用方的整个团队工作受阻
依赖反转原则
解耦在代码中的表现就是依赖反转。
单元测试就是依赖反转在开发中的直接应用和直接受益者。
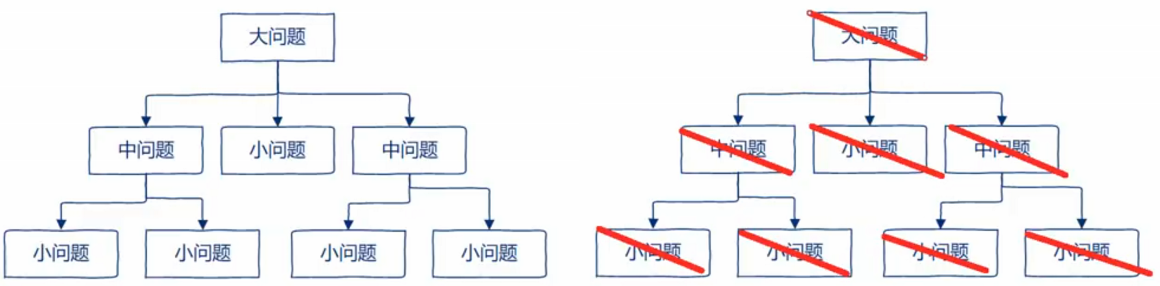
人类解决问题的典型思维:自顶向下,逐步求精。
在面向对象里像这样来解决问题时,这些问题就变成了不同的类,且类和类之间紧耦合,它们也形成了这样的金字塔。
依赖反转给了我们一种新思路,用来平衡自顶向下的思维方式。
平衡:不要一味推崇依赖反转,很多时候自顶向下就很好用,就该用。
单元测试
用例子来展示接口、解耦和依赖反转原则是怎么被单元测试应用的。
紧耦合:
class Program{static void Main(string[] args){var fan = new DeskFan(new PowerSupply());Console.WriteLine(fan.Work());}}// 背景:电扇有个电源,电源输出电流越大电扇转得越快// 电源输出有报警上限class PowerSupply{public int GetPower(){//return 100;return 210;}}class DeskFan{private PowerSupply _powerSupply;public DeskFan(PowerSupply powerSupply){_powerSupply = powerSupply;}public string Work(){int power = _powerSupply.GetPower();if (power <= 0){return "Won't work.";}else if (power < 100){return "Slow";}else if (power < 200){return "Work fine";}else{return "Warning";}}}
现在的问题是:我要测试电扇是否能按预期工作,我必须去修改 PowerSupply 里面的代码,这违反了开闭原则。
而且可能有除了电扇外的别的电器也连到了这个电源上面(在其他位置也引用了 PowerSupply),为了测试电扇工作就去改电源,很可能会造成别的问题。
接口的产生:自底向上(重构)和自顶向下(设计)。
只有对业务足够熟悉才能做到自顶向下,更多时候是一边写一边重构,现在我们就用接口去对电源和风扇进行解耦。
class Program{static void Main(string[] args){var fan = new DeskFan(new PowerSupply());Console.WriteLine(fan.Work());}}public interface IPowerSupply{int GetPower();}public class PowerSupply : IPowerSupply{public int GetPower(){return 110;}}public class DeskFan{private IPowerSupply _powerSupply;public DeskFan(IPowerSupply powerSupply){_powerSupply = powerSupply;}public string Work(){int power = _powerSupply.GetPower();if (power <= 0){return "Won't work.";}else if (power < 100){return "Slow";}else if (power < 200){return "Work fine";}else{return "Warning";}}}
有接口后,我们就可以专门创建一个用于测试的电源类。
- 为了单元测试,将相关的类和接口都显式声明为 public
- 示例本身是个 .NET Core Console App,其相应的测试项目最好用 xUnit(官方之选)
- 测试项目命名:被测试项目名.Tests,例如 InterfaceExample.Tests
- 测试项目要引用被测试项目
- 测试项目里面的类和被测试项目的类一一对应,例如 DeskFanTests.cs
using Xunit;namespace InterfaceExample.Tests{public class DeskFanTest{[Fact]public void PowerLowerThanZero_OK(){var fan = new DeskFan(new PowerSupplyLowerThanZero());var expected = "Won't work.";var actual = fan.Work();Assert.Equal(expected, actual);}[Fact]public void PowerHigherThan200_Warning(){var fan = new DeskFan(new PowerSupplyHigherThan200());// 注:此处为了演示,实际程序那边先故意改成了 Exploded!var expected = "Warning";var actual = fan.Work();Assert.Equal(expected, actual);}}class PowerSupplyLowerThanZero : IPowerSupply{public int GetPower(){return 0;}}class PowerSupplyHigherThan200 : IPowerSupply{public int GetPower(){return 220;}}}
每当有新的代码提交后,就将 TestCase 全部跑一遍,如果原来通过了的,这次却没有通过(称为回退),就开始 Debug。
平时工作中写测试 case 和写代码的重要性是一样的,没有测试 case 监控的代码的正确性、可靠度都不能保证。
程序想要能被测试,就需要引入接口、松耦合、依赖反转。
Mock
现在的一个问题就是:为了进行测试,我们要不断的创建实现了接口的测试类,造成这些看上去很丑的类越来越多。
可以通过 Mock(模拟) Framework 来解决。
打开测试项目的 NuGet,搜索并安装 Moq(发音就是 Mock)。
using Xunit;using Moq;namespace InterfaceExample.Tests{public class DeskFanTest{[Fact]public void PowerLowerThanZero_OK(){var mock = new Mock<IPowerSupply>();// 设置该 mock 对应的 GetPower 方法返回 0mock.Setup(ps => ps.GetPower()).Returns(() => 0);var fan = new DeskFan(mock.Object);var expected = "Won't work.";var actual = fan.Work();Assert.Equal(expected, actual);}[Fact]public void PowerHigherThan200_Warning(){var mock = new Mock<IPowerSupply>();mock.Setup(ps => ps.GetPower()).Returns(() => 220);var fan = new DeskFan(mock.Object);var expected = "Warning";var actual = fan.Work();Assert.Equal(expected, actual);}}}
总结
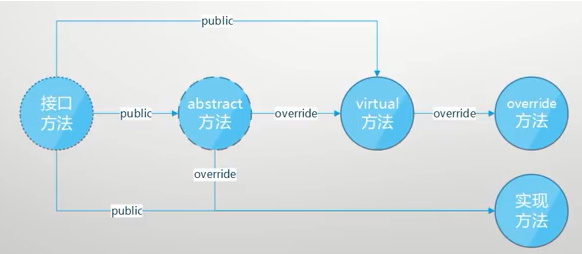
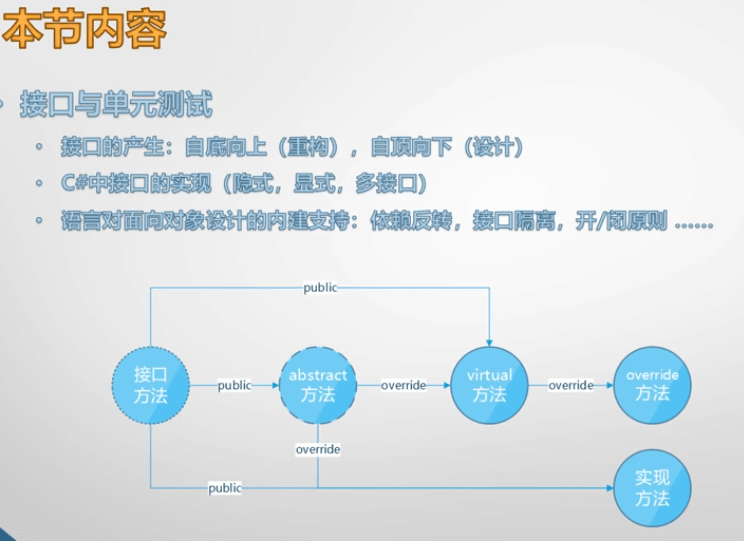
各种方法间的关系
- 接口方法用虚线圆表示接口方法是纯虚方法
- 接口方法的修饰符一定是 public
- 接口方法的修饰符一定是 public
- abstract 比纯虚方法稍微实现了点,但并未完全实现,其实现还要下推出去
- 从 abstract 到 virtual 和实现方法必须加 override
- 从 abstract 到 virtual 和实现方法必须加 override
- virtual、override 和实现方法是有了逻辑有了方法体的方法
- 从 virtual 到 override 方法也必须加 override
- 从 virtual 到 override 方法也必须加 override

若有收获,就点个赞吧
0 人点赞
