


nacos的安装:
https://www.cnblogs.com/liubaihui/p/13569380.html
默认为集群模式,设置为单机模式后,进入登录界面 账号和密码都是nacos
nacos注册中心

注册中心成功后,调用和之前的feign的调用方法 没有区别
https://nacos.io/zh-cn/docs/quick-start-spring-cloud.html 官网参考
添加依赖 ```java <?xml version=”1.0” encoding=”UTF-8”?>
4.0.0 com.itheima nacos-client104 1.0-SNAPSHOT org.springframework.boot spring-boot-starter-parent 2.1.4.RELEASE com.alibaba.cloud spring-cloud-starter-alibaba-nacos-discovery org.springframework.boot spring-boot-starter-web org.springframework.cloud spring-cloud-dependencies Greenwich.SR1 pom import com.alibaba.cloud spring-cloud-alibaba-dependencies 2.1.2.RELEASE pom import
2. application.yml配置nacos注册中心的地址```yamlspring:application:name: nacos-clientcloud:nacos:discovery:server-addr: localhost:8848 # 注册给服务端的地址
3. 启动文件
package com.itheima;

import org.springframework.boot.SpringApplication;
import org.springframework.boot.autoconfigure.SpringBootApplication;
import org.springframework.cloud.client.discovery.EnableDiscoveryClient;
import org.springframework.web.bind.annotation.GetMapping;
import org.springframework.web.bind.annotation.RestController;

@SpringBootApplication
@EnableDiscoveryClient // 启用服务注册发现
public class NacosClientApplication {
    public static void main(String[] args) {
        SpringApplication.run(NacosClientApplication.class,args);
    }

    @RestController
    public class TestController(){
        @GetMapping("/hello")
        public String hello(){
            return "hello";
        }
    }

}
4. 在nacos管理界面中即可看到内容<br />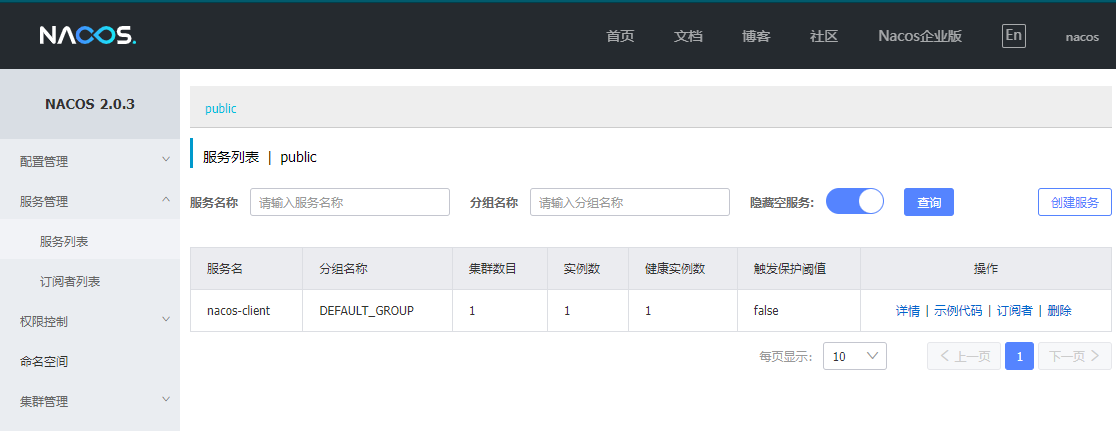
nacao配置中心的使用
在之前项目基础上添加依赖
<!-- nacos配置中心依赖包 --> <dependency> <groupId>com.alibaba.cloud</groupId> <artifactId>spring-cloud-starter-alibaba-nacos-config</artifactId> </dependency>nacos-web工程添加配置文件bootstrap.yml 同时删除之前旧的application.yml ```yaml spring: application: name: nacos-client cloud: nacos: server-addr: localhost:8848 # 这个配置可以替换上面两个配置 discovery:
server-addr: ${spring.cloud.nacos.server-addr} # 注册给服务端的地址config:
 server-addr: ${spring.cloud.nacos.server-addr} # 配置中心的地址
 file-extension: yaml  # 默认是使用properties文件作为后缀
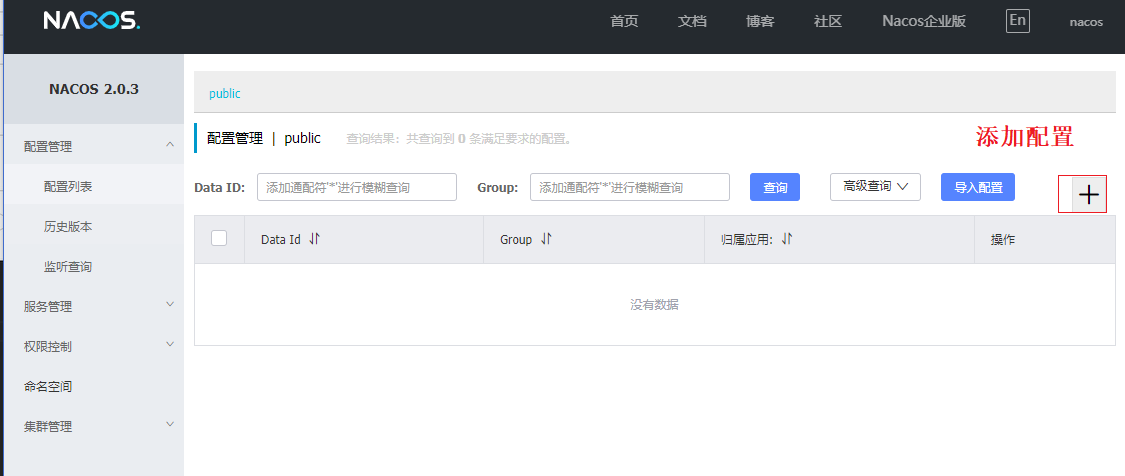
3. 添加配置
<br />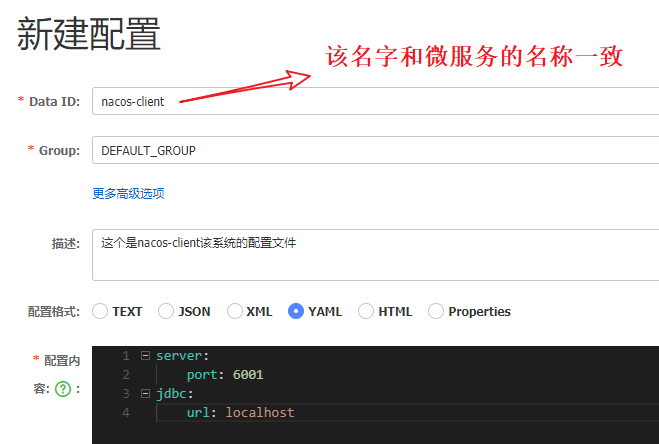
4. 启动类
```java
package com.itheima;
import org.springframework.beans.factory.annotation.Value;
import org.springframework.boot.SpringApplication;
import org.springframework.boot.autoconfigure.SpringBootApplication;
import org.springframework.cloud.client.discovery.EnableDiscoveryClient;
import org.springframework.cloud.context.config.annotation.RefreshScope;
import org.springframework.web.bind.annotation.GetMapping;
import org.springframework.web.bind.annotation.RestController;
@SpringBootApplication
@EnableDiscoveryClient // 启用服务注册发现
public class NacosClientApplication {
public static void main(String[] args) {
SpringApplication.run(NacosClientApplication.class,args);
}
@RestController
@RefreshScope //刷新bean 刷新配置
public class TestController{
@Value("${jdbc.url:123456}")
private String url;
@GetMapping("/hello")
public String hello(){
System.out.println("url:"+url);
return "hello";
}
}
}
5、 启动测试
注意: @RefreshScope //刷新bean 刷新配置 该注解添加后,修改nacos配置中心的配置文件后,程序就可以动态使用配置文件中的数据了!
nacos配置中心进阶


3.3 新建命名空间

3.4 配置列表中,进入dev 新建配置文件
3.5 修改bootstrap.yml配置文件
总结: 通过命名空间和组,可以在客户端中指定具体那个配置文件生效,这样就可以区分不同的开发环境不同的项目使用不同的配置文件了(配置文件的名字相同,内容不同)!
nacos持久化配置


3.3 重启nacos服务器,这个时候可以看到配置文件都没有了,重新创建命名空间dev,添加新的配置文件


nacos集群搭建 具体内容百度
 、
、

nacos的Sentinel 等等其他功能 自学

若有收获,就点个赞吧
0 人点赞
