title: Sentinel
::: tip 小结
Nacos:注册中心,解决服务的注册与发现
Ribbon:客户端的负载均衡器,服务集群的负载均衡
OpenFeign:声明式的HTTP客户端,服务远程调用
nacos-config:配置中心,配置文件的中心化管理
:::
一:Sentinel服务哨兵简介
中文文档:https://github.com/alibaba/Sentinel/wiki
下载地址:https://github.com/alibaba/Sentinel/releases
1.0:服务雪崩效应
级联失效、级联故障、cascading failure
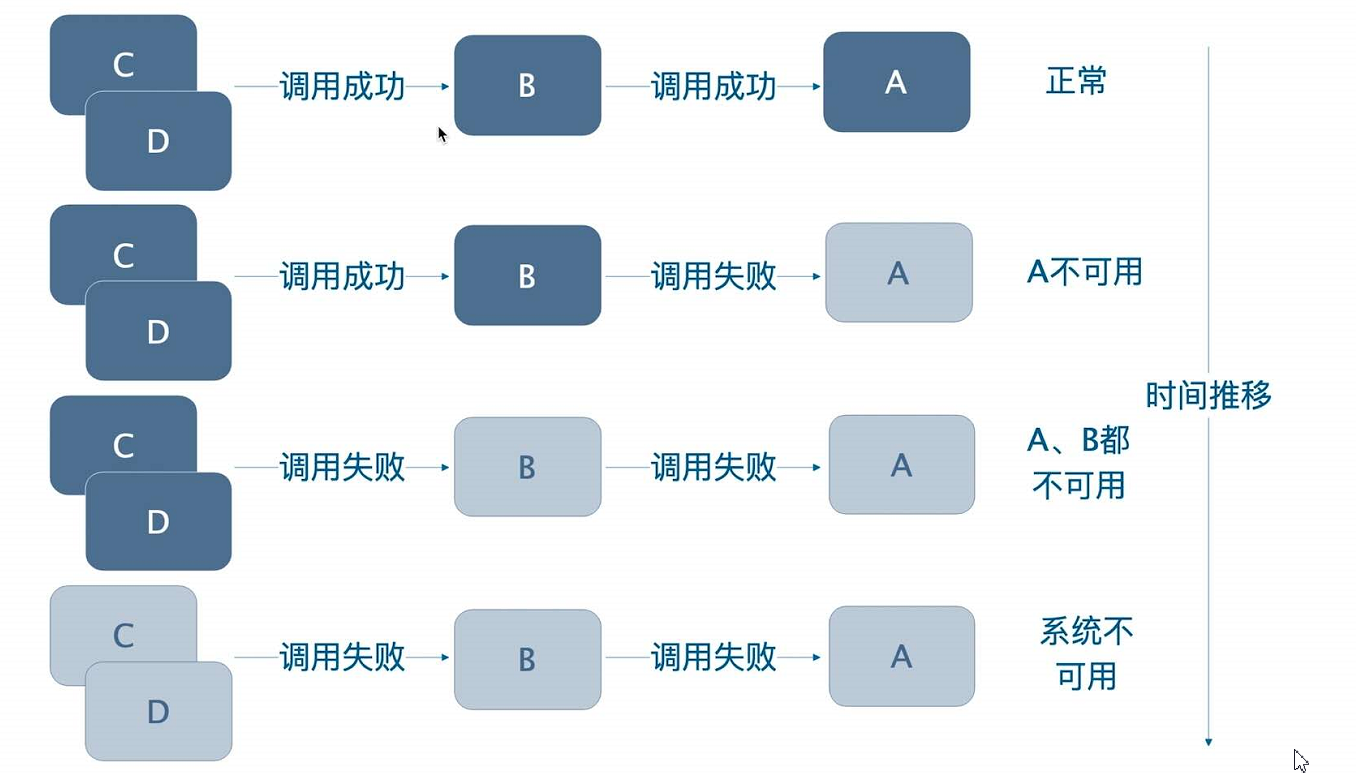
解决办法
1:限流
我们经过测试,发现某个请求能够承受的最大QPS(每秒查询率)是1000,那我们就把这个请求的QPS阈值设置成800,超过了这个阈值,请求直接返回被限流的错误。
2:仓壁模式
舱壁模式实际上就是借鉴于现实生活中的船舱结构而设计,一艘船想要不那么容易沉也需要具备有一定的”容错“能力,而早期的船由于设计上的欠缺,只要一个地方进水了,那么水就会逐渐漫进整个船舱,这种结构的船几乎没有“容错”能力,所以就比较容易沉。于是此时就有人想到将原本一体的船舱分隔成一个个独立的船舱,船舱之间都使用钢板焊死隔开,这些钢板就是所谓的舱壁了。采用这种设计后,就算当其中一个两个船舱进水了,也不会影响到其他船舱,这艘船依旧能够正常行驶。
在软件层面上借鉴这种思想,我们可以让每个服务都运行在自己独立的线程池中,线程池之间是互不干扰的,服务A的线程池资源耗尽也不会影响到服务B。此时线程池就像船舱的舱壁一样将不同的服务资源隔离开来,这样某个服务挂掉也不会影响其他服务的运行。

3:断路器
检测一定时间内的错误率,错误数,比如5秒之内错误率,错误次数,达到某个阈值,就认为B服务所调用的A服务挂了,就跳闸(打开断路器),就不会堆积那么多线程等待了,然后在10秒之后(称作断路器时间窗口),断路器就变成半开状态,此状态向A再次发送仅一次请求,如果这次请求又失败了,就再跳闸(断路器打开状态),默认等待10秒(断路器时间窗口,不是非得10秒,这个值可以自定义),断路器又变成半开状态,再次向A发送一次请求,如果这次请求成功了,断路器就彻底恢复,闸彻底闭合。
1.1:Sentinel是什么
随着微服务的流行,服务和服务之间的稳定性变得越来越重要。Sentinel 以流量为切入点,从流量控制、熔断降级、系统负载保护等多个维度保护服务的稳定性。
1.1.1:Sentinel 具有以下特征
丰富的应用场景:Sentinel 承接了阿里巴巴近 10 年的双十一大促流量的核心场景,例如秒杀(即突发流量控制在系统容量可以承受的范围)、消息削峰填谷、集群流量控制、实时熔断下游不可用应用等。

完备的实时监控:Sentinel 同时提供实时的监控功能。您可以在控制台中看到接入应用的单台机器秒级数据,甚至 500 台以下规模的集群的汇总运行情况。
广泛的开源生态:Sentinel 提供开箱即用的与其它开源框架/库的整合模块,例如与 Spring Cloud、Dubbo、gRPC 的整合。您只需要引入相应的依赖并进行简单的配置即可快速地接入 Sentinel。
完善的 SPI 扩展点:Sentinel 提供简单易用、完善的 SPI 扩展接口。您可以通过实现扩展接口来快速地定制逻辑。例如定制规则管理、适配动态数据源等。
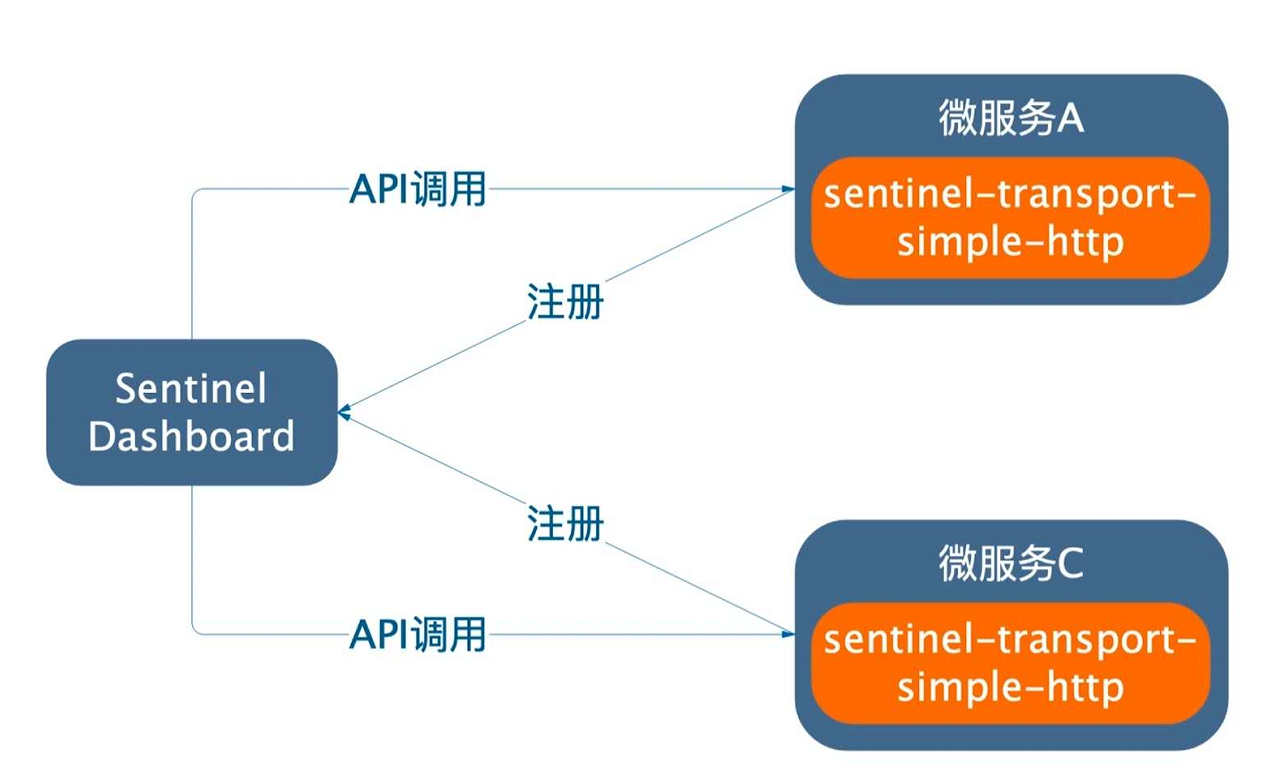
1.1.2:Sentinel 分为两个部分:
- 核心库(Java 客户端)不依赖任何框架/库,能够运行于所有 Java 运行时环境,同时对 Dubbo / Spring Cloud 等框架也有较好的支持。
- 控制台(Dashboard)基于 Spring Boot 开发,打包后可以直接运行,不需要额外的 Tomcat 等应用容器。
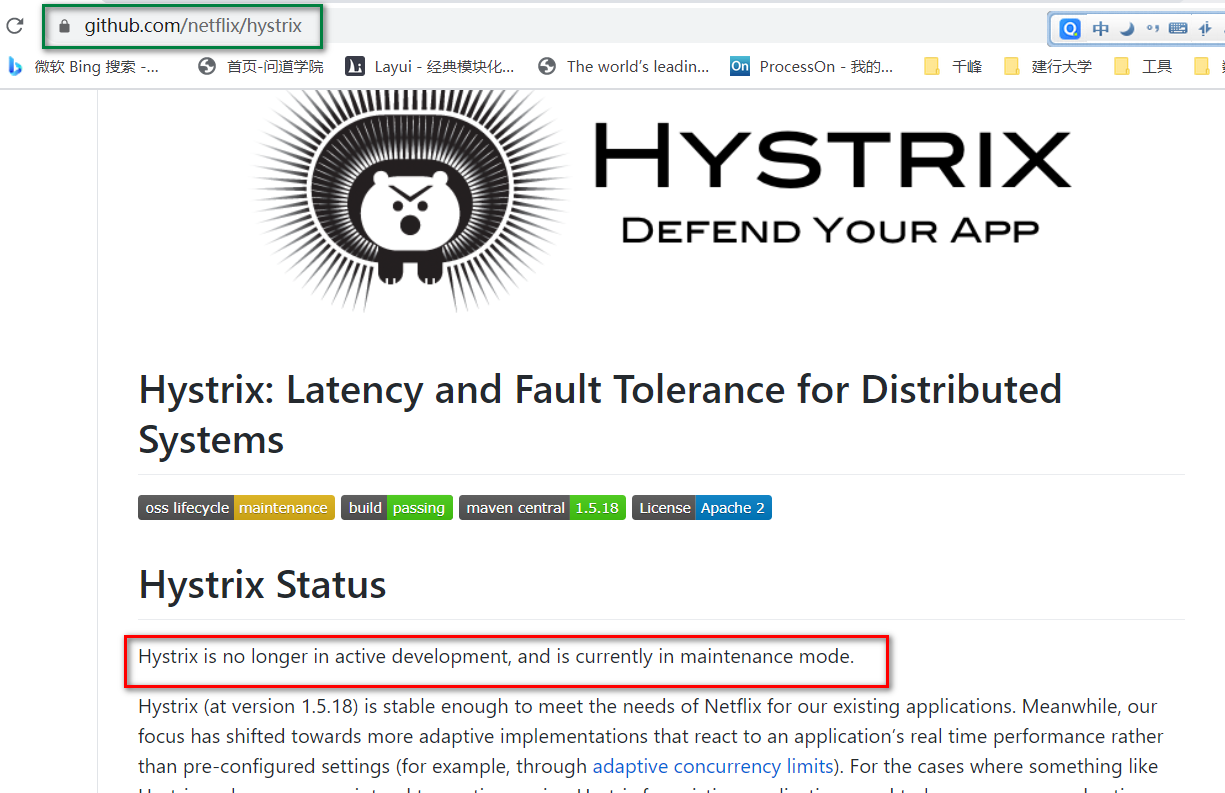
1.2:Sentinel与Hystrix对比
Sentinel是阿里对hystrix的替换
| Sentinel | Hystrix | |
|---|---|---|
| 隔离策略 | 信号量隔离(并发线程数) | 线程池隔离/信号量隔离 |
| 熔断降级策略 | 慢调用比例、异常比率、异常数 | 异常比率 |
| 实时指标实现 | 滑动窗口 | 滑动窗口(基于 RxJava) |
| 规则配置(rule) | 支持多种数据源 | 支持多种数据源 |
| 扩展性 | 多个扩展点 | 插件的形式 |
| 基于注解的支持 | 支持 | 支持 |
| 调用链路信息 | 支持同步调用 | 不支持 |
| 限流QPS | 基于 QPS / 并发数,支持基于调用关系的限流 | 不支持 |
| 流量整形 | 支持慢启动、匀速器模式 | 不支持 |
| 系统负载保护 | 支持 | 不支持 |
| 实时监控 API | 各式各样 | 较为简单 |
| 控制台 | 开箱即用,可配置规则、查看秒级监控、机器发现等 | 不完善 |
| 常见框架的适配 | Servlet、Spring Cloud、Dubbo、gRPC 等 | Servlet、Spring Cloud Netflix |
Hystrix已经停更说明
1.3:Sentinel架构
#接口概览http://127.0.0.1:8720/api#获取资源的metrics信息http://127.0.0.1:8720/cnode?id=/jifen/{jifenId}#获取流控规则接口http://127.0.0.1:8720/getRules?type=flow#设置规则接口http://127.0.0.1:8720/setRules
1.4:Sentinel控制台安装
注意:启动 Sentinel 控制台需要 JDK 版本为 1.8 及以上版本。
功能
1:实时观看每个资源的访问情况(qps)
2:通过控制台,设置流控规则(qps、线程数)、还可以设置熔断降级的规则(慢调用比例、异常比例、异常数)
java -jar sentinel-dashboard-1.8.1.jar --server.port=8888
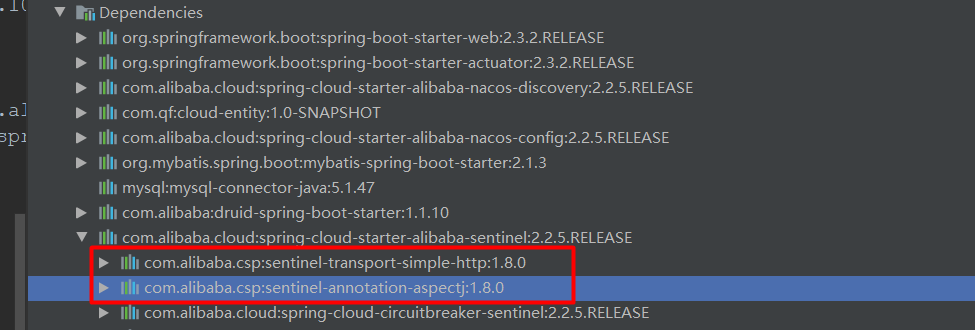
1.5:微服务整合Sentinel
第一步:在订单服务中添加依赖
<dependency>
    <groupId>com.alibaba.cloud</groupId>
    <artifactId>spring-cloud-starter-alibaba-sentinel</artifactId>
</dependency>
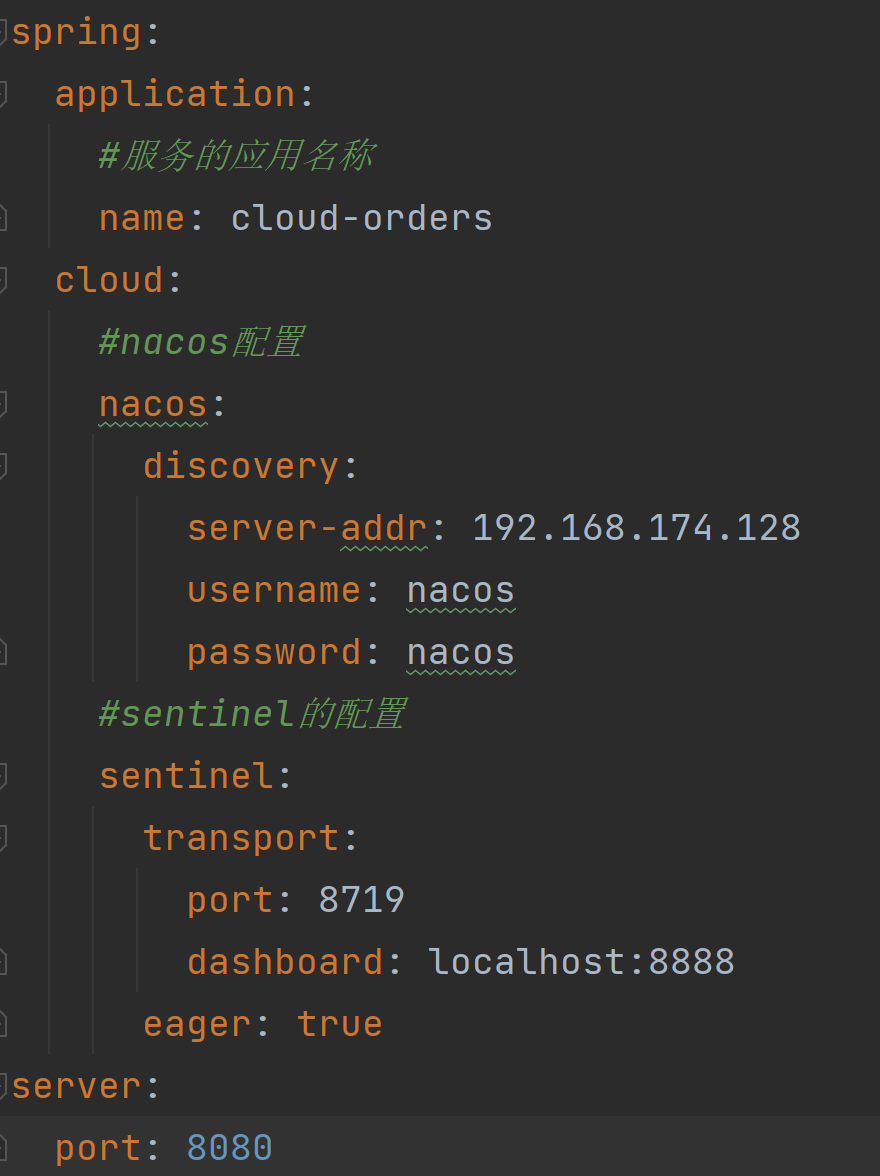
第二步:配置
#默认是8719,如果8719被占用 +1,一直到没有被占用
spring.cloud.sentinel.transport.port=8719
spring.cloud.sentinel.transport.dashboard=localhost:8888
#开启饥额加载,当项目启动立即完成初始化,默认是懒加载
spring.cloud.sentinel.eager=true
二:Sentinel服务流控
Sentinel通过流量控制(flow control)以及熔断降级来保护系统资源
2.1:QPS超过阈值直接失败
流量控制(flow control),其原理是监控应用流量的 QPS 或并发线程数等指标,当达到指定的阈值时对流量进行控制,以避免被瞬时的流量高峰冲垮,从而保障应用的高可用性。
QPS:Queries-per-second,每秒资源被访问的次数
当被访问资源的QPS超过阈值,直接进行限流(限制访问),从而保护资源,
在订单项目中新增测试接口
/**
 * 限流测试接口
 * @return
 */
@GetMapping("test")
public String test() {
    return "Order Test!";
}
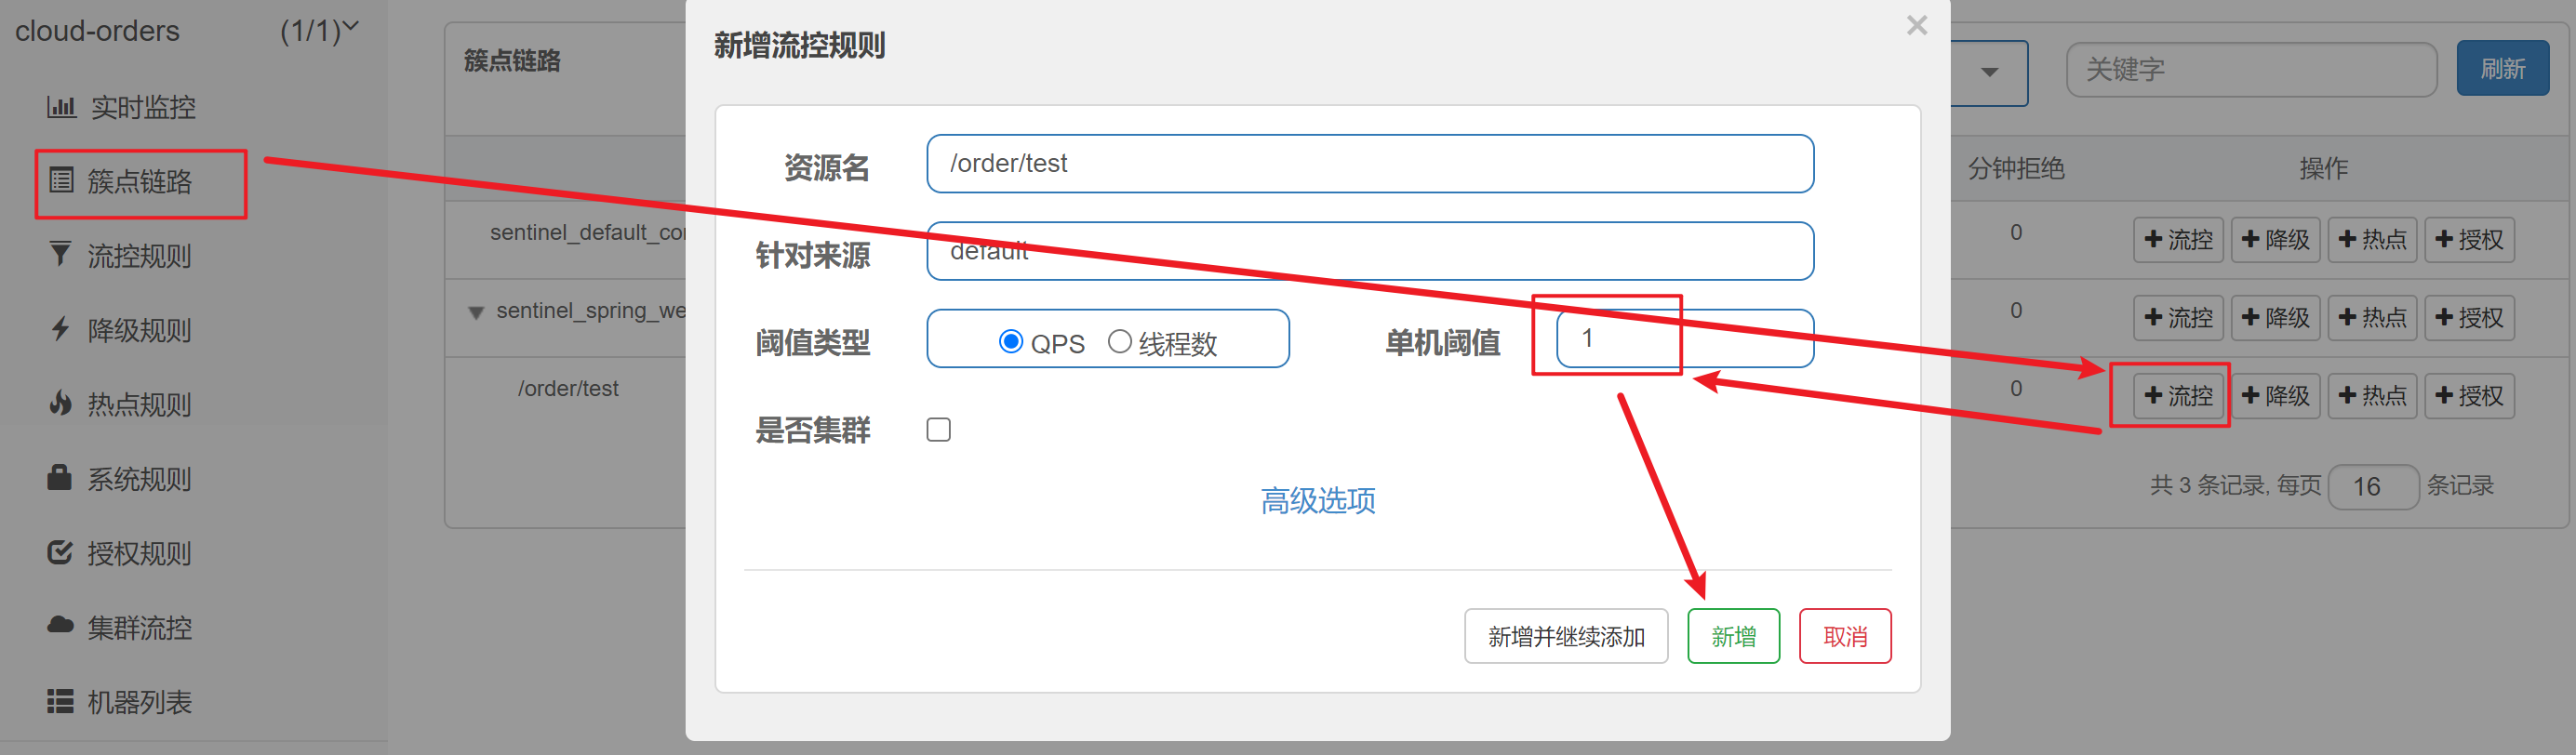
触发条件:/order/test当qps>1时,会触发流控
| 添加流控规则 |
|---|
 |
| 正常访问接口 |
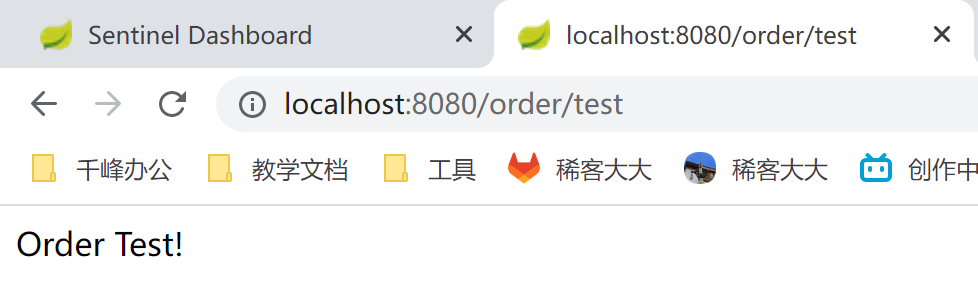 |
| 快速访问 |
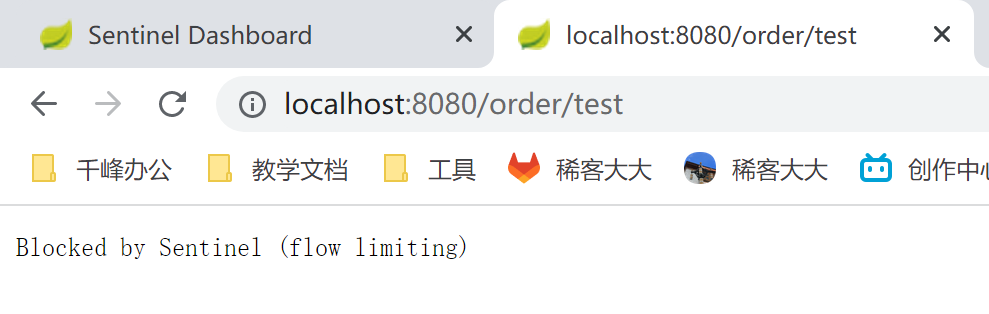 |
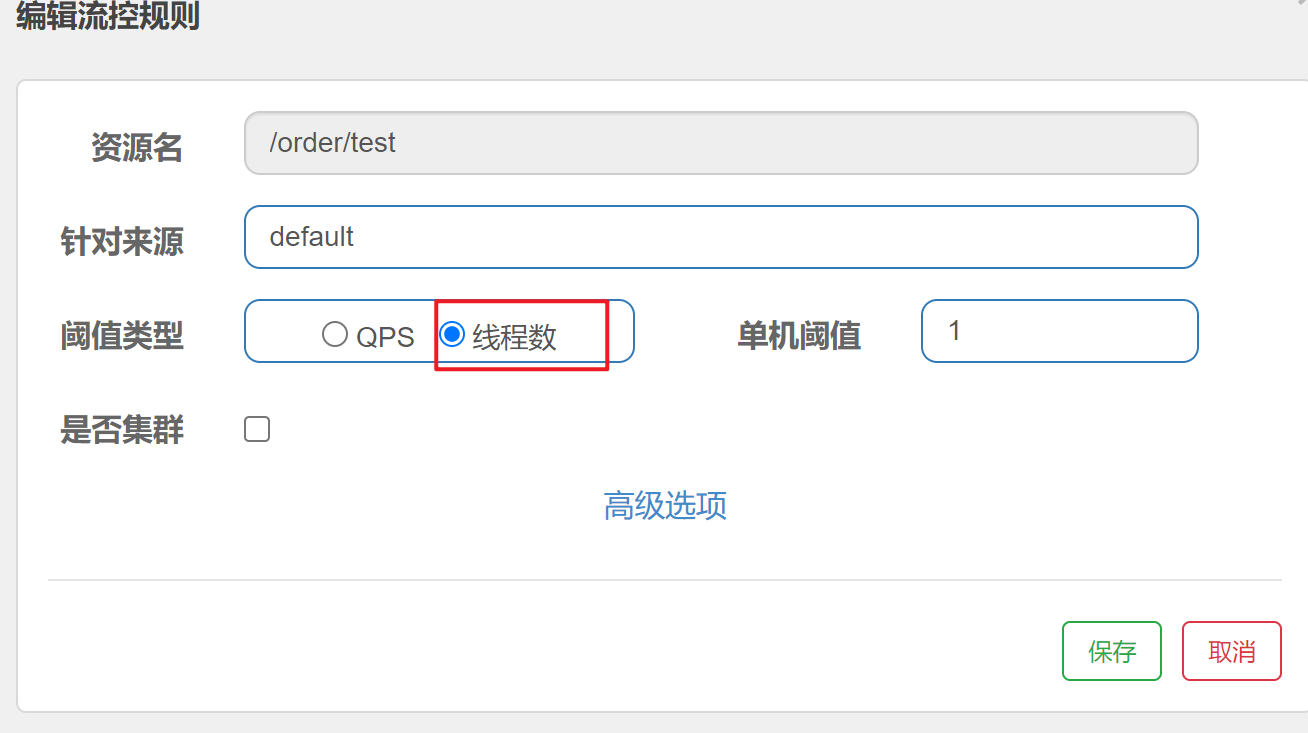
2.2:线程数超过阈值直接失败
触发条件:当/order/test 正在工作的线程数>1
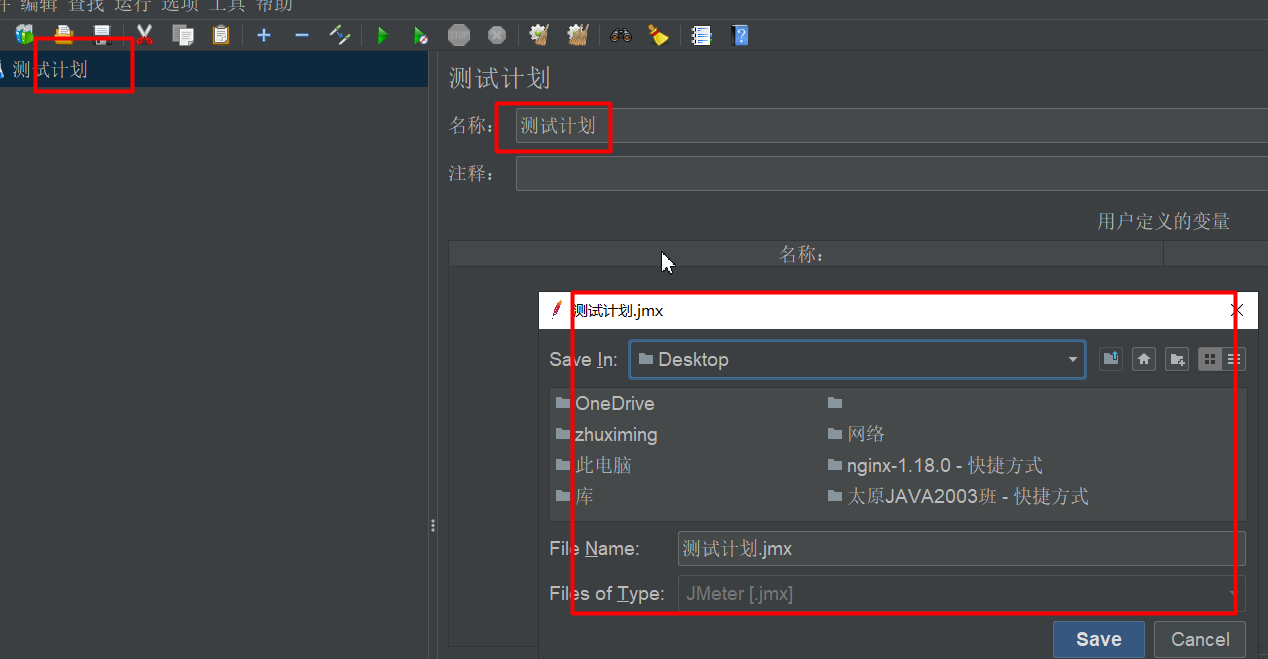
Jemeter使用步骤
1:新建测试计划
2:添加线程组

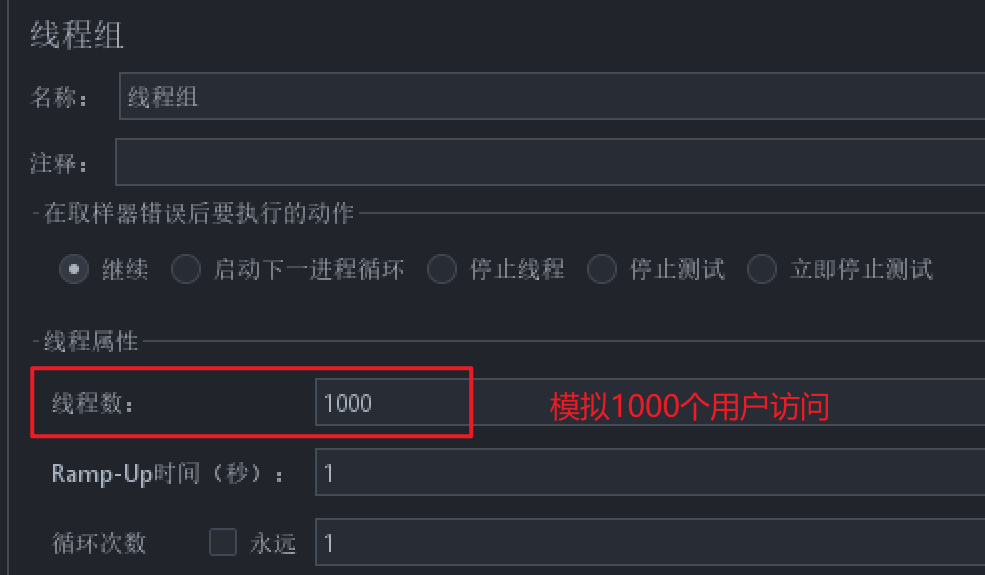
Ramp-Up时间指的是需要在这个时间内完成所有的请求
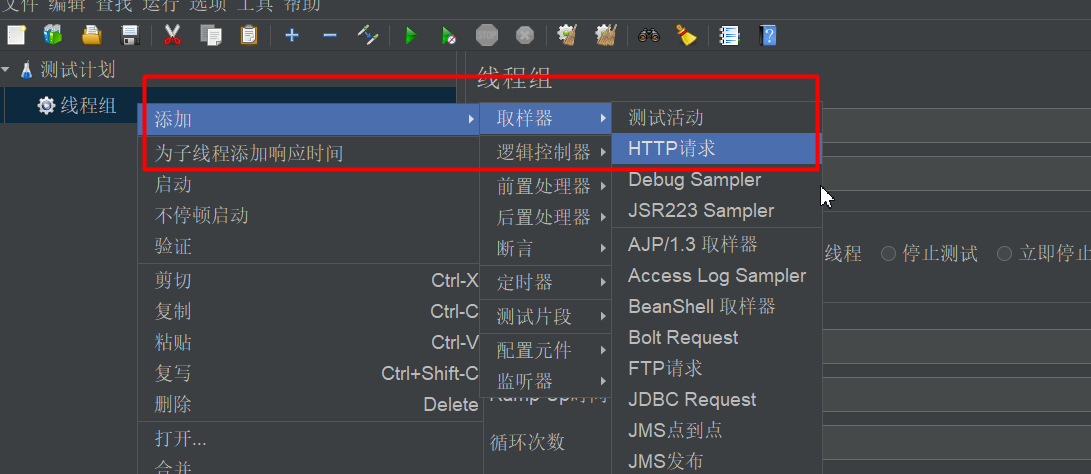
3:添加http请求
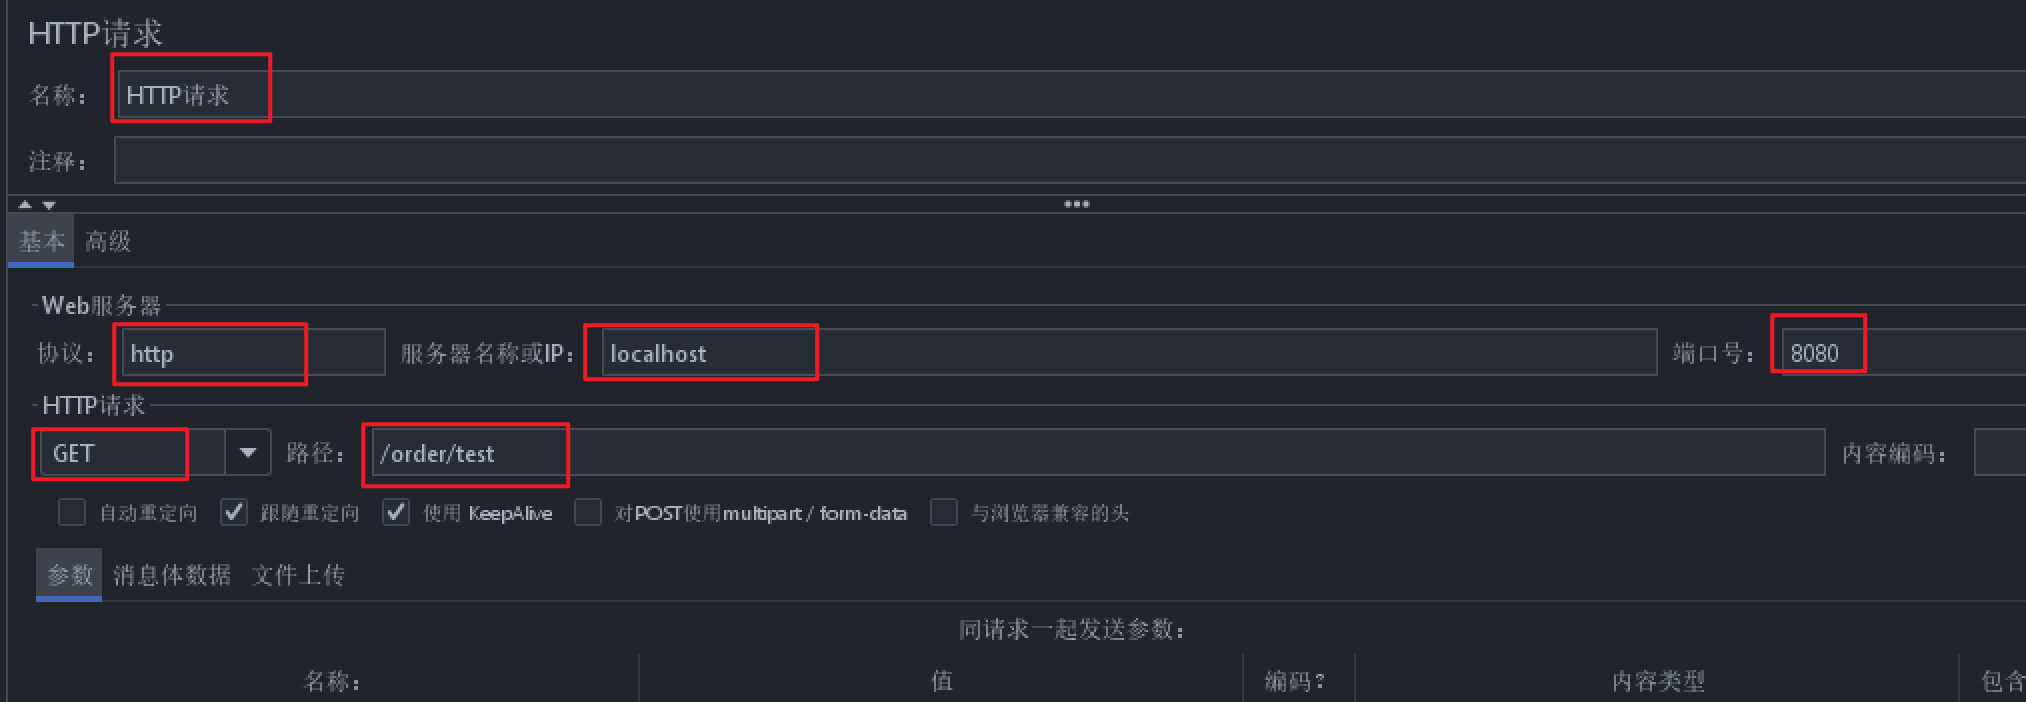
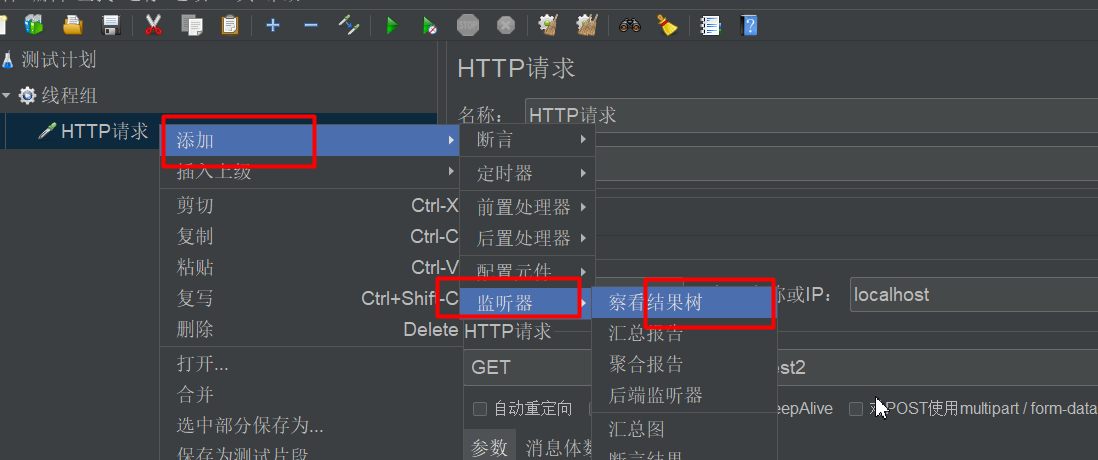
4:添加结果观察
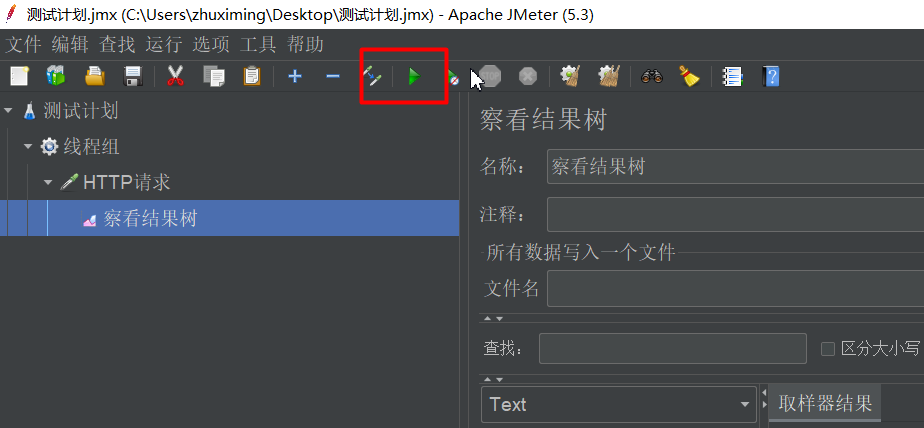
5:发送请求
| 线程数限流图示 |
|---|
 |
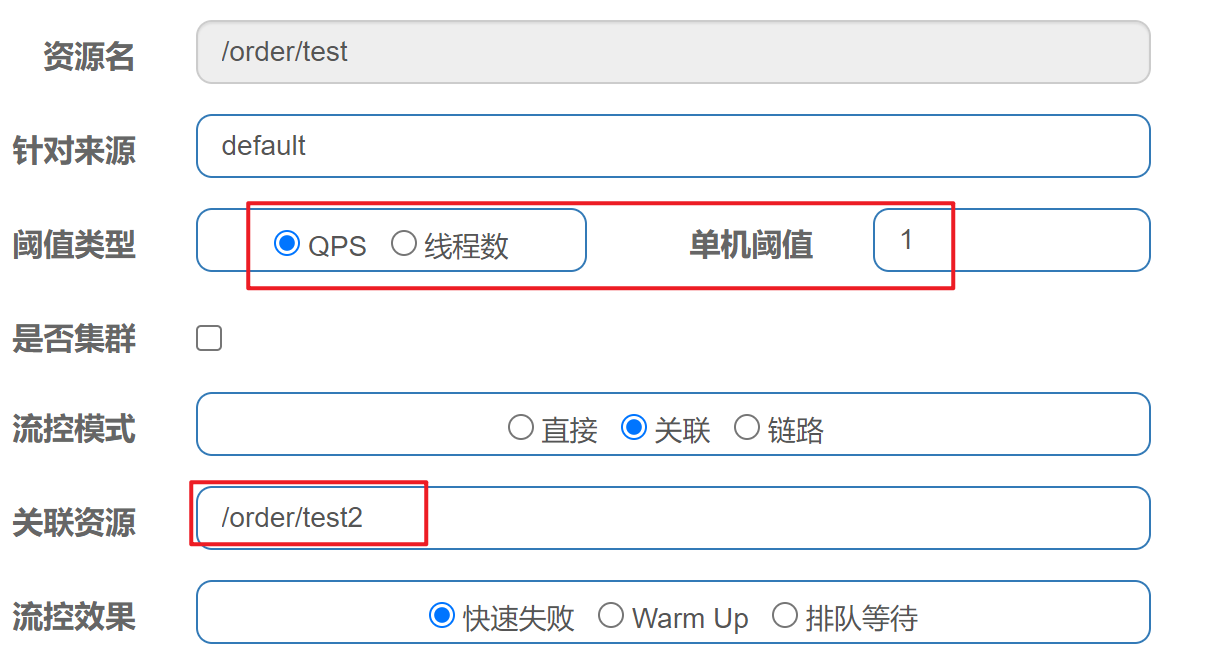
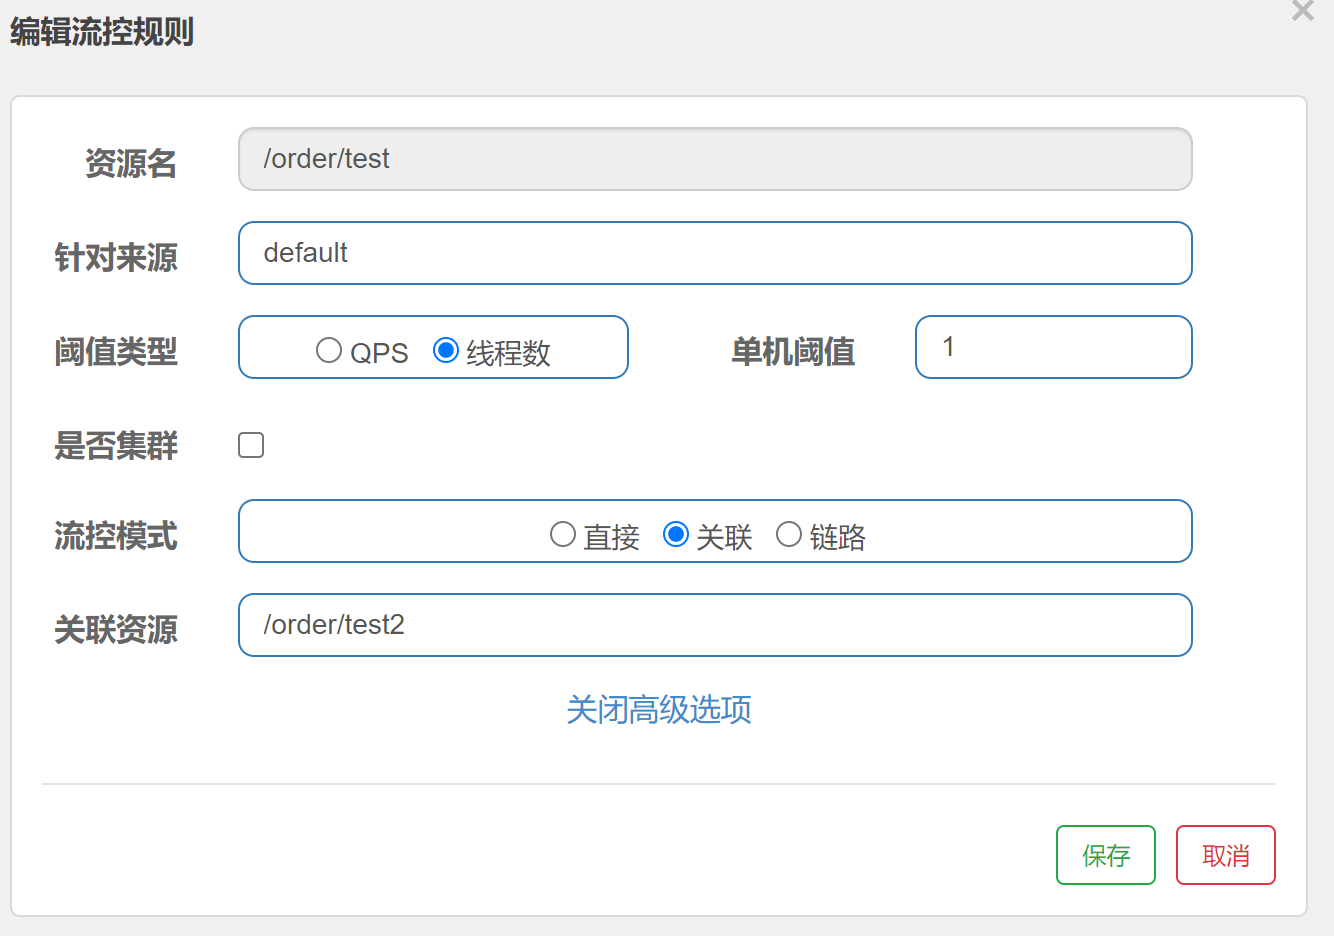
2.3:QPS超过阈值关联失败
触发条件:当关联资源(/order/test2)访问qps>1 ,那么/order/test 就会被流控
关联资源接口
/**
 * 关联资源
 * @return
 */
@GetMapping("test2")
public String test2() {
    return "Order Test2!";
}
使用JMeter测试 /order/test2 接口,发现在访问 /order/test 接口时被限流。 |
|---|
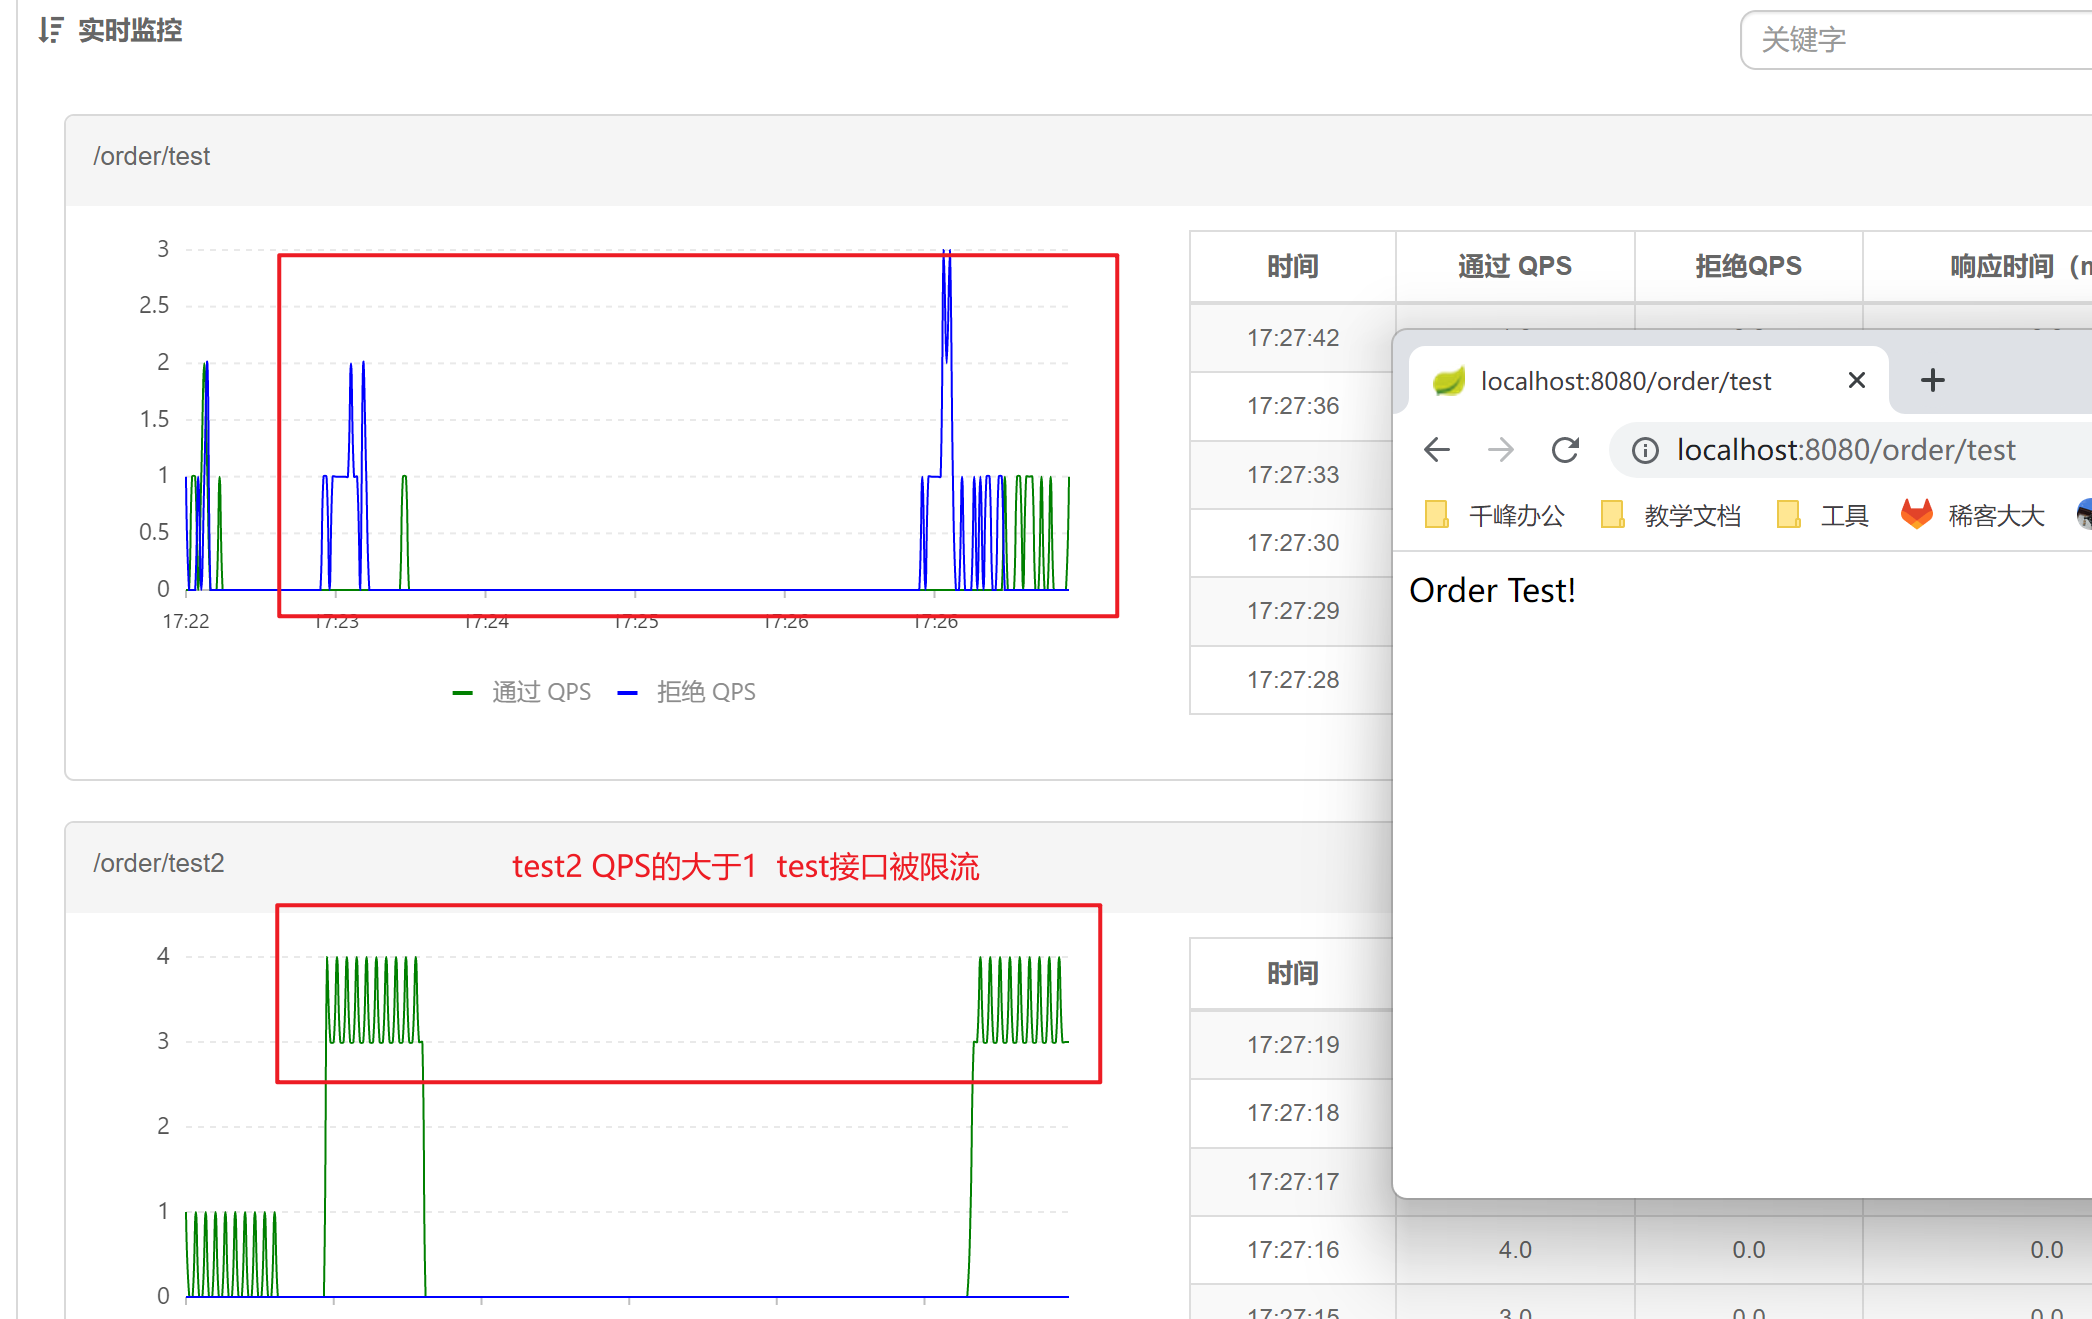 |
2.4:线程超过阈值关联失败
触发条件:当关联资源(/order/test)正在工作的线程数(并发数)>1 ,那么/order/test 就会被流控
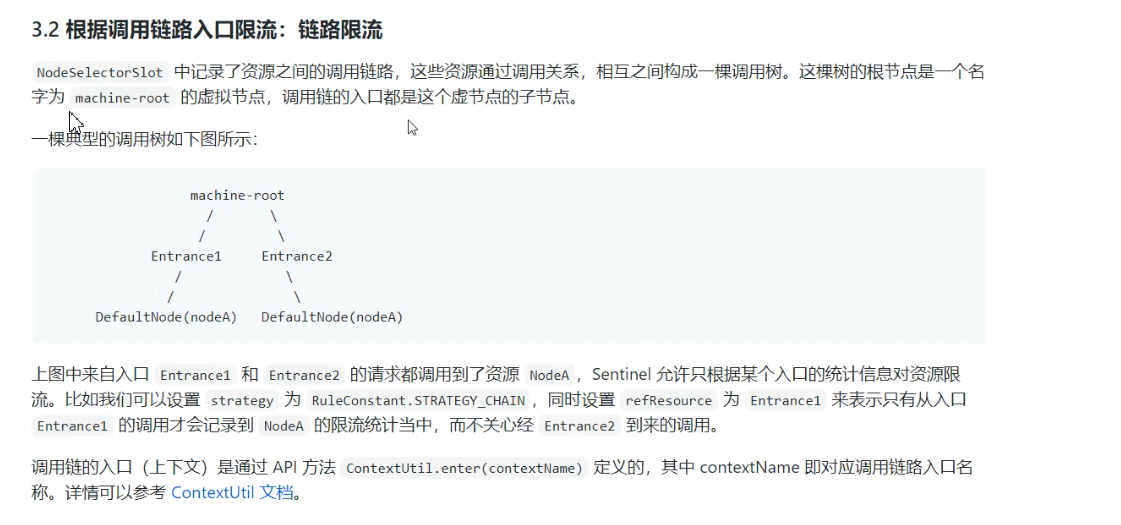
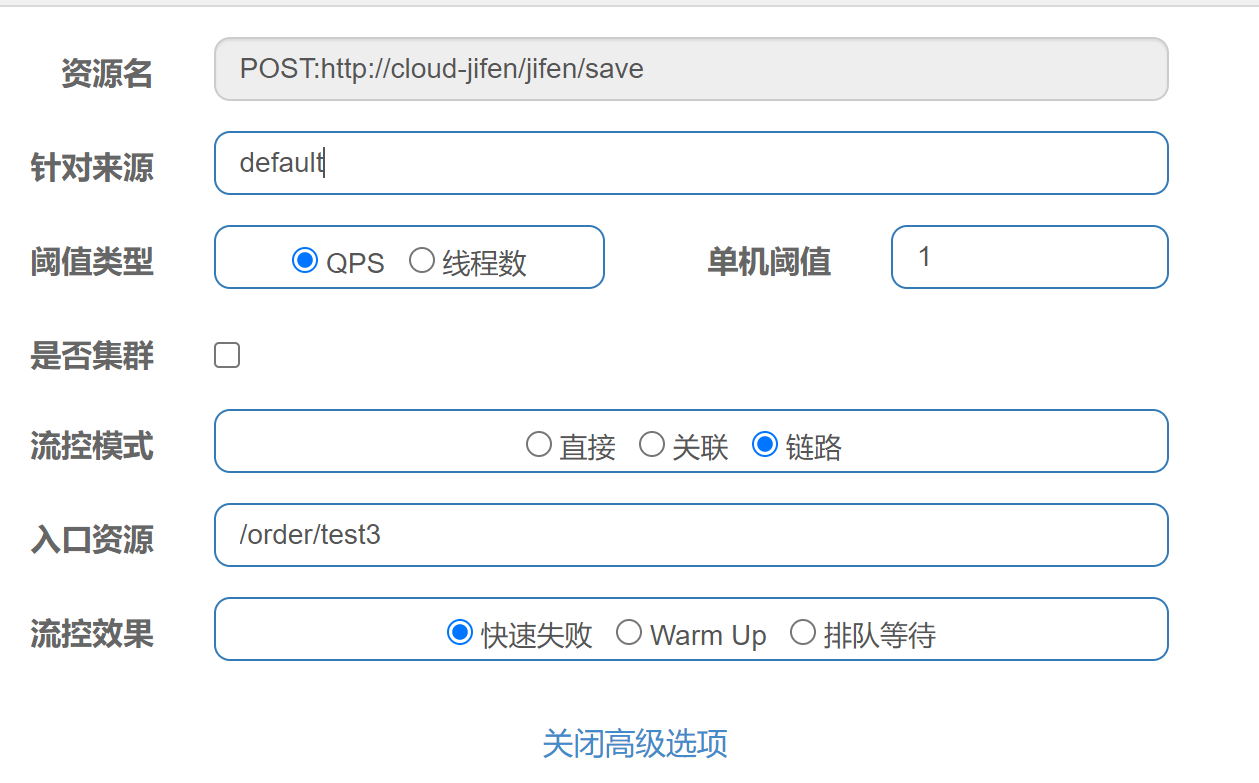
2.5:QPS超过阈值链路失败
feign.sentinel.enabled=true
# 是否收敛context,将其配置为 false 即可根据不同的URL 进行链路限流
spring.cloud.sentinel.web-context-unify=false
需要进行一些配置链路限流才能生效
从1.6.3 版本开始,Sentinel Web filter默认收敛所有URL的入口context,因此链路限流不生效。
1.7.0 版本开始(对应spring cloud alibaba的2.1.1.RELEASE),官方在CommonFilter 引入了WEB_CONTEXT_UNIFY 参数,用于控制是否收敛context。将其配置为 false 即可根据不同的URL 进行链路限流。
spring cloud alibaba 2.1.1.RELEASE之后的版本,可以通过配置spring.cloud.sentinel.web-context-unify=false即可关闭收敛触发条件:jifen/save 有两个入口,分别为/order/test3和/order/test4
当/order/test3访问qps>1 那么/order/test3就不能访问受保护资源,其他入口照常访问
| 链路流控效果 |
|---|
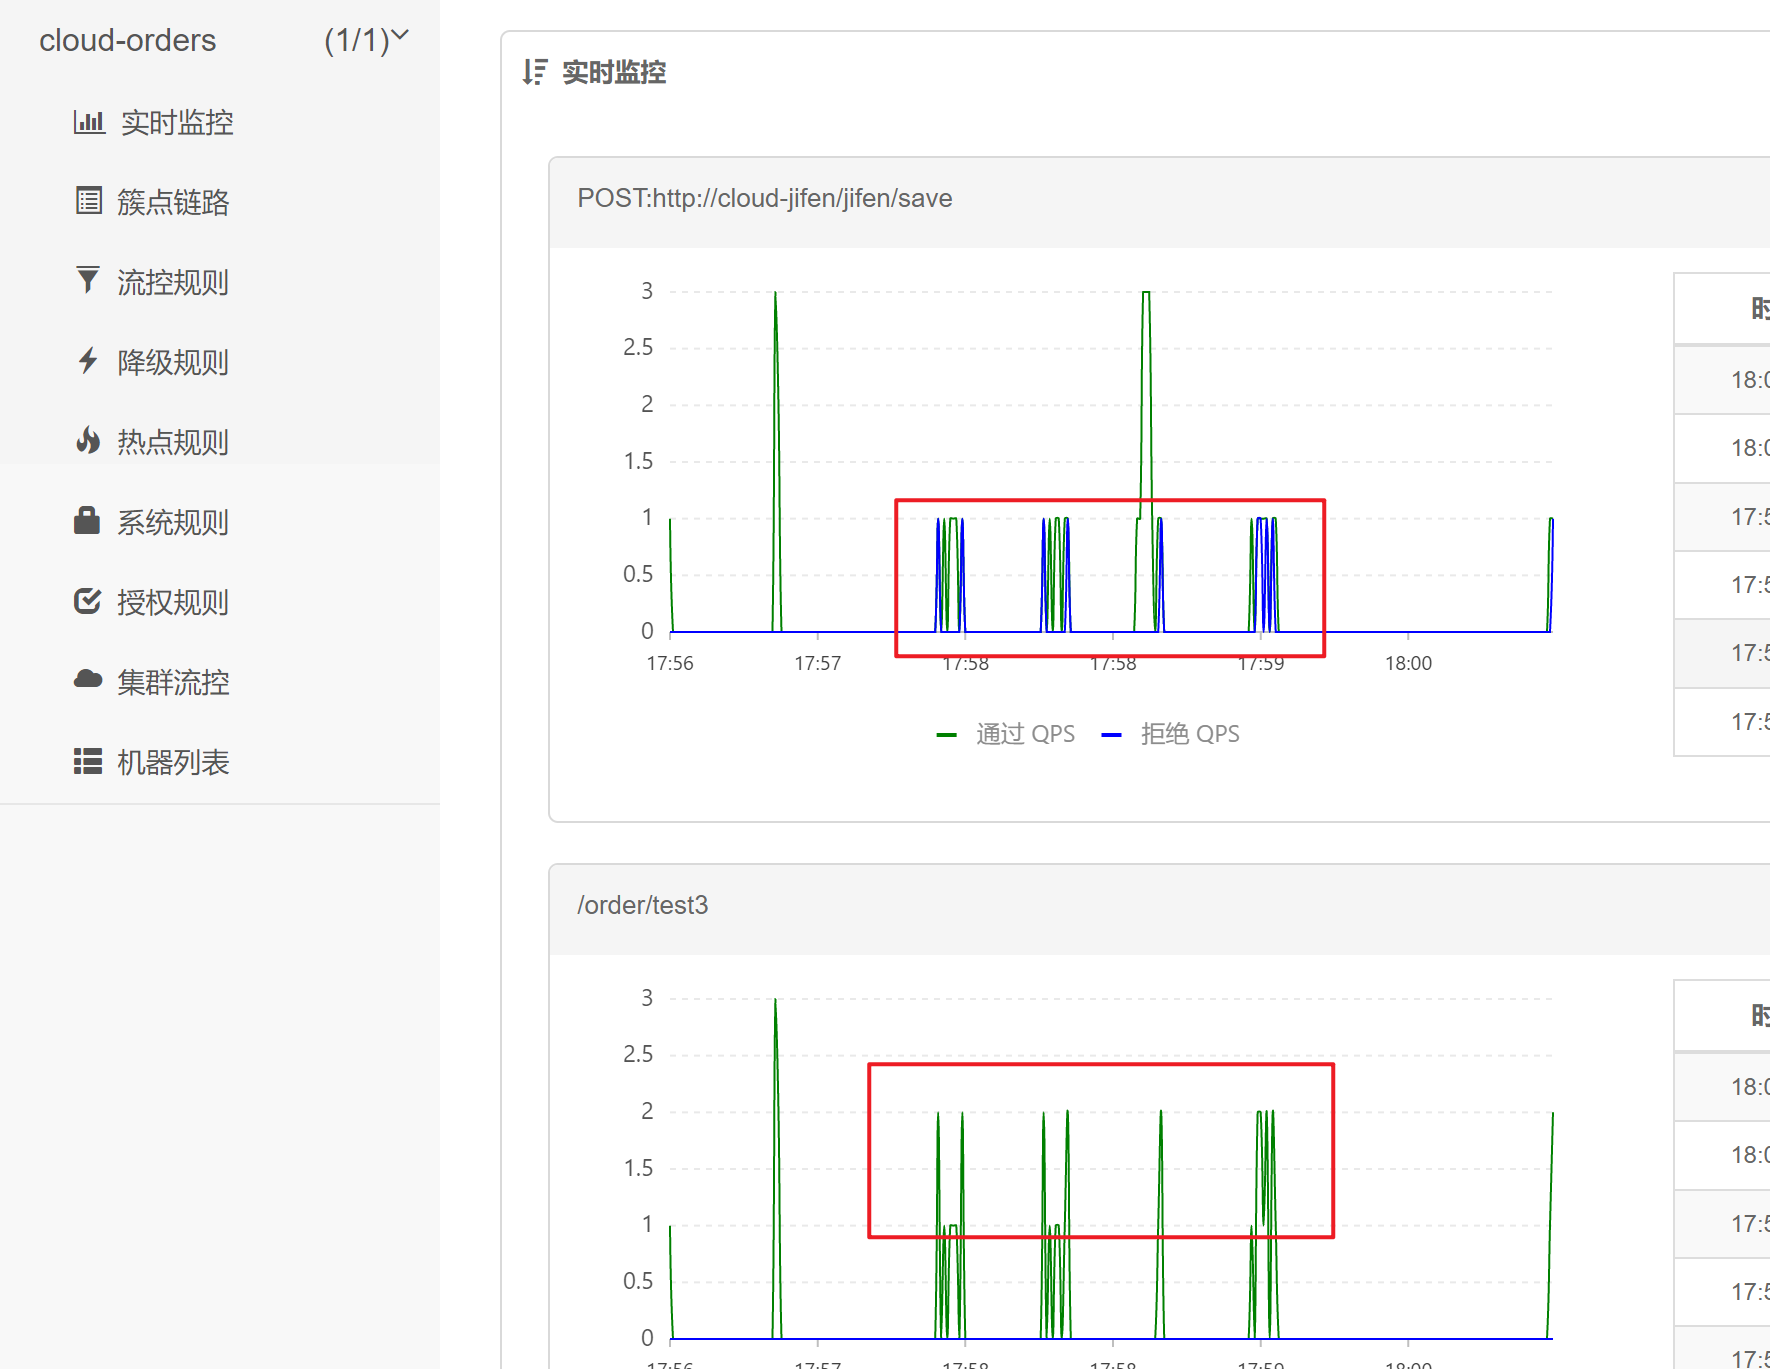 |
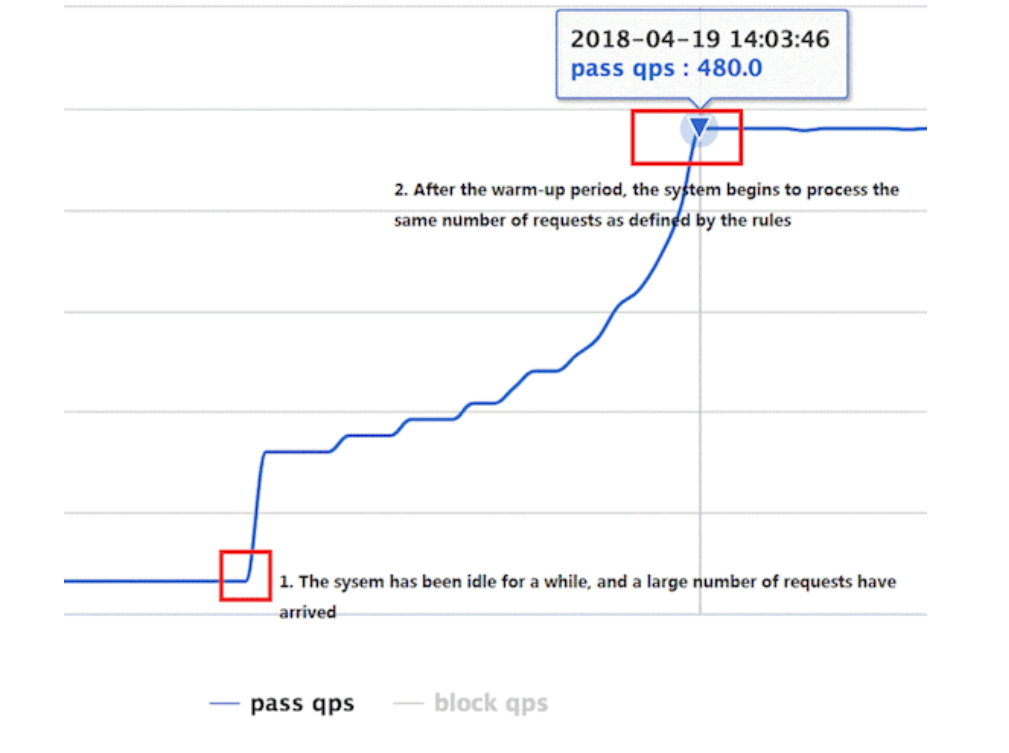
2.6:流控效果-Warm-up
Warm Up(
RuleConstant.CONTROL_BEHAVIOR_WARM_UP)方式,即预热/冷启动方式。当系统长期处于低水位的情况下,当流量突然增加时,直接把系统拉升到高水位可能瞬间把系统压垮。通过”冷启动”,让通过的流量缓慢增加,在一定时间内逐渐增加到阈值上限,给冷系统一个预热的时间,避免冷系统被压垮默认
coldFactor为 3,即请求 QPS 从threshold / 3开始,经预热时长逐渐升至设定的 QPS 阈值。
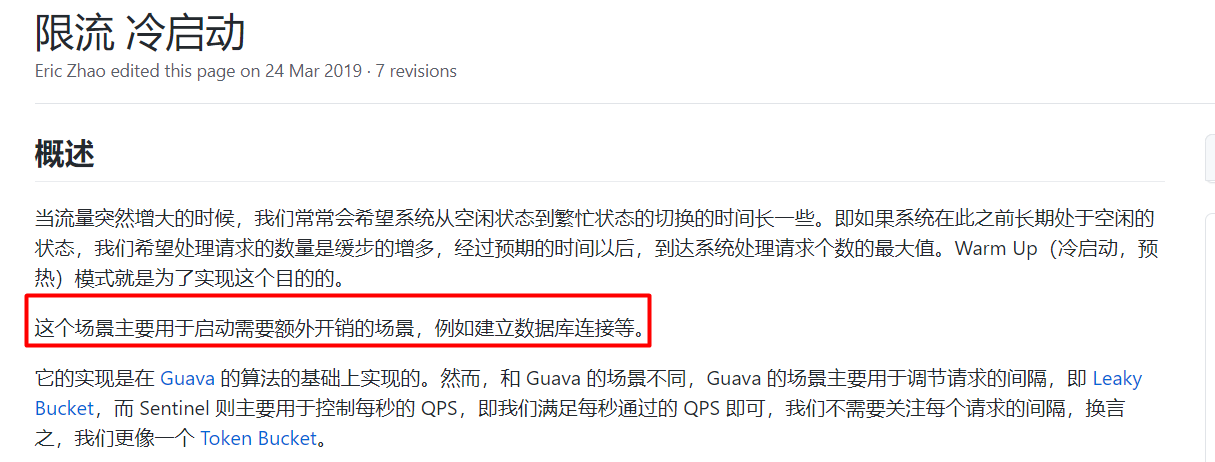
场景:
2.7:流控效果-匀速排队
匀速排队(RuleConstant.CONTROL_BEHAVIOR_RATE_LIMITER)方式会严格控制请求通过的间隔时间,也即是让请求以均匀的速度通过,对应的是漏桶算法。详细文档可以参考 流量控制 - 匀速器模式,具体的例子可以参见 PaceFlowDemo。
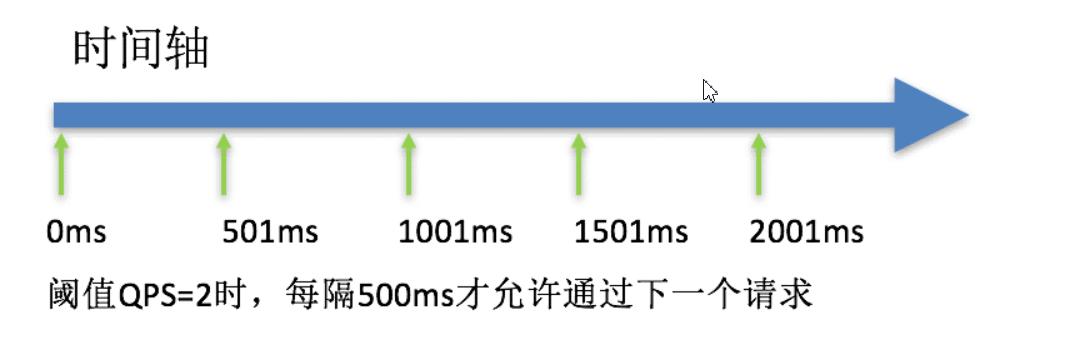
这种方式主要用于处理间隔性突发的流量,例如消息队列。想象一下这样的场景,在某一秒有大量的请求到来,而接下来的几秒则处于空闲状态,我们希望系统能够在接下来的空闲期间逐渐处理这些请求,而不是在第一秒直接拒绝多余的请求。
注意:匀速排队模式暂时不支持 QPS > 1000 的场景。
三:Sentinel服务熔断降级
除了流量控制以外,对调用链路中不稳定的资源进行熔断降级也是保障高可用的重要措施之一。一个服务常常会调用别的模块,可能是另外的一个远程服务、数据库,或者第三方 API 等。例如,支付的时候,可能需要远程调用银联提供的 API;查询某个商品的价格,可能需要进行数据库查询。然而,这个被依赖服务的稳定性是不能保证的。如果依赖的服务出现了不稳定的情况,请求的响应时间变长,那么调用服务的方法的响应时间也会变长,线程会产生堆积,最终可能耗尽业务自身的线程池,服务本身也变得不可用。
3.1:熔断降级- 慢调用比例
慢调用比例 (
SLOW_REQUEST_RATIO):选择以慢调用比例作为阈值,需要设置允许的慢调用 RT(即最大的响应时间),请求的响应时间大于该值则统计为慢调用。当单位统计时长(statIntervalMs)内请求数目大于设置的最小请求数目,并且慢调用的比例大于阈值,则接下来的熔断时长内请求会自动被熔断。经过熔断时长后熔断器会进入探测恢复状态(HALF-OPEN 状态),若接下来的一个请求响应时间小于设置的慢调用 RT 则结束熔断,若大于设置的慢调用 RT 则会再次被熔断。断路器的工作流程:
一旦熔断,断路器的状态是Open(所有的请求都不能进来)
当熔断时长结束,断路器的状态是half-Open(可以允许一个请求进来)
如果接下来的请求正常,断路器的状态是close(资源就自恢复)
如果接下来的请求不正常,断路器的状态是open
触发条件
1:1s内最小请求数必须大于5
2:慢请求/总请求 > 0.6
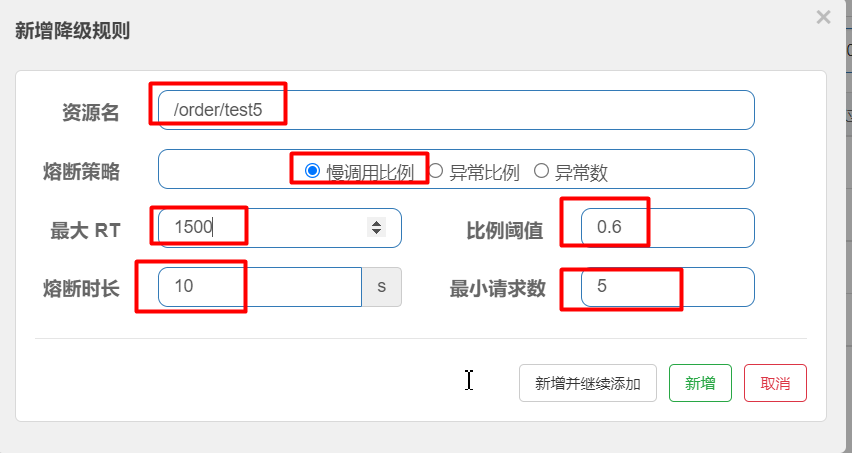
演示代码:
// 演示慢调用触发熔断
@RequestMapping("test5")
public String test5(String flag)throws  Exception{
    if (flag == null) {
        Thread.sleep(1800);
    }
    return "test5";
}
3.2:熔断降级-异常比例
异常比例 (
ERROR_RATIO):当单位统计时长(statIntervalMs)内请求数目大于设置的最小请求数目,并且异常的比例大于阈值,则接下来的熔断时长内请求会自动被熔断。经过熔断时长后熔断器会进入探测恢复状态(HALF-OPEN 状态),若接下来的一个请求成功完成(没有错误)则结束熔断,否则会再次被熔断。异常比率的阈值范围是[0.0, 1.0],代表 0% - 100%。断路器的工作流程:
一旦熔断,断路器的状态是Open(所有的请求都不能进来)
当熔断时长结束,断路器的状态是half-Open(可以允许一个请求进来)
如果接下来的请求正常,断路器的状态是close(资源就自恢复)
如果接下来的请求不正常,断路器的状态是open
触发条件
1:2s内最小请求数大于5
2:2s内 异常数/总请求数 > 0.6

演示代码
@RequestMapping("test6")
public String test6(String flag)throws  Exception{
    if (flag == null) {
        throw  new IllegalArgumentException("参数异常");
    }
    return "test6";
}
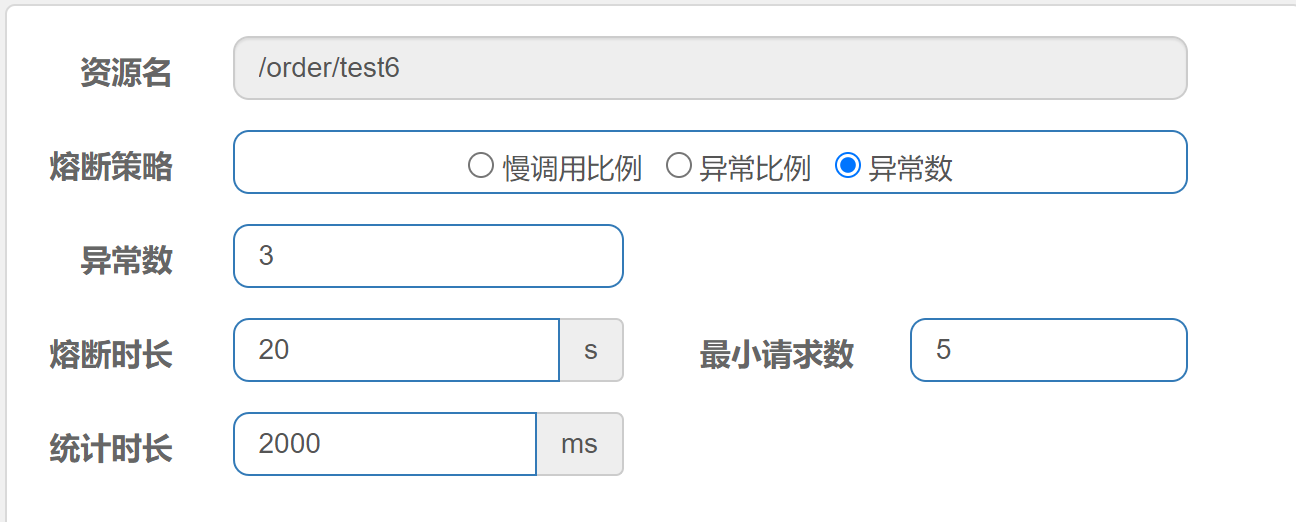
3.3:熔断降级-异常数
异常数 (
ERROR_COUNT):当单位统计时长内的异常数目超过阈值之后会自动进行熔断。经过熔断时长后熔断器会进入探测恢复状态(HALF-OPEN 状态),若接下来的一个请求成功完成(没有错误)则结束熔断,否则会再次被熔断。触发条件
1:每2秒请求数必须大于5
2:每2秒的异常数必须大于3【我们设置的阈值】
Blocked by Sentinel (flow limiting)
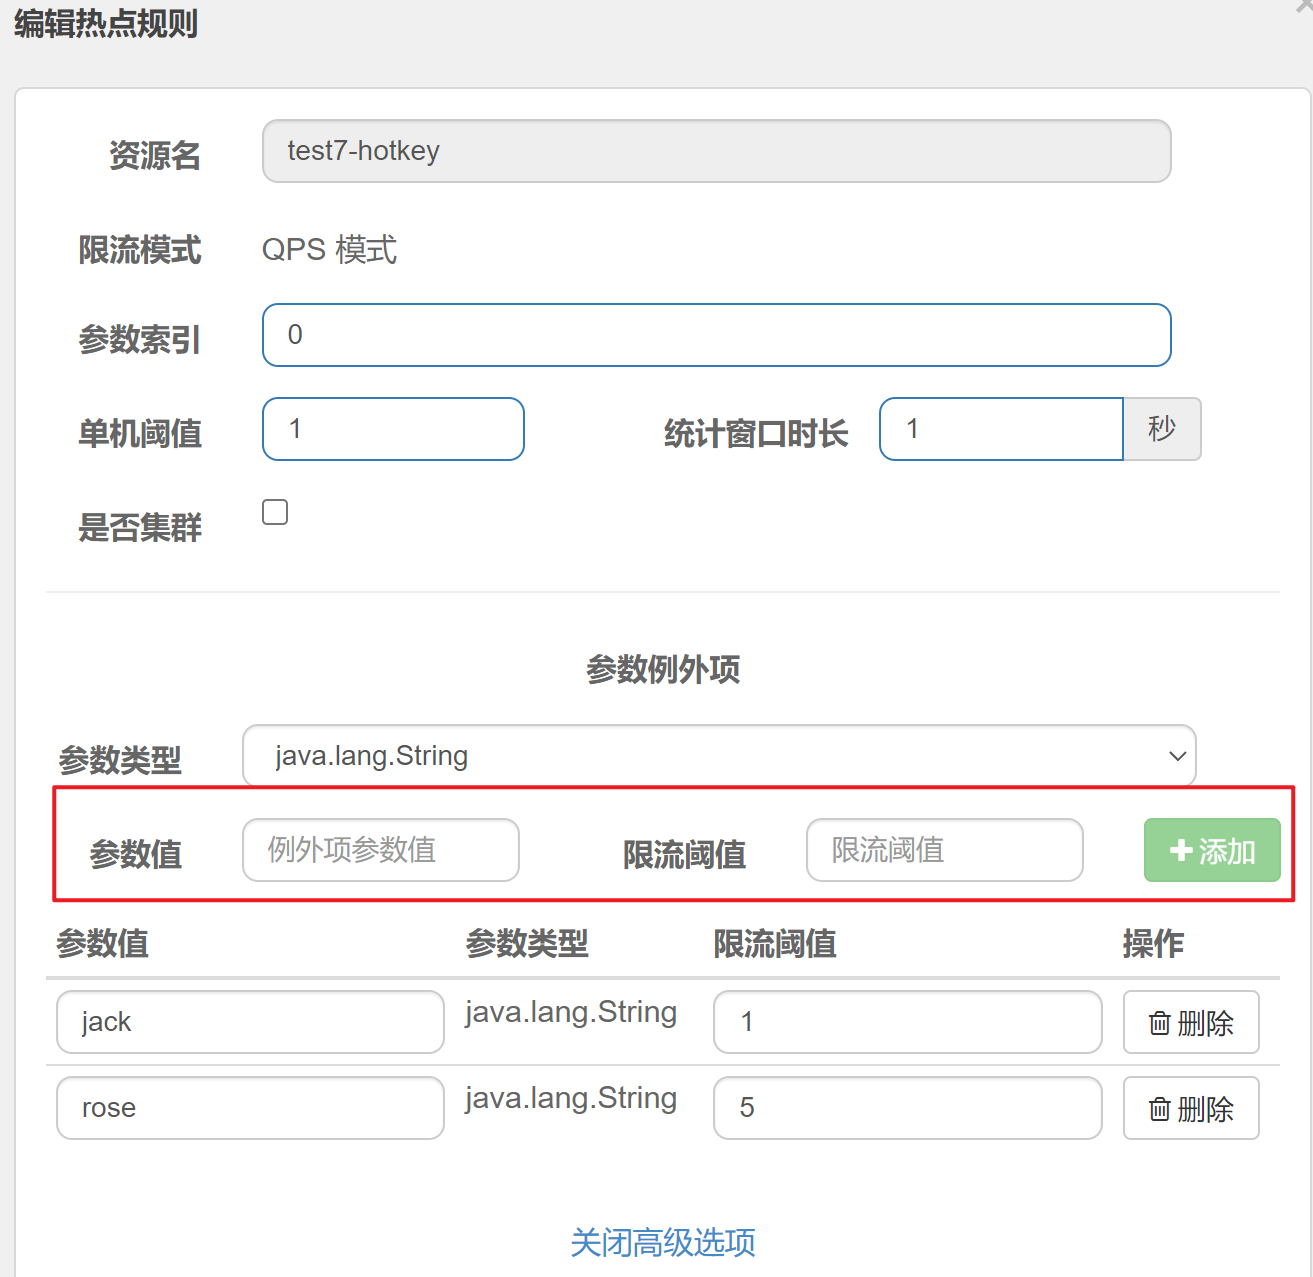
四:Sentinel-热点key规则
触发条件
1:必须有一个参数,参数的值可以任意 例如:http://localhost:8080/order/test7?name=jack
2:接口访问qps>1
验证代码
/**
 * 热点参数限流
 * @param name 参数名字
 * @return
 */
@RequestMapping("test7")
@SentinelResource("test7-hotkey")
public String test7(String name) {
    System.out.println(name);
    return name;
}
@SentinelResource(“test7-hotkey”)
手动指定资源名称,经过验证此注解必须添加,否则热点key规则不生效
触发条件
1:第一个参数的值如果为jack,那么qps阈值为1
2:第一个参数的值如果为rose,那么qps阈值为5
3:第一个参数的值如果为其他,那么qps阈值为1

添加后重新编辑规则:
五:Sentinel-权限规则
/goods/findById/{id} 对于cloud-orders不能调用
| 在cloud-goods中添加授权规则 |
|---|
 |
| 把来自cloud-orders应用的请求加入黑名单 【详细配置如下,如上图所示结果】 |
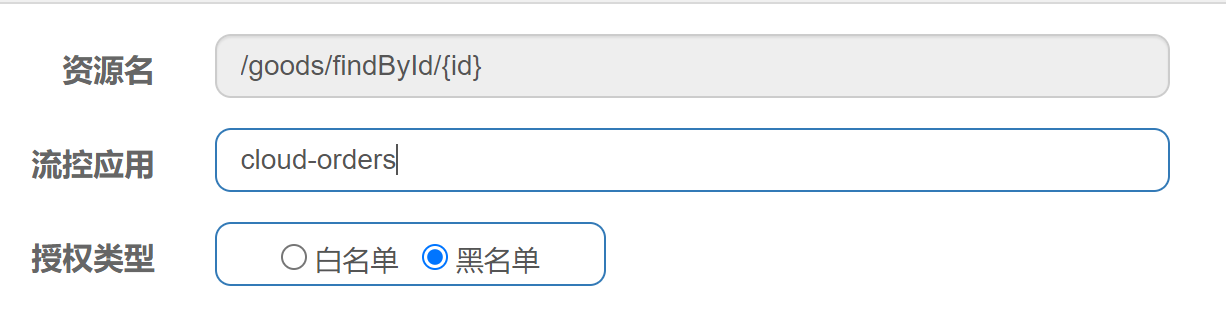 |
第一步:在cloud-goods应用中从请求头获取source
package com.qf.spring.cloud.goods.web;

import com.alibaba.csp.sentinel.adapter.spring.webmvc.callback.RequestOriginParser;
import org.springframework.stereotype.Component;

import javax.servlet.http.HttpServletRequest;

@Component
public class CustomerRequestOriginParser implements RequestOriginParser {

    public String parseOrigin(HttpServletRequest request) {
        //获取请求头的source
        return request.getHeader("source");
    }
}
第二步:
如果是使用的restTemplate发送的请求,就需要在接口上追加请求来源source
如果restTemplate发送的是是GET请求
@GetMapping("save")
public Map save(){
    String url = "http://cloud-goods/goods/findById/11";
    // 设置请求头
    HttpHeaders requestHeaders = new HttpHeaders();
    requestHeaders.set("source", "cloud-orders");
    HttpEntity requestEntity = new HttpEntity(requestHeaders);
    // 发送除POST请求之外的其他请求
    ResponseEntity<Goods> goods = restTemplate.exchange(url, HttpMethod.GET,requestEntity, Goods.class);

    System.out.println("商品信息是:" + goods.getBody());
    //保存订单(本地调用)
    System.out.println("保存订单成功!!!");
    // 扣库存
    return  new HashMap(){{
        put("code", 200);
        put("msg", "success");
    }};
}
如果restTemplate发送的是是POST请求
@GetMapping("save")
public Map save(){
    String url = "http://cloud-goods/goods/findById/11";
    // 设置请求头
    HttpHeaders requestHeaders = new HttpHeaders();
    requestHeaders.set("source", "cloud-orders");
    HttpEntity requestEntity = new HttpEntity(requestHeaders);
    // 发送POST请求
    Goods goods = restTemplate.postForObject(url,requestEntity, Goods.class);
    System.out.println("商品信息是:" + goods);
    //保存订单(本地调用)
    System.out.println("保存订单成功!!!");
    // 扣库存
    return  new HashMap(){{
        put("code", 200);
        put("msg", "success");
    }};
}
如果是使用的openFeign,则需要
1、在接口定义上添加@RequestHeader(“source”)参数
2、使用拦截器统一设置请求头
单独在接口定义上添加@RequestHeader(“source”)参数 这种方式和统一设置请求头,选一种方式就行
因为本质上都是设置请求头的,可以单独设置也可以统一设置。
openFeign指定请求头,发送请求
//接口声明(根据id获取积分)
@GetMapping(value = "/jifen/{jifenId}")
public Jifen findJifenById(@PathVariable("jifenId") Integer jifenId,@RequestHeader("source") String source);
openfeign拦截器统一设置请求头
package com.qf.spring.cloud.goods.feign;

import feign.RequestInterceptor;
import feign.RequestTemplate;
import org.springframework.stereotype.Component;

@Component
public class CustomerRequestInterceptor implements RequestInterceptor {
    public void apply(RequestTemplate requestTemplate) {
        //统一设置请求头
        requestTemplate.header("source","cloud-orders");
    }
}
六:Sentinel-针对来源
新增流控规则时的针对来源
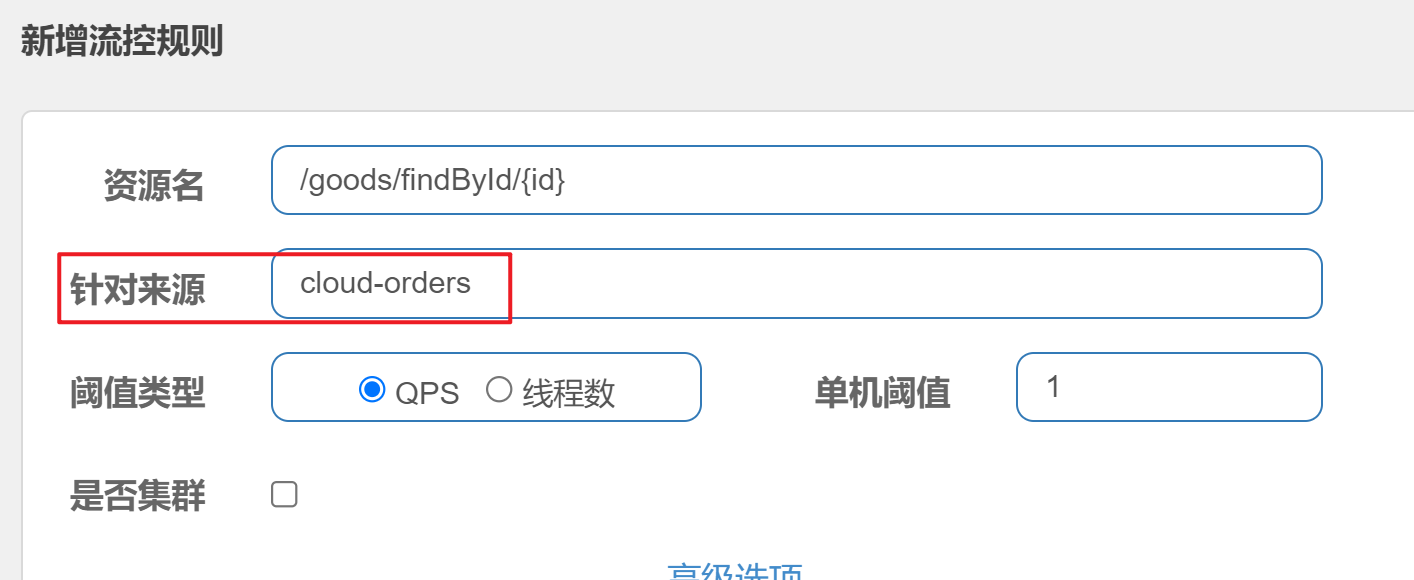
当我们的服务提供方S的某个资源(接口方法)想针不同的服务消费方(A与B)设置不同的限流阈值时,这时就需要用到针对调用来源的限流。那我们可以大规模去使用这种限流方式吗?
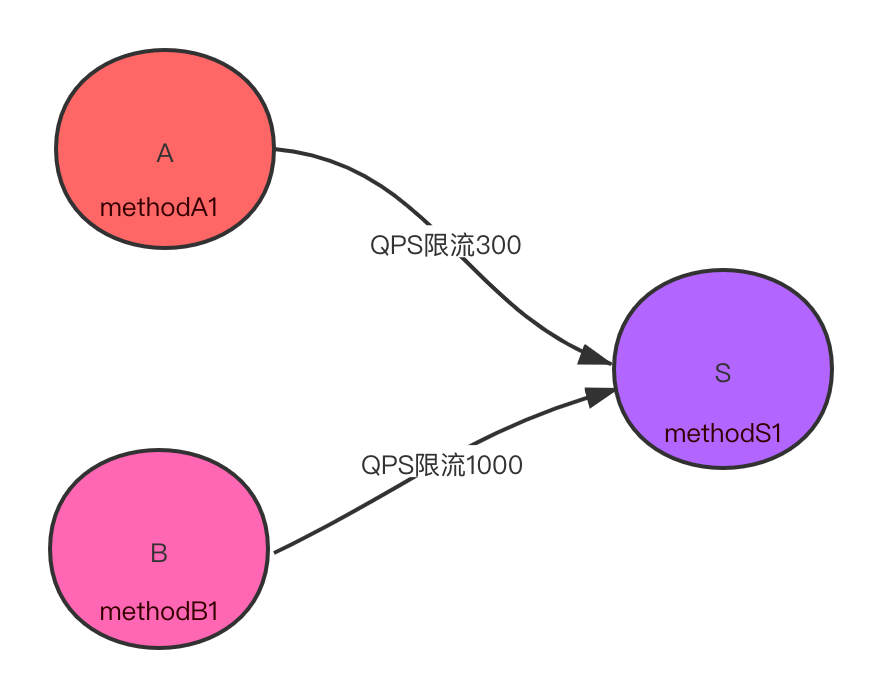
示意图如下,针对A服务methodA1调用服务S的methodS1设置QPS限流300,针对B服务methodB1调用S服务的methodS1设置限流1000。也就是需要在S服务中对相同的资源(methodS1)针对不同的来源A与B设置不同的限流阈值。
| 示意图如下 |
|---|
 |
- 实现原理
- Sentinel在统计请求流量时会为每个调用来源构建统计信息(StatisticNode)
- 在请求通过时获取调用来源origin对应的统计信息判决请求是否放行
- 为什么不能大量使用针对调用来源的限流?
由于需要为每个调用来源origin的资源建立统计信息StatisticNode,大量使用会造成内存占用过多。这点官方faq中也给出了警示,注意 origin 数量不能太多,否则会导致内存暴涨,并且目前不支持模式匹配。
七:系统规则
- Load 自适应(仅对 Linux/Unix-like 机器生效):系统的 load1 作为启发指标,进行自适应系统保护。当系统 load1 超过设定的启发值,且系统当前的并发线程数超过估算的系统容量时才会触发系统保护(BBR 阶段)。系统容量由系统的
maxQps * minRt估算得出。设定参考值一般是CPU cores * 2.5。- CPU usage(1.5.0+ 版本):当系统 CPU 使用率超过阈值即触发系统保护(取值范围 0.0-1.0),比较灵敏。
- 平均 RT:当单台机器上所有入口流量的平均 RT 达到阈值即触发系统保护,单位是毫秒。
- 并发线程数:当单台机器上所有入口流量的并发线程数达到阈值即触发系统保护。
- 入口 QPS:当单台机器上所有入口流量的 QPS 达到阈值即触发系统保护。
八:@SentinelResource注解
8.1:流控自定义异常处理
//主逻辑
@RequestMapping("test9")
@SentinelResource(value="test9",blockHandler="test9Handler")
public String test9(String name){

    //todo ...

    return "test9";
}

//备选逻辑,限流后会执行,正常情况执行不到这里
public String test9Handler(String name,BlockException exception){
    return "系统繁忙,请稍后重试!!!";
}
8.2:流控自定义异常优化
自定义
//核心主逻辑
//blockHandler 异常方法,静态方法
//blockHandlerClass 自定义的异常类
@GetMapping("test10")
@SentinelResource(value = "test10", blockHandler = "customBlockHandle", blockHandlerClass = CustomBlockHandle.class)
public Map<String, Object> test10(String name) {
    return new HashMap<String, Object>() {{
        put("code", "200");
        put("msg", "success");
    }};
}
package com.qf.spring.cloud.orders.handler;

import com.alibaba.csp.sentinel.slots.block.BlockException;

import java.util.HashMap;
import java.util.Map;

/**
 * @author zed
 * @date 2022/6/13 19:56
 */
public class CustomBlockHandle {

    //限流逻辑(备选逻辑),BlockException参数必须写
    //方法定义为静态方法
    public static Map<String, Object> customBlockHandle(String name, BlockException blockException) {
        return new HashMap<String, Object>() {{
            put("code", "200");
            put("msg", "系统繁忙,请稍后重试!!!");
        }};
    }
}
需要注意的问题:
1、限流异常处理方法必须和原始方法签名保持一致。
2、方法的参数类型和个数,方法的返回值都得保持一致。
3、限流异常处理方法是static
8.3:熔断降级自定义处理
// 主逻辑
@GetMapping("test11")
@SentinelResource(value = "test11", fallback = "test11Handler")
public String test11(String flag) {
    if (Objects.isNull(flag)) {
        throw new IllegalArgumentException("非法参数异常!");
    }
    return "Order Test11! " + flag;
}


// 备选:Degrade 降级
public String test11Handler(String flag, Throwable throwable) {
    if (throwable instanceof DegradeException) {
        return "系统开小差,请稍后再试!";
    }
    return "其他异常";
}
8.4:熔断降级自定义处理优化
主逻辑:只要发生异常,流程都会进入fallback方法
// 主逻辑
@GetMapping("test12")
@SentinelResource(value = "test12", fallback = "customFallbackHandle",fallbackClass = CustomFallbackHandle.class)
public String test12(String flag) {
    if (Objects.isNull(flag)) {
        throw new IllegalArgumentException("非法参数异常!");
    }
    return "Order Test12! " + flag;
}
降级逻辑
package com.qf.spring.cloud.orders.handler;

import com.alibaba.csp.sentinel.slots.block.degrade.DegradeException;

import java.util.HashMap;
import java.util.Map;

/**
 * @author zed
 * @date 2022/6/13 19:56
 * 自定义熔断处理器
 */
public class CustomFallbackHandle {

    //降级逻辑(备选逻辑),BlockException参数必须写
    //方法定义为静态方法
    public static String customFallbackHandle(String flag,Throwable throwable) {
        if(throwable instanceof DegradeException){
            return "Sentinel 熔断异常";
        }else {
            return "其他异常,"+throwable.getMessage();
        }
    }
}
8.5:全局异常处理
springboot全局异常处理
使用全局异常处理就不需要要编写前面自定义的流控和熔断的异常处理了。
需要注意的是,前面通过fallback指定熔断异常处理方法时,主逻辑指定发生异常都会触发熔断,不配置熔断规则也可以!
但是,全局异常处理中,熔断降级的异常处理必须配合熔断规则。没有熔断规则就不会抛出DegradeException
Controller控制器代码
package com.qf.spring.cloud.orders.controller;

import com.alibaba.csp.sentinel.annotation.SentinelResource;
import org.springframework.web.bind.annotation.GetMapping;
import org.springframework.web.bind.annotation.RequestMapping;
import org.springframework.web.bind.annotation.RestController;

import java.util.Objects;

/**
 * @author zed
 * @date 2022/6/13 19:48
 */
@RestController
@RequestMapping("order")
public class OrderCustomController {

    // 演示QPS限流
    @GetMapping("test9")
    @SentinelResource("test9")
    public String test9(String name) {
        return "Order Test9! " + name;
    }

    // 演示异常熔断
    @GetMapping("test11")
    @SentinelResource("test11")
    public String test11(String flag) {
        if (Objects.isNull(flag)) {
            throw new IllegalArgumentException("非法参数异常!");
        }
        return "Order Test11! " + flag;
    }

}
全局异常处理代码
package com.qf.spring.cloud.orders.handler;

import com.alibaba.csp.sentinel.slots.block.authority.AuthorityException;
import com.alibaba.csp.sentinel.slots.block.degrade.DegradeException;
import com.alibaba.csp.sentinel.slots.block.flow.FlowException;
import org.springframework.web.bind.annotation.ControllerAdvice;
import org.springframework.web.bind.annotation.ExceptionHandler;
import org.springframework.web.bind.annotation.ResponseBody;

import java.util.HashMap;
import java.util.Map;

/**
 * @author zed
 * @date 2022/6/13 21:16
 */
@ControllerAdvice
public class CustomExceptionHandler {

    //流控规则,全局异常处理
    @ExceptionHandler(FlowException.class)
    @ResponseBody
    public Map handlerFlowException(){
        return  new HashMap(){{
            put("code", "5xx");
            put("msg", "系統繁忙,稍后重试!!");
        }};
    }


    //熔断降级规则,全局异常处理
    @ExceptionHandler(DegradeException.class)
    @ResponseBody
    public Map handlerDegradeException(){
        return  new HashMap(){{
            put("code", "5xx");
            put("msg", "系统开小差,稍后重试!!");
        }};
    }


    //权限规则,全局异常处理
    @ExceptionHandler(AuthorityException.class)
    @ResponseBody
    public Map handlerAuthorityException(){
        return  new HashMap(){{
            put("code", "5xx");
            put("msg", ",没有权限访问!!");
        }};
    }
}
九:Sentinel规则持久化
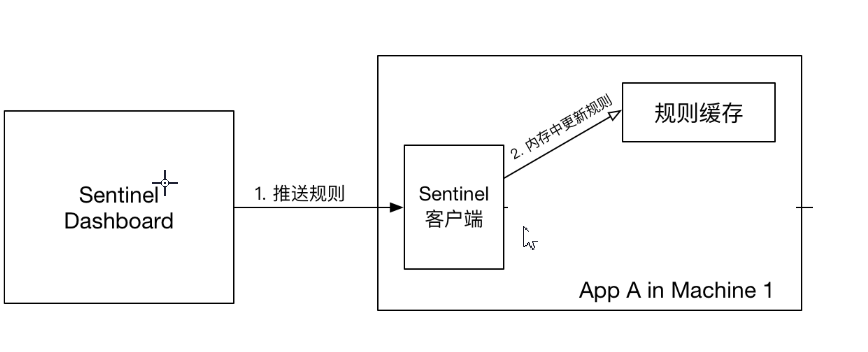
9.1:原始模式
如果不做任何修改,Dashboard 的推送规则方式是通过 API 将规则推送至客户端并直接更新到内存中:
这种做法的好处是简单,无依赖;坏处是应用重启规则就会消失,仅用于简单测试,不能用于生产环境。
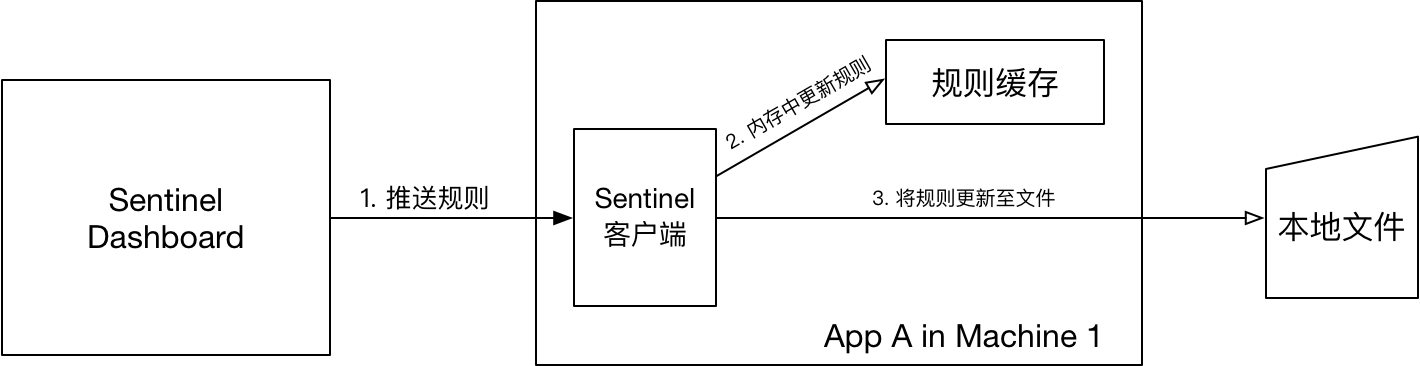
9.2:Pull模式
FileWritableDataSource 接收控制台规则推送,并根据配置,修改规则JSON文件【图中的本地文件】。
FileRefreshableDataSource 定时从指定文件中读取规则JSON文件【图中的本地文件】,如果发现文件发生变化,就更新规则缓存。
9.2.1:核心代码
package com.qf.sentinel;

import com.alibaba.csp.sentinel.command.handler.ModifyParamFlowRulesCommandHandler;
import com.alibaba.csp.sentinel.datasource.*;
import com.alibaba.csp.sentinel.init.InitFunc;
import com.alibaba.csp.sentinel.slots.block.authority.AuthorityRule;
import com.alibaba.csp.sentinel.slots.block.authority.AuthorityRuleManager;
import com.alibaba.csp.sentinel.slots.block.degrade.DegradeRule;
import com.alibaba.csp.sentinel.slots.block.degrade.DegradeRuleManager;
import com.alibaba.csp.sentinel.slots.block.flow.FlowRule;
import com.alibaba.csp.sentinel.slots.block.flow.FlowRuleManager;
import com.alibaba.csp.sentinel.slots.block.flow.param.ParamFlowRule;
import com.alibaba.csp.sentinel.slots.block.flow.param.ParamFlowRuleManager;
import com.alibaba.csp.sentinel.slots.system.SystemRule;
import com.alibaba.csp.sentinel.slots.system.SystemRuleManager;
import com.alibaba.csp.sentinel.transport.util.WritableDataSourceRegistry;
import com.alibaba.fastjson.JSON;
import com.alibaba.fastjson.TypeReference;

import java.io.File;
import java.io.IOException;
import java.util.List;

/**
 * 拉模式规则持久化
 */
public class FileDataSourceInit implements InitFunc {
    @Override
    public void init() throws Exception {
        // TIPS: 如果你对这个路径不喜欢,可修改为你喜欢的路径
        String ruleDir = System.getProperty("user.dir") + "/sentinel/rules";
        String flowRulePath = ruleDir + "/flow-rule.json";
        String degradeRulePath = ruleDir + "/degrade-rule.json";
        String systemRulePath = ruleDir + "/system-rule.json";
        String authorityRulePath = ruleDir + "/authority-rule.json";
        String paramFlowRulePath = ruleDir + "/param-flow-rule.json";

        this.mkdirIfNotExits(ruleDir);
        this.createFileIfNotExits(flowRulePath);
        this.createFileIfNotExits(degradeRulePath);
        this.createFileIfNotExits(systemRulePath);
        this.createFileIfNotExits(authorityRulePath);
        this.createFileIfNotExits(paramFlowRulePath);

        // 流控规则
        ReadableDataSource<String, List<FlowRule>> flowRuleRDS = new FileRefreshableDataSource<>(
            flowRulePath,
            flowRuleListParser
        );
        // 将可读数据源注册至FlowRuleManager
        // 这样当规则文件发生变化时,就会更新规则到内存
        FlowRuleManager.register2Property(flowRuleRDS.getProperty());
        WritableDataSource<List<FlowRule>> flowRuleWDS = new FileWritableDataSource<>(
            flowRulePath,
            this::encodeJson
        );
        // 将可写数据源注册至transport模块的WritableDataSourceRegistry中
        // 这样收到控制台推送的规则时,Sentinel会先更新到内存,然后将规则写入到文件中
        WritableDataSourceRegistry.registerFlowDataSource(flowRuleWDS);

        // 降级规则
        ReadableDataSource<String, List<DegradeRule>> degradeRuleRDS = new FileRefreshableDataSource<>(
            degradeRulePath,
            degradeRuleListParser
        );
        DegradeRuleManager.register2Property(degradeRuleRDS.getProperty());
        WritableDataSource<List<DegradeRule>> degradeRuleWDS = new FileWritableDataSource<>(
            degradeRulePath,
            this::encodeJson
        );
        WritableDataSourceRegistry.registerDegradeDataSource(degradeRuleWDS);

        // 系统规则
        ReadableDataSource<String, List<SystemRule>> systemRuleRDS = new FileRefreshableDataSource<>(
            systemRulePath,
            systemRuleListParser
        );
        SystemRuleManager.register2Property(systemRuleRDS.getProperty());
        WritableDataSource<List<SystemRule>> systemRuleWDS = new FileWritableDataSource<>(
            systemRulePath,
            this::encodeJson
        );
        WritableDataSourceRegistry.registerSystemDataSource(systemRuleWDS);

        // 授权规则
        ReadableDataSource<String, List<AuthorityRule>> authorityRuleRDS = new FileRefreshableDataSource<>(
            authorityRulePath,
            authorityRuleListParser
        );
        AuthorityRuleManager.register2Property(authorityRuleRDS.getProperty());
        WritableDataSource<List<AuthorityRule>> authorityRuleWDS = new FileWritableDataSource<>(
            authorityRulePath,
            this::encodeJson
        );
        WritableDataSourceRegistry.registerAuthorityDataSource(authorityRuleWDS);

        // 热点参数规则
        ReadableDataSource<String, List<ParamFlowRule>> paramFlowRuleRDS = new FileRefreshableDataSource<>(
            paramFlowRulePath,
            paramFlowRuleListParser
        );
        ParamFlowRuleManager.register2Property(paramFlowRuleRDS.getProperty());
        WritableDataSource<List<ParamFlowRule>> paramFlowRuleWDS = new FileWritableDataSource<>(
            paramFlowRulePath,
            this::encodeJson
        );
        ModifyParamFlowRulesCommandHandler.setWritableDataSource(paramFlowRuleWDS);
    }

    private Converter<String, List<FlowRule>> flowRuleListParser = source -> JSON.parseObject(
        source,
        new TypeReference<List<FlowRule>>() {
        }
    );
    private Converter<String, List<DegradeRule>> degradeRuleListParser = source -> JSON.parseObject(
        source,
        new TypeReference<List<DegradeRule>>() {
        }
    );
    private Converter<String, List<SystemRule>> systemRuleListParser = source -> JSON.parseObject(
        source,
        new TypeReference<List<SystemRule>>() {
        }
    );

    private Converter<String, List<AuthorityRule>> authorityRuleListParser = source -> JSON.parseObject(
        source,
        new TypeReference<List<AuthorityRule>>() {
        }
    );

    private Converter<String, List<ParamFlowRule>> paramFlowRuleListParser = source -> JSON.parseObject(
        source,
        new TypeReference<List<ParamFlowRule>>() {
        }
    );

    private void mkdirIfNotExits(String filePath) throws IOException {
        File file = new File(filePath);
        if (!file.exists()) {
            file.mkdirs();
        }
    }

    private void createFileIfNotExits(String filePath) throws IOException {
        File file = new File(filePath);
        if (!file.exists()) {
            file.createNewFile();
        }
    }

    private <T> String encodeJson(T t) {
        return JSON.toJSONString(t);
    }


}
9.2.2:配置
在项目的 resources/META-INF/services 目录下创建文件,
文件名: com.alibaba.csp.sentinel.init.InitFunc
内容为如下:
## 改成上面FileDataSourceInit的包名类名全路径即可。
com.wfx.config.FileDataSourceInit
9.2.3:优缺点分析
优点
- 简单易懂
- 没有多余依赖(比如配置中心、缓存等)
缺点
- 由于规则是用 FileRefreshableDataSource 定时更新的,所以规则更新会有延迟。如果FileRefreshableDataSource定时时间过大,可能长时间延迟;如果FileRefreshableDataSource过小,又会影响性能;
- 规则存储在本地文件,如果有一天需要迁移微服务,那么需要把规则文件一起迁移,否则规则会丢失。
9.3:Push模式
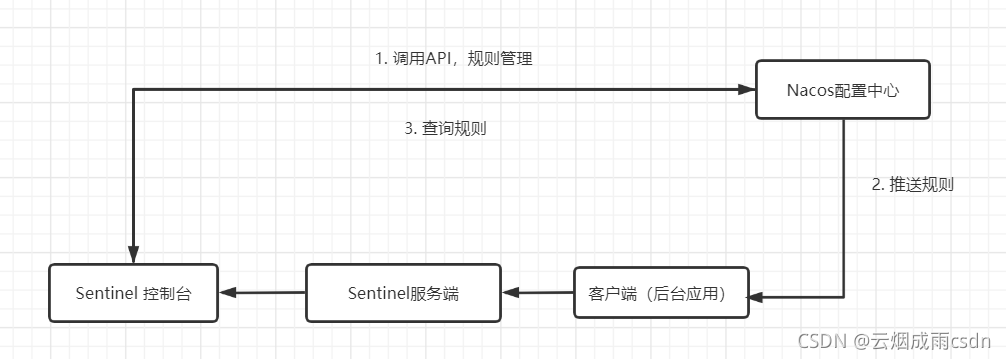
生产环境下一般更常用的是 push 模式的数据源。对于 push 模式的数据源,如远程配置中心(ZooKeeper, Nacos, Apollo等等),推送的操作不应由 Sentinel 客户端进行,而应该经控制台统一进行管理,直接进行推送,数据源仅负责获取配置中心推送的配置并更新到本地。因此推送规则正确做法应该是 配置中心控制台/Sentinel 控制台 → 配置中心 → Sentinel 数据源 → Sentinel,而不是经 Sentinel 数据源推送至配置中心。这样的流程就非常清晰了:

首先控制台调用Nacos,实现规则添加、删除、修改等,然后Nacos推送规则到客户端。查询规则时,则直接调用Nacos中的API查询。这样就实现了控制台和Nacos规则的双向同步。
9.3.1:控制台改造
懒人包:下载改造过的 sentinel-dashboard-nacos包,修改如下配置
| application.properties 文件种指定nacos服务地址 |
|---|
| sentinel.nacos.config.serverAddr=192.168.174.128 |
sentinel.nacos.config.serverAddr: 你自己改造的配置文件中nacos地址的配置项
或者直接在启动参数种指定:
java -jar sentinel-dashboard-1.8.1.jar —server.port=端口号 —sentinel.nacos.config.serverAddr=nacos服务地址:端口号
9.3.2:微服务端
<!-- sentinel -->
<dependency>
    <groupId>com.alibaba.cloud</groupId>
    <artifactId>spring-cloud-starter-alibaba-sentinel</artifactId>
</dependency>

<!-- sentinel-datasource-nacos -->
<dependency>
    <groupId>com.alibaba.csp</groupId>
    <artifactId>sentinel-datasource-nacos</artifactId>
</dependency>
9.3.3:添加配置
spring:
  cloud:
    sentinel:
      transport:
        port: 8721
        dashboard: localhost:8888
      eager: true #饥饿加载
      web-context-unify: false
      datasource:
        flow:
          nacos:
            server-addr: ${nacos.server-addr}
            username: ${nacos.username}
            password: ${nacos.password}
            groupId: SENTINEL_GROUP
            dataId: ${spring.application.name}-flow-rules
            rule-type: flow
        degrade:
          nacos:
            server-addr: ${nacos.server-addr}
            username: ${nacos.username}
            password: ${nacos.password}
            groupId: SENTINEL_GROUP
            dataId: ${spring.application.name}-degrade-rules
            rule-type: degrade
        param-flow:
          nacos:
            server-addr: ${nacos.server-addr}
            username: ${nacos.username}
            password: ${nacos.password}
            groupId: SENTINEL_GROUP
            dataId: ${spring.application.name}-param-rules
            rule-type: param-flow
        system:
          nacos:
            server-addr: ${nacos.server-addr}
            username: ${nacos.username}
            password: ${nacos.password}
            groupId: SENTINEL_GROUP
            dataId: ${spring.application.name}-system-rules
            rule-type: system
        authority:
          nacos:
            server-addr: ${nacos.server-addr}
            username: ${nacos.username}
            password: ${nacos.password}
            groupId: SENTINEL_GROUP
            dataId: ${spring.application.name}-authority-rules
            rule-type: authority
nacos:
  # 指定为自己的nacos服务地址
  server-addr: localhost:8848
  username: nacos
  password: nacos

若有收获,就点个赞吧
0 人点赞
