springboot使用的是嵌入式的servlet容器

因为引入了spring-boot-starter-web 启动器 改启动器会自动引入tomcat相关的jar包,所以springboot默认的使用的是tomcat作为servlet容器。
<dependency><groupId>org.springframework.boot</groupId><artifactId>spring-boot-starter-web</artifactId></dependency>
问题:如何修改和定制servlet容器的相关配置?
如何切换servlet容器呢,如何支持其他容器的?
如何修改和定制servlet容器的相关配置?
springboot1和springboot2实现方式的差别还是蛮大的,但是一些基本的思路和使用方式没有改变,接下来我先采用springboot1系列的版本,以及会谈及一下中间遇到的问题和感悟。
基于springboot的版本:1.5.10.RELEASE
<parent><groupId>org.springframework.boot</groupId><artifactId>spring-boot-starter-parent</artifactId><version>1.5.10.RELEASE</version><relativePath/> <!-- lookup parent from repository --></parent><groupId>com.springboot.servletContainer.version1</groupId><artifactId>embedded-container</artifactId><version>0.0.1-SNAPSHOT</version><name>embedded-container</name><description>Demo project for Spring Boot</description><properties><java.version>1.8</java.version></properties><dependencies><dependency><groupId>org.springframework.boot</groupId><artifactId>spring-boot-starter-web</artifactId></dependency><dependency><groupId>org.springframework.boot</groupId><artifactId>spring-boot-starter-test</artifactId><scope>test</scope></dependency></dependencies>
在1.5.10.RELEASE版本中修改servlet容器的一些配置可以在应用的主配置文件中application.properties直接修改
server.port=8086server.context-path=/portal
通过server.xxx 这个server前缀 可以将配置的属性配置到容器上
通过启动日志也可以发现 配置生效
那么为什么通过在配置文件中 配置server.xxxx 前缀的内容可以修改容器的配置呢?

了解下注解@ConfigurationProperties
注入配置文件属性方式一
加在类上,需要和@Component注解,结合使用
@ConfigurationProperties(prefix = "person")@Componentpublic class Person {private String name;private Integer age;public String getName() {return name;}public void setName(String name) {this.name = name;}public Integer getAge() {return age;}public void setAge(Integer age) {this.age = age;}}
注入配置文件属性方式二
通过@Bean的方式进行声明
@Configurationpublic class PersonConfig {@Bean@ConfigurationProperties(prefix = "person")public Person person(){return new Person();}}
注入配置文件属性方式三
结合这个注解@EnableConfigurationProperties(Person.class)
@Configuration@EnableConfigurationProperties(Person.class)public class PersonConfig {}
@ConfigurationProperties(prefix = "person")public class Person {private String name;private Integer age;private Car car;public String getName() {return name;}public void setName(String name) {this.name = name;}public Integer getAge() {return age;}public void setAge(Integer age) {this.age = age;}public Car getCar() {return car;}public void setCar(Car car) {this.car = car;}}
注意:加入下面的依赖 配置属性的时候会生成提示
you can easily generate your own configuration meta-data file from items annotated with @ConfigurationProperties by using the spring-boot-configuration-processor jar. The jar includes a Java annotation processor which is invoked as your project is compiled. To use the processor, simply include spring-boot-configuration-processor as an optional dependency, for example with Maven you would add:
<dependency><groupId>org.springframework.boot</groupId><artifactId>spring-boot-configuration-processor</artifactId><optional>true</optional></dependency>
也就是说 加入这个依赖会为你生成自己的元数据文件spring-configuration-metadata.json
{"hints": [],"groups": [{"sourceType": "com.atguigu.entity.Person","name": "person","type": "com.atguigu.entity.Person"},{"sourceType": "com.atguigu.entity.Person","name": "person.auth-info","sourceMethod": "getAuthInfo()","type": "com.atguigu.entity.Person$AuthInfo"},{"sourceType": "com.atguigu.entity.Person","name": "person.car","sourceMethod": "getCar()","type": "com.atguigu.entity.Car"}],"properties": [{"sourceType": "com.atguigu.entity.Person","name": "person.age","type": "java.lang.Integer"},{"sourceType": "com.atguigu.entity.Person$AuthInfo","name": "person.auth-info.password","type": "java.lang.String"},{"sourceType": "com.atguigu.entity.Person$AuthInfo","name": "person.auth-info.username","type": "java.lang.String"},{"sourceType": "com.atguigu.entity.Car","name": "person.car.car-color","type": "java.lang.String"},{"sourceType": "com.atguigu.entity.Car","name": "person.car.car-name","type": "java.lang.String"},{"sourceType": "com.atguigu.entity.Person","name": "person.name","type": "java.lang.String"}]}
生成的路径
Configuration meta-data files are located inside jars under META-INF/spring-configuration-metadata.json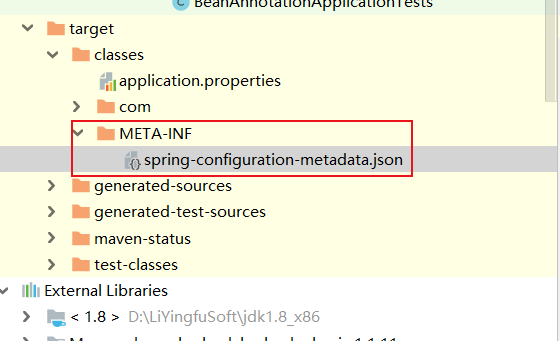
Nested properties:嵌套属性
//The annotation processor will automatically consider inner classes as nested properties.For example, the following class:@ConfigurationProperties(prefix="server")public class ServerProperties {private String name;private Host host;// ... getter and settersprivate static class Host {private String ip;private int port;// ... getter and setters}}
Will produce meta-data information for server.name, server.host.ip and server.host.port properties. You can use the @NestedConfigurationPropertyannotation on a field to indicate that a regular (non-inner) class should be treated as if it were nested.
@ConfigurationProperties(prefix = "person")public class Person {private String name;private Integer age;@NestedConfigurationPropertyprivate Car car;private AuthInfo authInfo;public String getName() {return name;}public void setName(String name) {this.name = name;}public Integer getAge() {return age;}public void setAge(Integer age) {this.age = age;}public Car getCar() {return car;}public void setCar(Car car) {this.car = car;}public void setAuthInfo(AuthInfo authInfo) {this.authInfo = authInfo;}public AuthInfo getAuthInfo() {return authInfo;}public static class AuthInfo {private String username;private String password;public String getUsername() {return username;}public void setUsername(String username) {this.username = username;}public String getPassword() {return password;}public void setPassword(String password) {this.password = password;}}}
向上面这样也会把Car这个普通常规类当成嵌套属性一样
上面插入了一段题外话,说明的是springboot配置元数据的一些相关知识,接下来步入整体,如何修改内置的servlet容器相关的配置呢?**
通过配置文件的方式修改servlet容器属性
和容器相关的配置均映射到ServerProperties类上,通过@ConfigurationProperties注解
@ConfigurationProperties(prefix = "server", ignoreUnknownFields = true)public class ServerPropertiesimplements EmbeddedServletContainerCustomizer, EnvironmentAware, Ordered {/*** Server HTTP port.*/private Integer port;/*** Network address to which the server should bind to.*/private InetAddress address;/*** Context path of the application.*/private String contextPath;/*** Display name of the application.*/private String displayName = "application";....}
通过一个定制类来修改servlet容器的相关配置
public interface EmbeddedServletContainerCustomizer {/*** Customize the specified {@link ConfigurableEmbeddedServletContainer}.* @param container the container to customize*/void customize(ConfigurableEmbeddedServletContainer container);}
在容器中配置一个servlet容器定制器EmbeddedServletContainerCustomizer
@Configurationpublic class MvcConfig {@Beanpublic EmbeddedServletContainerCustomizer embeddedServletContainerCustomizer(){return new EmbeddedServletContainerCustomizer() {//定制嵌入式servelt容器相关的规则@Overridepublic void customize(ConfigurableEmbeddedServletContainer container) {container.setPort(8090);container.setDisplayName("baidu");}};}}
总结:
通过配置文件和通过定制器修改servlet容器的表现方式是不一样的,一个是通过修改配置文件,一个是根据java代码方式,但是殊途同归,最终都采用的是定制器的方式,因为修改配置文件的server.xxx属性来修改容器的配置,会自动把server前缀的配置自动绑定到serverProperties类上,而这个类也是定制器的实现类,重写了customize方法,将配置文件的属性,又绑定到ConfigurableEmbeddedServletContainer上
@ConfigurationProperties(prefix = "server", ignoreUnknownFields = true)public class ServerPropertiesimplements EmbeddedServletContainerCustomizer, EnvironmentAware, Ordered {/*** Server HTTP port.*/private Integer port;/*** Network address to which the server should bind to.*/private InetAddress address;@Overridepublic void customize(ConfigurableEmbeddedServletContainer container) {if (getPort() != null) {container.setPort(getPort());}if (getAddress() != null) {container.setAddress(getAddress());}if (getContextPath() != null) {container.setContextPath(getContextPath());}if (getDisplayName() != null) {container.setDisplayName(getDisplayName());}if (getSession().getTimeout() != null) {container.setSessionTimeout(getSession().getTimeout());}container.setPersistSession(getSession().isPersistent());container.setSessionStoreDir(getSession().getStoreDir());if (getSsl() != null) {container.setSsl(getSsl());}if (getJspServlet() != null) {container.setJspServlet(getJspServlet());}if (getCompression() != null) {container.setCompression(getCompression());}container.setServerHeader(getServerHeader());if (container instanceof TomcatEmbeddedServletContainerFactory) {getTomcat().customizeTomcat(this,(TomcatEmbeddedServletContainerFactory) container);}if (container instanceof JettyEmbeddedServletContainerFactory) {getJetty().customizeJetty(this,(JettyEmbeddedServletContainerFactory) container);}if (container instanceof UndertowEmbeddedServletContainerFactory) {getUndertow().customizeUndertow(this,(UndertowEmbeddedServletContainerFactory) container);}container.addInitializers(new SessionConfiguringInitializer(this.session));container.addInitializers(new InitParameterConfiguringServletContextInitializer(getContextParameters()));}}
注册servlet filter listener 三大组件
在没有web.xml的情况下如何注册三大组件

注册servlet
如何将如下三个组件注册到这个容器中呢?
public class MyServlet extends HttpServlet {//处理get请求@Overrideprotected void doGet(HttpServletRequest req, HttpServletResponse resp) throws ServletException, IOException {doPost(req,resp);}//处理post请求@Overrideprotected void doPost(HttpServletRequest req, HttpServletResponse resp) throws ServletException, IOException {resp.getWriter().write("hello myServlet");}}
public class MyFilter implements Filter {@Overridepublic void init(FilterConfig filterConfig) throws ServletException {}@Overridepublic void doFilter(ServletRequest servletRequest, ServletResponse servletResponse, FilterChain filterChain) throws IOException, ServletException {System.out.println("myfilter process....");filterChain.doFilter(servletRequest,servletResponse);}@Overridepublic void destroy() {}}
public class MyListener implements ServletContextListener {@Overridepublic void contextInitialized(ServletContextEvent servletContextEvent) {System.out.println("servletContext initialize");}@Overridepublic void contextDestroyed(ServletContextEvent servletContextEvent) {System.out.println("servletContext destroyed");}}
使用如下的方式注入三大组件
@Configurationpublic class MvcConfig {//注册servlet@Beanpublic ServletRegistrationBean myservlet(){ServletRegistrationBean servletRegistrationBean=new ServletRegistrationBean(new MyServlet(),"/myServlet");return servletRegistrationBean;}//注册filter@Beanpublic FilterRegistrationBean myfilter(){FilterRegistrationBean filterRegistrationBean=new FilterRegistrationBean();filterRegistrationBean.setFilter(new MyFilter());filterRegistrationBean.setUrlPatterns(Arrays.asList("/myServlet"));return filterRegistrationBean;}//注册listener@Beanpublic ServletListenerRegistrationBean myListener(){ServletListenerRegistrationBean<MyListener> servletListenerRegistrationBean=new ServletListenerRegistrationBean<>(new MyListener());return servletListenerRegistrationBean;}}
具体为什么用这三个registrationBean就可以实现注册 ,我在下一个专栏为大家讲解。。。
其实我们会发现springboot底层大量注册的方式 使用了如上的方式:DispatcherServletAutoConfiguration
@Configuration@Conditional(DispatcherServletRegistrationCondition.class)@ConditionalOnClass(ServletRegistration.class)@EnableConfigurationProperties(WebMvcProperties.class)@Import(DispatcherServletConfiguration.class)protected static class DispatcherServletRegistrationConfiguration {private final ServerProperties serverProperties;private final WebMvcProperties webMvcProperties;private final MultipartConfigElement multipartConfig;public DispatcherServletRegistrationConfiguration(ServerProperties serverProperties, WebMvcProperties webMvcProperties,ObjectProvider<MultipartConfigElement> multipartConfigProvider) {this.serverProperties = serverProperties;this.webMvcProperties = webMvcProperties;this.multipartConfig = multipartConfigProvider.getIfAvailable();}@Bean(name = DEFAULT_DISPATCHER_SERVLET_REGISTRATION_BEAN_NAME)@ConditionalOnBean(value = DispatcherServlet.class, name = DEFAULT_DISPATCHER_SERVLET_BEAN_NAME)public ServletRegistrationBean dispatcherServletRegistration(DispatcherServlet dispatcherServlet) {ServletRegistrationBean registration = new ServletRegistrationBean(dispatcherServlet, this.serverProperties.getServletMapping());registration.setName(DEFAULT_DISPATCHER_SERVLET_BEAN_NAME);registration.setLoadOnStartup(this.webMvcProperties.getServlet().getLoadOnStartup());if (this.multipartConfig != null) {registration.setMultipartConfig(this.multipartConfig);}return registration;}}
上面涉及到一点知识 就是注解方式注入bean,采用构造器的形式注入,这里稍微的进行一下讲解
@bean注入的参数问题
@Configurationpublic class ProjectTaskConfig {@Beanpublic ProjectTask projectTask(Car car){return new ProjectTask();}}//注意:如果容器中没有Car类型的bean 那么是无法启动项目的,会报错//Parameter 0 of method projectTask in com.atguigu.config.ProjectTaskConfig required a bean of type 'com.atguigu.entity.Car' that could not be found.//Consider defining a bean of type 'com.atguigu.entity.Car' in your configuration.//也就是说会有强依赖性
###objectFactory
同理下面的方法也是:
@Configurationpublic class ProjectTaskConfig {@Beanpublic ProjectTask projectTask(ObjectFactory<Materail> objectFactory){Materail materail = objectFactory.getObject();Assert.notNull(materail,"car is not exists");return new ProjectTask();}}
public class BeanAnnotationApplicationTests {@AutowiredPerson p;@AutowiredMaterail materail;@Autowiredprivate ObjectFactory<Materail> objectFactory;
以上两种方式均可以注入容器中已经存在的Materail,但是在调用它的getObject方法的时候一定要确保
1.容器中含有该类型的bean
No qualifying bean of type ‘com.atguigu.entity.Materail’ available: expected at least 1 bean which qualifies as autowire candidate
2.容器中只能还有一个该类型的bean可以匹配 ,否则报错
public interface ObjectFactory<T> {/*** Return an instance (possibly shared or independent)* of the object managed by this factory.* @return an instance of the bean (should never be {@code null})* @throws BeansException in case of creation errors*/T getObject() throws BeansException;}
###ObjectProvider
从spring4.3后开始引进的新的方式
/*** A variant of {@link ObjectFactory} designed specifically for injection points,* allowing for programmatic optionality and lenient not-unique handling.** @author Juergen Hoeller* @since 4.3*/public interface ObjectProvider<T> extends ObjectFactory<T> {/*** Return an instance (possibly shared or independent) of the object* managed by this factory.* <p>Allows for specifying explicit construction arguments, along the* lines of {@link BeanFactory#getBean(String, Object...)}.* @param args arguments to use when creating a corresponding instance* @return an instance of the bean* @throws BeansException in case of creation errors* @see #getObject()*/T getObject(Object... args) throws BeansException;/*** Return an instance (possibly shared or independent) of the object* managed by this factory.* @return an instance of the bean, or {@code null} if not available* @throws BeansException in case of creation errors* @see #getObject()*/T getIfAvailable() throws BeansException;/*** Return an instance (possibly shared or independent) of the object* managed by this factory.* @return an instance of the bean, or {@code null} if not available or* not unique (i.e. multiple candidates found with none marked as primary)* @throws BeansException in case of creation errors* @see #getObject()*/T getIfUnique() throws BeansException;}
因为ObjectProvider继承至ObjectFactory,所以会有getObject()方法,调用这个方法的时候,要确保容器中只有一个工厂方法在创建这个对象 什么叫工厂方法 实现factoryBean的类 和@bean标注方法的类 都可以叫做工厂类,调用getObject(),所以也就是在调用对应工厂类中的方法,
public class BeanAnnotationApplicationTests {@AutowiredPerson p;@AutowiredMaterail materail;@Autowiredprivate ObjectFactory<Materail> objectFactory;@Autowiredprivate ObjectProvider<House> objectProvider;//用autowired注入 说明容器中只能有一个该类型的beanHouse hh = objectProvider.getObject();//org.springframework.beans.factory.NoUniqueBeanDefinitionException:// No qualifying bean of type 'com.atguigu.entity.House' available:// expected single matching bean but found 2: h1,h2House sy = objectProvider.getObject("沈阳");House ifAvailable = objectProvider.getIfAvailable();House ifUnique = objectProvider.getIfUnique();System.out.println(sy);System.out.println(ifAvailable);System.out.println(ifUnique);
我配置House类时
@Bean@Lazypublic House h1(String msg){this.msg=msg;return new House();}@Bean@Lazypublic House h2(){return new House();}
所以调用
House hh = objectProvider.getObject();时报错
错误如下:
org.springframework.beans.factory.NoUniqueBeanDefinitionException: No qualifying bean of type ‘com.atguigu.entity.House’ available: expected single matching bean but found 2: h1,h2
可以将容器中所有该类型的bean注入
@Beanpublic House h1(Materail materail){this.materail=materail;return new House();}@Beanpublic House h2(){return new House();}@Autowiredprivate ObjectProvider<List<House>> objectProvider;List<House> ifAvailable = objectProvider.getIfAvailable();//全部注入 上面两个System.out.println(ifAvailable);
同样如果注入的方式是这样
@Autowired
private ObjectProvider
然后调用
List
org.springframework.beans.factory.NoSuchBeanDefinitionException: No qualifying bean of type ‘java.util.List
使用的demo
@Bean@ConditionalOnMissingBean(MeterRegistry.class)public CompositeMeterRegistry compositeMeterRegistry(MetricsProperties config,ObjectProvider<List<MeterRegistryConfigurer>> configurers,ObjectProvider<Collection<MetricsExporter>> exportersProvider) {CompositeMeterRegistry composite =config.isUseGlobalRegistry() ? Metrics.globalRegistry : new CompositeMeterRegistry();if (exportersProvider.getIfAvailable() != null) {exportersProvider.getIfAvailable().forEach(exporter -> {final MeterRegistry childRegistry = exporter.registry();if (composite == childRegistry) {throw new IllegalStateException("cannot add a CompositeMeterRegistry to itself");}composite.add(childRegistry);});}if (configurers.getIfAvailable() != null) {configurers.getIfAvailable().forEach(conf -> conf.configureRegistry(composite));}return composite;}
如何切换servlet容器呢
 从前面的讲解 我们知道可以通过servlet容器定制器的方式进行容器的属性设置
public interface EmbeddedServletContainerCustomizer {/*** Customize the specified {@link ConfigurableEmbeddedServletContainer}.* @param container the container to customize*/void customize(ConfigurableEmbeddedServletContainer container);}
查看继承树
切换容器的方式
<dependency><groupId>org.springframework.boot</groupId><artifactId>spring-boot-starter-web</artifactId><exclusions><exclusion><artifactId>spring-boot-starter-tomcat</artifactId><groupId>org.springframework.boot</groupId></exclusion></exclusions></dependency><dependency><groupId>org.springframework.boot</groupId><artifactId>spring-boot-starter-jetty</artifactId></dependency>
排除tomcat依赖 并且加入jetty依赖
底层servlet容器自动配置的原理是如何的?为什么会自动配置的tomcat
@AutoConfigureOrder(Ordered.HIGHEST_PRECEDENCE)@Configuration@ConditionalOnWebApplication@Import(BeanPostProcessorsRegistrar.class)//这个注解的作用我们细讲public class EmbeddedServletContainerAutoConfiguration {/*** Nested configuration if Tomcat is being used.*/@Configuration@ConditionalOnClass({ Servlet.class, Tomcat.class })@ConditionalOnMissingBean(value = EmbeddedServletContainerFactory.class, search = SearchStrategy.CURRENT)public static class EmbeddedTomcat {@Beanpublic TomcatEmbeddedServletContainerFactory tomcatEmbeddedServletContainerFactory() {return new TomcatEmbeddedServletContainerFactory();}}}
如果这个内部配置类生效就会在当前容器中注入TomcatEmbeddedServletContainerFactory 嵌入式的tomcat容器工厂类 那么这个类要做什么呢?
public interface EmbeddedServletContainerFactory {/*** Gets a new fully configured but paused {@link EmbeddedServletContainer} instance.* Clients should not be able to connect to the returned server until* {@link EmbeddedServletContainer#start()} is called (which happens when the* {@link ApplicationContext} has been fully refreshed).* @param initializers {@link ServletContextInitializer}s that should be applied as* the container starts* @return a fully configured and started {@link EmbeddedServletContainer}* @see EmbeddedServletContainer#stop()*/EmbeddedServletContainer getEmbeddedServletContainer(ServletContextInitializer... initializers);}

接下来就是进入主题的时候了
@AutoConfigureOrder(Ordered.HIGHEST_PRECEDENCE)@Configuration@ConditionalOnWebApplication@Import(BeanPostProcessorsRegistrar.class)public class EmbeddedServletContainerAutoConfiguration {/*** Nested configuration if Tomcat is being used.*/@Configuration@ConditionalOnClass({ Servlet.class, Tomcat.class })@ConditionalOnMissingBean(value = EmbeddedServletContainerFactory.class, search = SearchStrategy.CURRENT)public static class EmbeddedTomcat {@Beanpublic TomcatEmbeddedServletContainerFactory tomcatEmbeddedServletContainerFactory() {return new TomcatEmbeddedServletContainerFactory();}}/*** Nested configuration if Jetty is being used.*/@Configuration@ConditionalOnClass({ Servlet.class, Server.class, Loader.class,WebAppContext.class })@ConditionalOnMissingBean(value = EmbeddedServletContainerFactory.class, search = SearchStrategy.CURRENT)public static class EmbeddedJetty {@Beanpublic JettyEmbeddedServletContainerFactory jettyEmbeddedServletContainerFactory() {return new JettyEmbeddedServletContainerFactory();}}/*** Nested configuration if Undertow is being used.*/@Configuration@ConditionalOnClass({ Servlet.class, Undertow.class, SslClientAuthMode.class })@ConditionalOnMissingBean(value = EmbeddedServletContainerFactory.class, search = SearchStrategy.CURRENT)public static class EmbeddedUndertow {@Beanpublic UndertowEmbeddedServletContainerFactory undertowEmbeddedServletContainerFactory() {return new UndertowEmbeddedServletContainerFactory();}}
spring会根据导入的jar包的情况,自动的向容器中添加对应的容器工厂类,例如tomcat的jar包引入后,就会配置
TomcatEmbeddedServletContainerFactory 容器工厂。
TomcatEmbeddedServletContainerFactory实现了EmbeddedServletContainerFactory接口,并重写了接口的getEmbeddedServletContainer()方法获取一个容器
@Overridepublic EmbeddedServletContainer getEmbeddedServletContainer(ServletContextInitializer... initializers) {Tomcat tomcat = new Tomcat();File baseDir = (this.baseDirectory != null ? this.baseDirectory: createTempDir("tomcat"));tomcat.setBaseDir(baseDir.getAbsolutePath());Connector connector = new Connector(this.protocol);tomcat.getService().addConnector(connector);customizeConnector(connector);tomcat.setConnector(connector);tomcat.getHost().setAutoDeploy(false);configureEngine(tomcat.getEngine());for (Connector additionalConnector : this.additionalTomcatConnectors) {tomcat.getService().addConnector(additionalConnector);}prepareContext(tomcat.getHost(), initializers);//将创建的内置tomcat包装一下return getTomcatEmbeddedServletContainer(tomcat);}protected TomcatEmbeddedServletContainer getTomcatEmbeddedServletContainer(Tomcat tomcat) {// 用TomcatEmbeddedServletContainer类包装创建的tomcat对象return new TomcatEmbeddedServletContainer(tomcat, getPort() >= 0);}
public class TomcatEmbeddedServletContainer implements EmbeddedServletContainer {private final Tomcat tomcat;private final boolean autoStart;//调用这个方法包装tomcatpublic TomcatEmbeddedServletContainer(Tomcat tomcat, boolean autoStart) {Assert.notNull(tomcat, "Tomcat Server must not be null");this.tomcat = tomcat;this.autoStart = autoStart;initialize();}//在initialize()方法中启动内置的tomcatprivate void initialize() throws EmbeddedServletContainerException {TomcatEmbeddedServletContainer.logger.info("Tomcat initialized with port(s): " + getPortsDescription(false));synchronized (this.monitor) {try {addInstanceIdToEngineName();try {// Remove service connectors to that protocol binding doesn't happen// yetremoveServiceConnectors();// Start the server to trigger initialization listenersthis.tomcat.start();// We can re-throw failure exception directly in the main threadrethrowDeferredStartupExceptions();Context context = findContext();try {ContextBindings.bindClassLoader(context, getNamingToken(context),getClass().getClassLoader());}catch (NamingException ex) {// Naming is not enabled. Continue}// Unlike Jetty, all Tomcat threads are daemon threads. We create a// blocking non-daemon to stop immediate shutdownstartDaemonAwaitThread();}catch (Exception ex) {containerCounter.decrementAndGet();throw ex;}}catch (Exception ex) {throw new EmbeddedServletContainerException("Unable to start embedded Tomcat", ex);}}}}
现在剩下的问题就是
1.EmbeddedServletContainerFactory这个工厂接口会在什么时候调用它的获取容器方法来创建一个servlet容器呢?
2.@Import(BeanPostProcessorsRegistrar.class)//这个注解的作用我们细讲 这个注解的作用?
public static class BeanPostProcessorsRegistrarimplements ImportBeanDefinitionRegistrar, BeanFactoryAware {private ConfigurableListableBeanFactory beanFactory;@Overridepublic void setBeanFactory(BeanFactory beanFactory) throws BeansException {if (beanFactory instanceof ConfigurableListableBeanFactory) {this.beanFactory = (ConfigurableListableBeanFactory) beanFactory;}}@Overridepublic void registerBeanDefinitions(AnnotationMetadata importingClassMetadata,BeanDefinitionRegistry registry) {if (this.beanFactory == null) {return;}registerSyntheticBeanIfMissing(registry,"embeddedServletContainerCustomizerBeanPostProcessor",EmbeddedServletContainerCustomizerBeanPostProcessor.class);registerSyntheticBeanIfMissing(registry,"errorPageRegistrarBeanPostProcessor",ErrorPageRegistrarBeanPostProcessor.class);}private void registerSyntheticBeanIfMissing(BeanDefinitionRegistry registry,String name, Class<?> beanClass) {if (ObjectUtils.isEmpty(this.beanFactory.getBeanNamesForType(beanClass, true, false))) {RootBeanDefinition beanDefinition = new RootBeanDefinition(beanClass);beanDefinition.setSynthetic(true);registry.registerBeanDefinition(name, beanDefinition);}}}
BeanPostProcessorsRegistrar负责向容器中注入EmbeddedServletContainerCustomizerBeanPostProcessor后置处理器,在bean初始化前后做一些拦截工作
看一下这个bean后置处理器做了写什么
public class EmbeddedServletContainerCustomizerBeanPostProcessorimplements BeanPostProcessor, BeanFactoryAware {private ListableBeanFactory beanFactory;private List<EmbeddedServletContainerCustomizer> customizers;@Overridepublic void setBeanFactory(BeanFactory beanFactory) {Assert.isInstanceOf(ListableBeanFactory.class, beanFactory,"EmbeddedServletContainerCustomizerBeanPostProcessor can only be used "+ "with a ListableBeanFactory");this.beanFactory = (ListableBeanFactory) beanFactory;}@Overridepublic Object postProcessBeforeInitialization(Object bean, String beanName)throws BeansException {//只对ConfigurableEmbeddedServletContainer类型进行拦截if (bean instanceof ConfigurableEmbeddedServletContainer) {postProcessBeforeInitialization((ConfigurableEmbeddedServletContainer) bean);}return bean;}@Overridepublic Object postProcessAfterInitialization(Object bean, String beanName)throws BeansException {return bean;}private void postProcessBeforeInitialization(ConfigurableEmbeddedServletContainer bean) {for (EmbeddedServletContainerCustomizer customizer : getCustomizers()) {//获取所用的定制器 进行对该servletContainer的定制customizer.customize(bean);}}private Collection<EmbeddedServletContainerCustomizer> getCustomizers() {if (this.customizers == null) {// Look up does not include the parent contextthis.customizers = new ArrayList<EmbeddedServletContainerCustomizer>(this.beanFactory.getBeansOfType(EmbeddedServletContainerCustomizer.class,false, false).values());Collections.sort(this.customizers, AnnotationAwareOrderComparator.INSTANCE);this.customizers = Collections.unmodifiableList(this.customizers);}return this.customizers;}}
补充:这里有一些好的编程方式 借鉴spring的 ,有机会会细细的学一下
Assert:断言的工具类 spring提供的
Collections:java提供的工具类
总结:
1,首先springboot根据我们的导包情况 会在容器中增加TomcatEmbeddedServletContainerFactory 容器工厂类
2.接下来后置处理器只会拦截ConfigurableEmbeddedServletContainer类型的bean的创建
恰好我们的TomcatEmbeddedServletContainerFactory就是这个类型的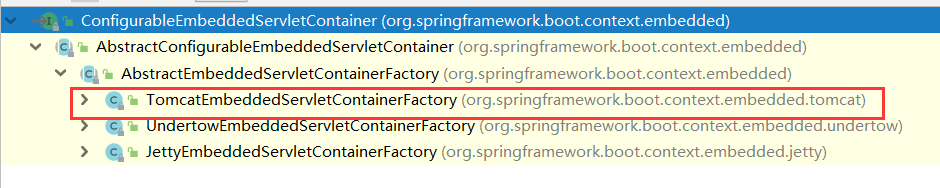
容器启动的时候会调用refresh方法刷新容器:
protected void onRefresh() throws BeansException {// For subclasses: do nothing by default.}
这个刷新 恰好是留个子类实现的,创建context的时候创建的是
/*** The class name of application context that will be used by default for non-web* environments.*/public static final String DEFAULT_CONTEXT_CLASS = "org.springframework.context."+ "annotation.AnnotationConfigApplicationContext";/*** The class name of application context that will be used by default for web* environments.*/public static final String DEFAULT_WEB_CONTEXT_CLASS = "org.springframework."+ "boot.context.embedded.AnnotationConfigEmbeddedWebApplicationContext";protected ConfigurableApplicationContext createApplicationContext() {Class<?> contextClass = this.applicationContextClass;if (contextClass == null) {try {contextClass = Class.forName(this.webEnvironment? DEFAULT_WEB_CONTEXT_CLASS : DEFAULT_CONTEXT_CLASS);}catch (ClassNotFoundException ex) {throw new IllegalStateException("Unable create a default ApplicationContext, "+ "please specify an ApplicationContextClass",ex);}}return (ConfigurableApplicationContext) BeanUtils.instantiate(contextClass);}
因为是web环境 所以创建的AnnotationConfigEmbeddedWebApplicationContext,它的refresh方法
@Overrideprotected void onRefresh() {super.onRefresh();try {//创建嵌入式的容器createEmbeddedServletContainer();}catch (Throwable ex) {throw new ApplicationContextException("Unable to start embedded container",ex);}}private void createEmbeddedServletContainer() {EmbeddedServletContainer localContainer = this.embeddedServletContainer;ServletContext localServletContext = getServletContext();if (localContainer == null && localServletContext == null) {//获取容器工厂EmbeddedServletContainerFactory containerFactory = getEmbeddedServletContainerFactory();//调用容器工厂的getEmbeddedServletContainer方法 把配置的参数设置给tomcat 并启动tomcatthis.embeddedServletContainer = containerFactory.getEmbeddedServletContainer(getSelfInitializer());}else if (localServletContext != null) {try {getSelfInitializer().onStartup(localServletContext);}catch (ServletException ex) {throw new ApplicationContextException("Cannot initialize servlet context",ex);}}initPropertySources();}//只能有一个容器工厂protected EmbeddedServletContainerFactory getEmbeddedServletContainerFactory() {// Use bean names so that we don't consider the hierarchyString[] beanNames = getBeanFactory().getBeanNamesForType(EmbeddedServletContainerFactory.class);if (beanNames.length == 0) {throw new ApplicationContextException("Unable to start EmbeddedWebApplicationContext due to missing "+ "EmbeddedServletContainerFactory bean.");}if (beanNames.length > 1) {throw new ApplicationContextException("Unable to start EmbeddedWebApplicationContext due to multiple "+ "EmbeddedServletContainerFactory beans : "+ StringUtils.arrayToCommaDelimitedString(beanNames));}return getBeanFactory().getBean(beanNames[0],EmbeddedServletContainerFactory.class);}
以上是自动配置的servlet容器的过程 是springboot1.5.10的版本 ,有时间会探究下2.0系列的版本
本文代码github地址

若有收获,就点个赞吧
0 人点赞
