实例在 angulardemo08,angulardemo08 :
Angular路由作用:为了解决各个组件之间挂载时需要手动去进行挂载取消操作。路由可以根据不同的URL地址,动态的让根组件挂载其他组件,来实现一个单页面应用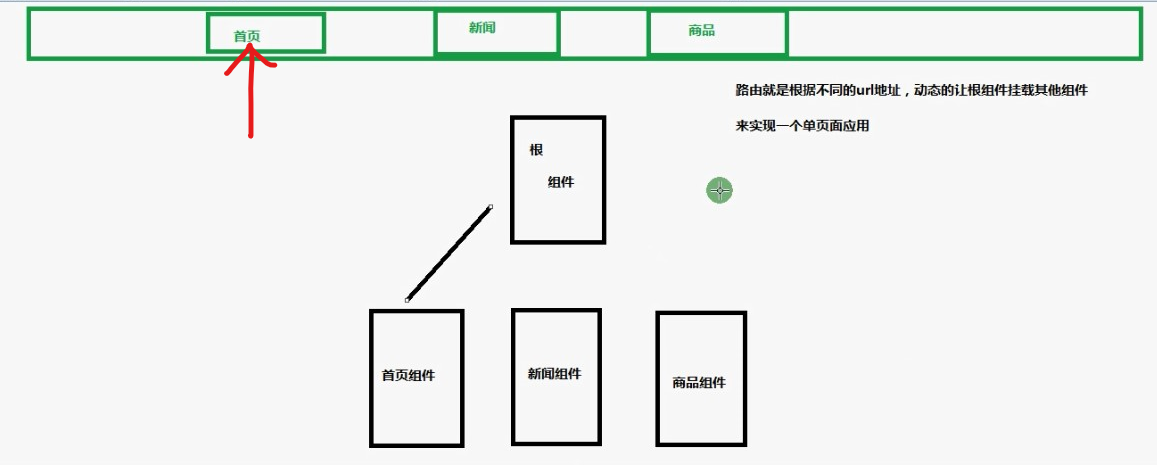
比如点击首页按钮时,根组件会动态的挂载首页组件,其他组件断开,从而在当前页面(不刷新)显示首页组件的内容。
/ *配置路由
- 创建项目时提示是否创建routing路由,选择yes
- 创建需要的组件,如 ng g component components/home(或者news,或者product)
- 在app-module.ts里引入import { HomeComponent } from’./components/home/home.component’;
,并且声明declarations: [HomeComponent,], 创建是应该默认已经配置好了的
- 在app-routing.module.ts中引入import { HomeComponent } from’./components/home/home.component’;并配置:const routes: Routes=[ {path: ‘home’, component: HomeComponent},{path:’‘,redirectTo:’home’}, ];//表示匹配任意路由,上面都找不到时默认跳转到home组件
*/
/ *路由跳转
- 使用时在根页面app.component.html里写
标签 在根页面app.component.html里的标签写上routerLink=”/要跳转的页面” 如下:
<h1><a routerLink="/home">首页</a> <a routerLink="/news">新闻</a></h1>
/
/ 按钮选中状态在根页面app.component.html标签中添加routerLinkActive=”自定义名称” 表示选中是触发routerLinkActive
- 在css页面app.component.css里对”自定义名称”进行样式设计,如下: ```html 首页
.active{color: red;}
*/<br />/* **get页面跳转和接收** 场景举例:点击新闻时动态跳转到新闻详情页面<br />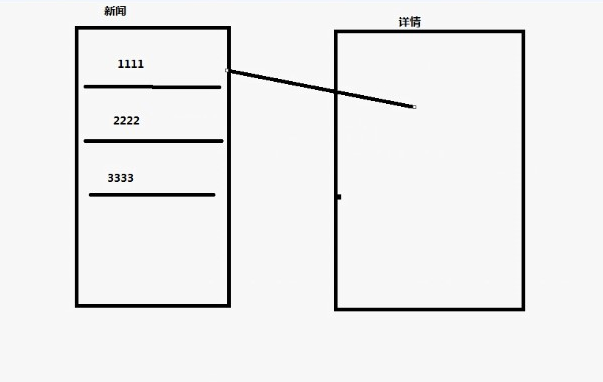1. 创建新闻详情组件,如:ng g component components/newscontent1. 在app-routing.module.ts中引入组件并配置(上面有,便省略)1. 在需要跳转的页面进行标签绑定,如下:```typescriptpublic list:any[]=[];ngOnInit(): void {for(var i=0;i<10;i++){this.list.push('这是第 '+i+' 条数据');}}
<ul><li *ngFor="let item of list;let key=index"><a [routerLink]="['/newscontent']" [queryParams]="{aid:key}" >{{key}}--{{item}}</a></li></ul>
注!queryParams中的aid:key表示执行时URL显示传的key值,如图:
- 在newscontent.component.ts获取(接收) news.component.html传过来的key:
- 在newscontent.component.ts引入ActivatedRoute: import { ActivatedRoute } from’@angular/router’;
- 构造器声明ActivatedRoute:constructor(public route:ActivatedRoute) {}
- this.route.queryParams.subscribe((data)=>{console.log(data);}); 就可以接收并打印key值,因为queryParams是Rxjs的,所以只能使用Rxjs内置方法subscribe接收数据
/
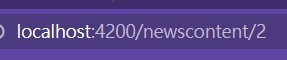
/ 动态路由传值 场景举例:点击新闻时动态跳转到新闻详情页面
- 配置路由—>在app-routing.module.ts配置的path里面加一个aid:如 {path:’newscontent/:aid’,component:NewscontentComponent}的
在html页面进行动态跳转,直接在routerLink里面写需要 传的位置,传的值 就行,如下:
<h2>动态路由传值跳转</h2><ul><li *ngFor="let item of list;let key=index"><a [routerLink]="['/newscontent',key]" >{{key}}--{{item}}</a></li></ul>
注! 标签中的key表示执行时URL显示传的值,如图:
- 在newscontent.component.ts获取(接收) news.component.html传过来的key:
- 和get获取差不多,只是调用的方法不一样。
- 在newscontent.component.ts引入ActivatedRoute: import { ActivatedRoute } from’@angular/router’;
- 构造器声明ActivatedRoute:constructor(public route:ActivatedRoute) {}
- this.route.params.subscribe((data)=>{console.log(data);}); 就可以接收并打印key值,因为queryParams是Rxjs的,所以只能使用Rxjs内置方法subscribe接收数据
/
/ 在业务逻辑里实现动态跳转(动态路由的js跳转) 场景举例:判断登录是否成功。在js中直接进行跳转
product和productcontent里演示
- 路由中引入: import { ProductcontentComponent } from’./components/productcontent/productcontent.component’;
- 配置路由:{path:’productcontent/:pid’,component:ProductcontentComponent},
html设置按钮,并设置事件监听:
<button (click)="goNewsContent()">动态路由传值JS跳转</button>
ts中引入Router:import { Router } from’@angular/router’;
- 构造器中声明router:constructor(publicrouter:Router) { }
在监听方法中设置需要跳转的界面和数据,普通路由跳转和动态路由跳转都适用。如下:
goNewsContent(){//路由跳转this.router.navigate(['/newscontent/','跳转成功']);//参数在括号里}
/
/ get传值的js跳转 product和productcontent里演示路由配置和引入同上,html设置按钮,并设置事件监听:
<button (click)="goNews()">get传值JS跳转</button>
ts中引入Router和NavigationExtras:import { Router,NavigationExtras } from’@angular/router’;
- 构造器中声明router:constructor(publicrouter:Router) { }
- 在监听方法中设置需要跳转的界面和数据,普通路由跳转和动态路由跳转都适用。
- 先创建NavigationExtras类型需要传的值的对象
- 然后再进行跳转,参数中写明对象,如下:
*/goNews(){//跳转并进行get传值let queryParams:NavigationExtras={queryParams:{'aid':123}}this.router.navigate(['/news'],queryParams);//参数在括号外}
/ *父子路由 场景举例:点击首页时左边显示商品列表信息,点击左边商品列右边显示商品详情信息,如下: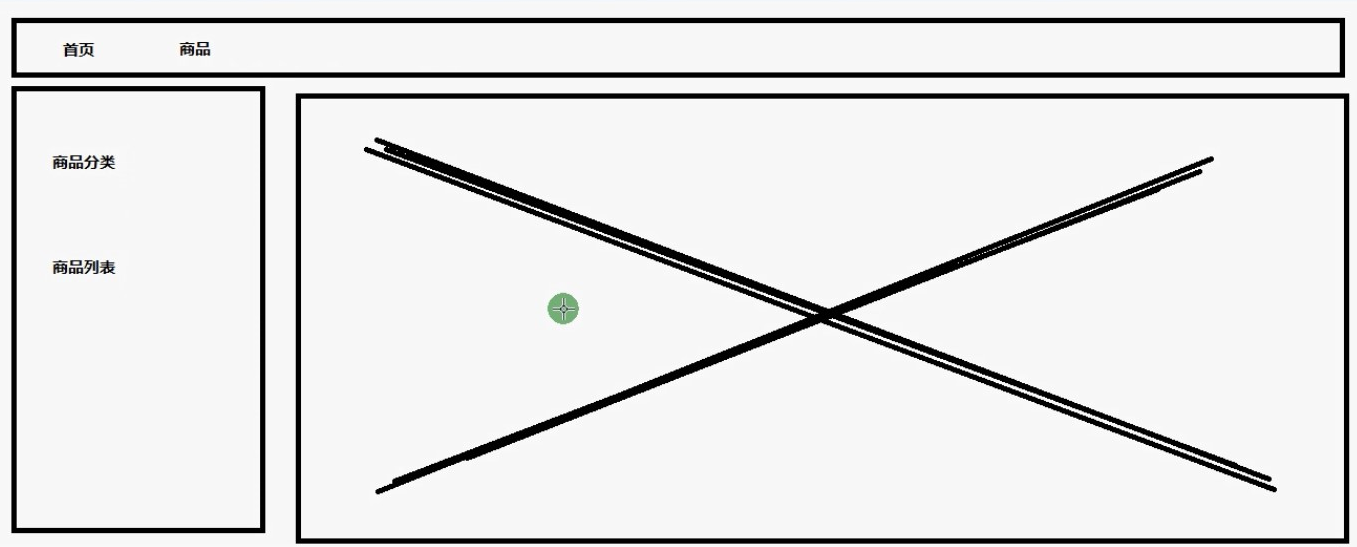
- 按照父子关系创建组件,在app-routing.module.ts里引入所有组件,并配置路径 ```typescript import { NgModule } from ‘@angular/core’; import { RouterModule, Routes } from ‘@angular/router’; import { HomeComponent } from ‘./components/home/home.component’; import { WelcomeComponent } from ‘./components/home/welcome/welcome.component’; import { SettingComponent } from ‘./components/home/setting/setting.component’; import { ProductComponent } from ‘./components/product/product.component’; import { PcateComponent } from ‘./components/product/pcate/pcate.component’; import { PlistComponent } from ‘./components/product/plist/plist.component’;
const routes: Routes = [ {path:’home’,component:HomeComponent, children:[ {path:’welcome’,component:WelcomeComponent}, {path:’setting’,component:SettingComponent}, {path:’‘,redirectTo:’welcome’}//默认跳转到welcome ] }, {path:’product’,component:ProductComponent, children:[ {path:’pcate’,component:PcateComponent}, {path:’plist’,component:PlistComponent}, {path:’‘,redirectTo:’pcate’}//默认跳转到Pcate ]
}, {path:’**’,redirectTo:’home’}////默认跳转到home ];
@NgModule({ imports: [RouterModule.forRoot(routes)], exports: [RouterModule] }) export class AppRoutingModule { }
2. app.module.ts引入并配置所有组件,这一步一般创建时就会默认引入```typescriptimport { NgModule } from '@angular/core';import { BrowserModule } from '@angular/platform-browser';import { AppRoutingModule } from './app-routing.module';import { AppComponent } from './app.component';import { HomeComponent } from './components/home/home.component';import { ProductComponent } from './components/product/product.component';import { WelcomeComponent } from './components/home/welcome/welcome.component';import { SettingComponent } from './components/home/setting/setting.component';import { PcateComponent } from './components/product/pcate/pcate.component';import { PlistComponent } from './components/product/plist/plist.component';@NgModule({declarations: [AppComponent,HomeComponent,ProductComponent,WelcomeComponent,SettingComponent,PcateComponent,PlistComponent],imports: [BrowserModule,AppRoutingModule],providers: [],bootstrap: [AppComponent]})export class AppModule { }
全局css设置,形成图中的效果 ```css .content{ width: 100%; height: 500px; display: flex; .left{ width: 200px; border-right:5px solid #eee; height: 500px;
} .right{ flex:1px;
}
}
4. 根组件引入router-outlet,使用routerLink跳转到指定组件页面(home页面或者product页面)```html<header class="header"><a [routerLink]="['/home']">首页</a><a [routerLink]="['/product']">商品</a></header><router-outlet></router-outlet>
在home组件引入router-outlet,使用routerLink跳转到指定组件页面(welcome页面或者setting页面),product组件同理
<div class="content"><div class="left"><br><br><br><a [routerLink]="[ '/home/welcome' ]">欢迎首页</a><br><br><br><a [routerLink]="[ '/home/setting' ]">系统设置</a></div><div class="right"><router-outlet></router-outlet></div></div>
*/

若有收获,就点个赞吧
0 人点赞
