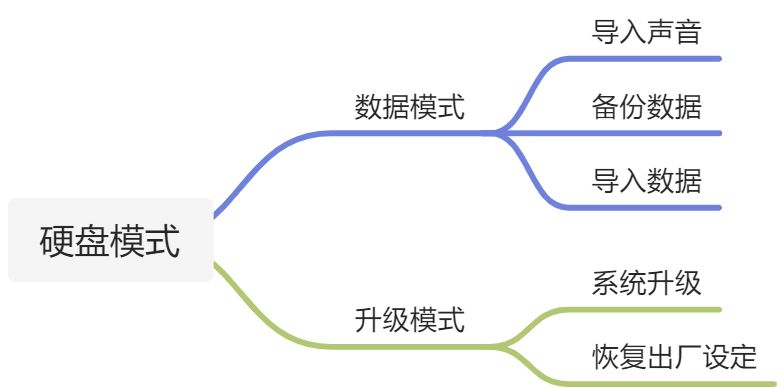
数据模式
用途?
数据模式可以让你备份和恢复数据文件,比如增加自定义内容,工程,增加音色等。
此外你还可以用目录模式来设置MIDI和DMX。
进入目录模式(备份和导入数据)
- 按住轨道按钮的的同时开机,这时候所以的LED显示为绿色
- 插上USB,连接电脑,此时会显示出一个OP-Z磁盘
- 现在就可以读写数据文件啦!(记得时长备份!)
- 完毕后记得安全退出磁盘
- 等待机器同步内容,并重新启动

注意:
- 一定要先进入目录模式,灯光开启后再连接电脑
- 一定要安全退出磁盘
- 你也可以通过点击播放按钮,退出目录模式
- 如果有任何被设备读取拒绝的文件,当你重新连接电脑时,会储存在rejected文件夹中
| 文件夹 | 添加 | 修改 | 删除 | 备注 |
|---|---|---|---|---|
| projects | V | V | V | 10个工程,可以自己备份及恢复,默认文件名不可更改,删除后会自动新建空白工程 |
| sample packs | V | V | V | 可以导入采样(格式为OP-1.aif),鼓,合成器以及OP-1导出的采样。 自己创建的话需要用到OP-1 drum utility软件或从op1.fun网站来下载 |
| bounces | X | X | V | 至多保存5个 |
| config | X | V | X | |
| MIDI | X | V | X | 使用midi.json文件来自定义MIDI设定 |
| DMX | X | V | X | 详情参考“如何使用DMX” |
采样包
在samplepacks文件夹中,对应8种乐器,每种乐器类里有10音色文件夹,可以找空文件夹放入新的采样文件或替换原有音色文件。
备注:
- 文件夹内只能有一个文件,多余的会被拒绝。
- 如果有相同的文件在不同的文件夹中,不会重复计算文件数据,会以副本的形式节约空间占用(用~标注的重复文件,大小为0)。
- 总共也有24MB空间,省着用吧。
OP-1 drum utility软件
OP1DrumUtilityPC_101.zipOP1DrumUtilityOSX_103.zip
(未处理)MIDI设置
------------------------------------------------------------------------| MIDI |------------------------------------------------------------------------修改midi.json的文件参数+--------------------------------------------------------------+| SETTING | DESCRIPTION |+--------------------------------------------------------------+| channel_one_to_active | any incoming midi on channel on is || | send to the currently active track |+--------------------------------------------------------------+| incoming_midi | enable incoming midi |+--------------------------------------------------------------+| outgoing_midi | enable outgoing midi |+--------------------------------------------------------------+| timing_clock_in | enable incoming midi clock |+--------------------------------------------------------------+| timing_clock_out | enable outgoing midi clock |+--------------------------------------------------------------+| enable_program_change | enable program change in/out |+--------------------------------------------------------------+| alt_program_change | alternative PC format, see manual |+--------------------------------------------------------------+| midi_echo | echo incoming midi back on same port |+--------------------------------------------------------------+| track_enable | enable midi per track |+--------------------------------------------------------------+| track_channels | set outgoing channel per track |+--------------------------------------------------------------+| parameter_cc_out | set outgoing cc value per parameter |+--------------------------------------------------------------+
(未处理)DMX设置
OP-Z can transform sequencer data to DMX channel data and send it outusing a USB DMX interface. use the dmx.json file to configure theoutgoing channel data to correspond to your DMX fixture setup.the supported channel types are:+-----------------+-----------+--------------------------------------+| CHANNEL | RANGE | DESC |+-----------------+-----------+--------------------------------------+| red | 0 - 255 | red color |+-----------------+-----------+--------------------------------------+| green | 0 - 255 | green color |+-----------------+-----------+--------------------------------------+| blue | 0 - 255 | blue color |+-----------------+-----------+--------------------------------------+| white | 0 - 255 | white color |+-----------------+-----------+--------------------------------------+| color | 0 - 255 | color wheel |+-----------------+-----------+--------------------------------------+| intensity | 0 - 255 | intensity / dimmer |+-----------------+-----------+--------------------------------------+| fog | 0, 255 | triggered by animation 14 |+-----------------+-----------+--------------------------------------+| knob1 | 0 - 255 | green knob (page 1) |+-----------------+-----------+--------------------------------------+| knob2 | 0 - 255 | blue knob (page 1) |+-----------------+-----------+--------------------------------------+| knob3 | 0 - 255 | yellow knob (page 1) |+-----------------+-----------+--------------------------------------+| knob4 | 0 - 255 | red knob (page 1) |+-----------------+-----------+--------------------------------------+| knob5 | 0 - 255 | green knob (page 2) |+-----------------+-----------+--------------------------------------+| knob6 | 0 - 255 | blue knob (page 2) |+-----------------+-----------+--------------------------------------+| knob7 | 0 - 255 | yellow knob (page 2) |+-----------------+-----------+--------------------------------------+| knob8 | 0 - 255 | red knob (page 2) |+-----------------+-----------+--------------------------------------+| 0 - 255 | 0 - 255 | custom fixed value |+-----------------+-----------+--------------------------------------+| on | 255 | always on |+-----------------+-----------+--------------------------------------+| off | 0 | always off |+-----------------+-----------+--------------------------------------+------------------------------------------------------------------------| fixture profiles |------------------------------------------------------------------------the first block of the config file ("profiles"), is where you define yourfixture profiles. give your profile a unique name and specify the channelsthat corresponds to the selected channel mode on your fixture.------------------------------------------------------------------------| fixture configuration |------------------------------------------------------------------------the second block ("config") of the config file is where you assign a profileto each of the 16 fixtures. OP-Z supports up to 16 fixtures. each of themcorresponds to a LED on the DMX preview on your OP-Z. assign a fixture to anindex, make sure the name matches the name of your fixture profile.___ ______ ______ ______ ______ ______ ______ ______ ______ _____)(__ __)(__ __)(__ __)(__ __)(__ __)(__ __)(__ __)(__ __)(__(______)(______)(______)(______)(______)(______)(______)(______)(______)
导入声音
备份目录
系统升级
- 按住屏幕按钮的同时开机,进入升级模式
- 连接电脑,把最新固件拖入OP-Z磁盘(根文件夹)
- 弹出OP-Z磁盘
- 等待更新完成,期间会看到灯光生长,和侧边绿色闪烁
- 当四个 LED 为绿色时,升级完成,设备自动重启
- 完成

注意:
- 请安全弹出OP-Z
- 升级期间不要关闭电源
- 附加模块更新和OP-Z系统更新不可同时升级。
- 如果单元显示四个红色 LED,则表示升级失败。重新启动您的设备并检查 upgrade.log 文件是否有错误。重新执行一遍升级步骤,确保仔细遵循每一步,最终肯定可以升级完成。
固件
21.06.18更新包
z_firmware_1_2_40.rar
恢复出厂设定
- 按住屏幕按钮的同时开机,进入升级模式
- 按住屏幕按钮和停止按钮几秒钟,直到看到灯光进度条生长完成
- 当你看到闪烁的LED和4个绿色转盘灯,则显示完成
- 关闭设备
- 完成

注意:
用户数据将被清空,请提前备份

若有收获,就点个赞吧
0 人点赞
