1. webpack配置基础
1.1 使用PostCSS自动补全浏览器前缀
- 安装postcss-loader
npm i -D postcss-loader
- 安装需要的插件
npm i -D autoprefixer
- 配置postcss-loader
const path = require('path')module.exports = {entry: './src/index.js',output: {filename: 'main.js',path: path.resolve(__dirname, 'dist')},module: {rules: [{test: /\.css$/,use: ['style-loader',{loader: 'css-loader',options: {importLoaders: 1}},'postcss-loader']},{test: /\.less$/,use: ['style-loader','css-loader','postcss-loader','less-loader']}]}}//打包css规则{test: /\.css$/,/*css-loader:解析css文件中的@import依赖关系style-loader:将webpack处理之后的css内容插入到HTML的HEAD标签里postcss-loader:放在最后面,最早执行*/use: [ 'style-loader', 'css-loader','postcss-loader' ]}//打包less的规则{test: /\.less$/,use: [{loader: "style-loader" // creates style nodes from JS strings,}, {loader: "css-loader" // translates CSS into CommonJS}, {loader: "less-loader" // compiles Less to CSS},{loader:'postcss-loader'}]},//打包scss规则{test: /\.scss$/,use: [{loader: "style-loader" // 将 JS 字符串生成为 style 节点}, {loader: "css-loader" // 将 CSS 转化成 CommonJS 模块}, {loader: "sass-loader" // 将 Sass 编译成 CSS},{loader:'postcss-loader'}]}"devDependencies": {"autoprefixer": "^10.3.1","css-loader": "^6.2.0","less": "^4.1.1","less-loader": "^10.0.1","postcss": "^8.3.6","postcss-cli": "^8.3.1","postcss-loader": "^6.1.1","postcss-preset-env": "^6.7.0","style-loader": "^3.2.1","webpack": "^5.47.1","webpack-cli": "^4.7.2""browserslist": {"development": ["last 1 chrome version","last 1 firefox version","last 1 safari version"],"production": ["ie > 6",">1%","not dead","not op_mini all"]}}
1.2 创建postcss-loader配置文件
- 在配置文件中配置autoprefixer
//postcss.config.jsmodule.exports = {plugins: {"autoprefixer": {"overrideBrowserslist": ["ie >= 8", // 兼容IE7以上浏览器"Firefox >= 3.5", // 兼容火狐版本号大于3.5浏览器"chrome >= 35", // 兼容谷歌版本号大于35浏览器,"opera >= 11.5", // 兼容欧朋版本号大于11.5浏览器]}}};
rules: [{test: /\.css$/,use: [// 'style-loader', \// 取代style-loader,作用:提取js中的css为单独文件MiniCssExtractPlugin.loader,'css-loader',// // 将less文件转为css文件// 'less-loader',/*** 兼容性处理* postcss:postcss-loader和postcss-preset-env* 识别对应的环境加载对应的配置* 该插件帮postcss找到package.json中的browserlist里面的配置,通过配置加载指定的css兼容性样式* "browserslist":{* // 默认生产环境"development": ["last 1 chrome version", // 兼容最近的一个chrome版本"last 1 firefox version","last 1 safari version"],"production":[">0.2%","not dead", // 不要已经丢弃的浏览器"not op_mini all" 不要所有的欧朋浏览器]}*/{loader: 'postcss-loader',options: {// webpack4配置// ident: 'postcss',// plugins: () => [// // postcss插件// require('postcss-preset-env')()// ]//webpack5postcssOptions: {plugins: [require('postcss-preset-env')(),]}}}]},]
1.3 使用PostCSS自动将px转换成rem
npm install postcss postcss-pxtorem --save-dev
module.exports = {plugins: {'postcss-pxtorem': {rootValue: 37.5,propList: ['*']},}}
1.4 .browserslistrc 配置目标浏览器和nodejs版本在不同的前端工具
> 0.01%last 2 versionnot dead"browserslist": ["> 1%","last 2 versions","not ie <= 8"]
1.5 file-loader模式打包图片类型
module.exports = {module: {rules: [{test: /\.(png|svg|gif|jpe?g)$/,use: [{loader: 'file-loader',options: {name: 'img/[name].[hash:6].[ext]',// outputPath: 'img'}}]}]}]}}/*** [ext]: 扩展名* [name]: 文件名* [hash]: 文件内容* [contentHash]:* [hash:<length>]* [path]:*/
- 生成文件 bd62c377ad80f89061ea5ad8829df35b.png (默认的文件名为 [hash].[ext]),输出到输出目录并返回 public URL。
- [ext]:String,默认值为 file.extname,表示资源扩展名;
- [name]:String,默认值为 file.basename,表示资源的基本名称;
- [path]:String,默认值为 file.dirname,表示资源相对于 context 的路径;
1.6 url-loaderurl-loader可以设置图片大小限制(公司配置模式)
- 公司配置模式 webpack4版本
{test: /\.(png|jpe?g|gif|svg)(\?.*)?$/,loader: 'url-loader',exclude: [resolve('src/icons')],options: {limit: 10000,name: utils.assetsPath('img/[name].[hash:7].[ext]')}},{test: /\.(mp4|webm|ogg|mp3|wav|flac|aac)(\?.*)?$/,loader: 'url-loader',options: {limit: 10000,name: utils.assetsPath('media/[name].[hash:7].[ext]')}},
// 判断生产环境不同exports.assetsPath = function(_path) {const assetsSubDirectory =process.env.NODE_ENV === 'production'? config.build.assetsSubDirectory: config.dev.assetsSubDirectoryreturn path.posix.join(assetsSubDirectory, _path)}
- 机构配置模式 webpack5版本
module.exports = {module: {rules: [{test: /\.(png|jpg|gif)$/i,type: 'asset',parser: {dataurlCondition: {maxSize: 8192}}},],},};
- CSDN老哥配置
在配置项内加入 publicPath 属性,设置为部署时的绝对路径
比如所 以后你的页面 会通过如下url方式让用户访问,所有前端文件都放置于
http://localhost:63342/url-loader-test/dist/
那么pubilcPath的 值就应该是 '/url-loader-test/dist/',也就是你的部署接口地址。
{test: /\.(png|jpe?g|gif|svg)(\?.*)?$/,loader: 'url-loader',options: {limit: 10000,name: 'img/[name].[hash:7].[ext]',publicPath:"/url-loader-test/dist/" //该地址不是唯一的,根据你的代码实际路由地址进行修改}},
- webpack5 版本各种类型匹配
module.exports = {module: {rules: [{test: /\.png$/i,use: 'asset/resource'},{test: /\.ico$/i,use: 'asset/inline'},{test: /\.text$/i,use: 'asset/source'},],},};
1.7 配置SVG图片
npm i -D svg-sprite-loader
{test: /\.svg$/,loader: 'svg-sprite-loader',include: [resolve('src/icons')],options: {symbolId: 'icon-[name]'}},{test: /\.(png|jpe?g|gif|svg)(\?.*)?$/,loader: 'url-loader',options: {limit: 10000,name: utils.assetsPath('img/[name].[hash:7].[ext]')},exclude: [resolve('src/icons')]},
注意 url-loader 中要将 icons 文件夹排除, 不让 url-loader 处理该文件夹
1.8 打包阿里字体图标
- 在webpack5之前是直接通过url-loader,file-loader来处理,webpack5后就不用了。
一般的操作都是将字体文件复制到build下面。
也是通过assets module type处理
MP3 MP4文件也是一样这样处理即可
{test: /\.(ttf|woff2?)$/,type: 'asset/resource',generator: {filename: 'font/[name].[hash:3][ext]'}}
1.9 打包其他资源 asset module type资源类型
asset/resource 发送一个单独的文件并导出URL,替代file-loader
asset/inline 导出一个资源的data URL,替代url-loader
asset/source 到处资源的源代码,之前通过使用raw-loader实现。
asset在导出一个data URL和发送一个单独的文件之间做选择,之前通过url-loader+limit属性实现。
- 在每一个type值后面配置geneator属性,生成的意识,里面是个对象,配置下filename即可
asset/resource{test: /\.(png|svg|gif|jpe?g)$/,type: ' asset/resource',// 输出的文件目录地址generator: {filename: "img/[name].[hash:4][ext]"},parser: {dataUrlCondition: {maxSize: 30 * 1024}}},
- asset/inline,同url-loader 转64,因为不生成文件,所以没有generator属性
{test: /\.(png|svg|gif|jpe?g)$/,type: 'asset/inline',
- 要实现limit的效果,就得用第四个了asset
- asset类型又多一个属性,parser,表示解析,是个对象,里面有个固定的属性,叫dataUrlCondition,顾名思义,data转成url的条件,也就是转成bas64的条件,maxSize是就相当于Limit了,当大于100kb才不转换,所以
{test: /\.(png|svg|gif|jpe?g)$/,type: ' asset/resource',// 生成目录地址generator: {filename: "img/[name].[hash:4][ext]"},// 生成的文件大小parser: {dataUrlCondition: {maxSize: 30 * 1024}}},
2. webpack之Plugin(插件)
2.1 clean-webpack-plugin
cnpm install clean-webpack-plugin -D
- 作用:打包成功并且帮我们删除了原来的build文件了。
const path = require('path')const { CleanWebpackPlugin } = require('clean-webpack-plugin')module.exports = {entry: './src/index.js',output: {filename: 'main.js',path: path.resolve(__dirname, 'dist'),// assetModuleFilename: "img/[name].[hash:4][ext]"},module: {},plugins: [new CleanWebpackPlugin()]}/*** class MyPlugin{* constructor(){}* apply()* }*/
2.2 HtmlWebpackPlugin
- 顾名思义就是对html文件的处理,因为我们之前打包,html是没有打包到build的。生成html有两种方式,一种是使用默认的,他自己的ejs模板,一种是我们给他一个ejs模板试试这插件的威力,直接把Index.html除掉.
const path = require('path')const { CleanWebpackPlugin } = require('clean-webpack-plugin')const HtmlWebpackPlugin = require('html-webpack-plugin')const { DefinePlugin } = require('webpack')module.exports = {entry: './src/index.js',output: {filename: 'main.js',path: path.resolve(__dirname, 'dist'),// assetModuleFilename: "img/[name].[hash:4][ext]"},module: {rules: []},plugins: [new CleanWebpackPlugin(),new HtmlWebpackPlugin({title: 'html-webpack-plugin',template: './public/index.html'}),new DefinePlugin({BASE_URL: '"./"'})]}
- DefinePlugin 允许创建一个在编译时可以配置的全局常量。这可能会对开发模式和发布模式的构建允许不同的行为非常有用。如果在开发构建中,而不在发布构建中执行日志记录,则可以使用全局常量来决定是否记录日志。这就是 DefinePlugin 的用处,设置它,就可以忘记开发和发布构建的规则。
new webpack.DefinePlugin({'process.env': require('../config/dev.env')}),module.exports = {NODE_ENV: '"development"',ENV_CONFIG: '"dev"',BASE_API: '"/apis"'}
2.3 copyWebpackPlugin
cnpm install copy-webpack-plugin -D
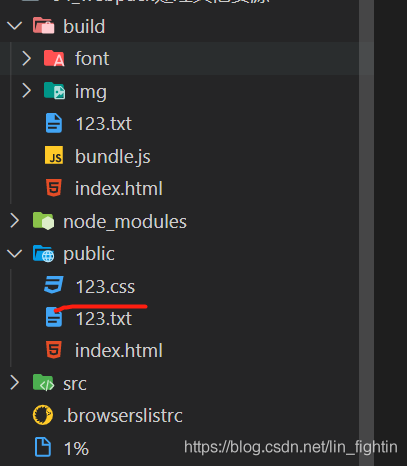
- 可以看到我们new的时候可以传参数过去,第一个就是patterns,匹配的意思,里面的from表示会复制的文件夹。而to可以忽略,默认会使用output的path的,最后就是我们要忽略的文件了,比如Index.html是要生成的,不是我们传的,所以使用globOptions里面的ignore属性,而且忽略要注意用法,加**/才表示是在public里面忽略。看看效果
- 可以看到Css文件被忽略了,index.html不是复制过来的,是生成的。
这样看上去有点别扭,因为我们生成的js文件,或者复制过去的css文件,icon文件想放在相对应的文件夹,如js文件夹, css文件夹等等。
我们来设置budle.js放到Js文件里去,
const CopyWebpackPlugin = require('copy-webpack-plugin')module.exports = {plugins: [new CleanWebpackPlugin(),new HtmlWebpackPlugin({title: 'copyWebpackPlugin',template: './public/index.html'}),new DefinePlugin({BASE_URL: '"./"'}),new CopyWebpackPlugin({ // 这个插件有很多参数patterns: [ // 匹配{from: 'public',globOptions: { // 全局设置的内容,index.html自动生成,所以我们不用复制过去ignore: ['**/index.html','**/123.css'] //忽略文件 “**代表忽略的目录是在public下面}}]})]}
3.0 babel处理兼容
- babel.config.js
module.exports = {presets: [['@babel/preset-env',{// false: 不对当前的JS处理做 polyfill 的填充// usage: 依据用户源代码当中所使用到的新语法进行填充// entry: 依据我们当前筛选出来的浏览器决定填充什么useBuiltIns: 'entry',corejs: 3}]]}
4.0 webpack-server配置
4.1 追述代码出错位置 开发模式
对于本指南,我们将使用 inline-source-map 选项,这有助于解释说明示例意图(此配置仅用于示例,不要用于生产环境):
const path = require('path');const HtmlWebpackPlugin = require('html-webpack-plugin');module.exports = {mode: 'development',entry: {index: './src/index.js',print: './src/print.js',},devtool: 'inline-source-map',plugins: [new HtmlWebpackPlugin({title: 'Development',}),],output: {filename: '[name].bundle.js',path: path.resolve(__dirname, 'dist'),clean: true,},};
Uncaught ReferenceError: cosnole is not definedat HTMLButtonElement.printMe (print.js:2)
我们可以看到,此错误包含有发生错误的文件(print.js)和行号(2)的引用。这是非常有帮助的,因为现在我们可以确切地知道,所要解决问题的位置。
4.2 webpack-dev-middleware
- webpack-dev-middleware,作用就是,生成一个与webpack的compiler绑定的中间件,然后在express启动的服务app中调用这个中间件。
- 通过watch mode,监听资源的变更,然后自动打包(如何实现,见下文详解);快速编译,走内存;返回中间件,支持express的use格式。
webpack-dev-middleware是一个封装器(wrapper),它可以把 webpack 处理过的文件发送到一个 server。webpack-dev-server在内部使用了它,然而它也可以作为一个单独的 package 来使用,以便根据需求进行更多自定义设置。下面是一个 webpack-dev-middleware 配合 express server 的示例。
npm install --save-dev express webpack-dev-middleware
- webpack.conf.js
- inline-source-map 有助于追踪错误和警告在源代码中的原始位置,如果不添加,则堆栈会简单的指向bundle.js,显然不利于我们开发过程中修改代码。
devtool: 'inline-source-map',
const path = require('path');const HtmlWebpackPlugin = require('html-webpack-plugin');module.exports = {mode: 'development',entry: {index: './src/index.js',print: './src/print.js',},devtool: 'inline-source-map',devServer: {static: './dist',},plugins: [new HtmlWebpackPlugin({title: 'Development',}),],output: {filename: '[name].bundle.js',path: path.resolve(__dirname, 'dist'),clean: true,publicPath: '/', //我们将会在 server 脚本使用},};
- 我们将会在 server 脚本使用
publicPath,以确保文件资源能够正确地 serve 在http://localhost:3000下,稍后我们会指定 port number(端口号)。接下来是设置自定义expressserver:
webpack-demo|- package.json|- webpack.config.js|- server.js // 自定义配置热更新服务器|- /dist|- /src|- index.js|- print.js|- /node_modules
server.js
const express = require('express');const webpack = require('webpack');const webpackDevMiddleware = require('webpack-dev-middleware');const app = express();const config = require('./webpack.config.js');const compiler = webpack(config);// 告知 express 使用 webpack-dev-middleware,// 以及将 webpack.config.js 配置文件作为基础配置。app.use(webpackDevMiddleware(compiler, {publicPath: config.output.publicPath,}));// 将文件 serve 到 port 3000。app.listen(3000, function () {console.log('Example app listening on port 3000!\n');});
现在,添加一个 npm script,以使我们更方便地运行 server:
package.json
{"scripts": {"test": "echo \"Error: no test specified\" && exit 1","watch": "webpack --watch","start": "webpack serve --open","server": "node server.js","build": "webpack"},}
5.0 Vuejs配置webpack环境
5.1 公司配置模式 webpack4版本
const VueLoaderPlugin = require('vue-loader/lib/plugin')module.exports = {devServer: {clientLogLevel: 'warning',historyApiFallback: true,hot: true,compress: true,host: HOST || config.dev.host,port: PORT || config.dev.port,open: config.dev.autoOpenBrowser,overlay: config.dev.errorOverlay? { warnings: false, errors: true }: false,publicPath: config.dev.assetsPublicPath,proxy: config.dev.proxyTable, // 代理环境quiet: true, // necessary for FriendlyErrorsPluginwatchOptions: {poll: config.dev.poll}},plugins: [new VueLoaderPlugin()]}
5.2 devServer配置机构
devServer: {hot: true,hotOnly: true,port: 4000,open: false,compress: true,historyApiFallback: true,proxy: {// /api/users// http://localhost:4000/api/users// https://api.github.com/info/users// /api/users---> 返回'/api': {target: 'https://api.github.com',pathRewrite: { "^/api": "" },changeOrigin: true}}},
5.3 resolve模块配置
resolve: {extensions: [".js", ".json", '.ts', '.jsx', '.vue'],alias: {//配置解析模块的路径别名:有点简写路径,缺点就是没有路径的提示'@': path.resolve(__dirname, 'src')}},
5.4 devtool配置的模式
| 模式 | 解释 |
|---|---|
| eval | 每个module会封装到 eval 里包裹起来执行,并且会在末尾追加注释 //@ sourceURL |
| . | |
| source-map | 生成一个SourceMap文件. |
| hidden-source-map | 和 source-map 一样,但不会在 bundle 末尾追加注释. |
| inline-source-map | 生成一个 DataUrl 形式的 SourceMap 文件. |
| eval-source-map | 每个module会通过eval()来执行,并且生成一个DataUrl形式的SourceMap. |
| cheap-source-map | 生成一个没有列信息(column-mappings)的SourceMaps文件,不包含loader的 sourcemap(譬如 babel 的 sourcemap) |
| cheap-module-source-map | 生成一个没有列信息(column-mappings)的SourceMaps文件,同时 loader 的 sourcemap 也被简化为只包含对应行的。 |
5.4.1 eval模式
webpackJsonp([1],[function(module,exports,__webpack_require__){eval(...//# sourceURL=webpack:///./src/js/index.js?')},function(module,exports,__webpack_require__){eval(...//# sourceURL=webpack:///./src/static/css/app.less?./~/.npminstall/css-loader/0.23.1/css-loader!./~/.npminstall/postcss-loader/1.1.1/postcss-loader!./~/.npminstall/less-loader/2.2.3/less-loader')},function(module,exports,__webpack_require__){eval(...//# sourceURL=webpack:///./src/tmpl/appTemplate.tpl?")},...])
- eval 模式会把每个 module 封装到 eval 里包裹起来执行,并且会在末尾追加注释。
5.4.2 source-map模式
webpackJsonp([1],[function(e,t,i){...},function(e,t,i){...},function(e,t,i){...},function(e,t,i){...},...])//# sourceMappingURL=index.js.map
- 与此同时,你会发现你的 output 目录下多了一个 index.js.map 文件。
{"version":3,"sources":["webpack:///js/index.js","webpack:///./src/js/index.js","webpack:///./~/.npminstall/css-loader/0.23.1/css-loader/lib/css-base.js",...],"names":["webpackJsonp","module","exports"...],"mappings":"AAAAA,cAAc,IAER,SAASC...","file":"js/index.js","sourcesContent":[...],"sourceRoot":""}
- 5.4.3 hidden-source-map

