CSS 的主要优势之一就是可以为同类型的所有元素应用一组样式,这是通过选择符实现的。
样式基本规则
元素选择符
元素选择符通常是 HTML 元素。而在 XML 中,什么都可以作为选择符。
html { color: black; }h1 {color: gray;}h2 {color: sliver;}
声明和关键字
- 声明块包含一个或多个声明
- 声明形式:
属性: 值;。冒号之后可以有零或多个空格 - “值”几乎都是一个关键字或以空格分隔的多个关键字
- 声明的属性和值无效,导致整个声明无效
/I* 无效声明 */brain-size: 2cm; /* 属性无效 */color: ultraviolet; /* 值无效 */
/* 用空格分隔的多个关键字 */p {font: medium Helvetica;}
当某个属性值是由多个关键字组成的,关键字之间通常以空格分隔。在 CSS 2.1 中有个特例,就是 font 属性,其值有一处要使用斜线(/)把两个关键字分开。
h2 {font: large/150% sans-serif;}
此外,其他在属性值中可使用斜线的属性包括(不完整):
- background
- border-images
- border-raduis
- grid
- grid-area
- grid-column
- grid-row
- grid-template
- mask-border
举例子:
.box {box-shadow: inset -1px -1px white,3px 3px 3px rgba(0, 0, 0, .2);background-image: url(myimage.png),line-gradient(180deg, #fff 0%, #000 100%);transform: translate(100px, 200px);}a:hover {transition: color, background-color 200ms ease-in 50ms;}
群组
接下里学习:如何把同一个样式应用到多元素上;如何同时为一个或多个元素应用多个样式。
群组选择符
如何把同一个样式应用到多元素上呢?就要使用群组选择符了——选择符部分,用逗号来分隔需要选择的多个元素。
h2, p {color: gray;}/* 等效于 */h2 {color: gray;}p {color: gray;}
通用选择符
通用选择符(universal selector)用星号(*)标识,匹配所有元素,是 CSS2 引入的。
* {color: red;}
群组声明
一个声明可以中可以包含多个选择符,同时,也可以有多个声明。也就是用 {} 括起来的声明块。
h1 {font: 18px Helvetica; color: purple; background: blue;}/* 等价于 */h1 {font: 18px Helvetica;}h1 {color: purple;}h1 {background: blue;}
二者结合
将群组选择符与群组声明结合起来使用。
h1, h2, h3, h4, h5, h6 {color: gray; background: white; padding: .5em;border: 1px solid black; font-family: Charcial, sanss-serif;}
在 IE8- 浏览器中使用新元素
在 IE9 之前的浏览器,无法选择 HTML5 规范中新加入的元素。因为浏览器在这些新元素出现之前就已存在,因此无法识别新的元素。
例如,IE8 不识别
document.createElement('main');
类和 ID 选择符
类和 ID 选择符能以一种独立于元素的方式赋予样式。
类选择符
在元素上使用 class 属性,在 CSS 中,类选择符句法是在 class 属性值之前加点号(.)。
<p class="warning">Lorem ipsum dolor sit amet, consectetur adipiscing elit, sed do eiusmod tempor incididunt ut labore et dolore magna aliqua.</p><style>.warning {font-weight: bold;}</style>
这里将 p 段落文字加粗。
同一个类名,为不同元素应用各自样式:
p.warning {font-weight: bold;}span.warning {font-style: italic;}
用类选择符定义通用样式,再用元素选择符,指定特定样式:
.warning {font-weight: bold;}span.warning {font-style: italic;}
多个类
根据 HTML 规范,class 属性值可以是多个词,词之间用空格分隔。这样就可以为元素同时应用多个类的样式了。
<p class="warning urgent">Lorem ipsum dolor sit amet, consectetur adipiscing elit, sed do eiusmod tempor incididunt ut labore et dolore magna aliqua.</p><style>.warning {font-weight: bold;}.urgent {font-style: italic;}.warning.urgent {background: sliver;}</style>
.warning.urgent 表示如果一个元素同时包含 warning 和 urgent 类名时使用样式。与之前两个类中单独声明的样式合在一起,结果就会呈现出一个银色背景、粗斜体文字显示的段落了。
ID 选择符
ID 选择符与类选择符类似,不过是以井号(#)开头的。
<p id="lead-para">Lorem ipsum dolor sit amet, consectetur adipiscing elit, sed do eiusmod tempor incididunt ut labore et dolore magna aliqua</p><style>#lead-para {font-weight: bold;}</style>
在每个文档中,id 值是唯一的。如果同时出现多个使用同一 id 值的元素,是无法预知会匹配这些元素中的哪一个。
使用类还是 ID 选择符?
- 元素个数:
- 类选择符可以赋予任意个元素。即同一个类名可以在多个元素的 class 属性值中使用。
- ID 选择符只能赋予一个元素。因为在一个 HTML 文档中,一个 ID 能且只能使用一次。
- 是否可串在一起:
- 类选择符能串在一起使用
- ID 选择符不能串在一起使用
- 权重
- ID 选择符的权重更高。
- 区分大小写
- 这一点,类选择符与 ID 选择符一样,都是区分大小写的。即 class=”warning’ 和 class=”Warning”、id=”para” 和 id=”Para” 是不同的。
属性选择符
类和 ID 选择符,选择的都是属性的值。为了扩展到其它的标记语言,CSS2 引入了属性选择符(attribute selector)。分四类:
- 简单属性选择符
- 精准属性值选择符
- 部分匹配属性值选择符
- 起始值属性值选择符
下面一一来介绍。
简单属性选择符
即选择具有某个属性的元素,属性包含在方括号([])中。
// 将所有具有 class 属性的 h1 标签的文本色设置为银色h1[class] {color: sliver;}
还可以基于多个属性选择。
// 将具有 href 和 title 属性的所有 a 标签文本设置为粗体显示a[href][title] {font-weight: bold;}
精准属性值选择符
进一步缩写范围,只选择特定属性值的元素。
a[href="http://www.w3.org"] {font-weight: bold;}
也可以基于属性值来选择元素。
a[href="http://www.w3.org"][title="W3C Home"] {font-size: 200%;}
注意,属性值选择符是区分大小写的,匹配元素要与其完全一致才能选中。大小写不一致,或者词序不一致,都不会选中。
部分匹配属性值选择符
我们还可以根据属性值的一部分来选择元素。CSS 为我们提供了多种方式,见下表。
| 方式 | 说明 |
|---|---|
| [foo|=”bar”] | 具有 foo 属性,且属性值以 bar 或 bar- 开头 |
| [foo~=”bar”] | 具有 foo 属性,且属性值中包含 bar 这个词(以空格分隔) |
| [foo*=”bar”] | 具有 foo 属性,且属性值中包含子串 bar |
| [foo^=”bar”] | 具有 foo 属性,且属性值以 bar 开头 |
| [foo$=”bar”] | 具有 foo 属性,且属性值以 bar 结尾 |
下面举例:
// 匹配属性值以 en 或 en- 开头的元素[land="en"] {color: white;}// 匹配以空格分隔的一组词中的一个p[class~="warning"] {font-weight: bold;}// 匹配属性值的子串span[class*="cloud"] {font-style: italic;}// 匹配以特定值开头的元素a[href^="https:"] {font-weight: bold;}// 匹配以特定值结束的元素a[href$=".pdf"] {font-weight: bold;}
忽略大小写标识符
之前有提到过,属性值匹配是区分大小写的,CSS Selector Level 4 为属性选择符引入了一个忽略大小写标识符 i,如此使用:
a[href=".PDF" i] {...}
上面讲到的所有属性选择符都可以使用这个标识符。
不过需要注意的是,i 标识符针对的是属性选择符中的值,而不包括 CSS 规则中的元素和属性本身。比如,在 XML 或 XHTML 中就不会生效。
<style>/* XML 下,元素和属性句法区分大小写,所以此样式不会被应用 */.planet[type*="rock" i] {font-weight: bold;}</style><div class="planet" TYPE="dusty rock">Mars</div>
不过,因为 HTML5 是不区分元素和属性大小写的,没有这方面的顾虑,不过还是鼓励都是用小写。
<style>/* HTML5 中,元素和属性句法不区分大小写,所以此样式会被应用 */.planet[type*="rock" i] {font-weight: bold;}</style><div class="planet" TYPE="dusty rock">Mars</div>
根据文档结构选择
在介绍更强大的选择符之前,先花点时间讨论文档结构。
理解父子关系
HTML 文档中的元素是一种层次结构。可用树状图来表示。
<html><head><base href="http://www.meerkat.web/"><title>Meerkat Central</title></head><body><h1>Meerkat <em>Central</em></h1><p>Welcome to Meerkat <em>Central</em>, the <strong>best meerkat web siteon <a href="inet.html">the <em>entire</em> Internet</a></strong>!</p><ul><li>We offer:<ul><li><strong>Detailed information</strong> on how to adopt a meerkat</li><li>Tips for living with a meerkat</li><li><em>Fun</em> things to do with a meerkat, including:<ol><li>Playing fetch</li><li>Digging for food</li><li>Hide and seek</li></ol></li></ul></li><li>...and so much more!</li></ul><p>Questions? <a href="mailto:suricate@meerkat.web">Contact us!</a></p></body></html>
上面的 HTML 结构,可用下面的树状图里来表示。
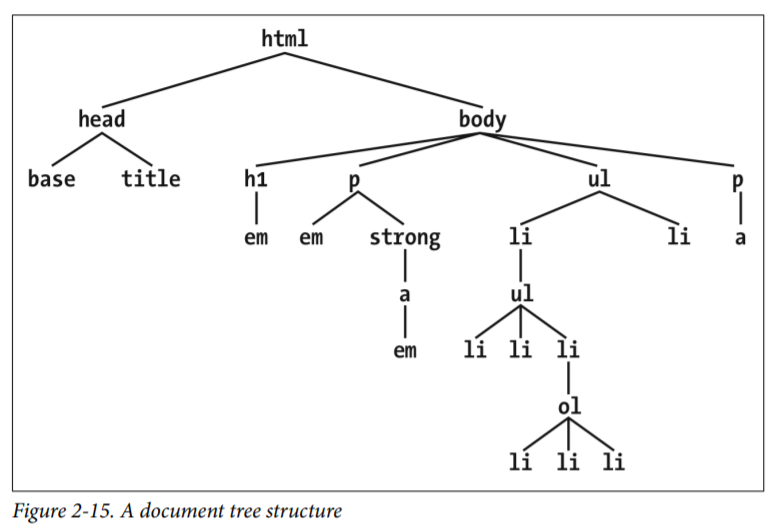
文档中的元素,要么是是一个元素的子元素,要么是一个元素的父元素,或者兼而有之。“父元素”和“子元素”是“祖辈元素”和“后代元素”的特例。对 HTML 文档来说,body 是浏览器中默认显示的所有元素的祖辈,html 元素被称为根元素(root element)。
后代选择符
后代选择符(descendant selector)也叫上下文选择符(contextual selector),使用空格( )作为连接符。
/* 将 h1 中所有 em 元素都设置文本色为灰色 */h1 em {color: gray;}
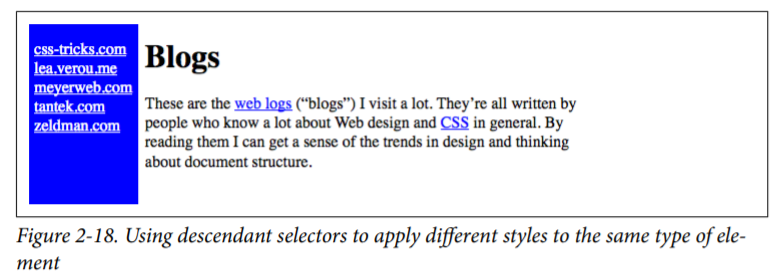
再一个例子。为相同类型的元素应用不同的样式。
.sidebar {background: blue;}main {background: white;}.sidebar a:link {color: white;}main a:link {color: blue;}
效果:
后代选择符对元素距离一无所知,是根据权重来应用样式的。
<style>div:not(.help) span {color: gray;}/* 1. 上下声明的权重一样,后者覆盖前者并没有因为 .aside 距离 span 更近,.help 距离 span 较远,就显示灰色,而是显示红色*/div.help span {color: red;}</style><div class="help"><div class="aside"><!-- 2. 这里的 <span> 文本最终显示为红色,可见,后代选择器对距离一无所知。-->This text contains <span>a span element</span> within.</div></div>
子元素选择符
子元素选择符使用大于号(>)连接符连接。
h1 > strong {color: red;}
与后代选择符不同的是,子元素选择符只会选择某个元素下的直接子元素。
紧邻同胞元素选择符
紧邻同胞元素选择符(adjacent-sibling selector)使用加号(+)连接符连接。
h1 + p {margin-top: 0;}
这个选择符的选择条件较为严苛,上述代码的意思是:将紧跟在 h1 元素之后的 p 元素的 margin-top 设置为 0。
注意,两个元素之间的文本不会影响紧邻同胞元素选择符起作用,因为文本节点不是元素节点。
<div><ol><li>List item 1</li><li>List item 1</li><li>List item 1</li></ol>This is some text that is part of the 'div'.<ul><li>A list item</li><li>Another list item</li><li>Yet another list item</li></ul></div>
这里,如果我使用 ol + ul {...},依然是为 ul 元素指定样式的。
连续后代同胞选择符
连续后代同胞选择符(general sibling selector)使用波浪号(~)连接符连接。
表示选择同属于某个父元素之下的某个元素之后的所有同胞元素。
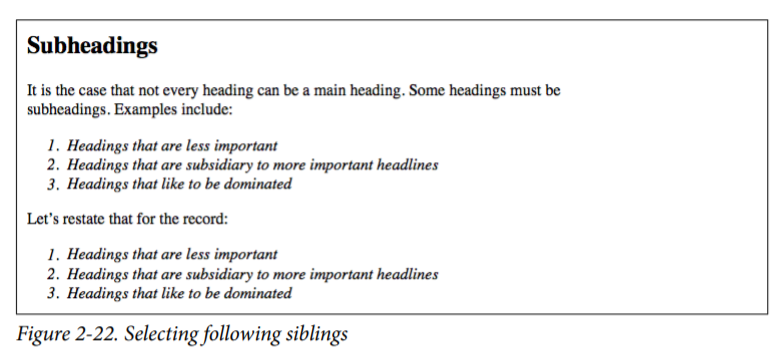
以 h2 ~ ol {font-style: italic}; 为例,HTML 结构如下:
<div><h2>Subheadings</h2><p>It is the case that not every heading can be a main heading. Some headingsmust be subheadings. Examples include:</p><ol><li>Headings that are less important</li><li>Headings that are subsidiary to more important headlines</li><li>Headings that like to be dominated</li></ol><p>Let's restate that for the record:</p><ol><li>Headings that are less important</li><li>Headings that are subsidiary to more important headlines</li><li>Headings that like to be dominated</li></ol></div>
最终,h2 之后的两个 ol 都会被选中。

若有收获,就点个赞吧
0 人点赞
