不论是用来 web 开发,还是用作其他的任务,都能利用到 Common Lisp 的优势:无与伦比的 REPL、错误处理系统、性能、构建可执行文件、稳定、线程、强类型等。可以这么说,定义一条新路由然后马上进行测试,不需要重启服务。也可以将函数的修改编译在同一时间进行(通常在 Slime 中是 C-c C-c)然后进行验证。反馈相当及时。还可以使用交互式的调试器:web 服务可以捕获异常并启动交互式调试器,或者在浏览器上打印 lisp 的回溯信息,又或者是现实 404 错误页面并将日志打印到标准输出上。构建可执行文件极大的简化了部署(比如说,和基于 npm 的应用相比的话),因为 lisp 只需要将可执行文件拷贝到服务器上并运行就好了。
本章将介绍一些成熟的 web 框架以及其他的通用库,以便对 web 应用进行开发。本章的目的不是说要有多么的详细,或者是说要取代上游的一些文档。所以说你们的反馈很重要。
概述
Hunchentoot 和 Clack 这两个库会经常用到
Hunchentoot 是
一个 web 服务,同时也是个构建动态网站的工具包。作为单独的 web 服务,Hunchentoot 能够实现 HTTP/1.1 分块(双向)、持久连接(keep-alive)和 SSL。提供了诸如自动会话处理(是否有 cookie)、日志记录、可自定义的异常处理以及简单访问客户机发送的 GET 和 POST 参数等功能。
Hunchentoot 是 Edi Weitz(“Common Lisp Recipes”、cl-ppcre 以及其他库的作者)开发出来的,这个库在使用情况中被证明很稳定。用 Hunchentoot 可以实现很多功能,但有时会比使用传统web 框架麻烦一些。例如,HTTP 方法发送路由有点复杂,需要写个函数来检查 :uri 参数,而这个参数在其他框架(如 Caveman)中是内置关键字。
Clack 是
Common Lisp 的 web 应用环境,灵感来源于 Python 的 WSGI 和 Ruby 的 Rack。
Clack 同样也是又另一个 lisper 大佬(E. Fukamachi)开发出来的,默认情况下,Clack 也是是用 Hunchentoot 作为服务,但由于其架构是可插入的,既可以使用其他的 web 服务,如异步处理的 Woo,Woo 是基于 libev 库中的事件循环开发的,或许是“所有编程语言中开发最开发最快的 Web 服务”吧。
本章也会介绍 Wookie,一个异步 HTTP 服务,以及其配套库 cl-async。在 Common Lisp 中,cl-async 是基于 libuv 开发的,用于非阻塞编程,而 libuv 是 Node.js 的后端库。
Clack 是近期才出现的,且文档较少,而 Hunchentoot 才是标准,所以本章重点介绍 Hunchentoot。当然,也欢迎其他人进行贡献。
Web 框架是基于 web 服务开发的,同时可以给常见 web 的开发提供工具,如模版系统、访问数据库、会话管理或者是构建 REST api。
一些 web 框架包含:
- Caveman,由 E. Fukamachi 开发。提供了即开即用的数据库管理、模版引擎(Djula),项目框架生成器、类似于 Flask 或 Sinatra 的路由系统、部署选项(mod_lisp 或 FastCGI)、对 Roswell 命令行的支持等
- Radiance,由 Shinmera
(Qtools、Portacle、lquery 等)开发,是个 web 应用环境,比一般的 web 框架更通用。它让我们能够开发网站和开发应用放到一起,从而简化了其整体部署。也有完整的文档、教程、模块、预编写应用 如 照片墙 或是 博客平台等。示例网站有https://shinmera.com/、reader.tymoon.eu和events.tymoon.eu. - Snooze,由 João Távora (Sly、Emacs’ Yasnippet、Eglot 等) 开发,
一个“围绕 REST 文本服务 设计的 url 路由”,与 Snooze 不同的是,在 Snooze 中,路由只是函数而 HTTP 条件只是 Lisp 的条件。 - cl-rest-server 用来开发 REST web API 的库。
APIs. 其特性有模式验证、日志记录、缓存、权限或身份认证、用 OpenAPI(Swagger)编写文档等。 - 最后是 Weblocks, 一个备受尊重的 Common Lisp web 框架,可以编写基于 ajax 动态 web应用,而不需要编写任何的 Javascript,也不需要编写转换为 JavaScript 的 Lisp。自 2017 年以来,经历了大量的重写和更新。这个在下面会有详细介绍。
如果需要 web 开发的库的完整列表,参见 awesome-cl
list#network-and-internet 和 Cliki。如果是需要静态页面生成器,参见 Coleslaw
安装
现在来安装需要用到的库吧:
(ql:quickload '("hunchentoot" "caveman" "spinneret" "djula"))
想要用 Weblocks 的话,可以去阅读它的文档。在编写本章时我们需要的 Weblocks 库还没有包含在 Quicklsip 中,
我们会先介绍将本地文件作为 web 页面,之后会讲解如何在 docker 镜像中运行服务。
简单的 webserver
提供本地文件
Hunchentoot
创建和启动 Web 服务如下:
(defvar *acceptor* (make-instance 'hunchentoot:easy-acceptor :port 4242))(hunchentoot:start *acceptor*)
上面代码中,创建了一个 easy-acceptor 的实例,其监听端口为 4242,然后启动这个实例。完成之后就可以访问 http://127.0.0.1:4242/了。访问该网站会看到个欢迎页面,同时在控制台会日志输出。
默认情况下,Hunchentoot 提供的文件的路径是其所在目录下的名为 www/ 的目录。因此,如果你要跳转到 easy-acceptor(Slime 中使用 M-.)源文件,那么就会跳转到 ~/quicklisp/dists/quicklisp/software/hunchentoot-v1.2.38/,在这个目录下,可以找到 root/ 文件夹。其中 root/ 文件夹中有:
errors/文件夹,里面存放404.html和500.html的错误模版img/文件夹index.html文件
要想使用其他的目录,需要给 easy-acceptor 一个 document-root 的选项。也可以设置这个属性的值:
(setf (hunchentoot:acceptor-document-root *acceptor*) #p"path/to/www")
首先创建个 index.html 文件,将这个文件放到当前目录(lisp repl 所处的路径)下的 www/index.html 位置:
<html><head><title>Hello!</title></head><body><h1>Hello local server!</h1><p>We just served our own files.</p></body></html>
然后在新的端口启动一个新的 acceptor:
(defvar *my-acceptor* (make-instance 'hunchentoot:easy-acceptor :port 4444:document-root #p"www/"))(hunchentoot:start *my-acceptor*)
访问http://127.0.0.1:4444/后就能看到差别。
注意,上面是在同一个 lisp 镜像中启动了另一个不同端口的 ceeptor。这就很酷了。
通过互联网访问 web 服务
Hunchentoot
有了 Hunchentoot,就什么都不用做了,可以直接从互联网访问 web 服务。
如果在 VPS 上执行下面语句:
(hunchentoot:start (make-instance 'hunchentoot:easy-acceptor :port 4242))
可以直接通过服务器 IP 进行访问。
停止服务命令为:(hunchentoot:stop *)。
路由
简单的路由
Hunchentoot
要将现有函数绑定到路由,需要创建“前缀调度”,然后将这个调度添加到 *dsipatch-table* 列表中:
(defun hello ()(format nil "Hello, it works!"))(push(hunchentoot:create-prefix-dispatcher "/hello.html" #'hello)hunchentoot:*dispatch-table*)
要在路由上使用正则,可以使用 create-regex-dispatcher,其中 url-as-regexp 可以是字符串、s表达式或是cl-ppcre scanner。
如果还没启动服务的话,创建个 acceptor 然后启动服务:
(defvar *server* (make-instance 'hunchentoot:easy-acceptor :port 4242))(hunchentoot:start *server*)
之后访问 http://localhost:4242/hello.html.
在 REPL 中会看到下面的日志输出:
127.0.0.1 - [2018-10-27 23:50:09] "get / http/1.1" 200 393 "-" "Mozilla/5.0 (X11; Linux x86_64; rv:58.0) Gecko/20100101 Firefox/58.0"127.0.0.1 - [2018-10-27 23:50:10] "get /img/made-with-lisp-logo.jpg http/1.1" 200 12583 "http://localhost:4242/" "Mozilla/5.0 (X11; Linux x86_64; rv:58.0) Gecko/20100101 Firefox/58.0"127.0.0.1 - [2018-10-27 23:50:10] "get /favicon.ico http/1.1" 200 1406 "-" "Mozilla/5.0 (X11; Linux x86_64; rv:58.0) Gecko/20100101 Firefox/58.0"127.0.0.1 - [2018-10-27 23:50:19] "get /hello.html http/1.1" 200 20 "-" "Mozilla/5.0 (X11; Linux x86_64; rv:58.0) Gecko/20100101 Firefox/58.0"
define-easy-handler 可以同时创建函数并将其绑定到 uri 上。
它的格式如下:
define-easy-handler (function-name :uri <uri> …) (lambda list parameters)
其中 <uri> 既可以是字符串也可以是函数
示例:
(hunchentoot:define-easy-handler (say-yo :uri "/yo") (name)(setf (hunchentoot:content-type*) "text/plain")(format nil "Hey~@[ ~A~]!" name))
访问 p://localhost:4242/yo 之后在访问加了参数的 url:http://localhost:4242/yo?name=Alice.
等一下,我们并没有明确的告诉 Hunchentoot 第一个端口为 4242 的 acceptor 添加这条路由。再来试试另一个 acceptor(上一节中的),这次是监听端口 4444 的:http://localhost:4444/yo?name=Bob,一样有效。实际上, define-easy-handler 有一个 acceptor-names 的参数:
acceptor-names (which is evaluated) can be a list of symbols which means that the handler will only be returned by DISPATCH-EASY-HANDLERS in acceptors which have one of these names (see ACCEPTOR-NAME). acceptor-names can also be the symbol T which means that the handler will be returned by DISPATCH-EASY-HANDLERS in every acceptor.
因此,define-easy-handler 有以下的格式:
define-easy-handler (function-name &key uri acceptor-names default-request-type) (lambda list parameters)
还有个参数叫 default-parameter-type,这个等下会用来获取 url 的参数。
对于 lambda 列表也有一些关键点需要了解。这个自行参阅文档。
Easy-routes (Hunchentoot)
easy-routes 是 Hunchentoot 中的路由处理的插件。有以下特点:
- 基于 HTTP 方法分配(否则在 Hunchentoot 中很麻烦)
- 从 url 中提取参数
- 以及修饰符(decorator)
要想使用的话,不要用 hunchentoot:easy-acceptor 创建服务,而是用 easy-routes:routes-acceptor:
(setf *server* (make-instance 'easy-routes:routes-acceptor))
然后像这样定义路由:
(easy-routes:defroute name ("/foo/:x" :method :get) (y &get z)(format nil "x: ~a y: ~y z: ~a" x y z))
在这里,:x会捕获路径参数然后将参数绑定到路由主体中的 x 变量上。y 和 &get z 定义了 url 参数,然后可以将其通过 &post 参数从 HTTP 请求体中提取出来。
这些参数可以可以通过 :init-form 和 :parameter-type 来初始化和指定类型,就像 define-easy-handler 中一样。
修饰符(decorators) 是在路由主体之前执行的函数。他们会调用 next 参数函数来继续执行修饰链,最后在执行路由主体。示例:
(defun @auth (next)(let ((*user* (hunchentoot:session-value 'user)))(if (not *user*)(hunchentoot:redirect "/login")(funcall next))))(defun @html (next)(setf (hunchentoot:content-type*) "text/html")(funcall next))(defun @json (next)(setf (hunchentoot:content-type*) "application/json")(funcall next))(defun @db (next)(postmodern:with-connection *db-spec*(funcall next)))
更多相关知识参阅 easy-routes‘ 的 readme。
Caveman
Caveman 有两个定义路由的方法:defroute 宏和 python 风格的 @route:
(defroute "/welcome" (&key (|name| "Guest"))(format nil "Welcome, ~A" |name|))@route GET "/welcome"(lambda (&key (|name| "Guest"))(format nil "Welcome, ~A" |name|))
带 url 参数的路由(注意 url 中的 :name)
(defroute "/hello/:name" (&key name)(format nil "Hello, ~A" name))
也可以定义“通配符”参数,配合 splat 关键字使用:
(defroute "/say/*/to/*" (&key splat); matches /say/hello/to/world(format nil "~A" splat));=> (hello world)
需要设置 :regexp t 来启用正则匹配:
(defroute ("/hello/([\\w]+)" :regexp t) (&key captures)(format nil "Hello, ~A!" (first captures)))
GET 和 POST 参数
Hunchentoot
首先,需要注意的是任何时候都可以用下面的语句获取查询参数:
(hunchentoot:parameter "my-param")
它作用于默认的 *request*对象,其中 *request* 会传递所有的 handler。
也有 get-parameter 和 post-parameter.
之前见过 define-easy-handler 的一些关键参数,现在要介绍的是 default-parameter-type:
之前定义过下面的 handler:
(hunchentoot:define-easy-handler (say-yo :uri "/yo") (name)(setf (hunchentoot:content-type*) "text/plain")(format nil "Hey~@[ ~A~]!" name))
name 变量默认是个字符串。现在来检查下:
(hunchentoot:define-easy-handler (say-yo :uri "/yo") (name)(setf (hunchentoot:content-type*) "text/plain")(format nil "Hey~@[ ~A~] you are of type ~a" name (type-of name)))
访问 http://localhost:4242/yo?name=Alice 将得到
Hey Alice you are of type (SIMPLE-ARRAY CHARACTER (5))
通过 default-parameter-type 自动将 name 绑定到其他的类型,这个类型可以是:
'string(default),'integer,'character(accepting strings of length 1 only, otherwise it is nil)'boolean
或者是个复合列表:
'(:list <type>)'(:array <type>)'(:hash-table <type>)
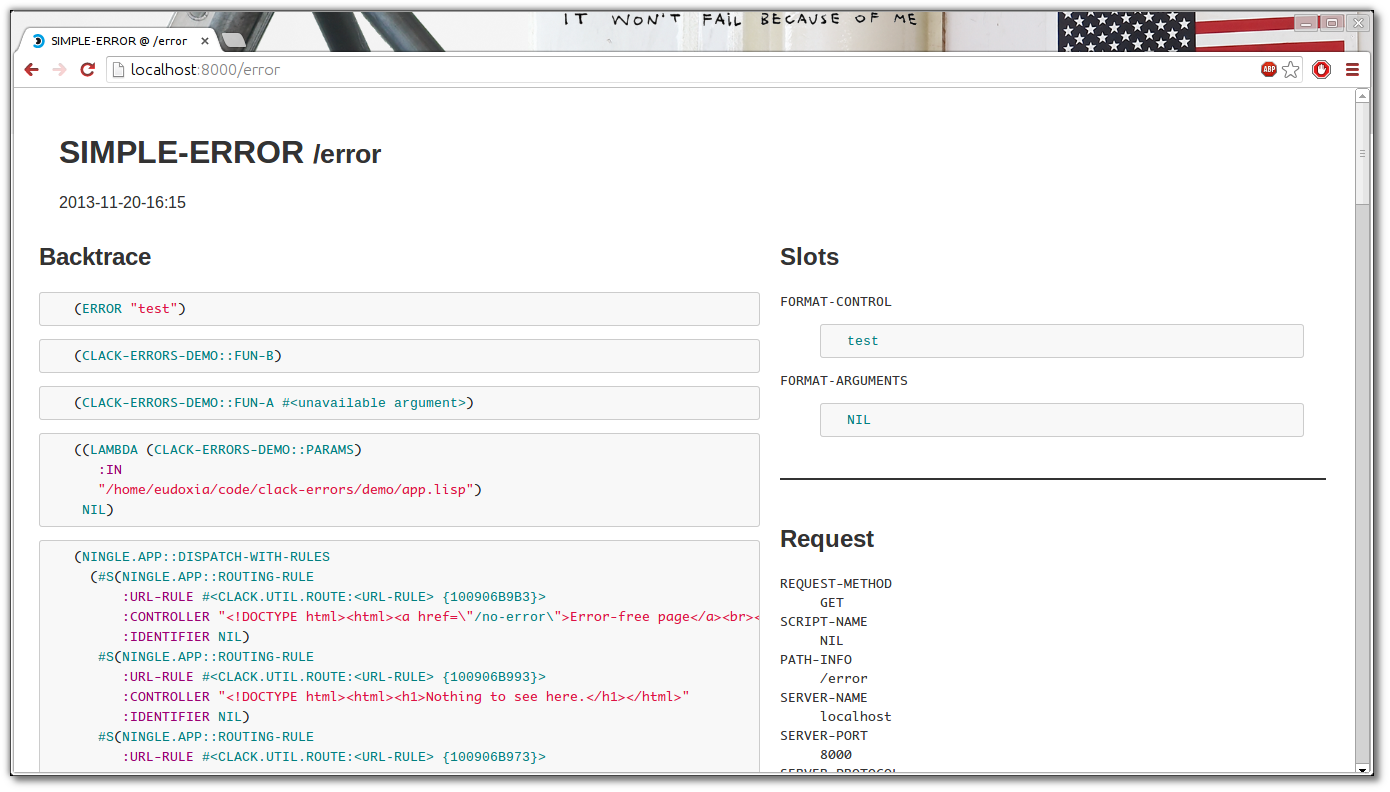
异常处理
在所有的框架中,都可以选择不同级别的交互。Web 框架可以返回 404 页面然后将输出打印在 repl 上,也能捕获异常并打开交互式的调试器,还可以在 html 页面显示 lisp 的回溯信息。
Hunchentoot
需要设置的全局变量有:*catch-errors-p*,*show-lisp-errors-p* 和 *show-lisp-backtraces-p*。
Hunchentoot 也可以定义异常类
参考文档: https://edicl.github.io/hunchentoot/#conditions.
Clack
Clack 的用户可以很好的使用插件,比如说 clack-errors 中间件:https://github.com/CodyReichert/awesome-cl#clack-plugins.
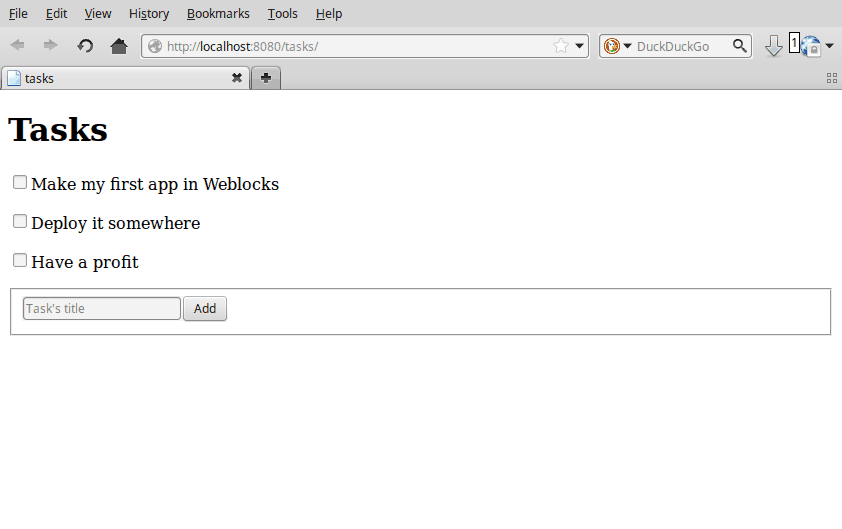
Weblocks - 处理“JavaScript问题”©
Weblocks 是基于 widget 和服务的狂简,内置 ajax 更新机制。可以编写动态 web 应用,而不需要 JavaScript 或是转换成 JavaScript 的 lisp 代码。
Weblokcs 是 Slava Akhmechet、Stephen Compall 和 Leslie Polzer 开发的一个老框架。经过就九年的沉寂后,现在好像又开始更新起来了,由 Alexander Artemenko 进行重构和重写。
weblock一开始是准备延续之前的特性(但目前已经删除了),因此变成了 Smalltalk Seaside)的近亲,也可以将其比做是 Haskell 的 Haste、OCaml 的 Eliom、Elixir 的 Phoenix LiveView 等。
Ultralisp 网站是 Cl 社区中这在开发的 weblock 示例。
Weblock 的工作单元是 widget。和类的定义很像:
(defwidget task ()((title:initarg :title:accessor title)(done:initarg :done:initform nil:accessor done)))
接下来要做的就是在 widget 中定义 render 方法:
(defmethod render ((task task))"Render a task."(with-html(:span (if (done task)(with-html(:s (title task)))(title task)))))
默认是使用 Spinneret 模版引擎,但也可以使用其他的模版引擎。
为了触发 ajax 事件,我们用 Common Lisp 写了个 lambda 函数:
...(with-html(:p (:input :type "checkbox":checked (done task):onclick (make-js-action(lambda (&key &allow-other-keys)(toggle task))))...
make-js-action 函数会创建个简单的 javascript 函数,该函数在服务器上调用 lisp,然后自动刷新 widgets需要的 html。在本章的例子中,只会重新渲染一个页面。
吸引到你了吗?可以阅读这篇快速入门继续深入了解:http://40ants.com/weblocks/quickstart.html。
模版
Djula - HTML模版
Djula 是 Common Lisp 中的 Python Django 模版引擎的接口库,其拥有优秀的文档.
Caveman 默认使用 Djula,另外,使用起来也简单。当然,首先要设置下模版的目录,如下:
(djula:add-template-directory (asdf:system-relative-pathname "webapp" "templates/"))
不出意外的话,Djula 模版看起来是这样的(忽略其中的 \%,这是因为 Jekyll 的限制):
{\% extends "base.html" \%}{\% block title %}Memberlist{\% endblock \%}{\% block content \%}<ul>{\% for user in users \%}<li><a href="{{ user.url }}">{{ user.username }}</a></li>{\% endfor \%}</ul>{\% endblock \%}
Djula 会在渲染模版前对模版进行编译。
Djula 还有个伙伴库——access,quicklisp 中下载量最多的库之一。
Spinneret - lispy 模版
Spinneret 是个 lisp 的 HTML5 的生成器。看起来是这样的:
(with-page (:title "Home page")(:header(:h1 "Home page"))(:section("~A, here is *your* shopping list: " *user-name*)(:ol (dolist (item *shopping-list*)(:li (1+ (random 10)) item))))(:footer ("Last login: ~A" *last-login*)))
spinneret 的开发者发现,与著名的 cl-who 相比,将 HTML 放在单独的函数和宏里要更容易。但 spinneret 还有以下的特性:
- 非法的标签和属性会报警
- 根据层次自动给标题排序
- 默认美化 html,自动换行
- 可以解析嵌入的 markdown 语法
- 定位生成函数的文档(
get-html-tag)
连接数据库
参见第27章:数据库操作。Mito ORM 支持 SQLite3、PostgreSQL、MySQL,也有迁移和数据库版本管理等。
在 Caveman 中,数据库的连接在 Lisp 会话中一直存活,并被每个 HTTP 请求重用。
检查用户是否登陆
框架会提供会话的方法。下面将创建一个宏来包装路由,这个宏用来检查用户是否登录。
在 Caveman 中, *session* 表示的是会话数据的哈希表。下面是登陆登出函数:
(defun login (user)"Log the user into the session"(setf (gethash :user *session*) user))(defun logout ()"Log the user out of the session."(setf (gethash :user *session*) nil))
可以定一个简单的断言
(defun logged-in-p ()(gethash :user cm:*session*))
然后自定义宏 with-logged-in:
(defmacro with-logged-in (&body body)`(if (logged-in-p)(progn ,@body)(render #p"login.html"'(:message "Please log-in to access this page."))))
如果用户没有登陆,就不会保存 session,而且会重定向到登陆页面。以上都正常的话,就可以执行这个宏的主体,像这样:
(defroute "/account/logout" ()"Show the log-out page, only if the user is logged in."(with-logged-in(logout)(render #p"logout.html")))(defroute ("/account/review" :method :get) ()(with-logged-in(render #p"review.html"(list :review (get-review (gethash :user *session*))))))
诸如此类。
加密
用 cl-pass 加密
cl-pass 是个哈希加密和验证的库。使用很简单:
(cl-pass:hash "test");; "PBKDF2$sha256:20000$5cf6ee792cdf05e1ba2b6325c41a5f10$19c7f2ccb3880716bf7cdf999b3ed99e07c7a8140bab37af2afdc28d8806e854"(cl-pass:check-password "test" *);; t(cl-pass:check-password "nope" **);; nil
也可以看看 hermetic,一个基于 Clack 的简单身份认证系统。
手动加密 (用Ironclad)
在本节中,将手动加密并进行验证。下面将会使用 Ironclad 加密库以及 Babel 编码/解码库。
下面的代码段生成了本该存在数据库中的密码散列。注意,Ironclad 的参数是字节向量,而不是字符串。
(defun password-hash (password)(ironclad:pbkdf2-hash-password-to-combined-string(babel:string-to-octets password)))
pbkdf2 定义在 RFC2898。这个库使用伪随机函数来生成密钥。
下面这个函数会检查用户是否激活并验证输入的密码。如果用户是激活的状态且密码通过验证,将返回用户 ID,否则返回 nil。将这个函数放到你的应用上吧:
(defun check-user-password (user password)(handler-case(let* ((data (my-get-user-data user))(hash (my-get-user-hash data))(active (my-get-user-active data)))(when (and active (ironclad:pbkdf2-check-password (babel:string-to-octets password)hash))(my-get-user-id data)))(condition () nil)))
下面的例子是在数据库中设置密码。注意是用 (password-hash password) 来保存密码。其余部分是有 web 框架和数据库指定。
(defun set-password (user password)(with-connection (db)(execute(make-statement :update :web_user(set= :hash (password-hash password))(make-clause :where(make-op := (if (integerp user):id_user:email)user))))))
鸣谢: _/u/arvid_ on /r/learnlisp.
编译
编译成单个可执行文件
对于所有的 Common Lisp 应用,可以将 web 应用放在一个可执行文件中,包括资源。这让部署非常简单:把应用拷贝到服务器并执行:
$ ./my-web-appHunchentoot server is started.Listening on localhost:9003.
参见 第25章:编译.
持续集成:Travis CI 或 Gitlab CI
Please see the section on testing#continuous-integration.
多平台编译:Electron
Ceramic 正是我们所需要的。
使用方法很简单,如下:
;; Load Ceramic and our app(ql:quickload '(:ceramic :our-app));; Ensure Ceramic is set up(ceramic:setup)(ceramic:interactive);; Start our app (here based on the Lucerne framework)(lucerne:start our-app.views:app :port 8000);; Open a browser window to it(defvar window (ceramic:make-window :url "http://localhost:8000/"));; start Ceramic(ceramic:show-window window)
而且在 Linux、Mac 和 Windows 上都可以使用
更多的是:
Ceramic applications are compiled down to native code, ensuring both performance and enabling you to deliver closed-source, commercial applications.
因此,没必要缩小 JS 的大小。
部署
手动部署
可以在 shell 中启动的可执行文件并将其切换到后台(C-z bg),或者在 tmux 中运行它。这不是最好的方法,但是,可以用©。
Systemd 部署
这实际上依赖于系统的版本。可以查看下在你自己的系统上怎么实现的。现在大部分 GNU/Linux 发行版都是使用的 Systemd,所以就有这个小示例了。使用 Systemd 部署应用很简单,只需要写个配置文件就可以:
$ emacs -nw /etc/systemd/system/my-app.service[Unit]Description=stupid simple example[Service]WorkingDirectory=/path/to/your/appExecStart=/usr/local/bin/sthg sthgType=simpleRestart=alwaysRestartSec=10
然后就可以通过命令来启动:
sudo systemctl start my-app.service
用命令来查看状态:
systemctl status my-app.service
同时 Systemd 也有 日志 机制(我们将错误输出到 stdout 或 stderr,而 Systemd 输出到日志中)
journalctl -f -u my-app.service
也能在服务崩溃后重启服务:
Restart=always
还可以让服务跟随系统重启:
[Install]WantedBy=basic.target
启用这个功能:
sudo systemctl enable my-app.service
Docker 部署
有些用于 Common Lisp 的 Docker 镜像,例如:
- 40ants/base-lisp-image 基于 Ubuntu LTS,其中安装了 SBCL、CCL、Quicklisp、Qlot 和 Roswell。
- container-lisp/s2i-lisp 基于 CentOS,包含了基于 Common Lisp 应用的 Quicklisp 的源代码,可以使用 OpenShift source-to-image 进行复制
Guix 部署
GNU Guix 是一个事务性的包管理器,可以在现有的操作系统上安装,并且是个支持声明式系统配置的完整发行版。 guix 支持部署独立的 tar 包,这 tar 包中有系统依赖项。比如说 Next 浏览器就是这样的。
部署在 Heroku 和其他服务上
参考 heroku-buildpack-common-lisp 和 Awesome CL#deploy 章节,可以在其中找到 Kubernetes、OpenShift、AWS 等的接口库。
监控
Prometheus.cl 库为 SBCL 和 Hunchentoot 提供了个 Grafana 的监控面板,可以监控 Hunchentoot 的内存、线程、每秒的请求数等。
连接远程 Lisp 镜像
参见 debugging#remote-debugging 章节。
热重载
例子来源于 Quickutil。实际上是前面例子的自动化版本。
其 Makefile 如下:
hot_deploy:$(call $(LISP), \(ql:quickload :quickutil-server) (ql:quickload :swank-client), \(swank-client:with-slime-connection (conn "localhost" $(SWANK_PORT)) \(swank-client:slime-eval (quote (handler-bind ((error (function continue))) \(ql:quickload :quickutil-utilities) (ql:quickload :quickutil-server) \(funcall (symbol-function (intern "STOP" :quickutil-server))) \(funcall (symbol-function (intern "START" :quickutil-server)) $(start_args)))) conn)) \$($(LISP)-quit))
这个例子必须在服务器上运行(可以通过 ssh 运行简单的 fabfile 命令进行调用)。在此之前,fab update 已经执行过 git pull,这样才能保证最新的代码没有在运行。然后它会连接到本地 swank 服务,加载新代码,停止和启动应用程序。
鸣谢

若有收获,就点个赞吧
0 人点赞
