前面讲解了关于 Flux 的一些理论性的知识点,包括 Flux 之前 React 独立架构的实现以及一些问题,然后讲解了 Flux 的架构模型,并逐个梳理了 Flux 架构中的每个角色(Store,Action,Dispatcher,View)。由于 Flux 和 MVC 架构模式比较类似,我们最后有对 Flux 和 MVC 详细的做了比较,顺便又提到了 MVC 的升级模式 MVVM。
理论的东西讲得多了,大家可能会感到厌烦,这小节我们就来了代码吧!利用 React 和 Flux 写一个简单的 Todo List ,然后从实例代码中,我们再把 Flux 模式好好的过一遍,以便加深理解。
环境搭建
前端技术的发展现在也是日新月异,尤其是基于 Node 的工具包发展起来后,一个前端的开发环境会依赖各种 npm 包工具文件,包括语法转译、编译,压缩,本地开发服务,打包等等。关于 React 的开发,官网已经给我们提供好了一个脚手架 —— create-react-app。我们只需要一个命令即可获得脚手架给我们准备的 React 开发环境依赖的包文件,做到了开箱即用,非常便捷。
但是如果你是刚开始学习 React ,这里并不建议你直接去使用脚手架,因为它包含的信息太多了,会把你搞糊涂,甚至会打消你的学习上进心。
初始化项目
如果本机安装了 create-react-app,直接执行 create-react-app react-flux-todo 就可以初始化项目了。如果本机没有安装,但是你的 node 版本在 5.2 以上,那么恭喜你,你可以直接运行 npx create-react-app react-flux-todo 来初始化项目了。
你也可以直接 clone 我已经写好的项目:
$ git clone https://github.com/YuQue-Case-Library/Flux-Case.git$ react-flux-todo && npm install$ npm start
当运行完 npm start 后,服务会自动拉起浏览器,打开 http://localhost:3000/ 页面,页面展示基本如下: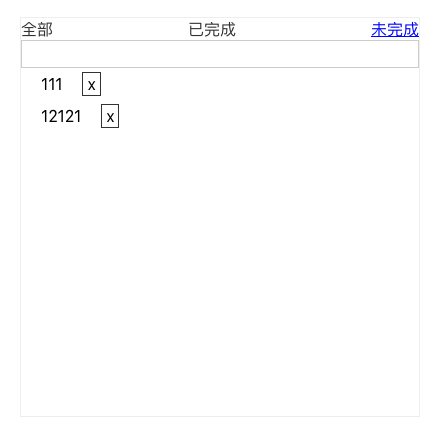
目录结构
项目初始化好后,在 src 目录下建立如下的目录结构,以便我们后续的开发:
|- src|-- actions // 存放项目涉及的 action|-- components // 存放项目的所有组件页面|-- dispatcher // 存放项目涉及的 dispatcher|-- stores // 存放项目涉及的数据状态
项目目录划分比较粗略,如果项目比较大,设计到的 action 比较多的话,可以单独建一个 constant.js 文件来维护 action type 常量。还可以将 Flux 中的 Dispatcher 单独抽取到一个文件,然后作为全局唯一的 Dispatcher 实例使用。如果项目设计的状态比较多,还可以将状态进行分类管理。
页面构造
通过上面的截图,已经知道页面大致长什么样子了,这里我们先对页面进行组件的拆分,让他们各司其职。
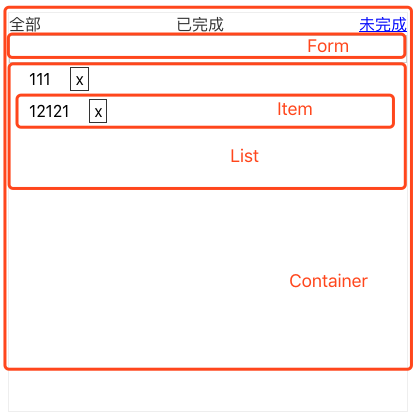
我们将整个页面拆分成 4 个部分:Item 是每个 Todo 的展示,List 是做个 Item 的展示,Form 是输入框的展示和新增 Todo 的表单组件,最后再将这个三个部分组合成整个 Container 页面。
Item 组件
import React from 'react';import './index.css';export default ({item: { id, text, status }, onRemove, onChangeStatus }) => (<li className="item"><span onClick={() => onChangeStatus(id, status === 'complete' ? '' : 'complete')} style={{textDecoration: status === 'complete' ? 'line-through' : ''}}>{text}</span><span className="close" onClick={() => onRemove(id)}>x</span></li>);
Item 组件接受单个 Todo 的数据信息进行了展示,并对单个 Todo 的状态切换事件和删除事件进行了绑定,但是事件的具体逻辑写在了 List 组件,然后通过 props 传递过来。
List 组件
import React from 'react';import Item from './Item';import actions from '../actions';import './index.css';export default ({ items }) => {const onRemove = (id) => {actions.removeItem(id);}const onChangeStatus = (id, status) => {actions.changeStatus(id, status);}return (<div className="list">{items.map((item, index) => (<Item key={index} item={item} onRemove={onRemove} onChangeStatus={onChangeStatus} />))}</div>);}
List 组件对多个 Item 进行了展示,它会从 Container 页面获取所有要展示的 Todos ,然后通过 Array.prototype.map 进行遍历,向 Item 组件传递每个 Todo 的数据信息,以及他们要绑定的事件。
Form 组件
import React, { Component } from 'react';import './index.css';export default class Form extends Component {constructor(props) {super(props);this.state = {inputValue: ''}}handleInputChange = e => {this.setState({inputValue: e.target.value})}formSubmit = (e) => {e.preventDefault();this.setState({inputValue: '',})this.props.addNewItem(e, this.state.inputValue);}render() {const { inputValue } = this.state;return (<form onSubmit={this.formSubmit}><input className="input" type="text" value={inputValue} onChange={this.handleInputChange} /></form>)}}
Form 组件和上面介绍的两个组件没有直接的联系,它主要展示一个 input,然后定义了一个 input 框输入事件监听和一个表单提交事件监听。也就是这个组件,是它触发了添加 Todo 的方法。
注意:这是一个受控组件。在 input 输入后,用一个监听事件获取当前 input 的 value 值,然后将其通过组件的 state 回写到 input 的 value 属性!
Container 组件 / controller-view
import React, { Component } from 'react';import actions from '../actions';import ListStore from '../stores/ListStore';import Form from './Form';import List from './List';import './index.css';export default class Container extends Component {constructor(props) {super(props);this.state = {items: ListStore.getAllItems(),filterType: 'all'};}componentDidMount() {ListStore.addChangeListener(this._onChange);}componentWillUnmount() {ListStore.removeChangeListener(this._onChange);}_onChange = () => {const { filterType } = this.state;this.filterItems(filterType);}addNewItem = (e, text) => {actions.addNewItem(text);}filterItems = (type) => {const allItems = ListStore.getAllItems();const filteredItem = allItems.filter(({ status }) => {switch(type) {case 'all':return true;case 'complete':return status === 'complete';case '':return status === '';default:throw new Error('刷选类型错误!');}});this.setState({filterType: type,items: filteredItem});}render() {const { items, filterType } = this.state;return (<div className="container"><div className="btn-wrapper"><a className={["filter-btn", filterType === 'all' ? "current" : ''].join(' ')} href="javascritp:;" onClick={() => this.filterItems('all')}>全部</a><a className={["filter-btn", filterType === 'complete' ? "current" : ''].join(' ')} href="javascritp:;" onClick={() => this.filterItems('complete')}>已完成</a><a className={["filter-btn", filterType === '' ? "current" : ''].join(' ')} href="javascritp:;" onClick={() => this.filterItems('')}>未完成</a></div><Form addNewItem={this.addNewItem} /><List items={items} /></div>)}}
Container 组件是以上组件组合而成的容器组件,也是涉及到逻辑最复杂的组件,它会跟 store 和 action 进行直接交互,然后还要通过过滤类型对 Todo 的数据进行处理,最后传递给它的各个子组件,对数据进行渲染。
其实不难发现,这个组件的功能就是我们之前说到的 controller-view。在这里有几个需要注意的地方:
定义了组件的初始化状态,即直接通过 ListStore 获取了 Store 里面数据状态,并传递给了 List 组件进行展示
在 componentDidMount 和 componentWillUnmount 生命周期方法中对 Store 里的状态变化的 change 事件进行绑定和解绑
定义 Store 里面状态变化的回调函数,在回调函数中获取最新的数据状态,然后调用 this.setState 方法更新 controll-view 中自己的状态,最后将这个状态传递给各个子组件
构造 Store
const EventEmitter = require('events').EventEmitter;const assign = require('object-assign');let _id = 0;export default assign({}, EventEmitter.prototype, {// 存储所有的 item 数据items: [],// 获取所有的 item 数据getAllItems() {return this.items;},// 添加 item 数据addNewItem(text) {this.items.push({id: ++_id,text,status: ''});},// 根据 id 移除 item 数据removeItem(removeId) {this.items = this.items.filter(({id}) => id !== removeId);},// 根据 ID 改变 item 状态changeItemStatus(changeId, status) {this.items.some((item, index) => {if(changeId === item.id) {this.items[index] = {...item,status}return true;}return false;})},// 添加数据变化监听事件addChangeListener(callback) {this.on('change', callback);},// 移除数据变化监听事件removeChangeListener(callback) {this.removeListener('change', callback);},// 触发数据变化监听事件emitChange() {this.emit('change');}});
Store 里面保存了应用涉及到的所有数据状态。相当于 MVVM 里面的 Model。
在这个 DEMO 里面,Store 里面通过 items 存储了所有数据,并定义了 items 数据处理的所有方法,向页面提供了 数据状态 change 事件的绑定方法。
getAllItem() 获取所有的 items 数据
addNewItem() 添加新的 item 数据
changeItemStatus() 改变 item 数据的状态
注意:Store 继承了 Node.js 里面的 EventEmitter,将事件处理赋能给 Store,Store 再提供事件方法供页面逻辑进行绑定以便对应用数据状态变化进行监听。当 Store 里面的数据状态发生变化后,就会触发 change 事件,页面那边同时会监听 change 事件,获取全新的数据状态对页面进行重渲染。
构造 Action / ActionCreator
import AppDispatcher from '../dispatcher/AppDispatcher';export default {addNewItem(text) {AppDispatcher.dispatch({type: 'ADD_ITEM',text,})},removeItem(id) {AppDispatcher.dispatch({type: 'REMOVE_ITEM',id,})},changeStatus(id, status) {AppDispatcher.dispatch({type: 'CHANGE_STATUS',id,status,})}}
在上面的实例代码中,我们实际上定义了添加(addNewItem)、删除(removeItem)和改变状态(changeStatus)的三个 ActionCreator 函数。在每个 ActionCreator 函数体内通过 Dispatcher 实例 AppDispatcher 的 dispatch 方法将 action 传递给 Store。而每个 ActionCreator 函数接受的参数即是 Action。Action 的作用只是用来描述数据状态的变化,是一个包含 type 属性和其他属性的 JavaScript 对象。
添加 Dispatcher
Dispatcher 作为 Action 和 Store 的中间枢纽,主要是将 action 发送到 Store。
import ListStore from '../stores/ListStore.js';const Dispatcher = require('flux').Dispatcher;const AppDispatcher = new Dispatcher();// 注册回调函数处理 actionAppDispatcher.register(({ type, id, text, status }) => {switch(type) {case 'ADD_ITEM':ListStore.addNewItem(text);ListStore.emitChange();break;case 'REMOVE_ITEM':ListStore.removeItem(id);ListStore.emitChange();break;case 'CHANGE_STATUS':ListStore.changeItemStatus(id, status);ListStore.emitChange();break;default:break;}});export default AppDispatcher;
Flux 里面的 Dispatcher 暴露了一个类,用来生成 Dispatcher 实例,并提供了 register 用来登记注册 Action 的回调函数。
在这里我们通过 AppDispatcher.register 注册了一个回调函数针对各种类型的 Action 调用了不同的方法对 Store 进行了处理。
注意:Dispatcher 全局只能有一个,且只用来派发 Action,不应该有其他的处理逻辑。
集成测试
使用 create-react-app 创建的项目默认集成了测试工具 Jest。可以通过创建以 .test.js 或者 .spec.js 为后缀的文件或者创建 _test_ 目录并将测试逻辑写在 .js 后缀的文件中。
当测试案例的逻辑写好后,只需要在终端运行 npm start 就可以看到测试案例运行的结果。

import actions from '../actions';import ListStore from '../stores/ListStore';// 通过传递 text 做了一次 action 添加 todoit('run once action with text', () => {actions.addNewItem('lane');const allItems = ListStore.getAllItems();// 此时 ListStore items 只有一个元素// 判断第一个元素的 text 是否等于期望值expect(allItems[0].text).toEqual('lane');expect(allItems.length).toEqual(1);actions.removeAll();});// 通过不传递 text 添加 todoit('run once action without text', () => {actions.addNewItem();const allItems = ListStore.getAllItems();// 此时 ListStore items 只有一个元素// 判断第一个元素的 text 是否等于期望值expect(allItems[0].text).toEqual(undefined);expect(allItems.length).toEqual(1);actions.removeAll();});// 添加 todo 然后移除所有的 todoit('run once and after remove all', () => {actions.addNewItem('lane');actions.removeAll();const allItems = ListStore.getAllItems();expect(allItems.length).toEqual(0);});// 通过传递 text 做了多次 action 添加 todoit('run times action with text', () => {actions.addNewItem('lane1');actions.addNewItem('lane2');const allItems = ListStore.getAllItems();expect(allItems.length).toEqual(2);actions.removeAll();});
在这个案例中,我们通过建立以 .test.js 为后缀的文件来添加测试用例。上面代码中,我们添加了四个简单的测试用例。关于每个案例的作用可以看一下每个案例的注释。
注意:对于多个场景应编写多个测试按钮,并且测试用例之间不应该互相影响。
总结
本章节我们从头到尾实现了一个 todo list 的案例,对 Flux 的各个角色做了代码实现,对每个角色的功能做了更深的理解。

若有收获,就点个赞吧
0 人点赞
