模块与组件
- 模块:向外提供特定功能的js程序, 一般就是一个js文件
- 组件:用来实现特定(局部)功能效果的代码集合(html/css/js)
自定义组件
自定义组件的两种方式
工厂函数组件
function MyComponent (props) {return <h2>工厂函数组件(简单组件)</h2>}// 渲染ReactDOM.render(<MyComponent1 />, document.getElementById('example1'))
ES6 类组件
class MyComponent2 extends React.Component {render () {console.log(this) // MyComponent2的实例对象return <h2>ES6类组件(复杂组件)</h2>}}// 渲染ReactDOM.render(<MyComponent2 />, document.getElementById('example2'))
注意
:::warning
- 组件名必须首字母大写
- 虚拟 DOM 元素只能有一个根元素
- 虚拟 DOM 元素必须有结束标签 :::
组件三大属性:state
- state 是组件对象最重要的属性, 值是对象(可以包含多个数据)
组件被称为”状态机”, 通过更新组件的 state 来更新对应的页面显示(重新渲染组件) :::info state 属性只能在 ES6类 创建的组件中使用,工厂函数 创建的组件不能使用,没有 state 属性。 :::
state 初始化
import React from 'react'// 第一种,使用 constructor 构造函数class CompoName extends React.Component {constructor(props) {super(props)this.state = {stateProp1: value1,stateProp2: value2}}render () {...}}// 第二种 ES6 class 的变式class CompoName extends React.Component {state = {stateProp1: value1,stateProp2: value2}render () {...}}
获取 state 的值
this.state.statePropertyName
更新状态
this.setState({stateProp1 : value1,stateProp2 : value2})
:::warning
注意:state 的值只能通过 setState 函数改变,这样才能刷新界面。
:::
组件三大属性:props
每个组件对象都会有props(properties的简写)属性。 :::info
- 工厂函数创建的组件,props 通过函数参数传递
- ES6类创建的组件,props 自动传入,使用构造函数时,一定要有
super(props)代码。 :::
:::warning 组件内部不要修改props数据 :::
读取 props
// ES6 class 方式this.props.propertyName
限制 props
需要引入 prop-types 库,可以参考npm
npm install --save prop-types
import PropTypes from 'prop-types'class Comp extends React.Component {// 第一种方式:使用staticstatic propTypes = {name: PropTypes.string.isRequired,add: PropTypes.func.isRequired}}// 第二种方式:在 class 外Comp.propTypes = {name: PropTypes.string.isRequired,add: PropTypes.func.isRequired}
默认 props
class App extends React.Component {// => 设置默认的propsstatic defaultProps = {name: 'Mary'}render () {return (<div>{this.props.name}</div>)}}
扩展属性
使用 ...object ES6 语法。将对象的所有属性通过props传递
<Person {...person}/>
组件三大属性:ref 和事件
ref
组件内的标签都可以定义ref属性来标识自己
// 回调函数在组件初始化渲染完或卸载时自动调用<input type="text" ref={input => this.msgInput = input}/>// 在组件中可以通过 this.msgInput 来得到对应的真实DOM元素
例子
效果:
代码:
import React from 'react'
class App extends React.Component {
  showOnClick = () => {
    alert(this.msgInput.value)
  }
  showOnBlue = (e) => {
    alert(e.target.value)
  }
  render () {
    return (
      <div>
        {/* ref 属性的使用 */}
        <input type='text'ref={input => this.msgInput = input}/> <button onClick={this.showOnClick}>显示</button> <br/>
        {/* 事件的使用 */}
        <input type='text' placeholder='失去焦点就显示' onBlur={this.showOnBlue}/>
      </div>
    )
  }
}
export default App
事件
通过onXxx属性指定组件的事件处理函数(注意大小写)。
- 通过
event.target得到发生事件的DOM元素对象,可参考上面的例子
// 这个简略,可参考上面的例子
<input onFocus={this.handleClick}/>
handleFocus(event) {
  event.target  //返回input对象
}
注意:方法中的 this 指向
:::warning
- 从React.Component 继承来的方法(render, componentDidMount等)的 this 指向组件对象,不需要特殊处理。
- 自定义的方法中 this 为 null,使 this 指向组件对象有两种方法:
- 第一种方法:在 constructor 构造函数中使用
bind() - 第二种方法:使用箭头函数 :::
- 第一种方法:在 constructor 构造函数中使用
第一种方法示例:
class App extends Component {
  constructor(props) {
    super(props)
    this.methodName = this.methodName.bind(this)
  }
  methodName () {...}
}
第二种方法示例:
class App extends Component {
  methodName = () => {...}
}
收集表单数据
包含表单的组件分为:受控组件和非受控组件
- 受控组件:表单项输入数据能自动收集成状态,一般与 state 的属性值绑定
- 非受控组件: 需要时才手动读取表单输入框中的数据,一般使用 ref 属性
例子
效果: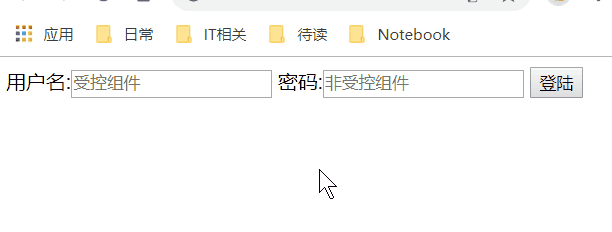
代码:
import React from 'react'
class App extends React.Component {
state = {
username: ''
}
handleChange = (e) => {
const username = e.target.value
this.setState({username})
}
handleSubmit = (e) => {
e.preventDefault()
alert(`用户名:${this.state.username},密码:${this.pwdInput.value}`)
}
render () {
return (
<div>
<form onSubmit={this.handleSubmit} action="/test">
<label>
用户名:
<input type="text"
value={this.state.username}
onChange={this.handleChange} placeholder='受控组件'/>
</label>
<label>
密码:
<input type="password"
ref={(input) => this.pwdInput = input} placeholder='非受控组件'/>
</label>
<input type="submit" value="登陆" />
</form>
</div>
)
}
}
export default App
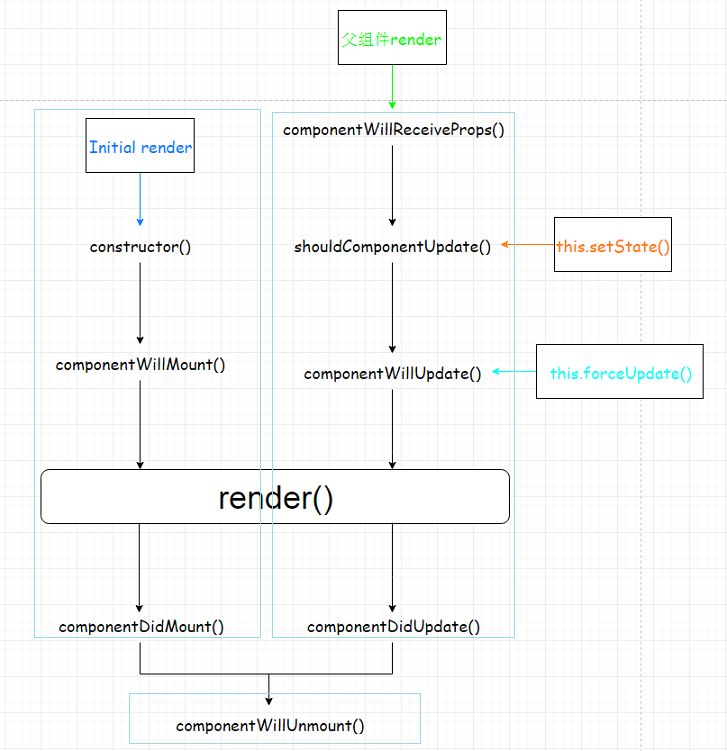
组件的生命周期
例子
效果: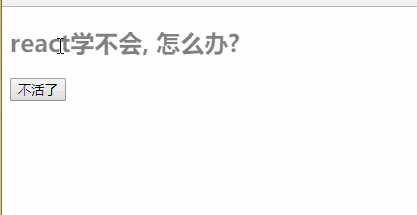
代码:
<!DOCTYPE html>
<html>
<head></head>
<body>
<div id="example"></div>
<script type="text/javascript" src="../js/react.development.js"></script>
<script type="text/javascript" src="../js/react-dom.development.js"></script>
<script type="text/javascript" src="../js/babel.min.js"></script>
<script type="text/babel">
  /*
  需求: 自定义组件
    1. 让指定的文本做显示/隐藏的动画
    2. 切换时间为2S
    3. 点击按钮从界面中移除组件界面
   */
  class Fade extends React.Component {

    constructor (props) {
      super(props)
      console.log('constructor(): 创建组件对象')
      this.state = {
        opacity: 1
      }
      this.removeComponent = this.removeComponent.bind(this)
    }

    componentWillMount () {
      console.log('componentWillMount(): 初始化将要挂载')
    }

    componentDidMount () {// 在此方法中启动定时器/绑定监听/发送ajax请求
      console.log('componentDidMount(): 初始化已经挂载')
      // 保存到当前组件对象中
      this.intervalId = setInterval(function () {
        console.log('--------')
        // 得到当前opacity
        let {opacity} = this.state
        // 更新opacity
        opacity -= 0.1
        if(opacity<=0) {
          opacity = 1
        }
        // 更新状态
        this.setState({opacity})
      }.bind(this), 200) // <= 注意使用 bind(this), 否则要使用箭头函数
    }

    componentWillUpdate () {
      console.log('componentWillUpdate(): 将要更新')
    }
    componentDidUpdate () {
      console.log('componentDidUpdate(): 已经更新')
    }

    componentWillUnmount () {// 清除定时器/解除监听
      console.log('componentWillUnmount(): 将要被移除')
      clearInterval(this.intervalId)
    }

    removeComponent () {
      ReactDOM.unmountComponentAtNode(document.getElementById('example'))
    }

    render() {
      console.log('render() 渲染组件')
      return (
        <div>
          <h2 style={{opacity:this.state.opacity}}>{this.props.content}</h2>
          <button onClick={this.removeComponent}>不活了</button>
        </div>
      )
    }
  }
  ReactDOM.render(<Fade content="react学不会, 怎么办?"/>, document.getElementById('example'))
</script>
</body>
</html>
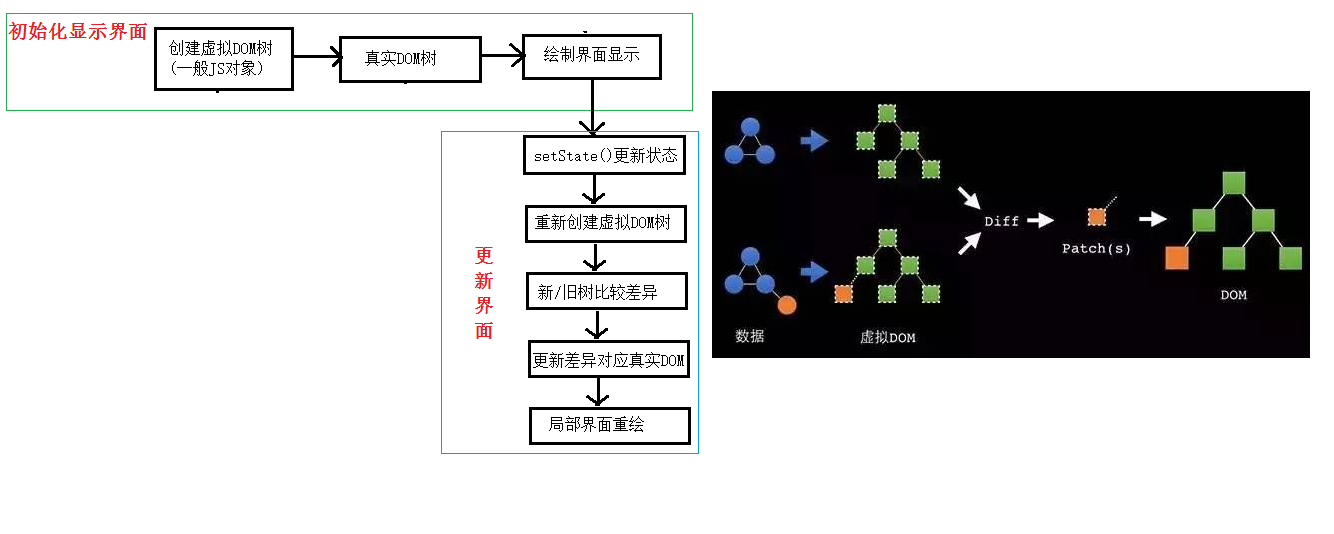
虚拟 DOM 与 DOM Diff 算法
基本原理图
例子
效果:
代码:
class HelloWorld extends React.Component {
constructor(props) {
super(props)
this.state = {
date: new Date()
}
}
componentDidMount () {
setInterval(() => {
this.setState({
date: new Date()
})
}, 1000)
}
render () {
console.log('render()')
return (
<p>
Hello, <input type="text" placeholder="Your name here"/>!
It is {this.state.date.toTimeString()}
</p>
)
}
}
ReactDOM.render(
<HelloWorld/>,
document.getElementById('example')
)

若有收获,就点个赞吧
0 人点赞
