- 一:安装两台centos7服务器
- 二:设置centos7基本配置
- 三:安装openstack基本环境
- …
- …
- …
- …
- su -s /bin/sh -c “glance-manage db_sync” glance
- systemctl enable openstack-glance-api.service
- systemctl start openstack-glance-api.service
- …
- …
- su -s /bin/sh -c “placement-manage db sync” placement
- systemctl restart httpd
- 创建nova_api,nova和nova_cell0数据库:
- 注意密码
- …
- …
- …
- …
- …
- …
- …
- …
- …
- …
- …
- su -s /bin/sh -c “nova-manage api_db sync” nova
- su -s /bin/sh -c “nova-manage cell_v2 map_cell0” nova
- su -s /bin/sh -c “nova-manage cell_v2 create_cell —name=cell1 —verbose” nova
- su -s /bin/sh -c “nova-manage db sync” nova
- systemctl enable \
- systemctl start \
- yum install openstack-nova-compute -y
- …
- …
- …
- …
- …
- …
- …
- …
- …
- …
- …
- systemctl enable libvirtd.service openstack-nova-compute.service
- systemctl start libvirtd.service openstack-nova-compute.service
- 创建neutron库
- yum install openstack-neutron openstack-neutron-ml2 \
- …
- …
- …
- …
- …
- …
- …
- …
- …
- …
- …
- …
- …
- …
- …
- …
- …
- ln -s /etc/neutron/plugins/ml2/ml2_conf.ini /etc/neutron/plugin.ini
- su -s /bin/sh -c “neutron-db-manage —config-file /etc/neutron/neutron.conf \
- systemctl restart openstack-nova-api.service
- systemctl enable neutron-server.service \
- systemctl start neutron-server.service \
- systemctl enable neutron-l3-agent.service
- systemctl start neutron-l3-agent.service
- yum install openstack-neutron-linuxbridge ebtables ipset -y
- …
- …
- …
- …
- …
- systemctl restart openstack-nova-compute.service
- systemctl enable neutron-linuxbridge-agent.service
- systemctl start neutron-linuxbridge-agent.service
- yum install openstack-dashboard -y
- systemctl restart httpd.service memcached.service
- 创建cinder数据库:
- 授予对cinder数据库的适当访问权限:
- 2:安装和配置存储节点
- …
- …
- …
- …
- …
- …
- systemctl enable openstack-cinder-volume.service target.service
- systemctl start openstack-cinder-volume.service target.service
- yum install openstack-swift-proxy python-swiftclient \
- https://opendev.org/openstack/swift/raw/branch/master/etc/proxy-server.conf-sample">curl -o /etc/swift/proxy-server.conf https://opendev.org/openstack/swift/raw/branch/master/etc/proxy-server.conf-sample
一:安装两台centos7服务器
建议最小化安装centos7 (在Windows上的VMware中安装即可);
要求:
- 两台主机都再添加一块网卡(添加后一共两块网卡,建议第一块使用NAT,第二块使用桥接)

- 给其中一台主机多添加两块硬盘当做compute节点(都要100G)
…………..
二:设置centos7基本配置
1):基本配置
修改主机名(两台服务器,一台改名为controller,另一台是多添加硬盘的那个命名为compute)
- 主机名映射(修改/etc/hosts文件)
- 关闭防火墙
- 关闭selinux
2):网络要求
在使用两台服务器搭建openstack平台时需要每台主机上要有两块网卡,其中一块用作两台服务器之间通信,另一块为后面创建openstack平台后里面创建的云主机使用
切换到我的环境看一下:

第一块网卡(nes32)需要有网关,子网掩码,第二块网卡(ens33)不设置网关3):存储块
在compute中多添加的两台硬盘是要为后续安装cinder服务和Swift服务做准备; ```go [root@compute ~]# lsblk NAME MAJ:MIN RM SIZE RO TYPE MOUNTPOINT sda 8:0 0 100G 0 disk ├─sda1 8:1 0 1G 0 part /boot └─sda2 8:2 0 99G 0 part ├─centos-root 253:0 0 50G 0 lvm / ├─centos-swap 253:1 0 3.9G 0 lvm [SWAP] └─centos-home 253:2 0 45.1G 0 lvm /home sdb 8:16 0 100G 0 disk sdc 8:32 0 100G 0 disk sr0 11:0 1 4.2G 0 rom
<a name="PkTIx"></a>## 3):时钟服务时钟服务将两台主机的时间进行同步,如果主机的时间不同步则会出现以外的错误<br />**controller节点:**```go[root@controller ~]# vi /etc/chrony.conf# Please consider joining the pool (http://www.pool.ntp.org/join.html).#server 0.centos.pool.ntp.org iburst#server 1.centos.pool.ntp.org iburst#server 2.centos.pool.ntp.org iburst#server 3.centos.pool.ntp.org iburst #将以上server全部注释掉server controller iburst #添加此行将自身作为时间同步源# Record the rate at which the system clock gains/losses time.driftfile /var/lib/chrony/drift# Allow the system clock to be stepped in the first three updates# if its offset is larger than 1 second.makestep 1.0 3# Enable kernel synchronization of the real-time clock (RTC).rtcsync# Enable hardware timestamping on all interfaces that support it.#hwtimestamp *# Increase the minimum number of selectable sources required to adjust# the system clock.#minsources 2# Allow NTP client access from local network.allow 192.168.44.0/24 #去除注释后将网段改为第一块网卡的网段# Serve time even if not synchronized to a time source.local stratum 10 #去除注释.......略
修改后重启服务,加入到开启启动项并查看状态:
[root@controller ~]# systemctl restart chronyd[root@controller ~]# systemctl enable chronyd[root@controller ~]# chronyc sources210 Number of sources = 1MS Name/IP address Stratum Poll Reach LastRx Last sample===============================================================================^* controller 10 6 377 17 -3524ns[-2922ns] +/- 22us
compute节点:
[root@compute ~]# vi /etc/chrony.conf# Use public servers from the pool.ntp.org project.# Please consider joining the pool (http://www.pool.ntp.org/join.html).#server 0.centos.pool.ntp.org iburst#server 1.centos.pool.ntp.org iburst#server 2.centos.pool.ntp.org iburst#server 3.centos.pool.ntp.org iburst #将以上server全部注释掉server controller iburst #添加此行将controller节点作为时间同步源# Record the rate at which the system clock gains/losses time.driftfile /var/lib/chrony/drift......略
修改后重启服务,加入到开启启动项并查看状态:
[root@compute ~]# systemctl restart chronyd[root@compute ~]# systemctl enable chronyd[root@compute ~]# chronyc sources210 Number of sources = 1MS Name/IP address Stratum Poll Reach LastRx Last sample===============================================================================^* controller 11 6 17 11 -1166ns[ +10us] +/- 771us
4):openstack package
! ! !步骤4需要在所有节点上执行
opensatck的安装可以使用网络yum源的方式进行安装,在安装时可以指定安装版本
安装完centos7主机后不要将原来的yum源删掉,在 CentOS 上,extras存储库提供启用 OpenStack 存储库的 RPM。CentOSextras默认包含存储库,因此您只需安装该软件包即可启用 OpenStack 存储库
我这里选择安装Train版本:
# yum install centos-release-openstack-train -y
安装完成后升级所有节点上的软件包
# yum upgrade -y
为您的版本安装合适的 OpenStack 客户端。(这个命令只支持centos7)
# yum install python-openstackclient -y
三:安装openstack基本环境
1):安装SQL数据库
大多数 OpenStack 服务使用 SQL 数据库来存储信息。数据库通常在控制器节点上运行。本指南中的过程根据发行版使用 MariaDB
安装mariadb想关及Python2-PyMySQL
[root@controller ~]# yum install mariadb mariadb-server python2-PyMySQL -y
创建和编辑/etc/my.cnf.d/openstack.cnf文件
创建一个[mysqld]section,设置bind-address key为controller节点的管理IP地址,允许其他节点通过管理网络访问。设置附加键以启用有用的选项和 UTF-8 字符集:
[mysqld]bind-address = 192.168.44.10 #controller节点的第一块网卡ipdefault-storage-engine = innodbinnodb_file_per_table = onmax_connections = 4096collation-server = utf8_general_cicharacter-set-server = utf8
启动服务并加入到开机启动项
[root@controller my.cnf.d]# systemctl restart mariadb[root@controller my.cnf.d]# systemctl enable mariadb
将数据库初始并设置一个密码(密码尽量设置简单)
这里我设置的mariadb用户密码为000000,默认为root用户
[root@controller my.cnf.d]# mysql_secure_installation........略
2):安装消息队列rabbitmq
OpenStack 使用消息队列来协调服务之间的操作和状态信息。消息队列服务通常在控制器节点上运行。指南实现了 RabbitMQ 消息队列服务,因为大多数发行版都支持它。
安装软件包
[root@controller ~]# yum install rabbitmq-server -y
启动消息队列服务并配置它在系统启动时启动
[root@controller ~]# systemctl restart rabbitmq-server.service[root@controller ~]# systemctl enable rabbitmq-server.serviceCreated symlink from /etc/systemd/system/multi-user.target.wants/rabbitmq-server.service to /usr/lib/systemd/system/rabbitmq-server.service.
添加openstack用户并允许用户的配置、写入和读取访问权限 openstack
这里我设置的openstack用户密码为000000
[root@controller ~]# rabbitmqctl add_user openstack 000000Creating user "openstack"[root@controller ~]# rabbitmqctl set_permissions openstack '.*' '.*' '.*'Setting permissions for user "openstack" in vhost "/"
3):内存缓存memcached
在控制节点执行
安装软件包
[root@controller ~]# yum install memcached python-memcached -y
修改/etc/sysconfig/memcached配置文件 ```go [root@controller ~]# vi /etc/sysconfig/memcached PORT=”11211” USER=”memcached” MAXCONN=”1024” CACHESIZE=”64” OPTIONS=”-l 127.0.0.1,::1,controller” #在此行添加控制节点ip,这是为了允许其他节点通过管理网络进行访问
3. **启动 Memcached 服务并配置它在系统启动时启动**```go[root@controller ~]# systemctl restart memcached[root@controller ~]# systemctl enable memcachedCreated symlink from /etc/systemd/system/multi-user.target.wants/memcached.service to /usr/lib/systemd/system/memcached.service.
4):安装Etcd
OpenStack 服务可能会使用 Etcd,一种分布式可靠的键值存储,用于分布式密钥锁定、存储配置、跟踪服务实时性和其他场景。
etcd 服务运行在控制器节点上。
安装软件包
[root@controller ~]# yum install -y etcd
修改/etc/etcd/etcd.conf配置文件
将ETCD_INITIAL_CLUSTER, ETCD_INITIAL_ADVERTISE_PEER_URLS, ETCD_ADVERTISE_CLIENT_URLS, 设置为ETCD_LISTEN_CLIENT_URLS控制器节点的管理 IP 地址,以允许其他节点通过管理网络访问:
[root@controller ~]# vi /etc/etcd/etcd.conf#[Member]#ETCD_CORS=""ETCD_DATA_DIR="/var/lib/etcd/default.etcd" #将这行注释掉#ETCD_WAL_DIR=""ETCD_LISTEN_PEER_URLS="http://192.168.44.10:2380" #将这行改为controller节点第一块网卡ipETCD_LISTEN_CLIENT_URLS="http://192.168.44.10:2379" #将这行改为controller节点第一块网卡ip#ETCD_MAX_SNAPSHOTS="5"#ETCD_MAX_WALS="5"ETCD_NAME="controller" #改为controller#ETCD_SNAPSHOT_COUNT="100000"#ETCD_HEARTBEAT_INTERVAL="100"#ETCD_ELECTION_TIMEOUT="1000"#ETCD_QUOTA_BACKEND_BYTES="0"#ETCD_MAX_REQUEST_BYTES="1572864"#ETCD_GRPC_KEEPALIVE_MIN_TIME="5s"#ETCD_GRPC_KEEPALIVE_INTERVAL="2h0m0s"#ETCD_GRPC_KEEPALIVE_TIMEOUT="20s"##[Clustering]ETCD_INITIAL_ADVERTISE_PEER_URLS="http://192.168.44.10:2380" #将这行改为controller节点第一块网卡ipETCD_ADVERTISE_CLIENT_URLS="http://192.168.44.10:2379" #将这行改为controller节点第一块网卡ip#ETCD_DISCOVERY=""#ETCD_DISCOVERY_FALLBACK="proxy"#ETCD_DISCOVERY_PROXY=""#ETCD_DISCOVERY_SRV=""ETCD_INITIAL_CLUSTER="controller=http://192.168.44.10:2380" #将这行改为controller节点第一块网卡ipETCD_INITIAL_CLUSTER_TOKEN="etcd-cluster-01" #将这行改为这样ETCD_INITIAL_CLUSTER_STATE="new" #将注释取消掉#ETCD_STRICT_RECONFIG_CHECK="true"#ETCD_ENABLE_V2="true"
- 启用并加入开启启动项 etcd 服务 ```go [root@controller etcd]# systemctl restart etcd [root@controller etcd]# systemctl enable etcd Created symlink from /etc/systemd/system/multi-user.target.wants/etcd.service to /usr/lib/systemd/system/etcd.service.
<a name="VsUiT"></a># 四:安装openstack服务<a name="t4ecc"></a>## 1):keystone服务安装**安装运行在控制节点上**<a name="pZSOE"></a>### ①:先决条件在安装keystone服务前需要先在数据库中创建keystone服务的存储库,并且授予一定的权限1. 使用root身份登陆数据库,创建keystone数据库`$ mysql -u root -p000000`2. 创建**keystone**数据库,并赋予适当的权限```plsqlMariaDB [(none)]> CREATE DATABASE keystone;MariaDB [(none)]> GRANT ALL PRIVILEGES ON keystone.* TO 'keystone'@'localhost' \IDENTIFIED BY '000000';MariaDB [(none)]> GRANT ALL PRIVILEGES ON keystone.* TO 'keystone'@'%' \IDENTIFIED BY '000000';
②:☆安装和配置组件☆
安装keystone组件
[root@controller ~]# yum install openstack-keystone httpd mod_wsgi -y
编辑/etc/keystone/keystone.conf文件并完成以下操作
在该**[database]**部分中,配置数据库访问
[database]# ...connection = mysql+pymysql://keystone:000000@controller/keystone
在**[token]**部分中,配置 Fernet 令牌提供程序:
[token]# ...provider = fernet
填充身份服务数据库
[root@controller ~]# su -s /bin/sh -c "keystone-manage db_sync" keystone
初始化 Fernet 密钥库
# keystone-manage fernet_setup --keystone-user keystone --keystone-group keystone# keystone-manage credential_setup --keystone-user keystone --keystone-group keystone
引导身份服务
#此处填写是admin的密码[root@controller ~]# keystone-manage bootstrap --bootstrap-password 000000 \--bootstrap-admin-url http://controller:5000/v3/ \--bootstrap-internal-url http://controller:5000/v3/ \--bootstrap-public-url http://controller:5000/v3/ \--bootstrap-region-id RegionOne
③:配置Apache httpd服务
编辑/etc/httpd/conf/httpd.conf文件并配置 ServerName选项以引用控制器节点:
ServerName controller
创建/usr/share/keystone/wsgi-keystone.conf文件链接:
ln -s /usr/share/keystone/wsgi-keystone.conf /etc/httpd/conf.d/
修改/etc/httpd/conf/httpd.conf为granted

④:完成安装
启动httpd服务并设置开启自启
注意:在启动的时候一定要确保selinux关闭状态(在这吃个亏)
# systemctl enable httpd.service# systemctl start httpd.service
通过设置适当的环境变量来配置管理帐户:
$ export OS_USERNAME=admin$ export OS_PASSWORD=000000 #设置密码$ export OS_PROJECT_NAME=admin$ export OS_USER_DOMAIN_NAME=Default$ export OS_PROJECT_DOMAIN_NAME=Default$ export OS_AUTH_URL=http://controller:5000/v3$ export OS_IDENTITY_API_VERSION=3
2):glance服务安装
①:先决条件
在安装keystone服务前需要先在数据库中创建glance服务的存储库,并且授予一定的权限
使用root身份登陆数据库,创建glance数据库
$ mysql -u root -p000000
创建keystone数据库,并赋予适当的权限
MariaDB [(none)]> CREATE DATABASE glance;MariaDB [(none)]> GRANT ALL PRIVILEGES ON glance.* TO 'glance'@'localhost' \IDENTIFIED BY '000000';MariaDB [(none)]> GRANT ALL PRIVILEGES ON glance.* TO 'glance'@'%' \IDENTIFIED BY '000000';
③:来源admin凭据来访问仅管理员CLI命令
④:创建服务凭证
创建glance用户
[root@controller ~]# openstack user create --domain default --password-prompt glanceUser Password:Repeat User Password:+---------------------+----------------------------------+| Field | Value |+---------------------+----------------------------------+| domain_id | default || enabled | True || id | 81e64b070c7a43e08fd0d45a620068de || name | glance || options | {} || password_expires_at | None |+---------------------+----------------------------------+
将admin角色添加到glance用户和 service项目:
service项目默认没有创建所以还要创建service项目
#创建service项目[root@controller ~]# openstack project create service+-------------+----------------------------------+| Field | Value |+-------------+----------------------------------+| description | || domain_id | default || enabled | True || id | e13b9b36486a4869b2db3608feac0caa || is_domain | False || name | service || options | {} || parent_id | default || tags | [] |+-------------+----------------------------------+
openstack role add admin --project service --user glance
- 创建glance服务实体
[root@controller ~]# openstack service create --name glance --description "OpenStack Image" image+-------------+----------------------------------+| Field | Value |+-------------+----------------------------------+| description | OpenStack Image || enabled | True || id | 6ce88856d85042f6b81a611403de57c1 || name | glance || type | image |+-------------+----------------------------------+
⑤:创建图像服务 API 端点
``` [root@controller ~]# openstack endpoint create —region RegionOne image public http://controller:9292 +———————+—————————————————+ | Field | Value | +———————+—————————————————+ | enabled | True | | id | 9826fd5a0ace4edb853e505bf736883e | | interface | public | | region | RegionOne | | region_id | RegionOne | | service_id | 6ce88856d85042f6b81a611403de57c1 | | service_name | glance | | service_type | image | | url | http://controller:9292 | +———————+—————————————————+ [root@controller ~]# openstack endpoint create —region RegionOne image internal http://controller:9292 +———————+—————————————————+ | Field | Value | +———————+—————————————————+ | enabled | True | | id | 7dcf9d76971141d1ad3e215698f92b67 | | interface | internal | | region | RegionOne | | region_id | RegionOne | | service_id | 6ce88856d85042f6b81a611403de57c1 | | service_name | glance | | service_type | image | | url | http://controller:9292 | +———————+—————————————————+ [root@controller ~]# openstack endpoint create —region RegionOne image admin http://controller:9292 +———————+—————————————————+ | Field | Value | +———————+—————————————————+ | enabled | True | | id | 50ba1764214d4dc6a9553356986fc59a | | interface | admin | | region | RegionOne | | region_id | RegionOne | | service_id | 6ce88856d85042f6b81a611403de57c1 | | service_name | glance | | service_type | image | | url | http://controller:9292 | +———————+—————————————————+
<a name="pXPbZ"></a>### ⑥:☆安装和配置组件☆1. 安装软件包
[root@controller ~]# yum install openstack-glance -y
2. 编辑**/etc/glance/glance-api.conf**文件并完成以下操作2.1 在该**[database]**部分中,配置数据库访问:
[database]
…
connection = mysql+pymysql://glance:000000@controller/glance #注意密码
2.2 在**[keystone_authtoken]**和**[paste_deploy]**部分,配置身份服务访问:
[keystone_authtoken]
…
www_authenticate_uri = http://controller:5000 auth_url = http://controller:5000 memcached_servers = controller:11211 auth_type = password project_domain_name = Default user_domain_name = Default project_name = service username = glance password = 000000 #注意密码
[paste_deploy]
…
flavor = keystone
2.3 在该**[glance_store]**部分中,配置本地文件系统存储和图像文件的位置:
[glance_store]
…
stores = file,http default_store = file filesystem_store_datadir = /var/lib/glance/images/
<a name="DePht"></a>### ⑦:填充影像服务数据库:
su -s /bin/sh -c “glance-manage db_sync” glance
…….
<a name="A4oO6"></a>### ⑧:完成安装
systemctl enable openstack-glance-api.service
systemctl start openstack-glance-api.service
验证:<br />上传个镜像看是否正常上传
[root@controller ~]# glance image-create —name cirros01 —disk-format qcow2 —container-format bare —progress < cirros-0.3.3-x86_64-disk.img [=============================>] 100% +—————————+—————————————————————————————————————————+ | Property | Value | +—————————+—————————————————————————————————————————+ | checksum | ee1eca47dc88f4879d8a229cc70a07c6 | | container_format | bare | | created_at | 2021-12-25T13:51:42Z | | disk_format | qcow2 | | id | d7b6d325-d557-4982-bc54-182b092bab23 | | min_disk | 0 | | min_ram | 0 | | name | cirros01 | | os_hash_algo | sha512 | | os_hash_value | 1b03ca1bc3fafe448b90583c12f367949f8b0e665685979d95b004e48574b953316799e23240f4f7 | | | 39d1b5eb4c4ca24d38fdc6f4f9d8247a2bc64db25d6bbdb2 | | os_hidden | False | | owner | 2d35428a028244c58e5dbf918ea87931 | | protected | False | | size | 13287936 | | status | active | | tags | [] | | updated_at | 2021-12-25T13:51:42Z | | virtual_size | Not available | | visibility | shared | +—————————+—————————————————————————————————————————+
[root@controller ~]# glance image-list +———————————————————+—————+ | ID | Name | +———————————————————+—————+ | d7b6d325-d557-4982-bc54-182b092bab23 | cirros01 | +———————————————————+—————+
<a name="NtB2v"></a>## 3):Placement服务安装**安装运行在控制节点上**<a name="uykxW"></a>### ①:先决条件在安装placement服务前需要先在数据库中创建placement服务的存储库,并且授予一定的权限1. 使用root身份登陆数据库,创建placement数据库`$ mysql -u root -p000000`2. 创建**placement**数据库,并赋予适当的权限```plsqlMariaDB [(none)]> CREATE DATABASE placement;MariaDB [(none)]> GRANT ALL PRIVILEGES ON placement.* TO 'placement'@'localhost' \IDENTIFIED BY '000000';MariaDB [(none)]> GRANT ALL PRIVILEGES ON placement.* TO 'placement'@'%' \IDENTIFIED BY '000000';
②:来源admin凭据来访问仅管理员CLI命令
③:使用您选择的创建一个安置服务用户
[root@controller ~]# openstack user create --domain default --password-prompt placementUser Password:Repeat User Password:+---------------------+----------------------------------+| Field | Value |+---------------------+----------------------------------+| domain_id | default || enabled | True || id | ac89572a77df4b2cad09e214f8051a51 || name | placement || options | {} || password_expires_at | None |+---------------------+----------------------------------+
④:将 Placement 用户添加到具有 admin 角色的服务项目:
$ openstack role add --project service --user placement admin
⑤:在服务目录中创建 Placement API 条目
[root@controller ~]# openstack service create --name placement --description "Placement API" placement+-------------+----------------------------------+| Field | Value |+-------------+----------------------------------+| description | Placement API || enabled | True || id | 72a7937d8bfa44a7a9d2ad7c3d42264c || name | placement || type | placement |+-------------+----------------------------------+
⑥:创建 Placement API 服务端点
[root@controller ~]# openstack endpoint create --region RegionOne placement public http://controller:8778+--------------+----------------------------------+| Field | Value |+--------------+----------------------------------+| enabled | True || id | 3d363de9c35e45088b7f18b50d9147e7 || interface | public || region | RegionOne || region_id | RegionOne || service_id | 72a7937d8bfa44a7a9d2ad7c3d42264c || service_name | placement || service_type | placement || url | http://controller:8778 |+--------------+----------------------------------+[root@controller ~]# openstack endpoint create --region RegionOne placement internal http://controller:8778+--------------+----------------------------------+| Field | Value |+--------------+----------------------------------+| enabled | True || id | 7eba6032af4d4a4f8b3502264c9efb65 || interface | internal || region | RegionOne || region_id | RegionOne || service_id | 72a7937d8bfa44a7a9d2ad7c3d42264c || service_name | placement || service_type | placement || url | http://controller:8778 |+--------------+----------------------------------+[root@controller ~]# openstack endpoint create --region RegionOne placement admin http://controller:8778+--------------+----------------------------------+| Field | Value |+--------------+----------------------------------+| enabled | True || id | 502df843701f4c7094cd6bf5fd0f6908 || interface | admin || region | RegionOne || region_id | RegionOne || service_id | 72a7937d8bfa44a7a9d2ad7c3d42264c || service_name | placement || service_type | placement || url | http://controller:8778 |+--------------+----------------------------------+
⑦:安装和配置组件
安装软件包:
# yum install openstack-placement-api -y
编辑/etc/placement/placement.conf文件并完成以下操作:
在该[placement_database]部分中,配置数据库访问:
[placement_database]# ...connection = mysql+pymysql://placement:000000@controller/placement #注意密码
在[api]和[keystone_authtoken]部分,配置身份服务访问: ``` [api]
…
auth_strategy = keystone
[keystone_authtoken]
…
auth_url = http://controller:5000/v3 memcached_servers = controller:11211 auth_type = password project_domain_name = Default user_domain_name = Default project_name = service username = placement password = 000000 #注意密码
3. 填充**placement**数据库
su -s /bin/sh -c “placement-manage db sync” placement
<a name="FqWON"></a>### ⑧:完成安装
systemctl restart httpd
验证:<br />对资源控制器状态进行检测
[root@controller ~]# placement-status upgrade check +—————————————————+ | Upgrade Check Results | +—————————————————+ | Check: Missing Root Provider IDs | | Result: Success | | Details: None | +—————————————————+ | Check: Incomplete Consumers | | Result: Success | | Details: None | +—————————————————+
<a name="iPZbG"></a>## 4):nova服务安装<a name="skmtM"></a>### 1:controller节点本节介绍如何在控制器节点上安装和配置代号为nova的Compute服务。<a name="Wh4go"></a>#### ①:先决条件在安装和配置 Compute 服务之前,您必须创建数据库、服务凭证和 API 端点。1. 创建nova想关的数据库
$ mysql -u root -p000000
创建nova_api,nova和nova_cell0数据库:
ariaDB [(none)]> CREATE DATABASE nova_api; MariaDB [(none)]> CREATE DATABASE nova; MariaDB [(none)]> CREATE DATABASE nova_cell0;
2. 授予对数据库的适当访问权限
注意密码
MariaDB [(none)]> GRANT ALL PRIVILEGES ON nova_api. TO ‘nova’@’localhost’ \ IDENTIFIED BY ‘000000’; MariaDB [(none)]> GRANT ALL PRIVILEGES ON nova_api. TO ‘nova’@’%’ \ IDENTIFIED BY ‘000000’;
MariaDB [(none)]> GRANT ALL PRIVILEGES ON nova. TO ‘nova’@’localhost’ \ IDENTIFIED BY ‘000000’; MariaDB [(none)]> GRANT ALL PRIVILEGES ON nova. TO ‘nova’@’%’ \ IDENTIFIED BY ‘000000’;
MariaDB [(none)]> GRANT ALL PRIVILEGES ON nova_cell0. TO ‘nova’@’localhost’ \ IDENTIFIED BY ‘000000’; MariaDB [(none)]> GRANT ALL PRIVILEGES ON nova_cell0. TO ‘nova’@’%’ \ IDENTIFIED BY ‘000000’;
3. 来源**admin**凭据来访问仅管理员CLI命令`$ . admin-openrc`<a name="WFRwU"></a>#### ②:创建计算服务凭证1. 创建nova用户
[root@controller ~]# openstack user create —domain default —password-prompt nova User Password: Repeat User Password: +——————————-+—————————————————+ | Field | Value | +——————————-+—————————————————+ | domain_id | default | | enabled | True | | id | 21160e9d248f453295e01cd0313a4b9f | | name | nova | | options | {} | | password_expires_at | None | +——————————-+—————————————————+
2. **admin**为**nova**用户添加角色:
$ openstack role add —project service —user nova admin
3. 创建**nova**服务实体
[root@controller ~]# openstack service create —name nova —description “OpenStack Compute” compute +——————-+—————————————————+ | Field | Value | +——————-+—————————————————+ | description | OpenStack Compute | | enabled | True | | id | 335f8d96662b412db56ca4163b2f554e | | name | nova | | type | compute | +——————-+—————————————————+
<a name="hJLoD"></a>#### ③:创建 Compute API 服务端点:
[root@controller ~]# openstack endpoint create —region RegionOne compute public http://controller:8774/v2.1 +———————+—————————————————+ | Field | Value | +———————+—————————————————+ | enabled | True | | id | 37bd3f96a2914efc8f67fabef0e795c6 | | interface | public | | region | RegionOne | | region_id | RegionOne | | service_id | 335f8d96662b412db56ca4163b2f554e | | service_name | nova | | service_type | compute | | url | http://controller:8774/v2.1 | +———————+—————————————————+ [root@controller ~]# openstack endpoint create —region RegionOne compute internal http://controller:8774/v2.1 +———————+—————————————————+ | Field | Value | +———————+—————————————————+ | enabled | True | | id | 156eadb75ac346858a1220ebc224347c | | interface | internal | | region | RegionOne | | region_id | RegionOne | | service_id | 335f8d96662b412db56ca4163b2f554e | | service_name | nova | | service_type | compute | | url | http://controller:8774/v2.1 | +———————+—————————————————+ [root@controller ~]# openstack endpoint create —region RegionOne compute admin http://controller:8774/v2.1 +———————+—————————————————+ | Field | Value | +———————+—————————————————+ | enabled | True | | id | d0b1ffa02a124e0d8e678422c7bf1bc2 | | interface | admin | | region | RegionOne | | region_id | RegionOne | | service_id | 335f8d96662b412db56ca4163b2f554e | | service_name | nova | | service_type | compute | | url | http://controller:8774/v2.1 | +———————+—————————————————+
<a name="ECuRZ"></a>#### ④:安装和配置组件1. 安装软件包
yum install openstack-nova-api openstack-nova-conductor \ openstack-nova-novncproxy openstack-nova-scheduler -y
<a name="Zz0vs"></a>#### ⑤:编辑/etc/nova/nova.conf文件并完成以下操作1. 编辑**/etc/nova/nova.conf**文件在该**[DEFAULT]**部分中,仅启用计算和元数据 API:
[DEFAULT]
…
enabled_apis = osapi_compute,metadata
2. 在**[api_database]**和**[database]**部分,配置数据库访问:
[api_database]
…
connection = mysql+pymysql://nova:000000@controller/nova_api
[database]
…
connection = mysql+pymysql://nova:000000@controller/nova
3. 在该**[DEFAULT]**部分,配置**RabbitMQ**消息队列访问:
[DEFAULT]
…
transport_url = rabbit://openstack:000000@controller:5672/
4. 在**[api]**和**[keystone_authtoken]**部分,配置身份服务访问:
[api]
…
auth_strategy = keystone
[keystone_authtoken]
…
www_authenticate_uri = http://controller:5000/ auth_url = http://controller:5000/ memcached_servers = controller:11211 auth_type = password project_domain_name = Default user_domain_name = Default project_name = service username = nova password = 000000 #注意更改密码
5. 在该**[DEFAULT]**部分中,配置**my_ip**选项以使用控制器节点的管理接口 IP 地址:
[DEFAULT] my_ip = 192.168.44.10 #控制节点的管理网络ip(controller节点第一块网卡)
在该**[DEFAULT]**部分中,启用对网络服务的支持:
[DEFAULT]
…
use_neutron = true firewall_driver = nova.virt.firewall.NoopFirewallDriver
6. 配置**/etc/nova/nova.conf**的**[neutron]**部分在该**[vnc]**部分中,将 VNC 代理配置为使用控制器节点的管理接口 IP 地址:
[vnc] enabled = true
…
server_listen = 192.168.44.10 #controller节点中监听的端口是自身 server_proxyclient_address = 192.168.44.10 #controller节点中代理的端口是自身
在该**[glance]**部分中,配置 Image 服务 API 的位置:
[glance]
…
api_servers = http://controller:9292
在该**[oslo_concurrency]**部分中,配置锁定路径:
[oslo_concurrency]
…
lock_path = /var/lib/nova/tmp
在**[placement]**部分中,配置对 Placement 服务的访问:
[placement]
…
region_name = RegionOne project_domain_name = Default project_name = service auth_type = password user_domain_name = Default auth_url = http://controller:5000/v3 username = placement password = 000000 #注意修改密码
<a name="fGqOH"></a>#### ⑥:填充nova-api数据库:
su -s /bin/sh -c “nova-manage api_db sync” nova
<a name="sF7m8"></a>#### ⑦:注册cell0数据库:
su -s /bin/sh -c “nova-manage cell_v2 map_cell0” nova
<a name="M0w6P"></a>#### ⑧:创建cell1单元格:
su -s /bin/sh -c “nova-manage cell_v2 create_cell —name=cell1 —verbose” nova
<a name="x8EtC"></a>#### ⑨:填充 nova 数据库:
su -s /bin/sh -c “nova-manage db sync” nova
<a name="SfPDS"></a>#### ⑩:验证 nova cell0 和 cell1 是否正确注册:
su -s /bin/sh -c “nova-manage cell_v2 list_cells” nova +———-+———————————————————+——————————————————————————+———————————————————————————————+—————+ | Name | UUID | Transport URL | Database Connection | Disabled | +———-+———————————————————+——————————————————————————+———————————————————————————————+—————+ | cell0 | 00000000-0000-0000-0000-000000000000 | none:/ | mysql+pymysql://nova:@controller/nova_cell0?charset=utf8 | False | | cell1 | f690f4fd-2bc5-4f15-8145-db561a7b9d3d | rabbit://openstack:@controller:5672/nova_cell1 | mysql+pymysql://nova:**@controller/nova_cell1?charset=utf8 | False | +———-+———————————————————+——————————————————————————+———————————————————————————————+—————+
<a name="Sw3cY"></a>#### 完成安装并加入到开机启动项:
systemctl enable \
openstack-nova-api.service \openstack-nova-scheduler.service \openstack-nova-conductor.service \openstack-nova-novncproxy.service
systemctl start \
openstack-nova-api.service \openstack-nova-scheduler.service \openstack-nova-conductor.service \openstack-nova-novncproxy.service
<a name="Zsuz8"></a>### 2:compute节点<a name="ZfWqw"></a>#### ①:安装和配置组件本节介绍如何在计算节点上安装和配置计算服务。该服务支持多个管理程序来部署实例或虚拟机 (VM)。为简单起见,此配置在支持虚拟机硬件加速的计算节点上使用 Quick EMUlator (QEMU) 管理程序和基于内核的 VM (KVM) 扩展。在旧硬件上,此配置使用通用 QEMU 管理程序。您可以按照这些说明稍加修改,以使用额外的计算节点水平扩展您的环境。
yum install openstack-nova-compute -y
<a name="nEM4H"></a>#### ②:编辑/etc/nova/nova.conf文件并完成以下操作1. 在该**[DEFAULT]**部分中,仅启用计算和元数据 API:
[DEFAULT]
…
enabled_apis = osapi_compute,metadata
在该**[DEFAULT]**部分,配置**RabbitMQ**消息队列访问:
[DEFAULT]
…
transport_url = rabbit://openstack:000000@controller:5672/ #注意修改密码
在**[api]**和**[keystone_authtoken]**部分,配置身份服务访问:
[api]
…
auth_strategy = keystone
[keystone_authtoken]
…
www_authenticate_uri = http://controller:5000/ auth_url = http://controller:5000/ memcached_servers = controller:11211 auth_type = password project_domain_name = Default user_domain_name = Default project_name = service username = nova password = 000000 #注意密码
在该**[DEFAULT]**部分中,配置**my_ip**选项:
[DEFAULT]
…
my_ip = 192.168.44.20 #填写compute节点的管理ip(第一块网卡)
在该**[DEFAULT]**部分中,启用对网络服务的支持:
[DEFAULT]
…
use_neutron = true firewall_driver = nova.virt.firewall.NoopFirewallDriver
在**[vnc]**部分中,启用和配置远程控制台访问:
[vnc]
…
enabled = true server_listen = 0.0.0.0 server_proxyclient_address = 192.168.44.20 #compute节点代理点是自身管理网卡(第一块网卡) novncproxy_base_url = http://192.168.44.10:6080/vnc_auto.html #注意ip
在该**[glance]**部分中,配置 Image 服务 API 的位置:
[glance]
…
api_servers = http://controller:9292
在该**[oslo_concurrency]**部分中,配置锁定路径:
[oslo_concurrency]
…
lock_path = /var/lib/nova/tmp
在**[placement]**部分中,配置 Placement API:
[placement]
…
region_name = RegionOne project_domain_name = Default project_name = service auth_type = password user_domain_name = Default auth_url = http://controller:5000/v3 username = placement password = 000000 #注意修改密码
<a name="wsGPi"></a>#### ③:完成安装1. 首先检查你的controller节点是否支持虚拟机的硬件加速
$ egrep -c ‘(vmx|svm)’ /proc/cpuinfo
如果此命令返回值,则您的计算节点支持硬件加速,这通常不需要额外的配置。<br />如果此命令返回值**0**,则您的计算节点不支持硬件加速,您必须配置**libvirt**为使用 QEMU 而不是 KVM。<br />如果不支持硬件虚拟机硬件加速则需要修改controller节点的**/etc/nova/nova.conf中的[libvirt]**部分建议在VMware中设置不开启硬件虚拟化,建议在配置文件中开启qemu(下方不要勾选)<br />*(这个看个人电脑情况,我的只有使用qemu才行)<br />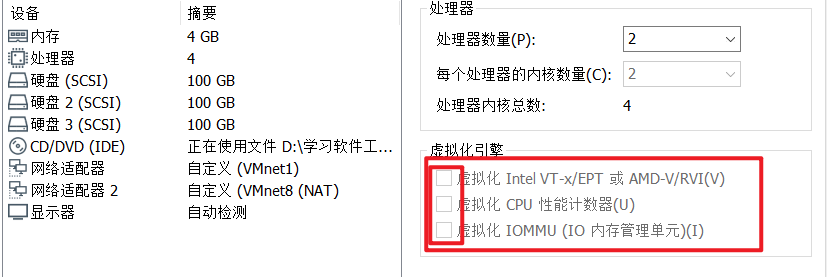
[libvirt]
…
virt_type = qemu
2. 启动 Compute 服务及其依赖项,并将它们配置为在系统启动时自动启动:
systemctl enable libvirtd.service openstack-nova-compute.service
systemctl start libvirtd.service openstack-nova-compute.service
④:将计算节点添加到cell数据库中(**以下两步在controller节点操作**)1. 获取管理员凭据以启用仅限管理员的 CLI 命令,然后确认数据库中有计算主机:
$ . admin-openrc
$ openstack compute service list —service nova-compute +——+———-+———————+———+———-+————-+——————————————+ | ID | Host | Binary | Zone | State | Status | Updated At | +——+———-+———————+———+———-+————-+——————————————+ | 1 | node1 | nova-compute | nova | up | enabled | 2017-04-14T15:30:44.000000 | +——+———-+———————+———+———-+————-+——————————————+
2. 发现计算主机:
[root@controller ~]# su -s /bin/sh -c “nova-manage cell_v2 discover_hosts —verbose” nova Found 2 cell mappings. Skipping cell0 since it does not contain hosts. Getting computes from cell ‘cell1’: 505ee0d4-107a-4a77-9408-075719fdda36 Checking host mapping for compute host ‘compute’: 85510419-6463-4da8-9ae6-ea8e50540694 Creating host mapping for compute host ‘compute’: 85510419-6463-4da8-9ae6-ea8e50540694 Found 1 unmapped computes in cell: 505ee0d4-107a-4a77-9408-075719fdda36
<a name="qC1J6"></a>#### ④:验证操作在controller节点
[root@controller ~]# openstack compute service list +——+————————+——————+—————+————-+———-+——————————————+ | ID | Binary | Host | Zone | Status | State | Updated At | +——+————————+——————+—————+————-+———-+——————————————+ | 1 | nova-scheduler | controller | internal | enabled | up | 2021-12-25T07:39:54.000000 | | 2 | nova-conductor | controller | internal | enabled | up | 2021-12-25T07:39:54.000000 | | 5 | nova-compute | compute | nova | enabled | up | 2021-12-25T07:39:57.000000 | +——+————————+——————+—————+————-+———-+——————————————+
```[root@controller ~]# openstack catalog list+-----------+-----------+-----------------------------------------+| Name | Type | Endpoints |+-----------+-----------+-----------------------------------------+| placement | placement | RegionOne || | | admin: http://controller:8778 || | | RegionOne || | | public: http://controller:8778 || | | RegionOne || | | internal: http://controller:8778 || | | || keystone | identity | RegionOne || | | internal: http://controller:5000/v3/ || | | RegionOne || | | public: http://controller:5000/v3/ || | | RegionOne || | | admin: http://controller:5000/v3/ || | | || glance | image | RegionOne || | | internal: http://controller:9292 || | | RegionOne || | | public: http://controller:9292 || | | RegionOne || | | admin: http://controller:9292 || | | || nova | compute | RegionOne || | | internal: http://controller:8774/v2.1 || | | RegionOne || | | admin: http://controller:8774/v2.1 || | | RegionOne || | | public: http://controller:8774/v2.1 || | | |+-----------+-----------+-----------------------------------------+
[root@controller ~]# nova-status upgrade check+--------------------------------+| Upgrade Check Results |+--------------------------------+| Check: Cells v2 || Result: Success || Details: None |+--------------------------------+| Check: Placement API || Result: Success || Details: None |+--------------------------------+| Check: Ironic Flavor Migration || Result: Success || Details: None |+--------------------------------+| Check: Cinder API || Result: Success || Details: None |+--------------------------------+
5):安装neutron组件
1:controller节点
①:先决条件
- 要创建数据库并要创建数据库 ``` $ mysql -u root -p000000
创建neutron库
MariaDB [(none)] CREATE DATABASE neutron;
授予对**neutron**数据库的适当访问权限,替换 **NEUTRON_DBPASS**为合适的密码:
MariaDB [(none)]> GRANT ALL PRIVILEGES ON neutron. TO ‘neutron’@’localhost’ \ IDENTIFIED BY ‘000000’; MariaDB [(none)]> GRANT ALL PRIVILEGES ON neutron. TO ‘neutron’@’%’ \ IDENTIFIED BY ‘000000’; #注意修改密码
<a name="uhRFU"></a>#### ②:创建网络服务凭证1. 创建**neutron**用户:
$ openstack user create —domain default —password-prompt neutron
User Password: Repeat User Password: +——————————-+—————————————————+ | Field | Value | +——————————-+—————————————————+ | domain_id | default | | enabled | True | | id | fdb0f541e28141719b6a43c8944bf1fb | | name | neutron | | options | {} | | password_expires_at | None | +——————————-+—————————————————+
2. **admin**为**neutron**用户添加角色:
$ openstack role add —project service —user neutron admin
3. 创建**neutron**服务实体:
$ openstack service create —name neutron \ —description “OpenStack Networking” network
+——————-+—————————————————+ | Field | Value | +——————-+—————————————————+ | description | OpenStack Networking | | enabled | True | | id | f71529314dab4a4d8eca427e701d209e | | name | neutron | | type | network | +——————-+—————————————————+
<a name="vg8sE"></a>#### ③:创建网络服务 API 端点:
openstack endpoint create —region RegionOne \ network public http://controller:9696
+———————+—————————————————+ | Field | Value | +———————+—————————————————+ | enabled | True | | id | 85d80a6d02fc4b7683f611d7fc1493a3 | | interface | public | | region | RegionOne | | region_id | RegionOne | | service_id | f71529314dab4a4d8eca427e701d209e | | service_name | neutron | | service_type | network | | url | http://controller:9696 | +———————+—————————————————+
$ openstack endpoint create —region RegionOne \ network internal http://controller:9696
+———————+—————————————————+ | Field | Value | +———————+—————————————————+ | enabled | True | | id | 09753b537ac74422a68d2d791cf3714f | | interface | internal | | region | RegionOne | | region_id | RegionOne | | service_id | f71529314dab4a4d8eca427e701d209e | | service_name | neutron | | service_type | network | | url | http://controller:9696 | +———————+—————————————————+
$ openstack endpoint create —region RegionOne \ network admin http://controller:9696
+———————+—————————————————+ | Field | Value | +———————+—————————————————+ | enabled | True | | id | 1ee14289c9374dffb5db92a5c112fc4e | | interface | admin | | region | RegionOne | | region_id | RegionOne | | service_id | f71529314dab4a4d8eca427e701d209e | | service_name | neutron | | service_type | network | | url | http://controller:9696 | +———————+—————————————————+
<a name="ymmrC"></a>#### ④:配置网络选项这里有两种方案,建议选择第二种自助服务网络。下面演示第二种(步骤④-⑦)<br />链接:[https://docs.openstack.org/neutron/train/install/controller-install-rdo.html](https://docs.openstack.org/neutron/train/install/controller-install-rdo.html)**自助服务网络:**1. **安装组件:**
yum install openstack-neutron openstack-neutron-ml2 \
openstack-neutron-linuxbridge ebtables -y
2. 配置服务器组件编辑**/etc/neutron/neutron.conf**文件并完成以下操作:<br />在该**[database]**部分中,配置数据库访问:
[database]
…
connection = mysql+pymysql://neutron:000000@controller/neutron #注意修改密码
在该**[DEFAULT]**部分中
[DEFAULT]
…
core_plugin = ml2 service_plugins = router allow_overlapping_ips = true transport_url = rabbit://openstack:000000@controller auth_strategy = keystone notify_nova_on_port_status_changes = true notify_nova_on_port_data_changes = true
在**[keystone_authtoken]**部分中
[keystone_authtoken]
…
www_authenticate_uri = http://controller:5000 auth_url = http://controller:5000 memcached_servers = controller:11211 auth_type = password project_domain_name = default user_domain_name = default project_name = service username = neutron password = 000000 #注意更改密码
在**[nova]**部分中
[nova]
…
auth_url = http://controller:5000 auth_type = password project_domain_name = default user_domain_name = default region_name = RegionOne project_name = service username = nova password = 000000 #注意更改密码
在该**[oslo_concurrency]**部分中,配置锁定路径:
[oslo_concurrency]
…
lock_path = /var/lib/neutron/tmp
<a name="hU2Tq"></a>#### ⑤:配置模块化第 2 层 (ML2) 插件ML2 插件使用 Linux 桥接机制为实例构建第 2 层(桥接和交换)虚拟网络基础设施。<br />编辑**/etc/neutron/plugins/ml2/ml2_conf.ini**文件并完成以下操作:<br />在该**[ml2]**部分中,启用平面、VLAN 和 VXLAN 网络:
[ml2]
…
type_drivers = flat,vlan,vxlan
在该**[ml2]**部分中,启用 VXLAN 自助网络:
[ml2]
…
tenant_network_types = vxlan
在该**[ml2]**部分中,启用 Linux 桥接和二层填充机制:
[ml2]
…
mechanism_drivers = linuxbridge,l2population
在该**[ml2]**部分中,启用端口安全扩展驱动程序:
[ml2]
…
extension_drivers = port_security
在该**[ml2_type_flat]**部分中,将提供者虚拟网络配置为平面网络:
[ml2_type_flat]
…
flat_networks = provider
在该**[ml2_type_vxlan]**部分中,配置自助网络的VXLAN网络标识符范围:
[ml2_type_vxlan]
…
vni_ranges = 1:1000
在该**[securitygroup]**部分中,启用ipset以提高安全组规则的效率:
[securitygroup]
…
enable_ipset = true
<a name="Q7XkK"></a>#### ⑥:配置 Linux 网桥代理Linux 桥接代理为实例构建第 2 层(桥接和交换)虚拟网络基础架构并处理安全组。- 编辑**/etc/neutron/plugins/ml2/linuxbridge_agent.ini**文件并完成以下操作:在该**[linux_bridge]**部分中,将提供者虚拟网络映射到提供者物理网络接口:
[linux_bridge] physical_interface_mappings = provider:ens33 #ens33为服务器的第二块网卡名称,当做外部网络的网卡
在该**[vxlan]**部分中,启用VXLAN覆盖网络,配置处理覆盖网络的物理网络接口的IP地址,并启用二层填充:
[vxlan] enable_vxlan = true local_ip = 192.168.44.10 #本地管理网络的ip l2_population = true
在该**[securitygroup]**部分中,启用安全组并配置 Linux 网桥 iptables 防火墙驱动程序:
[securitygroup]
…
enable_security_group = true
firewall_driver = neutron.agent.linux.iptables_firewall.IptablesFirewallDriver
修改/etc/sysctl.conf追加写入如下内容:
net.bridge.bridge-nf-call-iptables = 1 net.bridge.bridge-nf-call-ip6tables = 1
[root@node1 ~]# modprobe br_netfilter [root@node1 ~]# sysctl -p
⑦:配置三层代理与DHCP代理<br />第 3 层 (L3) 代理为自助服务虚拟网络提供路由和 NAT 服务。- 编辑**/etc/neutron/l3_agent.ini**文件并完成以下操作:- 在该**[DEFAULT]**部分,配置Linux网桥接口驱动:
[DEFAULT]
…
interface_driver = linuxbridge
DHCP 代理为虚拟网络提供 DHCP 服务。- 编辑**/etc/neutron/dhcp_agent.ini**文件并完成以下操作:- 在该**[DEFAULT]**部分中,配置 Linux 桥接接口驱动程序、Dnsmasq DHCP 驱动程序,并启用隔离元数据,以便提供商网络上的实例可以通过网络访问元数据:
[DEFAULT]
…
interface_driver = linuxbridge dhcp_driver = neutron.agent.linux.dhcp.Dnsmasq enable_isolated_metadata = true
<a name="DeSFT"></a>#### ⑦:配置元数据代理元数据代理向实例提供配置信息,例如凭据。- 编辑**/etc/neutron/metadata_agent.ini**文件并完成以下操作:- 在该**[DEFAULT]**部分中,配置元数据主机和共享密钥:
[DEFAULT]
…
nova_metadata_host = controller metadata_proxy_shared_secret = 000000 #注意修改密码
<a name="NDnZ9"></a>#### ⑧:配置controller节点以使用 Networking 服务编辑**/etc/nova/nova.conf**文件并执行以下操作:- 在该**[neutron]**部分,配置访问参数,启用元数据代理,并配置secret:
[neutron]
…
auth_url = http://controller:5000 auth_type = password project_domain_name = default user_domain_name = default region_name = RegionOne project_name = service username = neutron password = 000000 #注意修改密码 service_metadata_proxy = true metadata_proxy_shared_secret = 000000 #注意修改密码
<a name="GBAeO"></a>#### ⑨:完成安装1. 网络服务初始化脚本需要一个**/etc/neutron/plugin.ini**指向 ML2 插件配置文件的符号链接 **/etc/neutron/plugins/ml2/ml2_conf.ini**。如果此符号链接不存在,请使用以下命令创建它:
ln -s /etc/neutron/plugins/ml2/ml2_conf.ini /etc/neutron/plugin.ini
2. 填充数据库:
su -s /bin/sh -c “neutron-db-manage —config-file /etc/neutron/neutron.conf \
—config-file /etc/neutron/plugins/ml2/ml2_conf.ini upgrade head” neutron
3. 重启计算 API 服务:
systemctl restart openstack-nova-api.service
4. 启动网络服务并将它们配置为在系统启动时启动。
systemctl enable neutron-server.service \
neutron-linuxbridge-agent.service neutron-dhcp-agent.service \ neutron-metadata-agent.service
systemctl start neutron-server.service \
neutron-linuxbridge-agent.service neutron-dhcp-agent.service \ neutron-metadata-agent.service
对于网络选项 2(这次演示搭建的就是网络2),还启用并启动第 3 层服务:
systemctl enable neutron-l3-agent.service
systemctl start neutron-l3-agent.service
<a name="AMMCz"></a>### 2:compute节点安装<a name="muq8n"></a>#### ①:安装组件
yum install openstack-neutron-linuxbridge ebtables ipset -y
<a name="KVByM"></a>#### ②:配置通用组件Networking 通用组件配置包括身份验证机制、消息队列和插件。编辑**/etc/neutron/neutron.conf**文件并完成以下操作:- 在该**[database]**部分中,注释掉所有**connection**选项,因为计算节点不直接访问数据库。- 在该**[DEFAULT]**部分,配置**RabbitMQ** 消息队列访问:
[DEFAULT] transport_url = rabbit://openstack:000000@controller
在**[DEFAULT]**和**[keystone_authtoken]**部分,配置身份服务访问:
[DEFAULT]
…
auth_strategy = keystone
[keystone_authtoken]
…
www_authenticate_uri = http://controller:5000 auth_url = http://controller:5000 memcached_servers = controller:11211 auth_type = password project_domain_name = default user_domain_name = default project_name = service username = neutron password = 000000 #注意更改密码
在该**[oslo_concurrency]**部分中,配置锁定路径:
[oslo_concurrency]
…
lock_path = /var/lib/neutron/tmp
<a name="xVx36"></a>#### ③:配置网络选项compute选择的模式要与controller选择的模式相同,所以这里也选择第二种自助服务网络<a name="S5scr"></a>#### ④:配置Linux网桥代理Linux 桥接代理为实例构建第 2 层(桥接和交换)虚拟网络基础架构并处理安全组。- 编辑**/etc/neutron/plugins/ml2/linuxbridge_agent.ini**文件并完成以下操作:- 在该**[linux_bridge]**部分中,将提供者虚拟网络映射到提供者物理网络接口:
[linux_bridge] physical_interface_mappings = provider:ens33 #ens33是第二块网卡,当做外部网络的网卡
在该**[vxlan]**部分中,启用VXLAN覆盖网络,配置处理覆盖网络的物理网络接口的IP地址,并启用二层填充:
[vxlan] enable_vxlan = true local_ip = 192.168.44.20 #当前所在主机的管理网络ip l2_population = true
在该**[securitygroup]**部分中,启用安全组并配置 Linux 网桥 iptables 防火墙驱动程序:
[securitygroup]
…
enable_security_group = true firewall_driver = neutron.agent.linux.iptables_firewall.IptablesFirewallDriver
通过验证以下所有**sysctl**值都设置为,确保您的 Linux 操作系统内核支持网桥过滤器**1**:<br />修改/etc/sysctl.conf追加写入如下内容:
net.bridge.bridge-nf-call-iptables = 1 net.bridge.bridge-nf-call-ip6tables = 1
<a name="hephs"></a>#### ⑤:配置compute节点使用network服务编辑**/etc/nova/nova.conf**文件并完成以下操作:- 在该**[neutron]**部分,配置访问参数:
[neutron]
…
auth_url = http://controller:5000 auth_type = password project_domain_name = default user_domain_name = default region_name = RegionOne project_name = service username = neutron password = 000000
<a name="ohp4U"></a>#### ⑥:完成安装1. 重启计算服务:
systemctl restart openstack-nova-compute.service
2. 启动 Linux 网桥代理并将其配置为在系统启动时启动:
systemctl enable neutron-linuxbridge-agent.service
systemctl start neutron-linuxbridge-agent.service
<a name="qpDnE"></a>#### ⑦:验证操作controller 节点
[root@controller ~]# openstack network agent list +———————————————————+——————————+——————+—————————-+———-+———-+—————————————-+ | ID | Agent Type | Host | Availability Zone | Alive | State | Binary | +———————————————————+——————————+——————+—————————-+———-+———-+—————————————-+ | 1f178085-5af5-4d83-9c11-43878b576a71 | L3 agent | controller | nova | :-) | UP | neutron-l3-agent | | 2f222344-680e-49d7-9ee1-6e186ebbf749 | Linux bridge agent | compute | None | :-) | UP | neutron-linuxbridge-agent | | 91dfd975-e07c-4ce4-b524-f8810273d67d | DHCP agent | controller | nova | :-) | UP | neutron-dhcp-agent | | d63f5518-0bce-4a51-9930-985012e67614 | Linux bridge agent | controller | None | :-) | UP | neutron-linuxbridge-agent | | f7356ff9-6e9e-4f11-be35-a349e9c41b8f | Metadata agent | controller | None | :-) | UP | neutron-metadata-agent | +———————————————————+——————————+——————+—————————-+———-+———-+—————————————-+
compute节点
[root@compute ~]# openstack network agent list +———————————————————+——————————+——————+—————————-+———-+———-+—————————————-+ | ID | Agent Type | Host | Availability Zone | Alive | State | Binary | +———————————————————+——————————+——————+—————————-+———-+———-+—————————————-+ | 1f178085-5af5-4d83-9c11-43878b576a71 | L3 agent | controller | nova | :-) | UP | neutron-l3-agent | | 2f222344-680e-49d7-9ee1-6e186ebbf749 | Linux bridge agent | compute | None | :-) | UP | neutron-linuxbridge-agent | | 91dfd975-e07c-4ce4-b524-f8810273d67d | DHCP agent | controller | nova | :-) | UP | neutron-dhcp-agent | | d63f5518-0bce-4a51-9930-985012e67614 | Linux bridge agent | controller | None | :-) | UP | neutron-linuxbridge-agent | | f7356ff9-6e9e-4f11-be35-a349e9c41b8f | Metadata agent | controller | None | :-) | UP | neutron-metadata-agent | +———————————————————+——————————+——————+—————————-+———-+———-+—————————————-+
<a name="yc90Y"></a>## 6:):dashboard界面服务安装dashboard安装在controller节点<a name="dALOd"></a>### ①:安装软件包
yum install openstack-dashboard -y
<a name="k82nN"></a>### ②:修改配置文件编辑 **/etc/openstack-dashboard/local_settings** 文件并完成以下操作:- 配置仪表板以在**controller**节点上使用 OpenStack 服务 :
OPENSTACK_HOST = “controller”
- 允许您的主机访问仪表板:
ALLOWED_HOSTS = [‘*’, ‘localhost’]
- 配置**memcached**会话存储服务:
SESSION_ENGINE = ‘django.contrib.sessions.backends.cache’
CACHES = { ‘default’: { ‘BACKEND’: ‘django.core.cache.backends.memcached.MemcachedCache’, ‘LOCATION’: ‘controller:11211’, #该为controller } }
- 启用身份 API 版本 3:
OPENSTACK_KEYSTONE_URL = “http://%s:5000/v3“ % OPENSTACK_HOST
- 启用对域的支持:
OPENSTACK_KEYSTONE_MULTIDOMAIN_SUPPORT = True
- 配置 API 版本:
OPENSTACK_API_VERSIONS = { “identity”: 3, “image”: 2, “volume”: 3, }
- 配置**Default**为您通过仪表板创建的用户的默认域:
OPENSTACK_KEYSTONE_DEFAULT_DOMAIN = “Default”
- 配置**user**为您通过仪表板创建的用户的默认角色:
OPENSTACK_KEYSTONE_DEFAULT_ROLE = “user”
<a name="QpG4o"></a>### ③:修改http配置文件/etc/httpd/conf.d/openstack-dashboard.conf如果不包括一下内容,则添加以下行 。
WSGIApplicationGroup %{GLOBAL}
修改/etc/httpd/conf/httpd.conf为granted<br />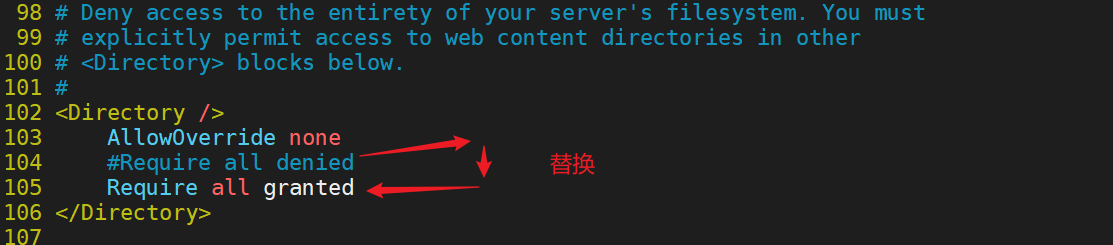<a name="k2wm4"></a>### ④:完成安装重新启动 Web 服务器和会话存储服务:
systemctl restart httpd.service memcached.service
<a name="fgDel"></a>### ⑤:通过浏览器进行访问http://controller节点的管理的ip/dashboardhttp://192.168.44.10/dashboard <br />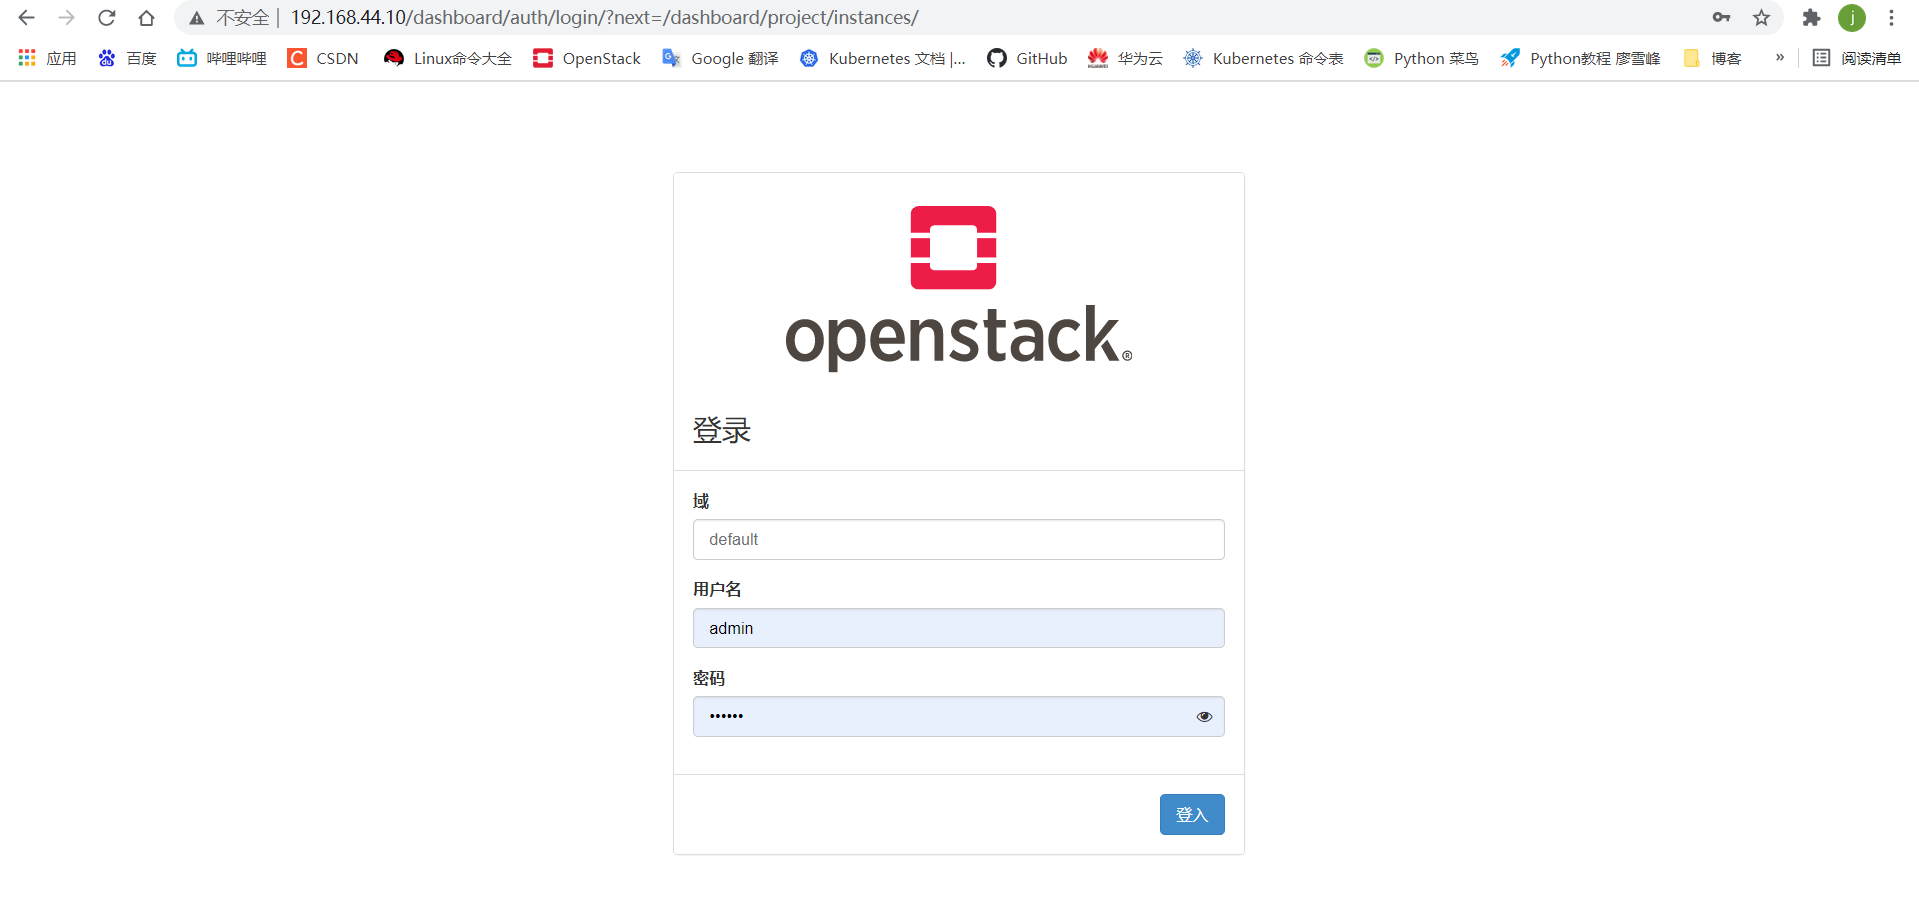<br />到此openstack**最小部署已经完成**,通过下面的综合检验来验证最下部署各个服务是否正常运行<a name="kDLWf"></a># 五:综合检验:登陆到dashboard界面后创建网络,创建云主机类型,创建镜像,最后创建云主机<a name="JcCz3"></a>## 1):创建网络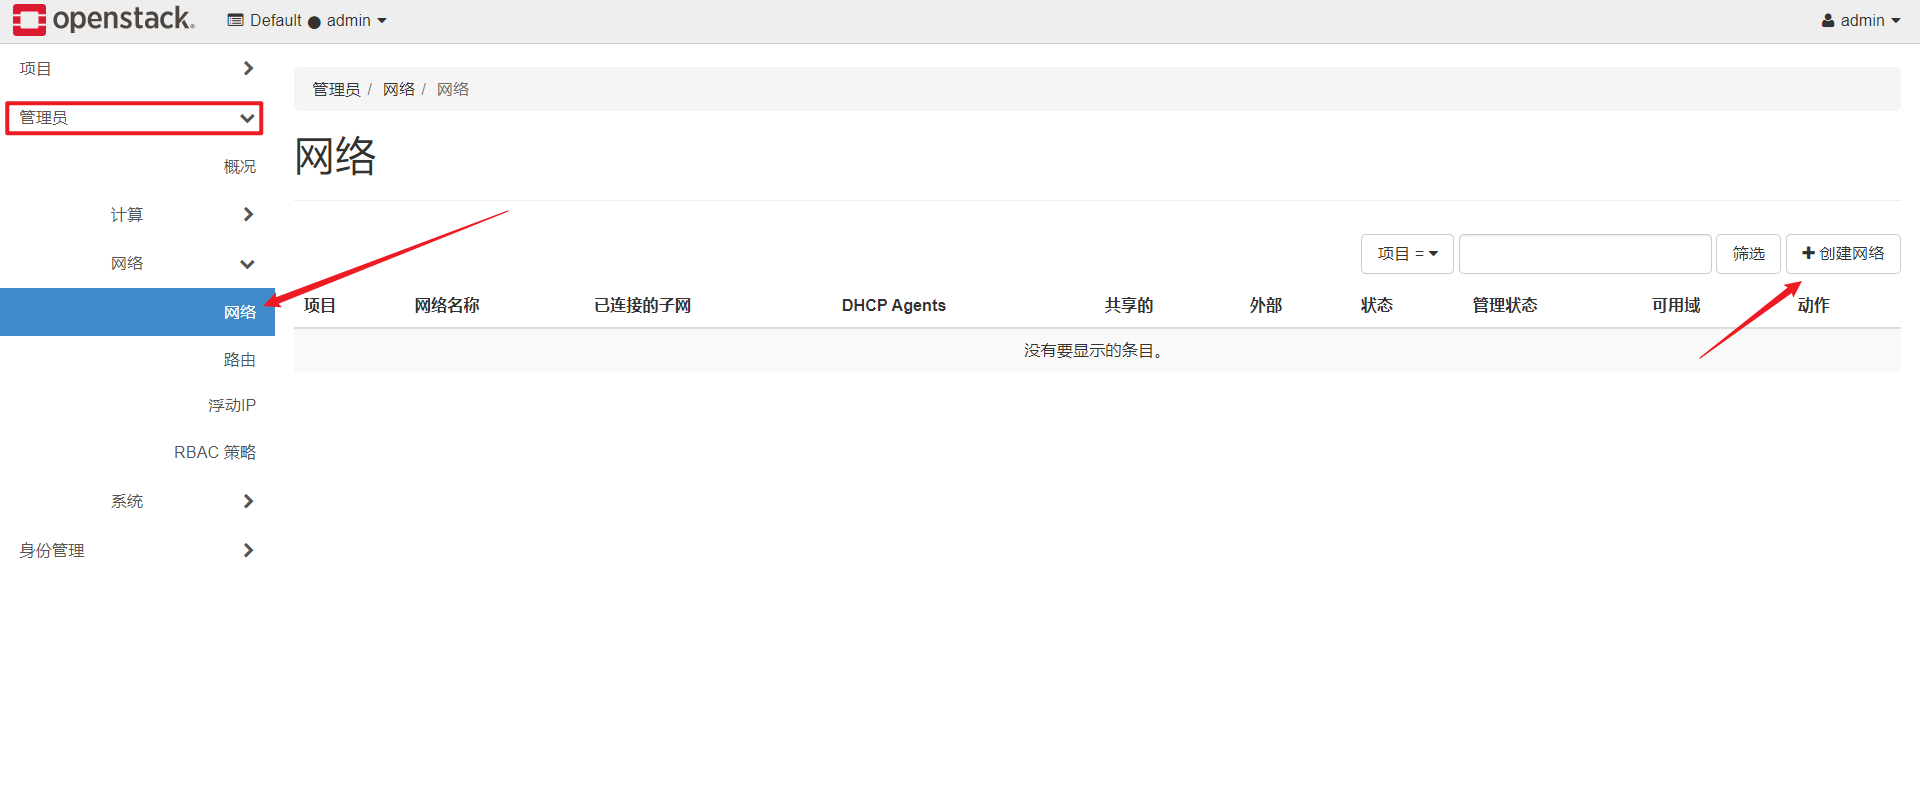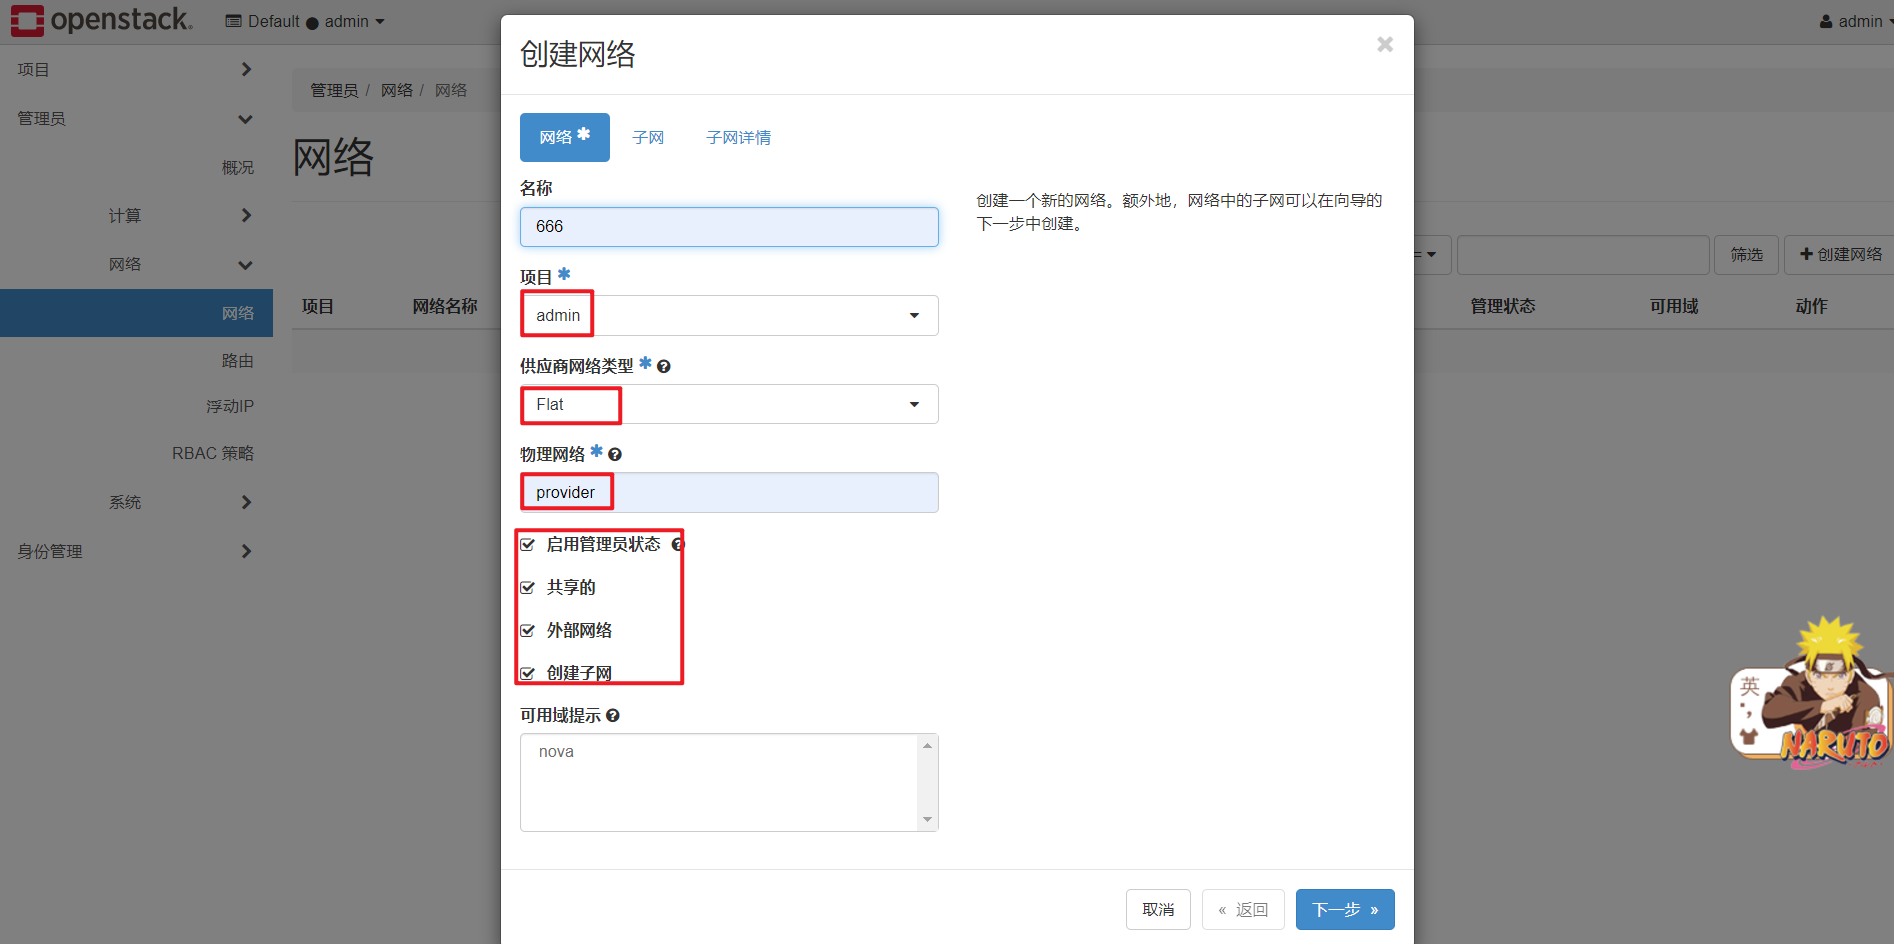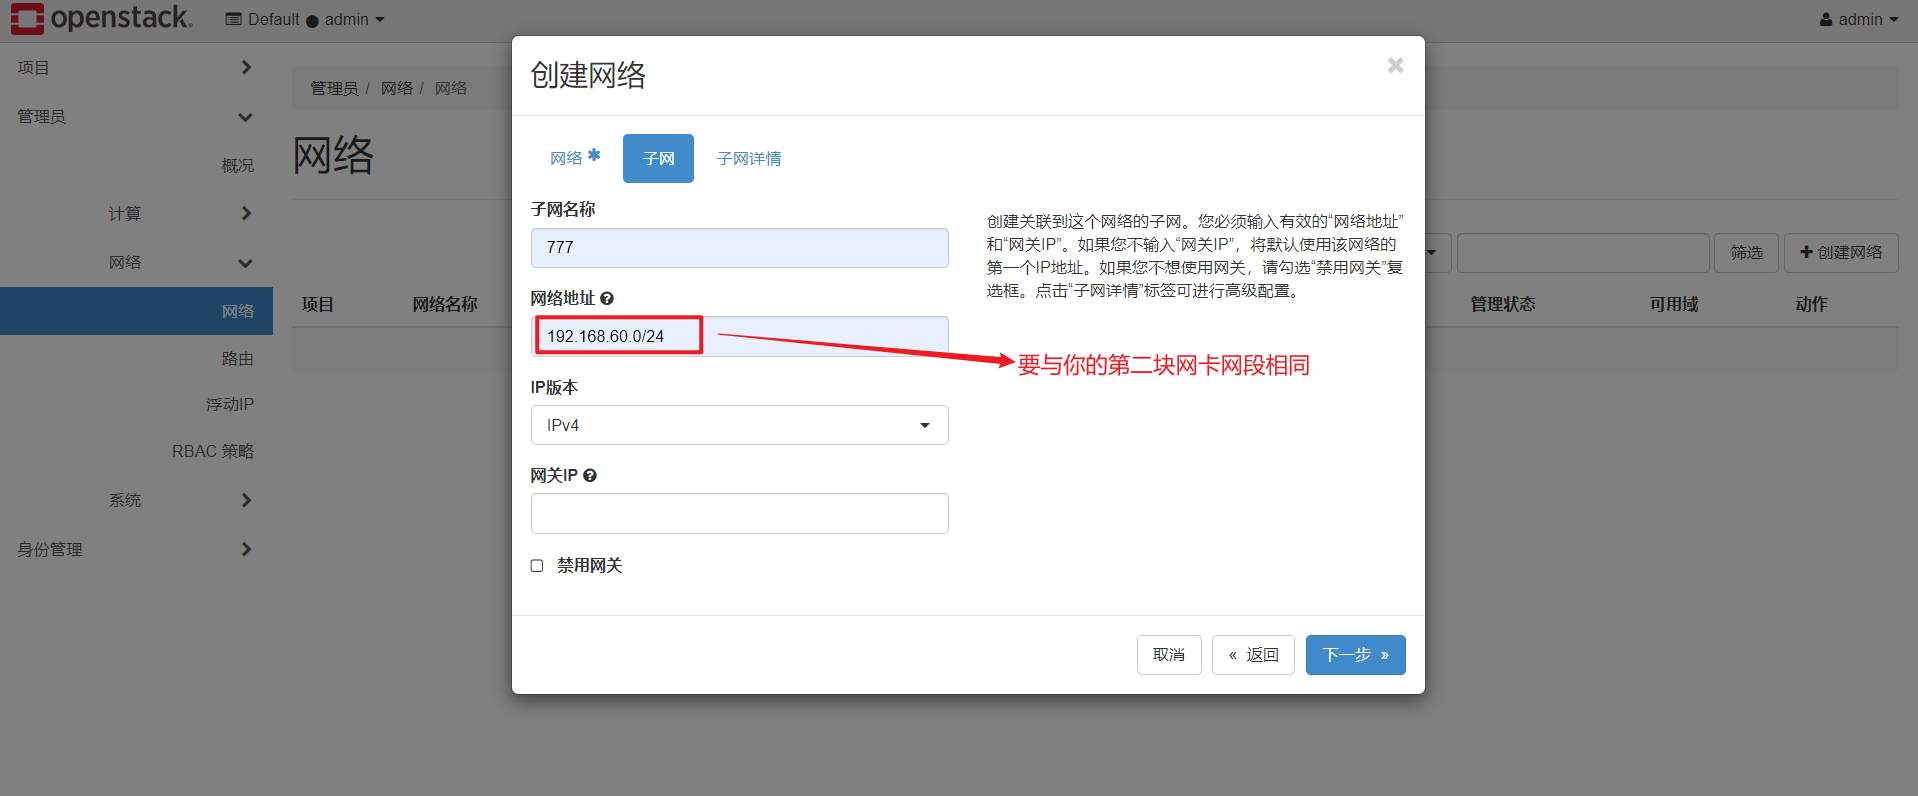<a name="gaCCd"></a>## 2):创建云主机类型: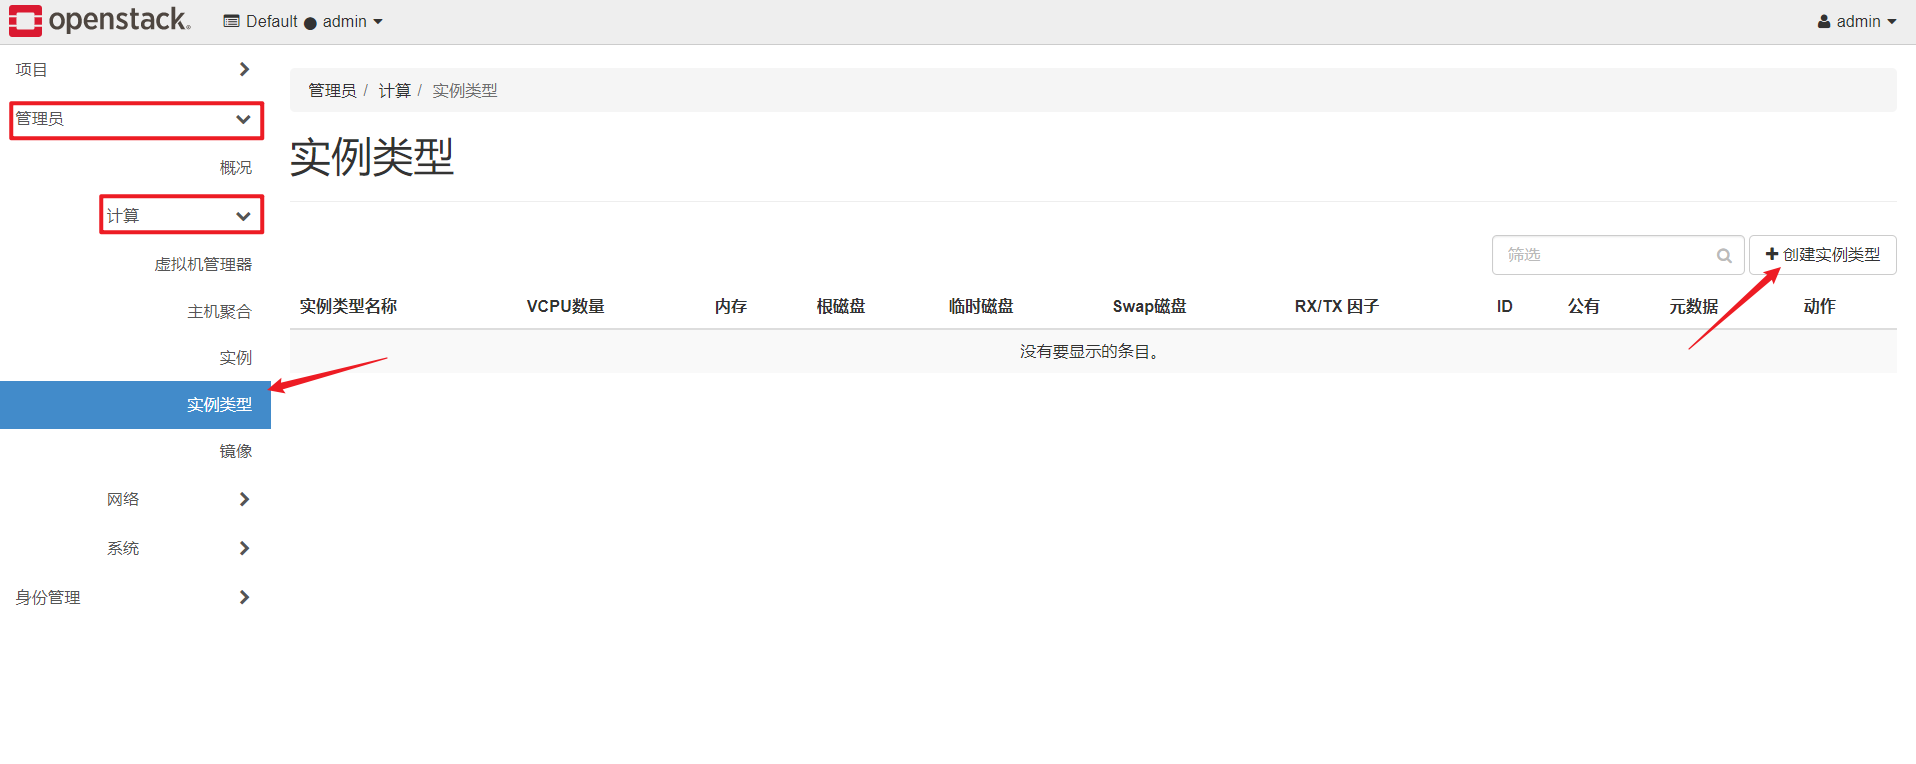<br />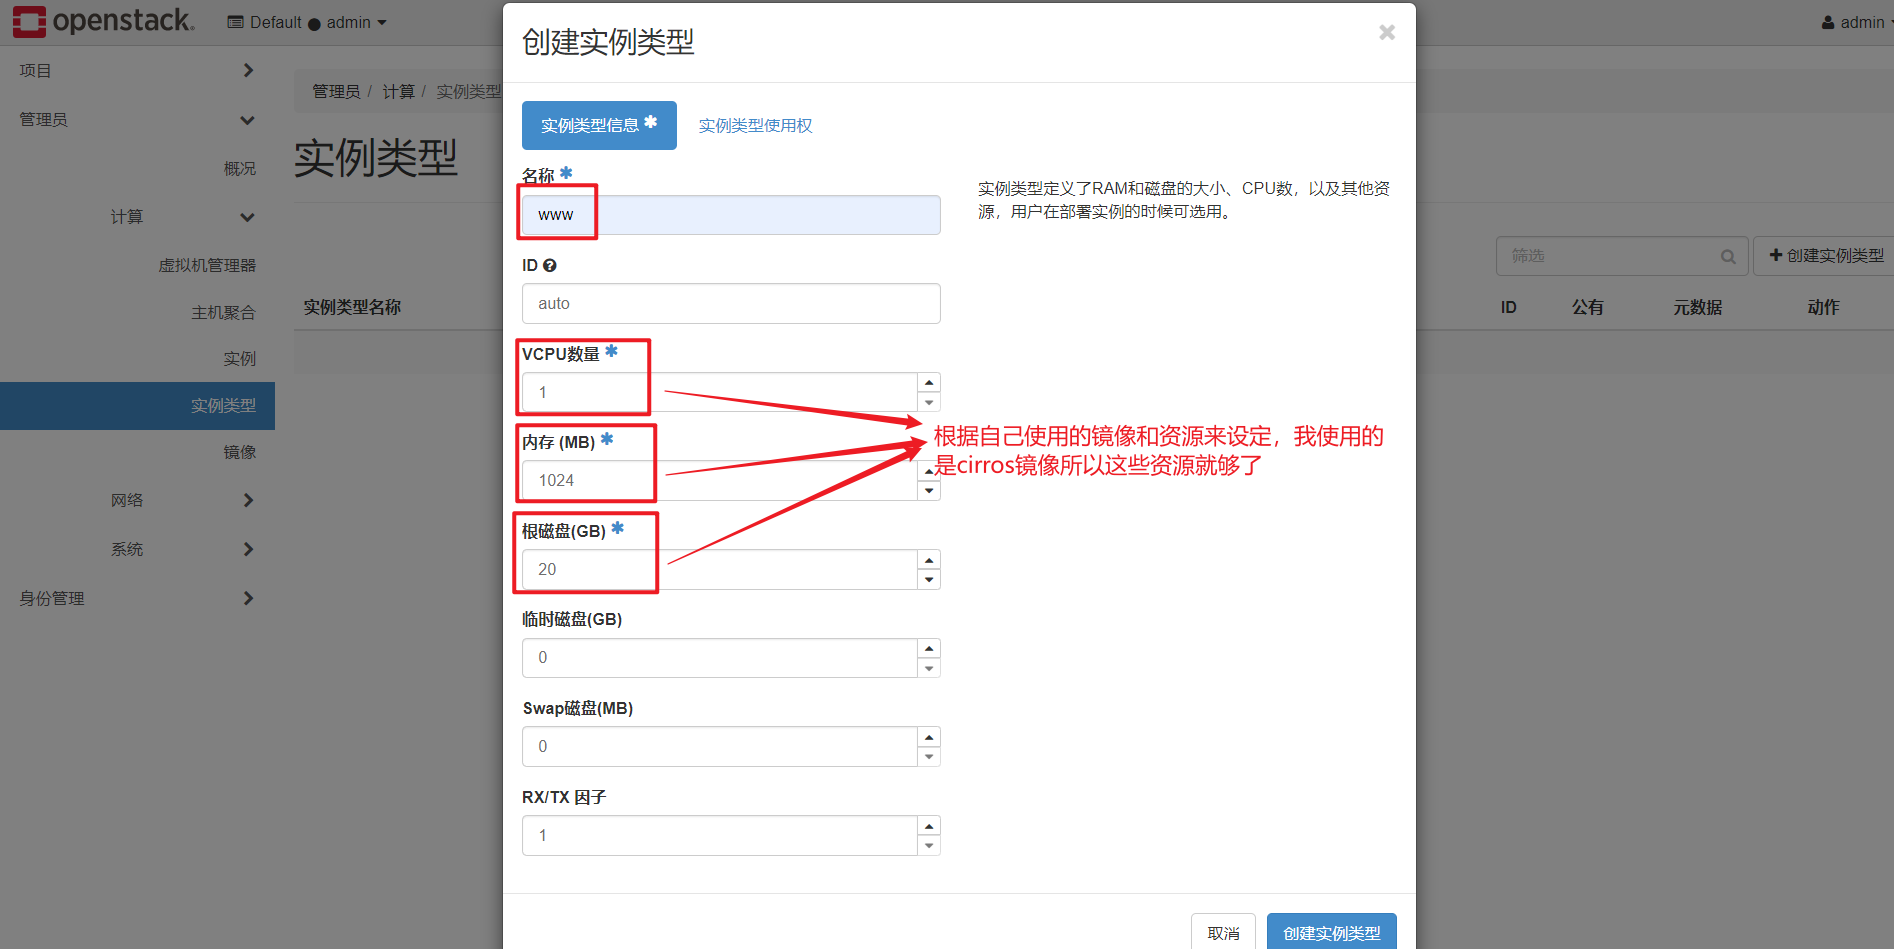<a name="WeFos"></a>## 3):管理安全组:<br />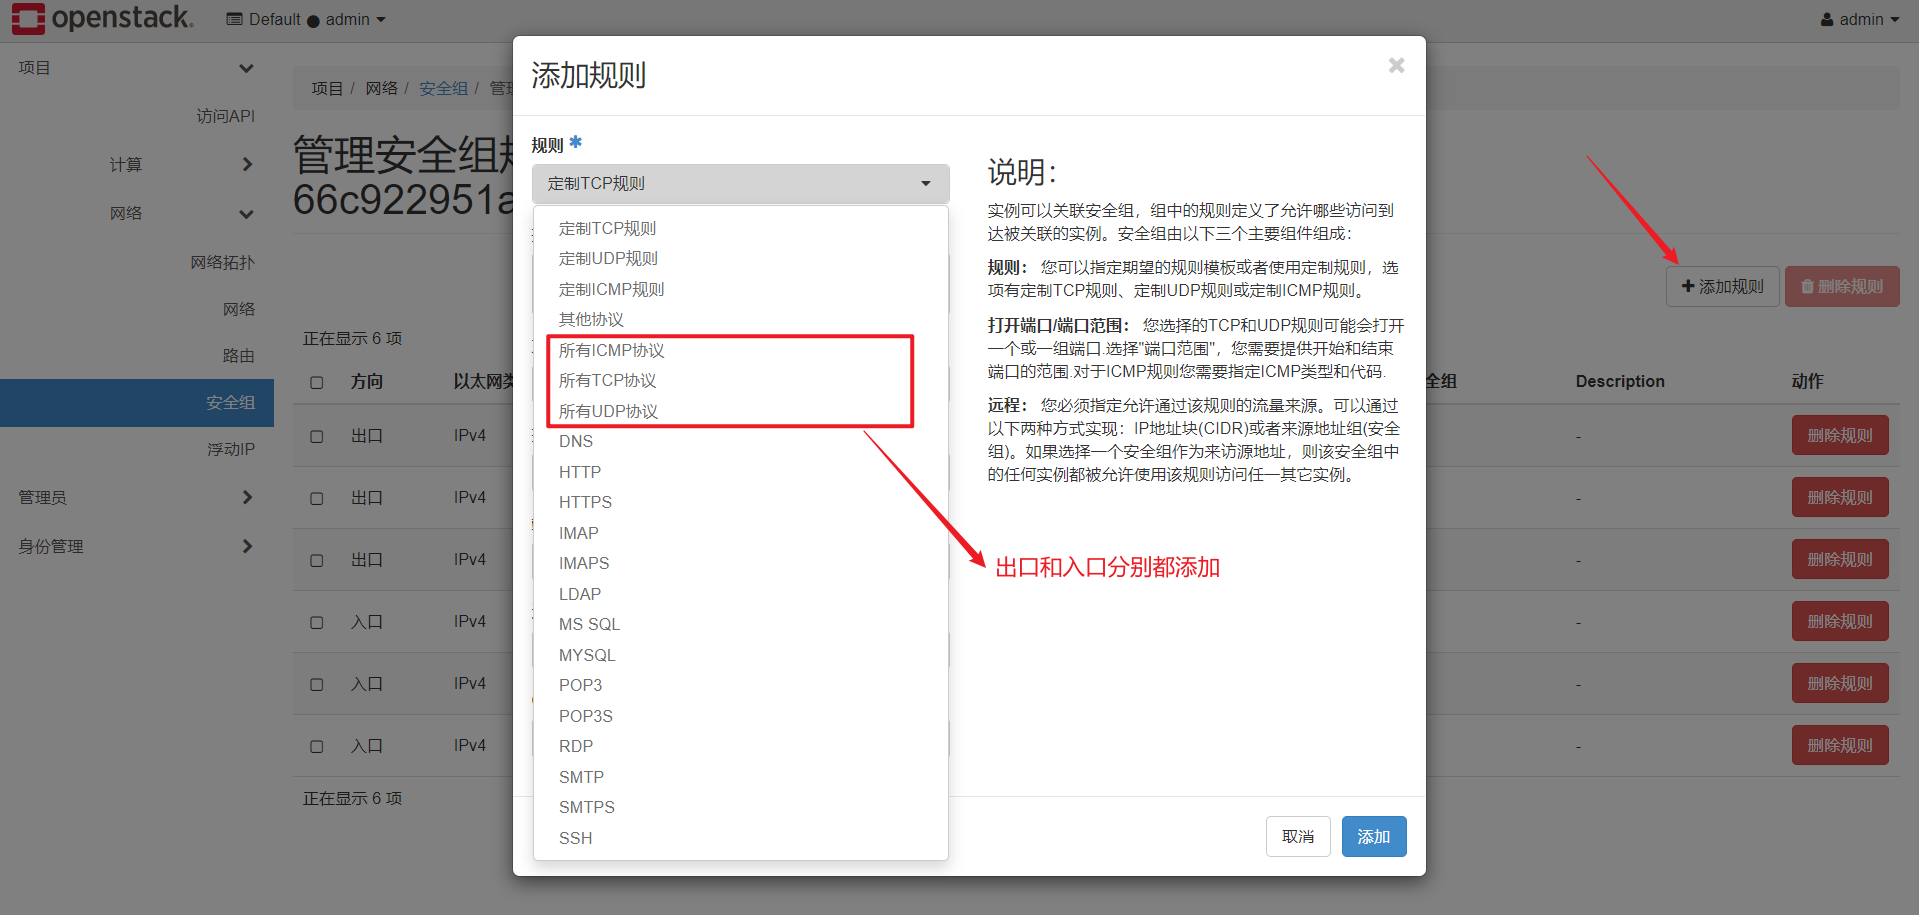<br /><br />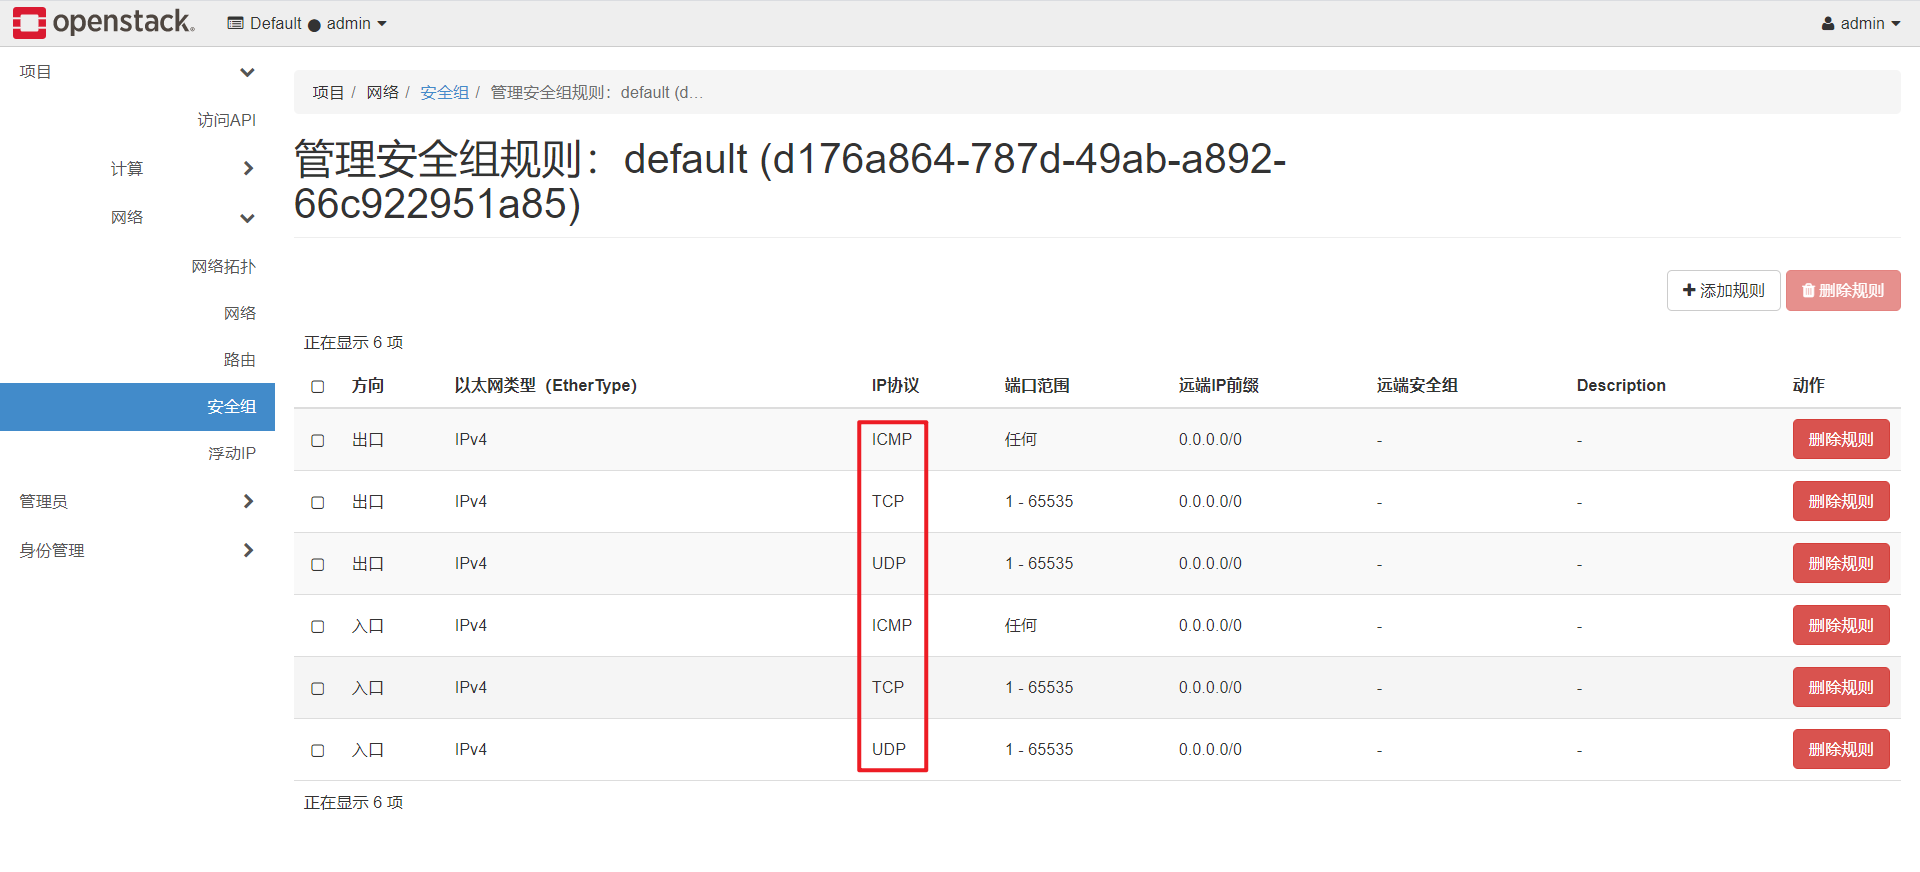<a name="s72of"></a>## 4):创建实例: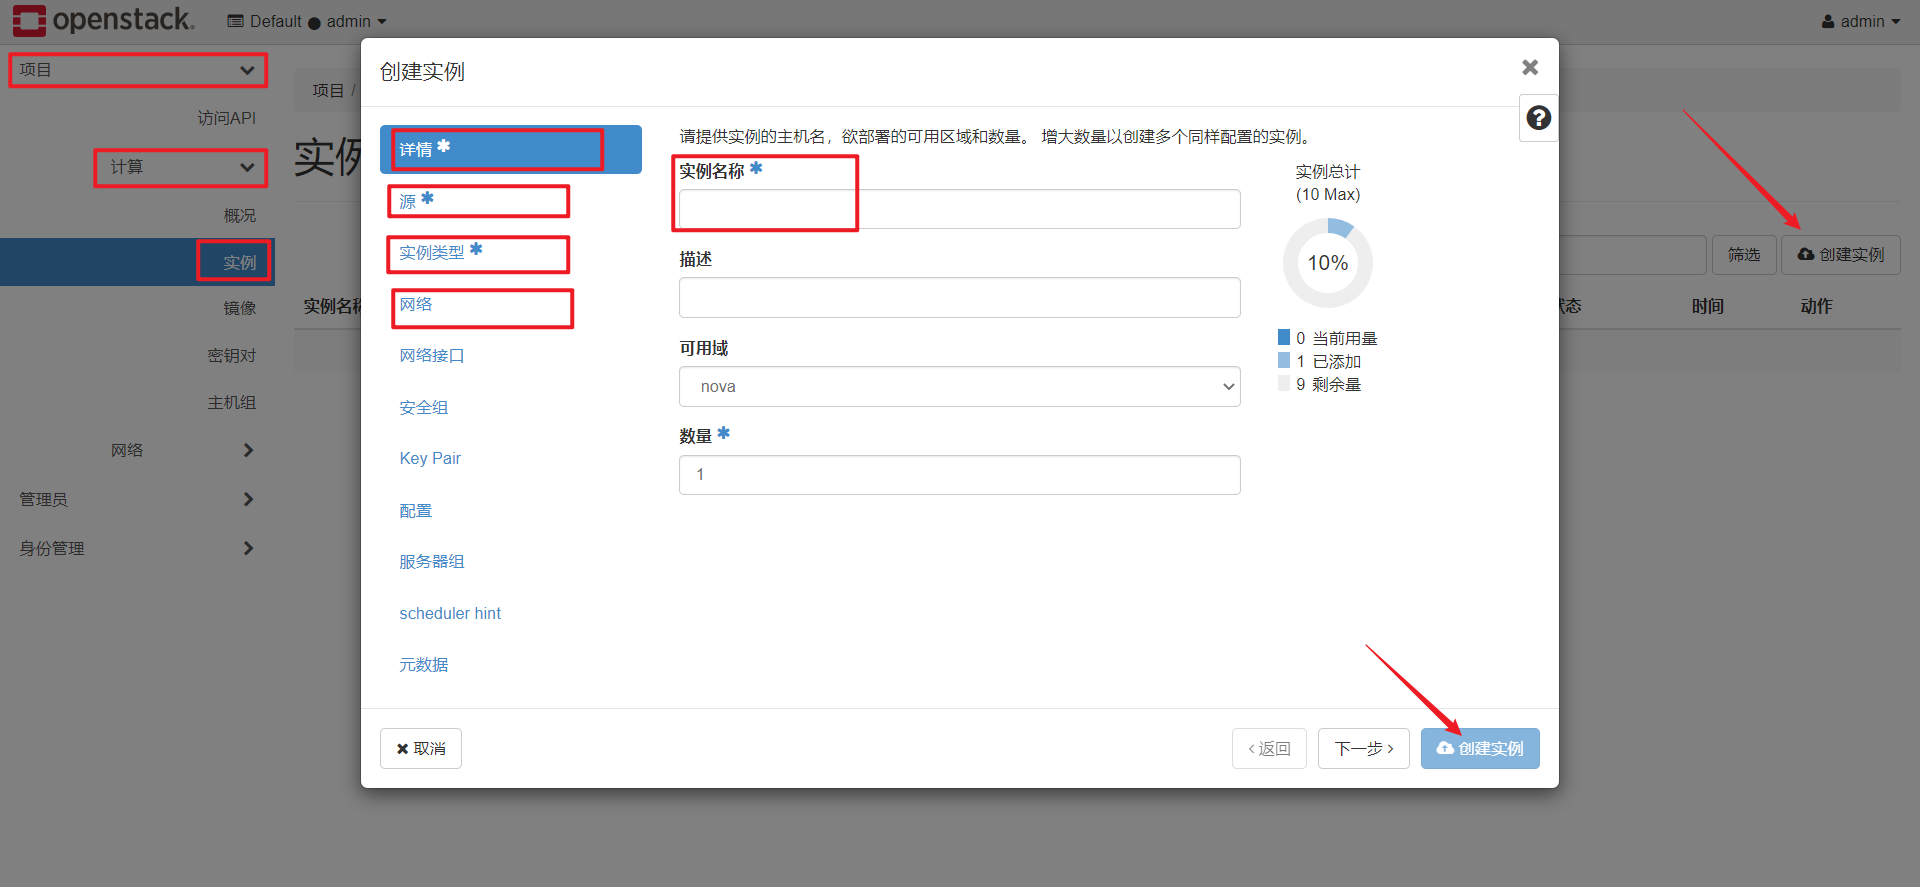<br />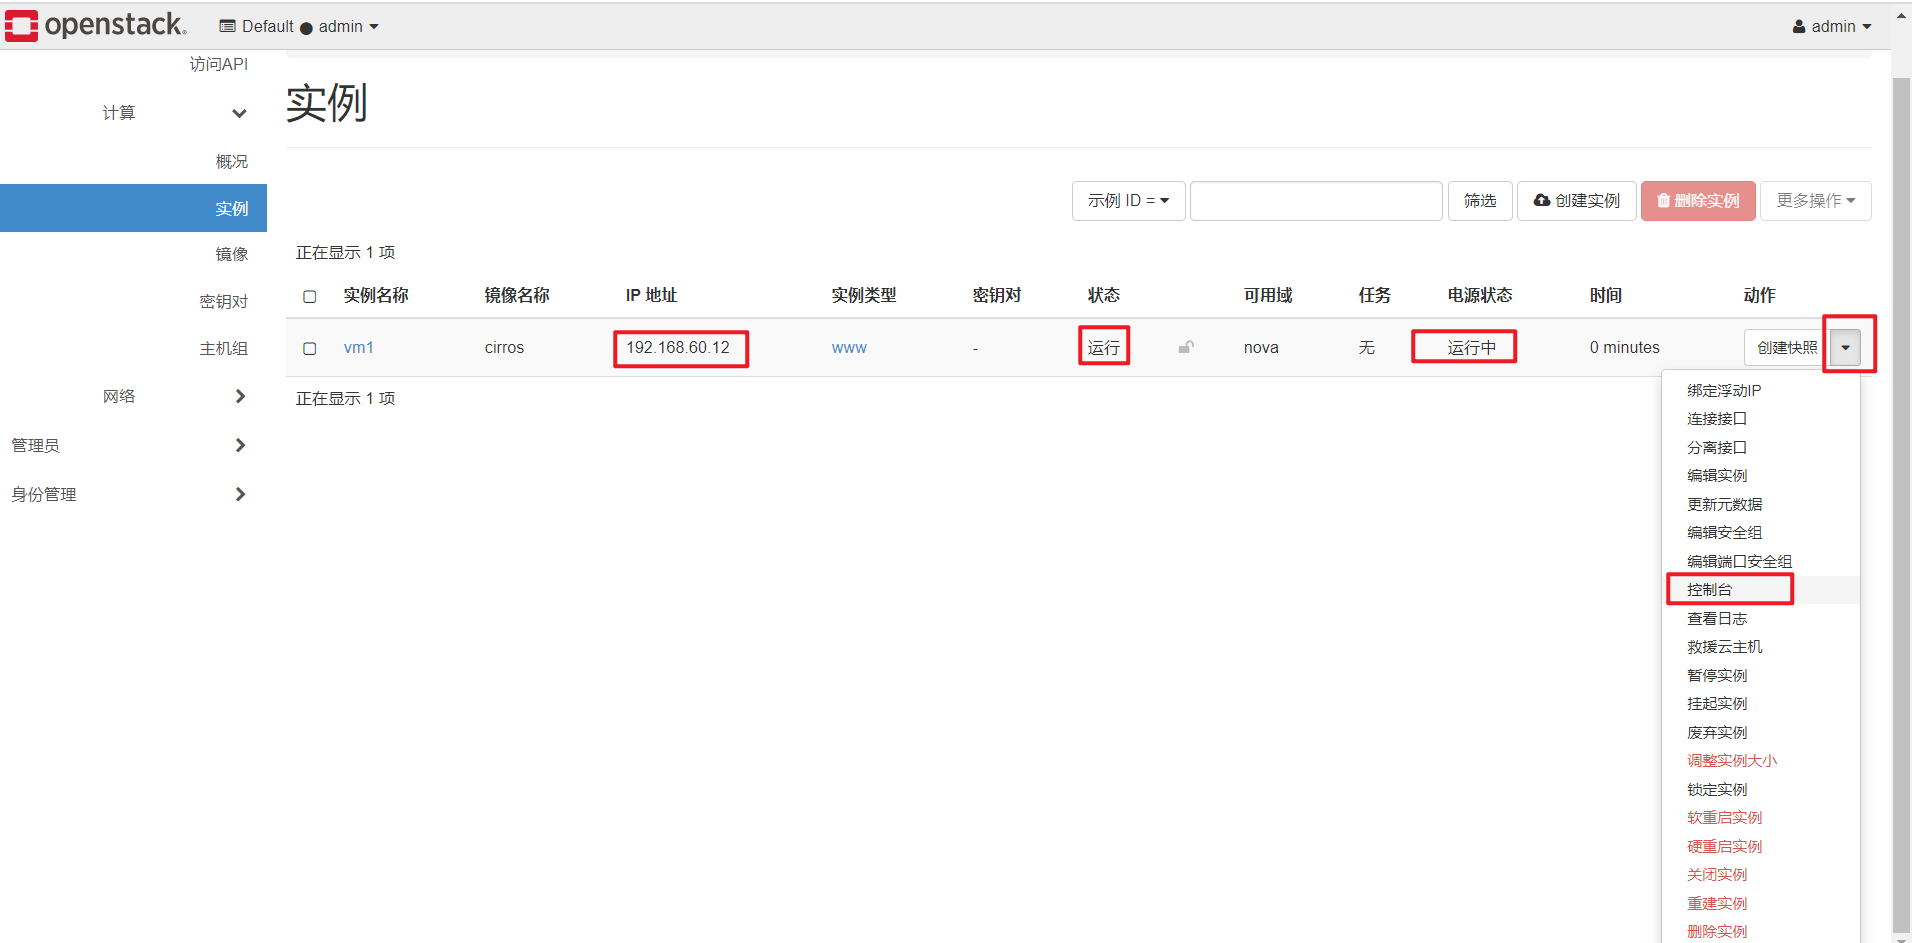通过控制台可以登陆进去说明创建成功了<br />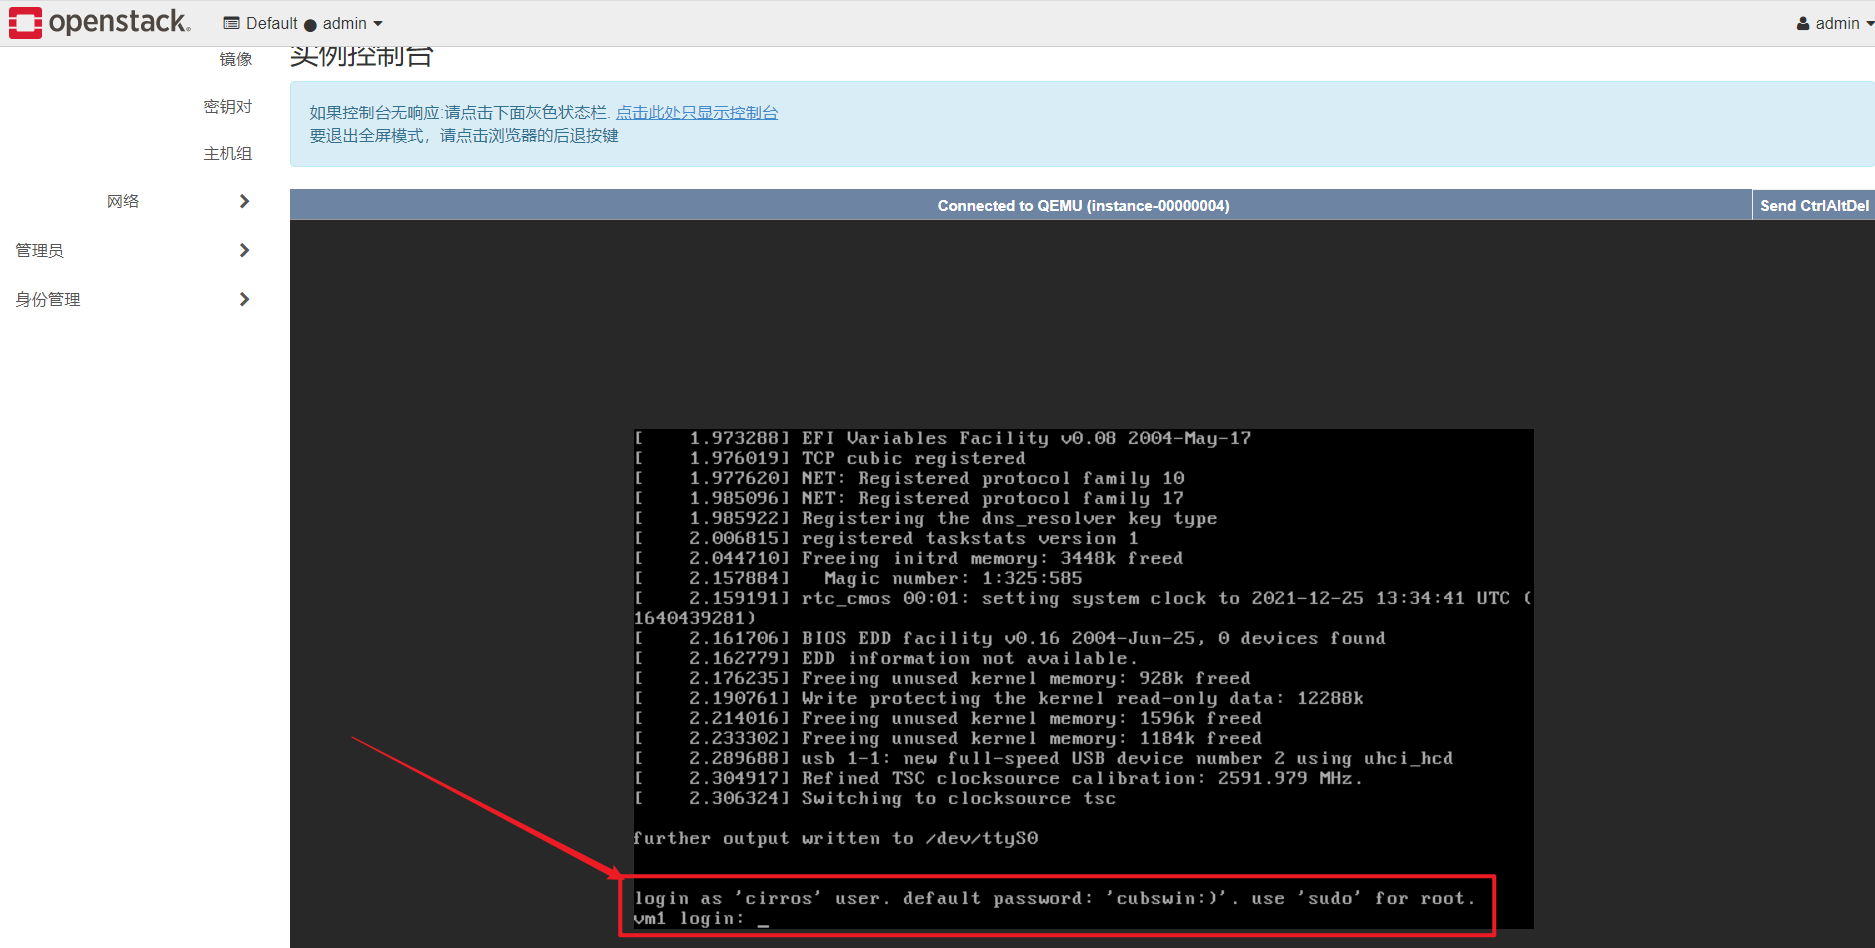通过远程公路链接上<br />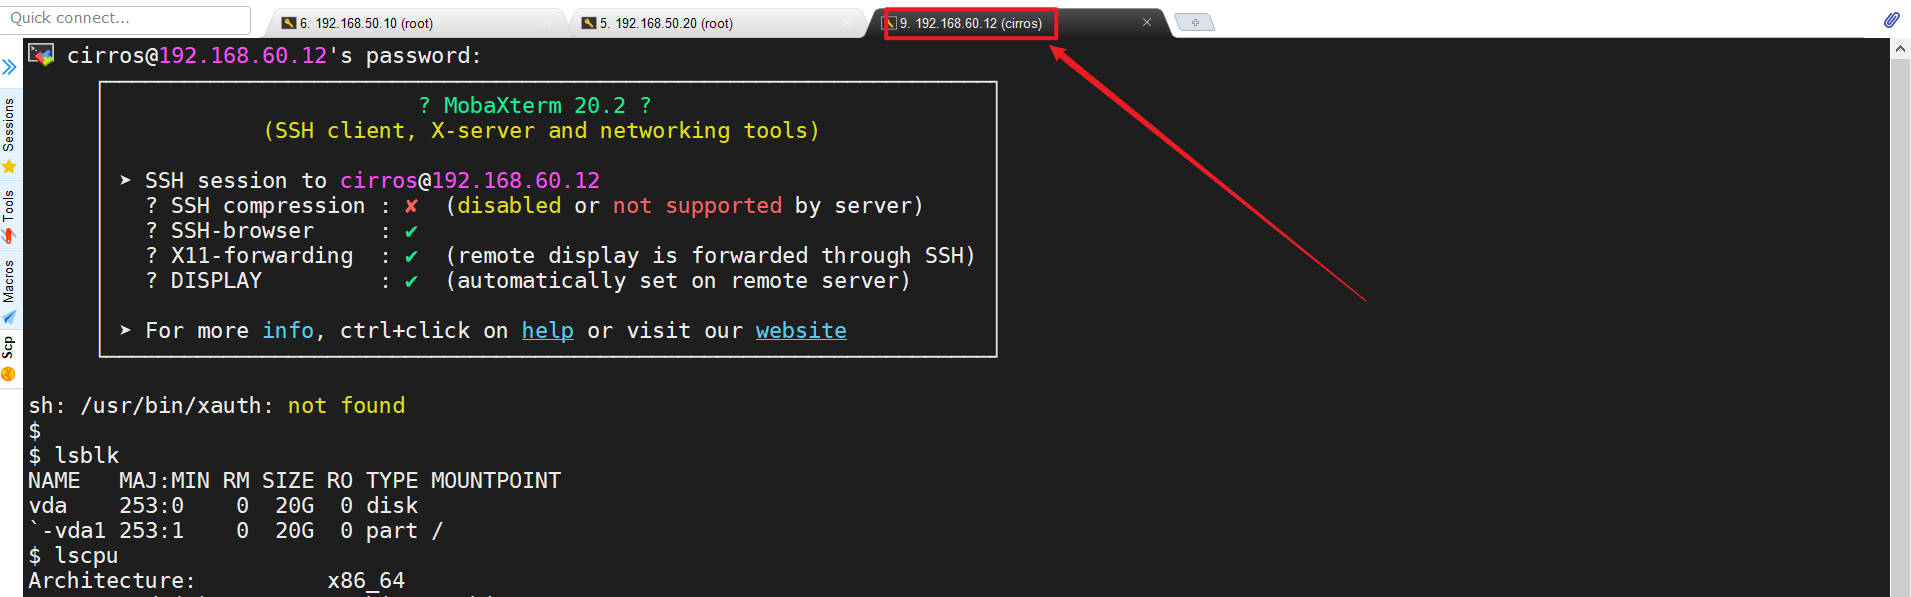<a name="NIwvi"></a># 六:实战演练在搭建完成最小部署后通过dashboard界面创建两个不同网段的网络,使得在不同网段的主机能正常通信在试验前需要先把云主机类型,镜像上传好<a name="guQf9"></a>## 1):创建网络通过dashboard界面 管理员==》网络==》网络 来创建<br />创建第一个网络<br />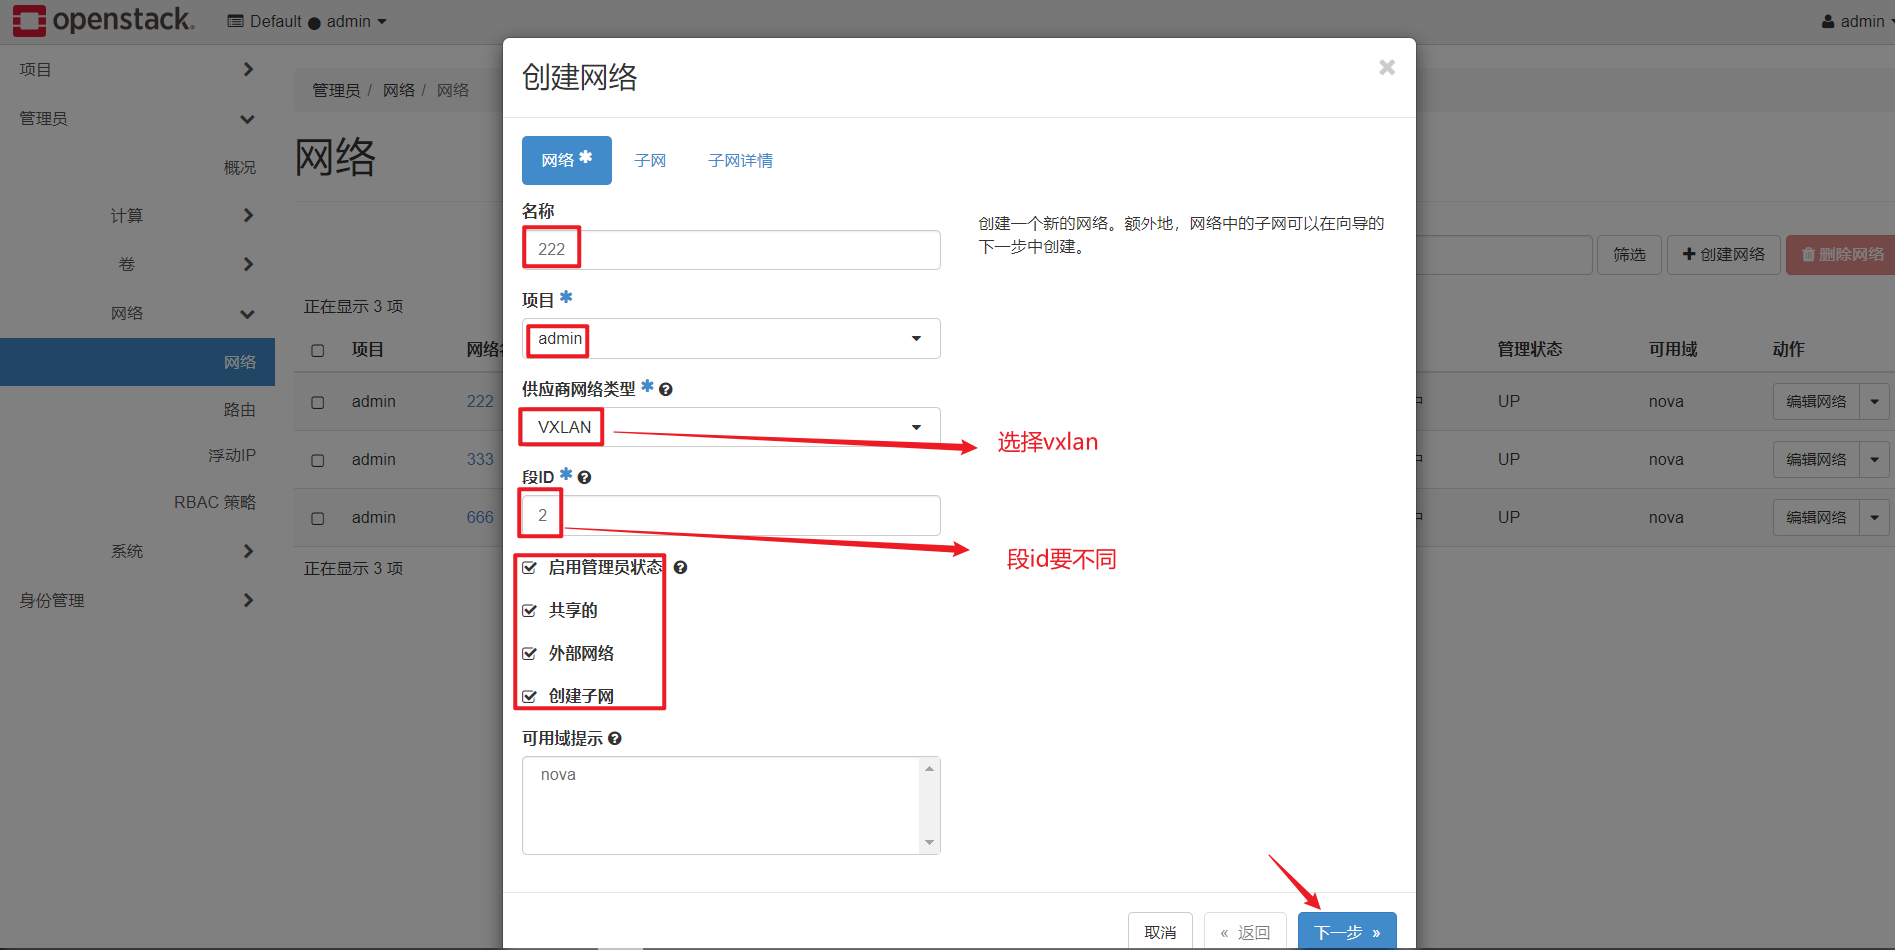<br />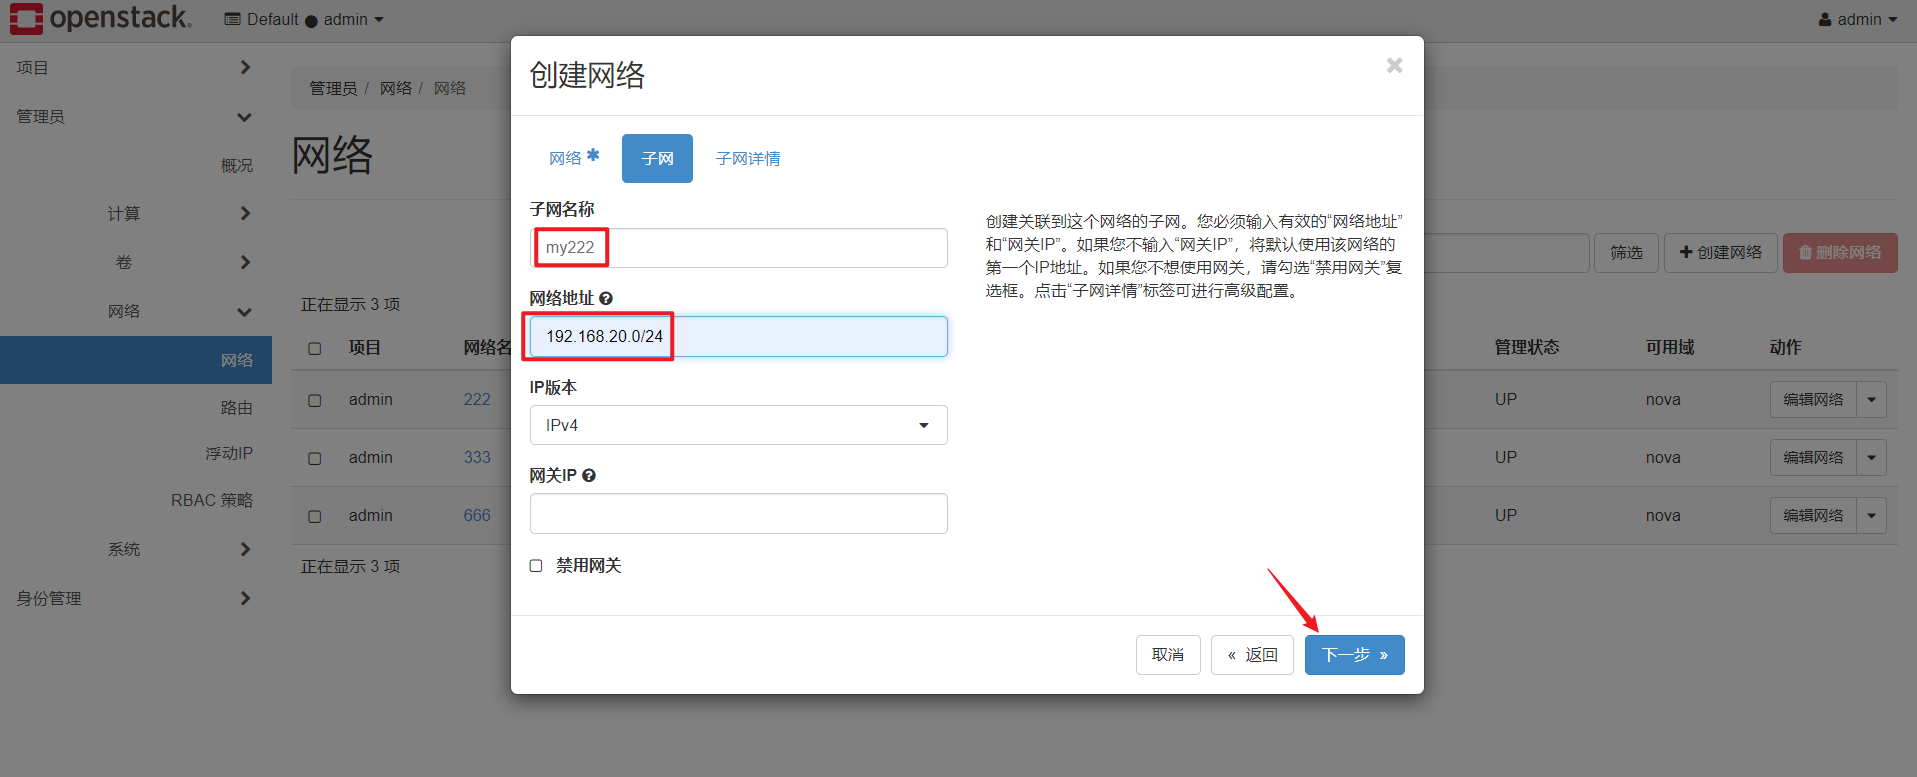<br />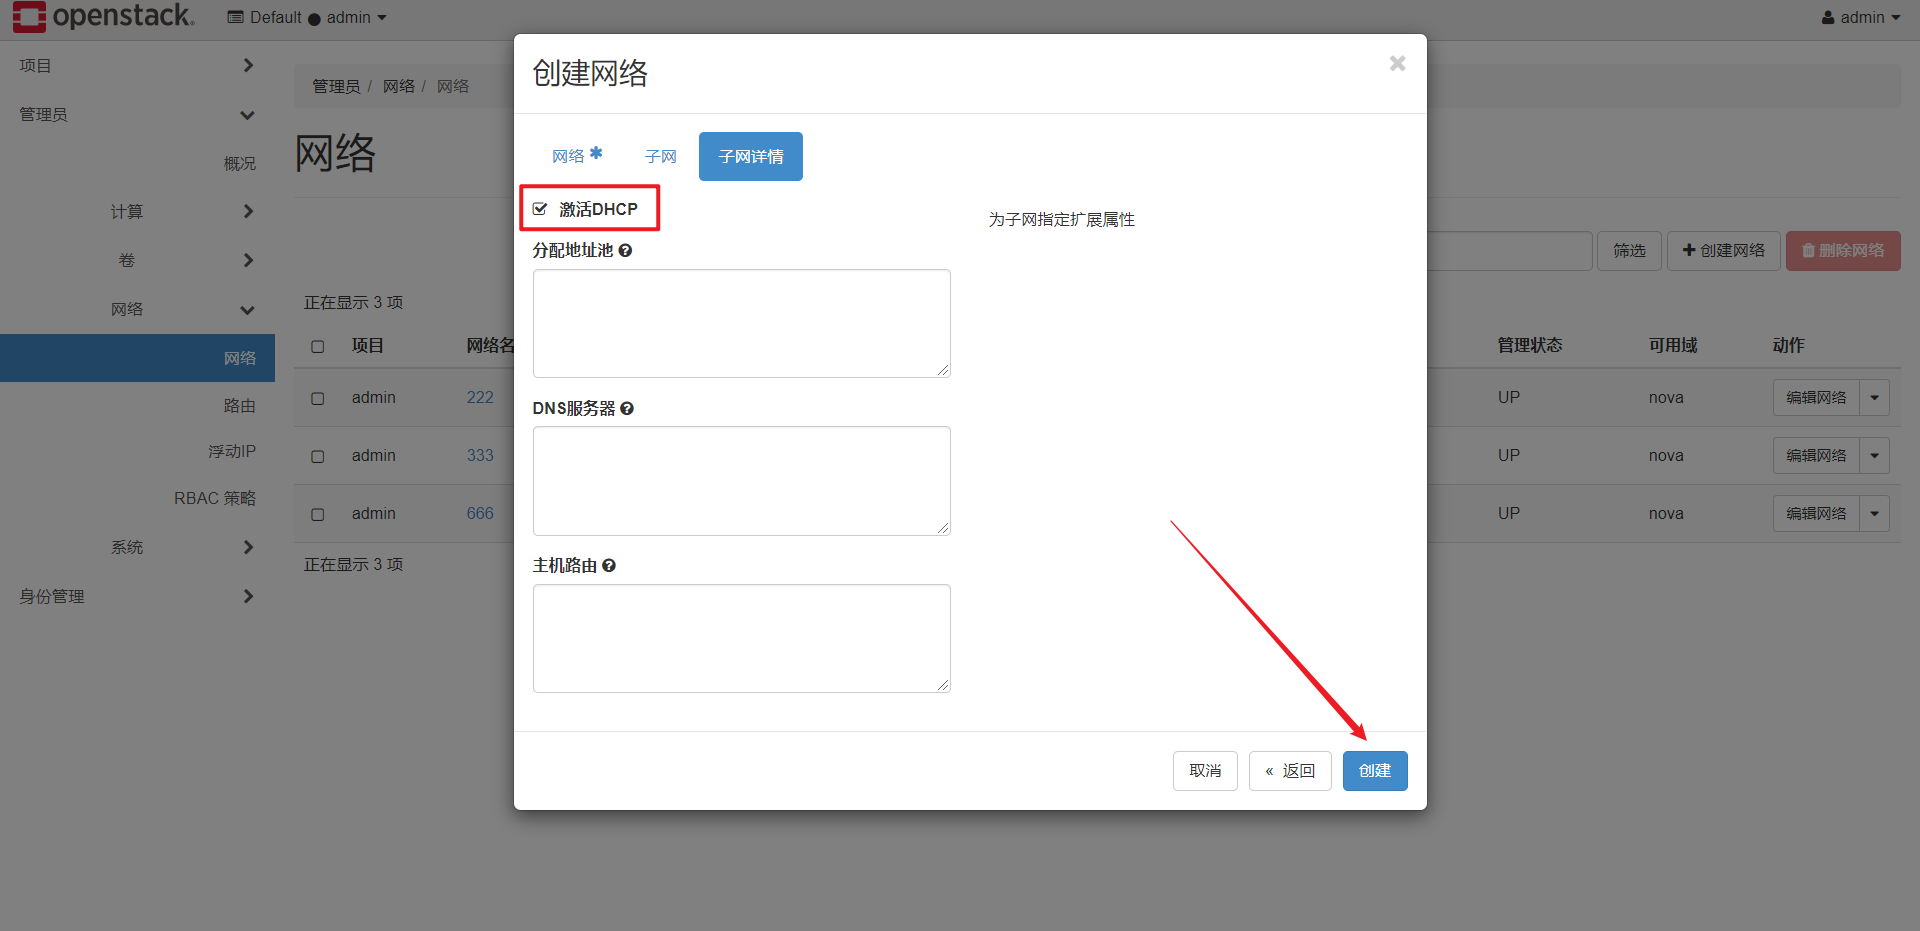第二个网络<br />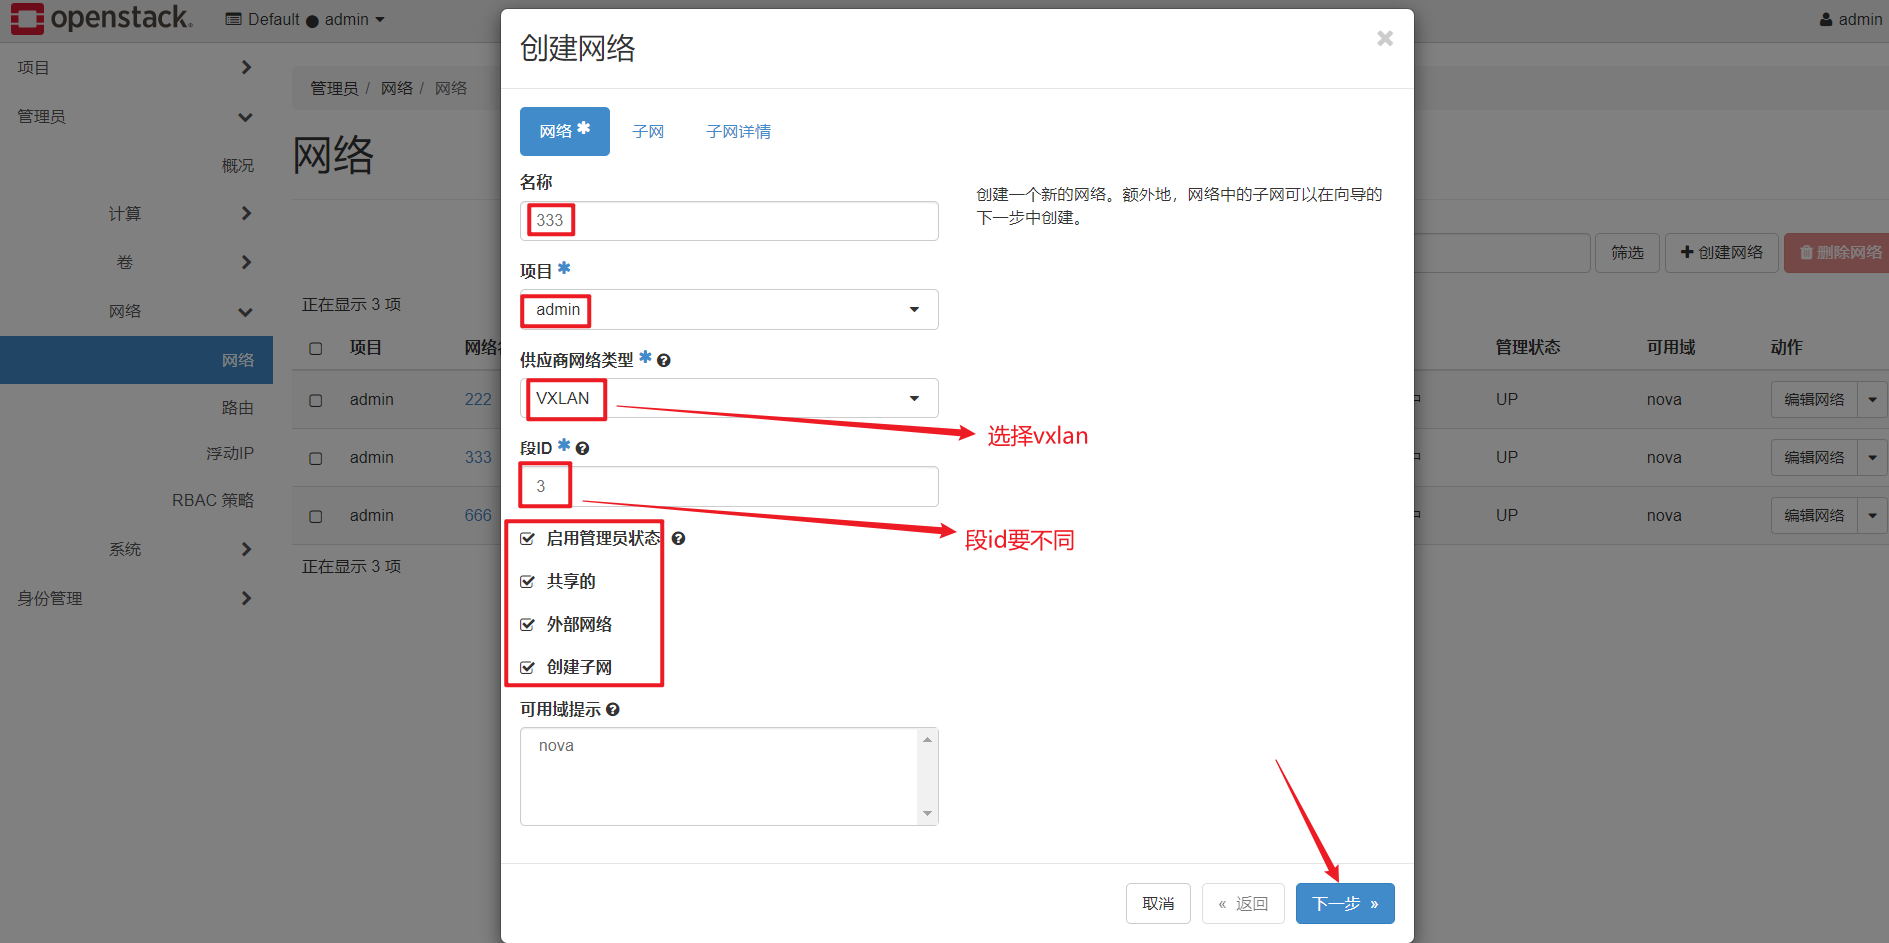<br />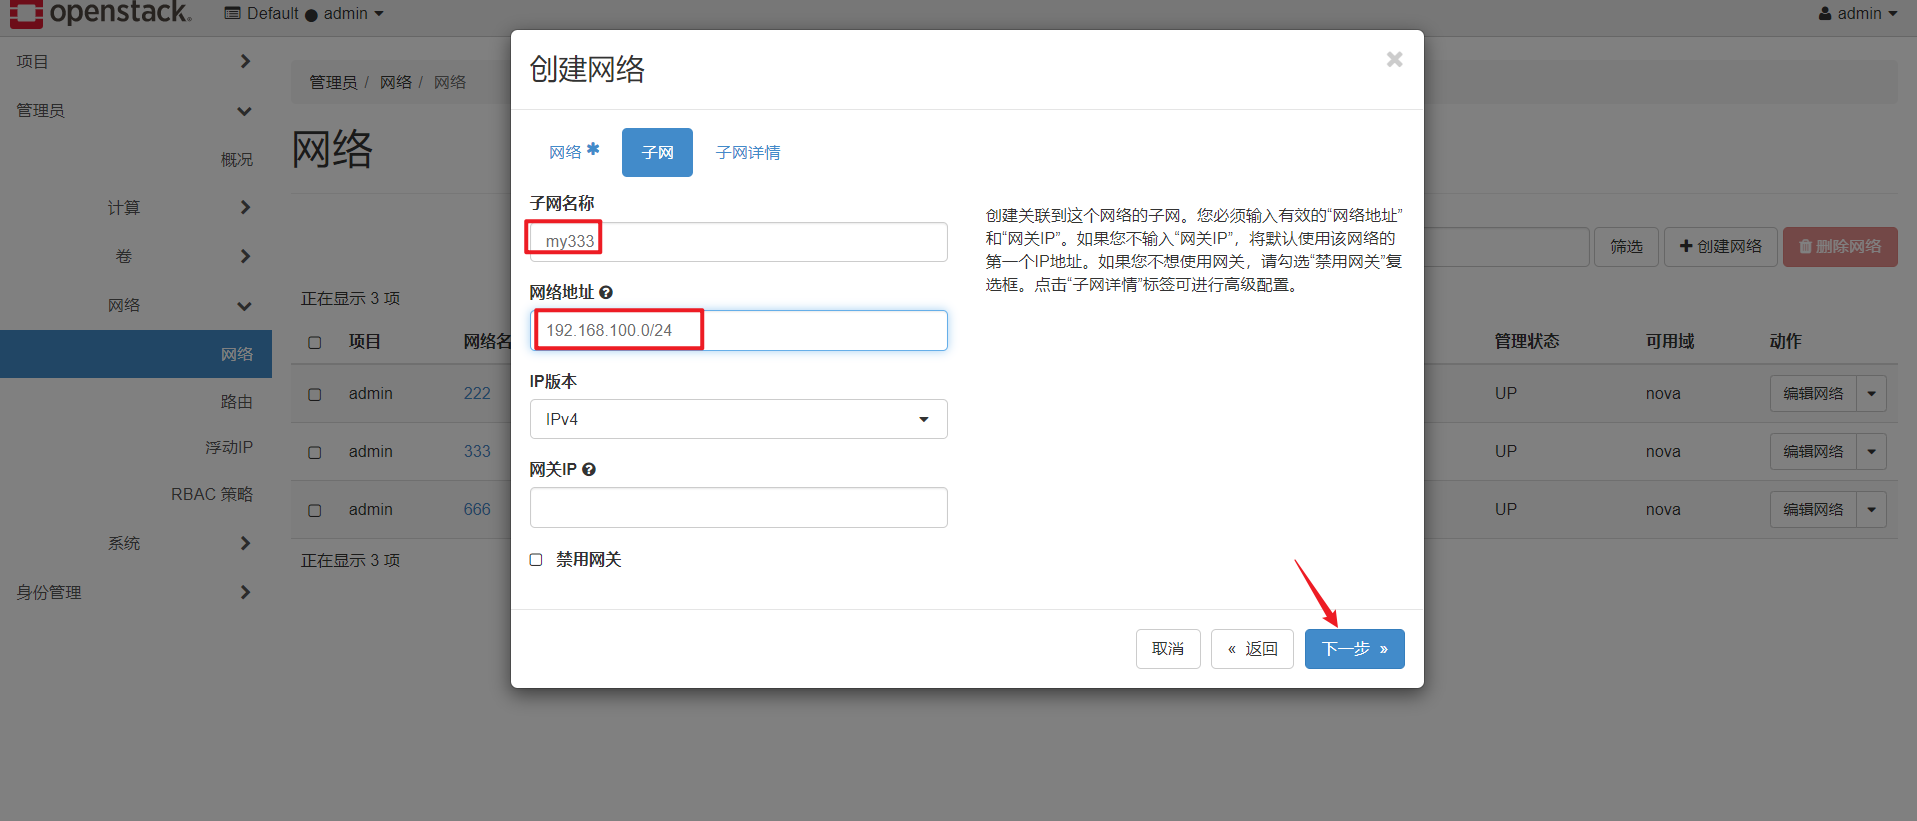<br />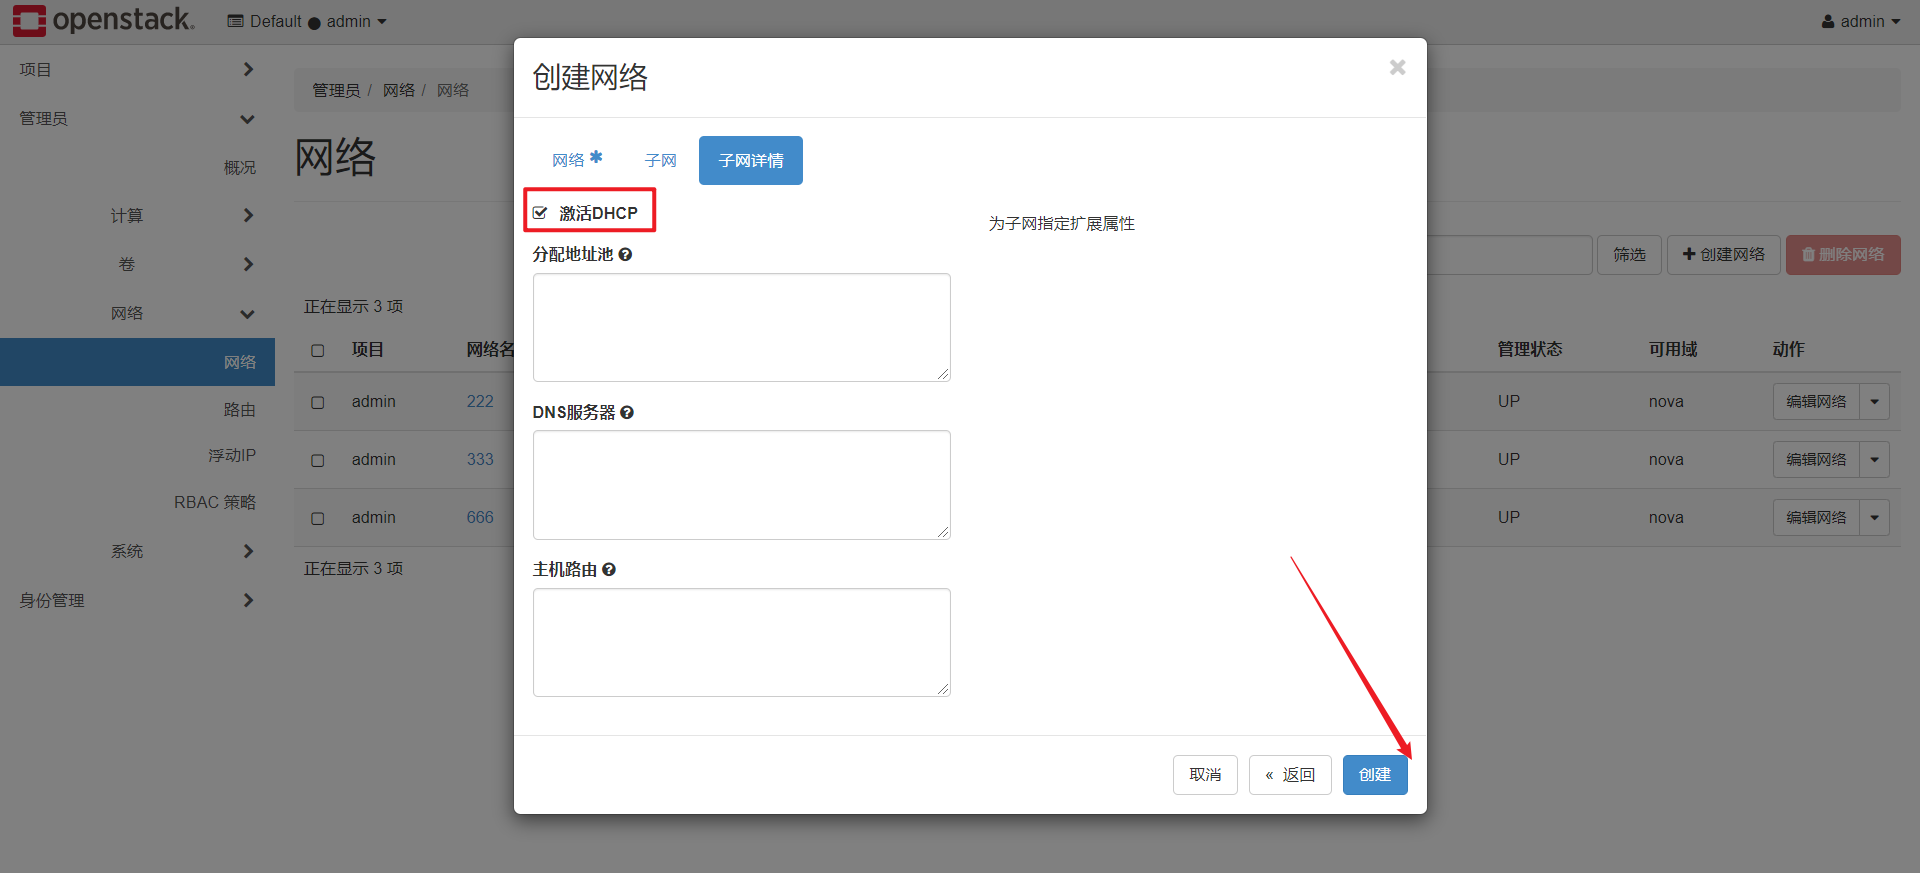<a name="pqrgV"></a>## 2):新建路由表新建第一个路由表<br />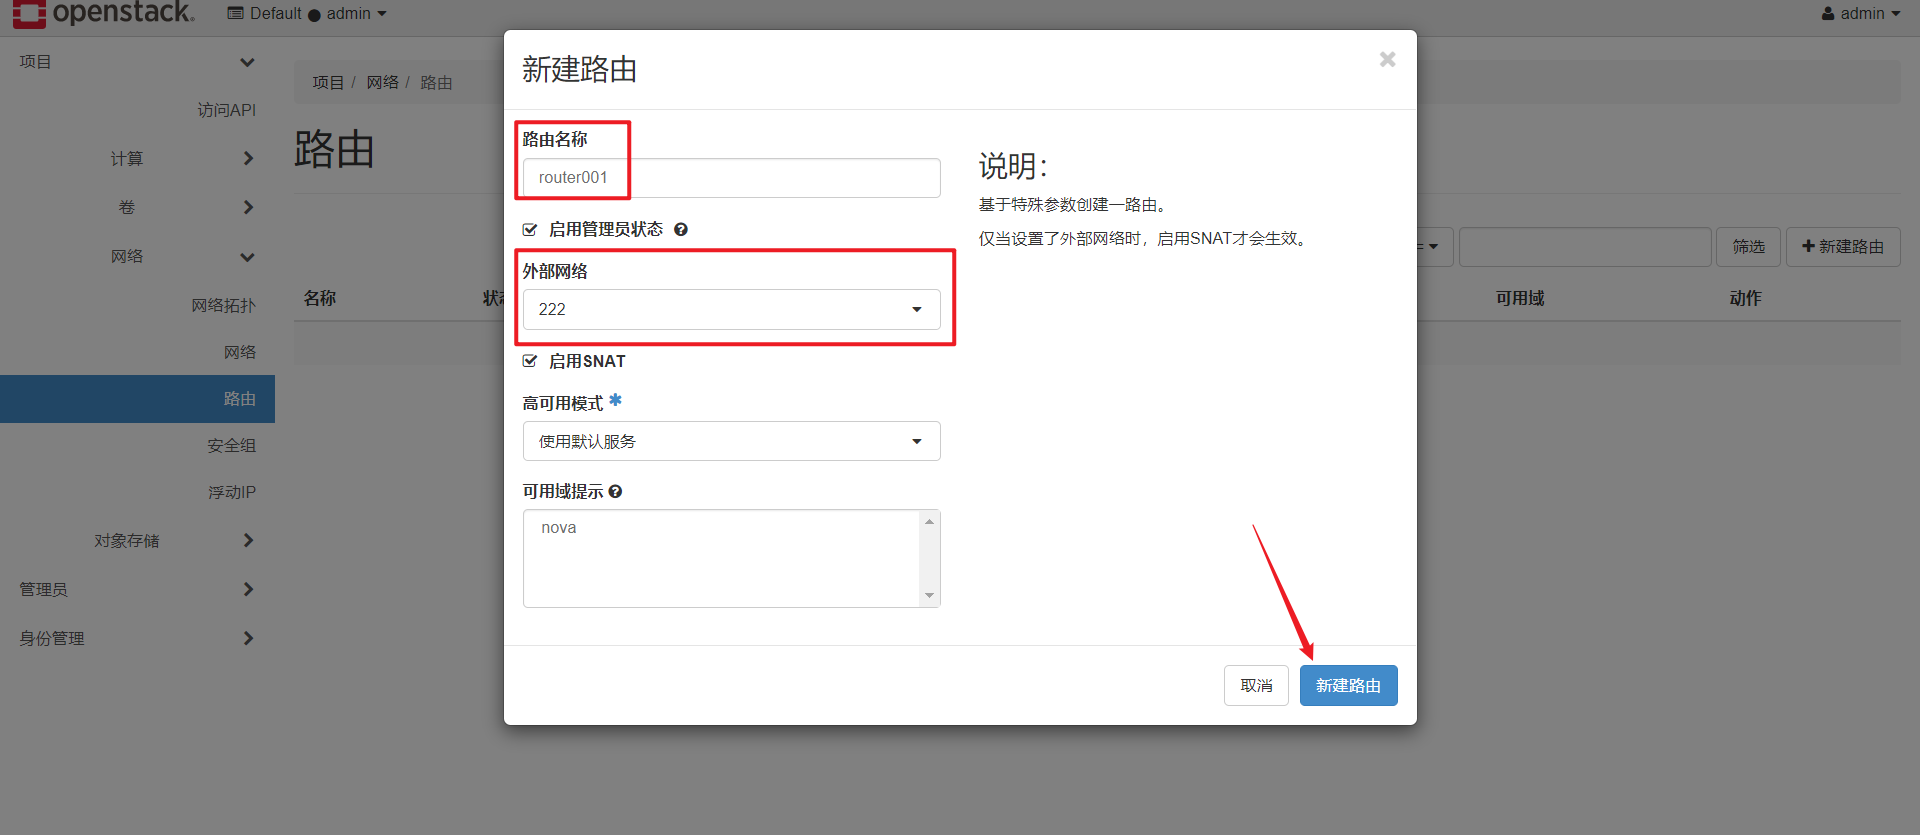<br />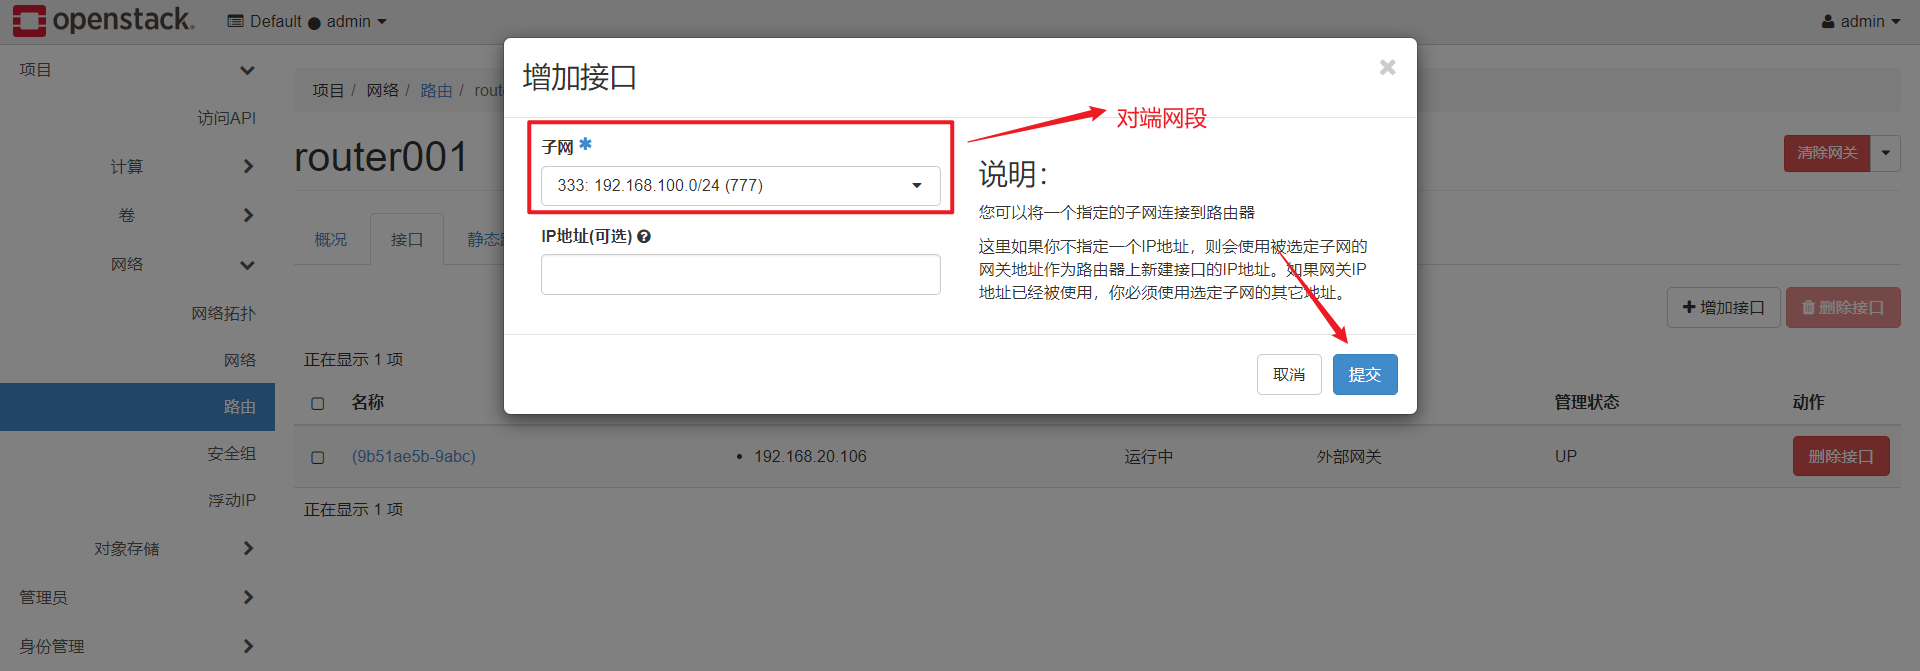新建第二个路由<br />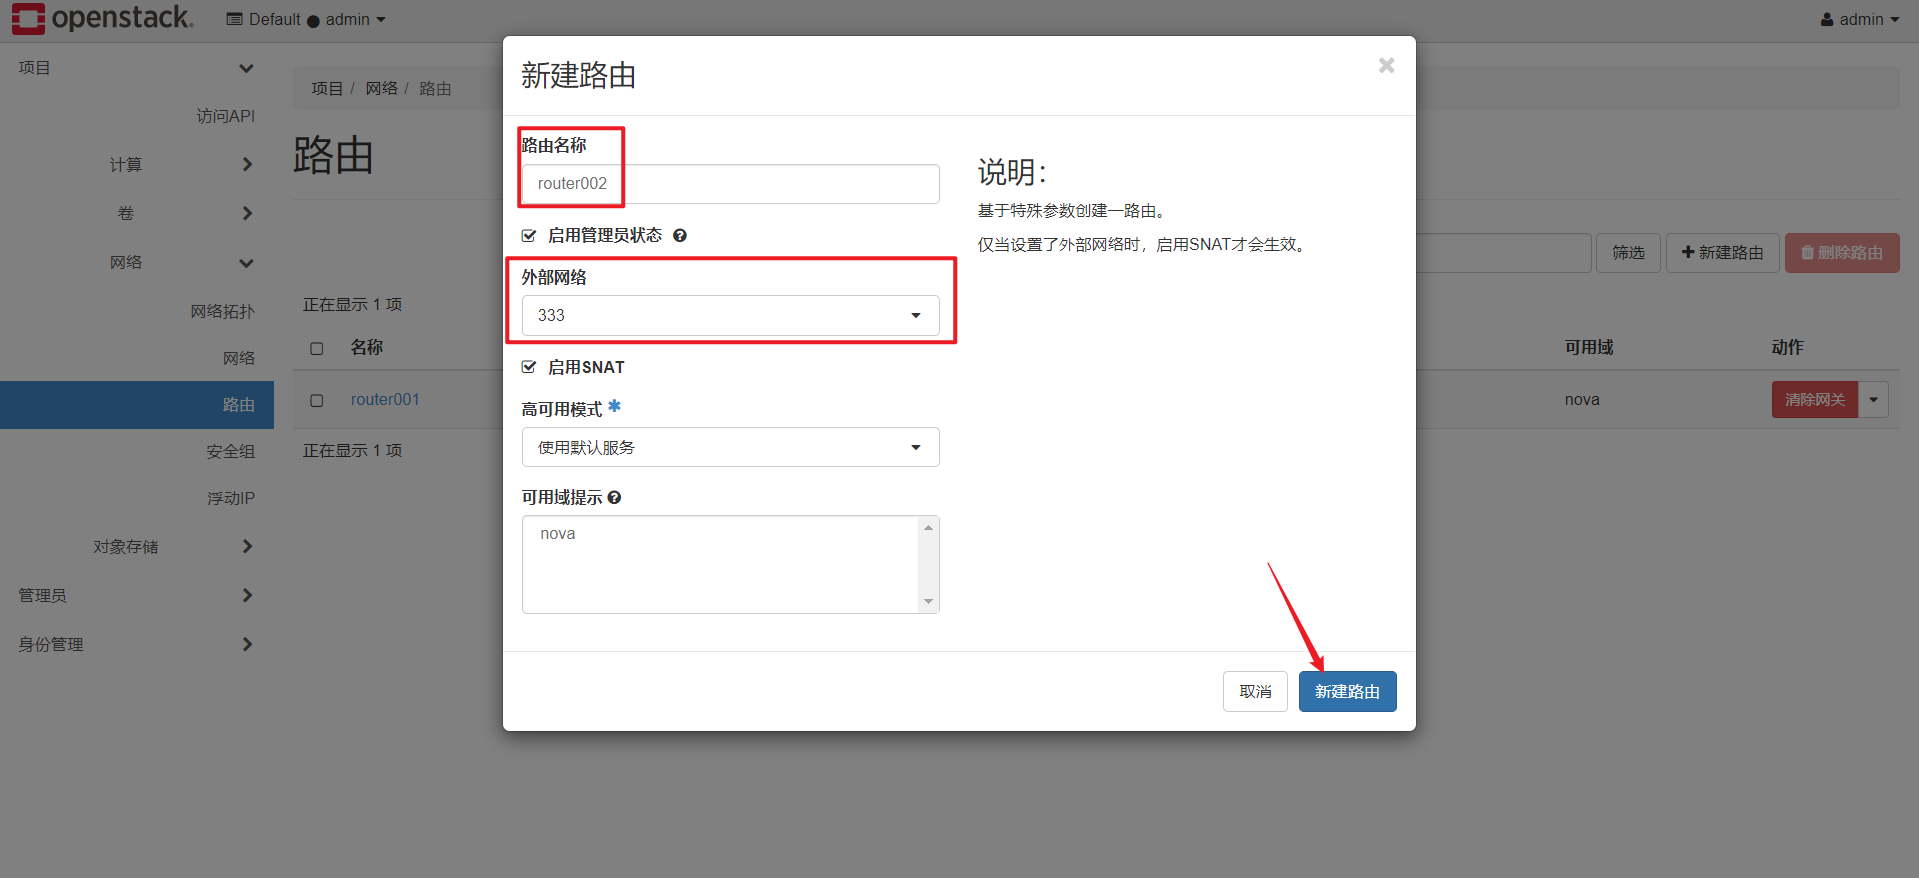<br />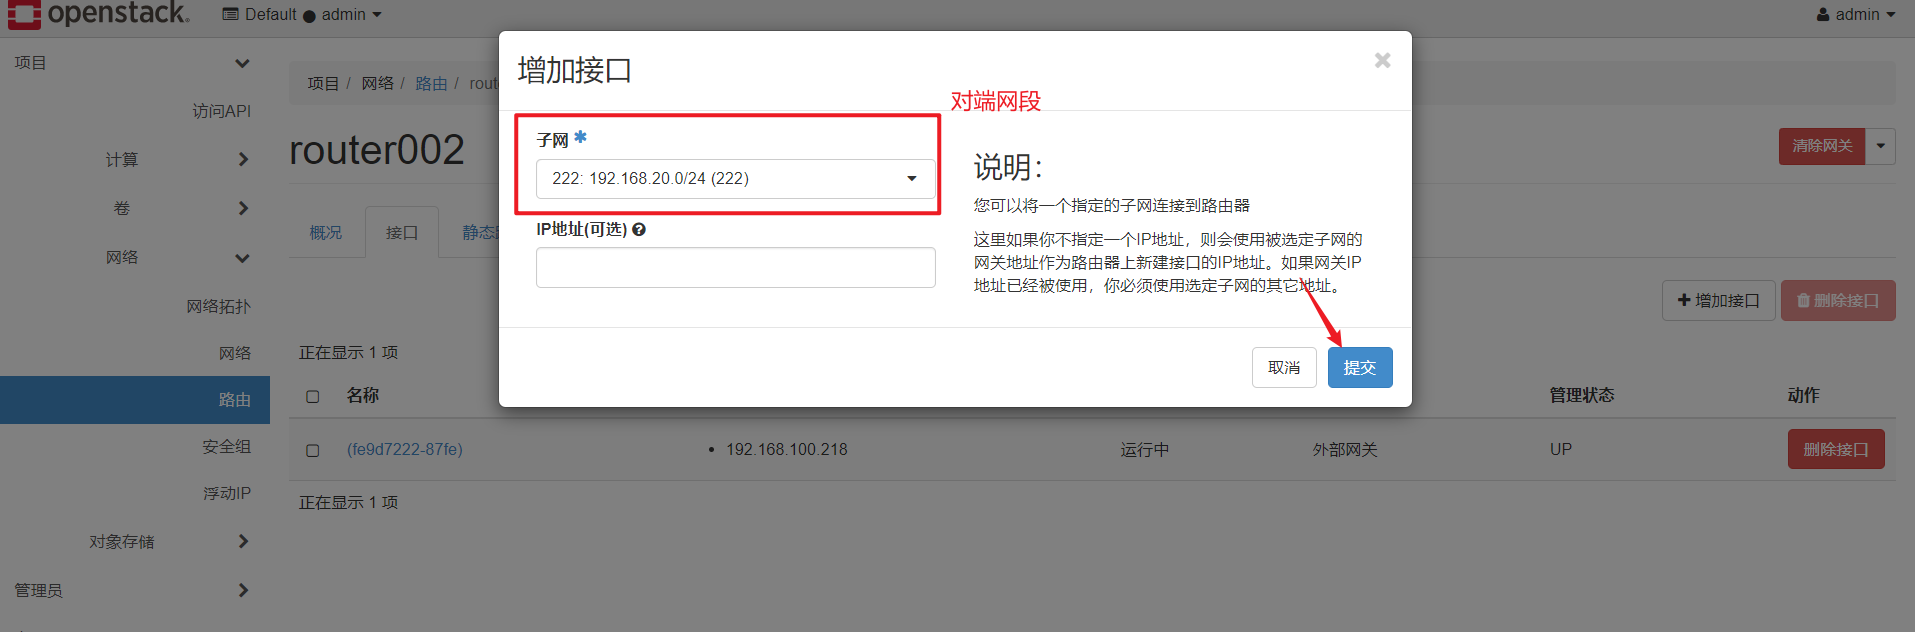<a name="TIZKE"></a>## 3):网络路由都弄好后使用这个两个网段分别创建两台主机,这里不在演示..........创建两台主机后通过网络拓扑图查看网络结构:<br />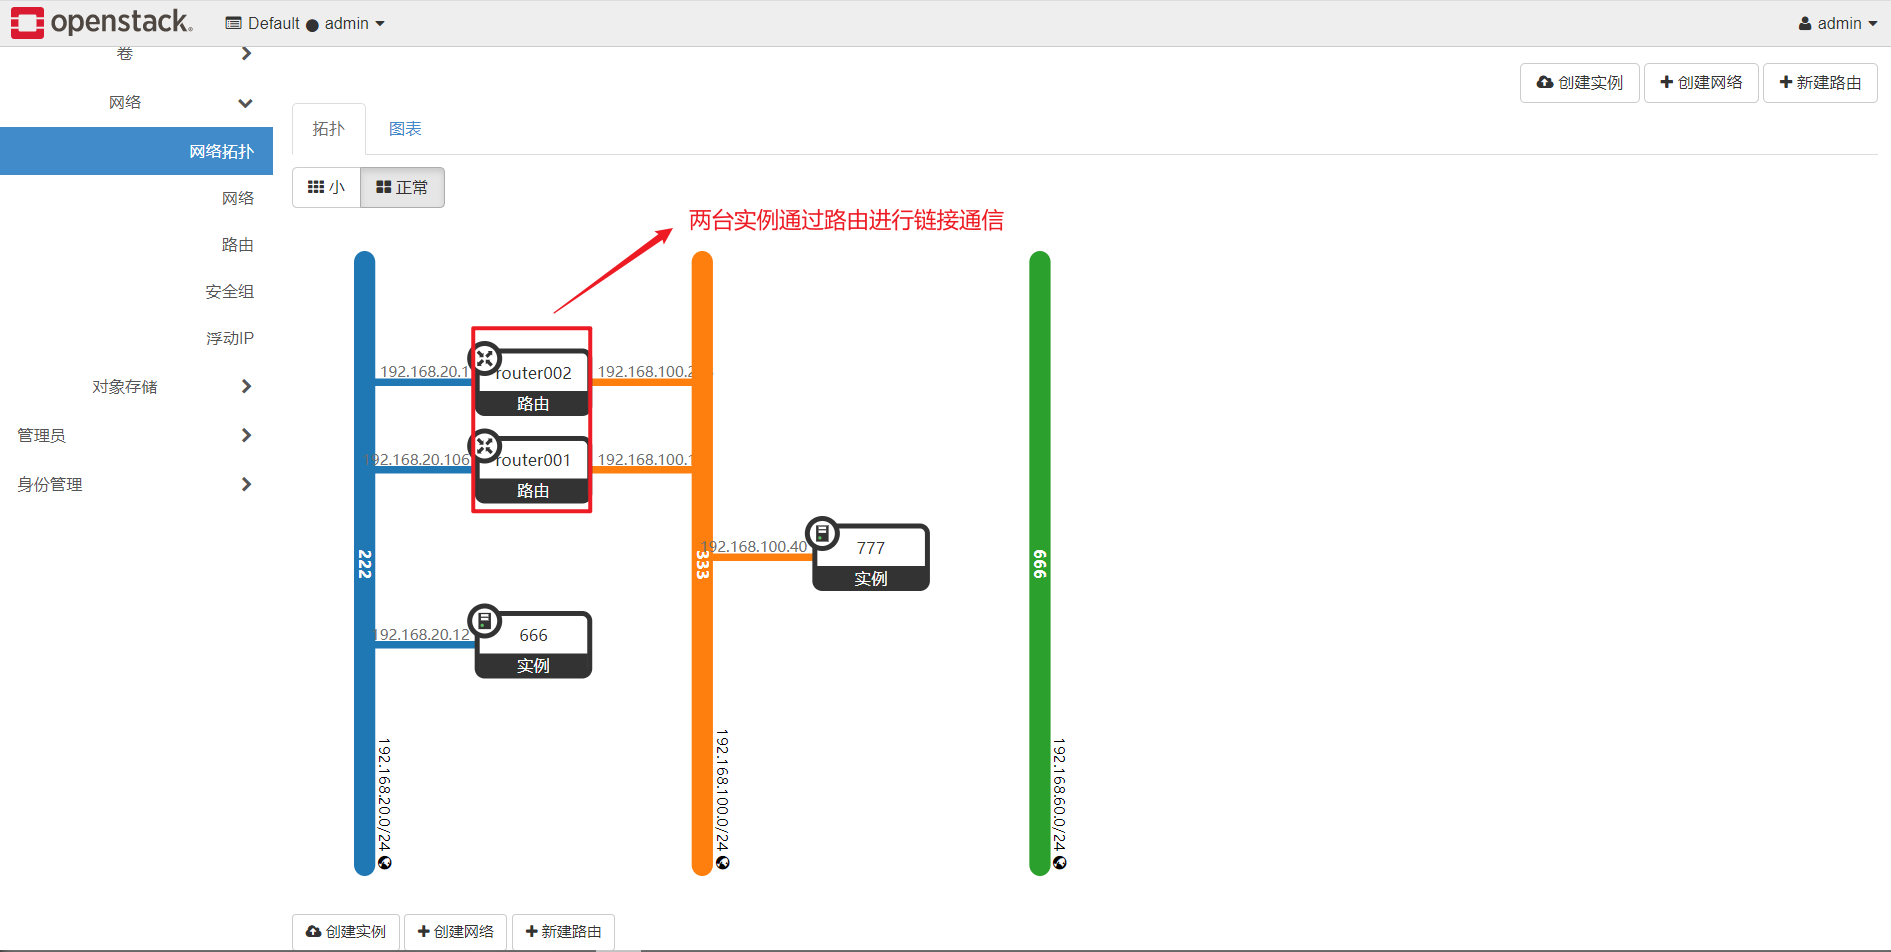<br />创建完成后这两台主机是能相互通信的<a name="DRRVC"></a># 七:扩展服务在具体部署 OpenStack 时应该遵循“逐步扩展部署法”通过安装Swift(对象存储)和cinder(快存储)就是一个准系统了<br />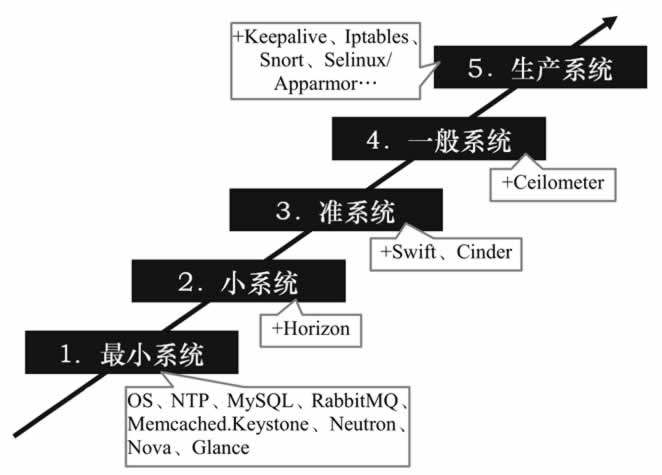<a name="s03cL"></a>## 1):cinder服务安装<a name="EJP92"></a>### 1:controller节点安装<a name="ft4Oh"></a>#### ①:先决条件1. 在安装和配置块存储服务之前,您必须创建数据库、服务凭证和 API 端点。要创建数据库,请完成以下步骤:1. 使用数据库访问客户端以**root**用户身份连接数据库服务器:
$ mysql -u root -p000000
创建cinder数据库:
MariaDB [(none)]> CREATE DATABASE cinder;
授予对cinder数据库的适当访问权限:
MariaDB [(none)]> GRANT ALL PRIVILEGES ON cinder. TO ‘cinder’@’localhost’ \ IDENTIFIED BY ‘CINDER_DBPASS’; MariaDB [(none)]> GRANT ALL PRIVILEGES ON cinder. TO ‘cinder’@’%’ \ IDENTIFIED BY ‘CINDER_DBPASS’;
2. 要创建服务凭证,请完成以下步骤:创建**cinder**用户:
$ openstack user create —domain default —password-prompt cinder
User Password: Repeat User Password: +——————————-+—————————————————+ | Field | Value | +——————————-+—————————————————+ | domain_id | default | | enabled | True | | id | 9d7e33de3e1a498390353819bc7d245d | | name | cinder | | options | {} | | password_expires_at | None | +——————————-+—————————————————+
**admin**为**cinder**用户添加角色:
$ openstack role add —project service —user cinder admin
创建**cinderv2**和**cinderv3**服务实体:
$ openstack service create —name cinderv2 \ —description “OpenStack Block Storage” volumev2
+——————-+—————————————————+ | Field | Value | +——————-+—————————————————+ | description | OpenStack Block Storage | | enabled | True | | id | eb9fd245bdbc414695952e93f29fe3ac | | name | cinderv2 | | type | volumev2 | +——————-+—————————————————+
```$ openstack service create --name cinderv3 \--description "OpenStack Block Storage" volumev3+-------------+----------------------------------+| Field | Value |+-------------+----------------------------------+| description | OpenStack Block Storage || enabled | True || id | ab3bbbef780845a1a283490d281e7fda || name | cinderv3 || type | volumev3 |+-------------+----------------------------------+
创建块存储服务** API 端点**:
$ openstack endpoint create --region RegionOne \volumev2 public http://controller:8776/v2/%\(project_id\)s+--------------+------------------------------------------+| Field | Value |+--------------+------------------------------------------+| enabled | True || id | 513e73819e14460fb904163f41ef3759 || interface | public || region | RegionOne || region_id | RegionOne || service_id | eb9fd245bdbc414695952e93f29fe3ac || service_name | cinderv2 || service_type | volumev2 || url | http://controller:8776/v2/%(project_id)s |+--------------+------------------------------------------+$ openstack endpoint create --region RegionOne \volumev2 internal http://controller:8776/v2/%\(project_id\)s......略$ openstack endpoint create --region RegionOne \volumev2 admin http://controller:8776/v2/%\(project_id\)s.......略
$ openstack endpoint create --region RegionOne \volumev3 public http://controller:8776/v3/%\(project_id\)s+--------------+------------------------------------------+| Field | Value |+--------------+------------------------------------------+| enabled | True || id | 03fa2c90153546c295bf30ca86b1344b || interface | public || region | RegionOne || region_id | RegionOne || service_id | ab3bbbef780845a1a283490d281e7fda || service_name | cinderv3 || service_type | volumev3 || url | http://controller:8776/v3/%(project_id)s |+--------------+------------------------------------------+$ openstack endpoint create --region RegionOne \volumev3 internal http://controller:8776/v3/%\(project_id\)s.........略$ openstack endpoint create --region RegionOne \volumev3 admin http://controller:8776/v3/%\(project_id\)s.........略
②:安装和配置组件
安装软件包
# yum install openstack-cinder
编辑/etc/cinder/cinder.conf文件并完成以下操作:
在该[database]部分中,配置数据库访问:
[database]# ...connection = mysql+pymysql://cinder:000000@controller/cinder #注意修改密码
在该**[DEFAULT]**部分,配置**RabbitMQ** 消息队列访问:
[DEFAULT]# ...transport_url = rabbit://openstack:RABBIT_PASS@controller
在**[DEFAULT]**和**[keystone_authtoken]**部分,配置身份服务访问:
[DEFAULT]# ...auth_strategy = keystone[keystone_authtoken]# ...www_authenticate_uri = http://controller:5000auth_url = http://controller:5000memcached_servers = controller:11211auth_type = passwordproject_domain_name = defaultuser_domain_name = defaultproject_name = serviceusername = cinderpassword = 000000 #注意修改密码
在该**[DEFAULT]**部分中,配置**my_ip**选项以使用控制器节点的管理接口 IP 地址:
[DEFAULT]# ...my_ip = 192.168.50.10 #controller节点管理ip
在该**[oslo_concurrency]**部分中,配置锁定路径:
[oslo_concurrency]# ...lock_path = /var/lib/cinder/tmp
③:填充块存储数据库:
# su -s /bin/sh -c "cinder-manage db sync" cinder
④:配置计算节点使用块存储设备
编辑/etc/nova/nova.conf文件并将以下内容添加到其中:
[cinder]os_region_name = RegionOne
⑤:完成安装
重启计算 API 服务:
# systemctl restart openstack-nova-api.service
启动块存储服务并配置它们在系统启动时启动:
# systemctl enable openstack-cinder-api.service openstack-cinder-scheduler.service# systemctl start openstack-cinder-api.service openstack-cinder-scheduler.service
2:安装和配置存储节点
在存储节点上安装和配置块存储服务之前,您必须准备好存储设备。
在创建虚拟机时为compute节点多添加两块硬盘,添加完成后设备中会多出/dev/sdb 和、/dev/sdc(根据自己实际情况来)①:先决条件
安装支持的实用程序包:
一些发行版默认包含 LVM。
# yum install lvm2 device-mapper-persistent-data# systemctl enable lvm2-lvmetad.service# systemctl start lvm2-lvmetad.service
②:创建 LVM 物理卷/dev/sdb:
# pvcreate /dev/sdbPhysical volume "/dev/sdb" successfully created
③:创建 LVM 卷组cinder-volumes:
# vgcreate cinder-volumes /dev/sdbVolume group "cinder-volumes" successfully created
④:重新配置LVM
只有实例可以访问块存储卷组。不过,底层的操作系统管理这些设备并将其与卷关联。默认情况下,LVM卷扫描工具会扫描/dev 目录,查找包含卷的块存储设备。如果项目在他们的卷上使用LVM,扫描工具检测到这些卷时会尝试缓存它们,可能会在底层操作系统和项目卷上产生各种问题。您必须重新配置LVM,让它只扫描包含cinder-volume卷组的设备。编辑/etc/lvm/lvm.conf文件并完成下面的操作:
- 在
devices部分,添加一个过滤器,只接受/dev/sdb设备,拒绝其他所有设备: - 编辑/etc/lvm/lvm.conf
每个过滤器组中的元素都以devices {...filter = [ "a/sdb/", "r/.*/"]
a开头,即为 accept,或以 r 开头,即为reject,并且包括一个设备名称的正则表达式规则。过滤器组必须以r/.*/[](https://docs.openstack.org/mitaka/zh_CN/install-guide-rdo/cinder-storage-install.html#id1)结束,过滤所有保留设备。⑤:安装和配置组件
- 安装软件包
# yum install openstack-cinder targetcli python-keystone
- 编辑/etc/cinder/cinder.conf文件并完成以下操作:
在该[database]部分中,配置数据库访问:
[database]# ...connection = mysql+pymysql://cinder:000000@controller/cinder
在该[DEFAULT]部分,配置RabbitMQ 消息队列访问:
[DEFAULT]# ...transport_url = rabbit://openstack:RABBIT_PASS@controller
在[DEFAULT]和[keystone_authtoken]部分,配置身份服务访问: ``` [DEFAULT]
…
auth_strategy = keystone
[keystone_authtoken]
…
www_authenticate_uri = http://controller:5000 auth_url = http://controller:5000 memcached_servers = controller:11211 auth_type = password project_domain_name = default user_domain_name = default project_name = service username = cinder password = 000000
- 在该**[DEFAULT]**部分中,配置**my_ip**选项:
[DEFAULT]
…
my_ip = 192.168.50.20 #存储节点的ip(我采用的是两个节点,所以compute节点又担任存储节点所以填的 是compute节点ip)
- 在该**[lvm]**部分中,使用 LVM 驱动程序、**cinder-volumes**卷组、iSCSI 协议和适当的 iSCSI 服务配置 LVM 后端。如果该**[lvm]**部分不存在,请创建它:
[lvm] volume_driver = cinder.volume.drivers.lvm.LVMVolumeDriver volume_group = cinder-volumes target_protocol = iscsi target_helper = lioadm
- 在该**[DEFAULT]**部分中,启用 LVM 后端:
[DEFAULT]
…
enabled_backends = lvm
- 在该**[DEFAULT]**部分中,配置 Image 服务 API 的位置
[DEFAULT]
…
glance_api_servers = http://controller:9292
- 在该**[oslo_concurrency]**部分中,配置锁定路径:
[oslo_concurrency]
…
lock_path = /var/lib/cinder/tmp
<a name="xH2ff"></a>#### ⑥:完成安装启动 Block Storage 卷服务,包括其依赖项,并将它们配置为在系统启动时启动:
systemctl enable openstack-cinder-volume.service target.service
systemctl start openstack-cinder-volume.service target.service
<a name="wGM7O"></a>#### ⑦:验证cinder
[root@controller ~]# openstack volume service list +—————————+——————-+———+————-+———-+——————————————+ | Binary | Host | Zone | Status | State | Updated At | +—————————+——————-+———+————-+———-+——————————————+ | cinder-scheduler | controller | nova | enabled | up | 2021-12-26T09:22:07.000000 | | cinder-volume | compute@lvm | nova | enabled | up | 2021-12-26T09:22:12.000000 | +—————————+——————-+———+————-+———-+——————————————+
创建一个2G大小名称为mycinder的块存储
[root@controller ~]# cinder create —name mycinder 2 +————————————————+———————————————————+ | Property | Value | +————————————————+———————————————————+ | attachments | [] | | availabilityzone | nova | | bootable | false | | consistencygroupid | None | | createdat | 2021-12-26T09:23:31.000000 | | description | None | | encrypted | False | | groupid | None | | id | b872e916-ff84-4e00-bd9c-b4baa18ddb78 | | metadata | {} | | migration_status | None | | multiattach | False | | name | mycinder | | os-vol-host-attr:host | None | | os-vol-mig-status-attr:migstat | None | | os-vol-mig-status-attr:name_id | None | | os-vol-tenant-attr:tenant_id | 2d35428a028244c58e5dbf918ea87931 | | provider_id | None | | replication_status | None | | service_uuid | None | | shared_targets | True | | size | 2 | | snapshot_id | None | | source_volid | None | | status | creating | | updated_at | None | | user_id | de2fa96213994b78b68cc574f6bfcdcc | | volume_type | __DEFAULT | +————————————————+———————————————————+ [root@controller ~]# cinder list +———————————————————+—————-+—————+———+——————-+—————+——————-+ | ID | Status | Name | Size | Volume Type | Bootable | Attached to | +———————————————————+—————-+—————+———+——————-+—————+——————-+ | b872e916-ff84-4e00-bd9c-b4baa18ddb78 | available | mycinder | 2 | __DEFAULT | false | | +———————————————————+—————-+—————+———+——————-+—————+——————-+
<a name="PAhY4"></a>## 2):Swift服务安装链接:[https://docs.openstack.org/swift/train/install/](https://docs.openstack.org/swift/train/install/)<a name="RLHVM"></a>### 1:controller节点安装对象存储服务不使用控制器节点上的 SQL 数据库。相反,它在每个存储节点上使用分布式 SQLite 数据库。<br />来源**admin**凭据来访问仅管理员CLI命令:
[root@controller ~]# source admin-openrc
<a name="MaZyj"></a>#### ①:要创建身份服务凭证,请完成以下步骤:1. 创建Swift用户
$ openstack user create —domain default —password-prompt swift
2. **admin**为**swift**用户添加角色:
$ openstack role add —project service —user swift admin
3. 创建**swift**服务实体
$ openstack service create —name swift \ —description “OpenStack Object Storage” object-store
<a name="wmQgv"></a>#### ②:创建Swift服务端点
[root@controller ~]# openstack endpoint create —region RegionOne object-store public http://controller:8080/v1/AUTH_%\(project_id\)s +———————+———————————————————————-+ | Field | Value | +———————+———————————————————————-+ | enabled | True | | id | d5800018a6f3423ea92a539f65a0faf8 | | interface | public | | region | RegionOne | | regionid | RegionOne | | service_id | 3ccaffcf593d4e35a0ad3a423d9867a9 | | service_name | swift | | service_type | object-store | | url | http://controller:8080/v1/AUTH%(projectid)s | +———————+———————————————————————-+ [root@controller ~]# openstack endpoint create —region RegionOne object-store internal http://controller:8080/v1/AUTH%(projectid)s +———————+———————————————————————-+ | Field | Value | +———————+———————————————————————-+ | enabled | True | | id | 9670d4eb67c74a249fc74930642a7787 | | interface | internal | | region | RegionOne | | region_id | RegionOne | | service_id | 3ccaffcf593d4e35a0ad3a423d9867a9 | | service_name | swift | | service_type | object-store | | url | http://controller:8080/v1/AUTH%(project_id)s | +———————+———————————————————————-+ [root@controller ~]# openstack endpoint create —region RegionOne object-store admin http://controller:8080/v1 +———————+—————————————————+ | Field | Value | +———————+—————————————————+ | enabled | True | | id | fe5ee782b95f4248aafd96923d258f07 | | interface | admin | | region | RegionOne | | region_id | RegionOne | | service_id | 3ccaffcf593d4e35a0ad3a423d9867a9 | | service_name | swift | | service_type | object-store | | url | http://controller:8080/v1 | +———————+—————————————————+
<a name="uGFKI"></a>#### ③:安装和配置组件1. 下载安装包
yum install openstack-swift-proxy python-swiftclient \
python-keystoneclient python-keystonemiddleware \ memcached
<a name="hB30x"></a>#### ④:从 Object Storage 源存储库中获取代理服务配置文件:
curl -o /etc/swift/proxy-server.conf https://opendev.org/openstack/swift/raw/branch/master/etc/proxy-server.conf-sample
<a name="hFYeU"></a>#### ⑤:配置proxy-server编辑**/etc/swift/proxy-server.conf**文件并完成以下操作:- 在该**[DEFAULT]**部分中,配置绑定端口、用户和配置目录:
[DEFAULT] … bind_port = 8080 user = swift swift_dir = /etc/swift
在该**[pipeline:main]**部分中,删除**tempurl**和 **tempauth**模块并添加**authtoken**和**keystoneauth** 模块:
[pipeline:main] pipeline = catch_errors gatekeeper healthcheck proxy-logging cache container_sync bulk ratelimit authtoken keystoneauth container-quotas account-quotas slo dlo versioned_writes proxy-logging proxy-server
不要更改模块的顺序。<br />在该**[app:proxy-server]**部分中,启用自动帐户创建:
[app:proxy-server] use = egg:swift#proxy … account_autocreate = True
在**[filter:keystoneauth]**部分中,配置操作员角色:
[filter:keystoneauth] use = egg:swift#keystoneauth … operator_roles = admin,user
在**[filter:authtoken]**部分,配置身份服务访问:
[filter:authtoken] paste.filter_factory = keystonemiddleware.auth_token:filter_factory … www_authenticate_uri = http://controller:5000 auth_url = http://controller:5000 memcached_servers = controller:11211 auth_type = password project_domain_id = default user_domain_id = default project_name = service username = swift password = 000000 delay_auth_decision = True
在该**[filter:cache]**部分中,配置**memcached**位置:
[filter:cache] use = egg:swift#memcache memcache_servers = controller:11211 ```

若有收获,就点个赞吧
0 人点赞
