什么是Service
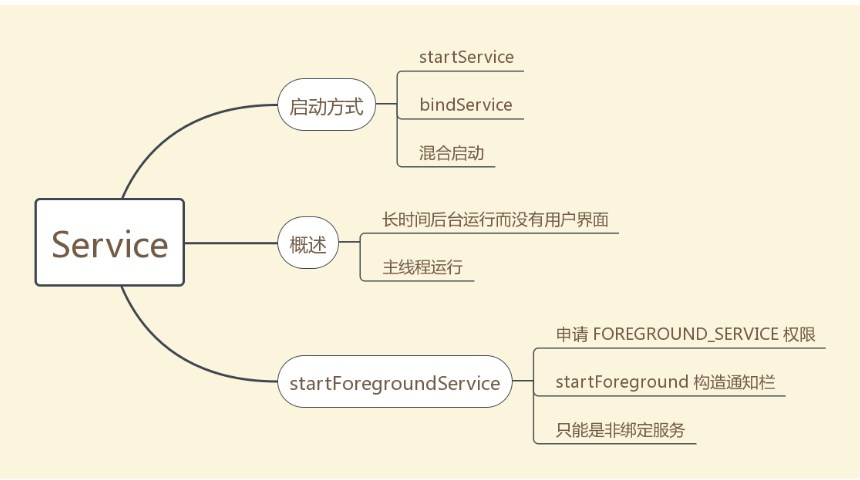
务是Android中实现程序后台运行的解决方案,他非常适合去执行那些不需要和用户交互而且还要长期运行的任务。服务的运行不依赖于任何用户界面,即使程序被切换到后台,或者用户打开了另一个应用程序,服务仍然能够保持独立运行。不过需要注意的是,服务并不是运行在一个独立的进程当中,而是依赖于创建服务时所在的应用程序进程。当某个应用程序被杀掉时,所有依赖该进程的服务也会停止运行。service基本上分为两种形式:
- 本地服务:
该服务依附在主进程上而不是独立的进程,这样在一定程度上节约了资源,另外本地服务因为是在同一进程因此不需要IPC,也不需要AIDL。相应bindService会方便很多,当主进程被Kill后,服务便会终止。一般使用在音乐播放器播放等不需要常驻的服务。指的是服务和启动服务的activity在同一个进程中。
- 远程服务:
该服务是独立的进程,对应进程名格式为所在包名加上你指定的android:process字符串。一般定义方式 android:process=”:service” 由于是独立的进程,因此在Activity所在进程被Kill的时候,该服务依然在运行,不受其他进程影响,有利于为多个进程提供服务具有较高的灵活性。由于是独立的进程,会占用一定资源,并且使用AIDL进行IPC比较麻烦。一般用于系统的Service,这种Service是常驻的。指的是服务和启动服务的activity不在同一个进程中。
* 注意(启动本地服务用的是显式启动; 远程服务的启动要用到隐式启动)
Service工作状态
Service 分为两种工作状态,一种是启动状态,主要用于执行后台计算;另一种是绑定状态,主要用于其他组件和 Service 的交互。
1. 启动状态:startService()启动
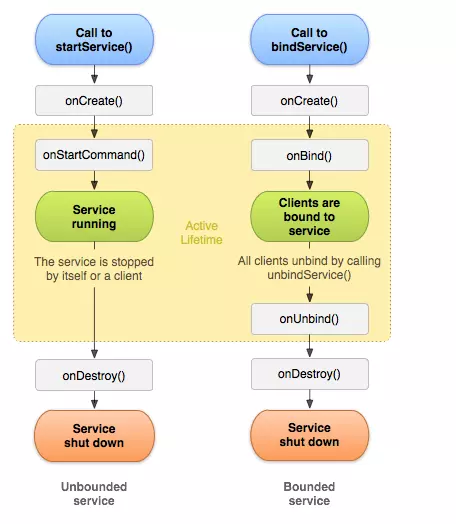
当应用组件(如 Activity)通过调用 startService() 启动服务时,服务即处于“启动”状态。一旦启动,服务即可在后台无限期运行,即使启动服务的组件已被销毁也不受影响,除非手动调用才能停止服务, 已启动的服务通常是执行单一操作,而且不会将结果返回给调用方。
@UnsupportedAppUsageprivate void handleCreateService(CreateServiceData data) {···LoadedApk packageInfo = getPackageInfoNoCheck(data.info.applicationInfo, data.compatInfo);Service service = null;try {java.lang.ClassLoader cl = packageInfo.getClassLoader();service = packageInfo.getAppFactory().instantiateService(cl, data.info.name, data.intent);}···try {if (localLOGV) Slog.v(TAG, "Creating service " + data.info.name);ContextImpl context = ContextImpl.createAppContext(this, packageInfo);context.setOuterContext(service);Application app = packageInfo.makeApplication(false, mInstrumentation);service.attach(context, this, data.info.name, data.token, app,ActivityManager.getService());service.onCreate();mServices.put(data.token, service);try {ActivityManager.getService().serviceDoneExecuting(data.token, SERVICE_DONE_EXECUTING_ANON, 0, 0);} catch (RemoteException e) {throw e.rethrowFromSystemServer();}}···}
2. 绑定状态:bindService()启动
当应用组件通过调用 bindService() 绑定到服务时,服务即处于“绑定”状态。绑定服务提供了一个客户端-服务器接口,允许组件与服务进行交互、发送请求、获取结果,甚至是利用进程间通信 (IPC) 跨进程执行这些操作。 仅当与另一个应用组件绑定时,绑定服务才会运行。 多个组件可以同时绑定到该服务,但全部取消绑定后,该服务即会被销毁。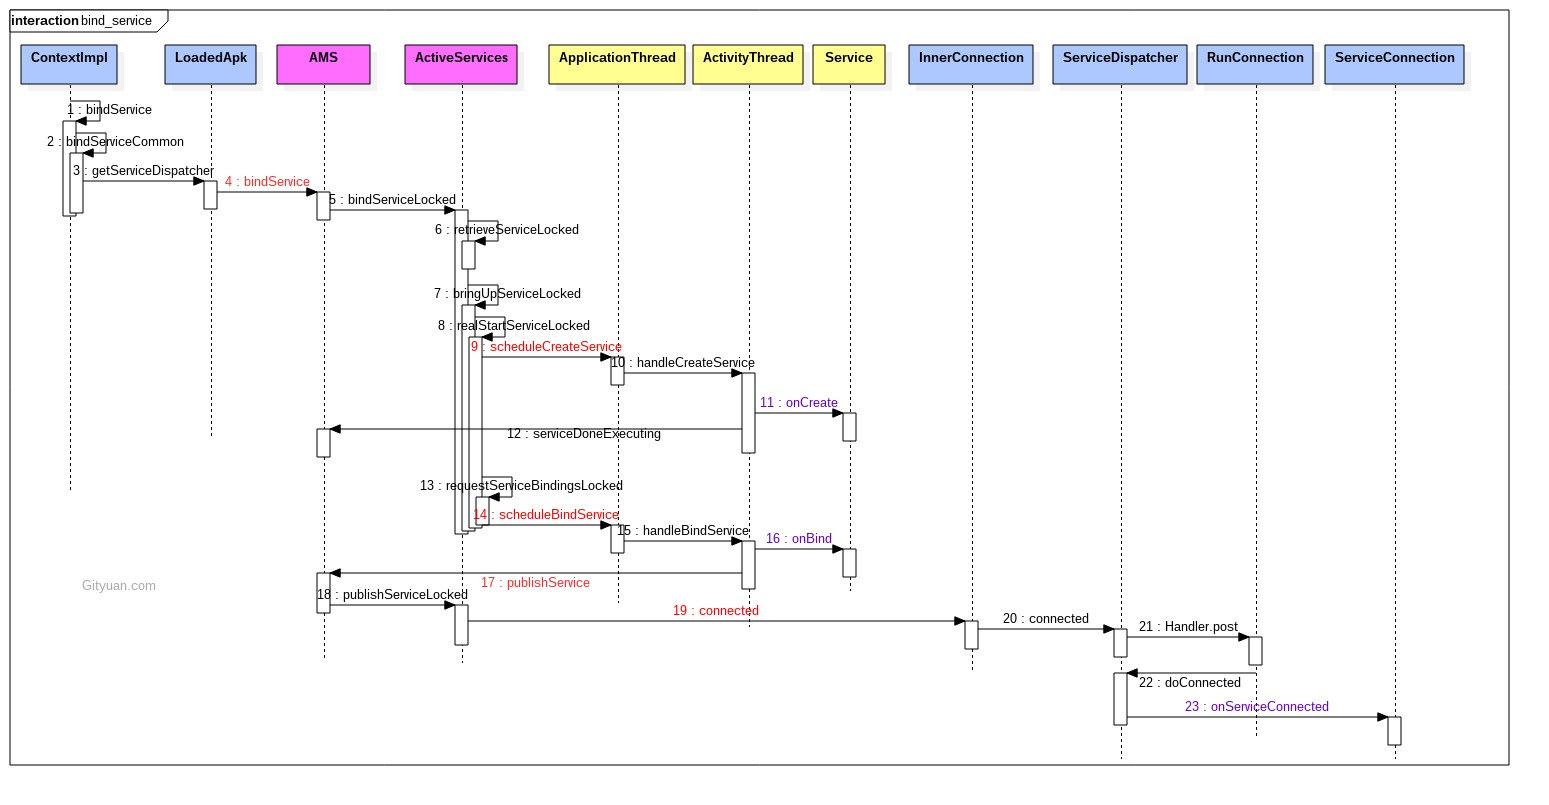
private void handleBindService(BindServiceData data) {Service s = mServices.get(data.token);···if (s != null) {try {data.intent.setExtrasClassLoader(s.getClassLoader());data.intent.prepareToEnterProcess();try {if (!data.rebind) {IBinder binder = s.onBind(data.intent);ActivityManager.getService().publishService(data.token, data.intent, binder);} else {s.onRebind(data.intent);ActivityManager.getService().serviceDoneExecuting(data.token, SERVICE_DONE_EXECUTING_ANON, 0, 0);}} catch (RemoteException ex) {throw ex.rethrowFromSystemServer();}}···}}
实例:
创建服务(其实就是在 onBind 方法中返回 IBinder 实例)
public class MyBindService extends Service {private static final String TAG = "MyBindService";@Overridepublic void onCreate() {super.onCreate();Log.i(TAG, "onCreate: ");}@Overridepublic int onStartCommand(Intent intent, int flags, int startId) {Log.i(TAG, "onStartCommand: ");return super.onStartCommand(intent, flags, startId);}@Overridepublic IBinder onBind(Intent intent) {Log.i(TAG, "onBind: ");return new MyBinder();}@Overridepublic boolean onUnbind(Intent intent) {Log.i(TAG, "onUnbind: ");return super.onUnbind(intent);}@Overridepublic void onDestroy() {super.onDestroy();Log.i(TAG, "onDestroy: ");}public class MyBinder extends Binder{public String getInfo(){return "Info";}}}
绑定服务(提供一个 ServiceConnection 接口,在接口回调中获取 Binder 对象,与服务进行通信) ```java private MyBindService.MyBinder mMyBinder; //绑定/解除绑定 Service 回调接口 private ServiceConnection mConnection = new ServiceConnection() { @Override public void onServiceConnected(ComponentName name, IBinder service) {
//绑定成功后回调//1.获取 Binder 接口对象mMyBinder = (MyBindService.MyBinder) service;//2.从服务获取数据String content = mMyBinder.getInfo();//3.界面提示Toast.makeText(MainActivity.this, content, Toast.LENGTH_SHORT).show();
}
@Override public void onServiceDisconnected(ComponentName name) {
//解除绑定后回调mMyBinder = null;
} };
bindService(intent, mConnection, Context.BIND_AUTO_CREATE); unbindService(mConnection);
<a name="HB7O6"></a>### 3. 混合启动如果一个服务被启动又被绑定,onCreate 方法只会执行一次,startService 调用多少次,onStartCommand 就会执行多少次,调用 stopService 并不会回调 onDestory,unBindService 可以。<a name="E0Jd9"></a>### onStartCommand 返回值- START_NOT_STICKY<br />如果系统在 onStartCommand 返回后终止服务,则除非有挂起 Intent 要传递,否则系统不会重建服务。这是最安全的选项,可以避免在不必要时以及应用能够轻松重启所有未完成的作业时运行服务。<br />- START_STICKT<br />如果系统在 onStartCommand 返回后终止服务,则会重建服务并调用 onStartCommadn,但绝对不会重新传递最后一个 Intent。相反,除非有挂起 Intent 要启动服务,否则系统会通过空 Intent 调用 onStartCommand。这适用于不执行命令、但无限期运行并等待作业的媒体播放器等。<br />- START_REDELIVER_INTENT<br />如果系统在 onStartCommand 返回后终止服务,则会重建服务,并通过传递给服务等最后一个 Intent 调用 onStartCommand。任何挂起 Intent 均依次传递。这适用于主动执行应该立即恢复的作业的服务,例如下载文件.<a name="vjRr0"></a>### bindService 参数```java// 第三个参数一般传 Context.BIND_AUTO_CREATE。他是一个枚举类型public boolean bindService(Intent service, ServiceConnection conn,int flags) {return mBase.bindService(service, conn, flags);}
startForegroundService
最开始使用这个方法时,不是 Crash 就是 ANR;
首先使用前台服务,必须申请 FOREGROUND_SERVICE 权限,这是普通权限,未申请则会引发 SecurityException。
ANR 的解决
使用前台服务,必须提供一个通知栏,不然五秒就会 ANR。
public int onStartCommand(Intent intent, int flags, int startId) {Log.i(TAG, "onStartCommand: ");NotificationManager mNotificationManager = (NotificationManager) getSystemService(Context.NOTIFICATION_SERVICE);// 通知渠道的idString id = "my_channel_01";// 用户可以看到的通知渠道的名字.CharSequence name = "Demo";// 用户可以看到的通知渠道的描述String description = "Desc";int importance = NotificationManager.IMPORTANCE_HIGH;NotificationChannel mChannel = new NotificationChannel(id, name, importance);// 配置通知渠道的属性mChannel.setDescription(description);// 设置通知出现时的闪灯(如果 android 设备支持的话)mChannel.enableLights(true);mChannel.setLightColor(Color.RED);// 设置通知出现时的震动(如果 android 设备支持的话)mChannel.enableVibration(true);mChannel.setVibrationPattern(new long[]{100, 200, 300, 400, 500, 400, 300, 200, 400});mNotificationManager.createNotificationChannel(mChannel);// 通知渠道的idString CHANNEL_ID = "my_channel_01";// Create a notification and set the notification channel.Notification notification = new Notification.Builder(this, CHANNEL_ID).setContentTitle("New Message").setContentText("You've received new messages.").setSmallIcon(R.drawable.ic_launcher_foreground).build();startForeground(1, notification);return super.onStartCommand(intent, flags, startId);}
准确的来说,应该是必须调用 startForeground 方法。
既然我是写在 onStartCommand 方法里面,就说明这是一个启动服务非绑定服务,所以可以多次调用 startForegroundService 方法,调用一次 stopService 即可停止服务。
Crash 的解决
android.app.RemoteServiceException: Context.startForegroundService() did not then call Service.startForeground(): ServiceRecord
这是由于我在 startForegroundService 之后就 stopService,在 Service 中并没有构造通知栏导致的。
使用前台服务,有三点需要注意:
- 申请 FOREGROUND_SERVICE 权限,它是普通权限
- 在 onStartCommand 中必须要调用 startForeground 构造一个通知栏,不然 ANR
- 前台服务只能是启动服务,不能是绑定服务
Service在清单文件中的声明
<service android:name=".myservice"android:enabled="true"android:exported="true"android:icon="@drawable/background_blue"android:label="string"android:process="string"android:permission="string"></service>
| android:exported | 表示是否允许除了当前程序之外的其他程序访问这个服务 |
|---|---|
| android:enabled | 表示是否启用这个服务 |
| android:permission | 是权限声明 |
| android:process | 是否需要在单独的进程中运行,当设置为android:process=”:remote”时,代表Service在单独的进程中运行。注意“:”很重要,它的意思是指要在当前进程名称前面附加上当前的包名,所以“remote”和”:remote”不是同一个意思,前者的进程名称为:remote,而后者的进程名称为:App-packageName:remote。 |
| android:isolatedProcess | 设置 true 意味着,服务会在一个特殊的进程下运行,这个进程与系统其他进程分开且没有自己的权限。与其通信的唯一途径是通过服务的API(bind and start)。 |
Service 启动服务 以及 终止服务
首先要创建服务,必须创建 Service 的子类(或使用它的一个现有子类如IntentService)。在实现中,我们需要重写一些回调方法,以处理服务生命周期的某些关键过程,下面我们通过简单案例来分析需要重写的回调方法有哪些。
import android.app.Service;import android.content.Intent;import android.os.IBinder;import android.support.annotation.IntDef;import android.support.annotation.Nullable;import android.util.Log;/*** Created by jie on 2018/9/15.*/public class MyService extends Service {private static final String TAG = "myservice";@Nullable@Overridepublic IBinder onBind(Intent intent) {return null;}@Overridepublic void onCreate() {Log.e(TAG, "onCreate:");super.onCreate();}@Overridepublic int onStartCommand(Intent intent, int flags, int startId) {Log.e(TAG, "onStartCommand:");return super.onStartCommand(intent, flags, startId);}@Overridepublic void onDestroy() {Log.e(TAG, "onDestroy:");super.onDestroy();}}
在Activity中启动和关闭服务
// 启动Intent start = new Intent(this,MyService.class);startService(start);// 停止Intent stop = new Intent(this,MyService.class);stopService(stop);
Service生命周期
onBind()
当另一个组件想通过调用 bindService() 与服务绑定(例如执行 RPC)时,系统将调用此方法。在此方法的实现中,必须返回 一个IBinder 接口的实现类,供客户端用来与服务进行通信。无论是启动状态还是绑定状态,此方法必须重写,但在启动状态的情况下直接返回 null。
onCreate()
首次创建服务时,系统将调用此方法来执行一次性设置程序(在调用 onStartCommand() 或onBind() 之前)。如果服务已在运行,则不会调用此方法,该方法只调用一次
- onStartCommand()
当另一个组件(如 Activity)通过调用 startService() 请求启动服务时,系统将调用此方法。一旦执行此方法,服务即会启动并可在后台无限期运行。 如果自己实现此方法,则需要在服务工作完成后,通过调用 stopSelf() 或 stopService() 来停止服务。(在绑定状态下,无需实现此方法。)
onDestroy()
当服务不再使用且将被销毁时,系统将调用此方法。服务应该实现此方法来清理所有资源,如线程、注册的侦听器、接收器等,这是服务接收的最后一个调用。
onUnbind()
当所有与服务绑定的组件都解除绑定时,就会调用此方法。
多次 bindService 并不会回调任何方法,多次 unBindService 则会 Crash。
面试题
1. 如何保证 Service 不被杀死
- 在 Service 的 onStartCommand 中返回 START_STICKY,该标志使得 Service 被杀死后尝试再次启动 Service
- 提高 Service 优先级,比如设置成前台服务
- 在 Activity 的 onDestory 发送广播,在广播接收器的 onReceiver 重启 Service

若有收获,就点个赞吧
0 人点赞
