一、NIO概述
对比BIO
BIO即blockIO:
- ServerSocket.accept()
调用了这个函数后,就会一直处于阻塞状态,直到服务端接收了新的连接请求
- InputStream.read(),OutputStream.write()
这个其实更严重,若用户长时间不输入信息则会造成长时间的阻塞
- 无法在同一线程里处理多个StreamIO
非阻塞式NIO
NIO即NonBlocking:
- 使用channel代替Stream
流是单向的写入或者写出数据,而channel是有两种模式的,一种是类似于Stream的单向阻塞式操作,另一种则是非阻塞式的方法。
- 使用Selector监控多条Channel
非阻塞的意义则是某一channel的去数据时,若数据没准备好即立刻返回状态并保持查询状态。
- 可以在一个线程处理多个ChannelIO
多线程是很浪费资源的,而一个线程处理多个Channel则把现成的利用率最大化了。
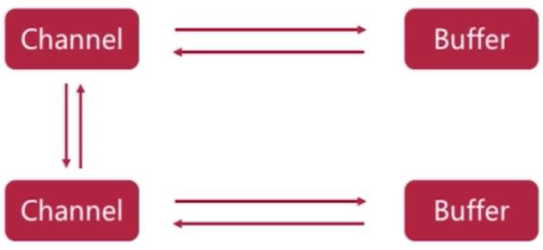
二、Channel与Buffer
Buffer是干什么的?
在NIO中读写是要通过Buffer来完成的,在Channel写数据是要写在Buffer中的,读数据也是要在Buffer中读取的,因此Buffer也是双向的。
Buffer的写入数据:
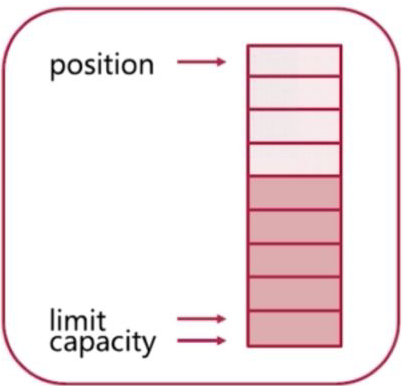
step 1:
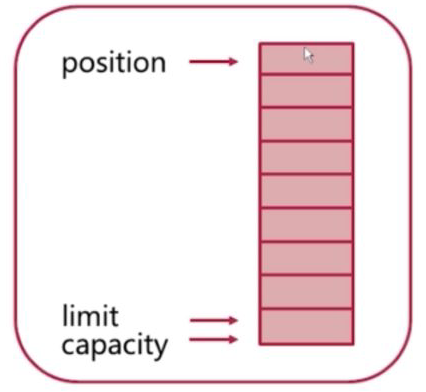
如图所示,图中由三个指针类的变量:postion、limit、capacity。
capacity:即整个Buffer最大的容量,及最多可写到的位置。
position:即当前位置
在最开始的时候,position指向最开始,从最开始的地方开始写入。
而limit暂时不做解释,他只是指在了capacity这个位置。
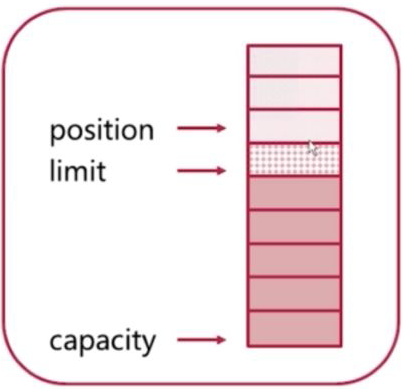
step 2:
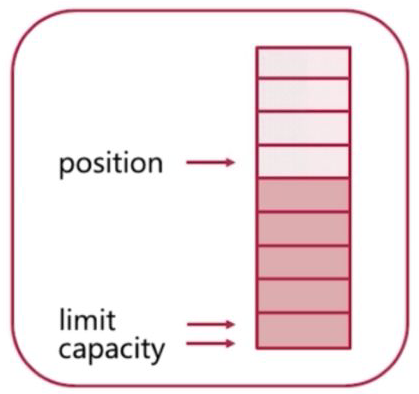
在写入一定的数据后,poistion的位置发生了改变,这时候为了接下来的读取,调用flip()方法。
step 3:
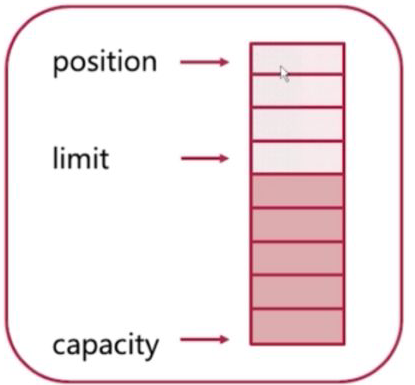
调用flip函数后,position对到了最开始的位置,limit移动到了写入道德最远位置。
Buffer读取数据:
情况一:
step 1:
数据全部读完,position移动到了limit的位置。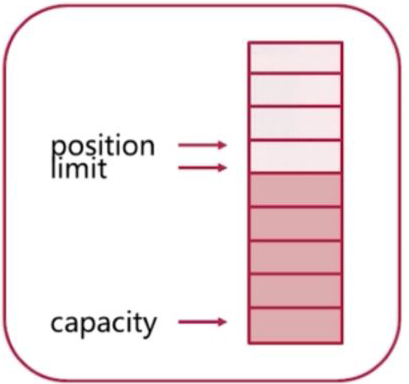
这时候需要调用clear()函数将指针调整方便下一次写入数据。
step 2:
熟悉的样子,熟悉的配方,这里就不过多阐述了。注意:数据没有进行清除,只是移动了指针,在下一次写入数据时后进行覆盖。
情况二:
step 1:
数据没有全部读完,却要进行模式转换。
step 2:
compat函数将未读数据拷贝到开始的位置,position会指向未读数据以下位置,在未读数据以前的数据则会进行覆盖。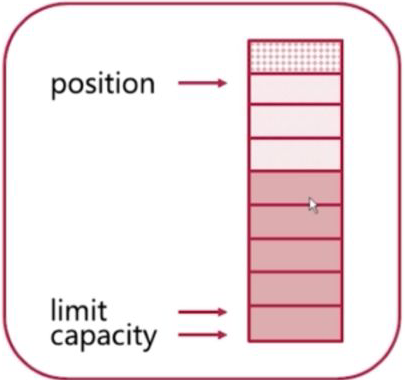
三、Channel简析
Channel的基本操作
几个重要的Channel
Channel的子类还有很多,这里就不一一列出了,以后找时间扩展好了。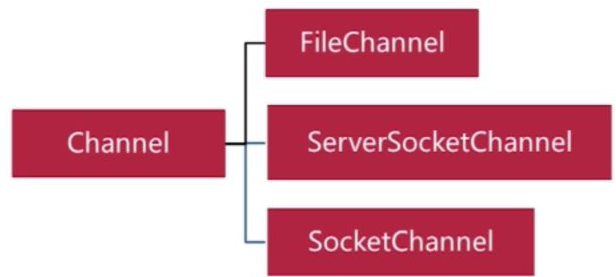
ServerSocketChannel和SocketChannel主要用于网络编程中的数据传输。
这里举例FileChannel的例子。
多方法实现文件拷贝
shutdown方法:
private static void shutdown(Closeable... closeable) {for (Closeable shut : closeable) {try {if (shut != null) {shut.close();}} catch (IOException e) {e.printStackTrace();}}}
没有Buffer的Stream
FileCopyRunner noBufferStreamCopy;noBufferStreamCopy = new FileCopyRunner() {@Overridepublic void copyFile(File source, File target) {InputStream input = null;OutputStream output = null;try {input = new FileInputStream(source);output = new FileOutputStream(target);int result=0;while ((result = input.read()) != -1) {output.write(result);}} catch (FileNotFoundException e) {e.printStackTrace();} catch (IOException e) {e.printStackTrace();} finally {shutdown(input, output);}}@Overridepublic String toString() {return "noBufferStreamCopy";}};
有Buffer的Stream
FileCopyRunner bufferedStreamCopy;bufferedStreamCopy = new FileCopyRunner() {@Overridepublic void copyFile(File source, File target) {BufferedInputStream input = null;BufferedOutputStream output = null;try {input = new BufferedInputStream(new FileInputStream(source));output = new BufferedOutputStream(new FileOutputStream(target));byte[] buffer = new byte[1024];int result= 0;while ((result = input.read(buffer)) != -1) {output.write(buffer, 0, result);}} catch (FileNotFoundException e) {e.printStackTrace();} catch (IOException e) {e.printStackTrace();} finally {shutdown(input, output);}}@Overridepublic String toString() {return "bufferedStreamCopy";}};
NIO的ChannelCopy
FileCopyRunner nioBufferCopy;nioBufferCopy = new FileCopyRunner() {@Overridepublic void copyFile(File source, File target) {FileChannel input = null;FileChannel output = null;try {input = new FileInputStream(source).getChannel();output = new FileOutputStream(target).getChannel();ByteBuffer buffer = ByteBuffer.allocate(1024);while ((input.read(buffer)) != -1) {buffer.flip();while (buffer.hasRemaining()) {output.write(buffer);}buffer.clear();}} catch (FileNotFoundException e) {e.printStackTrace();} catch (IOException e) {e.printStackTrace();} finally {shutdown(input, output);}}@Overridepublic String toString() {return "nioBufferCopy";}};
NIO的TransferCopy
FileCopyRunner nioTransfertCopy;nioTransfertCopy = new FileCopyRunner() {@Overridepublic void copyFile(File source, File target) {FileChannel input = null;FileChannel output = null;try {input = new FileInputStream(source).getChannel();output = new FileOutputStream(target).getChannel();long size = 0L;long sumsize = input.size();while (sumsize != size) {size = input.transferTo(0,sumsize,output);}} catch (FileNotFoundException e) {e.printStackTrace();} catch (IOException e) {e.printStackTrace();} finally {shutdown(input, output);}}@Overridepublic String toString() {return "nioTransfertCopy";}};
运行情况测试
打包复制类:
private static void benchmark(FileCopyRunner test, File source, File targe) {long elapsed = 0L;for (int i = 0; i < ROUNDS; i++) {long startTime = System.currentTimeMillis();test.copyFile(source, targe);elapsed += System.currentTimeMillis() - startTime;targe.delete();}System.out.println(test + ": " + elapsed / ROUNDS);}
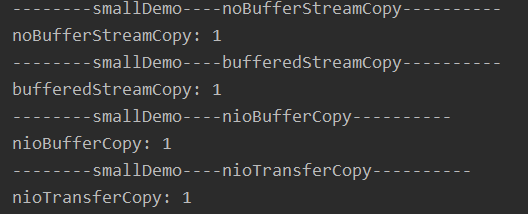
小文件实现代码:
System.out.println("--------smallDemo----noBufferStreamCopy----------");benchmark(noBufferStreamCopy, smallFile, smallFileCopy);System.out.println("--------smallDemo----bufferedStreamCopy----------");benchmark(bufferedStreamCopy, smallFile, smallFileCopy);System.out.println("--------smallDemo----nioBufferCopy----------");benchmark(nioBufferCopy, smallFile, smallFileCopy);System.out.println("--------smallDemo----nioTransferCopy----------");benchmark(nioTransferCopy, smallFile, smallFileCopy);
大文件实现代码:
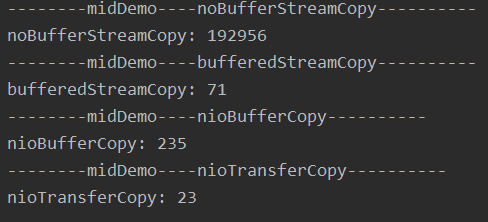
结论:
- 缓冲区对于IO的帮助是很大的
- NIO相比传统IO差距并不大,不过相对来说NIO稍微好一点。(JDK1.4时推出的NIO,相比传统IO性能极佳,新版本的IO基层也用了NIO的方法,所以性能也不会太差)。
四、Selector简析
Selector与Channel
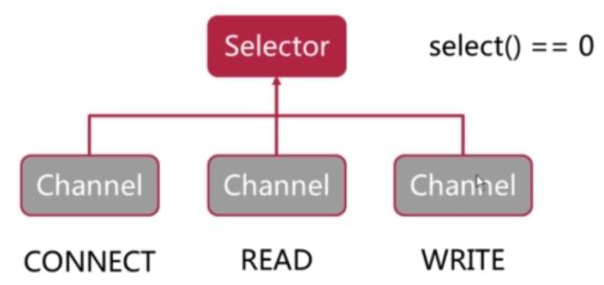
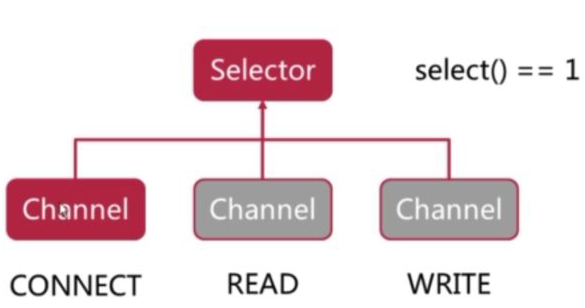
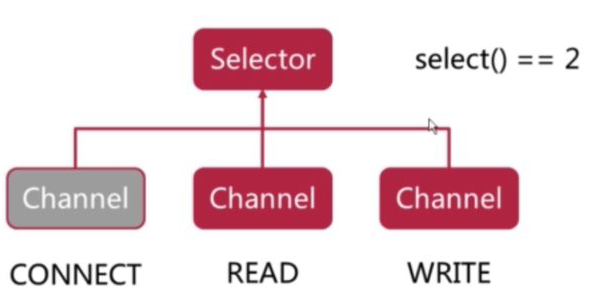
可以选择通道进行非阻塞式的数据传输,但是通道是否可操作却需要不停的询问,因此需要用Selector监听Channel。
在使用之前,要将Channel注册到Selector中,形成下图状态。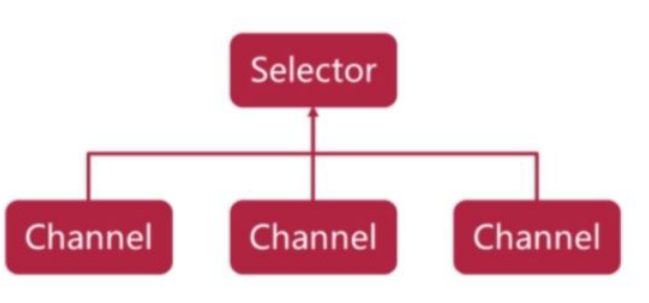
Channel的状态变化
CONNECT:与服务器建立连接
ACCEPT:服务器端接受了请求
READ:有可读取信息
WRITE:可写入状态
无状态:没有任何状态。
无论哪一种Channel都会处于一种状态在Selector上注册Channel
inserstOps():注册的状态
readyOps():显示可操作的状态
channel():返回注册的channel对象
selector():所注册的是哪个selector对象
attachment():附加对象使用Selector选择Channel
没有开启通道:
开启了一个通道:
注意:处理完Channel需要手动重置Channel为等待状态开启了两个通道:

若有收获,就点个赞吧
0 人点赞
