1、线程的创建和启动
Java虚拟机的主线程入口是main方法,用户可以自己创建线程,创建方式有两种:
| public void run() |
|---|
| public void start() |
采用Thread类创建线程,用户只需要继承Thread,覆盖Thread中的run方法,父类Thread中的run方法没有抛出异常,那么子类也不能抛出异常,最后采用start启动线程即可
public class ThreadTest01 {public static void main(String[] args) {Processor p = new Processor();p.run();method1();}private static void method1() {System.out.println("--------method1()----------");}}class Processor {public void run() {for (int i=0; i<10; i++) {System.out.println(i);}}}
以上顺序输出相应的结果(属于串行),也就是run方法完全执行完成后,才执行method1方法,也就是method1必须等待前面的方法返回才可以得到执行,这是一种“同步编程模型”
public class ThreadTest02 {public static void main(String[] args) {Processor p = new Processor();//手动调用该方法//不能采用run来启动一个场景(线程),//run就是一个普通方法调用//p.run();//采用start启动线程,不是直接调用run//start不是马上执行线程,而是使线程进入就绪//线程的正真执行是由Java的线程调度机制完成的p.start();//只能启动一次//p.start();method1();}private static void method1() {System.out.println("--------method1()----------");}}class Processor extends Thread {//覆盖Thread中的run方法,该方法没有异常//该方法是由java线程掉机制调用的//我们不应该手动调用该方法public void run() {for (int i=0; i<10; i++) {System.out.println(i);}}}
通过输出结果大家会看到,没有顺序执行,而在输出数字的同时执行了method1()方法,如果从效率上看,采用多线程的示例要快些,因为我们可以看作他是同时执行的,mthod1()方法没有等待前面的操作完成才执行,这叫“异步编程模型”
1.2、实现Runnable接口
其实Thread对象本身就实现了Runnable接口,但一般建议直接使用Runnable接口来写多线程程序,因为接口会比类带来更多的好处
public class ThreadTest03 {public static void main(String[] args) {//Processor r1 = new Processor();Runnable r1 = new Processor();//不能直接调用run//p.run();Thread t1 = new Thread(r1);//启动线程t1.start();method1();}private static void method1() {System.out.println("--------method1()----------");}}//实现Runnable接口class Processor implements Runnable {//实现Runnable中的run方法public void run() {for (int i=0; i<10; i++) {System.out.println(i);}}}
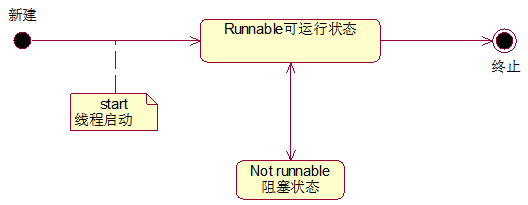
2、线程的生命周期
线程的生命周期存在五个状态:新建、就绪、运行、阻塞、死亡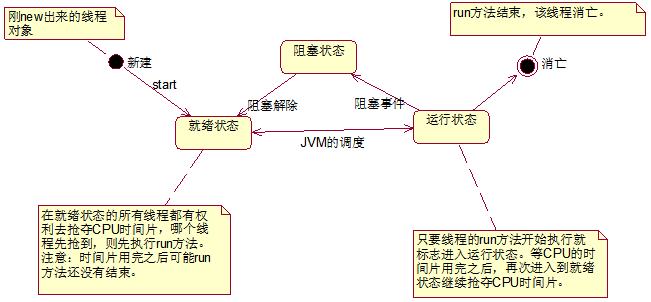
新建:采用new语句创建完成
就绪:执行start后
运行:占用CPU时间
阻塞:执行了wait语句、执行了sleep语句和等待某个对象锁,等待输入的场合
终止:退出run()方法
3、线程的调度与控制
通常我们的计算机只有一个CPU,CPU在某一个时刻只能执行一条指令,线程只有得到CPU时间片,也就是使用权,才可以执行指令。在单CPU的机器上线程不是并行运行的,只有在多个CPU上线程才可以并行运行。Java虚拟机要负责线程的调度,取得CPU的使用权,目前有两种调度模型:分时调度模型和抢占式调度模型,Java使用抢占式调度模型。
分时调度模型:所有线程轮流使用CPU的使用权,平均分配每个线程占用CPU的时间片
抢占式调度模型:优先让优先级高的线程使用CPU,如果线程的优先级相同,那么会随机选择一个(优先级高的线程获取CPU的时间片多一些。)
3.1、线程优先级
线程优先级主要分三种:MAX_PRIORITY(最高级);MIN_PRIORITY(最低级)NOM_PRIORITY(标准)默认
public class ThreadTest04 {public static void main(String[] args) {Runnable r1 = new Processor();Thread t1 = new Thread(r1, "t1");//设置线程的优先级,线程启动后不能再次设置优先级//必须在启动前设置优先级//设置最高优先级t1.setPriority(Thread.MAX_PRIORITY);//启动线程t1.start();//取得线程名称//System.out.println(t1.getName());Thread t2 = new Thread(r1, "t2");//设置最低优先级t2.setPriority(Thread.MIN_PRIORITY);t2.start();System.out.println(Thread.currentThread().getName());}}class Processor implements Runnable {public void run() {for (int i=0; i<100; i++) {System.out.println(Thread.currentThread().getName() + "," + i);}}}
从以上输出结果应该看可以看出,优先级高的线程(t1)会得到的CPU时间多一些,优先执行完成
3.2、Thread.sleep
sleep设置休眠的时间,单位毫秒,当一个线程遇到sleep的时候,就会睡眠,进入到阻塞状态,放弃CPU,腾出cpu时间片,给其他线程用,所以在开发中通常我们会这样做,使其他的线程能够取得CPU时间片,当睡眠时间到达了,线程会进入可运行状态(就绪状态),得到CPU时间片继续执行,如果线程在睡眠状态被中断了,将会抛出InterruptedException
public class ThreadTest05 {public static void main(String[] args) {Runnable r1 = new Processor();Thread t1 = new Thread(r1, "t1");t1.start();Thread t2 = new Thread(r1, "t2");t2.start();}}class Processor implements Runnable {public void run() {for (int i=0; i<100; i++) {System.out.println(Thread.currentThread().getName() + "," + i);if (i % 10 == 0) {try {//睡眠100毫秒,主要是放弃CPU的使用,将CPU时间片交给其他线程使用Thread.sleep(100);}catch(InterruptedException e) {e.printStackTrace();}}}}}
3.3、Thread中几个方法、属性
1、wait、notify、notifyAll
等待/通知的相关方法描述如下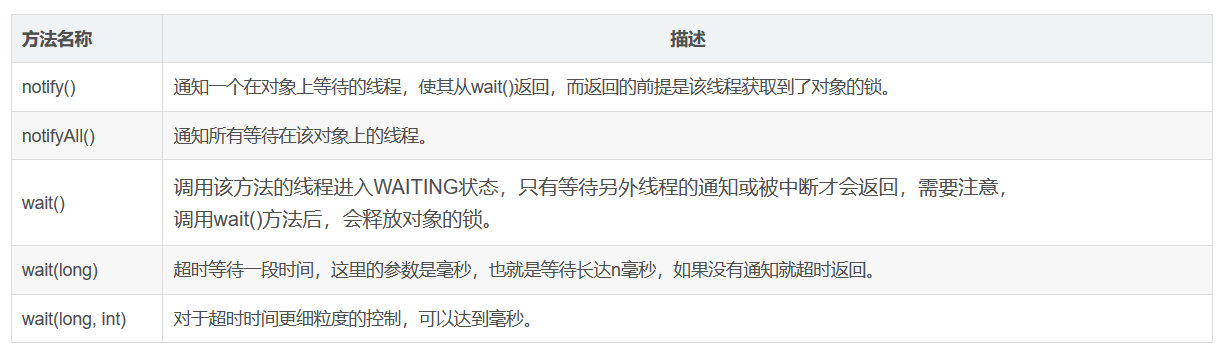
public class WaitNotifyTest {public static void main(String[] args) {/*** 这里可以任意的对象,每个对象都有一个锁* 当这个锁被一个线程A获取到,其他线程不能再获取,直到线程A执行释放其他线程才能获取* 执行wait方法可以释放锁,其他线程可以拿到锁执行通知*/Object lock = new Object();new Thread(new Runnable() {@Overridepublic void run() {System.out.println("线程A等待获取lock锁");synchronized (lock) {try {System.out.println("线程A获取了lock锁");System.out.println("线程A将要运行lock.wait()方法进行等待");lock.wait();//执行等待,一直等待通知System.out.println("线程A等待结束");} catch (Exception e) {e.printStackTrace();}}}}).start();new Thread(new Runnable() {@Overridepublic void run() {System.out.println("线程B等待获取lock锁");synchronized (lock) {System.out.println("线程B获取了lock锁");System.out.println("线程B将要运行lock.notify()方法进行通知");lock.notify();}}}).start();}}
2、yield
Java线程中的Thread.yield( )方法,译为线程让步。顾名思义,就是说当一个线程使用了这个方法之后,它就会把自己CPU执行的时间让掉
让自己或者其它的线程运行,注意是让自己或者其他线程运行,并不是单纯的让给其他线程。
yield()的作用是让步。它能让当前线程由“运行状态”进入到“就绪状态”,从而让其它具有相同优先级的等待线程获取执行权;但是,并不能保
证在当前线程调用yield()之后,其它具有相同优先级的线程就一定能获得执行权;也有可能是当前线程又进入到“运行状态”继续运行!
public class YieldTest {public static void main(String[] args) {Runnable p1 = new YieldProcessor();Thread t1 = new Thread(p1);t1.start();Runnable p2 = new YieldProcessor();Thread t2 = new Thread(p1);t2.start();}}class YieldProcessor implements Runnable{@Overridepublic void run() {String threadName = Thread.currentThread().getName();System.out.println("当前线程名称:" + threadName);if("Thread-0".equals(threadName)){/*** 让步:但是CPU实际调用也是按照自身去调用,不会完全让步*/Thread.yield();}}}
3、join
join()方法是Thread类中的一个方法,该方法的定义是等待该线程终止。其实就是join()方法将挂起调用线程的执行,直到被调用的对象完成它的执行。
注:让当前线程执行完,后面的线程再去执行
/*** 现在有T1、T2、T3三个线程,你怎样保证T2在T1执行完后执行,T3在T2执行完后执行?*/public class JoinDemo {public static void main(String[] args) {//初始化线程t1,由于后续有匿名内部类调用这个对象,需要用final修饰final Thread t1 = new Thread(new Runnable() {@Overridepublic void run() {System.out.println("t1 is running");}});//初始化线程t2,由于后续有匿名内部类调用这个对象,需要用final修饰final Thread t2 = new Thread(new Runnable() {@Overridepublic void run() {try {//t1调用join方法,t2会等待t1运行完之后才会开始执行后续代码t1.join();} catch (InterruptedException e) {e.printStackTrace();} finally {System.out.println("t2 is running");}}});//初始化线程t3Thread t3 = new Thread(new Runnable() {@Overridepublic void run() {try {//t2调用join方法,t3会等待t2运行完之后才会开始执行后续代码t2.join();} catch (InterruptedException e) {e.printStackTrace();} finally {System.out.println("t3 is running");}}});//依次启动3个线程t1.start();t2.start();t3.start();}}
4、interrupt、isInterrupted
一看到线程的interrupt()方法,根据字面意思,很容易将该方法理解为中断线程。其实Thread.interrupt()并不会中断线程的运行,它的作用仅仅是为线程设定一个状态而已,即标明线程是中断状态,这样线程的调度机制或我们的代码逻辑就可以通过判断这个状态做一些处理,比如sleep()方法会抛出异常,或是我们根据isInterrupted()方法判断线程是否处于中断状态,然后做相关的逻辑处理。
对于底层代码native可以查看OpenJDK源代码
| public boolean isInterrupted() | 测试线程是否已经中断。线程的中断状态不受该方法的影响。 |
|---|---|
| public void interrupt() | 中断线程。 |
public class InterruptTest {public static void main(String[] args) {Processor3 processor3 = new Processor3();Thread t = new Thread(processor3);t.start();t.interrupt();}}class Processor3 extends Thread{@Overridepublic void run() {System.out.println(this.isInterrupted());try {Thread.sleep(5 * 1000);} catch (InterruptedException e) {e.printStackTrace();}}}

若有收获,就点个赞吧
0 人点赞
