我们团队的Element发布了。为了让大家使用起来便捷。需要加入vue-cli和vite生态之中。
今天先说说vue-cli插件如何开发。
大家可以尝试一下先
vue create vue3-demovue add element3
一、什么是Vue CLI插件
Vue CLI工具是Vue生态在Vue生态中负责工具基础标准化。他使用一套基于插件的架构。
比如vue-router、vuex或者安装组件库等都可以通过插件的形式安装。
vue add 的设计意图是为了安装和调用 Vue CLI 插件。
# 插件安装vue add vuex
一个vue add xxx就搞定了。
二、功能实现
1. 搭建框架
1.1 初始npm库
为了让一个 CLI 插件在 Vue CLI 项目中被正常使用,它必须遵循 vue-cli-plugin-<name> 或者 @scope/vue-cli-plugin-<name> 这样的命名惯例。这样你的插件才能够:
- 被
@vue/cli-service发现;
也就是说我们只需要将npm库的名字命名为 vue-cli-plugin-element3
这样只要最后提交到npm仓库后 ,我们通过
vue add element3
就可以安装插件了
mkdir vue-cli-plugin-element3npm init -y
2. 安装配置命令行交互
在安装插件前通常会通过命令行交互形式,选择一下安装参数:
比如Element中需要询问
- 是否全局安装

- 是否使用sass?

这个功能是使用通过 inquirer 实现。其实你自己写一个cli工具一般也会用这个功能
在这里面我们只需要编辑一下 prompts.js文件就可以了。具体配置可以参考 inquirer
module.exports = [{type: 'list',name: 'import',message: 'How do you want to import Element3?',choices: [{ name: 'Fully import', value: 'full' },{ name: 'Import on demand', value: 'partial' }],default: 'full',},{when: answers => answers.import === 'full',type: 'confirm',name: 'customTheme',message: 'Do you wish to overwrite Element\'s SCSS variables?',default: false,},]
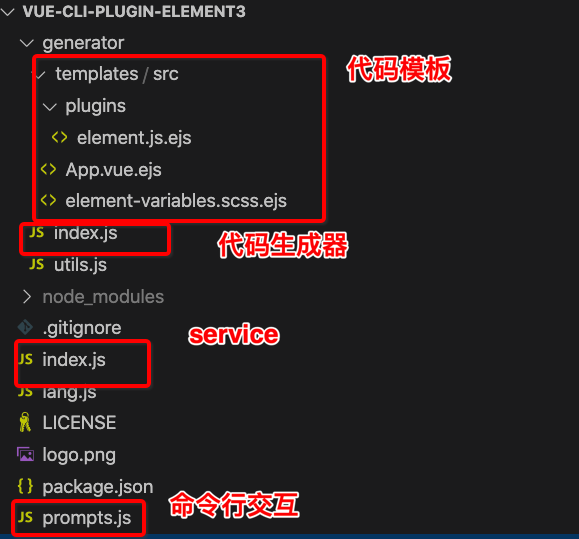
3. 代码生成器Generator
添加element3组件库的主要功能集中在生成器上。生成器的作用就是
- 修改已有代码
- 添加代码
- 添加依赖
- 其他功能(比如babel配置)
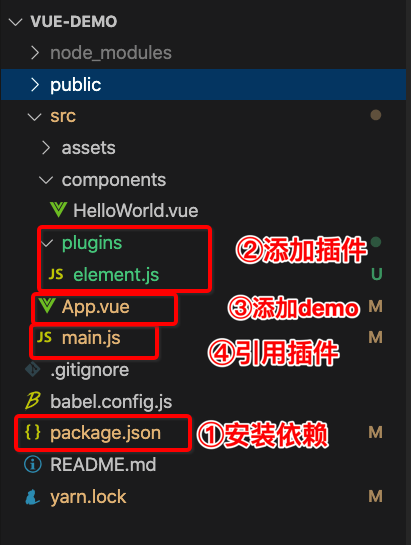
如果手工添加Element3库大概需要以下步骤:
- npm添加依赖库
- 以vue plugin形式添加组件库
- main.js引用组件库
- App.vue中写一个代码例子 比如: 引用一个按钮 确认安装效果
3.1 添加依赖
module.exports = (api, opts, rootOptions) => {api.extendPackage({dependencies: {'element3': '^0.0.26'}})}
这个功能其实就是调用cli提供的api就可以实现了。
3.2 添加插件
添加插件的过程其实就是需要添加/plugins/element.js文件
生成代码通常会使用模板引擎渲染方式,过程类似后端代码渲染,常用的库有ejs模板和hbs模板
cli工具中要求我们使用ejs模板。
如果想了解模板引擎实现原理 请看这篇【天天造轮子 - 模板引擎】](https://juejin.cn/post/6884138429181870093)
首先定义模板
// 部分节选<%_ if (options.import === 'full') { _%>import Element3 from 'element3'<%_ if (options.customTheme) { _%>import '../element-variables.scss'<%_ } else { _%>import 'element3/lib/theme-chalk/index.css'<%_ } _%><%_ if (options.lang !== 'en') { _%>import locale from 'element3/lib/locale/lang/<%= options.lang %>'<%_ } _%><%_ } else { _%>import { ElButton } from 'element3'import 'element3/lib/theme-chalk/index.css'<%_ if (options.lang !== 'en') { _%>import lang from 'element3/lib/locale/lang/<%= options.lang %>'import locale from 'element3/lib/locale'<%_ }} _%>export default (app) => {<%_ if (options.import === 'full') { _%><%_ if (options.lang !== 'en') { _%>app.use(Element3, { locale })<%_ } else { _%>app.use(Element3)<%_ } _%><%_ } else { _%><%_ if (options.lang !== 'en') { _%>locale.use(lang)<%_ } _%>app.use(ElButton)<%_ } _%>}
调用模板引擎渲染
这里面还是使用api提供的render方法 其实就是ejs模板引擎
api.render({'./src/plugins/element.js': './templates/src/plugins/element.js.ejs',})
3.3 添加插件引用
添加插件引用相当于在main.js文件中增加内容
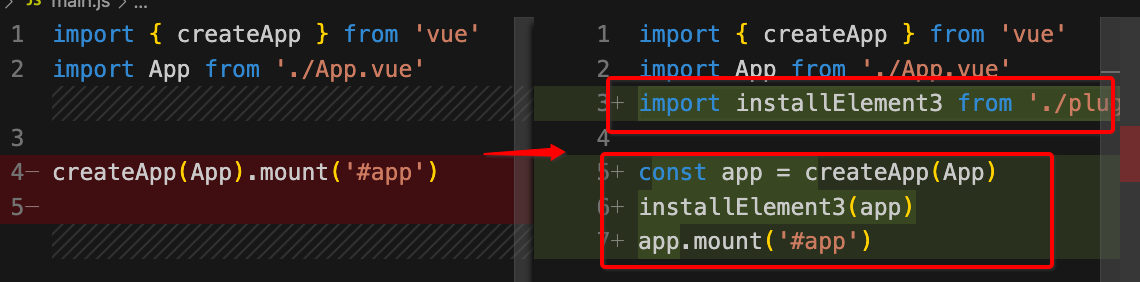
这个程序逻辑比较简单 ,只需要通过简单的文件操作+正则就可以完成。
如果是复杂功能还需要借助AST抽象语法树完成。这个后续章节有介绍。
api.afterInvoke(() => {const { EOL } = require('os')const fs = require('fs')const contentMain = fs.readFileSync(api.resolve(api.entryFile), { encoding: 'utf-8' })const lines = contentMain.split(/\r?\n/g)const renderIndex = lines.findIndex(line => line.match(/createApp\(App\)\.mount\('#app'\)/))lines[renderIndex] = `const app = createApp(App)`lines[renderIndex + 1] = `installElement3(app)`lines[renderIndex + 2] = `app.mount('#app')`fs.writeFileSync(api.resolve(api.entryFile), lines.join(EOL), { encoding: 'utf-8' })})
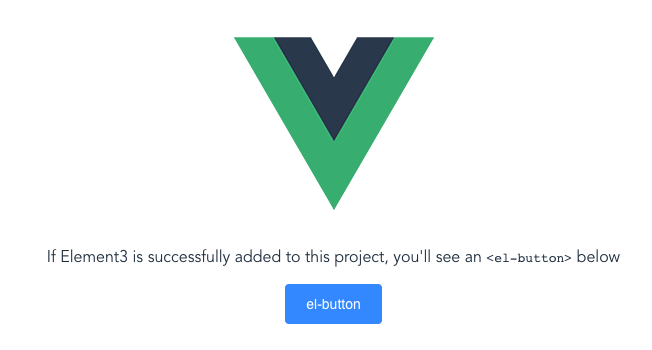
3.4 添加代码示例
这个功能还是通过代码模板渲染代码。
<template><div id="app"><img src="./assets/logo.png"><div><p>If Element3 is successfully added to this project, you'll see an<code v-text="'<el-button>'"></code>below</p><el-button type="primary">el-button</el-button></div><HelloWorld msg="Welcome to Your Vue.js App"/></div></template><script>import HelloWorld from './components/HelloWorld.vue'export default {name: 'App',components: {HelloWorld}}</script><style>#app {font-family: Avenir, Helvetica, Arial, sans-serif;-webkit-font-smoothing: antialiased;-moz-osx-font-smoothing: grayscale;text-align: center;color: #2c3e50;margin-top: 60px;}</style>
api.render({'./src/App.vue': './templates/src/App.vue.ejs'})
4. Service处理
service的会在启动服务时运行。我们这里就小小的秀一下Logo。
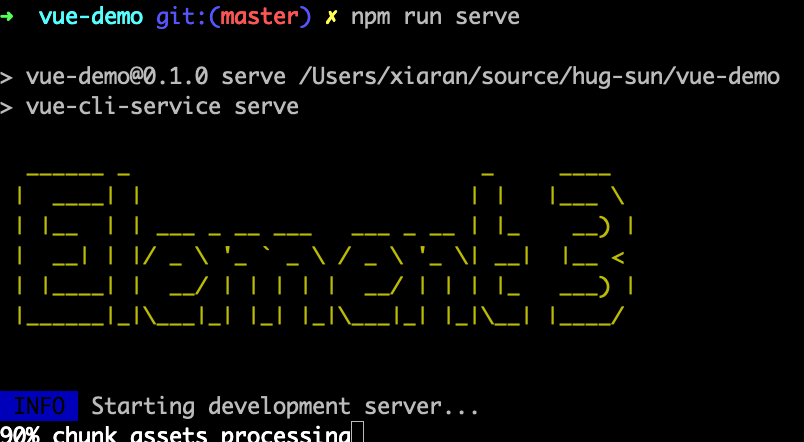
我们使用figlet + chalk完成
const figlet = require('figlet')const chalk = require('chalk')module.exports = () => {console.log(chalk.yellow(figlet.textSync('Element 3', {font: 'big',horizontalLayout: 'default',verticalLayout: 'default',width: 80,whitespaceBreak: true})));}
三、本地调试
在没有上传npm前需要,本地安装,方法如下:
# 再次安装依赖yarnnpm install --save-dev file:/Users/xiaran/source/hug-sun/vue-cli-plugin-element3vue invoke vue-cli-plugin-element3
四、上传npm仓库
上传仓库就是执行npm publish就行了。只不过要注意需要更改镜像仓库。上传完后再改回来。
#!/usr/bin/env bashnpm config get registry # 检查仓库镜像库npm config set registry=http://registry.npmjs.orgecho '请进行登录相关操作:'npm login # 登陆echo "-------publishing-------"npm publish # 发布npm config set registry=https://registry.npm.taobao.org # 设置为淘宝镜像echo "发布完成"exit
五、常用插件一览
开发框架
- vue.js - 流行的轻量高效的前端组件化方案
- vue-admin - Vue管理面板框架
- electron-vue - Electron及VueJS快速启动样板
- vue-2.0-boilerplate - Vue2单页应用样板
- vue-spa-template - 前后端分离后的单页应用开发
- Framework7-Vue - VueJS与Framework7结合
- vue-bulma - 轻量级高性能MVVM Admin UI框架
- vue-webgulp - 仿VueJS Vue loader示例
- vue-element-starter - vue启动页
UI组件库
- element - 饿了么出品的Vue2的web UI工具套件
- Vux - 基于Vue和WeUI的组件库
- mint-ui - Vue 2的移动UI元素
- iview - 基于 Vuejs 的开源 UI 组件库
- Keen-UI - 轻量级的基本UI组件合集
- vue-material - 通过Vue Material和Vue 2建立精美的app应用
- muse-ui - 三端样式一致的响应式 UI 库
- vuetify - 为移动而生的Vue JS 2组件框架
- vonic - 快速构建移动端单页应用
- eme - 优雅的Markdown编辑器
- vue-multiselect - Vue.js选择框解决方案
- vue-table - 简化数据表格
- VueCircleMenu - 漂亮的vue圆环菜单
- vue-chat - vuejs和vuex及webpack的聊天示例
- radon-ui - 快速开发产品的Vue组件库
- vue-waterfall - Vue.js的瀑布布局组件
- vue-carbon - 基于 vue 开发MD风格的移动端
- vue-beauty - 由vue和ant design创建的优美UI组件
- vue-blu - 帮助你轻松创建web应用
- vueAdmin - 基于vuejs2和element的简单的管理员模板
- vue-syntax-highlight - Sublime Text语法高亮
- vue-infinite-scroll - VueJS的无限滚动指令
- Vue.Draggable - 实现拖放和视图模型数组同步
- vue-awesome-swiper - vue.js触摸滑动组件
- vue-calendar - 日期选择插件
- bootstrap-vue - 应用于Vuejs2的Twitter的Bootstrap 4组件
- vue-swipe - VueJS触摸滑块
- vue-amap - 基于Vue 2和高德地图的地图组件
- vue-chartjs - vue中的Chartjs的封装
- vue-datepicker - 日历和日期选择组件
- markcook - 好看的markdown编辑器
- vue-google-maps - 带有双向数据绑定Google地图组件
- vue-progressbar - vue轻量级进度条
- vue-picture-input - 移动友好的图片文件输入组件
- vue-infinite-loading - VueJS的无限滚动插件
- vue-upload-component - Vuejs文件上传组件
- vue-datetime-picker - 日期时间选择控件
- vue-scroller - Vonic UI的功能性组件
- vue2-calendar - 支持lunar和日期事件的日期选择器
- vue-video-player - VueJS视频及直播播放器
- vue-fullcalendar - 基于vue.js的全日历组件
- rubik - 基于Vuejs2的开源 UI 组件库
- VueStar - 带星星动画的vue点赞按钮
- vue-mugen-scroll - 无限滚动组件
- mint-loadmore - VueJS的双向下拉刷新组件
- vue-tables-2 - 显示数据的bootstrap样式网格
- vue-virtual-scroller - 带任意数目数据的顺畅的滚动
- DataVisualization - 数据可视化
- vue-quill-editor - 基于Quill适用于Vue2的富文本编辑器
- Vueditor - 所见即所得的编辑器
- vue-html5-editor - html5所见即所得编辑器
- vue-msgbox - vuejs的消息框
- vue-slider - vue 滑动组件
- vue-core-image-upload - 轻量级的vue上传插件
- vue-slide - vue轻量级滑动组件
- vue-lazyload-img - 移动优化的vue图片懒加载插件
- vue-drag-and-drop-list - 创建排序列表的Vue指令
- vue-progressive-image - Vue的渐进图像加载插件
- vuwe - 基于微信WeUI所开发的专用于Vue2的组件库
- vue-dropzone - 用于文件上传的Vue组件
- vue-charts - 轻松渲染一个图表
- vue-swiper - 易于使用的滑块组件
- vue-images - 显示一组图片的lightbox组件
- vue-carousel-3d - VueJS的3D轮播组件
- vue-region-picker - 选择中国的省份市和地区
- vue-typer - 模拟用户输入选择和删除文本的Vue组件
- vue-impression - 移动Vuejs2 UI元素
- vue-datatable - 使用Vuejs创建的DataTableView
- vue-instant - 轻松创建自动提示的自定义搜索控件
- vue-dragging - 使元素可以拖拽
- vue-slider-component - 在vue1和vue2中使用滑块
- vue2-loading-bar - 最简单的仿Youtube加载条视图
- vue-datepicker - 漂亮的Vue日期选择器组件
- vue-video - Vue.js的HTML5视频播放器
- vue-toast-mobile - VueJS的toast插件
- vue-image-crop-upload - vue图片剪裁上传组件
- vue-tooltip - 带绑定信息提示的提示工具
- vue-highcharts - HighCharts组件
- vue-touch-ripple - vuejs的触摸ripple组件
- coffeebreak - 实时编辑CSS组件工具
- vue-datasource - 创建VueJS动态表格
- vue2-timepicker - 下拉时间选择器
- vue-date-picker - VueJS日期选择器组件
- vue-scrollbar - 最简单的滚动区域组件
- vue-quill - vue组件构建quill编辑器
- vue-google-signin-button - 导入谷歌登录按钮
- vue-svgicon - 创建svg图标组件的工具
- vue-float-label - VueJS浮动标签模式
- vue-baidu-map - 基于 Vue 2的百度地图组件库
- vue-social-sharing - 社交分享组件
- vue2-editor - HTML编辑器
- vue-tagsinput - 基于VueJS的标签组件
- vue-easy-slider - Vue 2.x的滑块组件
- datepicker - 基于flatpickr的时间选择组件
- vue-chart - 强大的高速的vue图表解析
- vue-music-master - vue手机端网页音乐播放器
- handsontable - 网页表格组件
- vue-simplemde - VueJS的Markdown编辑器组件
- vue-popup-mixin - 用于管理弹出框的遮盖层
- cubeex - 包含一套完整的移动UI
- vue-fullcalendar - vue FullCalendar封装
- vue-material-design - Vue MD风格组件
- vue-morris - Vuejs组件封装Morrisjs库
- we-vue - Vue2及weui1开发的组件
- vue-image-clip - 基于vue的图像剪辑组件
- vue-bootstrap-table - 可排序可检索的表格
- vue-radial-progress - Vue.js放射性进度条组件
- vue-slick - 实现流畅轮播框的vue组件
- vue-pull-to-refresh - Vue2的上拉下拉
- vue-form-2 - 全面的HTML表单管理的解决方案
- vue-side-nav - 响应式的侧边导航
- mint-indicator - VueJS移动加载指示器插件
- chartjs - Vue Bulma的chartjs组件
- vue-scroll - vue滚动
- vue-ripple - 制作谷歌MD风格涟漪效果的Vue组件
- vue-touch-keyboard - VueJS虚拟键盘组件
- vue-chartkick - VueJS一行代码实现优美图表
- vue-ztree - 用 vue 写的树层级组件
- vue-m-carousel - vue 移动端轮播组件
- vue-datepicker-simple - 基于vue的日期选择器
- vue-tabs - 多tab页轻型框架
- vue-verify-pop - 带气泡提示的vue校验插件
- vue-parallax - 整洁的视觉效果
- vue-img-loader - 图片加载UI组件
- vue-typewriter - vue组件类型
- vue-smoothscroll - smoothscroll的VueJS版本
- vue-city - 城市选择器
- vue-tree - vue树视图组件
- vue-ios-alertview - iOS7+ 风格的alertview服务
- dd-vue-component - 订单来了的公共组件库
- paco-ui-vue - PACOUI的vue组件
- vue-cmap - Vue China map可视化组件
- vue-button - Vue按钮组件
实用库
- vuex - 专为 Vue.js 应用程序开发的状态管理模式
- vuelidate - 简单轻量级的基于模块的Vue.js验证
- qingcheng - qingcheng主题
- vue-desktop - 创建管理面板网站的UI库
- vue-meta - 管理app的meta信息
- vue-axios - 将axios整合到VueJS的封装
- vue-svg-icon - vue2的可变彩色svg图标方案
- avoriaz - VueJS测试实用工具库
- vue-framework7 - 结合VueJS使用的Framework7组件
- vue-bootstrap-modal - vue的Bootstrap样式组件
- vuep - 用实时编辑和预览来渲染Vue组件
- vue-online - reactive的在线和离线组件
- vue-lazy-render - 用于Vue组件的延迟渲染
- vue-password-strength-meter - 交互式密码强度计
- element-admin - 支持 vuecli 的 Element UI 的后台模板
- vue-electron - 将选择的API封装到Vue对象中的插件
- cleave - 基于cleave.js的Cleave组件
- vue-events - 简化事件的VueJS插件
- vue-shortkey - 应用于Vue.js的Vue-ShortKey 插件
- vue-cordova - Cordova的VueJS插件
- vue-router-transition - 页面过渡插件
- vue-gesture - VueJS的手势事件插件
- http-vue-loader - 从html及js环境加载vue文件
- vue-qart - 用于qartjs的Vue2指令
- vuemit - 处理VueJS事件
- vue-websocket - VueJS的Websocket插件
- vue-local-storage - 具有类型支持的Vuejs本地储存插件
- lazy-vue - 懒加载图片
- vue-bus - VueJS的事件总线
- vue-reactive-storage - vue插件的Reactive层
- vue-notifications - 非阻塞通知库
- vue-lazy-component - 懒加载组件或者元素的Vue指令
- v-media-query - vue中添加用于配合媒体查询的方法
- vue-observe-visibility - 当元素在页面上可见或隐藏时检测
- vue-ts-loader - 在Vue装载机检查脚本
- vue-pagination-2 - 简单通用的分页组件
- vuex-i18n - 定位插件
- Vue.resize - 检测HTML调整大小事件的vue指令
- vuex-shared-mutations - 分享某种Vuex mutations
- vue-file-base64 - 将文件转换为Base64的vue组件
- modal - Vue Bulma的modal组件
- Famous-Vue - Famous库的vue组件
- leo-vue-validator - 异步的表单验证组件
- Vue-Easy-Validator - 简单的表单验证
- vue-truncate-filter - 截断字符串的VueJS过滤器
- vue-zoombox - 一个高级zoombox
- vue-input-autosize - 基于内容自动调整文本输入的大小
- vue-lazyloadImg - 图片懒加载插件
服务端
- nuxt.js - 用于服务器渲染Vue app的最小化框架
- express-vue - 简单的使用服务器端渲染vue.js
- vue-ssr - 非常简单的VueJS服务器端渲染模板
- vue-ssr - 结合Express使用Vue2服务端渲染
- vue-easy-renderer - Nodejs服务端渲染
辅助工具
- DejaVue - Vuejs可视化及压力测试
- vue-play - 展示Vue组件的最小化框架
- vscode-VueHelper - 目前vscode最好的vue代码提示插件
- vue-generate-component - 轻松生成Vue js组件的CLI工具
- vue-multipage-cli - 简单的多页CLI
- VuejsStarterKit - vuejs starter套件
应用实例
- koel - 基于网络的个人音频流媒体服务
- pagekit - 轻量级的CMS建站系统
- vuedo - 博客平台
- jackblog-vue - 个人博客系统
- vue-cnode - 重写vue版cnode社区
- CMS-of-Blog - 博客内容管理器
- rss-reader - 简单的rss阅读器
- vue-ghpages-blog - 依赖GitHub Pages无需本地生成的静态博客
- swoole-vue-webim - Web版的聊天应用
- vue-dashing-js - nuvo-dashing-js的fork
- fewords - 功能极其简单的笔记本
- vue-blog - 使用Vue2.0 和Vuex的vue-blog
Demo示例
- Vue-cnodejs - 基于vue重写Cnodejs.org的webapp
- NeteaseCloudWebApp - 高仿网易云音乐的webapp
- vue-zhihu-daily - 知乎日报 with Vuejs
- vue-wechat - vue.js开发微信app界面
- vue2-demo - 从零构建vue2 + vue-router + vuex 开发环境
- eleme - 高仿饿了么app商家详情
- vue-demo - vue简易留言板
- maizuo - vue/vuex/redux仿卖座网
- spa-starter-kit - 单页应用启动套件
- vue-music - Vue 音乐搜索播放
- douban - 模仿豆瓣前端
- vue-Meizi - vue最新实战项目
- zhihudaily-vue - 知乎日报web版
- vue-demo-kugou - vuejs仿写酷狗音乐webapp
- VueDemo_Sell_Eleme - Vue2高仿饿了么外卖平台
- vue2.0-taopiaopiao - vue2.0与express构建淘票票页面
- vue-leancloud-blog - 一个前后端完全分离的单页应用
- node-vue-server-webpack - Node.js+Vue.js+webpack快速开发框架
- mi-by-vue - VueJS仿小米官网
- vue-fis3 - 流行开源工具集成demo
- vue2.x-douban - Vue2实现简易豆瓣电影webApp
- vue-demo-maizuo - 使用Vue2全家桶仿制卖座电影
- vue-zhihudaily - 知乎日报 Web 版本
- vue-adminLte-vue-router - vue和adminLte整合应用
- vue-axios-github - 登录拦截登出功能
- Zhihu-Daily-Vue.js - Vuejs单页网页应用
- hello-vue-django - 使用带有Django的vuejs的样板项目
- vue-cnode - vue单页应用demo
- x-blog - 开源的个人blog项目
- vue-express-mongodb - 简单的前后端分离案例
- websocket_chat - 基于vue和websocket的多人在线聊天室
- photoShare - 基于图片分享的社交平台
- vue-zhihudaily-2.0 - 使用Vue2.0+vue-router+vuex创建的zhihudaily
- notepad - 本地存储的记事本
- vueBlog - 前后端分离博客
- vue-ruby-china - VueJS框架搭建的rubychina平台
- Zhihu_Daily - 基于Vue和Nodejs的Web单页应用
- vue-koa-demo - 使用Vue2和Koa1的全栈demo
- vue2.x-Cnode - 基于vue全家桶的Cnode社区
- life-app-vue - 使用vue2完成多功能集合到小webapp
- github-explorer - 寻找最有趣的GitHub库
- vue-trip - vue2做的出行webapp
- vue-ssr-boilerplate - 精简版的ofvue-hackernews-2
- vue-bushishiren - 不是诗人应用
- houtai - 基于vue和Element的后台管理系统
- ios7-vue - 使用vue2.0 vue-router vuex模拟ios7
- Framework7-VueJS - 使用移动框架的示例
- cnode-vue - 基于vue和vue-router构建的cnodejs web网站SPA
- vue-cli-multipage-bootstrap - 将vue官方在线示例整合到组件中
- vue-cnode - 用 Vue 做的 CNode 官网
- HyaReader - 移动友好的阅读器
- zhihu-daily - 轻松查看知乎日报内容
- seeMusic - 跨平台云音乐播放器
- vue-cnode - 使用cNode社区提供的接口
- zhihu-daily-vue - 知乎日报
- sls-vuex2-demo - vuex2商城购物车demo
- vue-dropload - 用以测试下拉加载与简单路由
- vue-cnode-mobile - 搭建cnode社区
- Vuejs-SalePlatform - vuejs搭建的售卖平台demo
- v-notes - 简单美观的记事本
- vue-starter - VueJs项目的简单启动页
- vue-memo - 用 vue写的记事本应用

若有收获,就点个赞吧
0 人点赞
