环境安装
如果你是 Windows,恭喜你,等待被环境折腾吧(当然如果你Visual Studio 安装得比较全:主要指 VC++ BuildTool,那环境问题就要好不少了)。Windows用户可以考虑搭配 Windows Subsystem for Linux(安装文档:https://docs.microsoft.com/zh-cn/windows/wsl/install-win10)。
首先必须是先安装好 Rust 环境,详见:《Hello,Rust》。
起步
处理过程

如图所示,抛开具体的执行逻辑来说,核心就是对参数的解析。以便确定后续具体的命令执行。
命令行参数
在命令行参数中,也有多种分类。按照你表现形式,可以分为如下几种:
- 核心参数(Args):命令行启动的核心参数,需要提供值
- 标记类(Flags):指不带参数值的标记项,如
-d -a -v -h这类 - 可选项(Options):一般用于配置部分参数,值非必须,如
--os_type这类常见参数解析
一般来说,我们可以通过std::env来解析命令行参数(原始方式) ```rust use std::env;
fn main() { // 取出命令行参数 let mut args = env::args(); let arg1 = args.nth(1).expect(“请提供第一个参数”); println!(“第一个参数是:{}”, arg1); }
<a name="VFu1H"></a>### 命令解析核心包<a name="g7CsU"></a>#### clap[https://clap.rs/](https://clap.rs/) 命令行工具核心类库,可以实现参数绑定、子命令、帮助文档等能力```rustuse clap::Clap;/// Simple program to greet a person#[derive(Clap, Debug)]#[clap(name = "hello")]struct Hello {/// Name of the person to greet#[clap(short, long)]name: String,/// Number of times to greet#[clap(short, long, default_value = "1")]count: u8,}fn main() {let hello = Hello::parse();for _ in 0..hello.count {println!("Hello {}!", hello.name)}}
structopt
https://docs.rs/structopt/0.3.23/structopt/
基于 clap ,通过派生宏来定义代码。
use std::path::PathBuf;use structopt::StructOpt;#[derive(Debug, StructOpt)]#[structopt(name = "example", about = "An example of StructOpt usage.")]struct Opt {/// Activate debug mode// short and long flags (-d, --debug) will be deduced from the field's name#[structopt(short, long)]debug: bool,/// Set speed// we don't want to name it "speed", need to look smart#[structopt(short = "v", long = "velocity", default_value = "42")]speed: f64,/// Input file#[structopt(parse(from_os_str))]input: PathBuf,/// Output file, stdout if not present#[structopt(parse(from_os_str))]output: Option<PathBuf>,/// Where to write the output: to `stdout` or `file`#[structopt(short)]out_type: String,/// File name: only required when `out-type` is set to `file`#[structopt(name = "FILE", required_if("out-type", "file"))]file_name: Option<String>,}fn main() {let opt = Opt::from_args();println!("{:?}", opt);}
使用 structopt 来解析参数
首先,是定义出一个参数对象,并附加一些信息为整个命令行程序的基本信息
use structopt::StructOpt;#[derive(Debug, StructOpt)]#[structopt(name = "Ho",version = "0.0.1",about = "这是一个用 rust 编写的命令行工具 Demo")]struct CommandLineOpt {}fn main() {let opt = CommandLineOpt::from_args();println!("{:?}", opt);}
通过执行命令 cargo run --bin rust-cli -- --help 可以看到如下效果: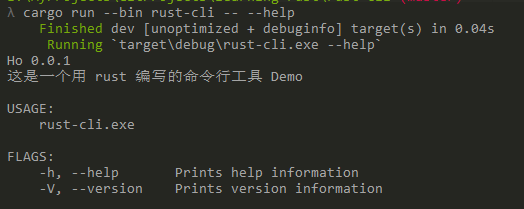
其中 -h,-V 是工具提供的默认标记,用于查看帮助和版本
接下来我们来补充下 Options 参数
struct CommandLineOpt {#[structopt(short, long, default_value = "12")]arg1: u32,#[structopt(short = "b", long = "arg2", default_value = "42")]arg2: u32,}
再执行 -h ,输出如下: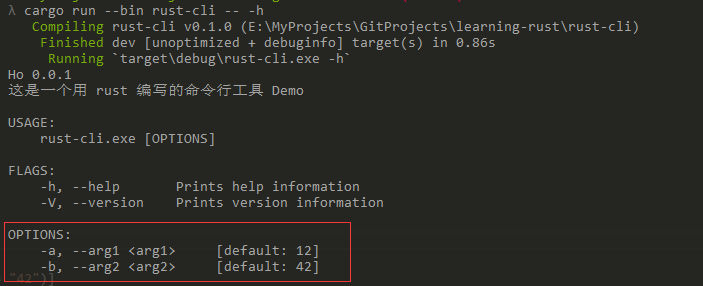
其中 short 表示简写参数名,如果不设定值,则会采用属性名首字母;long 表示参数名全称,不设定值,则直接使用属性名称。如果出现重复的短名称,则会产生编译错误。
接下来,再来添加核心参数:
struct CommandLineOpt {#[structopt(short, long, default_value = "12")]arg1: u32,#[structopt(short = "b", long = "arg2", default_value = "42")]arg2: u32,#[structopt(required = true)]arg3: String,}
-h 的输出效果如下: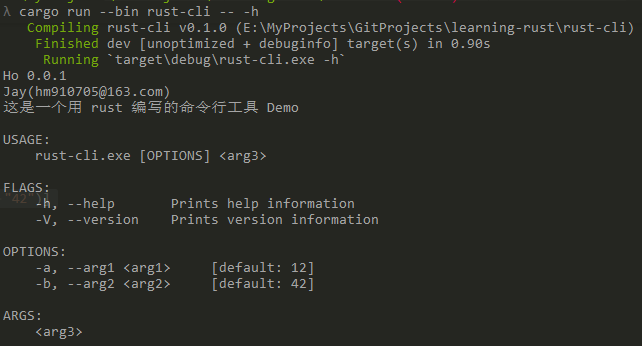
从如上的输出效果来看,并没有告诉用户参数的具体含义,那么我们可以通过 /// (比注释多一根斜杠)来增加命令行注释,修改后的代码如下:
在 structopt 中设置 about=”xxx”,也是命令注释,且优先级高于 ///。
struct CommandLineOpt {/// 这是参数1,用于xxx#[structopt(short, long, default_value = "12")]arg1: u32,/// 这是参数2,别名 -b,用于 xxx#[structopt(short = "b", long = "arg2", default_value = "42")]arg2: u32,/// 这是参数3,必填,用于 xxx#[structopt(required = true)]arg3: String,}
执行 -h 后输出效果如下: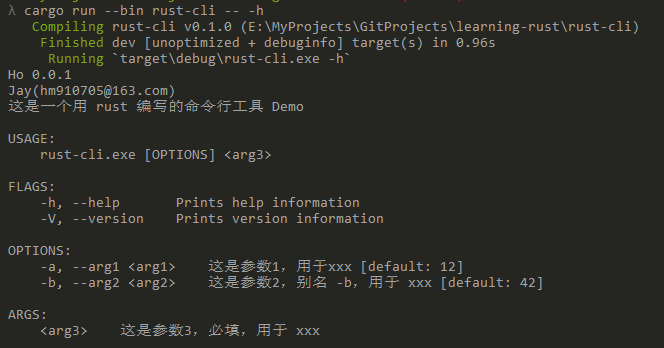
最后,我们再来整体看下参数解析效果,执行 cargo run --bin rust-cli xxxx -a 33 -b 44 效果如下:
使用 stuctopt 实现子命令
如果要用到子命令,核心就是将整个参数对象用枚举来表示。样例如下:
// 文件地址:src/bin/subc.rsuse std::path::PathBuf;use structopt::StructOpt;#[derive(Debug, StructOpt)]#[structopt(name = "Hos",version = "0.0.1",author = "Jay(hm910705@163.com)",about = "这是一个用 rust 编写的仿 Git 的子命令 Demo")]enum CommandLineOpt {#[structopt(name = "clone", about = "Clone a repository into a new directory.")]Clone {/// 远端仓库地址#[structopt(required = true)]url: PathBuf,},#[structopt(name = "init",about = "Create an empty Git repository or reinitialize an existing one.")]Init {},}fn main() {let opt = CommandLineOpt::from_args();println!("{:?}", opt);}
直接执行 cargo run --bin subc -- clone [http://xxx](http://xxx) 的效果如图:
高级功能
显示进度条
命令行程序要显示进度条是一个比较常见的诉求,在 Rust 中,推荐使用 indicatif([https://crates.io/crates/indicatif](https://crates.io/crates/indicatif)) 来实现进度条功能,具体使用代码如下:
fn main() {let opt = CommandLineOpt::from_args();println!("{:?}", opt);let pb = ProgressBar::new(100);let dur = Duration::from_millis(5);for _ in 1..=100 {thread::sleep(dur);// pb.println(format!("[+] finished #{}", i));// 每次循环 + 1pb.inc(1);}pb.reset();for i in 1..=100 {thread::sleep(dur);// 直接设置pb.set_position(i);}pb.finish_with_message("done");println!("done!");}

测试命令行应用
测试命令行的工具库是 assert_cmd([https://docs.rs/assert_cmd/2.0.1/assert_cmd/](https://docs.rs/assert_cmd/2.0.1/assert_cmd/)) ,我们现在 [dev-dependencies] 中安装它。除此之外,还需要装下 predicates([https://docs.rs/predicates/2.0.2/predicates/](https://docs.rs/predicates/2.0.2/predicates/)) 来辅助断言。
测试 rust-cli 这个 bin 的代码可以如下:
use assert_cmd::prelude::*; // Add methods on commandsuse predicates::prelude::*; // Used for writing assertionsuse std::process::Command; // Run programs#[test]fn test_rust_cli_success() -> Result<(), Box<dyn std::error::Error>> {// 通过 bin 名称来实例化一个命令行应用let mut cmd = Command::cargo_bin("rust-cli")?;// 配置参数,如下三个参数的拼接结果是:"required arg" "--arg1" "12" "-b" "44"cmd.arg("required arg");cmd.arg("--arg1").arg("12");cmd.arg("-b").arg("44");// 开始断言let result = cmd.assert();// 命令行要执行成功,通过控制台输出中需要包含 required argresult.success().stdout(predicate::str::contains("required arg"));Ok(())}#[test]fn test_rust_cli_failuer() -> Result<(), Box<dyn std::error::Error>> {let mut cmd = Command::cargo_bin("rust-cli")?;// 直接执行命令行会出错,同时错误信息需要包含 error 这段文本cmd.assert().failure().stderr(predicate::str::contains("error: The following required arguments were not provided",));Ok(())}
测试结果如下:
更多测试细节还需要持续探索,非三言两语就能理解到。
发布命令行应用
更多发布说明,请查阅:https://doc.rust-lang.org/1.39.0/cargo/reference/publishing.html
- 首先,我们得先注册到 crates.io 这个
rust的包管理中心。该站点提供了直接github账号登录(OAuth)

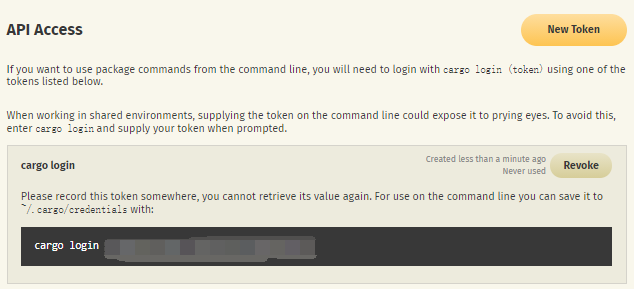
- 执行上一步骤中的
cargo login xxxx即可完成crates.io的登录。 在发布包之前,首先我们得填写包的信息,大致填写内容如下(填写在 Cargo.toml 中):
[package]name = "rust-cli"version = "0.1.0"edition = "2018"authors = ["Your Name <your@email.com>"]license = "MIT OR Apache-2.0"description = "A tool to search files"readme = "README.md"homepage = "https://github.com/you/grrs"repository = "https://github.com/you/grrs"keywords = ["cli", "search", "demo"]categories = ["command-line-utilities"]
之后则是执行
cargo publish命令了~

若有收获,就点个赞吧
0 人点赞
