- 官方文档
- 前端部署到tomat服务器,刷新报404
- tomcat配置虚拟路径
- 修改浏览器窗口标题
- element-ui
- 树形结构问题
- 新增菜单图标
- treeselect 禁用分支节点
- 点击空白处禁止关闭弹窗
- show-overflow-tooltip
- el-select 配置 宽度
- Drawer 滑动
- 列显示图片
- This may cause an update error
- 表单增加图片
- 全局配置EL-table属性
- 表格 行合并
- disabled 禁用
- css cursor(鼠标悬浮禁用)
- 单次定时任务推送
- 抽屉式+标签页
- 子组件不能修改父组件的值
- 父组件修改子组件data值
- 实现表单里面的 lable 标签对齐
- watch 用法
- 增加回收站
- 执行重置方法报错
- el-select 远程搜索
- 固定表格最右一栏
- 去掉 url 中的
- 应用部署在子路径
- springboot配置文件上传大小
- el-upload 上传替换上一个文件
- echarts 图表引入
- 实现第三方登录
- 处理多图上传问题,闪屏
- @EqualsAndHashCode()注解详解
- 上传图片报 403 ,拦截权限问题
- 分页注意
- nginx 配置静态资源目录,反向代理服务
- 列表数据图片预览拼接全路径
- 手动关闭当前标签页
- 修改表头背景颜色
- 修改侧边栏主题
- table展开后搜索问题
- 富文本上传图片
- 引入cards,卡片式统计
- 行拖拽
- 图片按顺序显示
- 前端接口请求超时配置
- 设置el-table行高
- 全局配置el-table字体大小
- 动态配置表格
- 处理图片富文本中图片宽度最大100%
官方文档
http://doc.ruoyi.vip/ruoyi-vue/
前端部署到tomat服务器,刷新报404
添加一个 WEB-INF 文件夹,文件夹里面新建文件 web.xml,内容如下
<?xml version="1.0" encoding="UTF-8"?><web-app xmlns="http://xmlns.jcp.org/xml/ns/javaee" xmlns:xsi="http://www.w3.org/2001/XMLSchema-instance"xsi:schemaLocation="http://xmlns.jcp.org/xml/ns/javaeehttp://xmlns.jcp.org/xml/ns/javaee/web-app_3_1.xsd"version="3.1" metadata-complete="true"><display-name>Router for Tomcat</display-name><error-page><error-code>404</error-code><location>/index.html</location></error-page></web-app>
tomcat配置虚拟路径
修改server.xml,Host节点下添加
<Context docBase="" path="/" reloadable="true" source=""/>
修改浏览器窗口标题
修改位置

element-ui
| 标签 | 描述 | |
|---|---|---|
| el-form | form 表单 | |
| el-form-item | form 表单项 | |
| el-table | 表格 | |
| el-table-column | 表格列 | |
| el-dialog | 对话框 | |
| el-button | 按钮 |
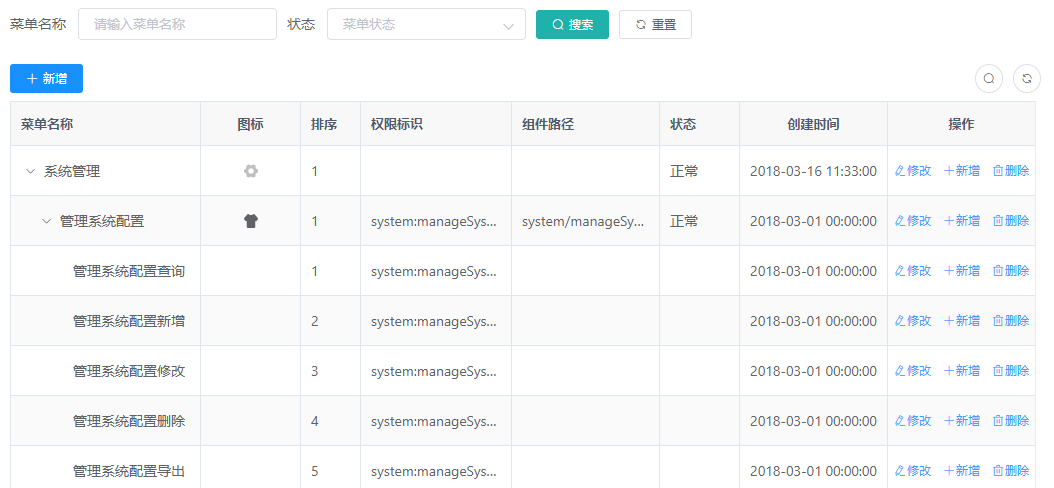
树形结构问题
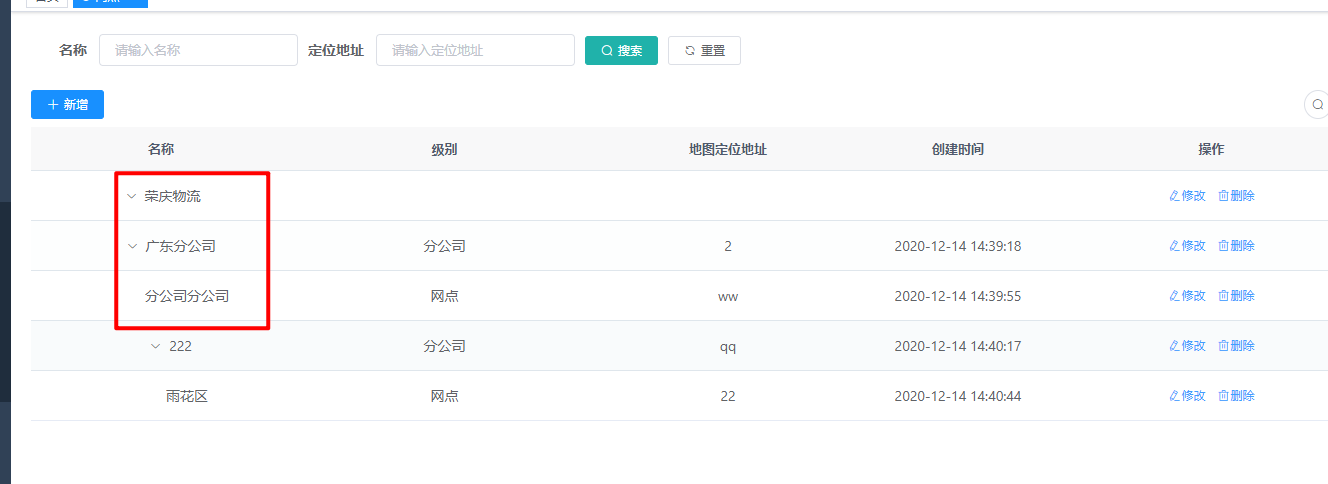
原因:列是 居中的 ,去掉即可

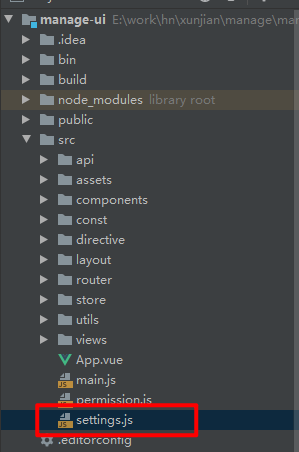
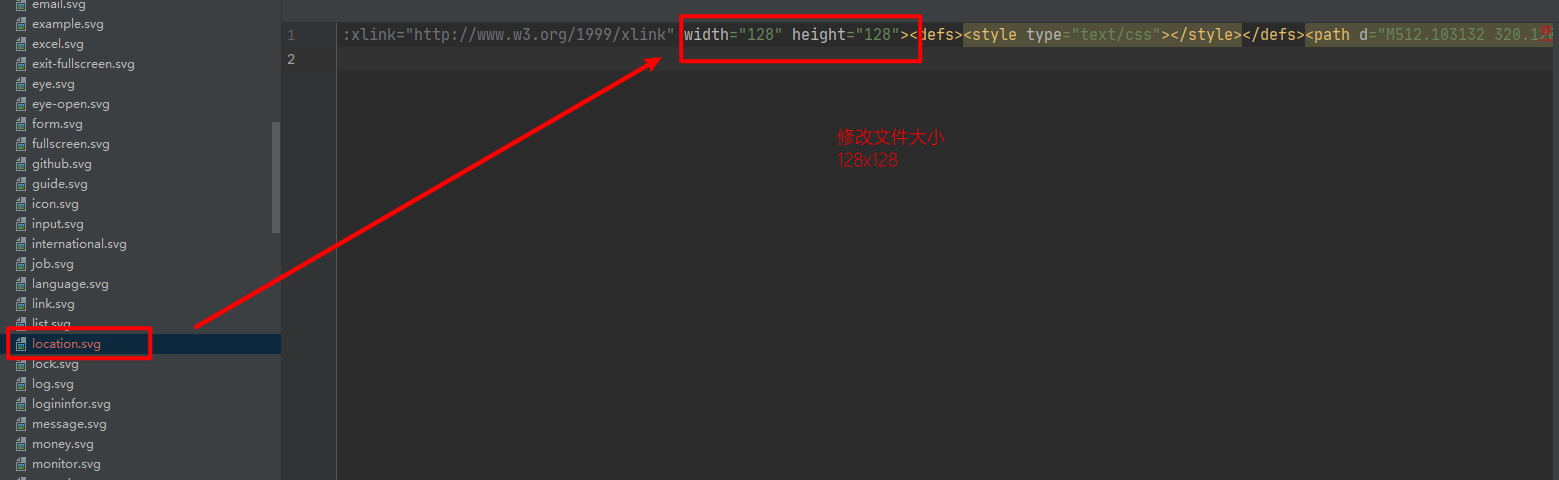
新增菜单图标
如果你是从 iconfont (opens new window)下载的图标,记得使用如 Sketch 等工具规范一下图标的大小问题,不然可能会造成项目中的图标大小尺寸不统一的问题。 本项目中使用的图标都是 128*128 大小规格的。
将下载的图标 移动到 src/assets/icons/svg 这个目录
treeselect 禁用分支节点

只能点击最子节点
点击空白处禁止关闭弹窗
之前的效果:
main.js 在 Vue.use(Element)上面添加以下内容
Element.Dialog.props.closeOnClickModal.default = false
禁用后的效果:
show-overflow-tooltip
当内容长度超过了指定长度,会隐藏,然后鼠标悬浮在内容上面,会悬浮显示全部内容
el-select 配置 宽度

在 <el-select> 加上 :style="{width: '100%'}"
<el-row><el-col :span="24"><el-form-item label="角色"><el-select v-model="form.roleIds" multiple :style="{width: '100%'}" placeholder="请选择" ><el-optionv-for="item in roleOptions":key="item.roleId":label="item.roleName":value="item.roleId"></el-option></el-select></el-form-item></el-col></el-row>
Drawer 滑动
.el-drawer.rtl {overflow: scroll}
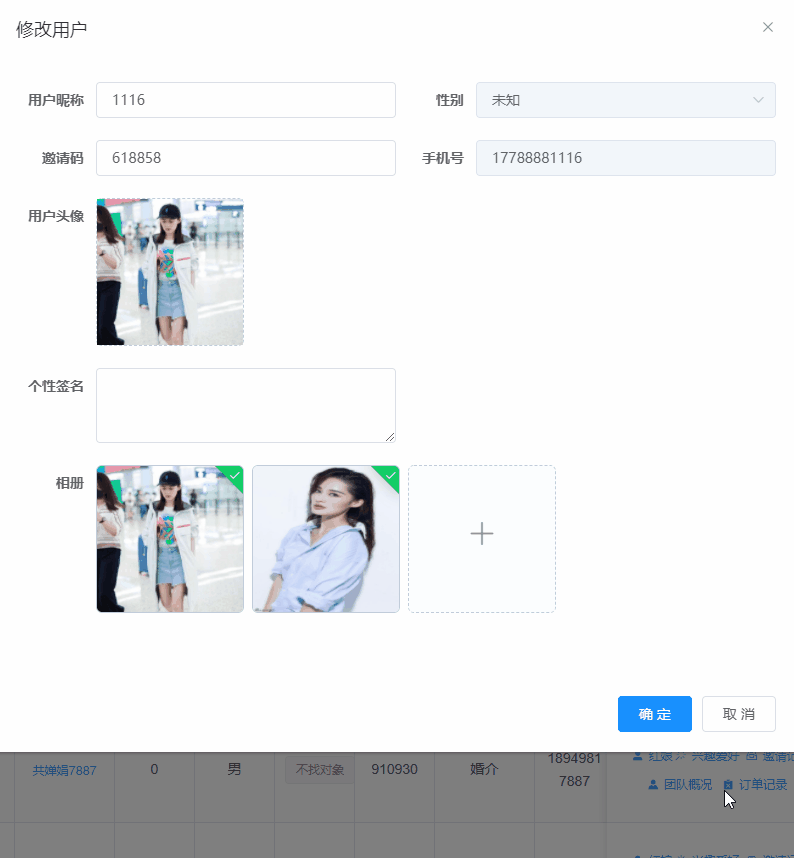
列显示图片
<el-form-item label="照片"><span v-for="fit in previewImgFormat(props.row)" :key="fit"><el-imagestyle="width: 100px; height: 100px ;margin: 5px":src="fit":preview-src-list="previewImgFormat(props.row)"></el-image></span></el-form-item>export default {methods: {previewImgFormat(row, column){var imgUrl = row.imgUrls;return imgUrl.split(",");},}}
This may cause an update error
是v-for循环里,key值可能重复了,所以会报这个错
表单增加图片
vue代码如下
<el-row><el-col :span="12"><el-form-item label="封面图片 :" label-width="90px" prop="imgUrl" ><image-upload-local-vue :parentImage="form.imgUrl" @oneImage="oneImageFun"></image-upload-local-vue></el-form-item></el-col></el-row>
javascript 代码如下
// 引入 imageUploadLocalVue 组件import imageUploadLocalVue from "@/components/upload/image-upload-local.vue";export default {name: "Branch",components: {imageUploadLocalVue},methods: {/** 单图上传 */oneImageFun(val) {this.form.imgUrl = val;},}}
全局配置EL-table属性
main.js 添加以下内容
// 带有斑马纹Element.Table.props.stripe = {default:true,type:Boolean}// 带有边框Element.Table.props.border = {default:true,type:Boolean}Vue.use(Element, {size: Cookies.get('size') || 'medium' // set element-ui default size})
最后效果:

表格 行合并

<el-table v-loading="loading" :data="quesPartItemList" :span-method="objectSpanMethod" stripe border><el-table-column type="selection" width="55" align="center" fixed="left" /><el-table-column label="检查部位" align="center" prop="partTypeId" :formatter="partTypeFormat" show-overflow-tooltip/></el-table><script>export default {name: "QuesPartItem",methods: {/** 查询问卷检查项列表 */getList() {this.loading = true;listQuesPartItem(this.queryParams).then(response => {this.quesPartItemList = response.rows;this.total = response.total;this.loading = false;this.getListDataForRowAndColumn(this.quesPartItemList);});},/*** 处理表格数据*/getListDataForRowAndColumn(data){let self = this;self.rowAndColumn = [];self.rowRoomColumn = [];for (var i = 0; i < data.length; i++) {if (i === 0) {// 如果是第一条记录(即索引是0的时候),向数组中加入1self.rowAndColumn.push(1);self.pos = 0;self.rowRoomColumn.push(1);self.posT = 0;} else {if (data[i].partTypeId === data[i - 1].partTypeId) {// 如果storeName相等就累加,并且push 0self.rowAndColumn[self.pos] += 1self.rowAndColumn.push(0)if (data[i].partTypeId === data[i - 1].partTypeId) {// 如果roomName相等就累加,并且push 0self.rowRoomColumn[self.posT] += 1self.rowRoomColumn.push(0)}else{self.rowRoomColumn.push(1)self.posT = i}} else {// 不相等push 1self.rowAndColumn.push(1)self.pos = i;self.rowRoomColumn.push(1)self.posT = i}}}console.log(this.rowAndColumn);console.log(this.rowRoomColumn);},objectSpanMethod({ row, column, rowIndex, columnIndex }) {let self = this;if (columnIndex === 0) {if (self.rowAndColumn[rowIndex]) {let rowNum = self.rowAndColumn[rowIndex];return {rowspan: rowNum,colspan: rowNum > 0 ? 1 : 0}}return {rowspan: 0,colspan: 0}}if (columnIndex === 1) {if (self.rowRoomColumn[rowIndex]) {let roomNum = self.rowRoomColumn[rowIndex];return {rowspan: roomNum,colspan: roomNum > 0 ? 1 : 0}}return {rowspan: 0,colspan: 0}}},}}</script>
disabled 禁用
内容字体不明显
index.scss
.el-input.is-disabled .el-input__inner {color: #333!important;cursor:default; // 鼠标悬浮光标样式}.el-range-editor.is-disabled input {color: #333!important;cursor:default;}.el-textarea.is-disabled .el-textarea__inner {color: #333!important;cursor:default;}
css cursor(鼠标悬浮禁用)
| url | 需使用的自定义光标的 URL。注释:请在此列表的末端始终定义一种普通的光标,以防没有由 URL 定义的可用光标。 |
|---|---|
| default | 默认光标(通常是一个箭头) |
| auto | 默认。浏览器设置的光标。 |
| crosshair | 光标呈现为十字线。 |
| pointer | 光标呈现为指示链接的指针(一只手) |
| move | 此光标指示某对象可被移动。 |
| e-resize | 此光标指示矩形框的边缘可被向右(东)移动。 |
| ne-resize | 此光标指示矩形框的边缘可被向上及向右移动(北/东)。 |
| nw-resize | 此光标指示矩形框的边缘可被向上及向左移动(北/西)。 |
| n-resize | 此光标指示矩形框的边缘可被向上(北)移动。 |
| se-resize | 此光标指示矩形框的边缘可被向下及向右移动(南/东)。 |
| sw-resize | 此光标指示矩形框的边缘可被向下及向左移动(南/西)。 |
| s-resize | 此光标指示矩形框的边缘可被向下移动(南)。 |
| w-resize | 此光标指示矩形框的边缘可被向左移动(西)。 |
| text | 此光标指示文本。 |
| wait | 此光标指示程序正忙(通常是一只表或沙漏)。 |
| help | 此光标指示可用的帮助(通常是一个问号或一个气球)。 |
单次定时任务推送
如何使用?
SysJob sysJob = new SysJob();// 是否并发执行(0允许 1禁止)sysJob.setConcurrent("1");Integer userId = taskPushRecord.getUserId();userId = userId == null ? 0 : userId;sysJob.setInvokeTarget("dingNoticeTask.sendDingNotice(" + pushRecordId+ "," + 1 + ")");sysJob.setStartAt(DateUtil.parseTimeToday(releaseRemindTime));sysJob.setJobGroup("releasePushRecord");sysJob.setJobId(Long.valueOf(pushRecordId));sysJob.setJobName("发布任务提醒");// 任务状态(0正常 1暂停)sysJob.setStatus("0");OnceScheduleUtils.createScheduleJob(scheduler, sysJob);
OnceScheduleUtils.java 代码如下
package com.hn.common.utils.job;import cn.hutool.json.JSONUtil;import com.hn.common.constant.ScheduleConstants;import com.hn.common.exception.job.TaskException;import com.hn.project.monitor.domain.SysJob;import lombok.extern.slf4j.Slf4j;import org.quartz.*;/*** 定时单次任务工具类*/@Slf4jpublic class OnceScheduleUtils {/*** 得到quartz任务类** @param sysJob 执行计划* @return 具体执行任务类*/private static Class<? extends Job> getQuartzJobClass(SysJob sysJob) {boolean isConcurrent = "0".equals(sysJob.getConcurrent());return isConcurrent ? QuartzJobExecution.class : QuartzDisallowConcurrentExecution.class;}/*** 构建任务触发对象*/public static TriggerKey getTriggerKey(Long jobId, String jobGroup) {return TriggerKey.triggerKey(ScheduleConstants.TASK_CLASS_NAME + jobId, jobGroup);}/*** 构建任务键对象*/public static JobKey getJobKey(Long jobId, String jobGroup) {return JobKey.jobKey(ScheduleConstants.TASK_CLASS_NAME + jobId, jobGroup);}/*** 创建定时任务*/public static void createScheduleJob(Scheduler scheduler, SysJob job) throws SchedulerException, TaskException {log.info("############ 创建定时任务:{}", JSONUtil.toJsonStr(job));Class<? extends Job> jobClass = getQuartzJobClass(job);// 构建job信息Long jobId = job.getJobId();String jobGroup = job.getJobGroup();JobDetail jobDetail = JobBuilder.newJob(jobClass).withIdentity(getJobKey(jobId, jobGroup)).build();// 只需要执行一次SimpleScheduleBuilder simpleScheduleBuilder = SimpleScheduleBuilder.simpleSchedule();// 按新的cronExpression表达式构建一个新的triggerSimpleTrigger trigger = TriggerBuilder.newTrigger().withIdentity(getTriggerKey(jobId, jobGroup)).startAt(job.getStartAt()).withSchedule(simpleScheduleBuilder).build();// 放入参数,运行时的方法可以获取jobDetail.getJobDataMap().put(ScheduleConstants.TASK_PROPERTIES, job);// 判断是否存在if (scheduler.checkExists(getJobKey(jobId, jobGroup))) {log.info("############ 移除定时任务:{}", JSONUtil.toJsonStr(job));// 防止创建时存在数据问题 先移除,然后在执行创建操作scheduler.deleteJob(getJobKey(jobId, jobGroup));}scheduler.scheduleJob(jobDetail, trigger);// 暂停任务if (job.getStatus().equals(ScheduleConstants.Status.PAUSE.getValue())) {scheduler.pauseJob(ScheduleUtils.getJobKey(jobId, jobGroup));}}}
生成的任务都在 qrtz_triggers 数据表

注意: 如果时间点在之前,会立刻推送 比如当前时间 16:00 ,你设置的是当天 8:00 推送 ,那会立刻就推送
抽屉式+标签页
<el-drawer :title="detail.title" size="50%" :visible.sync="detail.open" :direction="detail.direction"><el-tabs tab-position="top" ><el-tab-pane label="巡检问卷" name="second">巡检问卷</el-tab-pane><el-tab-pane label="任务记录" name="third">任务记录</el-tab-pane></el-tabs></el-drawer>
<style>.el-tabs__header {margin-left: auto;margin-right: auto;width: 95%;}</style>
子组件不能修改父组件的值
子组件代码:
<template><div class="top-right-btn"><el-row><el-tooltip class="item" effect="dark" :content="showSearch ? '隐藏搜索' : '显示搜索'" placement="top"><el-button size="mini" circle icon="el-icon-search" @click="toggleSearch()"/></el-tooltip><el-tooltip class="item" effect="dark" v-if="showGarbage" :content="showGarbageIcon? '垃圾箱' : '返回'"placement="top"><el-button size="medium" circle :icon="showGarbageIcon? 'el-icon-delete' : 'el-icon-back'" @click="garbage()"/></el-tooltip></el-row></div></template><script>export default {name: "RightToolbar",data() {return {};},props: {showSearch: {type: Boolean,default: true,},showGarbage: {type: Boolean,default: true,},showGarbageIcon: {type: Boolean,default: true,},},methods: {//搜索toggleSearch() {this.$emit("update:showSearch", !this.showSearch);},garbage() {var showGarbageIcon = this.showGarbageIcon;// this.showGarbageIcon = !showGarbageIcon; //这行去掉 不能直接改变props中参数的值this.$emit("queryTable"); //通知父组件改变。},},};</script>
父组件代码:
<right-toolbar :showSearch.sync="showSearch" @queryTable="getList"></right-toolbar>

通过props传递给子组件的show,不能在子组件内部修改props中的show值。
错误信息:
[Vue warn]: Avoid mutating a prop directly since the value will be overwritten whenever the parent component re-renders. Instead, use a data or computed property based on the prop's value. Prop being mutated: "showGarbageIcon"
正确传值方法:
this.$emit("queryTable");
父组件修改子组件data值
父组件代码如下
<!--详情--><details-from ref="orderDetail" :orderId="orderId"/>// 引入组件import detailsFrom from './orderDetail'components: {detailsFrom},data(){orderStatusOptions:[],orderPayTypeOptions:[]}method(){updateChildData(){// ref='orderDetail'this.$refs.orderDetail.orderStatusOptions = this.orderStatusOptionsthis.$refs.orderDetail.orderPayTypeOptions = this.orderPayTypeOptions}}
子组件代码如下
data() {return {orderStatusOptions:[],orderPayTypeOptions:[]}},
实现表单里面的 lable 标签对齐
<!-- lable-width 值调大一点 --><el-form ref="form" :model="form" :rules="rules" label-width="120px"></el-form>
watch 用法
watch: {// 监听这个字段变化showGarbageIcon: function (val) {console.log(val)this.queryParams.delFlag = val ? 0 : 2;this.showDeleteIcon = val ? 'el-icon-delete':'el-icon-circle-check';this.getList();}},
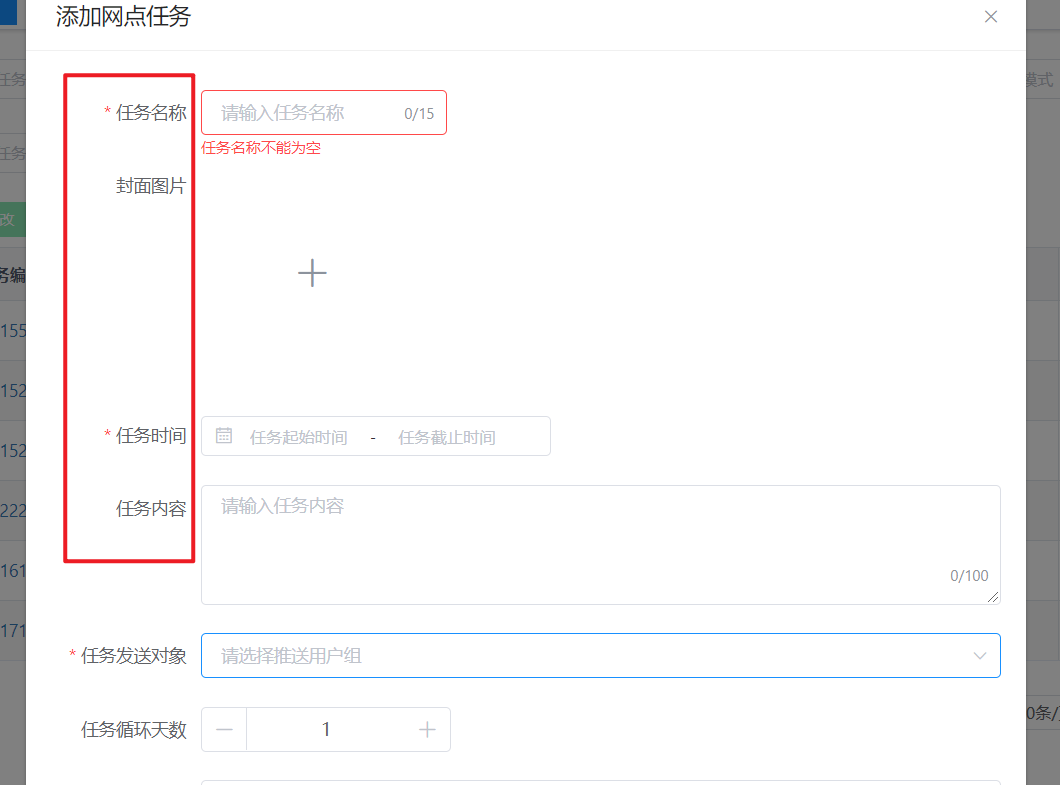
增加回收站
<right-toolbar :showSearch.sync="showSearch" :showGarbage="garbage.show":showGarbageIcon="garbage.iconShow"@queryGarbage="listGarbage"@queryTable="getList"></right-toolbar>
api.js
// 删除问卷检查项export function delQuesPartItem(id, delFlag) {let url = '/rqinspect/quesPartItem/' + id;if (delFlag != null) {url = url + "?delFlag=" + delFlag;}return request({url: url,method: 'delete'})}
vue
queryParams: {pageNum: 1,pageSize: 10,delFlag: 0,}
查询垃圾箱的js
listGarbage(val){console.log(val)this.garbage.iconShow = val;this.garbage.btnIcon = val ? 'el-icon-delete':'el-icon-circle-check';this.garbage.btnText = val ? '删除':'启用';this.queryParams.delFlag = val ? 0 : 2;this.getList();},
删除js
/** 删除按钮操作 */handleDelete(row) {const ids = row.id || this.ids;var delFlag = this.garbage.iconShow ? 2 : 0;var text = this.garbage.btnText;this.$confirm('是否确认'+text+'网点任务编号为"' + ids + '"的数据项?', "警告", {confirmButtonText: "确定",cancelButtonText: "取消",type: "warning"}).then(function () {return delTask(ids,delFlag);}).then(() => {this.getList();this.msgSuccess(text+"成功");}).catch(function () {});},
Controller.java
@PreAuthorize("@ss.hasPermi('rqinspect:quesPartItem:remove')")@Log(title = "问卷检查项", businessType = BusinessType.DELETE)@DeleteMapping("/{ids}/{delFlag}")public AjaxResult remove(@PathVariable Integer[] ids,@PathVariable("delFlag") Integer delFlag){return toAjax(quesPartItemService.deleteQuesPartItemByIds(ids));}
mapper.java
public int deleteQuesByIds(@Param("ids") Integer[] ids, @Param("delFlag") Integer delFlag);
mapper.xml
<delete id="deleteQuesByIds" parameterType="String">update sys_ques set del_flag = #{delFlag} where id in<foreach item="id" collection="ids" open="(" separator="," close=")">#{id}</foreach></delete>
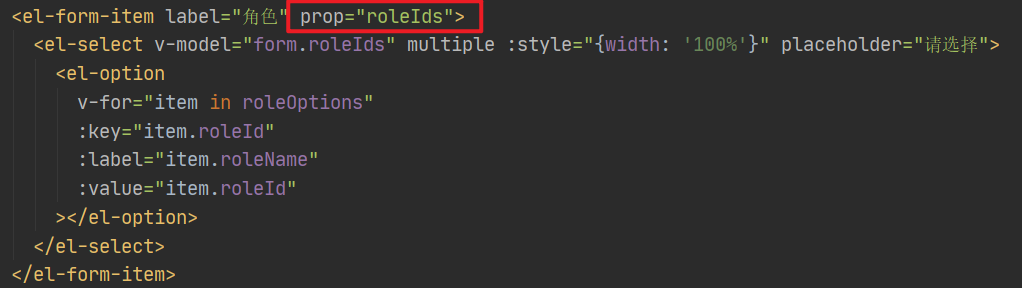
执行重置方法报错
报错信息
TypeError: Cannot read property ‘indexOf’ of undefined at VueComponent.resetField (element-ui.common.js?5c96:23528)
正常的
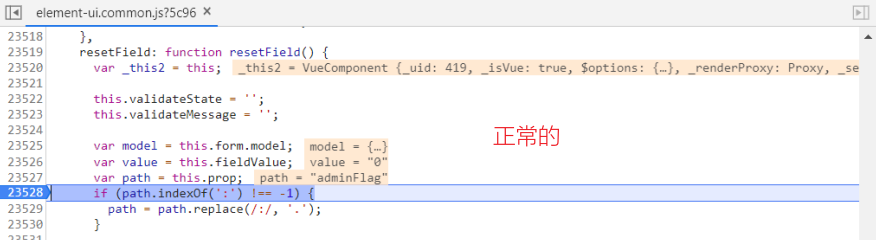
错误的,path 等于 undefined
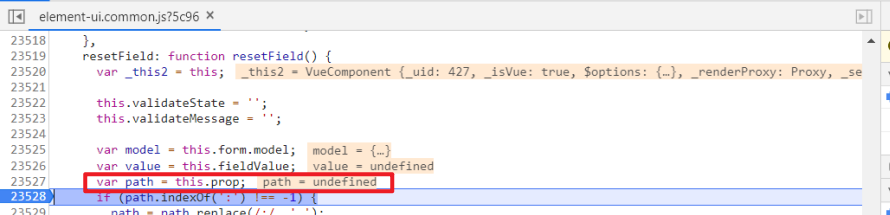
element-ui.commmon.js
resetField: function resetField() {var _this2 = this;this.validateState = '';this.validateMessage = '';var model = this.form.model;var value = this.fieldValue; // 报undefinedvar path = this.prop; // 报undefinedif (path.indexOf(':') !== -1) {path = path.replace(/:/, '.');}var prop = Object(util_["getPropByPath"])(model, path, true);this.validateDisabled = true;if (Array.isArray(value)) {prop.o[prop.k] = [].concat(this.initialValue);} else {prop.o[prop.k] = this.initialValue;}// reset validateDisabled after onFieldChange triggeredthis.$nextTick(function () {_this2.validateDisabled = false;});this.broadcast('ElTimeSelect', 'fieldReset', this.initialValue);},
- 原因如下,在使用
validate、resetFields方法的情况下,prop属性是必填的

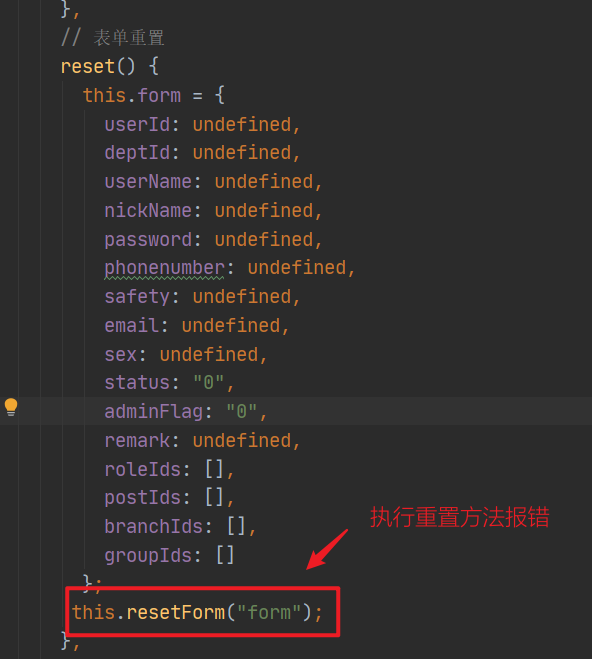
- 解决方法如下
<!--加一个 prop='属性名' --><el-form-item label="角色" prop="roleIds">
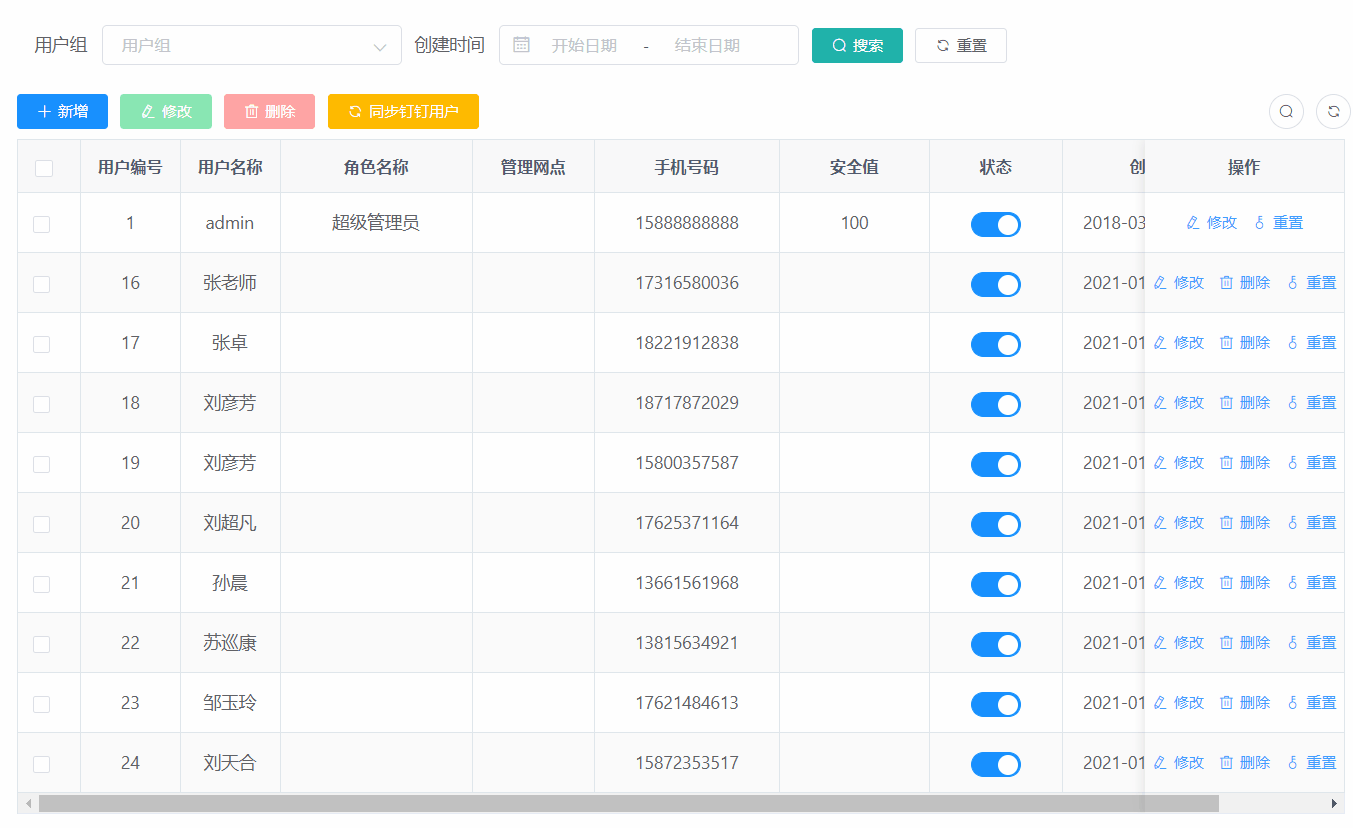
el-select 远程搜索
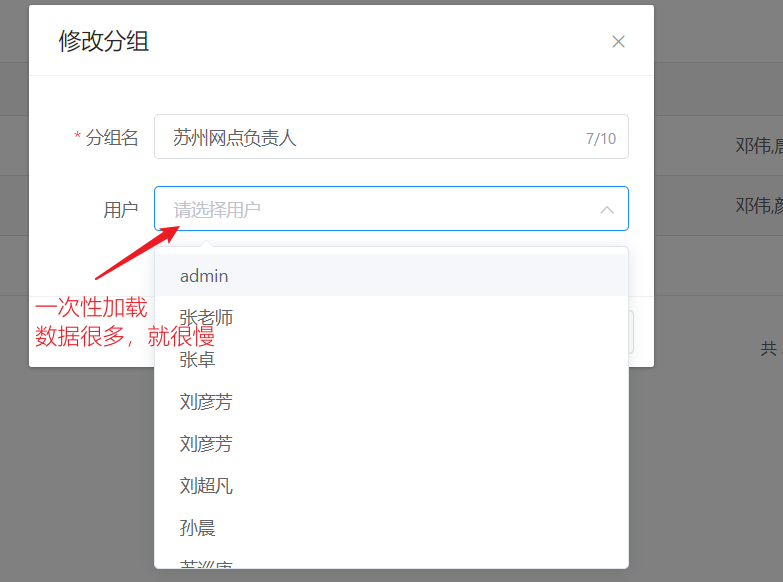
el-select 一次性加载数据如果很多,就会很慢,我们这边改进一下。
改成远程搜索
<el-form-item label="用户" prop="userIds"><el-select filterable remote :remote-method="remoteMethod" v-model="form.userIds" multiple :loading="selectloading" :style="{width: '100%'}" placeholder="请选择用户"><el-optionv-for="item in userOptions":key="item.userId":label="item.userName":value="item.userId"></el-option></el-select></el-form-item>
export default {name: "Group",data() {return {selectloading: true,userOptions: []}},methods:{/** 修改按钮操作 */handleUpdate(row) {this.reset();const id = row.id;getGroup(id).then(response => {this.form = response.data;this.form.userIds = response.userIds;// 根据用户id 获取获取用户信息listAllUser({'userIds':response.userIds.join(',')}).then(response=>{this.userOptions = response.data;});this.open = true;this.title = "修改分组";});},// 远程搜索remoteMethod(query){if (query !== '') {this.selectloading = true;var _this = this;setTimeout(() => {this.selectloading = false;listAllUser({'userName':query}).then(response=>{_this.userOptions = response.data;});}, 200);} else {this.options = [];}}}}
固定表格最右一栏
| 参数 | 说明 | 类型 | 可选值 |
|---|---|---|---|
| fixed | 列是否固定在左侧或者右侧,true 表示固定在左侧 | string, boolean | true, left, right |
在 el-table-column 加上 fixed="right"
<el-table-columnlabel="操作"align="center"width="160"class-name="small-padding fixed-width"fixed="right"><template slot-scope="scope"><el-buttonsize="mini"type="text"icon="el-icon-edit"@click="handleUpdate(scope.row)"v-hasPermi="['system:user:edit']">修改</el-button></template></el-table-column>
去掉 url 中的
nginx 配置的时候注意一下
router/index.js
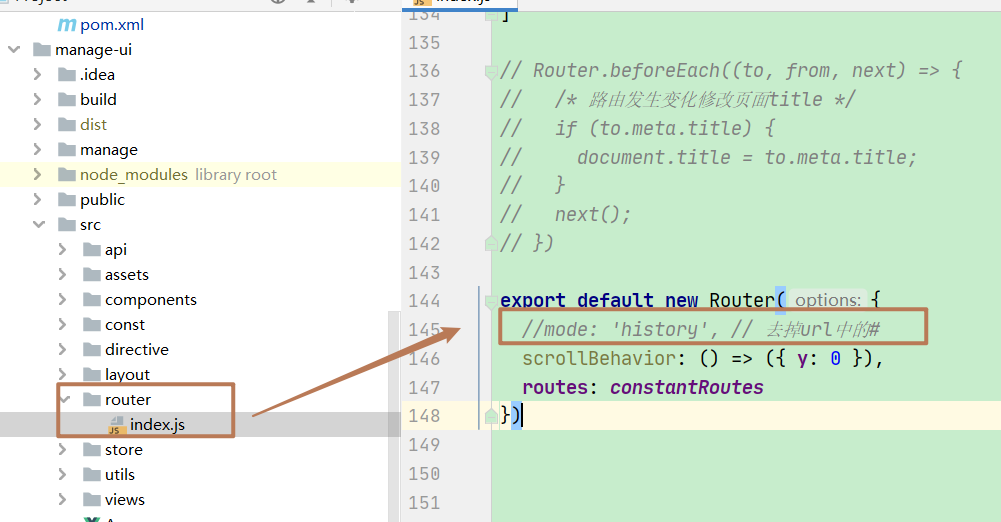
改成
export default new Router({// mode: 'history', // 去掉url中的#scrollBehavior: () => ({ y: 0 }),routes: constantRoutes})
hash和history两种模式的区别 https://www.jianshu.com/p/bfffb4b8c9fa
应用部署在子路径
vue.config.js
// 例如 https://www.ruoyi.vip/。如果应用被部署在一个子路径上,你就需要用这个选项指定这个子路径。例如,如果你的应用被部署在 https://www.ruoyi.vip/admin/,则设置 baseUrl 为 /admin/。publicPath: process.env.NODE_ENV === "production" ? "/" : "/",
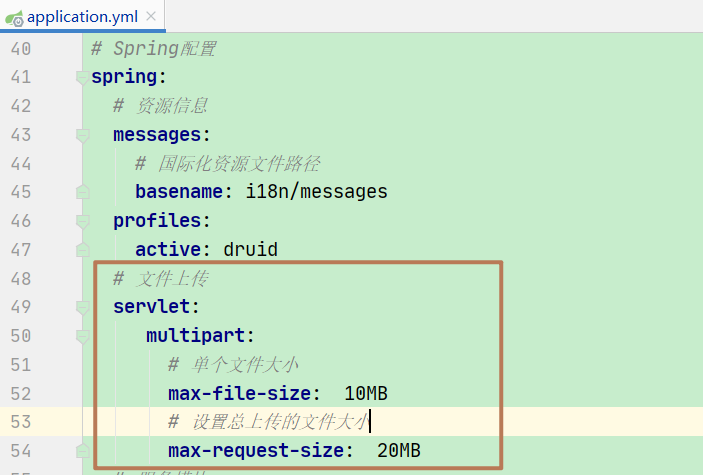
springboot配置文件上传大小
错误信息如下:
Maximum upload size exceeded; nested exception is java.lang.IllegalStateException: org.apache.tomcat.util.http.fileupload.FileUploadBase$FileSizeLimitExceededException: The field avatarfile exceeds its maximum permitted size of 10485760 bytes.
配置文件增加以下内容:
# springboot 2.xspring:servlet:multipart:# 文件最大max-file-size: 20MB# 设置总上传数据总大小max-request-size: 20MB
el-upload 上传替换上一个文件
应用场景: 导入excel文件的时候用到
# 在 el-upload 加上监听文件修改的方法:on-change="handleFileChange"# 限制文件上传个数:limit="2"
监听代码如下
handleFileChange(file, fileList) {// 当多余一个的时候替换文件if (fileList.length > 1) {fileList.splice(0, 1);}},
echarts 图表引入
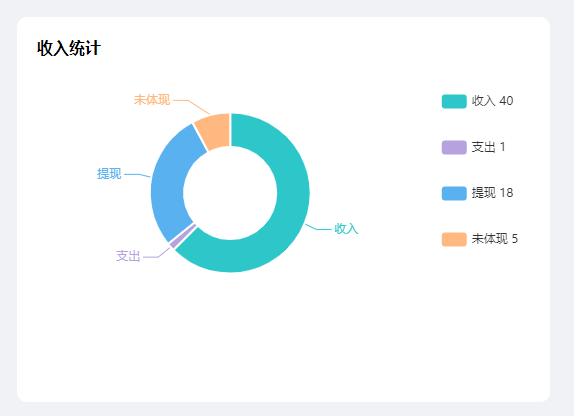
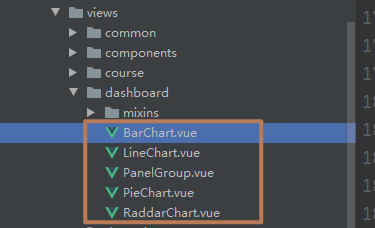
代码如下,更多请参考 index.vue
<el-col :span="8"><div class="card_centre"><div class="card_title"><div class="item1">收入统计</div></div><!-- <div class="total_data"><span>{{indexData.user.total}}</span></div>--><pie-chart :chart-data="pieChartData"/></div></el-col></el-row># 引入import PieChart from './dashboard/PieChart'
实现第三方登录
创建好token之后在Authorization携带token访问接口即可。不需要用户名和密码。会根据token查询到对应用户的权限
OapiUserGetuserinfoResponse userInfoByCode = DingUserUtil.getUserInfoByCode(code);String userid = userInfoByCode.getUserid();AssertUtils.notNull(userid,"登录失败,用户不存在");SysUser sysUser = sysUserService.selectUserByDingId(userid);if(sysUser == null){throw new BaseException(userid,"登录失败,用户不存在");}AsyncManager.me().execute(AsyncFactory.recordLogininfor(sysUser.getUserName(), Constants.LOGIN_SUCCESS, MessageUtils.message("user.login.success")));LoginUser loginUser = new LoginUser(sysUser,permissionService.getMenuPermission(sysUser));// 生成tokenreturn tokenService.createToken(loginUser);
处理多图上传问题,闪屏
去掉watch,绑定唯一key值
<el-form-item label="相册" prop="photoAlbum"><upload-image-list :key="form.userId" v-model="form.photoAlbum"/></el-form-item>
UploadImageList 代码如下
<template><div class="component-upload-image"><el-upload:action="uploadImgUrl":before-upload="handleBeforeUpload":data="data":file-list="fullUrls":http-request="handleRequest":limit="limit":on-error="handleUploadError":on-preview="handlePictureCardPreview":on-remove="handleRemove":on-success="handleUploadSuccess"class="uploadComponent"list-type="picture-card"name="file"style="display: inline-block; vertical-align: top"><i class="el-icon-plus avatar-uploader-icon"></i><el-dialog :visible.sync="dialogVisible" append-to-body width="500px"><img :src="dialogImageUrl" width="100%"></el-dialog></el-upload></div></template><script>import { getMinioToken } from '@/api/oss'import { createUploadPath } from '@/utils/index'import axios from 'axios'export default {components: {},data() {return {dialogImageUrl: '',dialogVisible: false,//process.env.VUE_APP_BASE_API + "/common/upload",uploadImgUrl: '', // 上传的图片服务器地址downloadImgUrl: 'http://8.136.97.240:9000/gongchanjuan/', // 上传的图片服务器地址data: {key: '', //图片名字处理,},method: 'put',fullUrls: []}},props: {limit: {type: Number,default: 3},value: {type: String,default: ''}},// watch: {// value: function(val) {// console.log(val,"val");// console.log(this.value,"this.value");// this.split(val)// }// },created() {this.split(this.value)},methods: {handleRequest(params) {axios({url: this.uploadImgUrl,method: this.method,headers: {'Content-Type': params.file.type},data: params.file}).then(() => {this.handleUploadSuccess()}).catch(() => {this.handleUploadError()})},getQiniuToken() {// getToken(this.form).then(response => {// if (response.code === 200) {// this.data.token = response.data;// } else {// this.msgError(response.msg);// }// });},async getMinioToken(fileName) {await getMinioToken(fileName).then(response => {if (response.code === 200) {this.uploadImgUrl = response.dataconsole.log(this.uploadImgUrl)} else {this.msgError(response.msg)}})},split(str) {console.log("### split")this.fullUrls = []if (str == null) returnvar urlArr = str.split(',')if (this.limit > 0) {urlArr.slice(0, this.limit)}for (let index in urlArr) {var url = urlArr[index]if (url != null && url !== '') {this.fullUrls.push({ url: this.downloadImgUrl + url, fileName: url })}}},merge(arr) {if (arr == null && arr.length == 0) return ''let str = ''for (let i in arr) {var fileName = arr[i].fileNamestr += fileName + ','}if (str.length > 0) {str = str.substr(0, str.length - 1)}return str},handleUploadSuccess() {this.fullUrls.push({ url: this.downloadImgUrl + this.data.key, fileName: this.data.key })console.log(this.fullUrls)var str = this.merge(this.fullUrls)console.log(str)this.$emit('input', str)this.loading.close()},async handleBeforeUpload(file) {console.log(file)var index1 = file.name.lastIndexOf('.')var index2 = file.name.lengthvar suffix = file.name.substring(index1 + 1, index2)this.data.key = `${createUploadPath()}.${suffix}`console.log(this.data.key)await this.getMinioToken(this.data.key)this.loading = this.$loading({lock: true,text: '上传中',background: 'rgba(0, 0, 0, 0.7)'})},handleRemove(val) {var uid = val.uidvar index = this.fullUrls.findIndex(x => x.uid === uid)this.fullUrls.splice(index, 1)var str = this.merge(this.fullUrls)this.$emit('input', str)},handleUploadError() {this.$message({type: 'error',message: '上传失败'})this.loading.close()},handlePictureCardPreview(file) {this.dialogImageUrl = file.urlthis.dialogVisible = true}}}</script><style lang="scss" scoped>.avatar {width: 100%;height: 100%;}//在样式把这个is-ready给隐藏掉就好了,就是这么Easy/deep/.el-upload-list__item.is-ready {display: none;}</style>
@EqualsAndHashCode()注解详解
原文中提到的大致有以下几点:
- 此注解会生成equals(Object other) 和 hashCode()方法。
- 它默认使用非静态,非瞬态的属性
- 可通过参数exclude排除一些属性
- 可通过参数of指定仅使用哪些属性
- 它默认仅使用该类中定义的属性且不调用父类的方法
- 可通过callSuper=true解决上一点问题。让其生成的方法中调用父类的方法。
另:@Data相当于@Getter @Setter @RequiredArgsConstructor @ToString @EqualsAndHashCode这5个注解的合集。
通过官方文档,可以得知,当使用@Data注解时,则有了@EqualsAndHashCode注解,那么就会在此类中存在equals(Object other) 和 hashCode()方法,且不会使用父类的属性,这就导致了可能的问题。
比如,有多个类有相同的部分属性,把它们定义到父类中,恰好id(数据库主键)也在父类中,那么就会存在部分对象在比较时,它们并不相等,却因为lombok自动生成的equals(Object other) 和 hashCode()方法判定为相等,从而导致出错。
@EqualsAndHashCode(callSuper = true),那就是用自己的属性和从父类继承的属性 来生成hashcode,所以结果为false;
修复此问题的方法很简单:
- 使用@Getter @Setter @ToString代替@Data并且自定义equals(Object other) 和 hashCode()方法,比如有些类只需要判断主键id是否相等即足矣。
- 或者使用在使用@Data时同时加上@EqualsAndHashCode(callSuper=true)注解。
来源 https://blog.csdn.net/c851204293/article/details/96989512
上传图片报 403 ,拦截权限问题
拦截权限问题
// 使用 permitAll() 方法所有人都能访问,包括带上 token 访问.antMatchers("/admins/**").permitAll()// 使用 anonymous() 所有人都能访问,但是带上 token 访问后会报错.antMatchers("/admins/**").anonymous()
分页注意
分页必须要在查询列表的上一行代码
startPage();// 查询网点列表List<Integer> branchIds = userService.listBranchIds();// 查询网点下的任务列表List<Task> tasks = taskService.listTaskIds();
这时候就会出现 userService.listBranchIds() 分页了
真正需要分页的 taskService.listTaskIds() 没有分页
正确的写法如下:
// 查询网点列表List<Integer> branchIds = userService.listBranchIds();startPage();// 查询网点下的任务列表List<Task> tasks = taskService.listTaskIds();
nginx 配置静态资源目录,反向代理服务
server{listen 80;server_name xxx.com;index index.php index.html index.htm default.php default.htm default.html;root /www/wwwroot/xxx.com/;location /{// 如果访问不到静态资源,就访问反向代理服务if ( !-e $request_filename){proxy_pass http://127.0.0.1:8130;}}}
列表数据图片预览拼接全路径


引用代码如下:
<el-table-column align="center" label="品牌LOGO" prop="logo" width="100"><template slot-scope="scope"><image-view imageStyle="width:20px;height:20px" v-model="scope.row.logo" /></template></el-table-column>
imageView 代码如下
<template><div class="component-image-view"><span v-if="fullUrls.length===0" style="color:#c0c4cc;">暂无</span><el-image v-for="(item,index) in fullUrls":style="imageStyle":src="item":preview-src-list="fullUrls" slot="reference"></el-image></div></template><script>export default {data() {return {source:{//本地local:{downloadImgUrl: process.env.VUE_APP_BASE_API + "/upload",},//七牛qiniu:{downloadImgUrl: "http://qnimage.fangfujie.cn/",},//miniominio:{downloadImgUrl: "http://8.136.97.240:9000/gongchanjuan/",},// 阿里云ali:{downloadImgUrl: "http://youlishop.oss-cn-beijing.aliyuncs.com/",},},fullUrls:[],};},props: {value: {type: String,default: "",},imageStyle: {type: String,default: "width:100px;height:100px;margin-right:4px",},limit:{type:Number,default:-1,},to:{type: String,// 默认访问图片根地址default: "ali",},},watch: {value:function(val){this.value = val;this.init();},imageStyle:function (val) {this.style = val;this.init();},limit:function (val) {this.limit = val;this.init();},to:function (val) {this.to = val;this.init();}},created() {this.init();},methods: {init(){this.fullUrls = [];if (this.value==null)returnvar urlArr = this.value.split(",");if (this.limit>0){urlArr = urlArr.slice(0,this.limit)}for (let index in urlArr){var url = urlArr[index];if (url!=null && url!==''){this.fullUrls.push(this.source[this.to].downloadImgUrl+url);}}}},};</script><style scoped lang="scss"></style>
手动关闭当前标签页
this.$store.dispatch("tagsView/delView", this.$route);
修改表头背景颜色

修改后

.el-table__header-wrapper, .el-table__fixed-header-wrapper {th {word-break: break-word;//background-color: #f8f8f9;background-color: #ffffff;color: #333333;//height: 20px;line-height: 23px;font-weight: 500;font-size: 12px;}}
路径地址: manage-ui/src/assets/styles/ruoyi.scss
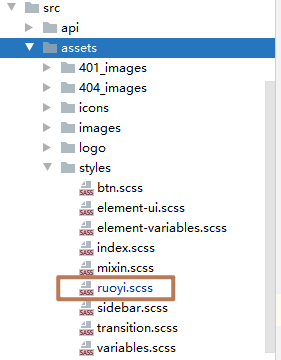
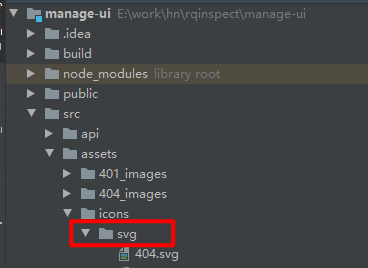
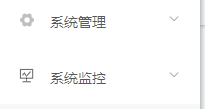
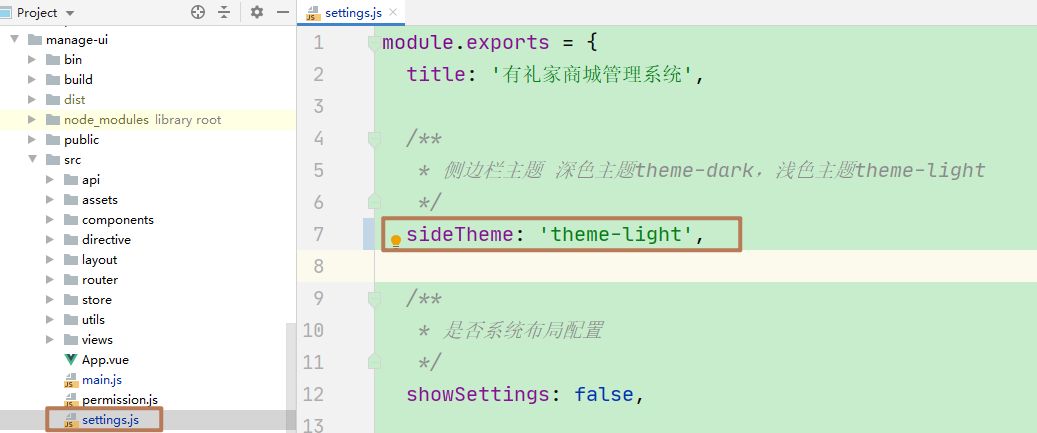
修改侧边栏主题
manage-ui/src/settings.js
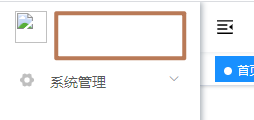
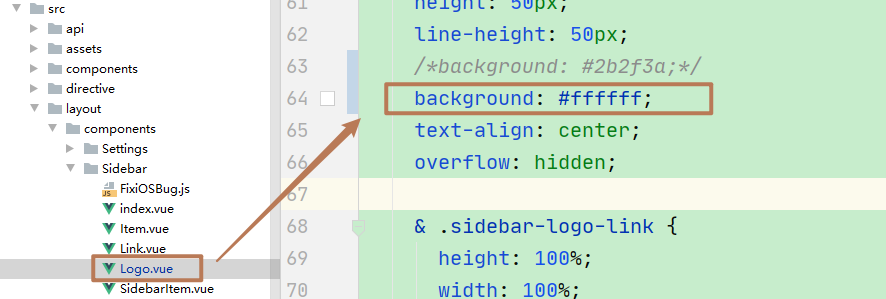
manage-ui/src/layout/components/Sidebar/Logo.vue
修改左上角标题颜色
manage-ui/src/layout/components/Sidebar/Logo.vue
& .sidebar-title {display: inline-block;margin: 0;// color 变成黑色color: #131313;font-weight: 600;line-height: 50px;font-size: 14px;font-family: Avenir, Helvetica Neue, Arial, Helvetica, sans-serif;vertical-align: middle;}
注释以下代码:
manage-ui/src/layout/components/Navbar.vue
/*box-shadow: 0 1px 4px rgba(0,21,41,.08);*/
manage-ui/src/layout/components/TagsView/index.vue
/*box-shadow: 0 1px 3px 0 rgba(0, 0, 0, .12), 0 0 3px 0 rgba(0, 0, 0, .04);*/
manage-ui/src/assets/styles/sidebar.scss
//-webkit-box-shadow: 2px 0 6px rgba(0,21,41,.35);//box-shadow: 2px 0 6px rgba(0,21,41,.35);
最後效果

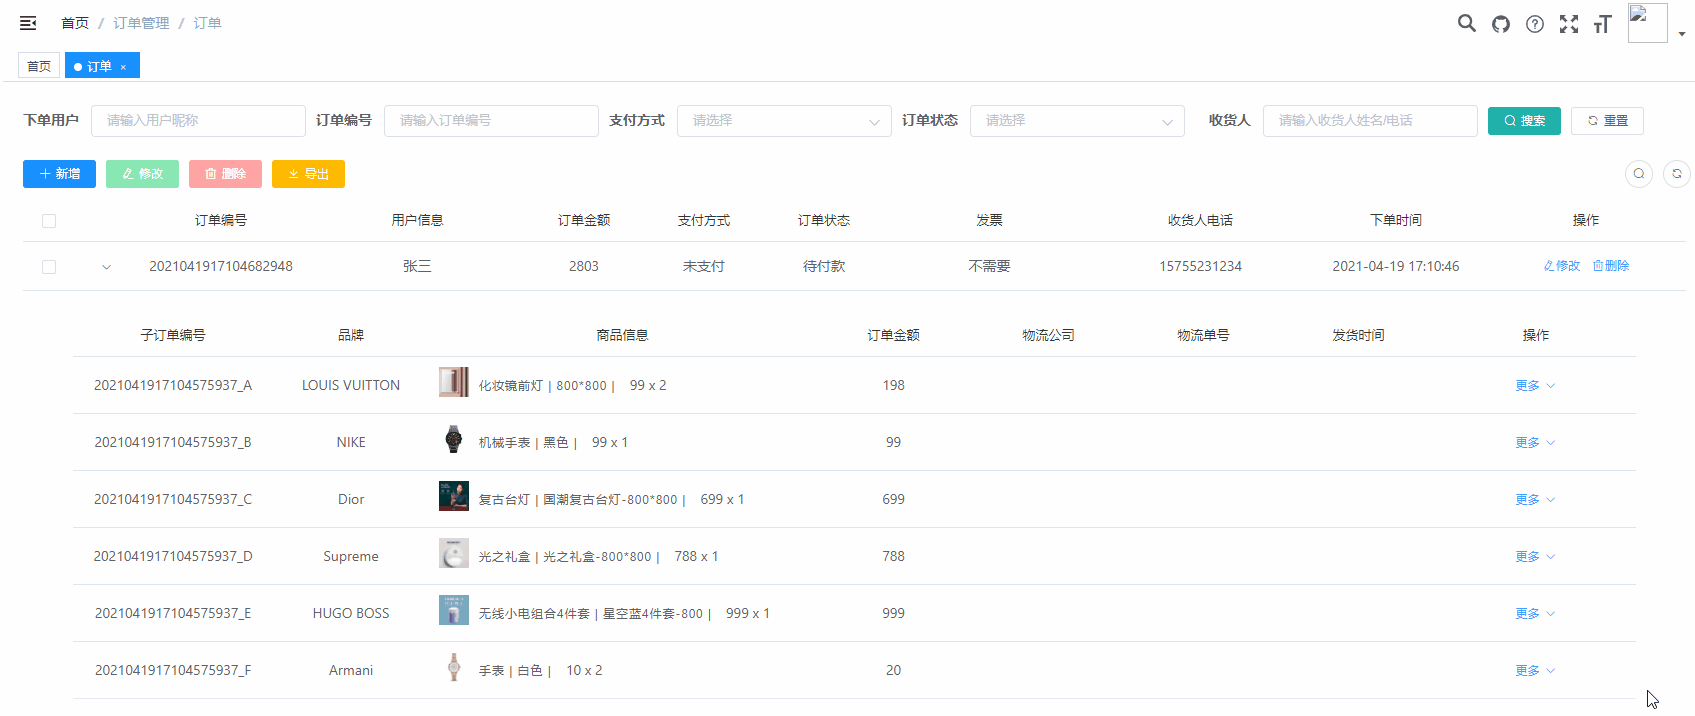
table展开后搜索问题
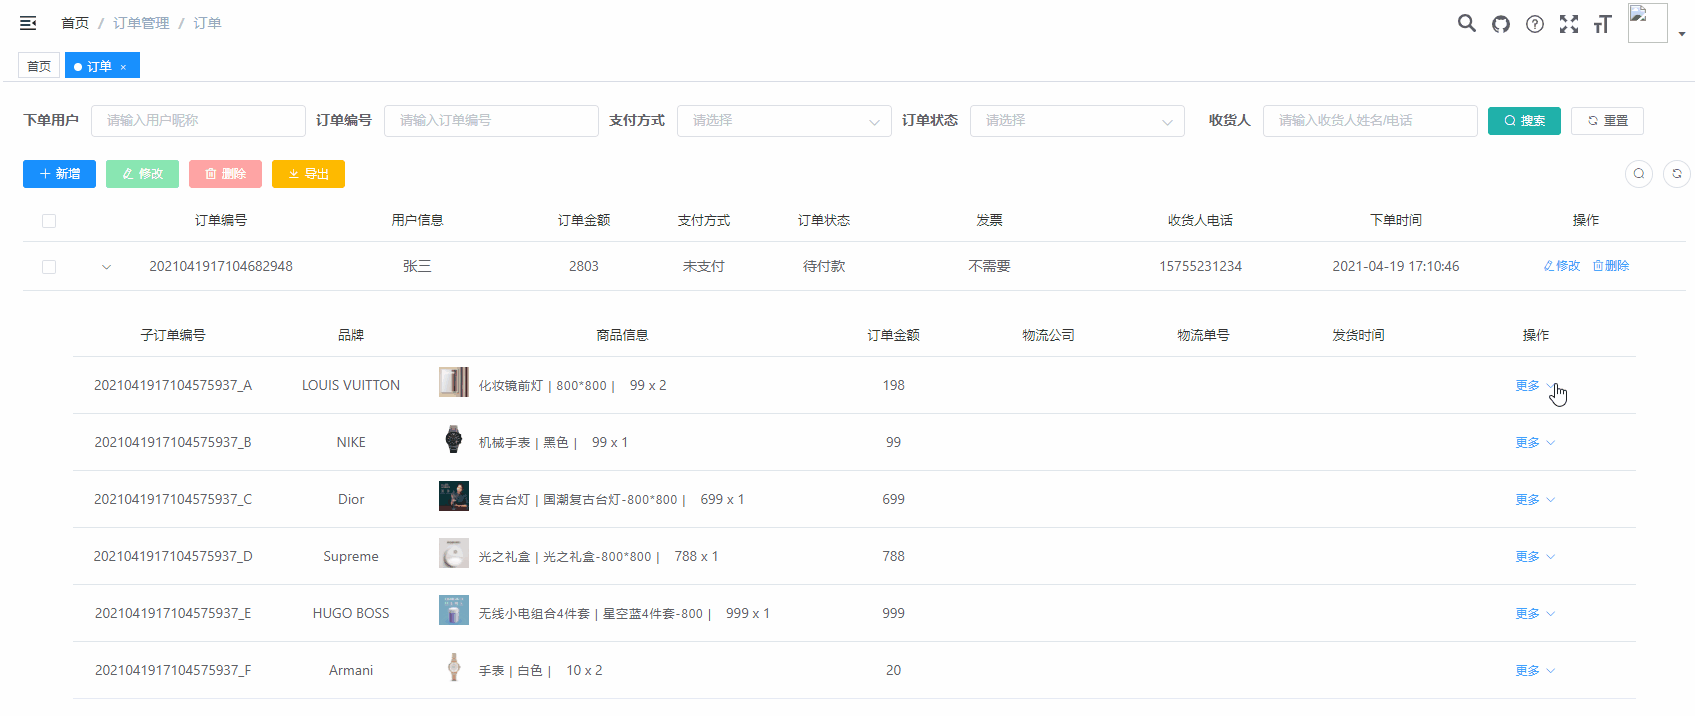
/** 查询订单列表 */getList() {this.loading = true;listOrder(this.queryParams).then(response => {if (response) {response.rows.map(item => {item.subOrderList = [];});this.orderList = response.rows;this.total = response.total;this.loading = false;// 搜索后置位空this.expands = [];}});},
富文本上传图片
manage-ui/src/components/Editor/index.vue
<!-- 图片上传组件辅助 --><el-uploadclass="avatar-uploader quill-img":action="host":data="reqData"name="file":show-file-list="false":on-success="quillImgSuccess":on-error="uploadError":before-upload="quillImgBefore"accept='.jpg,.jpeg,.png,.gif,.jfif'></el-upload>
import { getToken } from "@/api/system/upload.js";
data:{host:'http://youlishop.oss-cn-beijing.aliyuncs.com/',reqData: {},dir:"fuwenben",}
methods: {// 获取阿里云数据async getAliyunToken(query) {const { data } = await getToken(query)this.reqData.OSSAccessKeyId = data.OSSAccessKeyId;this.reqData.policy = data.policy;this.reqData.signature = data.signature;this.reqData.success_action_status = 200;},// 富文本图片上传前async quillImgBefore(file) {let fileType = file.type;if(fileType === 'image/jpeg' || fileType === 'image/png' || fileType === 'image/jpg'){// 获取上传tokenvar index1 = file.name.lastIndexOf(".");var index2 = file.name.length;var suffix = file.name.substring(index1 + 1, index2);var timestamp = Date.parse(new Date());this.reqData.key = this.dir+'/'+timestamp+"."+suffix;let query = {dir:this.dir};await this.getAliyunToken(query)console.log(this.reqData.key);return true;}else {this.$message.error('请插入图片类型文件(jpg/jpeg/png)');return false;}},quillImgSuccess(res, file) {// res为图片服务器返回的数据// 获取富文本组件实例let quill = this.$refs.quillEditor.quill;// 如果上传成功// 获取光标所在位置let length = quill.getSelection().index;// 插入图片quill.insertEmbed(length, "image", this.host + this.reqData.key);// 调整光标到最后quill.setSelection(length + 1);},
引入cards,卡片式统计

页面引入
<cards-data :cardLists="cardLists"></cards-data>import cardsData from '@/components/cards/index'components: {detailsFrom,orderSend,cardsData},data(){cardLists: [{ name: '订单数量', count: '' },{ name: '订单金额', count: '' },{ name: '微信支付金额', count: '' },{ name: '余额支付金额', count: '' },],}
行拖拽
npm install vuedraggable
图片按顺序显示
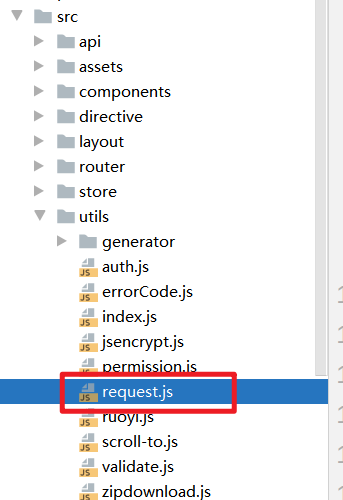
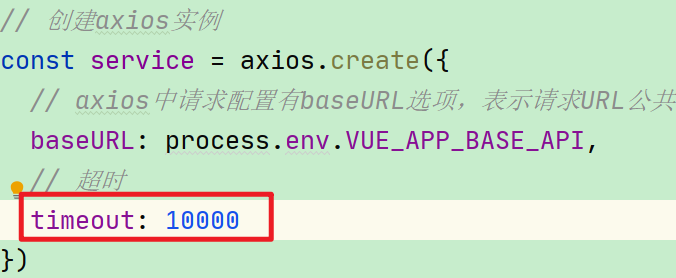
前端接口请求超时配置
utils->request.js
设置el-table行高
<el-table v-show="total > 0" v-loading="loading" :data="dataList":row-style="{height:'50px'}"style="font-size: 15px" @selection-change="handleSelectionChange">
全局配置el-table字体大小
.el-table{font-size: 15px}
动态配置表格

<el-table-column v-for="column in tableColumnList" :label="column.name" align="center"><!-- <el-table-column min-width="45%" label="数量(袋)" align="center" :prop="'wmsNum' + column.id">--><!-- </el-table-column>--><!-- <el-table-column min-width='55%' label="重量(千克)" align="center" :prop="'wmsWeight' + column.id">--><!-- </el-table-column>--><template slot-scope="scope"><div style="text-align: left;">{{ scope.row['wmsNum' + column.id] }}</div><div style="text-align: left;">{{ scope.row['wmsWeight' + column.id] }}</div></template></el-table-column>
处理图片富文本中图片宽度最大100%

<div v-html="formatContent(form.content)"></div>
// 实现rich-text富文本中图片宽度最大100%formatContent(html){if(!html){return;}// 去掉img标签里的style、width、height属性let content_data= html.replace(/<img[^>]*>/gi,function(match,capture){match = match.replace(/style="[^"]+"/gi, '').replace(/style='[^']+'/gi, '');match = match.replace(/width="[^"]+"/gi, '').replace(/width='[^']+'/gi, '');match = match.replace(/height="[^"]+"/gi, '').replace(/height='[^']+'/gi, '');return match;}); // 修改所有style里的width属性为max-width:100%content_data = content_data.replace(/style="[^"]+"/gi,function(match,capture){match = match.replace(/width:[^;]+;/gi, 'max-width:100%;').replace(/width:[^;]+;/gi, 'max-width:100%;');return match;}); // 去掉<br/>标签content_data = content_data.replace(/<br[^>]*\/>/gi, ''); // img标签添加style属性:max-width:100%;height:autocontent_data = content_data.replace(/\<img/gi, '<img style="max-width:100%;height:auto;display:block;margin:0px auto;"');return content_data;}

若有收获,就点个赞吧
0 人点赞
