创建新的Gradle项目
按照本文档,您将创建一个简单的Gradle项目,调用一些基本的Gradle命令,并了解Gradle如何管理这个项目
你需要什么
- 大约11分钟
- 终端应用程序(cmd或bash)
- Java运行时环境(JRE)或Java Development Kit(JDK),版本1.8或更高版本(仅运行Gradle时需要)
- Gradle分发版,版本4.10-rc-2或更高版本
Shell命令将显示基于Unix的系统。 Windows对每个命令都有类似的命令
初始化一个项目
首先,让我们为新项目创建一个新的目录。
❯ mkdir basic-demo❯ cd basic-demo
现在我们可以使用Gradle的 gradle init 命令来生成一个简单的项目。然后查看生成的所有内容,以便知道发生了什么。
❯ gradle initStarting a Gradle Daemon (subsequent builds will be faster)BUILD SUCCESSFUL in 3s2 actionable tasks: 2 executed
如果你想使用 Kotlin DSL 脚本,可以使用
gradle init --dsl kotlin命令。更多信息可以阅读 详细文档.
该命令应显示 “BUILD SUCCESSFUL” 并生成以下 “空” 项目。 如果没有,请确保正确 安装Gradle,并确保正确设置了 JAVA_HOME 环境变量。
这就是Gradle为您生成的内容。
Groovy
├── build.gradle├── gradle│ └── wrapper│ ├── gradle-wrapper.jar│ └── gradle-wrapper.properties├── gradlew├── gradlew.bat└── settings.gradle
Kotlin
├── build.gradle.kts├── gradle│ └── wrapper│ ├── gradle-wrapper.jar│ └── gradle-wrapper.properties├── gradlew├── gradlew.bat└── settings.gradle.kts
build.gradle 用于配置当前项目的Gradle构建脚本
gradle-wrapper.jar Gradle Wrapper可执行JAR
gradle-wrapper.properties Gradle Wrapper配置属性
gradlew 基于Unix的系统的Gradle Wrapper脚本
gradlew.bat 适用于Windows的Gradle Wrapper脚本
settings.gradle 用于配置Gradle构建的Gradle设置脚本
gradle init可以生成各种不同类型的项目,甚至知道如何将简单的pom.xml文件转换为Gradle。
搞定!我们的教程可以在这里结束,但是您可能想知道如何在这个项目中使用Gradle。那就让我们继续吧。
创建一个任务
Gradle提供了用于通过基于Groovy或Kotlin的DSL脚本创建和配置任务的API。 Project (项目)包括一组任务,每个任务执行一些基本操作。
Gradle提供了一个任务库,您可以在自己的项目中配置它。例如,有一个名为Copy的核心任务类型,它将文件从一个位置复制到另一个位置。复制任务非常有用(参阅文档了解详细信息),但是在这里,让我们再次保持简单。执行以下步骤:
- 创建一个名为
src的目录。 - 在
src目录中添加一个名为myfile.txt的文件。内容可以是任意的(甚至可以是空的),但是为了方便起见,可以添加一行Hello, World!。 - 在你的
build.gradle文件中定义一个类型为Copy(注意首字母大写)名称为copy的任务来复制src目录到一个名为dest的目录(你不必去手动创建dest目录,因为任务会为你去创建)。
build.gradle width Groovy
task copy(type: Copy, group: "Custom", description: "Copies sources to the dest directory") {from "src"into "dest"}
build.gradle.kts width Kotlin
tasks.create<Copy>("copy") {description = "Copies sources to the dest directory"group = "Custom"from("src")into("dest")}
在这里,group 和 description 您可以随便写,甚至可以忽略它们,但是这样做也会在稍后使用的tasks报告中忽略它们。
现在来执行您新建 copy 任务:
❯ ./gradlew copy> Task :copyBUILD SUCCESSFUL in 0s1 actionable task: 1 executed
我们可以检查一下 dest 目录中是否存在名为 myfile.txt 的文件并且它的内容和 src 目录中的文件一样,来验证 copy 任务是否成功执行。
应用插件
Gradle包含一系列的插件,在 Gradle插件市场 上可以找到更多的插件。该发行版附带的插件之一是 base plugin(基本插件)。这个基础插件附带了一个名为 Zip 的任务类型,您可以通过配置名称和路径来为你的项目打包成一个 zip 压缩文件。
添加 base plugin(基本插件)到构建脚本可以使用名为 plugins 语法块。请确保 plugins{} 代码块添加在文件的前面。
build.gradle width Groovy
plugins {id "base"}... rest of the build file ...
build.gradle.kts width Kotlin
plugins {id("base")}... rest of the build file ...
现在可以添加把 src 目录打包成 zip 文件的任务了。
build.gradle width Groovy
task zip(type: Zip, group: "Archive", description: "Archives sources in a zip file") {from "src"setArchiveName "basic-demo-1.0.zip"}
build.gradle.kts width Kotlin
tasks.create<Zip>("zip") {description = "Archives sources in a zip file"group = "Archive"from("src")setArchiveName("basic-demo-1.0.zip")}
base plugin(基本插件)根据上面的设置在 build/distributions 目录创建一个名为 basic-demo-1.0.zip 的压缩文件。
现在,只需运行新的 zip 任务,并查看生成的zip文件是否符合您的期望。
❯ ./gradlew zip> Task :zipBUILD SUCCESSFUL in 0s1 actionable task: 1 executed
探索和调试项目
让我们看看在我们的新项目中还可以用Gradle做些什么。我们可以在 命令行界面 中完成。
发现可用的任务
tasks 命令可以列出了可用的Gradle任务,包括 base plugin(基本插件)添加的任务,以及您刚刚添加的自定义任务。
❯ ./gradlew tasks> Task :tasks------------------------------------------------------------All tasks runnable from root project------------------------------------------------------------Archive tasks-------------zip - Archives sources in a zip fileBuild tasks-----------assemble - Assembles the outputs of this project.build - Assembles and tests this project.clean - Deletes the build directory.Build Setup tasks-----------------init - Initializes a new Gradle build.wrapper - Generates Gradle wrapper files.Custom tasks------------copy - Simply copies sources to a the build directoryHelp tasks----------buildEnvironment - Displays all buildscript dependencies declared in root project 'basic-demo'.components - Displays the components produced by root project 'basic-demo'. [incubating]dependencies - Displays all dependencies declared in root project 'basic-demo'.dependencyInsight - Displays the insight into a specific dependency in root project 'basic-demo'.dependentComponents - Displays the dependent components of components in root project 'basic-demo'. [incubating]help - Displays a help message.model - Displays the configuration model of root project 'basic-demo'. [incubating]projects - Displays the sub-projects of root project 'basic-demo'.properties - Displays the properties of root project 'basic-demo'.tasks - Displays the tasks runnable from root project 'basic-demo'.Verification tasks------------------check - Runs all checks.Rules-----Pattern: clean<TaskName>: Cleans the output files of a task.Pattern: build<ConfigurationName>: Assembles the artifacts of a configuration.Pattern: upload<ConfigurationName>: Assembles and uploads the artifacts belonging to a configuration.To see all tasks and more detail, run gradlew tasks --allTo see more detail about a task, run gradlew help --task <task>BUILD SUCCESSFUL in 0s1 actionable task: 1 executed
分析和调试项目
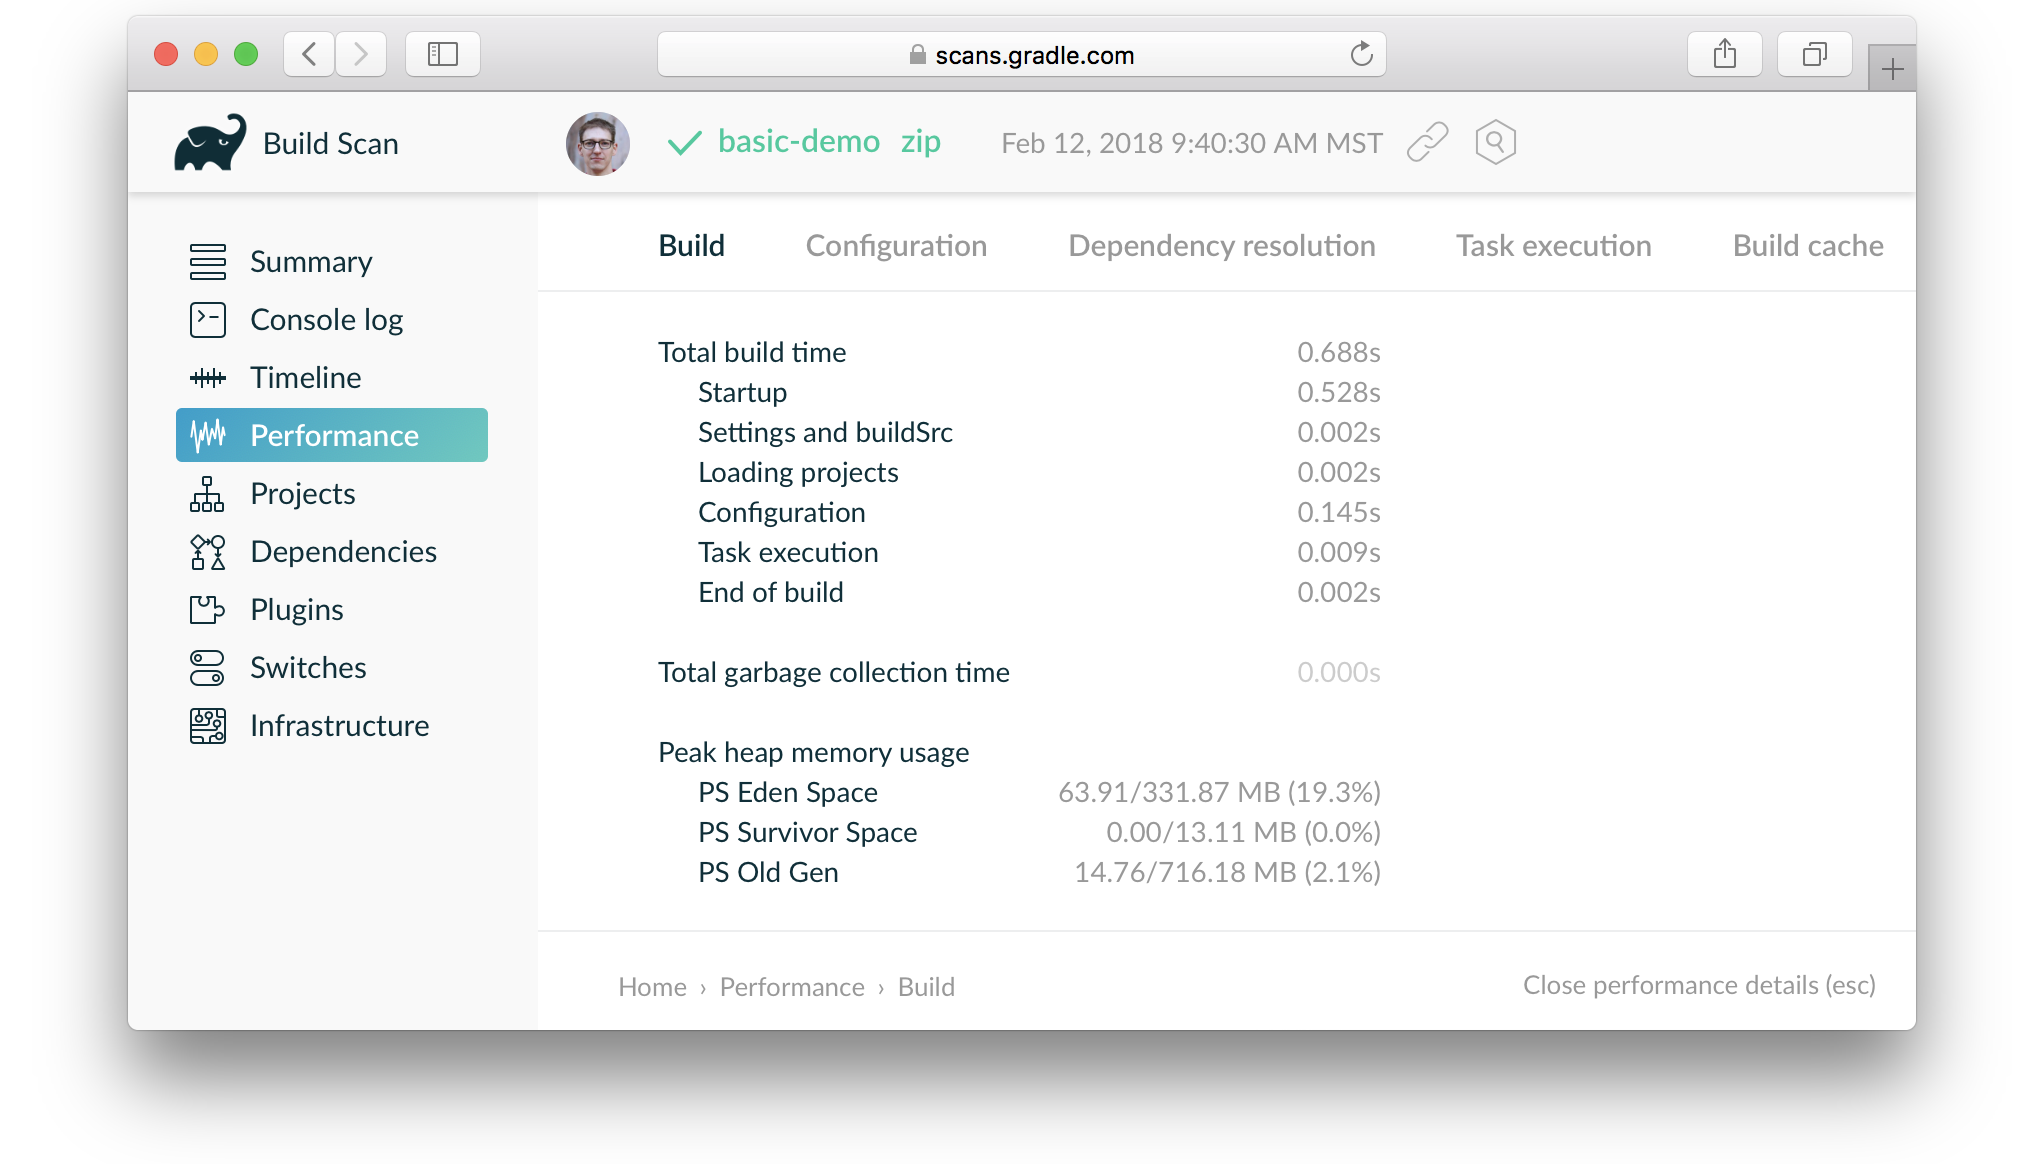
Gradle还提供了一个丰富的、基于web的构建视图,叫做 build scan(构建扫描)。
通过使用 --scan 选项或显式地将 build scan 插件应用到项目中,您可以在 scans.gradle.com 中免费创建一个 build scan。将 构建扫描 发布到 scans.gradle.com 会将此数据传输到Gradle的服务器。要将数据保存在自己的服务器上,请查看 Gradle 企业版。
尝试在执行任务时添加 --scan 来创建构建扫描。
❯ ./gradlew zip --scanBUILD SUCCESSFUL in 0s1 actionable task: 1 up-to-datePublishing a build scan to scans.gradle.com requires accepting the Terms of Service defined at https://scans.gradle.com/terms-of-service. Do you accept these terms? [yes, no]Gradle Cloud Services license agreement accepted.Publishing build scan...https://gradle.com/s/repnge6srr5qs
如果您浏览您的 build scan ,您应该能够很容易地找到在哪里执行的任务,它们花费了多少时间,应用了哪些插件,等等。下次在StackOverflow上调试的某些东西时,可以考虑附上一个 build scan 信息。
您可以在 build scan 插件用户手册 中学习怎样配置和使用 build scan。
发现可用的属性
properties 命令告诉您项目的属性。
❯ ./gradlew properties
输出结果很全,以下是一些可用的属性:
> Task :properties------------------------------------------------------------Root project------------------------------------------------------------buildDir: /Users/.../basic-demo/buildbuildFile: /Users/.../basic-demo/build.gradle.ktsdescription: nullgroup:name: basic-demoprojectDir: /Users/.../basic-demoversion: unspecifiedBUILD SUCCESSFUL
默认情况下,项目的 name 与文件夹的名称一样。 您还可以指定 group 和 version 属性,但目前它们采用默认值,如上描述的一样。
buildFile 属性是 build.gradle 脚本的路径名,默认情况下位于 projectDir 中。
您可以更改许多属性。 例如,您可以尝试将以下行添加到 build.gradle 脚本件中,然后重新执行gradle属性。
version = "1.0"description = "A trivial Gradle build"
下一步
恭喜你!您已经学会了创建一个新的Gradle项目,并学习了如何检查Gradle构建!
您可能想要为特定的平台创建一个库或应用程序,因此这里有一些 使用指南,将教你如何在选择的平台中创建构建:
您也可以在 Github 上获取实例项目。

若有收获,就点个赞吧
0 人点赞
