Docker i
智控-价签系统
集群部署操作说明
(仅供内部和特定客户使用)
2020年07月03日
杭州智控网络有限公司
版权所有 不得复制
前言
编写目的
本文档描述了智控价签系统的集群部署。用于指导相应人员进行系统部署。部署人员有一定的运维基础,且对keepalived和docker有基本的了解。
读者对象
修订记录
| 版本 | 发布日期 | 发布说明 |
|---|---|---|
| 1.0 | 2020-07-03 | 首次发布 |
| 1.1 | 2020-07-19 | 组件安装顺序调整,补充基础环境安装说明 |
| 1.2 | 2020-07-20 | 修改一个命令书写错误 |
| 1.3 | 2020-07-21 | 新增邮件模板说明 提醒主备my.cnf的配置位置 |
| 1.4 | 2020-07-26 | redis配置优化(关闭持久化,增加内存和内存淘汰策略配置) Esl-app,增加jvm参数修改说明 |
| 1.5 | 2020-07-27 | 增加监控脚本部署说明 |
名词解释
| 名称 | 描述 |
|---|---|
| docker | 应用容器引擎 |
| keepalived | 基于vrrp协议的一款高可用软件 |
| MySQL | 关系型数据库 |
| Nginx | 高性能的HTTP和方向代理web服务器 |
| XXL-JOB | 分布式任务调度组件 |
| Redis | 基于key-value结构存储的内存数据库 |
| IoT MQ | 物联网消息服务组件 |
| Fastdfs | 分布式文件系统 |
| ZK-ESL | 智控的价签系统 |
部署架构
安装注意事项
文档中所有提到的配置文件(包括但不限于keepalived.conf, *.sh等),如果有在windows上编辑过,先执行dos2unix转义命令(安装使用见本文档章节Dos2unix安装使用);
文档中所有提到的执行文件(.sh后缀),均需要授予执行权限(linux命令:chmod +x 文件名);
文档中提到的IP、端口、账号、密码、邮箱等,根据实际部署进行设置;
文档中提到的容器名,如esl_tracker_n,其中n代表序号,根据需要设置,如设置为1或者2;
文档中提到的镜像文档、组件安装包等,在软件安装包中提供 (ZK-ESL除外,根据最终版本确定)。
服务器信息
| 部署服务 | 服务器配置 |
|---|---|
| 服务器一:主服务:MySQL、Redis、Nginx 集群结点1:ZK-ESL、IoT MQ、XXL-JOB、FastDFS |
CPU:4 Core;RAM:16G;SSD:500G。 |
| 服务器二:备服务:MySQL、Redis、Nginx 集群结点2:ZK-ESL、IoT MQ、XXL-JOB、FastDFS |
CPU:4 Core;RAM:16G;SSD:500G。 |
基于以上服务器信息进行部署。如新增服务器,再进行适当调整。
组件部署说明
本文档中,以/usr/local/esl为安装根目录,如无特殊说明,esl目录均为/usr/local/esl这个根目录。
Keepalived高可用配置
nginx高可用配置
1.实践环境,配置实现虚IP转移
| 状态 | IP | 角色 |
|---|---|---|
| 节点1 | 192.168.100.231 | Master |
| 节点2 | 192.168.100.232 | Backup |
| VIP | 192.168.100.233 |
2.在master与backup上分别安装keepalived
[root@lb01 ~]# yum install keepalived -y[root@lb02 ~]# yum install keepalived -y[root@lb01 ~]# ifconfig eth0:1 192.168.100.233 netmask 255.255.255.0 up
3.配置节点1,Master,Nginx Web高可用配置
[root@lb01 ~]# cat /etc/keepalived/keepalived.conf
global_defs {
         router_id lb01
}

#1.每5秒执行一次脚本, 脚本执行内容不能超过5秒,否则会被中断再次重新运行脚本
vrrp_script check_web {
   script "/server/scripts/check_web.sh"
   interval 5
}

vrrp_instance VI_1 {
    nopreempt
    state MASTER
    interface eth0
    virtual_router_id 50
    priority 150
    advert_int 1
    authentication {
        auth_type PASS
        auth_pass 1111
    }
    virtual_ipaddress {
        192.168.100.233
    }

    #2.调用并运行该脚本
    track_script {
        check_web
    }
}
4.配置节点2,Backup
[root@lb02 ~]# cat /etc/keepalived/keepalived.conf
global_defs {

    router_id lb02

}


vrrp_instance VI_1 {

    state BACKUP

    interface eth0

    virtual_router_id 50

    priority 100

    advert_int 1

    authentication {

        auth_type PASS

        auth_pass 1111

}

    virtual_ipaddress {

        192.168.100.233

    }

}
[root@lb02 ~]#
5.对比keepalived的master与backup配置的区别
| Keepalived配置区别 | Master配置 | Backup节配置 |
|---|---|---|
| route_id(唯一标识) | lb01 | lb02 |
| state(角色状态) | MASTER | BACKUP |
| priority(优先级) | 150 | 100 |
6.启动Master与Backup节点的keepalived
#lb01
[root@lb01 ~]# systemctl enable keepalived
[root@lb01 ~]# systemctl start keepalived

#lb02
[root@lb02 ~]# systemctl enable keepalived
[root@lb02 ~]# systemctl start keepalived
1.在备上编写检测脚本, 测试如果能ping通主并且备节点还有VIP的话则认为产生了列脑
[root@lb02 ~]# cat check_split_brain.sh
vip=192.168.100.233
master_ip=192.168.100.231

while true;do
    ping -c 2 -W 3 $master_ip &>/dev/null
    if [ $? -eq 0 -a `ip add|grep "$vip"|wc -l` -eq 1 ];then
        echo "ha is split brain.warning."
    else
        echo "ha is ok"
    fi
sleep 5
done
[root@lb02 ~]#
2.如果Nginx宕机, 会导致用户请求失败, 但Keepalived并不会进行切换, 所以需要编写一个脚本检测Nginx的存活状态, 如果不存活则kill nginx和keepalived
[root@lb01 ~]# mkdir /server/scripts
[root@lb01 ~]# vim /server/scripts/check_web.sh
#!/bin/sh
nginxpid=$(ps -C nginx --no-header|wc -l)
#1.判断Nginx是否存活,如果不存活则尝试启动Nginx
if [ $nginxpid -eq 0 ];then
    systemctl start nginx
    sleep 3
    #2.等待3秒后再次获取一次Nginx状态
    nginxpid=$(ps -C nginx --no-header|wc -l)
    #3.再次进行判断, 如Nginx还不存活则停止Keepalived,让地址进行漂移,并退出脚本
    if [ $nginxpid -eq 0 ];then
        systemctl stop keepalived
   fi
fi

#给脚本增加执行权限
[root@lb01 ~]# chmod +x /server/scripts/check_web.sh
3.在lb01主机的keepalived配置文件中调用此脚本
[root@lb01 ~]# cat /etc/keepalived/keepalived.conf
global_defs {
         router_id LVS_01
}

#1.每5秒执行一次脚本, 脚本执行内容不能超过5秒,否则会被中断再次重新运行脚本
vrrp_script check_web {
   script "/server/scripts/check_web.sh"
   interval 5
}

vrrp_instance VI_1 {
    nopreempt
    state MASTER
    interface eth0
    virtual_router_id 50
    priority 150
    advert_int 1
    authentication {
        auth_type PASS
        auth_pass 1111
    }
    virtual_ipaddress {
        192.168.100.233
    }

    #2.调用并运行该脚本
    track_script {
        check_web
    }
}
Nginx 配置
1.master nginx配置
server {
    listen       80;
    #charset koi8-r;


    #access_log  logs/host.access.log  main;
    server_name ops.nginx.com;
    #rewrite ^(.*) http://192.168.100.117/maintenance/ permanent;
        #location ^~ /maintenance/ {root /etc/nginx/html/;index index.html index.htm;}
       # /usr/local/nginx/logs/


        #log_format main '$remote_addr - $remote_user [$time_local] "$request" '
        #'$status $body_bytes_sent "$http_referer" '
        #'"$http_user_agent" "$http_x_forwarded_for"'
        #'$upstream_addr $upstream_response_time $request_time ';

        #access_log logs/access.log main;
        #location / {
        #add_header backendIP $upstream_addr;
        #add_header backendCode $upstream_status;
        #}
    location ^~ /.well-known/acme-challenge/ {
        default_type "text/plain";
        root     /usr/share/nginx/html;
    }

    location = /.well-known/acme-challenge/ {
        return 404;
    }
    location /zk/fonts/ {
                alias /usr/local/esl/myfonts/;
        }

        location ~ .*\.(gif|jpg|jpeg|png|ico|css|js|woff|woff2|ttf)$ {
                root   html/build/dist;
                access_log off;
                gzip_static on;
                expires 7d;
         }

       location / {
                add_header Access-Control-Allow-Origin *;
                add_header Access-Control-Allow-Headers "Origin, X-Requested-With, Content-Type, Accept";
                add_header Access-Control-Allow-Methods "GET, POST, OPTIONS";
        fastcgi_buffers 8 128k;
                        send_timeout 60;
                root   html/build/dist;
                index  index.html index.htm;
                expires 24h;
        }

  location /group1/ {
           proxy_set_header Host $host;
           proxy_set_header X-Real-IP $remote_addr;
           proxy_set_header X-Forwarded-For $proxy_add_x_forwarded_for;
       access_log /var/log/nginx/access.log main;
       error_log /var/log/nginx/error.log error;
           proxy_pass http://localhost:8410;
        }


    location /zk/ {
        # 把 /zk 路径下的请求转发给真正的后端服务器
        rewrite  ^/zk/(.*)$ /$1 break;
        proxy_pass http://localhost:9999;
        fastcgi_buffers 8 128k;
        send_timeout 60;
                client_max_body_size     100m;
    }

        location /lcd/ {
                rewrite  ^/lcd/(.*)$ /$1 break;
                proxy_pass http://localhost:7777;
                fastcgi_buffers 8 128k;
                send_timeout 60;
                client_max_body_size     500m;
        }

    location /font {
          autoindex on;
        root /usr/share/nginx/html;
    }

    #error_page  404              /404.html;

    # redirect server error pages to the static page /50x.html
    #
    error_page   500 502 503 504  /50x.html;
    location = /50x.html {
       root   /usr/share/nginx/html;
    }
}
2.slave nginx配置
server {
    listen       80;

    #charset koi8-r;

    #access_log  logs/host.access.log  main;
    #server_name pre.zkong.com
    #rewrite ^(.*) https://pre.zkong.com$1 permanent;
    location ^~ /.well-known/acme-challenge/ {
        default_type "text/plain";
        root     /usr/share/nginx/html;
    }

    location = /.well-known/acme-challenge/ {
        return 404;
    }

        location /group1/ {
           proxy_set_header Host $host;
           proxy_set_header X-Real-IP $remote_addr;
           proxy_set_header X-Forwarded-For $proxy_add_x_forwarded_for;
       access_log /var/log/nginx/access.log main;
       error_log /var/log/nginx/error.log error;
           proxy_pass http://localhost:22122;
        }


    location / {
        add_header Access-Control-Allow-Origin *;
        add_header Access-Control-Allow-Headers "Origin, X-Requested-With, Content-Type, Accept";
        add_header Access-Control-Allow-Methods "GET, POST, OPTIONS";
    fastcgi_buffers 8 128k;
            send_timeout 60;
        root   /usr/share/nginx/html/build/dist;
        index  index.html index.htm;
    }

    location /zk/ {
        # 把 /zk 路径下的请求转发给真正的后端服务器
        rewrite  ^/zk/(.*)$ /$1 break;
        proxy_pass http://localhost:9999;
        fastcgi_buffers 8 128k;
        send_timeout 60;
    }

    #error_page  404              /404.html;

    # redirect server error pages to the static page /50x.html
    #
    error_page   500 502 503 504  /50x.html;
    location = /50x.html {
       root   /usr/share/nginx/html;
    }
}

[root@lb02 servers]#
EMQTT 配置
[root@ecloud-zone-pre-01 etc]# grep -Ev '^$|#' emqx.conf|head
cluster.name = emqxcl
cluster.discovery = static
cluster.autoheal = on
cluster.autoclean = 5m
cluster.static.seeds = emqx1@192.168.0.107,emqx2@192.168.0.108
node.name = emqx1@192.168.0.107
node.cookie = emqxsecretcookie
node.max_clients = 1024000
node.data_dir = data
node.async_threads = 32
[root@ecloud-zone-pre-01 etc]#


[root@ecloud-zone-pre-02 etc]# grep -Ev '^$|#' emqx.conf|head
cluster.name = emqxcl
cluster.discovery = static
cluster.autoheal = on
cluster.autoclean = 5m
cluster.static.seeds = emqx1@192.168.0.108,emqx2@192.168.0.107
node.name = emqx2@192.168.0.108
node.cookie = emqxsecretcookie
node.max_clients = 1024000
node.data_dir = data
node.async_threads = 32
[root@ecloud-zone-pre-02 etc]#

MySQL双主配置
MySQL配置修改
两台服务器修改服务器uuid 防止uuid唯一

/usr/local/esl/mysql/auto.cnf
01服务器my.cnf配置
binlog_format = row
server-id=1
expire_logs_days=3
character-set-server=utf8
transaction_isolation=READ-COMMITTED
binlog-do-db = demo
binlog-ignore-db = information_schema,mysql
slave-skip-errors = 1062,1053,1146,1213,1264,1205,1396
auto-increment-offset = 1   #初始字段ID为1
slave-skip-errors = all   #忽略所有复制产生的错误
02服务器修改my.cnf配置
binlog_format = row
server-id=2
binlog-do-db = demo
binlog-ignore-db = information_schema,mysql
slave-skip-errors = 1062,1053,1146,1213,1264,1205,1396
expire_logs_days=3
03创建同步用户
master 创建同步用户
grant replication slave on *.* to 'replication'@'slaveip' identified by '1234567';

slave 创建同步用户
grant replication slave on *.* to 'replication'@'masterIP' identified by '1234567';

master操作
change master to master_host='slaveip',master_port=3306,master_user='replication',master_password='1234567',master_log_file='master-bin.000001',master_log_pos=154;
start slave;

slave操作
change master to master_host='masterIP',master_port=3306,master_user='replication',master_password='1234567',master_log_file='master-bin.000001',master_log_pos=154;
start slave;
04 数据同步操作
略
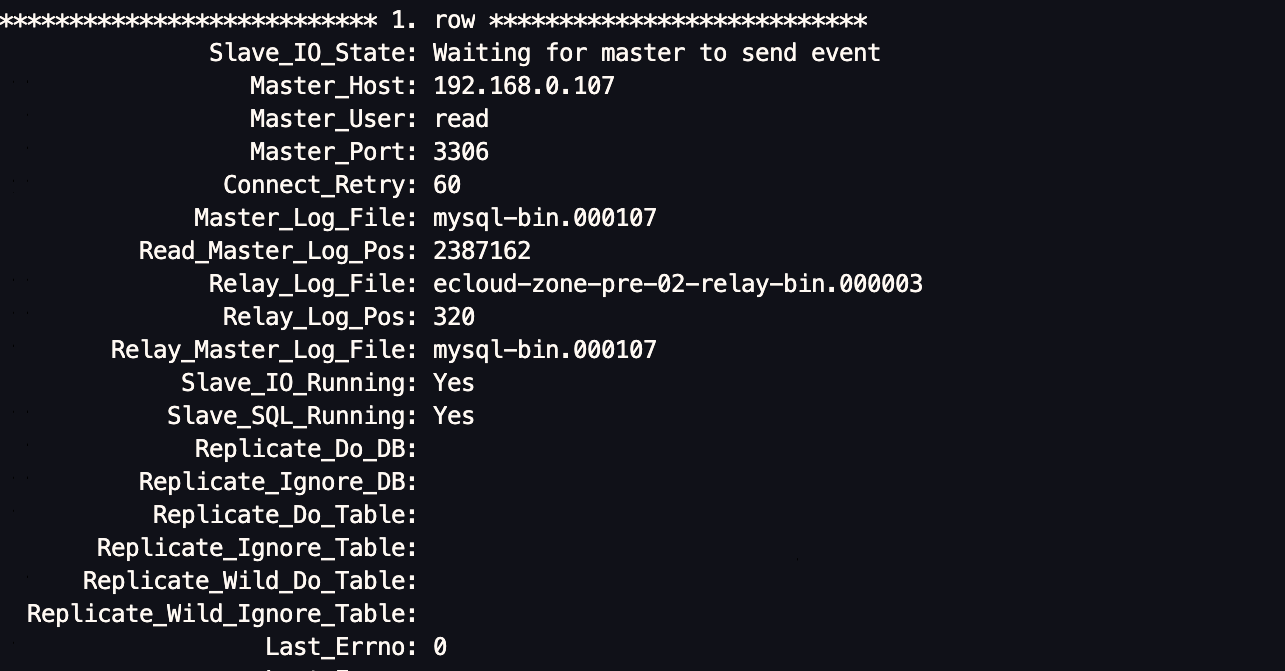
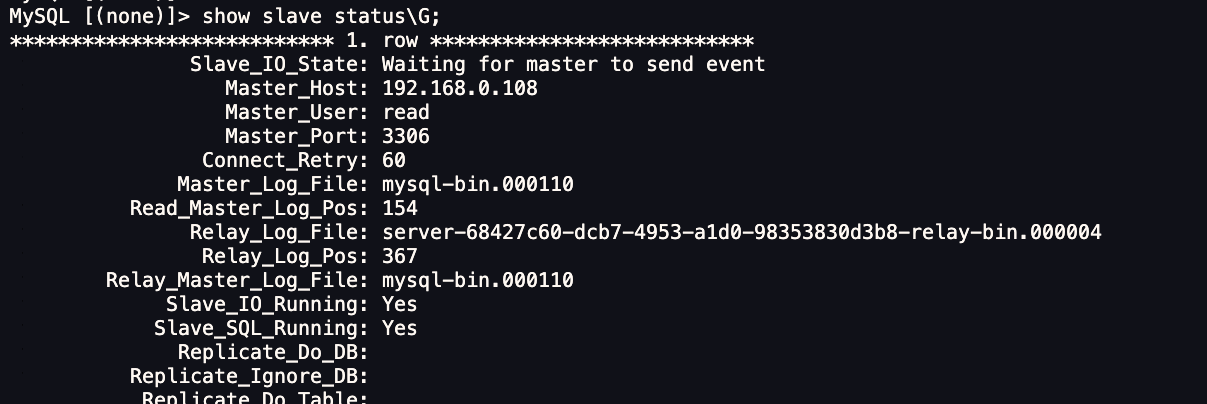
05验证双主状态
FastDFS配置
1.    创建工作目录:
mkdir -p /usr/local/esl/fastdfs/tracker
2.    mkdir -p /usr/local/esl/fastdfs/storage
3.    先在2台服务器启动tracker:
docker run -dti -e TZ="Asia/Tokyo" --network=host --name esl_tracker_1 --restart=always -v /usr/local/esl/fastdfs/tracker/:/export/fastdfs/tracker -e TRACKER_BASE_PATH=/export/fastdfs/tracker -e TRACKER_PORT=8300 gzlj2018/fastdfs:5.11 sh /usr/local/src/tracker.sh
Tip: esl_tracker_n中的n,修改为数字。第一台为1,第二台为2,...;下面esl_storage_n同样处理。ip,修改为机器ip
4.    分别在2台服务器再启动storage:
docker run -dti -e TZ="Asia/Tokyo" --network=host --name esl_storage_1 --restart=always -v /usr/local/esl/fastdfs/storage/:/export/fastdfs/storage -e STORAGE_PORT=8400 -e STORAGE_BASE_PATH=/export/fastdfs/storage -e STORAGE_PATH0=/export/fastdfs/storage -e TRACKER_SERVER=ip_1:8300,ip_2:8300 -e GROUP_COUNT=1 -e HTTP_SERVER_PORT=8410 -e GROUP_NAME=group1 gzlj2018/fastdfs:5.11 sh /usr/local/src/storage.sh
redis主从配置
1.Master keepalived配置
同级目录创建redis_monitor目录

mkdir redis_monitor

[root@ecs-175c-0001 keepalived]# cat keepalived.conf

global_defs {
         router_id ecs-175c-0001
         script_user root
}

vrrp_script mysql_monitor {
    script "/etc/keepalived/redis_monitor/redis_monitor.sh"
    interval 20
}

vrrp_instance VI_1 {
    state MASTER
    interface eth0
    virtual_router_id 50
    priority 150
    advert_int 1
    authentication {
        auth_type PASS
        auth_pass 1111
    }
    virtual_ipaddress {
       192.168.0.102
    }
        notify_master /etc/keepalived/redis_monitor/redis_master.sh
        notify_backup /etc/keepalived/redis_monitor/redis_backup.sh
        notify_fault  /etc/keepalived/redis_monitor/redis_fault.sh
        notify_stop   /etc/keepalived/redis_monitor/redis_stop.sh
}
redis_backup.sh
[root@ecs-175c-0001 redis_monitor]# cat redis_backup.sh
#!/bin/bash

source /etc/keepalived/redis_monitor/redis_env.sh

# 将当前主机修改为slave
CURRENT_MACHINE_TO_SLAVE="$REDIS_CLI_PATH -h $REDIS_CURRENT_MACHINE_IP -p $REDIS_PORT -a $REDIS_PASSWORD slaveof $REDIS_OTHER_MACHINE_IP $REDIS_PORT"

echo -e '\r\n==============' >> $LOG_FILE

echo `date --date=today +"%Y-%m-%d %H:%M:%S"` - [INFO] enter redis_backup.sh >> $LOG_FILE

sleep 8 #延迟15秒待数据被对方同步完成之后再切换主从角色

echo `date --date=today +"%Y-%m-%d %H:%M:%S"` - [INFO] Run SLAVEOF cmd. >> $LOG_FILE

$CURRENT_MACHINE_TO_SLAVE >>$LOG_FILE  2>&1
redis_env.sh
#!/bin/bash
LOG_FILE="/etc/keepalived/redis_monitor/log_redis.log"
# redis_cli路径
REDIS_CLI_PATH="/soft/redis-4.0.14/src/redis-cli"
# redis端口
REDIS_PORT=6379
# redis访问密码
REDIS_PASSWORD=zk123
# 当前机器IP
REDIS_CURRENT_MACHINE_IP=127.0.0.1
# 另外一台机器IP
REDIS_OTHER_MACHINE_IP=192.168.0.96
redis_fault.sh
[root@ecs-175c-0001 redis_monitor]# cat redis_fault.sh
#!/bin/bash

source /etc/keepalived/redis_monitor/redis_env.sh

echo -e '\r\n==============' >> $LOG_FILE
echo `date --date=today +"%Y-%m-%d %H:%M:%S"` - [INFO] enter redis_fault.sh >> $LOG_FILE
redis_master.sh
[root@ecs-175c-0001 redis_monitor]# cat redis_master.sh
#!/bin/bash

source /etc/keepalived/redis_monitor/redis_env.sh

# 将当前主机修改为slave
CURRENT_MACHINE_TO_SLAVE="$REDIS_CLI_PATH -h $REDIS_CURRENT_MACHINE_IP -p $REDIS_PORT -a $REDIS_PASSWORD slaveof $REDIS_OTHER_MACHINE_IP $REDIS_PORT"
# 将当前主机修改为master
CURRENT_MACHINE_TO_MASTER="$REDIS_CLI_PATH -h $REDIS_CURRENT_MACHINE_IP -p $REDIS_PORT -a $REDIS_PASSWORD slaveof no one"

echo -e '\r\n==============' >> $LOG_FILE

echo `date --date=today +"%Y-%m-%d %H:%M:%S"` - [INFO] enter redis_master.sh >> $LOG_FILE

sleep 1

echo "Run SLAVEOF cmd ... will sync data">> $LOG_FILE

$CURRENT_MACHINE_TO_SLAVE >>$LOG_FILE 2>&1
#$REDIS_CLI_PATH -h $REDIS_CURRENT_MACHINE_IP -p $REDIS_PORT -a $REDIS_PASSWORD slaveof $REDIS_OTHER_MACHINE_IP $REDIS_PORT>&1
#$REDIS_CLI_PATH -h $REDIS_CURRENT_MACHINE_IP -p $REDIS_PORT -a $REDIS_PASSWORD slaveof $REDIS_OTHER_MACHINE_IP $REDIS_PORT
if [ $? -ne 0 ];then
    echo `date --date=today +"%Y-%m-%d %H:%M:%S"` - [INFO] data rsync fail. >>$LOG_FILE 2>&1
else
    echo `date --date=today +"%Y-%m-%d %H:%M:%S"` - [INFO] data rsync OK. >> $LOG_FILE  2>&1
fi

sleep 6 #延迟10秒以后待数据同步完成后再取消同步状态

echo `date --date=today +"%Y-%m-%d %H:%M:%S"` - [INFO] Run SLAVEOF NO ONE cmd. >> $LOG_FILE

$CURRENT_MACHINE_TO_MASTER >> $LOG_FILE 2>&1
if [ $? -ne 0 ];then
    echo `date --date=today +"%Y-%m-%d %H:%M:%S"` - [INFO] Run SLAVEOF NO ONE cmd fail. >>$LOG_FILE 2>&1
else
    echo `date --date=today +"%Y-%m-%d %H:%M:%S"` - [INFO] Run SLAVEOF NO ONE cmd OK. >> $LOG_FILE  2>&1
fi
redis_monitor.sh
[root@ecs-175c-0001 redis_monitor]# cat redis_monitor.sh
#!/bin/bash
source /etc/keepalived/redis_monitor/redis_env.sh

echo -e '\r\n==============' >> $LOG_FILE

echo "enter redis_monitor.sh" >> $LOG_FILE
# 检查当前机器是否存活
CURRENT_MACHINE_IS_ALIVE="$REDIS_CLI_PATH -h $REDIS_CURRENT_MACHINE_IP -p $REDIS_PORT -a $REDIS_PASSWORD PING"
$CURRENT_MACHINE_IS_ALIVE>&1 2>&1

if [ "$?" == "0" ]
then
        echo `date --date=today +"%Y-%m-%d %H:%M:%S"` - [INFO] - redis available: success >> $LOG_FILE
        exit 0
else
        echo `date --date=today +"%Y-%m-%d %H:%M:%S"` - [INFO] - master $REDIS_CURRENT_MACHINE_IP redis invaild. >> $LOG_FILE
        exit 1
fi
redis_stop.sh
root@ecs-175c-0001 redis_monitor]# cat redis_stop.sh
#!/bin/bash

source /etc/keepalived/redis_monitor/redis_env.sh

echo -e '\r\n==============' >> $LOG_FILE

echo `date --date=today +"%Y-%m-%d %H:%M:%S"` - [INFO] enter redis_stop.sh >> $LOG_FILE

systemctl start keepalived.service

echo 'start keepalived.service' >> $LOG_FILE
redis配置文件
[root@ecs-175c-0001 conf]# grep -Ev "^$|[#;]" redis.conf
bind 0.0.0.0
protected-mode no
port 6379
tcp-backlog 511
timeout 0
tcp-keepalive 300
daemonize no
supervised no
pidfile /var/run/redis_6379.pid
loglevel notice
logfile ""
databases 16
always-show-logo yes
save ""
stop-writes-on-bgsave-error yes
rdbcompression yes
rdbchecksum yes
dbfilename dump.rdb
dir ./
masterauth zk123
slave-serve-stale-data yes
slave-read-only yes
repl-diskless-sync no
repl-diskless-sync-delay 5
repl-disable-tcp-nodelay no
slave-priority 100
requirepass "zk123"
lazyfree-lazy-eviction no
lazyfree-lazy-expire no
lazyfree-lazy-server-del no
slave-lazy-flush no
appendonly no
appendfilename "appendonly.aof"
appendfsync everysec
no-appendfsync-on-rewrite no
auto-aof-rewrite-percentage 100
auto-aof-rewrite-min-size 64mb
aof-load-truncated yes
aof-use-rdb-preamble no
lua-time-limit 5000
slowlog-log-slower-than 10000
slowlog-max-len 128
latency-monitor-threshold 0
notify-keyspace-events ""
hash-max-ziplist-entries 512
hash-max-ziplist-value 64
list-max-ziplist-size -2
list-compress-depth 0
set-max-intset-entries 512
zset-max-ziplist-entries 128
zset-max-ziplist-value 64
hll-sparse-max-bytes 3000
activerehashing yes
client-output-buffer-limit normal 0 0 0
client-output-buffer-limit slave 256mb 64mb 60
client-output-buffer-limit pubsub 32mb 8mb 60
hz 10
aof-rewrite-incremental-fsync yes
2. slave keepalived配置
global_defs {
         router_id ecs-175c-0002
         script_user root
}

vrrp_script mysql_monitor {
    script "/etc/keepalived/redis_monitor/redis_monitor.sh"
    interval 20
}
vrrp_instance VI_redis_81 {
    state BACKUP
    interface eth0
    virtual_router_id 50
    priority 100
    advert_int 1
    authentication {
        auth_type PASS
        auth_pass 1111
    }
    virtual_ipaddress {
         192.168.0.102
    }
        notify_master /etc/keepalived/redis_monitor/redis_master.sh
        notify_backup /etc/keepalived/redis_monitor/redis_backup.sh
        notify_fault  /etc/keepalived/redis_monitor/redis_fault.sh
        notify_stop   /etc/keepalived/redis_monitor/redis_stop.sh
}
脚本复用master脚本文件即可 修改redis_env.sh中服务器IP
Master Redis 配置文件
[root@ecs-175c-0002 conf]# grep -Ev "^$|[#;]" redis.conf
bind 0.0.0.0
masterauth zk123
Slave Redis配置文件
slaveof 192.168.0.107 6379
masterauth zk123
主从Docker-compose 挂载监控配置
  redis:
    image: esl/redis:4.0.14
    volumes:
      - ./redis/data:/data
      - ./redis/conf/redis.conf:/etc/redis/redis.conf
      - /etc/localtime:/etc/localtime
      - /etc/keepalived/redis_monitor:/etc/keepalived/redis_monitor
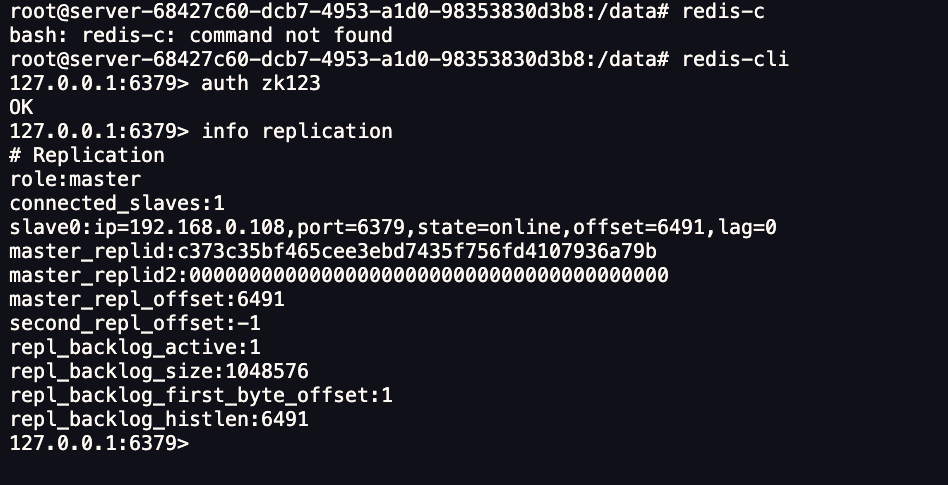
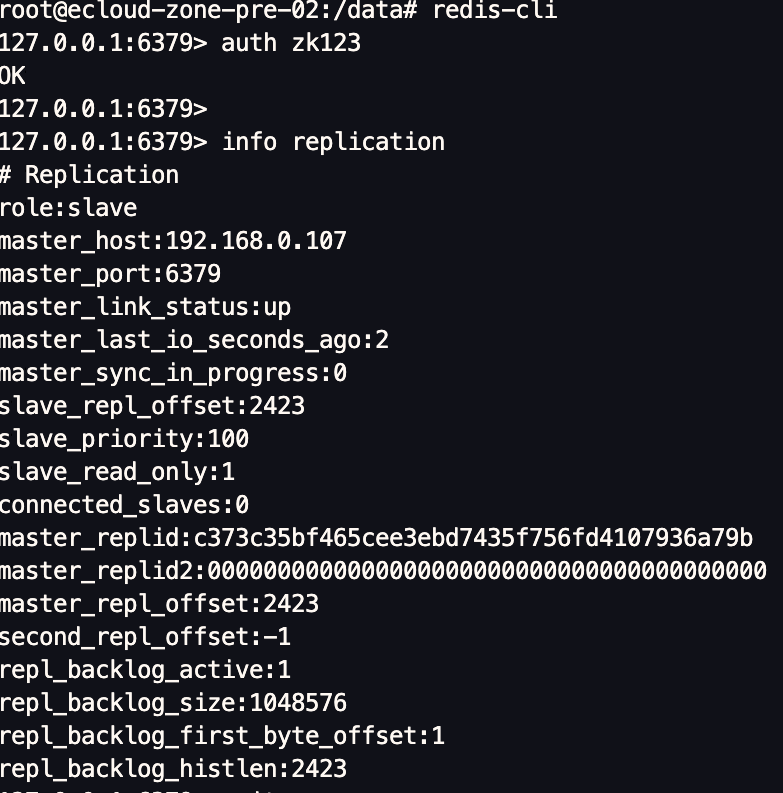
查看主从状态
验证主从切换
略
new:经验证公有云环境不支持原生keepalived VIP 需要自行申请虚拟IP

若有收获,就点个赞吧
0 人点赞
