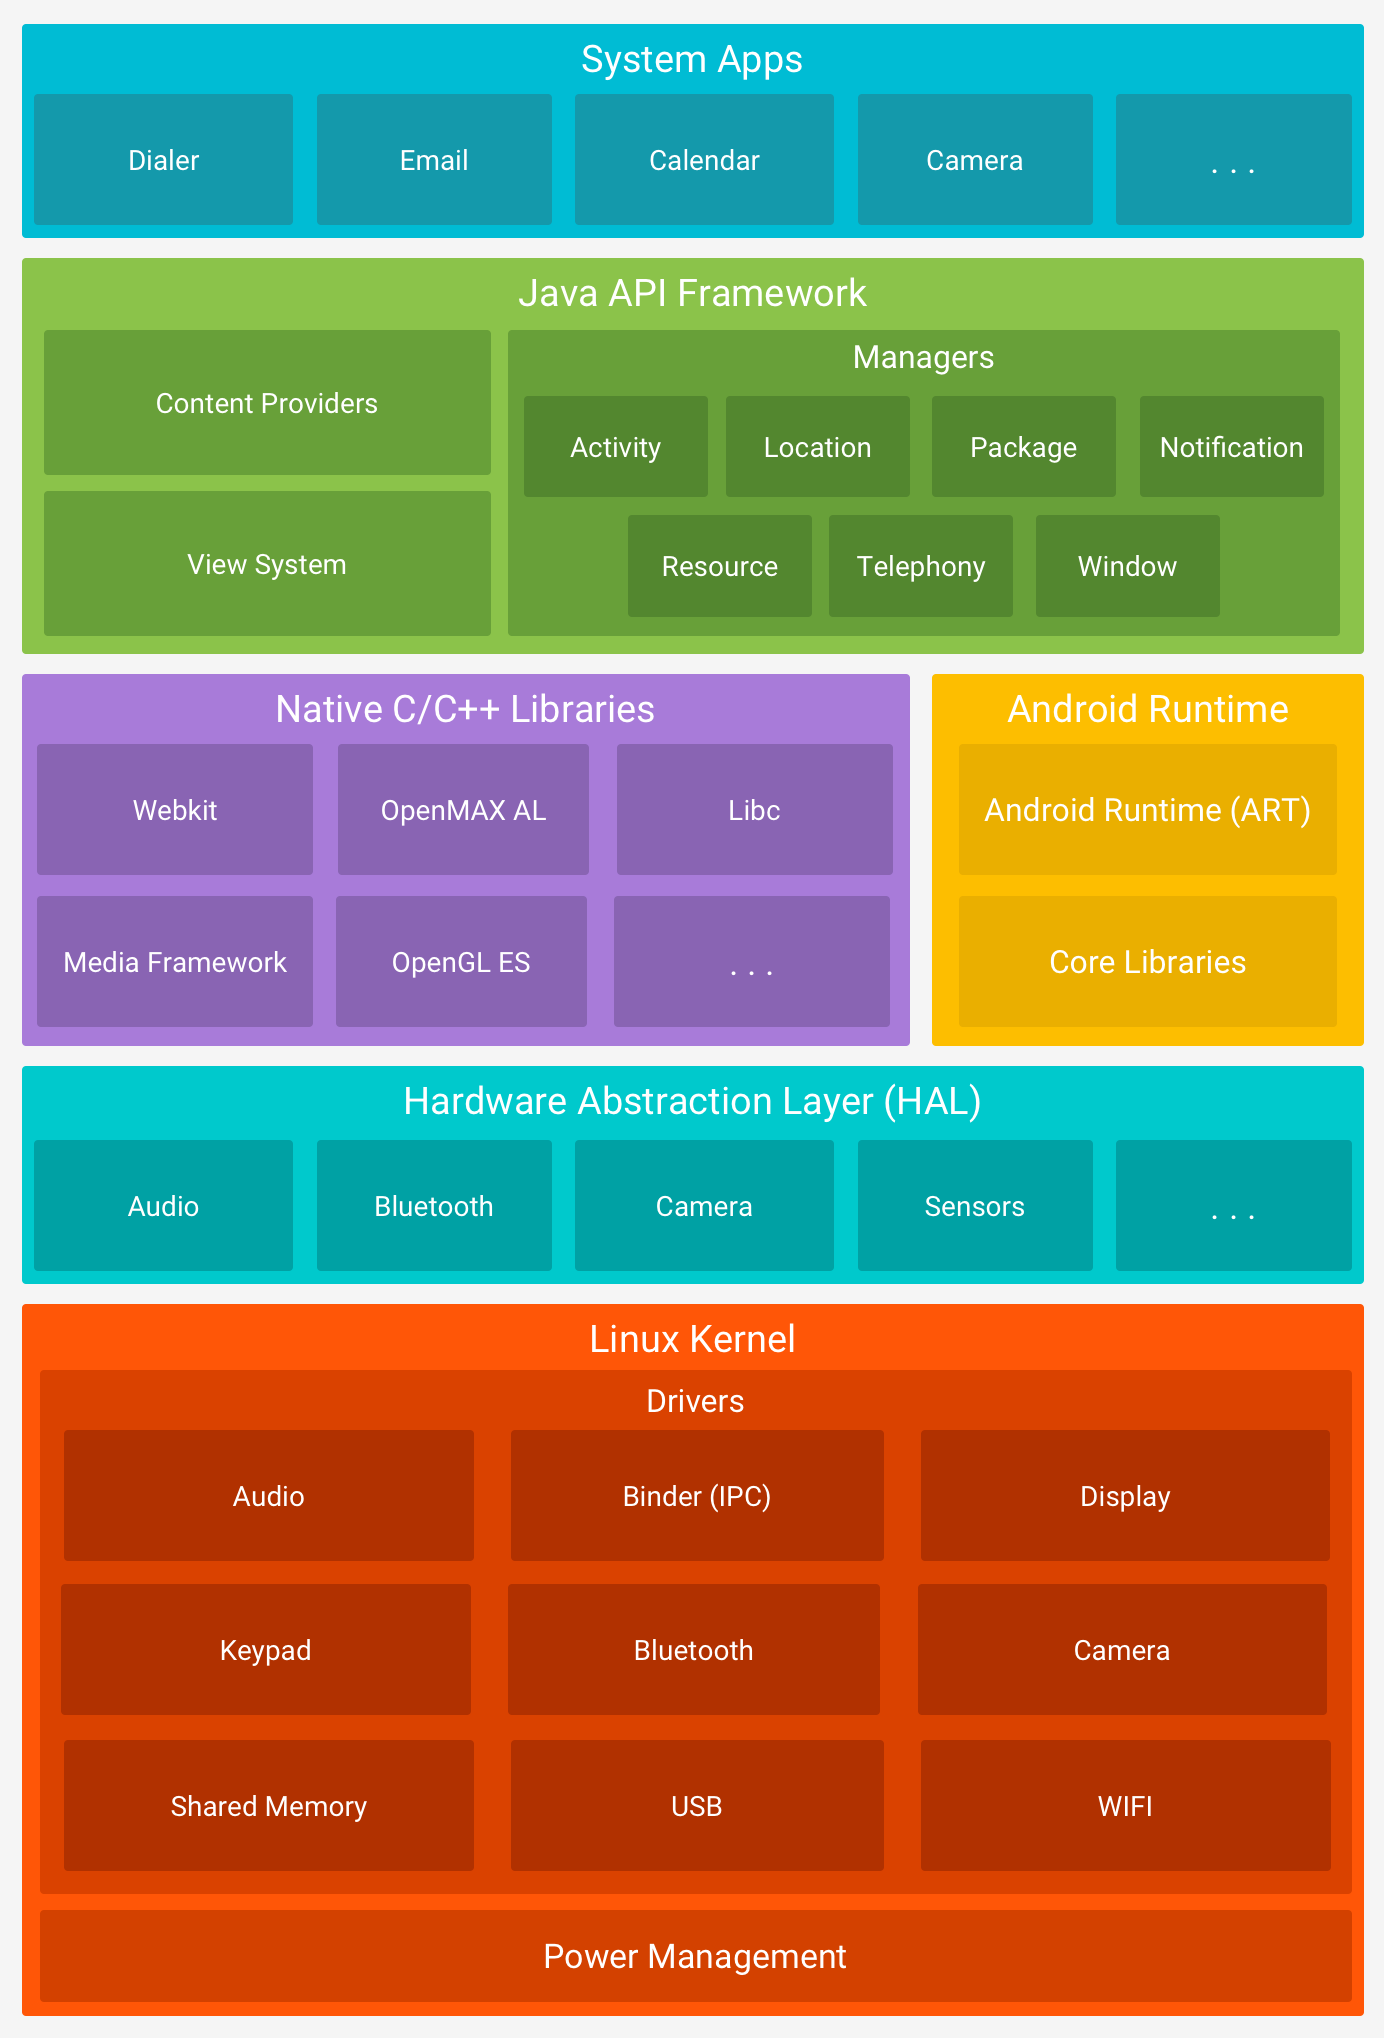
- 安卓系统架构
- 安卓项目层次分析
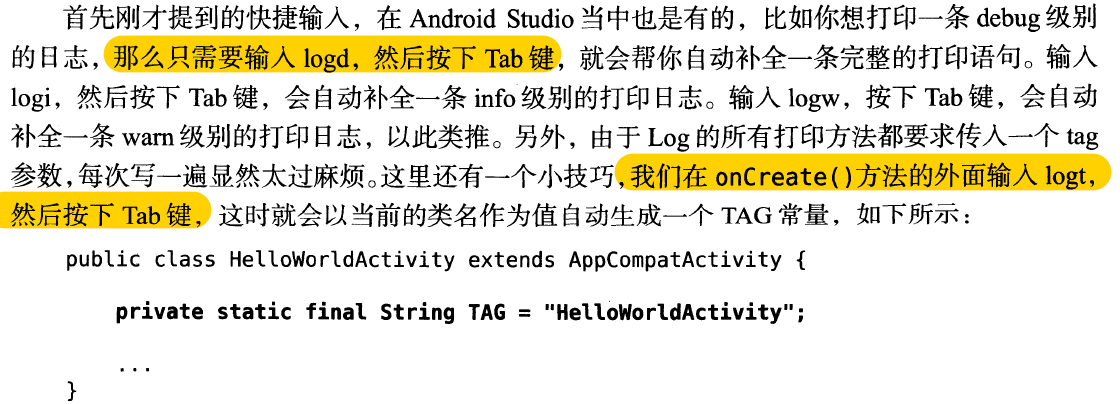
- 掌握日志工具的使用
- 活动Activity
- UI开发
- 手机平板也要兼顾——探究碎片
- 详解广播机制
- 数据存储全方案
- 跨程序共享数据-探究内容提供器
- 手机多媒体
- 使用网络技术
- 后台默默的劳动者——探究服务
- 基于位置的服务
- materialDesign实战
- 开发酷欧天气
安卓系统架构
安卓项目层次分析
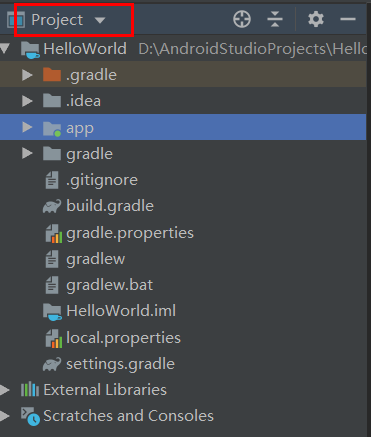
任何一个新建项目都会默认使用Android模式的项目结构,但并不是项目真实的目录结构。可以将其变换成Project模式,这就是项目真实的目录结构。
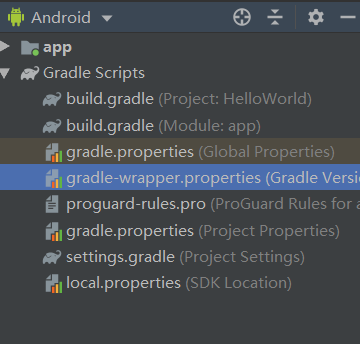
来自Gemini的解析:Android Studio中不同目录(文件)的位置和用途
| 文件(夹)名 | 用途 |
|---|---|
| .gradle | Gradle编译系统,版本由wrapper指定 |
| .idea | Android Studio IDE所需要的文件 |
| build | 代码编译后生成的文件存放的位置 |
| gradle | wrapper的jar和配置文件所在的位置 |
| .gitignore | git使用的ignore文件 |
| build.gradle | gradle编译的相关配置文件(相当于Makefile) |
| gradle.properties | gradle相关的全局属性设置 |
| gradlew | *nix下的gradle wrapper可执行文件 |
| graldew.bat | windows下的gradle wrapper可执行文件 |
| local.properties | 本地属性设置(key设置,android sdk位置等属性),这个文件是不推荐上传到VCS中去的 |
| settings.gradle | 和设置相关的gradle脚本 |
这是app模块下的文件目录结构,介绍下他们的用途
| 文件(夹)名 | 用途 |
|---|---|
| build | 编译后的文件存在的位置(包括最终生成的apk也在这里面) |
| libs | 依赖的库所在的位置(jar和aar) |
| src | 源代码所在的目录 |
| src/main | 主要代码所在位置(src/androidTest)就是测试代码所在位置了 |
| src/main/assets | android中附带的一些文件 |
| src/main/java | 最最重要的,我们的java代码所在的位置 |
| src/main/jniLibs | jni的一些动态库所在的默认位置(.so文件) |
| src/main/res | android资源文件所在位置 |
| src/main/AndroidManifest.xml | AndroidManifest不用介绍了吧~ |
| build.gradle | 和这个项目有关的gradle配置,相当于这个项目的Makefile,一些项目的依赖就写在这里面 |
| proguard.pro | 代码混淆配置文件 |
local.properties
这个文件用于指定本机中的Android SDK路径,通常内容都是自动生成的,我们并不需要修改。除非你本机中的Android SDK位置发生了变化,那么就将这个文件中的路径改成新的位置即可。
AndroidManifest.xml
这是你整个Android项目的配置文件,你在程序中定义的所以四大组件都需要在这个文件里注册,另外还可以在这个文件中给应用程序添加权限声明。
proguard-rules.pro
这个文件用于指定项目代码的混淆规则,当代码开发完成后打成安装包文件,如果不希望代码被别人破解,通常会将代码混淆,从而让破解者难以阅读。
项目中的资源
- 以drawable开头的文件夹都是用来放图片的;
- 以mipmap开头的文件夹都是用来放应用图标的;
- 以values开头的文件夹都是用来放字符串、样式、颜色等配置的;
- layout文件夹是用来放布局文件的;

详解build.gradle文件
掌握日志工具的使用
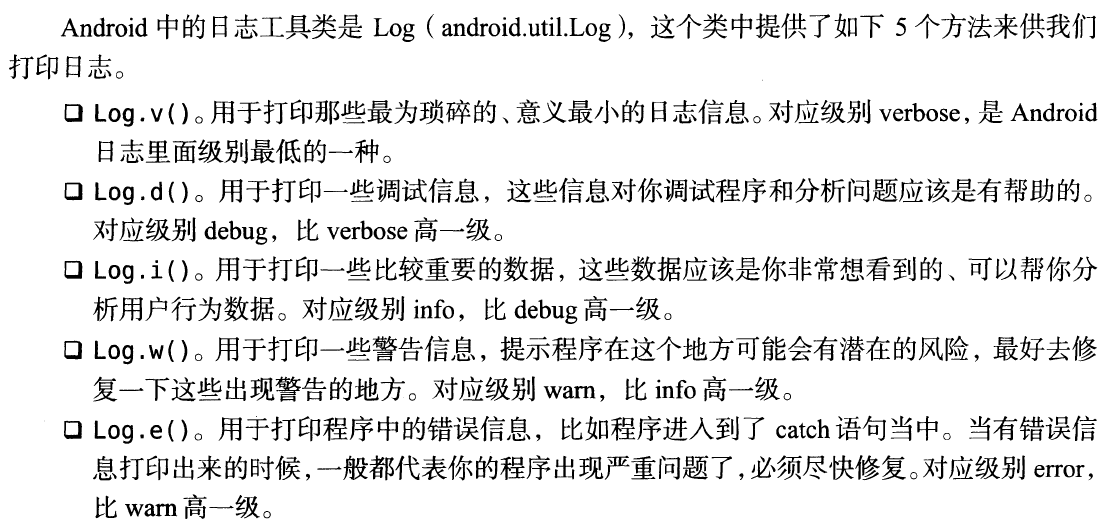
为什么使用log而不是System.out
1、Log是Android提供的打印日志的工具类,可以根据自己需求设置打印级别,设置过滤标签。System.out是Java提供的输出类,相比之下Log甚是方便。
2、Log调的是native层C语言(具体看android_util_Log.cpp),而System.out是Java语言,我们知道C的执行效率要比Java高,我们Android开发对效率更是看重,所以建议尽量要使用Log。
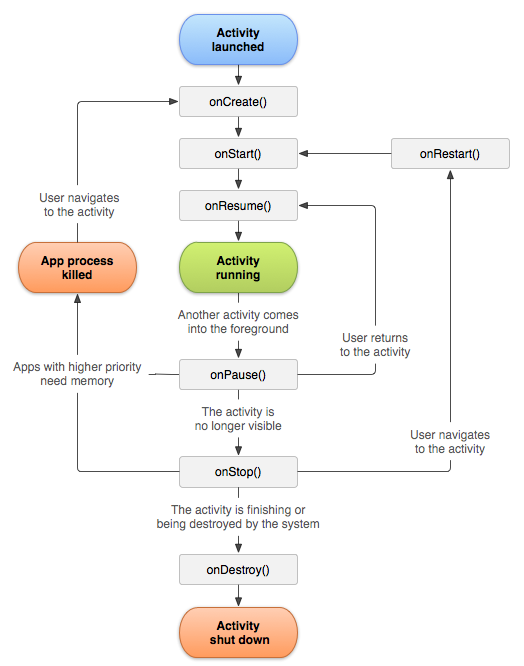
活动Activity
什么是活动
Activity 是一个应用组件,用户可与其提供的屏幕进行交互,以执行拨打电话、拍摄照片、发送电子邮件或查看地图等操作。 每个 Activity 都会获得一个用于绘制其用户界面的窗口。窗口通常会充满屏幕,但也可小于屏幕并浮动在其他窗口之上。
一个应用通常由多个彼此松散联系的 Activity 组成。 一般会指定应用中的某个 Activity 为“主”Activity,即首次启动应用时呈现给用户的那个 Activity。 而且每个 Activity 均可启动另一个 Activity,以便执行不同的操作。 每次新 Activity 启动时,前一 Activity 便会停止,但系统会在堆栈(“返回栈”)中保留该 Activity。 当新 Activity 启动时,系统会将其推送到返回栈上,并取得用户焦点。 返回栈遵循基本的“后进先出”堆栈机制,因此,当用户完成当前 Activity 并按“返回”按钮时,系统会从堆栈中将其弹出(并销毁),然后恢复前一 Activity。 (任务和返回栈文档中对返回栈有更详细的阐述。)
活动生命周期
活动的启动模式
活动的最佳实践
UI开发
常用控件
ProgressDialog
This class was deprecated in API level 26.
ProgressDialogis a modal dialog, which prevents the user from interacting with the app. Instead of using this class, you should use a progress indicator like[ProgressBar](https://developer.android.com/reference/android/widget/ProgressBar.html), which can be embedded in your app’s UI. Alternatively, you can use a notification to inform the user of the task’s progress.
详解四大布局
创建自定义控件
引入布局
创建自定义控件
ListView
什么是ArrayAdapter
RecyclerView
手机平板也要兼顾——探究碎片
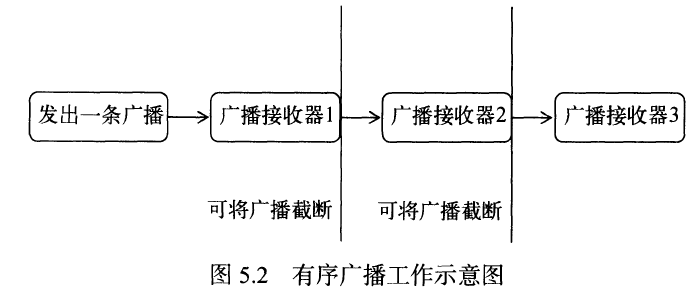
详解广播机制
简介
广播接收器 Broadcast Receiver
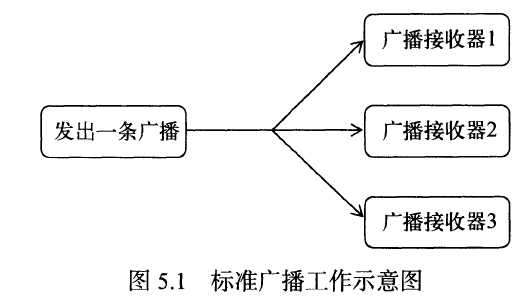
接收系统广播
通过监听系统广播来得到各种系统的状态信息。
广播接收器更常见的用途只是作为通向其他组件的通道,旨在执行极少量的工作。
动态注册监听网络变化


权限声明

静态注册实现开机启动


监听系统开机广播需要声明权限

广播使用注意事项

发送自定义广播
发送标准广播
发送有序广播
Android8.0中将静态注册改为动态注册(自定义标准广播)
原文链接
链接2
原因:Android8.0在AndroidManifest.xml文件中静态注册广播接收失效是由于官方对耗电量的优化,避免APP滥用广播的一种处理方式。除了少部分的广播仍支持静态注册(如开机广播),其余的都会出现失效的情况。
对广播的限制具体可以查看一下Android 8.0 API 介绍 https://developer.android.google.cn/about/versions/oreo/background
解决方案:
改成动态注册(在Android8.0以及以后,都建议采用这种注册方式)
如果动态广播不能满足你的需求,必须要使用静态广播的话,那么就得在 Intent 中设置参数 Component参数,然后其他注册广播的步骤和原来在 Android 6.0 系统以下注册的方法一样。
举个栗子:
假如我有两个应用 A 和 B,A 应用的包名为:com.chen.testbroadcast1, 然后 B 应用的包名为:com.chen.testbroadcast2 ,现在要求是: A 应用向 B 应用发送广播,那么在 B 中 注册静态广播接收广播,接收的广播的路径是com.chen.testbroadcast2.broadcast.MyBroadCastReciver,接收的广播的 action 为 com.chen.broadcastrevicer ,那么具体的用法如下:
在应用 A 中发送广播:
Intent intent = new Intent("com.chen.broadcastrevicer");intent.setComponent(new ComponentName("com.chen.testbroadcast2","com.chen.testbroadcast2.broadcast.MyBroadCastReciver"));// 携带数据intent.putExtra("test","我是来测 A 应用的Android 8.0 系统静态广播的测试数据");// 启动发送广播sendBroadcast(intent);
new ComponentName(参数1,参数2)详解:
参数1:广播接收器应用的包名,如此例子的 B 应用的包名:com.chen.testbroadcast2
参数2:广播接收器所在的完整路径,如此例子的 B 应用的广播接收器:com.chen.testbroadcast2.broadcast.MyBroadCastReciver
在应用 B 中接收 A 中发送过来的广播:
public class MyBroadCastReciver extends BroadcastReceiver {@Overridepublic void onReceive(Context context, Intent intent) {String message = intent.getStringExtra("test");Log.i("MyBroadCastReciver"," -- 接收到的消息 -- = "+message);}}
核心思想:将在AndroidManifest.xml中注册的部分移到MainActivity.java中进行注册(记得销毁注册)
另外一个方法
@Overridepublic void onClick(View view) {Intent intent = new Intent("com.example.broadcasttest.MY_BROADCAST");if(Build.VERSION.SDK_INT >= 26) {intent.addFlags(0x01000000);}sendBroadcast(intent);}
使用本地广播


LocalBroadcastManager LocalBroadcastManager已被废弃
This class is deprecated. LocalBroadcastManager is an application-wide event bus and embraces layer violations in your app: any component may listen events from any other. You can replace usage of LocalBroadcastManager with other implementation of observable pattern, depending on your usecase suitable options may be [LiveData](https://developer.android.google.cn/reference/androidx/lifecycle/LiveData.html) or reactive streams.
解决Android开发中LocalBroadcastManager类无法使用的问题
但是这个方法不行。原因是AS3.4推出了AndroidX要取代原来的support库。创建新项目的时候,如果没有勾选“Use androidx. artifacts”,那么导入外部模块不会报错;只有勾选了“Use androidx. artifacts”,导入外部模块才会报上面的错。而且一旦勾选了“Use androidx.* artifacts”,后续创建其它项目的时候,该选项会变成默认选中,且为灰显不可取消,只有卸载重装AS才能恢复该选项。
详细请看Android Studio 3.4升级后的运行问题解决办法
数据存储全方案

文件存储

使用LitePal操作数据库
在LitePal 3.0中,DataSupport已经被弃用,改用LitePalSupport 。将实体类的继承结构更改为LitePalSupport之后,得到的一个隐形好处就是所有的实例CRUD方法都会自动升级到2.0.0版本了,如save()方法,update()方法,delete()方法等等。因此,我们原来存储一条数据该怎么写,现在就还怎么写。
接下来第二步需要升级的是静态CRUD方法。现在,所有的静态CRUD方法都被移动到了LitePal类当中,因此我们只需要将DataSupport修改为LitePal即可,其他的用法都是完全不变的。没错,升级过程就是这么简单。总结一下其实主要就只有两点,如果你是在继承结构中使用了DataSupport,那么就将它改为LitePalSupport,如果你是调用了DataSupport中的静态方法,那么就将它改为LitePal。
不过最后还有一件事需要注意,如果你的项目代码启用了混淆,那么混淆的配置也需要进行相应的修改才行,原来的混淆配置如下所示:
class org.litepal.** {*;}class * extends org.litepal.crud.DataSupport {*;}
而由于DataSupport类已经被废弃了,因此这里也需要将混淆文件中的DataSupport改成LitePalSupport才行,如下所示:
class org.litepal.** {*;}class * extends org.litepal.crud.LitePalSupport{*;}
最新使用方法参考githubLitePal
另外博客参考安卓项目实战之:数据库框架 LitePal 3.0 的使用详解
Android数据库高手秘籍(九),赶快使用LitePal 2.0版本吧
最好的5个Android ORM框架
注意
不管实体类中有没有id这个属性,都会默认创建一个为整型的id字段,作为自增的主键
如果实体类中有一个字段名为id,那么类型只能为int或者long
id字段的值始终为当前记录的行号(下标从1开始),即使我们在实体类中定义了int或者long类型的id字段,在添加数据时人为的设置id的值为100,等其他值,查询数据库发现该id字段的值设置是无效的,她始终等于该条记录所在的行id,即第几条记录。**
跨程序共享数据-探究内容提供器
手机多媒体
使用通知
NotificationCompat.Builder (Context context)
This constructor was **deprecated **in API level 26.1.0.(安卓8.0)
use [NotificationCompat.Builder(Context, String)](https://developer.android.com/reference/android/support/v4/app/NotificationCompat.Builder.html#NotificationCompat.Builder(android.content.Context,%20java.lang.String)) instead. All posted Notifications must specify a NotificationChannel Id.
两个参考网站:
一个是stackoverflow上关于Notification.Bulider()方法改进的回答,链接
一个是Google官方的Android文档,关于更新到API26.0之后的Notification.Builder()的使用方法,谷歌Android官方文档-Notification.Builder()链接
Android - 吃奥利奥系列(1) Notification
NotificationManager manager=(NotificationManager)getSystemService(NOTIFICATION_SERVICE);//高版本需要渠道if(Build.VERSION.SDK_INT >= android.os.Build.VERSION_CODES.O){//只在Android O之上需要渠道,这里的第一个参数要和下面的channelId一样NotificationChannel notificationChannel = new NotificationChannel("1","name",NotificationManager.IMPORTANCE_HIGH);//如果这里用IMPORTANCE_NOENE就需要在系统的设置里面开启渠道,通知才能正常弹出manager.createNotificationChannel(notificationChannel);}//这里的第二个参数要和上面的第一个参数一样Notification notification=new NotificationCompat.Builder(this,"1").setContentTitle("这是一个内容标题").setContentText("这是一个内容文本").setWhen(System.currentTimeMillis()).setSmallIcon(R.mipmap.ic_launcher).setLargeIcon(BitmapFactory.decodeResource(getResources(),R.mipmap.ic_launcher)).build();manager.notify(1,notification);
FileProvider 在 Android N(7.0)上的应用
参考FileProvider 在 Android N 上的应用
一、背景
Android 从 N 开始不允许以 file:// 的方式通过 Intent 在两个 App 之间分享文件,取而代之的是通过 FileProvider 生成 content://Uri 。如果在 Android N 以上的版本继续使用 file:// 的方式分享文件,则系统会直接抛出异常,导致 App 出现 Crash ,同时会报以下错误日志:
FATAL EXCEPTION: mainProcess: com.inthecheesefactory.lab.intent_fileprovider, PID: 28905android.os.FileUriExposedException: file:///storage/emulated/0/.../xxx/xxx.jpg exposed beyond app through ClipData.Item.getUri()at android.os.StrictMode.onFileUriExposed(StrictMode.java:1799)at android.net.Uri.checkFileUriExposed(Uri.java:2346)at android.content.ClipData.prepareToLeaveProcess(ClipData.java:832)
当然如果工程的 targetSDK 小于24,暂时还不会遇到这个问题,一旦升级到24及以上,则会立即出现上述问题,所以提早做好预防很有必要,否则等到线上曝出大量的 bug 就很被动了。
二、关于 FileProvider
官方对于 FileProvider 的解释为:FileProvider 是一个特殊的 ContentProvider 子类,通过 content://Uri 代替 file://Uri 实现不同 App 间的文件安全共享。
当通过包含 Content URI 的 Intent 共享文件时,需要申请临时的读写权限,可以通过 Intent.setFlags() 方法实现。
而 file://Uri 方式需要申请长期有效的文件读写权限,直到这个权限被手动改变为止,这是极其不安全的做法。因此 Android 从 N 版本开始禁止通过 file://Uri 在不同 App 之间共享文件。
三、FileProvider 的使用流程
完成整个文件共享的流程,需要配置以下5点:
- 定义一个 FileProvider
- 指定有效的文件
- 为文件生成有效的 Content URI
- 申请临时的读写权限
- 发送 Content URI 至其他的 App
1. 定义 FileProvider
FileProvider 已经把文件生成 Content URI 的工作帮我们做掉了,因此我们只需要在 AndroidManifest.xml 文件中配置
重要的属性包括以下四个:
- 设置 android:name 为androidx.core.content.FileProvider,这是固定的,不需要手动更改;
- 设置 android:authorities 为 application id + .provider ;
- 设置 android:exported 为 false ,表示 FileProvider 不是公开的;
- 设置 android:grantUriPermissions 为 true 表示允许临时读写文件。
此处需要特别说明的是
- android:authorities 最好是 application id 而不能直接用包名硬编码,因为 Android 系统要求 android:authorities 对于每个 App 而言必须是唯一的。
- 假如 FileProvider 用在 SDK 中,多个 App 都在调用同一个 SDK,而 SDK 中的 android:authorities 为硬编码,那么 App 之间的 authorities 就会出现冲突,会报 Install shows error in console: INSTALL FAILED CONFLICTING PROVIDER 的错误。
- 如果 SDK 的 android:authorities 是 application id,那么 authorities 会和宿主 App 的 application id 保持一致,就不会出现 authorities 冲突的问题。
- 在 Java 代码中调用 getPackageName() 返回的是 application id ,而非 package name ,要验证这一点也很容易,在 build.gradle 文件中定义和包名不同的 application id ,打印代码中 getPackageName() 的返回值,就会发现返回值是 build.gradle 中自定义的 application id ,而非 package name
- 关于 package name 和 application id 的区别可以参考 ApplicationId 与 PackageName 的区别
以下是一个简单的示例:
<manifest>...<application>...<providerandroid:name="androidx.core.content.FileProvider"android:authorities="${applicationId}.provider"android:exported="false"android:grantUriPermissions="true">...</provider>...</application></manifest>
需要说明的是 ${applicationId} 是占位符,Gradle 会替换成我们在 build.gralde 中定义的 applicationId “com.domain.example”,如果 build.gradle 文件中没有定义,那么 application id的默认值是 App 的 package name。
2. 指定有效的文件
A FileProvider can only generate a content URI for files in directories that you specify beforehand. To specify a directory, specify its storage area and path in XML, using child elements of the
FileProvider只能为您预先指定的目录中的文件生成内容URI。要指定目录,请使用元素的子元素以XML格式指定其存储区域和路径<paths>。例如,以下paths元素告诉FileProvider您打算为images/私有文件区域的子目录请求内容URI 。链接
The
在生成 Content URI 之前你还需要提前指定文件目录,通常的做法是在 res 目录下新建一个 xml 文件夹,然后创建一个 xml 文件,在此文件中指定共享文件的路径和名字,示例如下:
<paths xmlns:android="http://schemas.android.com/apk/res/android"><external-path name="my_images" path="images/"/>...</paths>
其中 name 属性和 path 属性必填, name 表示共享文件的名字, path 代表文件路径。
- external-path :Represents files in the root of the external storage area. The root path of this subdirectory is the same as the value returned by
[Environment.getExternalStorageDirectory()](https://developer.android.com/reference/android/os/Environment.html#getExternalStorageDirectory()). - files-path :Represents files in the
files/subdirectory of your app’s internal storage area. This subdirectory is the same as the value returned by[Context.getFilesDir()](https://developer.android.com/reference/android/content/Context.html#getFilesDir()). - cache-path:Represents files in the cache subdirectory of your app’s internal storage area. The root path of this subdirectory is the same as the value returned by
[getCacheDir()](https://developer.android.com/reference/android/content/Context.html#getCacheDir()). :Represents files in the root of your app’s external storage area. The root path of this subdirectory is the same as the value returned by Context#getExternalFilesDir(String) Context.getExternalFilesDir(null).
Represents files in the root of your app’s external cache area. The root path of this subdirectory is the same as the value returned by [Context.getExternalCacheDir()](https://developer.android.com/reference/android/content/Context.html#getExternalCacheDir()).
Represents files in the root of your app’s external media area. The root path of this subdirectory is the same as the value returned by the first result of [Context.getExternalMediaDirs()](https://developer.android.com/reference/android/content/Context.html#getExternalMediaDirs()).
Note: this directory is only available on API 21+ devices.
These child elements all use the same attributes:
name="_name_"
A URI path segment. To enforce security, this value hides the name of the subdirectory you’re sharing. The subdirectory name for this value is contained in the **path** attribute.
path="_path_"
The subdirectory you’re sharing. While the name attribute is a URI path segment, the path value is an actual subdirectory name._ Notice that the value refers to a subdirectory**, not an individual file or files__. _You can’t share a single file by its file name, nor can you specify a subset of files using wildcards.
You must specify a child element of <paths> for each directory that contains files for which you want content URIs. For example, these XML elements specify two directories:
<paths xmlns:android="http://schemas.android.com/apk/res/android"><files-path name="my_images" path="images/"/><files-path name="my_docs" path="docs/"/></paths>
xml 文件创建完成后,还需要在 manifest 文件的
<providerandroid:name="androidx.core.content.FileProvider"android:authorities="${applicationId}.provider"android:exported="false"android:grantUriPermissions="true"><meta-dataandroid:name="android.support.FILE_PROVIDER_PATHS"android:resource="@xml/file_paths" /></provider>
3. 为共享文件生成 Content URI
文件配置完成后还需要生成可以被其他 App 访问的 Content URI,可以直接调用 FileProvider 提供的 getUriForFile(File file) 方法,顾名思义,传入文件名称就可以得到相应的 Content URI 。需要访问该文件的 App 可以通过 ContentResolver.openFileDescriptor 得到一个 ParcelFileDescriptor 对象。
For example, suppose your app is offering files to other apps with a FileProvider that has the authority com.mydomain.fileprovider. To get a content URI for the file default_image.jpg in the images/ subdirectory of your internal storage add the following code:
File imagePath = new File(Context.getFilesDir(), "images");File newFile = new File(imagePath, "default_image.jpg");Uri contentUri = getUriForFile(getContext(), "com.mydomain.fileprovider", newFile);
As a result of the previous snippet, [getUriForFile()](https://developer.android.com/reference/android/support/v4/content/FileProvider.html#getUriForFile(android.content.Context,%20java.lang.String,%20java.io.File)) returns the content URI
content://com.mydomain.fileprovider/``my_images``/default_image.jpg.
my_images隐藏了真实路径。
4. 申请临时读写文件权限
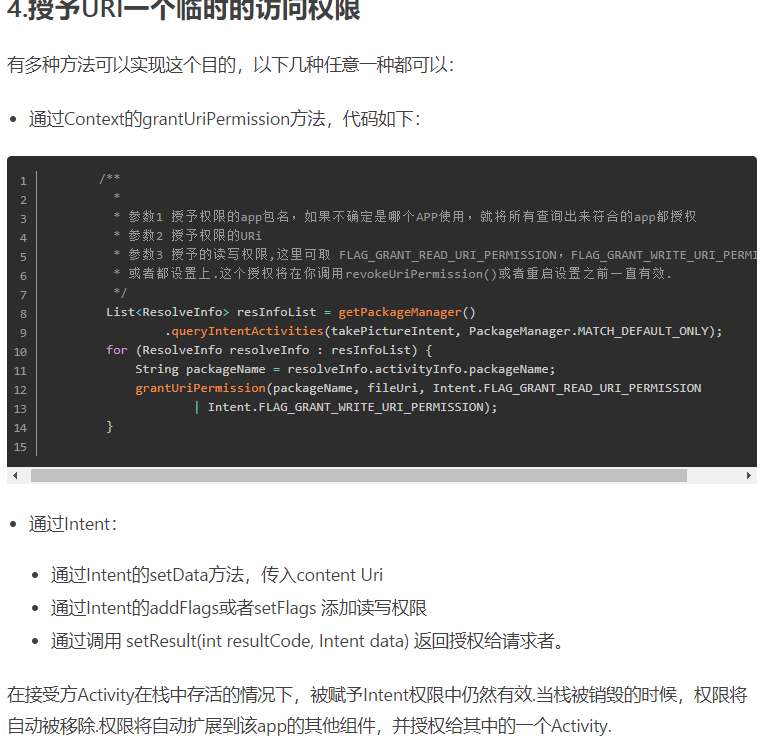
/**** 参数1 授予权限的app包名,如果不确定是哪个APP使用,就将所有查询出来符合的app都授权* 参数2 授予权限的URi* 参数3 授予的读写权限,这里可取 FLAG_GRANT_READ_URI_PERMISSION,FLAG_GRANT_WRITE_URI_PERMISSION,* 或者都设置上.这个授权将在你调用revokeUriPermission()或者重启设置之前一直有效.*/List<ResolveInfo> resInfoList = getPackageManager().queryIntentActivities(takePictureIntent, PackageManager.MATCH_DEFAULT_ONLY);for (ResolveInfo resolveInfo : resInfoList) {String packageName = resolveInfo.activityInfo.packageName;grantUriPermission(packageName, fileUri, Intent.FLAG_GRANT_READ_URI_PERMISSION| Intent.FLAG_GRANT_WRITE_URI_PERMISSION);}
上文已经提到 FileProvider 可以申请临时读写文件权限,以增强安全性,所以 Content URI 生成完成后,还需要申请临时访问权限。
通常直接通过 intent.setFlags 即可完成,具体的权限名称为:Intent.FLAG_GRANT_READ_URI_PERMISSION 和 Intent.FLAG_GRANT_WRITE_URI_PERMISSION。
5. 发送 Content URI 至其他的 App
万事已备,只需要发送出去即可,通常都会使用 startActivityForResult 方法发送,可以在 onActivityResult 中获取其他 App 的处理结果,完成整个操作闭环。
三、实用场景——手机照相
在 Android N 之前的版本调用相机获取图片可以用如下代码实现:
// 设置照片需要存储的位置photoPath = FileUtil.getImageFile().getPath()Intent intent = new Intent();// 指定开启系统相机的Actionintent.setAction(MediaStore.ACTION_IMAGE_CAPTURE);intent.addCategory(Intent.CATEGORY_DEFAULT);// 把文件地址转换成Uri格式Uri uri = Uri.parse("file://" + photoPath);intent.putExtra(MediaStore.EXTRA_OUTPUT, uri);activity.startActivityForResult(intent, requestCode);
如果要想在 Android N 及以上版本上不会出错,则必须将 file:// 形式替换成 content:// ,具体的代码如下:
Intent intent = new Intent();intent.setAction(MediaStore.ACTION_IMAGE_CAPTURE);// 系统版本大于N的统一用FileProvider处理if (Build.VERSION.SDK_INT >= Build.VERSION_CODES.N) {// 将文件转换成content://Uri的形式Uri photoURI = FileProvider.getUriForFile(activity,activity.getPackageName()+ ".provider",new File(photoPath));// 申请临时访问权限intent.setFlags(Intent.FLAG_ACTIVITY_NEW_TASK | Intent.FLAG_GRANT_READ_URI_PERMISSION| Intent.FLAG_GRANT_WRITE_URI_PERMISSION);intent.putExtra(MediaStore.EXTRA_OUTPUT, photoURI);} else {intent.addCategory(Intent.CATEGORY_DEFAULT);Uri uri = Uri.parse("file://" + photoPath);intent.putExtra(MediaStore.EXTRA_OUTPUT, uri);}activity.startActivityForResult(intent, requestCode);
需要注意的是 getPackageName() 返回值是 application id,关于 application id 上文已经解释过,此处不再重复。
实用场景——微信朋友圈多图分享
微信官方不支持朋友圈直接多图分享,Android 之前的版本由于没有强制限制 file:// 的使用,所以可以通过访问微信包名的方式实现朋友圈多图分享,但是Android N 之后这种“曲线救国”的方式就不行了。
先来看一下之前如何通过访问包名实现朋友圈多图分享,代码如下:
Intent intent = new Intent();intent.setComponent(new ComponentName("com.tencent.mm", "com.tencent.mm.ui.tools.ShareToTimeLineUI"));intent.setAction("android.intent.action.SEND_MULTIPLE");// List存储多张图片地址ArrayList<Uri> localArrayList = new ArrayList<>();for (int i = 0, size = localPicsList.size(); i < size; i++) {localArrayList.add(Uri.parse("file:///" + localPicsList.get(i)));}intent.putParcelableArrayListExtra("android.intent.extra.STREAM", localArrayList);intent.setType("image/*");intent.putExtra("Kdescription", desc);context.startActivity(intent);
这种方式可以直接绕过微信官方 SDK 实现多图分享,无需手动选择图片,唯一的问题就是没有分享结果的回调,也就是说无法判断是否分享成功,这在大部分情况下依然是一种可以接受的方案。
但是如果 targetSDK 大于等于24,那么这项功能就无效了,原因就是 Android N 不允许 file://Uri 的方式在不同的 App 间共享文件,但是如果换成 FileProvider 的方式,经试验发现依然是无效的,所以在 Android N 上无法实现朋友圈直接多图分享。
加餐
Android 适配 - FileProvide
<manifest>...<application>...<providerandroid:name="androidx.core.content.FileProvider"android:authorities="${applicationId}.fileProvider"android:exported="false"android:grantUriPermissions="true"><meta-dataandroid:name="android.support.FILE_PROVIDER_PATHS"android:resource="@xml/file_paths" /></provider></appliction></manifest>
上面的写法基本是固定的,很多项都是可以修改,但不建议做,下面只是记录一下。
可修改项 1
android:name="androidx.core.content.FileProvider"复制代码
上面为指定提供服务的 Provider 类。如上是 Android androidx 包提供的类,可以自定义。可以使用ContentProvider提供服务的目标即可。
可修改项 2
android:authorities="${applicationId}.fileProvider"复制代码
唯一字符串即可,上面为一般常用的写法。
可修改项 3
android:name="android.support.FILE_PROVIDER_PATHS"复制代码
是可以修改,但是如果没有自己实现 Provider ,这个值只能是这个。这个字符串是在类 FileProvider 里面定义的。
可修改项 4
android:resource="@xml/file_paths"复制代码
定义了类 FileProvider 使用的配置文件,文件名字不违法命名规范情况下随意。
增加一个特定的ContentProvider,FileProvider,包名androidx.core.content。
FileProvider 适配文件
文件地址 res/xml/file_paths.xml
<!-- 这个定义的根目录是 / --><root-path name="name" path="path" />复制代码
上面各个 -path 的区别是定义的根目录不同。
-path |
根目录 |
|---|---|
| files-path | Context.getFilesDir() |
| cache-path | Context.getCacheDir() |
| external-path | Environment.getExternalStorageDirectory() |
| external-files-path | Context.getExternalFilesDir(null) |
| external-cache-path | Context.getExternalCacheDir() |
| external-media-path | Context.getExternalMediaDirs() |
| root-path | / |
Path 节点里面的 name 属性
唯一不重复
Path 节点里面的 path 属性
文件夹名字,自动包括此文件夹下面的子目录
例子:
<external-path name="pic" path="Pictures" />复制代码
这样定义后,/sdcard/Pictures 里面的所有文件,都可以从自己的App里面发出到其他App中使用。
具体应用
我们 App 涉及到这个地方不多。都是简单的应用。
视频播放
有个功能视频播放使用的系统播放器,同时有视频异步下载。如果下载完成,播放本地视频。会使用这个功能。
核心代码
Uri uri = null;if (Build.VERSION.SDK_INT >= Build.VERSION_CODES.N) {uri = FileProvider.getUriForFile(this, getPackageName() + ".fileProvider", file);} else {uri = Uri.fromFile(file);}// 上面的和图片分享一致。但需要额外增加一行权限代码intent.setFlags(Intent.FLAG_GRANT_READ_URI_PERMISSION);复制代码
总结
相对而言,这个适配是比较简单的。我认为需要注意的有两个点。
- 要全部修改,不能有遗漏。包括代码和配置
- 版本判断
我想把 FileProvider 聊的更透彻一些
既然 FileProvider 本质上就是一个 ContentProvider ,它其实也继承了 ContentProvider 的特性。ContentProvider 其实就是在可控的范围内,向外部其他的 App 分享数据。而 FileProvider 将这样的数据变成了一个 File 文件而已。
在什么场景下需要使用 FileProvider
在 App 间对 file:// 的分享做了严格的校验之后,其实也是出于安全考虑,这就导致了,所有包含 file:// 的URI 的 Intent 离开你的 App ,都受此限制。所以说,只要你的 App 内,通过一个 Intent 传递了一个 file:// 的 Uri ,就需要小心使用了。
在实际开发过程中,使用最多的场景有一下几个:
- 调用相机拍照。
- 剪裁图片。
- 调用系统安装器去安装 Apk。
可以看到 name 属性就是标记当前 FileProvider 的实现类,对于一个 App Module 而言,如果只是自己使用,可以直接使用 v4 包下的 FileProvider ,但是如果是作为一个 Lib Module 来供其他项目使用,最好还是重新空继承一个 FileProvider ,这里填写我们的继承类即可。**
2) 指定可分享的文件路径
在配置 Provider 的时候,还需要额外配置一个 <meta-data/> 标签,它用于配置 FileProvider 支持分享出去的目录。这个 <meta-data/> 标签的 name 值是固定的,resource 需要指向一个 根节点为 paths 的 xml 资源文件。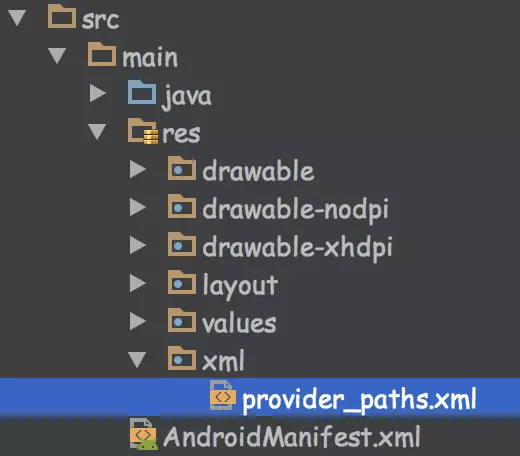
然后就可以对 provider_paths.xml 进行配置。
paths 标签内,必须配置最少一个 xxx-path 标签,上图给出的例子,配置的是 files-path 这些配置的信息,都是可以在官方文档中找到答案的,这里直接以查阅源码的方式来查看他们分别代表的意思。
这些配置,在 FileProvider 的源码内,都是以一个个 TAG_Xxx 标记的。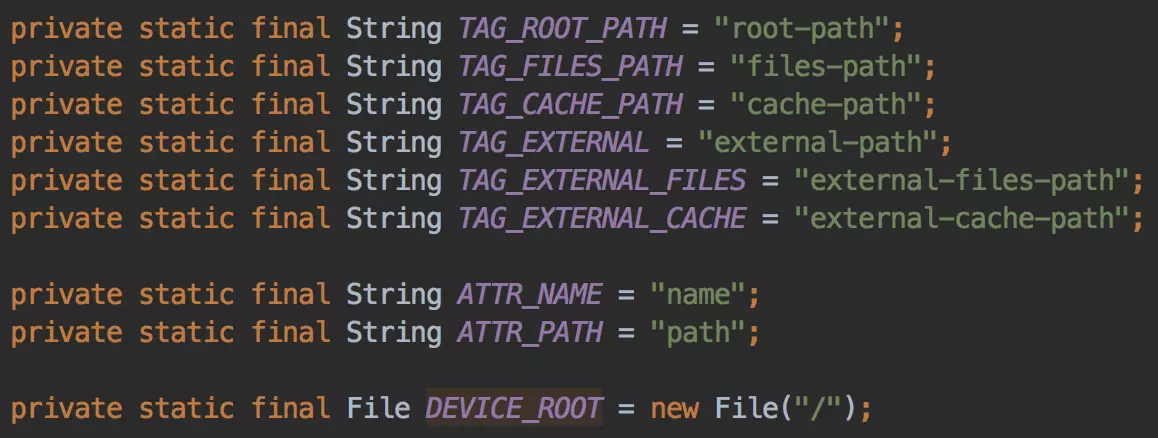
而他们分别代表的目录,也可以在源码内找到答案。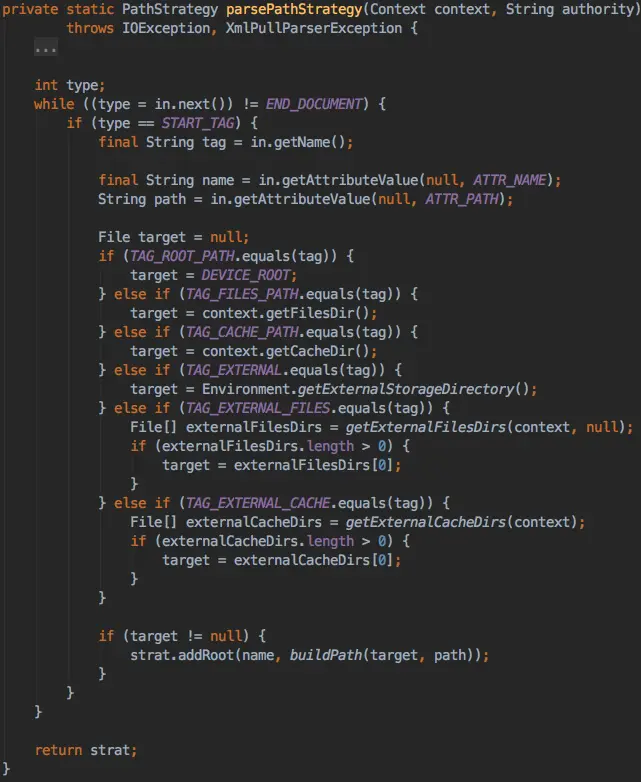
可以看到,不同的标签,代表不同的目录。
- root-path:表示根目录,『/』。
- files-path:表示 content.getFileDir() 获取到的目录。
- cache-path:表示 content.getCacheDir() 获取到的目录
- external-path:表示Environment.getExternalStorageDirectory() 指向的目录。
- external-files-path:表示 ContextCompat.getExternalFilesDirs() 获取到的目录。
- external-cache-path:表示 ContextCompat.getExternalCacheDirs() 获取到的目录。
注意,这里 ContextCompat 只是对 Context 做了一个兼容处理,其实就是对 Api level 19 做了一个分解,分别代表不同的获取方式,以 getExternalFilesDirs() 为例。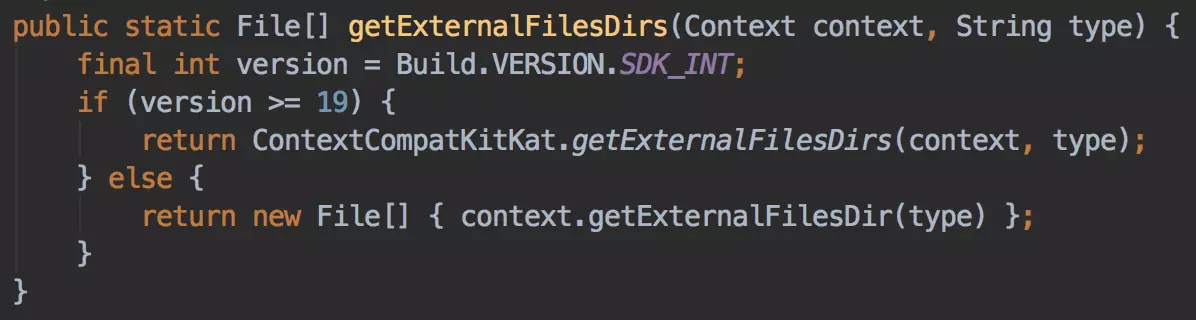
3) 使用 content://
配置工作已经全部完成,后面就需要将之前传递的 file:// 替换成 FileProvider 需要的 content:// ,这就需要用到 FileProvider.getUriForFile() 方法了,以下是它的完整签名。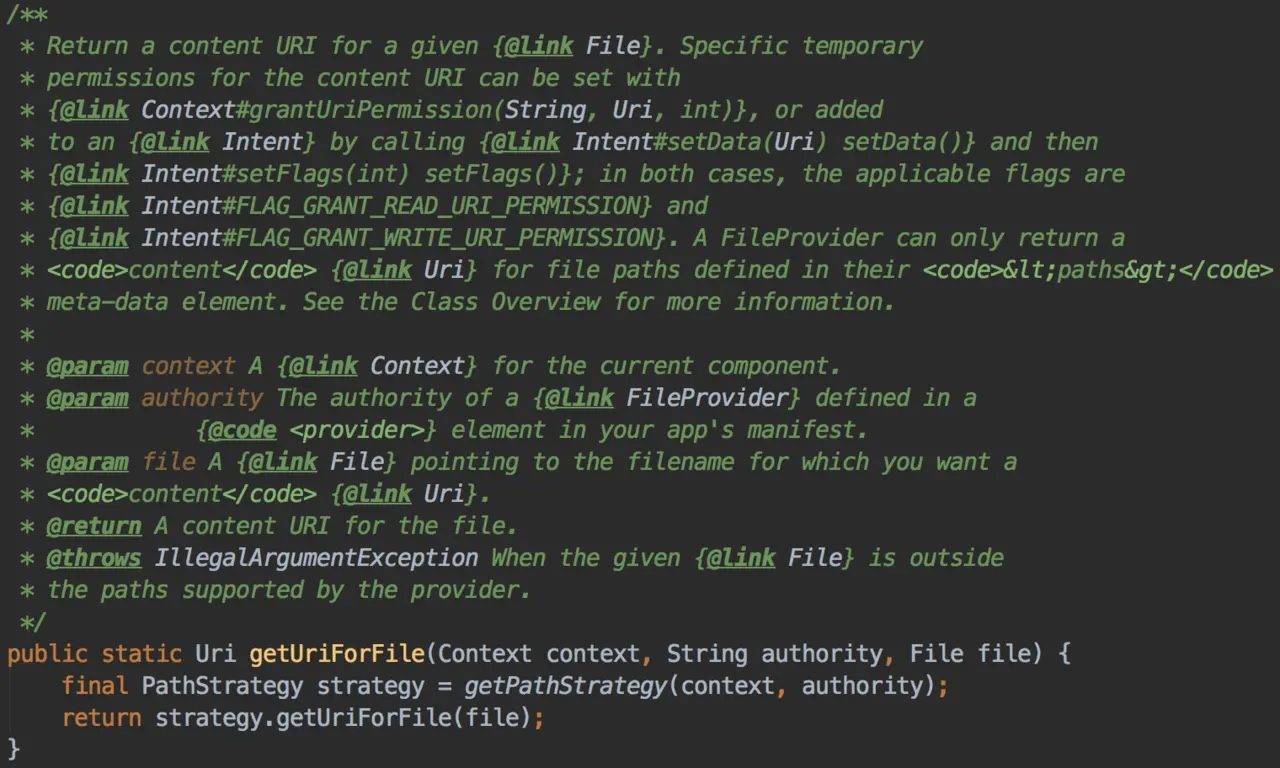
getUriForFile() 方法,需要一个 authority 的参数,这正是前面在 AndroidManifest.xml 中 配置的 android:authorities 。
调用此方法,会自动得到一个 file:// 转换成 content:// 的 一个 Uri 对象,可以供我们直接使用。
4) 授予临时的读写权限
在配置 provider 标签的时候,有一个属性 android:grantUriPermissions="true" ,它表示允许它授予 Uri 临时的权限。
当我们生成出一个 content:// 的 Uri 对象之后,其实也无法对其直接使用,还需要对这个 Uri 接收的 App 赋予对应的权限才可以。
授权类型的常量,被定义在 Intent 类中。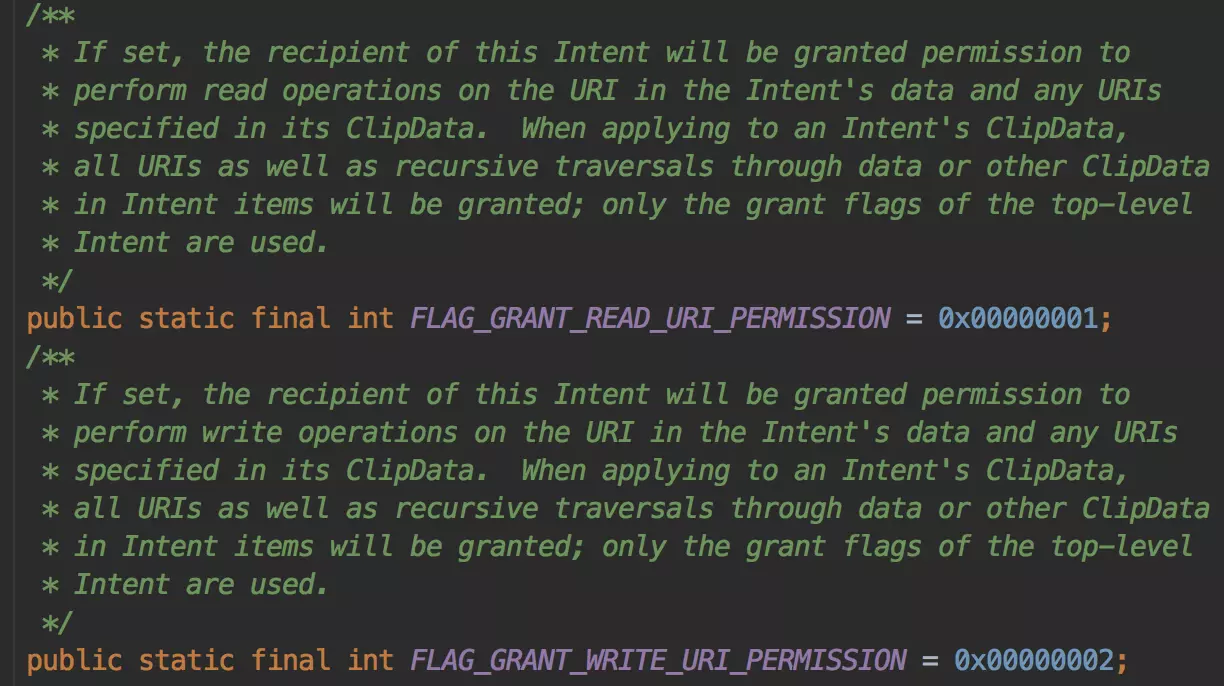
可以看到,直接就是读和写的权限授予。
而这个授权的动作,提供了两种方式来授权:
1、使用 Context.grantUriPermission() 为其他 App 授予 Uri 对象的访问权限。
它的完整签名如下:
grantUriPermission() 方法包含三个参数,这三个参数都非常的好理解。
- toPackage :表示授予权限的 App 的包名。
- uri:授予权限的 content:// 的 Uri。
- modeFlags:前面提到的读写权限。
这种情况下,授权的有效期限,从授权一刻开始,截止于设备重启或者手动调用 Context.revokeUriPermission() 方法,才会收回对此 Uri 的授权。
2、配合 Intent.addFlags() 授权。
既然这是一个 Intent 的 Flag,Intent 也提供了另外一种比较方便的授权方式,那就是使用 Intent.setFlags() 或者 Intent.addFlag 的方式。
这种方式相信大家都比较熟悉,就不细说了。而使用这种形式的授权,权限截止于该 App 所处的堆栈被销毁。也就是说,一旦授权,直到该 App 被完全退出,这段时间内,该 App 享有对此 Uri 指向的文件的对应权限,我们无法再主动收回此权限了。
虽然使用 Intent.addFlags() 的方式,一旦授权将无法主动回收,但是大多数情况下,也是会使用此种方式进行授权,除了操作起来方便之外,既然授权了也无需太担心对方会有破坏的行为。有点切合 用人不疑,疑人不用 的道理。
拥有了授权权限的 content:// 的 Uri 之后,就可以通过 startXxx 或者 setResult() 的方式,将 Uri 传递给其他的 App。
5)举个例子
到这里,基本上关于 FileProvider 的使用,都做了一个详尽的说明,接下来举个简单的例子来看看如何使用它。
调起系统安装器来安装一个 Apk 。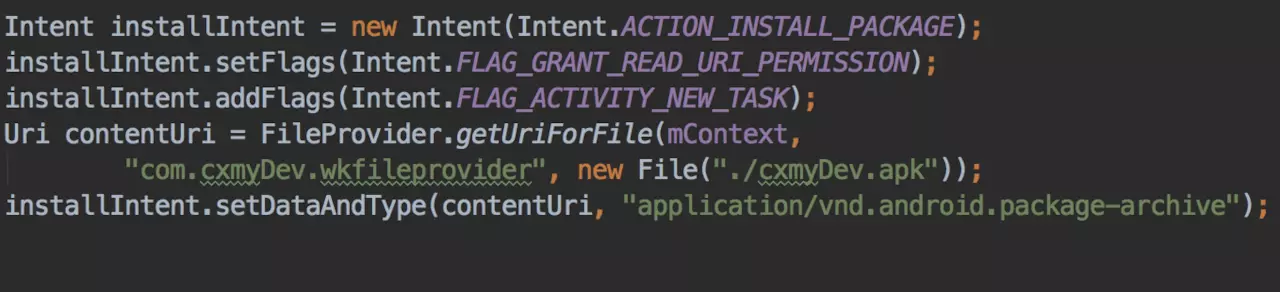
三、FileProvider 的注意事项
1、authorities 的唯一性
在 AndroidManifest.xml 中配置 provider 的时候,需要保证 android:authorities 的值,在整个系统中的唯一性。其实这也很好理解,看了 FileProvider.getUriForFile() 之后,发现它是通过 android:authorities 属性配置的值,来唯一确定由谁来响应这个 provider 的,所以它需要保证在系统内唯一,否者安装的时候会抛出异常。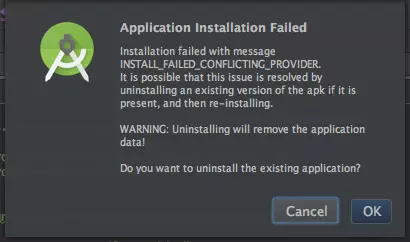
而在常规开发过程中,如果是一个 App Module 在使用 FileProvider 的话,那么只需要我们自己规范不要写同一个 authorities 即可。但是如果是作为一个 Lib Module 发布出去的话,是需要考虑使用者的如何使用的,所以为了友好起见,最好使用 applicationId 来配置 provider 标签。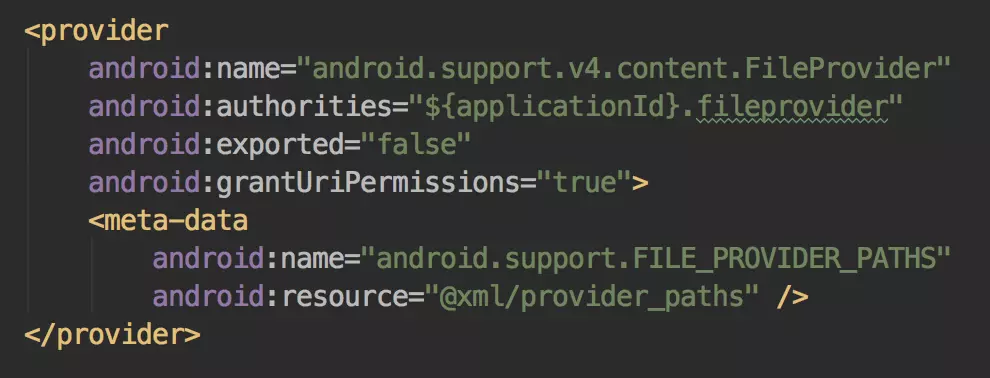
这样配置之后,就会使用 Gradle 中配置的 applicationId 的值替换这里,而使用 FileProvider.getUriForFile() 的时候,只需要根据 applicationId 拼接一个 authorities 值即可,简单修改一下上面调用系统去安装 APK 的例子。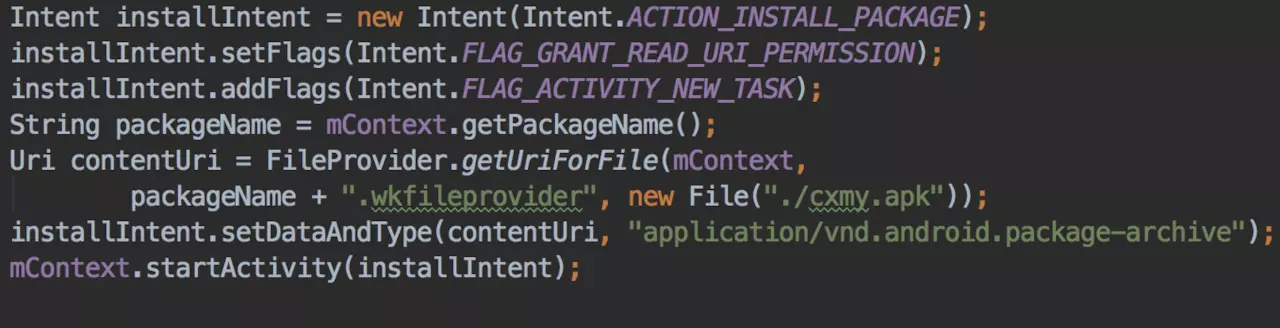
2、Lib 下的 targetSdkVersion
前面提到,如果不将 targatSdkVersion 升级到 24 的话,之前的方式依然是可用的,不会有 FileUriExposedException 的隐患。但是如果你的项目是作为一个 Lib Module 这种 SDK 的形式发布出去,供其他人使用的话,这里的 targetSdkVersion 就不受 Lib 的 targetSdkVersion 控制,而是主项目的 targetSdkVersion。
所以如果是以 SDK 的形式集成到别的 App 内使用的话,如果需要用发送一个 File 给其他 App,一定要适配 FileProvider 。
3、不使用 v4 包
FIleProvider 是存在于的 Support v4 包下,所以想要使用 FileProvider 就必须集成 v4 包。但是对于一个本身无需使用 v4 包的项目来说,为了 FileProvider 来集成 v4 包,无形中就增加了安装包的体积。
但是仔细看 FileProvider ,其实并没有引用到什么更多的 package ,而 FileProvider 本质上也只是一个 ContentProvider ,所以我们只需要将它的代码复制出来,简单修改一下保证可以正确运行,就可以使用,而不是必须继承 v4 包。
四、小结
FileProvider 的核心就是提高安全性,让开发者来限制自己本 App 的文件对外的访问权限,以提高安全性。
所以在开发过程中,只需要配合 FileProvider 将我们可能需要第三方 App 用到的文件目录加入到可授权的范围,然后在发送 Intent 的时候,对其进行授权即可,其他的操作和之前并无变化,这里就不一一列举了。
使用网络技术
webview的用法
使用Http协议访问网络
Android 9.0系统不允许Http协议访问网络突破
参考链接
原因:
Google表示,为保证用户数据和设备的安全,针对下一代 Android 系统(Android P(9.0)) 的应用程序,将要求默认使用加密连接,这意味着 Android P(9.0) 将禁止 App 使用所有未加密的连接,因此运行 Android P(9.0) 系统的安卓设备无论是接收或者发送流量,未来都不能明码传输,需要使用下一代(Transport Layer Security)传输层安全协议,而 Android Nougat 和 Oreo 则不受影响。
因此在Android P(9.0) 使用HttpUrlConnection进行http请求会出现以下异常:
W/System.err: java.io.IOException: Cleartext HTTP traffic to ** not permitted
使用OKHttp请求会出现:
java.net.UnknownServiceException: CLEARTEXT communication ** not permitted by network security policy
意思大概就是:安全策略不允许进行明文通讯
在Android P(9.0)系统的设备上,如果应用使用的是非加密的明文流量的http网络请求,则会导致该应用无法进行网络请求,https则不会受影响,如果应用嵌套了webview,webview也只能使用https请求。无法使用http请求,有人认为 Android P(9.0)上所有的 App 都需要使用 TLS 加密会降低上网体验,个人觉得上这是一种误解,对于一些老旧非要使用http协议的服务器我们可以采取配置APP的联网策略方式进行限制突破
解决方案如下:
一:
在Mainfiests,直接在application标签下配置如下代码
android:required=”false” />
二:
targetSdkVersion 降到27以下
三:(起效)
在 res 下新建一个xml目录,然后创建一个名为:network_config.xml 文件(名字自定),内容如下
<?xml version="1.0" encoding="utf-8"?><network-security-config><base-config cleartextTrafficPermitted="true" /></network-security-config>
在Mainfiests appliction标签下配置该属性
android:networkSecurityConfig="@xml/network_config"
即可解决,9.0系统不允许Http协议访问网络的限制。
解析XML格式数据
Android模拟器连接服务器的地址为10.0.2.2:8080
参考链接
在一般的Java Web程序开发中,我们通常使用localhost或者127.0.0.1来访问本机的Web服务,但是如果我们在Android模拟器中也采用同样的地址来访问,Android模拟器将无法正常访问到我们的服务,这是为什么呢?我们可以这样来理解:Android的底层是Linux kernel,包括Android本身就是一个操作系统,因此,这时我们在模拟器的浏览器中输入的localhost或127.0.0.1所代表的是Android模拟器(Android虚拟机),而不是你的电脑,明白了吗?这就是为什么你在模拟器中使用localhost时会报“Web page not available”的原因。
那到底要如何才能访问到本地电脑上的Web应用呢?在Android中,默认将我们本地电脑的地址映射为10.0.2.2,因此,只需要将原先的localhost或者127.0.0.1换成10.0.2.2,就可以在模拟器上访问本地计算机上的Web资源了。(如果是自定义端口,要加上端口号)
后台默默的劳动者——探究服务
服务的更多技巧
使用前台服务
Android在8.0限制了后台服务这些,启动后台服务需要设置通知栏,使服务变成前台服务。但是在9.0上,就会出现Permission Denial: startForeground requires android.permission.FOREGROUND_SERVICE。
解决办法是在AndroidManifest中添加
<!--android 9.0上使用前台服务,需要添加权限--><uses-permission android:name="android.permission.FOREGROUND_SERVICE" />
Android App兼容8.0和9.0
基于位置的服务
使用百度定位
定位问题分析
获取定位返回错误码::public int getLocType ( )返回值:61 : GPS定位结果,GPS定位成功。62 : 无法获取有效定位依据,定位失败,请检查运营商网络或者WiFi网络是否正常开启,尝试重新请求定位。63 : 网络异常,没有成功向服务器发起请求,请确认当前测试手机网络是否通畅,尝试重新请求定位。65 : 定位缓存的结果。66 : 离线定位结果。通过requestOfflineLocaiton调用时对应的返回结果。67 : 离线定位失败。通过requestOfflineLocaiton调用时对应的返回结果。68 : 网络连接失败时,查找本地离线定位时对应的返回结果。161: 网络定位结果,网络定位成功。162: 请求串密文解析失败,一般是由于客户端SO文件加载失败造成,请严格参照开发指南或demo开发,放入对应SO文件。167: 服务端定位失败,请您检查是否禁用获取位置信息权限,尝试重新请求定位。502: AK参数错误,请按照说明文档重新申请AK。505:AK不存在或者非法,请按照说明文档重新申请AK。601: AK服务被开发者自己禁用,请按照说明文档重新申请AK。602: key mcode不匹配,您的AK配置过程中安全码设置有问题,请确保:SHA1正确,“;”分号是英文状态;且包名是您当前运行应用的包名,请按照说明文档重新申请AK。501~700:AK验证失败,请按照说明文档重新申请AK。
参考链接
Android应用使用百度定位SDK 返回error code : 162 latitude : 4.9E-324 lontitude : 4.9E-324
有以下几种情况会导致这种情况的发生(首先要保证按照官方文档配置环境):
①官方文档不提供armeabi-v7a文件夹对应的.so文件,所以需要自己新建一个armeabi-v7a文件夹,并从另外一个文件夹里拷贝一个.so文件到该文件夹下,clean项目,再次编译即可成功!
②网络不好、联网失败之类的导致了定位没有成功,换到环境开阔的地方问题解决;注意室内也有可能定位失败;
③API_KEY不正确,注意开发的时候用的key是发布的key,导致了这个错误,将key换过来后问题解决
④创建应用时填写的sha1值不正确,如果换了电脑或者重装了系统,导致sha1值前后不一致也会出现该情况;
笔者是第四种情况,解决方式是重新填写sha1值(sha1值获取方式见#获取SHA1值的正确姿势#)
定位失败错误码返回167(BDLocation.TypeServerError)
出现此种情况说明百度定位服务注册已经没问题了,问题的根源是服务端定位失败,解决方案:
①请您检查是否禁用获取位置信息权限,尝试重新请求定位;
②如果是使用模拟器做开发测试,请确保已经打开群定位服务并且发送模拟的经纬度信息;
registerLocationListener 过时处理
问题原因与修改方法如下修改方法:
将原代码中public class MyLocationListener implements BDLocationListener
改为public class MyLocationListener extends BDAbstractLocationListener
materialDesign实战
滑动菜单
DrawerLayout
参考链接
<?xml version="1.0" encoding="utf-8"?><androidx.drawerlayout.widget.DrawerLayoutxmlns:android="http://schemas.android.com/apk/res/android"xmlns:app="http://schemas.android.com/apk/res-auto"android:id="@+id/drawer_layout"android:layout_width="match_parent"android:layout_height="match_parent"><FrameLayoutandroid:layout_width="match_parent"android:layout_height="match_parent" ><androidx.appcompat.widget.Toolbarandroid:id="@+id/toolbar"android:layout_width="match_parent"android:layout_height="?attr/actionBarSize"android:background="?attr/colorPrimary"android:theme="@style/ThemeOverlay.AppCompat.Dark.ActionBar"app:popupTheme ="@style/ThemeOverlay.AppCompat.Light"/></FrameLayout><com.google.android.material.navigation.NavigationViewandroid:id="@+id/nav_view"android:layout_width="match_parent"android:layout_height="match_parent"android:layout_gravity="start"app:menu="@menu/nav_menu"app:headerLayout="@layout/nav_header"/></androidx.drawerlayout.widget.DrawerLayout>
NavigationView
<com.google.android.material.navigation.NavigationViewandroid:id="@+id/nav_view"android:layout_width="match_parent"android:layout_height="match_parent"android:layout_gravity="start"app:menu="@menu/nav_menu"app:headerLayout="@layout/nav_header"/>
开发酷欧天气
NetworkSecurityConfig: No Network Security Config specified, using platform default
网络安全配置(谷歌官方文档)
The Network Security Configuration feature lets apps customize their network security settings in a safe, declarative configuration file without modifying app code. These settings can be configured for specific domains and for a specific app. The key capabilities of this feature are as follows:
- Custom trust anchors: Customize which Certificate Authorities (CA) are trusted for an app’s secure connections. For example, trusting particular self-signed certificates or restricting the set of public CAs that the app trusts.
- Debug-only overrides: Safely debug secure connections in an app without added risk to the installed base.
- Cleartext traffic opt-out: Protect apps from accidental usage of cleartext traffic.
- Certificate pinning: Restrict an app’s secure connection to particular certificates.
NetworkSecurityConfig: No Network Security Config specified, using the platform default
Try these solutions
android:usesCleartextTraffic="true"
Solution 2
Add android:networkSecurityConfig="@xml/network_security_config" in application tag
<applicationandroid:name=".ApplicationClass"android:allowBackup="true"android:hardwareAccelerated="false"android:icon="@mipmap/ic_launcher"android:label="@string/app_name"android:largeHeap="true"android:networkSecurityConfig="@xml/network_security_config"android:supportsRtl="true"android:theme="@style/AppTheme">
where network_security_config.xml
<?xml version="1.0" encoding="utf-8"?><network-security-config><base-config cleartextTrafficPermitted="true" /></network-security-config>
Create xml under res directory and then network_security_config.xml in XML folder
安卓模拟器连接网络问题
查找可用的模拟器
emulator -list-avds
Run your emulator with dns_server set to 8.8.8.8
Now run your emulator using the below command
emulator -avd Nexus_5X_API_27_x86 -dns-server 8.8.8.8,114.114.114.114emulator @{YourEmulator} -dns-server 8.8.8.8
从命令行启动模拟器时,您还可以使用 -dns-server <serverList> 选项来手动指定要使用的 DNS 服务器的地址,其中 <serverList> 是以英文逗号分隔的服务器名称或 IP 地址列表。如果在模拟网络中遇到 DNS 解析问题(例如,在使用网络浏览器时出现“Unknown Host error”消息),您可能会发现此选项很有用。
另外一种方法(试了没用效果)
先adb root(需要输入adb root 将模拟器root一下,才能更改DNS)
然后adb shell
接下来输入getprop获取模拟器系统属性。找到[net.eth0.dns1]这一项,发现后面为10.0.2.3,接下来我们输入setprop net.eth0.dns1 192.168.1.1.后面的ip也可为其他,不过我没尝试。
网上很多帖子是[net.dns1],不过我的模拟器上面dns1前面有eth0,这个大家根据自己的模拟器情况决定。
然后打开模拟器的数据连接。即可使用模拟器的谷歌浏览器上网。
设置 Android 模拟器网络

若有收获,就点个赞吧
0 人点赞
