一、工作架构
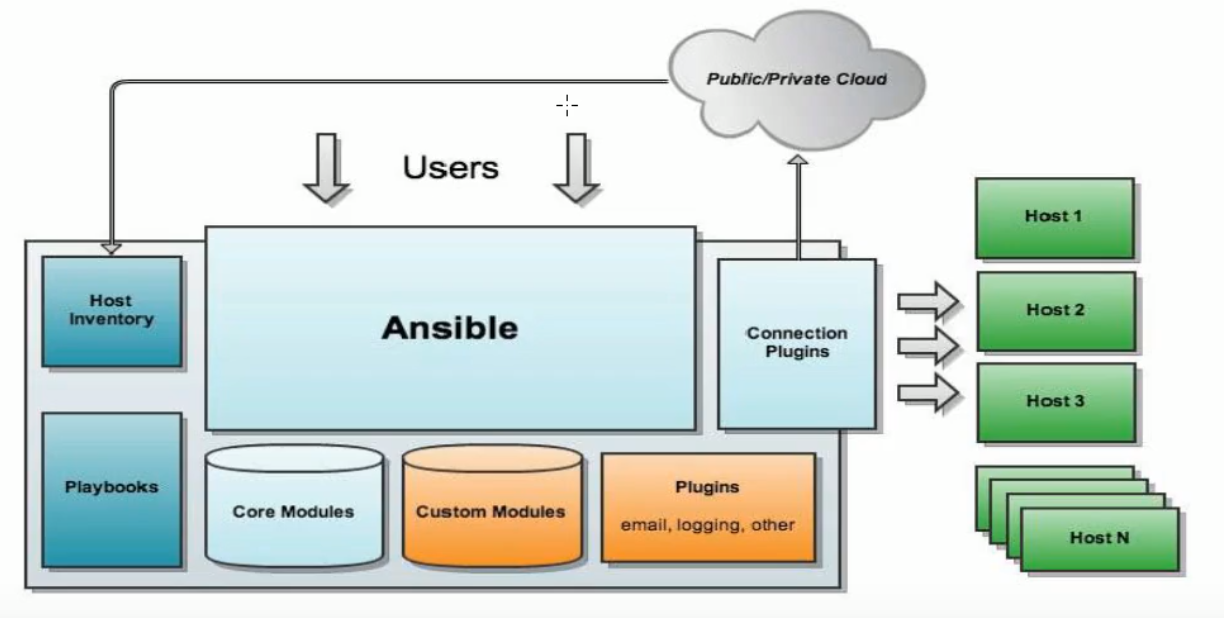
二 、工作原理
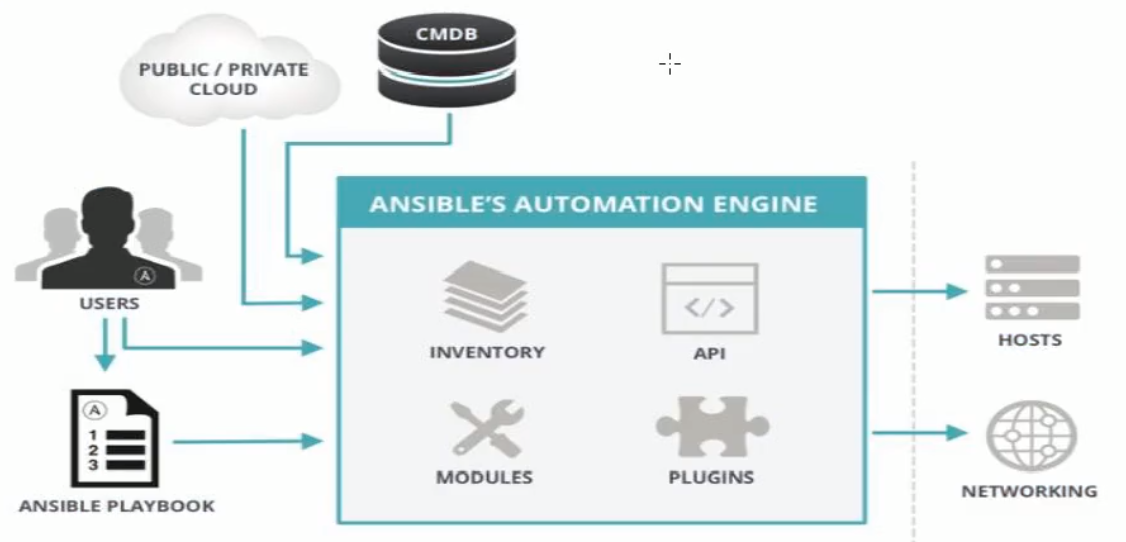
三、组成部分
1、ANSIBLE PLAYBOOKS:任务剧本(任务集),编排定义Ansible任务集的配置文件,由Ansible顺序依次执行,通常是JSON格式的YML文件
2、INVENTORY:Ansible管理主机的清单/etc/ansible/hosts
3、MODULES:Ansible执行命令的功能模块,多数为内置核心模块,也可自定义
4、PLUGINS:模块功能的补充,如连接类型插件,循环插件,变量插件,过滤插件等,该功能不常用
5、API:供第三方程序调用的应用程序编程接口
6、ANSIBLE:组合INVENTORY、API、MODULES、PLUGINS的绿框,可以理解为是ansible命令工具,其为核心执行工具
3.1 主机清单
1、ansible的主要功用在于批量主机操作,为了便捷地使用其中的部分主机,可以在inventory file中将其分组命名,默认的inventory file为/etc/ansible/hosts;inventory file可以有多个,且也可以通过Dynamic Inventory来动态生成
2、inventory文件遵循INI文件风格,中括号的字符为组名。可以将同一个主机同事归并到不通的组中;此外,当如若目标主机使用了非默认的ssh端口,还可以在主机名称之后使用冒号加端口号来标明
eg:
ntp.magedu.com
[webservers]
www1.magedu.com:2222
www2.magedu.com
[dbservers]
db1.magedu.com
db2.magedu.com
如果主机名称遵相似的命名模式,还可以使用列表的方式标识个主机
eg:
[wedservers]
www[01:100].example.com
[dbservers]
db-[a:f].example.com
四、Ansible安装
1、yum安装,此方式需要EPEL源
yum -y install ansible
2、编译安装
yum -y install python-jinjia2 PyYAML python-paramiko python-babel python-crypto
tar -xf ansible-1.5.2.tar.gz
cd ansible-1.5.4
python setup.py build
python setup.py install
mkdir /etc/ansible
cp -r examples/ /etc/ansible/
3、Git方式
git clone git://github.com/ansible/ansible.git —recursive
cd ./ansible
source ./hacking/env-setup
4、pip安装:pip是安装python包的管理器,类似于yum
yum -y install python-pip python-devel
yum -y install gcc glib-devel zlibl-devel rpm-build openssl-devel
pip install —upgrade pip
pip install ansible —upgrade
*确认安装:ansible —version
五、Ansible主程序文件说明
5.1 文件分类
1、配置文件
/etc/ansible/ansible.cfg主配置文件,配置ansible工作特性
/etc/ansible/hosts主机清单
/etc/ansible/roles/存放角色的目录
2、程序
/usr/bin/ansible主程序,临时命令执行工具
/usr/bin/ansible-doc查看配置文档,模块功能查看工具
/usr/bin/ansible-galaxy下载/上传优秀代码或Roles模块的官网平台
/usr/bin/ansible-playbook定制目动化任务,编排剧本工具/usr/bin/ansible-pull远程行命令的工具
3、程执行命令的工具
/usr/bin/ansible-vault文件加密工具
/usr/bin/ansible-console基于console界面与用户交互的执行工具
5.2 配置文件
1、主配置文件
ansible 配置文件/etc/ansible/ansible.cfg(一般保持默认)
[defaults]
#inventory = /etc/ansible/hosts #主机列表配置文件
#library = /usr/share/my_modules/ #库文件存放目录
#module_utils = /usr/share/my_module_utils/
#remote_tmp = ~/.ansible/tmp #临时py命令文件存放在远程主机目录
#local_tmp = ~/.ansible/tmp #本机临时命令执行目录
#forks = 5 #默认并发数(同时执行5个操作,eg五台主机五台的执行)
#poll_interval = 15
#sudo_user = root #默认sudo用户
#ask_sudo_pass = True #每次执行ansible命令是否询问ssh密码
#ask_pass = True
#transport = smart
#remote_port = 22
#module_lang = C
#module_set_locale = False
#host_key_checking = False #检查对应服务的的host_key,建议取消注释,如果保持默认,在ansible第一次连接被管理主机时会报错,需要至少ssh连接一次被管理主机,才不会报错,为了解决此问题,注释这行即可
#log_path = /var/log/ansible.log #日志文件,建议开启,默认关闭
六、命令格式说明
1、命令用法
ansible[-m module_name] [-a args]
—version 显示版本
-m module 指定模块,默认为command
-v 详细过程 -vv -vvv 更详细
—list-host 显示主机列表,可简写—list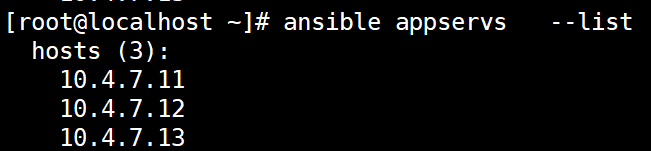
-k ,—ask-pass 提示输入ssh连接密码。默认key验证
-K, —ask-become-pass 提示输入sudo时的口令
-C,—check 检查不执行
-T —timeout=TIMEOUT 执行命令的超时时间,默认10s
-u —user=REMOTE——USER 执行远程执行的用户
-b, —become 代替旧版本的sudo切换
2、ansible-doc 显示模块帮助
ansible-doc [options][module]
-a 显示所有模块文档
-l,—list 列出可用模块
-s,—snippet 显示指定模块的playbook片段
实例:
ansible-doc -l 列出所有模块
ansible-doc ping 查看指定模块的帮助用法
ansible-doc -s ping 查看指定模块的帮助用法
ansible通过ssh实现配置管理、应用部署,任务执行等功能,建议配置ansible段能基于密钥认证的方式联系各 被管理节点
3、配置基于key的验证
1、在ansible主机上生成一对密钥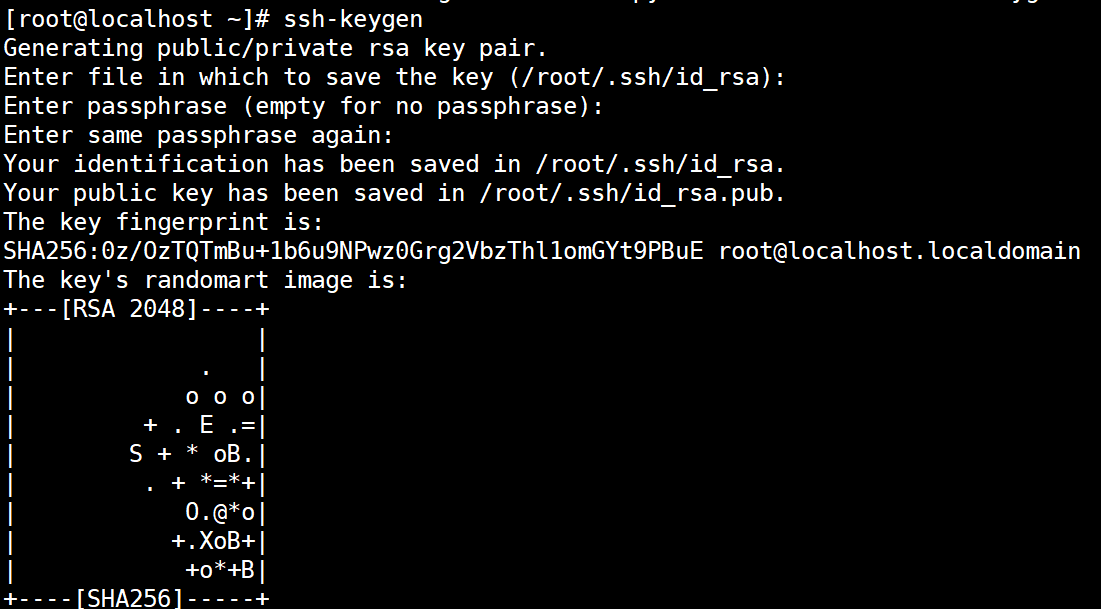
2、将公钥依次拷贝至被管理主机
3、接下来即可基于key方式的验证
4、主机匹配
all:表示所有Inventory中的所有主机
:通配符
ansible “” -m ping
ansible 192.168.1. -m ping
ansible “srvs” -m ping
或关系
ansible “webserver:dbserver” -m ping
ansible “webserver:dbserver” -m ping #执行在web组并且在dbserver组中的主机(忽略重复的)
与关系
ansible “webserver:&dbserver” -m ping
只执行在web组并且也在dbserver组中的主机
逻辑非
ansible ‘webserver:!dbserver’ -m ping 【注意此处只能使用单引号!】
综合逻辑
ansible ‘webserver:dbserver:&webserver:!dbserver’ -m ping
正则表达式
ansible “webserver:&dbserver” -m ping
ansible “~(web|db)..magedu.\com” -m ping
5、ansible命令执行过程
a 加载自己的配置文件 默认/etc/ansible/ansible.cfg
b 加载自己对应的模块 如command
c 通过ansible将模块或命令生成对应的临时py文件,并将改文件传输至远程服务器的对应执行用户 SHOME/.ansible/tmp/ansible-tmp-数字/XXX.py文件
d 文件见+x执行
e 执行并返回结果
f 删除临时py文件,sleep 0退出
*6、执行状态
绿色:执行成功并且不需要做改变的操作
黄色:执行成功并且对目标主机做变更
红色:执行失败
七、常用模块说明
1、command模块
在远程主机执行命令,默认模块。可忽略-m选项
ansible all -m command -a ‘hostname’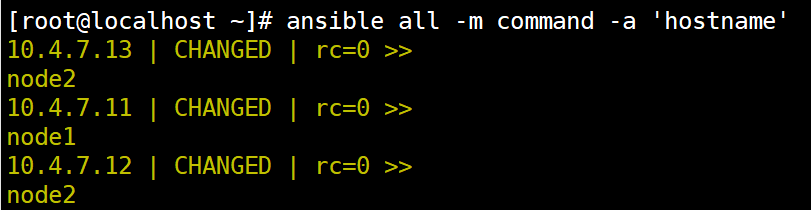
ansible all -m command -a ‘echo magedu | passwd —stdin wang’不成功
此命令不支持$VRNAME< > | ; & 等,需要用shell模块实现
2、shell模块
和command相似,用shell执行命令,shell模块支持command模块的所有命令
ansible all -m shell -a ‘echo abc123.. | passwd —stdin test’
调用bash执行命令 类似cat /tmp/stanley.md | awk -F ‘|’ ‘{print $1,$2}’ & >
/tmp/example.txt 这些复杂命令,及时使用shell也可能会失败,解决办法:写到脚本时,copy到远程,执行,再把需要的结果拉回执行命令的机器
3、script模块:运行脚本
-a “/PATH/TO/SCRIPT_FILE”
ansible all -m script -a ‘root/ansible/test.sh’
4、copy模块:从服务器复制文件到客户端
ansible all -m copy -a ‘src=/data/test1 dest=/data/test1 backup=yes mode=000 owner=zhang’ ##如目标存在,默认覆盖,此处是指先备份,并修改权限和属主
ansible all -m shell -a ‘ls -l /data/‘
ansible all -m copy -a “content=’test content\n’ dest=/tmo/f1.txt” 利用内容,直接生成目标文件
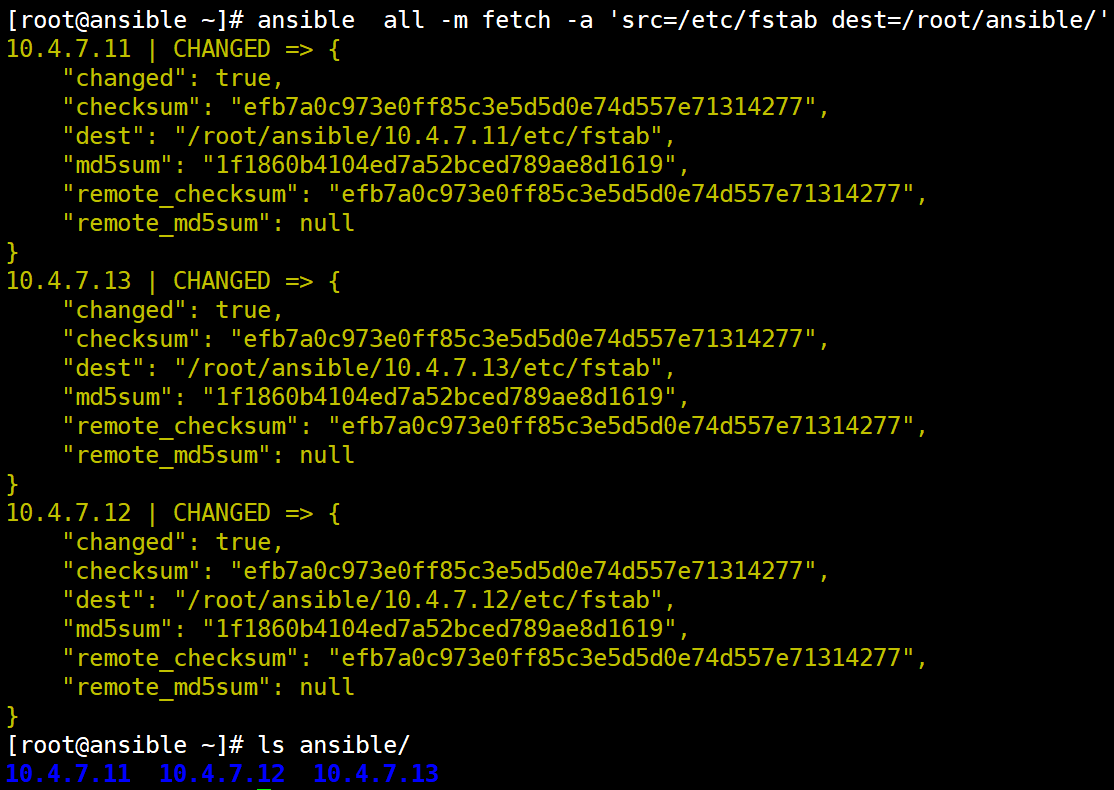
5、fetch:从客户端取文件至服务器端,与copy相反,目录可以先tar
如下将node节点下的/etc/fstab文件抓取到本地的/root/ansible目录下面
[root@ansible ~]# ansible all -m fetch -a ‘src=/etc/fstab dest=/root/ansible/‘
6、archive打包模块
将/var/log下的文件打包为log.tar.gz放到/root/目录下
[root@ansible ~]# ansible all -m archive -a ‘path=/var/log/ dest=/root/log.tar.gz’
7、unarchive 解打包模块
remote_src:
yes #要解压的包在受控端
no #要解压的包在控制端
将log.tar.gz解压到指定的目录下
[root@ansible ~]# ansible all -m unarchive -a ‘src=/root/log.tar.gz dest=/root/tmp/ remote_src=yes’
8、file模块
[root@ansible ~]# ansible all -m file -a “path=/root/a.sh owner=zhang mode=755”
[root@ansible ~]# ansible all -m file -a ‘name=/data/f3 state=touch’ 创建文件
[root@ansible ~]# ansible all -m file -a ‘name=/data/f3 state=absent’ 删除文件
[root@ansible ~]# ansible all -m file -a ‘name=/data/dir1 state=directory’ 创建目录
[root@ansible ~]# ansible all -m file -a ‘name=/data/dir1 state=absent’ 删除目录
[root@ansible ~]# ansible all -m file -a ‘src=/etc/fstab dest=/data/fstab.backup state=link’ 创建软链接
[root@ansible ~]# ansible all -m file -a ‘dest=/data/fstab.backup state=absent’ 删除软链接
9、hostname 管理主机名
ansible 192.168.10.24 -m hostname -a “name=kso-bj6-zw-zhangwei”#永久生效(但hosts文件需要手动更改)
10、cron 计划任务
支持时间:minute,hour,day,month,weekday
ansible all -m cron -a “minute=/5 weekday=1,3,5 job=’/usr/sbin/ntpfata 172.16.0.1 & >/dev/null’ name=Synctime” 创建任务
ansible all -m cron -a “disabled=true job=’/usr/sbin/ntpfata 172.16.0.1 & >/dev/null’ name=Synctime” 禁用任务(加#号注释)
ansible all -m cron -a “disabled=false job=’/usr/sbin/ntpfata 172.16.0.1 & >/dev/null’ name=Synctime” 启用任务
ansible all -m cron -a ‘state=absent name=Synctime’ 删除任务
11、yum:管理包
ansible all -m yum -a ‘name=httpd state=latest’安装
ansible all -m yum -a ‘name=httpd state=ansent’ 卸载
ansible all -m yum -a ‘name=dstat update_cache=yes’ 更新缓存
【注:dstat—监控工具https://www.jianshu.com/p/49b259cbcc79】
12、service:管理服务
ansible all -m service -a ‘name=httpd state=stopped’
ansible all -m service -a ‘name=httpd state=started enabled=yes’
ansible all -m service -a ‘name=httpd state=reload’
ansible all -m service -a ‘name=httpd state=restart’
13、user:管理用户
ansible all -m user -a ‘name=user1 comment=”test user” uid=2048 home=/data/home/user1 group=root’ 创建用户,以及uid,家目录,并描述(comment)
ansible all -m user -a ‘name=zhangwei shell=/sbin/nologin system=yes home=/data/home/zhangwei’ 创建不可登陆的系统用户
ansible all -m user -a ‘name=zhangwei state=absent remove=yes’删除用户及家目录
*14、group:管理组
ansible all -m group -a “name=testgroup system=yes”
ansible all -m group -a “name=testgroup state=absent”
ansible-doc -s moudul #简短介绍模块使用方法
ansible-doc modul #详细介绍模块使用方法

若有收获,就点个赞吧
0 人点赞
